![[Updated] Unlocking Mobile Tech How to Record Your Snapchat Content](https://thmb.techidaily.com/86eaf732ac0282547acec52c64c3976ebfde5c25b2b266f861ae95d9b96270a9.jpg)
"[Updated] Unlocking Mobile Tech How to Record Your Snapchat Content"
Unlocking Mobile Tech: How to Record Your Snapchat Content
Snapchat has 306 million users daily worldwide. It is considered the fastest way to share a moment and make a memory out of it. The article reflects upon screen record Snapchat and covers ways to do so via Android and iPhone devices. Let us commence this, shall we?
In this article
01 Will Snapchat Know When You Do Screen Recording?
02 How to Screen Record Snapchat on Android Phone?
03 How to Screen Record Snapchat on iPhone?
04 How to Make Screen Record on Snapchat without Notice?

Part 1: Will Snapchat Know When You Do Screen Recording?
Snapchat was designed in a way that it protects the privacy of the users. According to this social networking software policy, the messages and snaps disappear after 24 hours. It creates an urge to screenshot the snap or screen record the chat without getting noticed. The section reflects the answer to the concern if you screen record on Snapchat, does it show?”
The answer is yes. Snapchat sends a notification to the other person if you screen record on Snapchat. It plays a vital role as it helps steer clear from the stalkers and people who have no sense of boundaries.
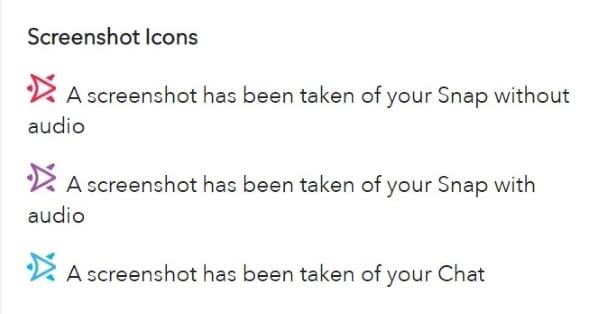
For taking a screenshot on Snapchat, the following notification show with specific colored arrows.
The red arrow displays that the screenshot was taken of snap without audio.
The purple arrow signifies that the screenshot was taken of snap with audio.
The blue arrows represent that a screenshot has been taken of chat.
It clearly shows that Snapchat takes the privacy of its users seriously. Therefore, to protect oneself from disappointment, it is crucial to avoid taking screenshots or screen recordings on Snapchat. You can use another phone to carry out the sneaky operation or download third-party software to screen capture and record safely.
Part 2: How to Screen Record Snapchat on Android Phone?
The Android users pretty much enhanced in the last decade exponentially. It is mainly because the workability of Android is more straightforward than that of iPhone. If you are a Snapchat addict on an Android phone, this section is designed for you.
Screen recording on Snapchat via Android phone is easy. There are no complications in the process, even for a beginner. For starters, make sure that the in-built screen recording functionality of Android is enabled via Settings. It will help initiate the recording immediately from the Action Center.
So, let us jump right into the step-by-step procedure to screen record on Snapchat.

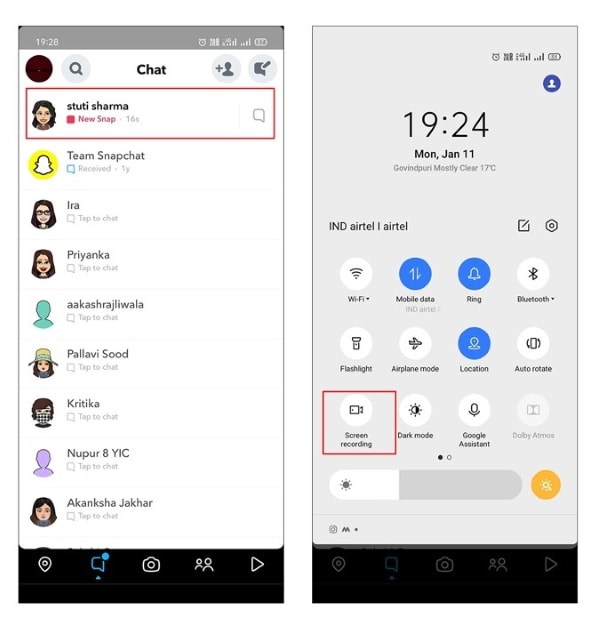
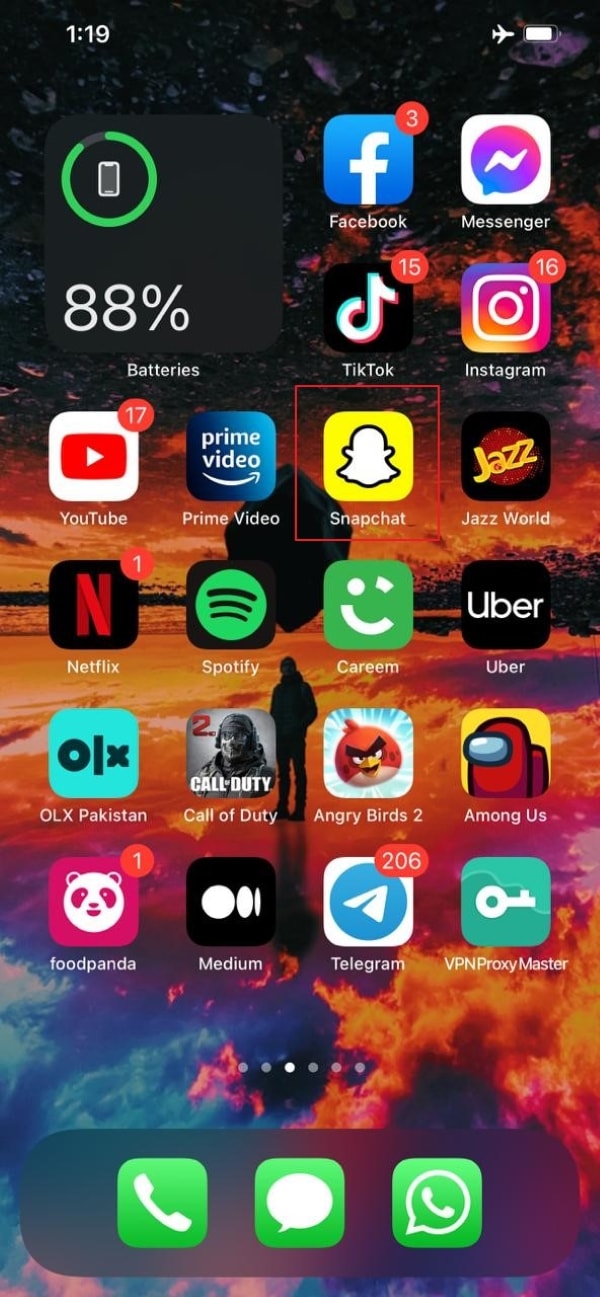
Step 1: Enabling the Airplane Mode
Open Snapchat from your Android phone. Refresh all the chats so that all new snaps can be accessed easily. After that, launch the “Action Center” and hit “Airplane Mode” to switch it on. It is shaped like an airplane.

Step 2: Start the Recording
Now, start screen recording by opening the “Action Center” again and clicking on “Screen Recorder.” As soon as the recording initiates, open the snap that you wish to record.

Step 3: Stop the Recording
After you are done, stop the recording. Disable the Airplane Mode and close the tool. The screen recording can be accessed from the Gallery.
Part 3: How to Screen Record Snapchat on iPhone?
Bringing more features and traits to the house, people have gone insane with every new model of the iPhone that is announced to the world. If you are an iPhone user looking to screen record on Snapchat, follow this section vividly.
Instead of using third-party software like AZ screen recorder Snapchat, the in-built tool of the iPhone is equally workable. There is no need to install new software on the device and play with the system’s memory. To initiate screen recording on Snapchat via iPhone, let us discuss the procedure extensively.
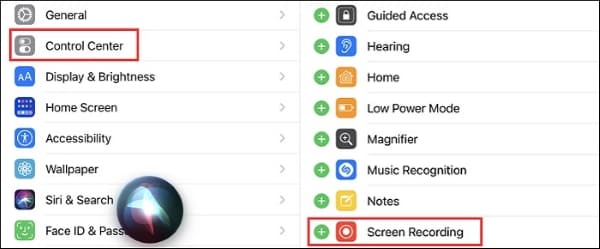
Step 1: Activating the Screen Recorder
Before starting, the user should make sure that the in-built screen recorder tool has been downloaded. Navigate to the “Control Center” and scroll down to find “Screen Recorder if it is not installed.” Hit the green (+) icon beside the tool to make it easily accessible.
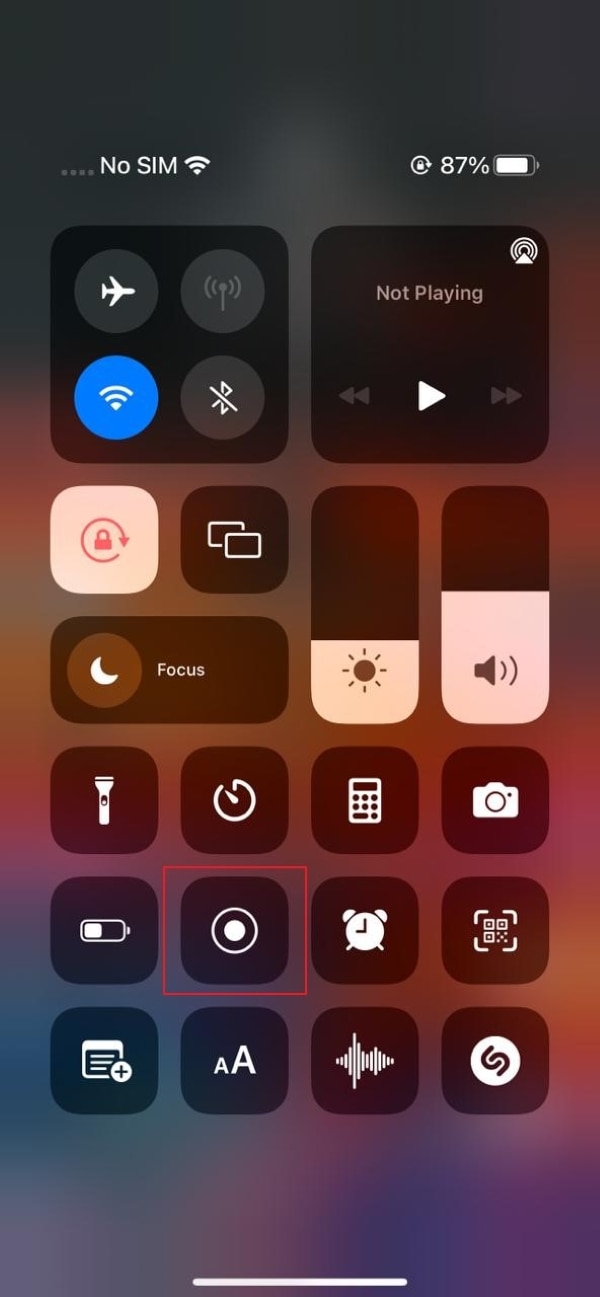
Step 2: Accessing the Feature for iPhone Versions
The accessing of Screen Recorder in-built tool varies from one iPhone version to another. For instance, if you have iPhone 8 or older versions, swipe down to tap the “Screen Recording” icon. However, if you own iPhone X or advanced versions, swipe up from the top right corner of the screen. Find the relevant icon to continue with the targeted process.

Step 3: Starting the Recording
Launch Snapchat from your iPhone and refresh the feed. Now, open the Screen Recording tool and initiate the recording. You have to turn on the “Airplane” mode as well before recording the snap. Now, the user is expected to open the snap that needs to be recorded.


WPS Office Premium ( File Recovery, Photo Scanning, Convert PDF)–Yearly
Step 4: Stopping the Recording
Stop the recording by clicking on the red icon on the screen. The screen recording is performed successfully. You can find the recording in your Photos in seconds.
Part 4: How to Make Screen Record on Snapchat without Notice?
It looks pretty embarrassing if you capture a screenshot and the other person receives a notification. The screen recording on Snapchat makes you awkward. To get rid of this embarrassment, one should use tricky and workable methods. Luckily, the section covers some of those methods. Let us have a look at each of them!
Switching off the Internet Connection
The first method revolves around disabling the internet connection of your device. For starters, reload and refresh your Snapchat feed. Disconnect the Wi-Fi or data network, and then screen records the snap. It helps you get the task done without getting noticed, as the app doesn’t know what is happening without internet connectivity.
Enabling the Airplane Mode
One workable method is to enable the Airplane Mode before you plan to screen record Snapchat. What happens is that the app doesn’t respond to the operation occurring as Airplane Mode is switched on. The process doesn’t send the notification to the targeted person; thus, it always works.
 The Tube Sites Submitter is a fast and efficient tool for anyone who needs to upload videos quickly, easily and automatically to hundreds of tube sites in mere minutes .
 Using a Third-Party Software
You can access the third-party screen recorder and then perform screen recording on Snapchat. The market offers numerous apps for a similar reason. Their usage is simple as well.
Mirroring Phone on PC
Another tricky method revolves around mirroring phones on PC. The Snapchat user can connect the device to the computer and then play the snap story. As Snapchat cannot read the computer’s activities, you can use the recorder to screen record Snapchat stories in seconds.
Using Another Phone
You can pick a phone of your sibling or a friend to record the snaps of the targeted person. It might not be a high-resolution output, but it would surely get your task done without getting noticed.
Final Remarks
Snapchat has become one of the most favorite software in the world. People like to capture the stories and screen record the chats that they find amusing, engaging, and other sneaky reasons. The article offered users a screen record on Snapchat via Android and iPhone. The tricky methods to screen record without getting noticed were also a part of this write-up.
02 How to Screen Record Snapchat on Android Phone?
03 How to Screen Record Snapchat on iPhone?
04 How to Make Screen Record on Snapchat without Notice?
Part 1: Will Snapchat Know When You Do Screen Recording?
Snapchat was designed in a way that it protects the privacy of the users. According to this social networking software policy, the messages and snaps disappear after 24 hours. It creates an urge to screenshot the snap or screen record the chat without getting noticed. The section reflects the answer to the concern if you screen record on Snapchat, does it show?”
The answer is yes. Snapchat sends a notification to the other person if you screen record on Snapchat. It plays a vital role as it helps steer clear from the stalkers and people who have no sense of boundaries.
For taking a screenshot on Snapchat, the following notification show with specific colored arrows.
The red arrow displays that the screenshot was taken of snap without audio.
The purple arrow signifies that the screenshot was taken of snap with audio.
The blue arrows represent that a screenshot has been taken of chat.
It clearly shows that Snapchat takes the privacy of its users seriously. Therefore, to protect oneself from disappointment, it is crucial to avoid taking screenshots or screen recordings on Snapchat. You can use another phone to carry out the sneaky operation or download third-party software to screen capture and record safely.
Part 2: How to Screen Record Snapchat on Android Phone?
The Android users pretty much enhanced in the last decade exponentially. It is mainly because the workability of Android is more straightforward than that of iPhone. If you are a Snapchat addict on an Android phone, this section is designed for you.
Screen recording on Snapchat via Android phone is easy. There are no complications in the process, even for a beginner. For starters, make sure that the in-built screen recording functionality of Android is enabled via Settings. It will help initiate the recording immediately from the Action Center.
So, let us jump right into the step-by-step procedure to screen record on Snapchat.
Step 1: Enabling the Airplane Mode
Open Snapchat from your Android phone. Refresh all the chats so that all new snaps can be accessed easily. After that, launch the “Action Center” and hit “Airplane Mode” to switch it on. It is shaped like an airplane.
 PDF application, powered by AI-based OCR, for unified workflows with both digital and scanned documents.
Step 2: Start the Recording
Now, start screen recording by opening the “Action Center” again and clicking on “Screen Recorder.” As soon as the recording initiates, open the snap that you wish to record.

Step 3: Stop the Recording
After you are done, stop the recording. Disable the Airplane Mode and close the tool. The screen recording can be accessed from the Gallery.
Part 3: How to Screen Record Snapchat on iPhone?
Bringing more features and traits to the house, people have gone insane with every new model of the iPhone that is announced to the world. If you are an iPhone user looking to screen record on Snapchat, follow this section vividly.
Instead of using third-party software like AZ screen recorder Snapchat, the in-built tool of the iPhone is equally workable. There is no need to install new software on the device and play with the system’s memory. To initiate screen recording on Snapchat via iPhone, let us discuss the procedure extensively.

Step 1: Activating the Screen Recorder
Before starting, the user should make sure that the in-built screen recorder tool has been downloaded. Navigate to the “Control Center” and scroll down to find “Screen Recorder if it is not installed.” Hit the green (+) icon beside the tool to make it easily accessible.
Step 2: Accessing the Feature for iPhone Versions
The accessing of Screen Recorder in-built tool varies from one iPhone version to another. For instance, if you have iPhone 8 or older versions, swipe down to tap the “Screen Recording” icon. However, if you own iPhone X or advanced versions, swipe up from the top right corner of the screen. Find the relevant icon to continue with the targeted process.
Step 3: Starting the Recording
Launch Snapchat from your iPhone and refresh the feed. Now, open the Screen Recording tool and initiate the recording. You have to turn on the “Airplane” mode as well before recording the snap. Now, the user is expected to open the snap that needs to be recorded.
Step 4: Stopping the Recording
Stop the recording by clicking on the red icon on the screen. The screen recording is performed successfully. You can find the recording in your Photos in seconds.
Part 4: How to Make Screen Record on Snapchat without Notice?
It looks pretty embarrassing if you capture a screenshot and the other person receives a notification. The screen recording on Snapchat makes you awkward. To get rid of this embarrassment, one should use tricky and workable methods. Luckily, the section covers some of those methods. Let us have a look at each of them!
Switching off the Internet Connection
The first method revolves around disabling the internet connection of your device. For starters, reload and refresh your Snapchat feed. Disconnect the Wi-Fi or data network, and then screen records the snap. It helps you get the task done without getting noticed, as the app doesn’t know what is happening without internet connectivity.
Enabling the Airplane Mode
One workable method is to enable the Airplane Mode before you plan to screen record Snapchat. What happens is that the app doesn’t respond to the operation occurring as Airplane Mode is switched on. The process doesn’t send the notification to the targeted person; thus, it always works.
Using a Third-Party Software
You can access the third-party screen recorder and then perform screen recording on Snapchat. The market offers numerous apps for a similar reason. Their usage is simple as well.
Mirroring Phone on PC
Another tricky method revolves around mirroring phones on PC. The Snapchat user can connect the device to the computer and then play the snap story. As Snapchat cannot read the computer’s activities, you can use the recorder to screen record Snapchat stories in seconds.
Using Another Phone
You can pick a phone of your sibling or a friend to record the snaps of the targeted person. It might not be a high-resolution output, but it would surely get your task done without getting noticed.
Final Remarks
Snapchat has become one of the most favorite software in the world. People like to capture the stories and screen record the chats that they find amusing, engaging, and other sneaky reasons. The article offered users a screen record on Snapchat via Android and iPhone. The tricky methods to screen record without getting noticed were also a part of this write-up.
02 How to Screen Record Snapchat on Android Phone?
03 How to Screen Record Snapchat on iPhone?
04 How to Make Screen Record on Snapchat without Notice?
Part 1: Will Snapchat Know When You Do Screen Recording?
Snapchat was designed in a way that it protects the privacy of the users. According to this social networking software policy, the messages and snaps disappear after 24 hours. It creates an urge to screenshot the snap or screen record the chat without getting noticed. The section reflects the answer to the concern if you screen record on Snapchat, does it show?”
The answer is yes. Snapchat sends a notification to the other person if you screen record on Snapchat. It plays a vital role as it helps steer clear from the stalkers and people who have no sense of boundaries.
For taking a screenshot on Snapchat, the following notification show with specific colored arrows.
The red arrow displays that the screenshot was taken of snap without audio.
The purple arrow signifies that the screenshot was taken of snap with audio.
The blue arrows represent that a screenshot has been taken of chat.
It clearly shows that Snapchat takes the privacy of its users seriously. Therefore, to protect oneself from disappointment, it is crucial to avoid taking screenshots or screen recordings on Snapchat. You can use another phone to carry out the sneaky operation or download third-party software to screen capture and record safely.
 EmEditor Professional (Lifetime License, non-store app)
Part 2: How to Screen Record Snapchat on Android Phone?
The Android users pretty much enhanced in the last decade exponentially. It is mainly because the workability of Android is more straightforward than that of iPhone. If you are a Snapchat addict on an Android phone, this section is designed for you.
Screen recording on Snapchat via Android phone is easy. There are no complications in the process, even for a beginner. For starters, make sure that the in-built screen recording functionality of Android is enabled via Settings. It will help initiate the recording immediately from the Action Center.
So, let us jump right into the step-by-step procedure to screen record on Snapchat.
 Glary Utilities PRO - Premium all-in-one utility to clean, speed up, maintain and protect your PC
Step 1: Enabling the Airplane Mode
Open Snapchat from your Android phone. Refresh all the chats so that all new snaps can be accessed easily. After that, launch the “Action Center” and hit “Airplane Mode” to switch it on. It is shaped like an airplane.
 vMix Basic HD - Software based live production. vMix Basic HD includes 4 inputs, 3 cameras, streaming, recording, playlist.
Step 2: Start the Recording
Now, start screen recording by opening the “Action Center” again and clicking on “Screen Recorder.” As soon as the recording initiates, open the snap that you wish to record.

Step 3: Stop the Recording
After you are done, stop the recording. Disable the Airplane Mode and close the tool. The screen recording can be accessed from the Gallery.
Part 3: How to Screen Record Snapchat on iPhone?
Bringing more features and traits to the house, people have gone insane with every new model of the iPhone that is announced to the world. If you are an iPhone user looking to screen record on Snapchat, follow this section vividly.
Instead of using third-party software like AZ screen recorder Snapchat, the in-built tool of the iPhone is equally workable. There is no need to install new software on the device and play with the system’s memory. To initiate screen recording on Snapchat via iPhone, let us discuss the procedure extensively.
Step 1: Activating the Screen Recorder
Before starting, the user should make sure that the in-built screen recorder tool has been downloaded. Navigate to the “Control Center” and scroll down to find “Screen Recorder if it is not installed.” Hit the green (+) icon beside the tool to make it easily accessible.
Step 2: Accessing the Feature for iPhone Versions
The accessing of Screen Recorder in-built tool varies from one iPhone version to another. For instance, if you have iPhone 8 or older versions, swipe down to tap the “Screen Recording” icon. However, if you own iPhone X or advanced versions, swipe up from the top right corner of the screen. Find the relevant icon to continue with the targeted process.
 Easy and Safe Partition Software & Hard Disk Manager
Step 3: Starting the Recording
Launch Snapchat from your iPhone and refresh the feed. Now, open the Screen Recording tool and initiate the recording. You have to turn on the “Airplane” mode as well before recording the snap. Now, the user is expected to open the snap that needs to be recorded.
Step 4: Stopping the Recording
Stop the recording by clicking on the red icon on the screen. The screen recording is performed successfully. You can find the recording in your Photos in seconds.
Part 4: How to Make Screen Record on Snapchat without Notice?
It looks pretty embarrassing if you capture a screenshot and the other person receives a notification. The screen recording on Snapchat makes you awkward. To get rid of this embarrassment, one should use tricky and workable methods. Luckily, the section covers some of those methods. Let us have a look at each of them!
Switching off the Internet Connection
The first method revolves around disabling the internet connection of your device. For starters, reload and refresh your Snapchat feed. Disconnect the Wi-Fi or data network, and then screen records the snap. It helps you get the task done without getting noticed, as the app doesn’t know what is happening without internet connectivity.
Enabling the Airplane Mode
One workable method is to enable the Airplane Mode before you plan to screen record Snapchat. What happens is that the app doesn’t respond to the operation occurring as Airplane Mode is switched on. The process doesn’t send the notification to the targeted person; thus, it always works.
Using a Third-Party Software
You can access the third-party screen recorder and then perform screen recording on Snapchat. The market offers numerous apps for a similar reason. Their usage is simple as well.

Mirroring Phone on PC
Another tricky method revolves around mirroring phones on PC. The Snapchat user can connect the device to the computer and then play the snap story. As Snapchat cannot read the computer’s activities, you can use the recorder to screen record Snapchat stories in seconds.
Using Another Phone
You can pick a phone of your sibling or a friend to record the snaps of the targeted person. It might not be a high-resolution output, but it would surely get your task done without getting noticed.

Final Remarks
Snapchat has become one of the most favorite software in the world. People like to capture the stories and screen record the chats that they find amusing, engaging, and other sneaky reasons. The article offered users a screen record on Snapchat via Android and iPhone. The tricky methods to screen record without getting noticed were also a part of this write-up.
02 How to Screen Record Snapchat on Android Phone?
03 How to Screen Record Snapchat on iPhone?
04 How to Make Screen Record on Snapchat without Notice?
Part 1: Will Snapchat Know When You Do Screen Recording?
Snapchat was designed in a way that it protects the privacy of the users. According to this social networking software policy, the messages and snaps disappear after 24 hours. It creates an urge to screenshot the snap or screen record the chat without getting noticed. The section reflects the answer to the concern if you screen record on Snapchat, does it show?”
The answer is yes. Snapchat sends a notification to the other person if you screen record on Snapchat. It plays a vital role as it helps steer clear from the stalkers and people who have no sense of boundaries.
For taking a screenshot on Snapchat, the following notification show with specific colored arrows.
The red arrow displays that the screenshot was taken of snap without audio.
The purple arrow signifies that the screenshot was taken of snap with audio.
The blue arrows represent that a screenshot has been taken of chat.
It clearly shows that Snapchat takes the privacy of its users seriously. Therefore, to protect oneself from disappointment, it is crucial to avoid taking screenshots or screen recordings on Snapchat. You can use another phone to carry out the sneaky operation or download third-party software to screen capture and record safely.
Part 2: How to Screen Record Snapchat on Android Phone?
The Android users pretty much enhanced in the last decade exponentially. It is mainly because the workability of Android is more straightforward than that of iPhone. If you are a Snapchat addict on an Android phone, this section is designed for you.
Screen recording on Snapchat via Android phone is easy. There are no complications in the process, even for a beginner. For starters, make sure that the in-built screen recording functionality of Android is enabled via Settings. It will help initiate the recording immediately from the Action Center.
So, let us jump right into the step-by-step procedure to screen record on Snapchat.
Step 1: Enabling the Airplane Mode
Open Snapchat from your Android phone. Refresh all the chats so that all new snaps can be accessed easily. After that, launch the “Action Center” and hit “Airplane Mode” to switch it on. It is shaped like an airplane.
Step 2: Start the Recording
Now, start screen recording by opening the “Action Center” again and clicking on “Screen Recorder.” As soon as the recording initiates, open the snap that you wish to record.

Step 3: Stop the Recording
After you are done, stop the recording. Disable the Airplane Mode and close the tool. The screen recording can be accessed from the Gallery.
Part 3: How to Screen Record Snapchat on iPhone?
Bringing more features and traits to the house, people have gone insane with every new model of the iPhone that is announced to the world. If you are an iPhone user looking to screen record on Snapchat, follow this section vividly.
Instead of using third-party software like AZ screen recorder Snapchat, the in-built tool of the iPhone is equally workable. There is no need to install new software on the device and play with the system’s memory. To initiate screen recording on Snapchat via iPhone, let us discuss the procedure extensively.
Step 1: Activating the Screen Recorder
Before starting, the user should make sure that the in-built screen recorder tool has been downloaded. Navigate to the “Control Center” and scroll down to find “Screen Recorder if it is not installed.” Hit the green (+) icon beside the tool to make it easily accessible.
Step 2: Accessing the Feature for iPhone Versions
The accessing of Screen Recorder in-built tool varies from one iPhone version to another. For instance, if you have iPhone 8 or older versions, swipe down to tap the “Screen Recording” icon. However, if you own iPhone X or advanced versions, swipe up from the top right corner of the screen. Find the relevant icon to continue with the targeted process.
Step 3: Starting the Recording
Launch Snapchat from your iPhone and refresh the feed. Now, open the Screen Recording tool and initiate the recording. You have to turn on the “Airplane” mode as well before recording the snap. Now, the user is expected to open the snap that needs to be recorded.

 /a>
/a>Step 4: Stopping the Recording
Stop the recording by clicking on the red icon on the screen. The screen recording is performed successfully. You can find the recording in your Photos in seconds.
Part 4: How to Make Screen Record on Snapchat without Notice?
It looks pretty embarrassing if you capture a screenshot and the other person receives a notification. The screen recording on Snapchat makes you awkward. To get rid of this embarrassment, one should use tricky and workable methods. Luckily, the section covers some of those methods. Let us have a look at each of them!
Switching off the Internet Connection
The first method revolves around disabling the internet connection of your device. For starters, reload and refresh your Snapchat feed. Disconnect the Wi-Fi or data network, and then screen records the snap. It helps you get the task done without getting noticed, as the app doesn’t know what is happening without internet connectivity.
Enabling the Airplane Mode
One workable method is to enable the Airplane Mode before you plan to screen record Snapchat. What happens is that the app doesn’t respond to the operation occurring as Airplane Mode is switched on. The process doesn’t send the notification to the targeted person; thus, it always works.
Using a Third-Party Software
You can access the third-party screen recorder and then perform screen recording on Snapchat. The market offers numerous apps for a similar reason. Their usage is simple as well.
Mirroring Phone on PC
Another tricky method revolves around mirroring phones on PC. The Snapchat user can connect the device to the computer and then play the snap story. As Snapchat cannot read the computer’s activities, you can use the recorder to screen record Snapchat stories in seconds.
Using Another Phone
You can pick a phone of your sibling or a friend to record the snaps of the targeted person. It might not be a high-resolution output, but it would surely get your task done without getting noticed.
Final Remarks
Snapchat has become one of the most favorite software in the world. People like to capture the stories and screen record the chats that they find amusing, engaging, and other sneaky reasons. The article offered users a screen record on Snapchat via Android and iPhone. The tricky methods to screen record without getting noticed were also a part of this write-up.
Mastering Eyes-Only Snap Retrieval on Social Media
Have you ever set some of your Snapchat pictures to “My Eyes Only” and then accidentally deleted them? Well, it’s happened to the best of us. Whether it’s a hilarious Snap streak with your best friend or a cute photo of your pet, losing important data can be frustrating.
But don’t worry, there’s a way to recover them! In this article, we’ll show you how to recover “My Eyes Only” pictures on Snapchat. We’ll also discuss how you can change or retrieve your password if you’ve forgotten it.
Part 1. How To Recover Photos Deleted From “My Eyes Only” on Snapchat
- Method 1. Recovering The Photos Via Snapchat - For iOS and Android
- Method 2. Using File Browser - For Android
Have you accidentally deleted a photo from your “My Eyes Only” album on Snapchat, and you’re now panicking because you think it’s gone forever? Don’t worry: with our two step-by-step methods provided below, you will surely retrieve your deleted snaps.
Method 1. Recovering The Photos Via Snapchat - For iOS and Android
The first method to recover My Eyes Only pictures on Snapchat is via the Privacy tab. Although it is a bit of a long process, this is surely going to work.
Here’s a quick and simple rundown of how you can recover your photos via Snapchat on your iOS and Android device:
Step1 Launch the Snapchat app on your device and sign in to your account. On the top left side of the screen, click your profile icon.
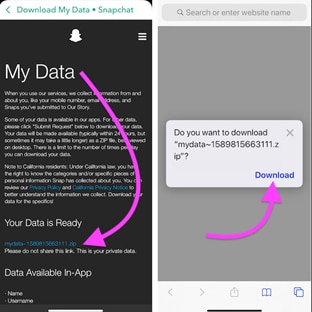
Step2 Tap the Setting icon and scroll down to the Privacy tab.

Step3 Under the Privacy tab, find the “My Data” option and tap it.

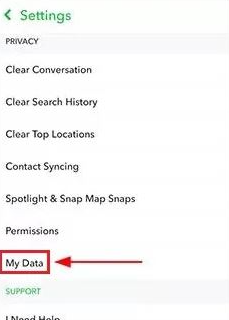
Step4 Log in to your Snapchat account once again, submit your request for data recovery from Snapchat’s server and download it.
![]()
Note: Keep in mind that only the snaps saved in your memory roll will be revived by this method.
Method 2. Using File Browser - For Android
You can also recover your My Eyes Only snapshots from the File Manager on your device. However, this solution only works on Android devices because iPhones do not provide all access to apps for your data safety.
Step1 Launch the File browser or File app on your device.
Step2 Head to “Data,” find the “Snapchat data or com.snapchat.android” file, and tap to open it.
Step3 Now, find a file with the “a .nomedia” extension, delete it, and the data will be restored to your Snapchat account.
![]()
Note: This method is only effective for a brief amount of time. Therefore, to recover your deleted Snaps, you should follow this method as soon as possible after they are deleted.
Apart from reading the methods we provided for your, you can also watch this video tutorial to help you recover My Eyes Only pictures quickly.
 Screensaver Factory, Create stunning professional screensavers within minutes. Create screensavers for yourself, for marketing or unlimited royalty-free commercial distribution. Make screensavers from images, video and swf flash, add background music and smooth sprite and transition effects. Screensaver Factory is very easy to use, and it enables you to make self-installing screensaver files and CDs for easy setup and distribution. Screensaver Factory is the most advanced software of its kind.
Part 2. A Bonus Tip: What If You Forget The Password Of My Eye Only
If you’ve ever forgotten the password to your “My Eye Only” on Snapchat, don’t worry; below, we’ve provided a few easy-to-follow instructions to help you quickly reset the password.
![]()
Note: If you opt to reset your current passcode, everything presently saved to My Eyes Only will be lost!!
How To Reset My Eyes Only Password?
Step1 Open the Snapchat app on your Android or iOS device and tap the overlaid Photos icon to head to the Memories section. Next, go to the “My Eyes Only” tab.
Step2 Tap “Options” at the lower right corner of the screen and select “Forgot Password.”
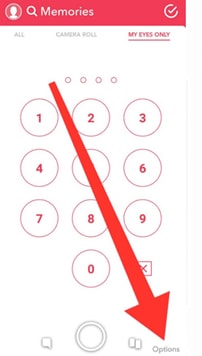
Step3 Type your Snapchat password and tap “Next.” Accept the rules and tap “Continue” to proceed further.
Step4 Reset the password and tap “Confirm” to apply your changes.
FAQs
How To Change My Eyes Only Password?
If you still remember the present password but want to change it, do the following steps to change the “My Eyes Only” password:
Step1 Open the Snapchat app, head to the Memories section, and tap the “My Eyes Only” tab.
Step2 Tap “Option”> “Change Password” and type your current “My Eyes Only” password to continue.
Step3 Type your new PIN and tap “Next.” Tap the “Use Passphrase” option if you do not want to set a PIN code.
Step4 Tap the box next to “I understand that if …” and tap “Continue.” Finally, tap “Finish” to complete the process.
 PDF application, powered by AI-based OCR, for unified workflows with both digital and scanned documents.
 How Do I Move Snaps To My Eyes Only?
Here’s how you can move Snaps to the “My Eyes Only” section on Snapchat:
Step1 Open the Snapchat app on your phone and go to the Memories section.
Step2 Choose the snap you want to move, tap and hold it.
Step3 Select “My Eyes Only” to move your snap.

How Do I Set Up My Eyes Only?
To set up “My Eyes Only” on Snapchat, do the following steps in sequence:
Step1 Head to the Memories section in Snapchat and tap the “My Eyes Only” tab.
Step2 Under the My Eyes Only tab, tap the “Quick Setup” option.
Step3 Create a passphrase or PIN and confirm it. Now, check the box next to “I understand that…,” select “Continue,” and tap the “Finish“ option to complete the setup process.

WPS Office Premium ( File Recovery, Photo Scanning, Convert PDF)–Yearly
How Do I Save Snaps To My Eyes Only By Default?
To save your Snaps to My Eyes only by default, follow these instructions step-by-step:
Step1 Open your Snapchat account and tap your Profile icon.
Step2 Tap the Settings icons at the top right-hand side of the screen and head to Memories.
Step3 Now, tap the toggle button next to “Save to My Eyes Only By Default” to change the settings. Your snaps will now save to the My Eyes Only section every time.
Conclusion
In this article, we’ve provided two step-by-step methods to help you recover My Eyes Only pictures on Snapchat on your iOS or Android device**.** We’ve also discussed how you can change or recover the My Eyes Only password with easy-to-follow instructions.
All in all, it is possible to recover your “My Eyes Only” pictures from Snapchat. While the process may be a little bit time-consuming, it is definitely worth it if you value your privacy. So, if you ever find yourself in this predicament, don’t despair - there is hope!
Be sure to follow the instructions carefully, and hopefully, you’ll be able to get your photos back!
Free Download For Win 7 or later(64-bit)
Free Download For macOS 10.14 or later
 NeoDownloader - Fast and fully automatic image/video/music downloader.
Method 2. Using File Browser - For Android
You can also recover your My Eyes Only snapshots from the File Manager on your device. However, this solution only works on Android devices because iPhones do not provide all access to apps for your data safety.
Step1 Launch the File browser or File app on your device.

Step2 Head to “Data,” find the “Snapchat data or com.snapchat.android” file, and tap to open it.
Step3 Now, find a file with the “a .nomedia” extension, delete it, and the data will be restored to your Snapchat account.
![]()
Note: This method is only effective for a brief amount of time. Therefore, to recover your deleted Snaps, you should follow this method as soon as possible after they are deleted.
Apart from reading the methods we provided for your, you can also watch this video tutorial to help you recover My Eyes Only pictures quickly.
Part 2. A Bonus Tip: What If You Forget The Password Of My Eye Only
If you’ve ever forgotten the password to your “My Eye Only” on Snapchat, don’t worry; below, we’ve provided a few easy-to-follow instructions to help you quickly reset the password.
![]()
Note: If you opt to reset your current passcode, everything presently saved to My Eyes Only will be lost!!
How To Reset My Eyes Only Password?
Step1 Open the Snapchat app on your Android or iOS device and tap the overlaid Photos icon to head to the Memories section. Next, go to the “My Eyes Only” tab.
Step2 Tap “Options” at the lower right corner of the screen and select “Forgot Password.”
Step3 Type your Snapchat password and tap “Next.” Accept the rules and tap “Continue” to proceed further.
Step4 Reset the password and tap “Confirm” to apply your changes.
FAQs

Key features:
• Import from any devices and cams, including GoPro and drones. All formats supported. Сurrently the only free video editor that allows users to export in a new H265/HEVC codec, something essential for those working with 4K and HD.
• Everything for hassle-free basic editing: cut, crop and merge files, add titles and favorite music
• Visual effects, advanced color correction and trendy Instagram-like filters
• All multimedia processing done from one app: video editing capabilities reinforced by a video converter, a screen capture, a video capture, a disc burner and a YouTube uploader
• Non-linear editing: edit several files with simultaneously
• Easy export to social networks: special profiles for YouTube, Facebook, Vimeo, Twitter and Instagram
• High quality export – no conversion quality loss, double export speed even of HD files due to hardware acceleration
• Stabilization tool will turn shaky or jittery footage into a more stable video automatically.
• Essential toolset for professional video editing: blending modes, Mask tool, advanced multiple-color Chroma Key
How To Change My Eyes Only Password?
If you still remember the present password but want to change it, do the following steps to change the “My Eyes Only” password:
Step1 Open the Snapchat app, head to the Memories section, and tap the “My Eyes Only” tab.
Step2 Tap “Option”> “Change Password” and type your current “My Eyes Only” password to continue.
Step3 Type your new PIN and tap “Next.” Tap the “Use Passphrase” option if you do not want to set a PIN code.
Step4 Tap the box next to “I understand that if …” and tap “Continue.” Finally, tap “Finish” to complete the process.
How Do I Move Snaps To My Eyes Only?
Here’s how you can move Snaps to the “My Eyes Only” section on Snapchat:
Step1 Open the Snapchat app on your phone and go to the Memories section.
Step2 Choose the snap you want to move, tap and hold it.
Step3 Select “My Eyes Only” to move your snap.
How Do I Set Up My Eyes Only?
To set up “My Eyes Only” on Snapchat, do the following steps in sequence:
Step1 Head to the Memories section in Snapchat and tap the “My Eyes Only” tab.
Step2 Under the My Eyes Only tab, tap the “Quick Setup” option.
Step3 Create a passphrase or PIN and confirm it. Now, check the box next to “I understand that…,” select “Continue,” and tap the “Finish“ option to complete the setup process.
How Do I Save Snaps To My Eyes Only By Default?
To save your Snaps to My Eyes only by default, follow these instructions step-by-step:
Step1 Open your Snapchat account and tap your Profile icon.
Step2 Tap the Settings icons at the top right-hand side of the screen and head to Memories.
Step3 Now, tap the toggle button next to “Save to My Eyes Only By Default” to change the settings. Your snaps will now save to the My Eyes Only section every time.
Conclusion
In this article, we’ve provided two step-by-step methods to help you recover My Eyes Only pictures on Snapchat on your iOS or Android device**.** We’ve also discussed how you can change or recover the My Eyes Only password with easy-to-follow instructions.
All in all, it is possible to recover your “My Eyes Only” pictures from Snapchat. While the process may be a little bit time-consuming, it is definitely worth it if you value your privacy. So, if you ever find yourself in this predicament, don’t despair - there is hope!
Be sure to follow the instructions carefully, and hopefully, you’ll be able to get your photos back!
Free Download For Win 7 or later(64-bit)
Free Download For macOS 10.14 or later
- Title: [Updated] Unlocking Mobile Tech How to Record Your Snapchat Content
- Author: Scott
- Created at : 2024-07-25 12:17:17
- Updated at : 2024-07-26 12:17:17
- Link: https://snapchat-videos.techidaily.com/updated-unlocking-mobile-tech-how-to-record-your-snapchat-content/
- License: This work is licensed under CC BY-NC-SA 4.0.