![[Updated] Unlocking Hidden Images on Snapchat for 2024](https://www.lifewire.com/thmb/FS9_kF5MJpIZzmUCUp5-14NjFaQ=/400x300/filters:no_upscale():max_bytes(150000):strip_icc()/iphonevideocrop-featured-5bee26cbc9e77c0051719b7b.jpg)
[Updated] Unlocking Hidden Images on Snapchat for 2024
Unlocking Hidden Images on Snapchat
Have you ever set some of your Snapchat pictures to “My Eyes Only” and then accidentally deleted them? Well, it’s happened to the best of us. Whether it’s a hilarious Snap streak with your best friend or a cute photo of your pet, losing important data can be frustrating.
But don’t worry, there’s a way to recover them! In this article, we’ll show you how to recover “My Eyes Only” pictures on Snapchat. We’ll also discuss how you can change or retrieve your password if you’ve forgotten it.
Part 1. How To Recover Photos Deleted From “My Eyes Only” on Snapchat
- Method 1. Recovering The Photos Via Snapchat - For iOS and Android
- Method 2. Using File Browser - For Android
Have you accidentally deleted a photo from your “My Eyes Only” album on Snapchat, and you’re now panicking because you think it’s gone forever? Don’t worry: with our two step-by-step methods provided below, you will surely retrieve your deleted snaps.
Method 1. Recovering The Photos Via Snapchat - For iOS and Android
The first method to recover My Eyes Only pictures on Snapchat is via the Privacy tab. Although it is a bit of a long process, this is surely going to work.
Here’s a quick and simple rundown of how you can recover your photos via Snapchat on your iOS and Android device:
Step1 Launch the Snapchat app on your device and sign in to your account. On the top left side of the screen, click your profile icon.
Step2 Tap the Setting icon and scroll down to the Privacy tab.

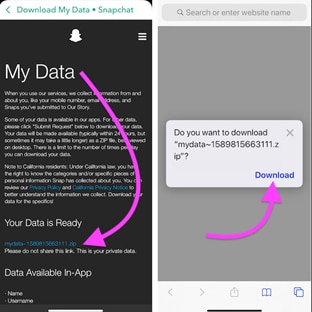
Step3 Under the Privacy tab, find the “My Data” option and tap it.
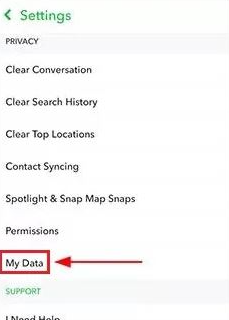
Step4 Log in to your Snapchat account once again, submit your request for data recovery from Snapchat’s server and download it.
![]()
Note: Keep in mind that only the snaps saved in your memory roll will be revived by this method.
Method 2. Using File Browser - For Android
You can also recover your My Eyes Only snapshots from the File Manager on your device. However, this solution only works on Android devices because iPhones do not provide all access to apps for your data safety.
Step1 Launch the File browser or File app on your device.

Step2 Head to “Data,” find the “Snapchat data or com.snapchat.android” file, and tap to open it.
Step3 Now, find a file with the “a .nomedia” extension, delete it, and the data will be restored to your Snapchat account.
![]()
Note: This method is only effective for a brief amount of time. Therefore, to recover your deleted Snaps, you should follow this method as soon as possible after they are deleted.
Apart from reading the methods we provided for your, you can also watch this video tutorial to help you recover My Eyes Only pictures quickly.
Part 2. A Bonus Tip: What If You Forget The Password Of My Eye Only
If you’ve ever forgotten the password to your “My Eye Only” on Snapchat, don’t worry; below, we’ve provided a few easy-to-follow instructions to help you quickly reset the password.
![]()
Note: If you opt to reset your current passcode, everything presently saved to My Eyes Only will be lost!!
How To Reset My Eyes Only Password?
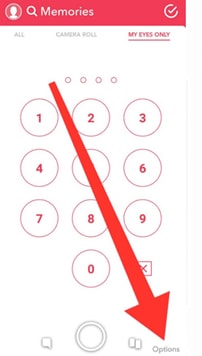
Step1 Open the Snapchat app on your Android or iOS device and tap the overlaid Photos icon to head to the Memories section. Next, go to the “My Eyes Only” tab.
Step2 Tap “Options” at the lower right corner of the screen and select “Forgot Password.”
Step3 Type your Snapchat password and tap “Next.” Accept the rules and tap “Continue” to proceed further.
Step4 Reset the password and tap “Confirm” to apply your changes.
FAQs
How To Change My Eyes Only Password?
If you still remember the present password but want to change it, do the following steps to change the “My Eyes Only” password:
Step1 Open the Snapchat app, head to the Memories section, and tap the “My Eyes Only” tab.
Step2 Tap “Option”> “Change Password” and type your current “My Eyes Only” password to continue.
Step3 Type your new PIN and tap “Next.” Tap the “Use Passphrase” option if you do not want to set a PIN code.
Step4 Tap the box next to “I understand that if …” and tap “Continue.” Finally, tap “Finish” to complete the process.
How Do I Move Snaps To My Eyes Only?
Here’s how you can move Snaps to the “My Eyes Only” section on Snapchat:
Step1 Open the Snapchat app on your phone and go to the Memories section.
Step2 Choose the snap you want to move, tap and hold it.
Step3 Select “My Eyes Only” to move your snap.
How Do I Set Up My Eyes Only?
To set up “My Eyes Only” on Snapchat, do the following steps in sequence:
Step1 Head to the Memories section in Snapchat and tap the “My Eyes Only” tab.
Step2 Under the My Eyes Only tab, tap the “Quick Setup” option.
Step3 Create a passphrase or PIN and confirm it. Now, check the box next to “I understand that…,” select “Continue,” and tap the “Finish“ option to complete the setup process.
How Do I Save Snaps To My Eyes Only By Default?
To save your Snaps to My Eyes only by default, follow these instructions step-by-step:
Step1 Open your Snapchat account and tap your Profile icon.
Step2 Tap the Settings icons at the top right-hand side of the screen and head to Memories.
Step3 Now, tap the toggle button next to “Save to My Eyes Only By Default” to change the settings. Your snaps will now save to the My Eyes Only section every time.
Conclusion
In this article, we’ve provided two step-by-step methods to help you recover My Eyes Only pictures on Snapchat on your iOS or Android device**.** We’ve also discussed how you can change or recover the My Eyes Only password with easy-to-follow instructions.
All in all, it is possible to recover your “My Eyes Only” pictures from Snapchat. While the process may be a little bit time-consuming, it is definitely worth it if you value your privacy. So, if you ever find yourself in this predicament, don’t despair - there is hope!
Be sure to follow the instructions carefully, and hopefully, you’ll be able to get your photos back!
Free Download For Win 7 or later(64-bit)
Free Download For macOS 10.14 or later
Method 2. Using File Browser - For Android
You can also recover your My Eyes Only snapshots from the File Manager on your device. However, this solution only works on Android devices because iPhones do not provide all access to apps for your data safety.
Step1 Launch the File browser or File app on your device.
Step2 Head to “Data,” find the “Snapchat data or com.snapchat.android” file, and tap to open it.
Step3 Now, find a file with the “a .nomedia” extension, delete it, and the data will be restored to your Snapchat account.
![]()
Note: This method is only effective for a brief amount of time. Therefore, to recover your deleted Snaps, you should follow this method as soon as possible after they are deleted.
Apart from reading the methods we provided for your, you can also watch this video tutorial to help you recover My Eyes Only pictures quickly.
Part 2. A Bonus Tip: What If You Forget The Password Of My Eye Only
If you’ve ever forgotten the password to your “My Eye Only” on Snapchat, don’t worry; below, we’ve provided a few easy-to-follow instructions to help you quickly reset the password.
![]()
Note: If you opt to reset your current passcode, everything presently saved to My Eyes Only will be lost!!
How To Reset My Eyes Only Password?
Step1 Open the Snapchat app on your Android or iOS device and tap the overlaid Photos icon to head to the Memories section. Next, go to the “My Eyes Only” tab.
Step2 Tap “Options” at the lower right corner of the screen and select “Forgot Password.”
Step3 Type your Snapchat password and tap “Next.” Accept the rules and tap “Continue” to proceed further.
Step4 Reset the password and tap “Confirm” to apply your changes.
FAQs
How To Change My Eyes Only Password?
If you still remember the present password but want to change it, do the following steps to change the “My Eyes Only” password:
Step1 Open the Snapchat app, head to the Memories section, and tap the “My Eyes Only” tab.
Step2 Tap “Option”> “Change Password” and type your current “My Eyes Only” password to continue.
Step3 Type your new PIN and tap “Next.” Tap the “Use Passphrase” option if you do not want to set a PIN code.
Step4 Tap the box next to “I understand that if …” and tap “Continue.” Finally, tap “Finish” to complete the process.
How Do I Move Snaps To My Eyes Only?
Here’s how you can move Snaps to the “My Eyes Only” section on Snapchat:
Step1 Open the Snapchat app on your phone and go to the Memories section.
Step2 Choose the snap you want to move, tap and hold it.
Step3 Select “My Eyes Only” to move your snap.
How Do I Set Up My Eyes Only?
To set up “My Eyes Only” on Snapchat, do the following steps in sequence:
Step1 Head to the Memories section in Snapchat and tap the “My Eyes Only” tab.
Step2 Under the My Eyes Only tab, tap the “Quick Setup” option.
Step3 Create a passphrase or PIN and confirm it. Now, check the box next to “I understand that…,” select “Continue,” and tap the “Finish“ option to complete the setup process.
How Do I Save Snaps To My Eyes Only By Default?
To save your Snaps to My Eyes only by default, follow these instructions step-by-step:
Step1 Open your Snapchat account and tap your Profile icon.
Step2 Tap the Settings icons at the top right-hand side of the screen and head to Memories.
Step3 Now, tap the toggle button next to “Save to My Eyes Only By Default” to change the settings. Your snaps will now save to the My Eyes Only section every time.
Conclusion
In this article, we’ve provided two step-by-step methods to help you recover My Eyes Only pictures on Snapchat on your iOS or Android device**.** We’ve also discussed how you can change or recover the My Eyes Only password with easy-to-follow instructions.
All in all, it is possible to recover your “My Eyes Only” pictures from Snapchat. While the process may be a little bit time-consuming, it is definitely worth it if you value your privacy. So, if you ever find yourself in this predicament, don’t despair - there is hope!
Be sure to follow the instructions carefully, and hopefully, you’ll be able to get your photos back!
Free Download For Win 7 or later(64-bit)
Free Download For macOS 10.14 or later
Installation Instructions for Snapchat on a Mac
It is the right place to know how to get Snapchat on Mac 2021. Being not officially available on the Mac App Store, users tend to find different ways of using Snapchat on Mac computers. And these different ways may include both reliable as well as non-reliable methods. However, the use of non-reliable methods won’t take you anywhere. Thus, we’d like to recommend our readers in simple ways only.
Before you dive into the article, let’s take a quick look at some interesting Snapchat facts!
- The Snap Camera by Snapchat is officially available for Mac users in different applications.
- Many successful brands, including Snapchat, Microsoft, and Apple, have already mentioned that they will be launching their apps in the Mac App Store very soon.
- People are currently obsessed and happy with using two favorite ways to install Snapchat on a Mac, i.e., the Nox and BlueStacks.
And, we’re here to provide you with a step-by-step guide on both ways. So, let’s begin with how to download Snapchat on Mac with BlueStacks.
Part 1: How to Download Snapchat on Mac with BlueStacks?
The BlueStacks is nothing but an Android Emulator for your Windows and Mac PC. It generally provides the means to run Android applications on a PC. So, it is similar to an Android phone inside your PC. Well, BlueStacks delivers one of the best ways how to use Snapchat on Mac.
Step-by-Step Guide on How to Use Snapchat on Mac
Step 1: Download the BlueStacks Android Emulator
Go to https://www.BlueStacks.com/ and click the Download BlueStacks tab to proceed.
Proceed for installation by selecting the Allow button.
Open the .dmg file and allow the prompts and instructions on the screen.
Click the Open > Install Now button afterward, as shown below on your Mac.
Step 2: Set Initial Boot
After you finish installing BlueStacks, know how to get Snapchat on Mac by following the instructions and setting it for initial boot. Then, you are required to allow all the permissions within the app.
Make sure to unblock BlueStacks if you are using the newer versions of macOS. Go to Security & Privacy > General > Allow and proceed.
Step 3: Link Your Google Account
Now, you need to sign in with your Google account to download apps from Play Store.
Step 4: Download Snapchat
Lookup for Snapchat in the Google Play Store and hit the Install button to download.
Once the installation is over, open the Snapchat app and start using it.
With the steps above, you can easily access Snapchat via BlueStacks. So, you will need to open the BlueStacks first every time!
Part 2: How to Download Snapchat on Mac without BlueStacks?
The Nox Player is another free Android Emulator for Mac and PC operating systems. So, let’s check out how to use Snapchat on Mac without BlueStacks.
Step-by-Step Guide to Using Snapchat on Mac without BlueStacks
Step 1: Download Nox Player
Go to https://www.bignox.com/ and hit the Download button to proceed.
Click on Agree after you complete installing the Nox Player application.
Step 2: Start the Nox Player Application
Drag the Nox Player to the Applications folder and double-click the icon to start.
Then, you need to click Open to start the Nox Player.
Step 3: Fix the Virtual Box Issue
The Nox Player will not start properly if you also get the following message.
Step 4: Install Virtual Box
Go to www.virtualbox.org and hit the Download button.
Then, you need to click the OS X Hosts to start downloading the Virtual Box.
Now, double-click the Virtual Box icon to start installing.
You will need to enter the Apple password to finish the installation.
Step 5: Restart Nox Player
Restart Nox Player after the installation of the Virtual Box application.
Sign in to your Google Account and check all the permissions. So, you need to click on the Play Store first.
After you complete all the Sign In procedure, you can open the Play Store and search for Snapchat.
So, this is how to get Snapchat on Mac without BlueStacks. Well, both the methods are pretty definitive and need the software to primarily open to access Snapchat.
Do you have more queries? Scroll to the section below to find more FAQs related to more on how to use Snapchat on Mac.
Part 3: FAQs about Using Snapchat on Mac
1. Is it possible to get Snapchat on a Mac?
Yes. Officially, it is not possible to use Snapchat on Mac without using any Android Emulator. Thus, we have mentioned how to use Snapchat on Mac with BlueStacks and Nox Player.
2. How do I log into Snapchat on my Mac?
You can log into Snapchat on Mac only after you’ve installed it over your Mac computer. And, we all know that the Snapchat app is not officially available for Mac. So, you need to primarily download the Android Emulator and then install Snapchat from the Google Play Store via the Emulator itself.
3. How can I use Snapchat on my Mac without BlueStacks?
There isn’t the best and free Android Emulator than the Nox Player if you want to replace BlueStacks.
4. Is BlueStacks Mac safe?
Yes, the BlueStacks is entirely safe for any operating system, regardless of Mac. It is legal as well.
5. Is Nox better than BlueStacks?
Both are Android Emulators and have their corresponding benefits. However, the Nox is said to be quick and smooth running software than BlueStacks. But then, there is no need to download software like Virtual Box on BlueStacks. So, each software comes with its merits and demerits.
Conclusion
Hopefully, you got how to get Snapchat on Mac via the different Android Emulators. You should consider using any of the emulator if you can’t resist using the all-time favorite Snapchat app. Also, check out the FAQs section for more clarity.
Wondershare Filmora
Get started easily with Filmora’s powerful performance, intuitive interface, and countless effects!
Try It Free Try It Free Try It Free 

And, we’re here to provide you with a step-by-step guide on both ways. So, let’s begin with how to download Snapchat on Mac with BlueStacks.
Part 1: How to Download Snapchat on Mac with BlueStacks?
The BlueStacks is nothing but an Android Emulator for your Windows and Mac PC. It generally provides the means to run Android applications on a PC. So, it is similar to an Android phone inside your PC. Well, BlueStacks delivers one of the best ways how to use Snapchat on Mac.
Step-by-Step Guide on How to Use Snapchat on Mac
Step 1: Download the BlueStacks Android Emulator
Go to https://www.BlueStacks.com/ and click the Download BlueStacks tab to proceed.
Proceed for installation by selecting the Allow button.
Open the .dmg file and allow the prompts and instructions on the screen.
Click the Open > Install Now button afterward, as shown below on your Mac.
Step 2: Set Initial Boot
After you finish installing BlueStacks, know how to get Snapchat on Mac by following the instructions and setting it for initial boot. Then, you are required to allow all the permissions within the app.
Make sure to unblock BlueStacks if you are using the newer versions of macOS. Go to Security & Privacy > General > Allow and proceed.
Step 3: Link Your Google Account
Now, you need to sign in with your Google account to download apps from Play Store.
Step 4: Download Snapchat
Lookup for Snapchat in the Google Play Store and hit the Install button to download.
Once the installation is over, open the Snapchat app and start using it.
With the steps above, you can easily access Snapchat via BlueStacks. So, you will need to open the BlueStacks first every time!
Part 2: How to Download Snapchat on Mac without BlueStacks?
The Nox Player is another free Android Emulator for Mac and PC operating systems. So, let’s check out how to use Snapchat on Mac without BlueStacks.
Step-by-Step Guide to Using Snapchat on Mac without BlueStacks
Step 1: Download Nox Player
Go to https://www.bignox.com/ and hit the Download button to proceed.
Click on Agree after you complete installing the Nox Player application.
Step 2: Start the Nox Player Application
Drag the Nox Player to the Applications folder and double-click the icon to start.
Then, you need to click Open to start the Nox Player.
Step 3: Fix the Virtual Box Issue
The Nox Player will not start properly if you also get the following message.
Step 4: Install Virtual Box
Go to www.virtualbox.org and hit the Download button.
Then, you need to click the OS X Hosts to start downloading the Virtual Box.
Now, double-click the Virtual Box icon to start installing.
You will need to enter the Apple password to finish the installation.
Step 5: Restart Nox Player
Restart Nox Player after the installation of the Virtual Box application.
Sign in to your Google Account and check all the permissions. So, you need to click on the Play Store first.
After you complete all the Sign In procedure, you can open the Play Store and search for Snapchat.
So, this is how to get Snapchat on Mac without BlueStacks. Well, both the methods are pretty definitive and need the software to primarily open to access Snapchat.
Do you have more queries? Scroll to the section below to find more FAQs related to more on how to use Snapchat on Mac.
Part 3: FAQs about Using Snapchat on Mac
1. Is it possible to get Snapchat on a Mac?
Yes. Officially, it is not possible to use Snapchat on Mac without using any Android Emulator. Thus, we have mentioned how to use Snapchat on Mac with BlueStacks and Nox Player.
2. How do I log into Snapchat on my Mac?
You can log into Snapchat on Mac only after you’ve installed it over your Mac computer. And, we all know that the Snapchat app is not officially available for Mac. So, you need to primarily download the Android Emulator and then install Snapchat from the Google Play Store via the Emulator itself.
3. How can I use Snapchat on my Mac without BlueStacks?
There isn’t the best and free Android Emulator than the Nox Player if you want to replace BlueStacks.
4. Is BlueStacks Mac safe?
Yes, the BlueStacks is entirely safe for any operating system, regardless of Mac. It is legal as well.
5. Is Nox better than BlueStacks?
Both are Android Emulators and have their corresponding benefits. However, the Nox is said to be quick and smooth running software than BlueStacks. But then, there is no need to download software like Virtual Box on BlueStacks. So, each software comes with its merits and demerits.
Conclusion
Hopefully, you got how to get Snapchat on Mac via the different Android Emulators. You should consider using any of the emulator if you can’t resist using the all-time favorite Snapchat app. Also, check out the FAQs section for more clarity.
Wondershare Filmora
Get started easily with Filmora’s powerful performance, intuitive interface, and countless effects!
Try It Free Try It Free Try It Free
Also read:
- [New] 2024 Approved Top 7 Video Enhancement Cameras To Skyrocket Your Blogging
- [New] In 2024, Social Network Showdown TikTok Vs Snap
- [New] Mastering Snap Ad Creation Essential Tips for Impactful Promotion for 2024
- [Updated] Capturing Snapshots Transferring From Snapchat to Device Storage for 2024
- [Updated] Integrating Your Photos Smart Transfers From iPhone to Snapchat for 2024
- [Updated] Navigate the Transfer of Social Media Photos to Hard Drive for 2024
- 2024 Approved Essential Tips Direct Camera Roll Upload to Snapchat
- A Lone Path with 3D Printers in the '3DR' World
- Fixed Lenovo Tap Glitch, Back to Life!
- In 2024, Celestial Wonders at Your Fingertips - HD Sky Website Guide
- In 2024, How to Change/Add Location Filters on Snapchat For your Honor 70 Lite 5G | Dr.fone
- In 2024, What is Geo-Blocking and How to Bypass it On Realme 10T 5G? | Dr.fone
- Insider Information Exposes Continued Stability Struggles in Intel Processors — More than Just Elevated Voltage Risks
- Step-by-Step Guide: Downloading and Watching Fandango Movies From Your Couch with Amazon Fire TV
- YouTube Celebs Gabbing via Snapchat for 2024
- Title: [Updated] Unlocking Hidden Images on Snapchat for 2024
- Author: Scott
- Created at : 2024-10-19 02:24:18
- Updated at : 2024-10-24 21:50:37
- Link: https://snapchat-videos.techidaily.com/updated-unlocking-hidden-images-on-snapchat-for-2024/
- License: This work is licensed under CC BY-NC-SA 4.0.