![[Updated] The Savvy Snapchat User's Guide to Gif Sharing for 2024](https://thmb.techidaily.com/f353031385ec13b27002aeb25b2433c7b7f2839e202aee43a31b71787185171a.jpg)
[Updated] The Savvy Snapchat User's Guide to Gif Sharing for 2024
The Savvy Snapchat User’s Guide to Gif Sharing

For all informal interactions between pals, Snapchat is the go-to app. Many configurable options are available on the platform, allowing you to express your inner creative sides. Snapchat helps to put your spin on anything, whether it’s just sharing random photos to your contacts or having extended chats.
The option to add GIFs to Snapchat is one such great feature. Because Snapchat is primarily a picture-sharing app, the emphasis is on making these images as engaging and imaginative as possible, and this is where animated GIFs come to play.
GIF stickers have exploded in popularity and for a good cause. The active emojis are mostly not amusing, but they also give life to your images, making your digital experience better overall.
Given how entertaining GIFs can be, knowing how to send gif on snapchat is essential. As a result, we’ve put up a detailed guide that explains how to send gif on snapchat in four distinct methods. Enjoy!
Do you want to know how to send gif on snapchat in different simple ways? Then you’ve arrived at the correct page. In this post, we’ll show you how to send gif on snapchat in just a few easy and simple steps.
1.How to send gif on snapchat?
- On your phone, open Snapchat.
- Take a picture
- Select the Stickers symbol.
- Select a GIF.
- Choose the GIF you want to use.
- Finally, please include it in the picture.
2.How to make your animated GIFs
GIF means Graphics Interchange Format, and it’s simply a series of moving, dynamic pictures (think Harry Potter) that loop indefinitely. They give your image, which would otherwise be stagnant and dull, a new dimension.
GIFs are so entertaining that they can be used to carry a whole discussion. However, if you want to learn how to make your GIFs, follow the steps below.
You’ll need to utilize the GIPHY application to generate your unique GIFs for this.
On your phone, download the GIPHY app.
- Start the app on your Mobile and select the create option.
- Smile symbol: Take a Photo and Gallery Option are the three options available to you.
- Smile Icon: This option allows you to make GIFs using the edit button.
- Capture a Photo: This option allows the user to take a photo on the scene and convert it to a GIF.
- Option of Gallery: You may build a GIF by selecting a photo from your gallery and editing it.
- Select options and begin designing depending on your preferences.
- When you will finish, click on the arrow in the bottom right-hand corner to exit.
- To save all the GIFs, go to Generated GIFs, touch on the three vertical dots, and choose Save GIF.
That GIF has now been saved to your pictures folder and can be seen anytime you need that.
3.What is the best way to transmit GIFs on Snapchat?
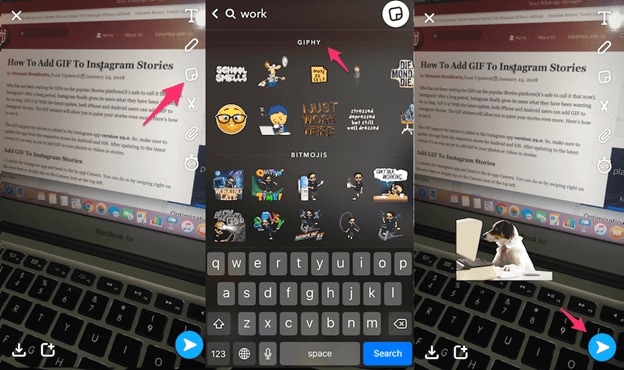
Putting GIFs in your photos is easy and takes only a few minutes. Here’s how to accomplish it.
- Log in to your Snapchat account by opening the app on your phone.
- Click a photo or choose an image from your collection to upload.
- Select the sticker button to add extra components to the Snap.
- Choose the GIF choice and any GIF you wish.
- Once you’ve chosen a GIF, it’ll show on the Snap for you to adjust and position anywhere you’d like.
- Lastly, to send the Snap to your pals, select the arrow option in the lower right corner.
4.On Android, how to send gif on snapchat Messages?
You must download the GBoard app on your phone to transfer GIFs to your pals immediately from a keypad on Android.

5.How can I get Gboard to work on Android?
To install and activate the Gboard application and transmit GIFs directly from it, follow the procedure.
- Download the Gboard application on your Android.
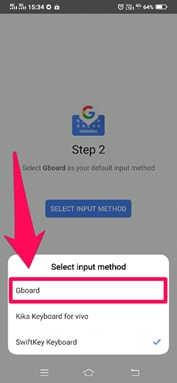
- Open the app and select Enable in Configurations from the menu.
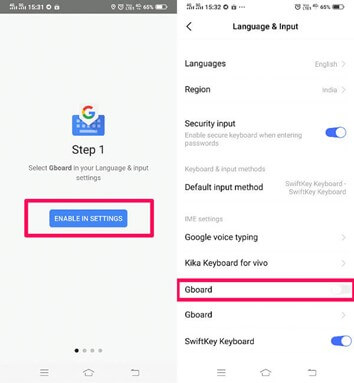
- The Communication and Input menu will appear in Preferences.
- Choose Gboard from the list of available keyboards.
6.In iOS, how to send gif on snapchat Messages?
Using the GIPHY keypad on your iPhone, you can share GIFs straight to your pals via Snapchat chats. However, you must first activate the keypad.
- Turn on the GIPHY keypad on your iPhone. Install the GIPHY phone app from the Apple Store. After you’ve downloaded the app, you’ll need to activate the GIPHY keypad on your iPhone.
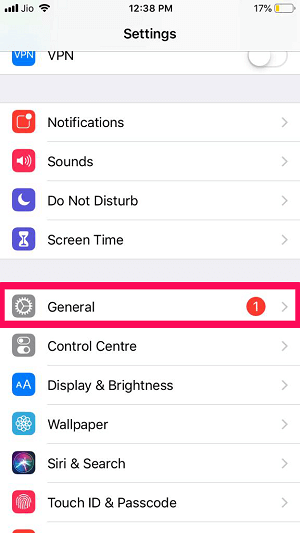
- To do just that, go over to the iPhone configuration menu and select “General” from the drop-down menu.
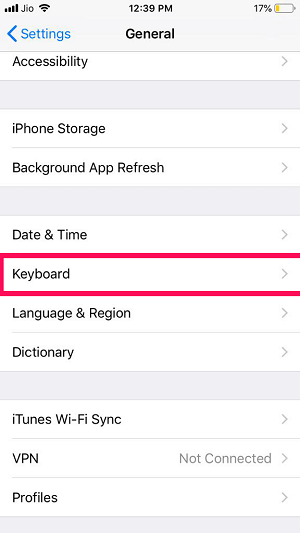
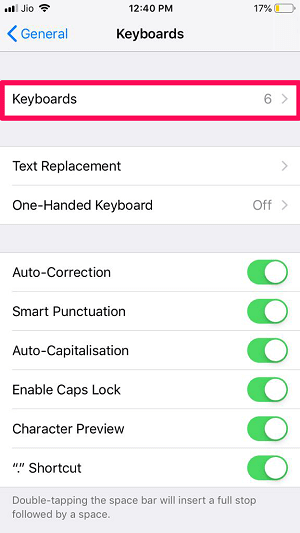
- Scroll to the bottom of the Keypad choice, then click “Keypads” once again.
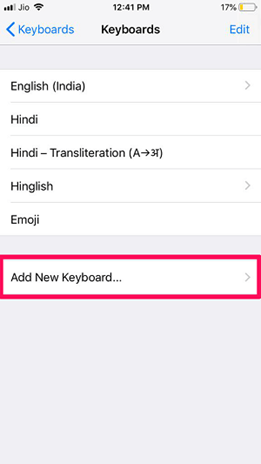
- All of the newly added keyboards will now be visible. Click the “Add Additional Keyboard” option to add GIPHY.
For Win 7 or later (64-bit)
For macOS 10.12 or later
For all informal interactions between pals, Snapchat is the go-to app. Many configurable options are available on the platform, allowing you to express your inner creative sides. Snapchat helps to put your spin on anything, whether it’s just sharing random photos to your contacts or having extended chats.
The option to add GIFs to Snapchat is one such great feature. Because Snapchat is primarily a picture-sharing app, the emphasis is on making these images as engaging and imaginative as possible, and this is where animated GIFs come to play.
GIF stickers have exploded in popularity and for a good cause. The active emojis are mostly not amusing, but they also give life to your images, making your digital experience better overall.
Given how entertaining GIFs can be, knowing how to send gif on snapchat is essential. As a result, we’ve put up a detailed guide that explains how to send gif on snapchat in four distinct methods. Enjoy!
Do you want to know how to send gif on snapchat in different simple ways? Then you’ve arrived at the correct page. In this post, we’ll show you how to send gif on snapchat in just a few easy and simple steps.
1.How to send gif on snapchat?
- On your phone, open Snapchat.
- Take a picture
- Select the Stickers symbol.
- Select a GIF.
- Choose the GIF you want to use.
- Finally, please include it in the picture.
2.How to make your animated GIFs
GIF means Graphics Interchange Format, and it’s simply a series of moving, dynamic pictures (think Harry Potter) that loop indefinitely. They give your image, which would otherwise be stagnant and dull, a new dimension.
GIFs are so entertaining that they can be used to carry a whole discussion. However, if you want to learn how to make your GIFs, follow the steps below.
You’ll need to utilize the GIPHY application to generate your unique GIFs for this.
On your phone, download the GIPHY app.
- Start the app on your Mobile and select the create option.
- Smile symbol: Take a Photo and Gallery Option are the three options available to you.
- Smile Icon: This option allows you to make GIFs using the edit button.
- Capture a Photo: This option allows the user to take a photo on the scene and convert it to a GIF.
- Option of Gallery: You may build a GIF by selecting a photo from your gallery and editing it.
- Select options and begin designing depending on your preferences.
- When you will finish, click on the arrow in the bottom right-hand corner to exit.
- To save all the GIFs, go to Generated GIFs, touch on the three vertical dots, and choose Save GIF.
That GIF has now been saved to your pictures folder and can be seen anytime you need that.
3.What is the best way to transmit GIFs on Snapchat?
Putting GIFs in your photos is easy and takes only a few minutes. Here’s how to accomplish it.
- Log in to your Snapchat account by opening the app on your phone.
- Click a photo or choose an image from your collection to upload.
- Select the sticker button to add extra components to the Snap.
- Choose the GIF choice and any GIF you wish.
- Once you’ve chosen a GIF, it’ll show on the Snap for you to adjust and position anywhere you’d like.
- Lastly, to send the Snap to your pals, select the arrow option in the lower right corner.
4.On Android, how to send gif on snapchat Messages?
You must download the GBoard app on your phone to transfer GIFs to your pals immediately from a keypad on Android.
5.How can I get Gboard to work on Android?
To install and activate the Gboard application and transmit GIFs directly from it, follow the procedure.
- Download the Gboard application on your Android.
- Open the app and select Enable in Configurations from the menu.
- The Communication and Input menu will appear in Preferences.
- Choose Gboard from the list of available keyboards.
6.In iOS, how to send gif on snapchat Messages?
Using the GIPHY keypad on your iPhone, you can share GIFs straight to your pals via Snapchat chats. However, you must first activate the keypad.
- Turn on the GIPHY keypad on your iPhone. Install the GIPHY phone app from the Apple Store. After you’ve downloaded the app, you’ll need to activate the GIPHY keypad on your iPhone.
- To do just that, go over to the iPhone configuration menu and select “General” from the drop-down menu.
- Scroll to the bottom of the Keypad choice, then click “Keypads” once again.
- All of the newly added keyboards will now be visible. Click the “Add Additional Keyboard” option to add GIPHY.
For Win 7 or later (64-bit)
For macOS 10.12 or later
Step Into the World of Modified Snapchat Speeches: Two Simple Steps
How to Change Voice on Snapchat with 2 Easy Methods

Ollie Mattison
Mar 27, 2024• Proven solutions
The recent feature of Snapchat allows you to change your voice without using some third party voice changers. Isn’t it an amazing news? Yes, now you can manipulate your voice in a weird manner and gain confidence to say anything you want to, which you otherwise, lacked in your original voice.
Your confidence level can sky rocket with the new Snapchat voice changer feature and it is definitely fun and cool. Now, create a cat face on Snapchat and add a voiceover to make it more weird and funny.
The alien, robot, bear, and cat voice filters have been released and more are sure, on its way. But, how to use the voice filters? In this article learn how to change voice on Snapchat in 2 easy ways.
Part 1: How To Change Voice On Snapchat With Lenses
Earlier, there were a few lenses that had built in Snapchat voice changer feature. But with the new voice filters on Snapchat, you can add voice to an already recorded video snap. Do you know how to change voice on Snapchat with the lenses? Let’s learn the following steps.
- The first thing that you need to do in order to use the Snapchat voice changer is Launch the Snapchat app. Next, you may hold your finger on the screen, on your face to select the lens and keep holding it until a white colored grid appears and you select the filter from the list available on the right side of the capture button. Or you may also just record the video snap first by holding the capture button without or with any filter selection.

- Once the recording is over, let the capture button go off to stop the recording. Beside the add to story icon and usual download options, at the left bottom, you can find a speaker icon. For the first time users, check for the message displaying ‘Tap to try Voice Filters!’

- When you click on the speaker icon, a list of voice filters appear above the screen. You may tap on any of the icon choices to start using the new voice filters.
- Once you have selected the Snapchat voice changer, you may keep on sharing snaps as you usually send by clicking on the blue button for sending.

Part 2: How To Change Voice On Snapchat With Speed Modifiers
Do you know how to change voice on Snapchat with the speed modifiers? By altering the speed of your Snapchat video, you may change your voice sound. So, first, you have to open the Snapchat app.
- You have to use the front facing camera so tap twice on the Snapchat camera. Then, you can see a round shaped button for recording the video. Press the button to start recording. Once you start recording the video a red line starts filling the circle around the icon. Once the recording is over, just release your finger to stop.

- You can find a range of filter appear when you swipe the video to the right or to the left. These filters are used to change the video speed. To play the audio or video in reverse motion tap the rewind filter, for playing it in slow motion tap the snail filter, and tap the rabbit filter for playing fast paced video and audio.

- Once the recording is finished, it starts automatic playback, which lets you listen to the filter modified voice of yours.
- For editing your snap, from the top screen, you may select the icons to add stickers, texts, and drawings to your snap by swiping left or right. You may save the snap by pressing the download icon. You may set the timer at the bottom of the screen for how long your friends can see your snap. The share button may also be tapped in order to share Snap to the Snapchat story.

- Lastly, on the right of your screen, you can see a blue button. You may choose the friends and press the button to receive Snapchat from them.
Conclusion
Although the voice filters were already available on Snapchat through some of the face filters, the new Snapchat voice changer feature is an added bonus. This feature lets you use both face filters as well as the voice filters combinedly. You may obviously, also use the voice filter alone. Select the features and make a great entry into the Snapchat land with a bang.
Images come from the Internet
Ollie Mattison
Ollie Mattison is a writer and a lover of all things video.
Follow @Ollie Mattison
Ollie Mattison
Mar 27, 2024• Proven solutions
The recent feature of Snapchat allows you to change your voice without using some third party voice changers. Isn’t it an amazing news? Yes, now you can manipulate your voice in a weird manner and gain confidence to say anything you want to, which you otherwise, lacked in your original voice.
Your confidence level can sky rocket with the new Snapchat voice changer feature and it is definitely fun and cool. Now, create a cat face on Snapchat and add a voiceover to make it more weird and funny.
The alien, robot, bear, and cat voice filters have been released and more are sure, on its way. But, how to use the voice filters? In this article learn how to change voice on Snapchat in 2 easy ways.
Part 1: How To Change Voice On Snapchat With Lenses
Earlier, there were a few lenses that had built in Snapchat voice changer feature. But with the new voice filters on Snapchat, you can add voice to an already recorded video snap. Do you know how to change voice on Snapchat with the lenses? Let’s learn the following steps.
- The first thing that you need to do in order to use the Snapchat voice changer is Launch the Snapchat app. Next, you may hold your finger on the screen, on your face to select the lens and keep holding it until a white colored grid appears and you select the filter from the list available on the right side of the capture button. Or you may also just record the video snap first by holding the capture button without or with any filter selection.
- Once the recording is over, let the capture button go off to stop the recording. Beside the add to story icon and usual download options, at the left bottom, you can find a speaker icon. For the first time users, check for the message displaying ‘Tap to try Voice Filters!’
- When you click on the speaker icon, a list of voice filters appear above the screen. You may tap on any of the icon choices to start using the new voice filters.
- Once you have selected the Snapchat voice changer, you may keep on sharing snaps as you usually send by clicking on the blue button for sending.
Part 2: How To Change Voice On Snapchat With Speed Modifiers
Do you know how to change voice on Snapchat with the speed modifiers? By altering the speed of your Snapchat video, you may change your voice sound. So, first, you have to open the Snapchat app.
- You have to use the front facing camera so tap twice on the Snapchat camera. Then, you can see a round shaped button for recording the video. Press the button to start recording. Once you start recording the video a red line starts filling the circle around the icon. Once the recording is over, just release your finger to stop.
- You can find a range of filter appear when you swipe the video to the right or to the left. These filters are used to change the video speed. To play the audio or video in reverse motion tap the rewind filter, for playing it in slow motion tap the snail filter, and tap the rabbit filter for playing fast paced video and audio.
- Once the recording is finished, it starts automatic playback, which lets you listen to the filter modified voice of yours.
- For editing your snap, from the top screen, you may select the icons to add stickers, texts, and drawings to your snap by swiping left or right. You may save the snap by pressing the download icon. You may set the timer at the bottom of the screen for how long your friends can see your snap. The share button may also be tapped in order to share Snap to the Snapchat story.
- Lastly, on the right of your screen, you can see a blue button. You may choose the friends and press the button to receive Snapchat from them.
Conclusion
Although the voice filters were already available on Snapchat through some of the face filters, the new Snapchat voice changer feature is an added bonus. This feature lets you use both face filters as well as the voice filters combinedly. You may obviously, also use the voice filter alone. Select the features and make a great entry into the Snapchat land with a bang.
Images come from the Internet
Ollie Mattison
Ollie Mattison is a writer and a lover of all things video.
Follow @Ollie Mattison
Also read:
- [New] 2024 Approved Direct Transfer Techniques Camera Roll Images to Snapchat
- [Updated] 2024 Approved Make Memories Count Learn to Share Photos Right Now
- [Updated] Framing Speed The Hyperlapse Video Methods
- [Updated] In 2024, Harnessing Microsoft Teams' Power with Simple Snap Camera Use
- [Updated] Snapchat Strategies Optimizing for Business Growth for 2024
- [Updated] The Ultimate Blueprint for Branding Success on SnapChat for 2024
- [Updated] Voice Over Techniques Video Production Edition for 2024
- 2024 Approved Expert Advice on Creating Impactful HDR Portraits
- Excellence in Starting Points for Panzoids for 2024
- Guide to Fixing Audio Device Connection Errors on PCs Running Windows 11, 8 or 7
- New The Ultimate List Top 10 Free WebM Video Editors You Need to Try for 2024
- Prank Your Friends! Easy Ways to Fake and Share Google Maps Location On Vivo V29 Pro | Dr.fone
- Surviving Snapstreaks Essential Strategies for Longevity for 2024
- The Ultimate Guide to Performance & Hardware by Tom's Experts
- Transforming Old Images Into Snaps on Snapchat for 2024
- Ultimate Mix Seamless Free & Paid Blu-Ray Playback (Windows, macOS) for 2024
- Title: [Updated] The Savvy Snapchat User's Guide to Gif Sharing for 2024
- Author: Scott
- Created at : 2024-11-03 21:18:07
- Updated at : 2024-11-05 23:12:06
- Link: https://snapchat-videos.techidaily.com/updated-the-savvy-snapchat-users-guide-to-gif-sharing-for-2024/
- License: This work is licensed under CC BY-NC-SA 4.0.