![[Updated] The Beginner's Pathway to Fashionable Snaps & Lenses](https://www.lifewire.com/thmb/86F84KXmC5S52L9NAF6LQTtWmFE=/540x405/filters:no_upscale():max_bytes(150000):strip_icc()/Google-IO-narrow-5f29c4777cf94e1291f3921f22964aed.jpg)
[Updated] The Beginner's Pathway to Fashionable Snaps & Lenses
The Beginner’s Pathway to Fashionable Snaps & Lenses
How to Create Snapchat Lenses Easily: 2 Methods

Ollie Mattison
Mar 27, 2024• Proven solutions
Are you feeling like creating your own Snapchat lens, so you can have an even better experience with the app? The good news is that two new Snapchat tools have been released – the Lens Studio and Create Your Own Lens applications.
If you are a regular Snapchat user, you may want to learn about the Snapchat lens and how it can help you. We will help you get started. Here is our step by step guide on how to make Snapchat lenses.
- Part1: Comparing Lens Studio and Creating Your Own Lens
- Part2: How to Use Lens Studio
- Part3: How to Create Snapchat Lenses Using Create Your Own Lens
 The Tube Sites Submitter is a fast and efficient tool for anyone who needs to upload videos quickly, easily and automatically to hundreds of tube sites in mere minutes .
 Part 1: Comparing Lens Studio and Creating Your Own Lens
The two programs that we are highlighting today are Lens Studio and Create Your Own Lens. These are both fantastic programs for creating your own Snapchat lens, but they do have slightly different uses. If you are the type of person who wants to design a professional Snapchat lens, you are going to prefer Lens Studio.
But if you are hoping to come up with something creative that you can share with your friends and family, then you may love Create Your Own Lens. It is a very easy program to use, and it offers a ton of features that you may be surprised to see.
Snapchat lenses is for fun
The beauty of Snapchat lenses is that you can now create your own environment, which you can use each time you are taking photos or videos. Sure, you can always use the filters that are already available in the application, but not everyone would find those enough.
If you want some customization, or you just want to mess around until you get the filter that makes sense for you, Snapchat lenses are the way to go.

Lens Studio is for business
Lens Studio is perfect for businesses that may want to create unique environments for their clients, or the times when they are releasing company Snapchat posts. Say the company is hosting an event. They may want a custom graphic for that event, which is used for all the pictures and videos posted to Snapchat about the event. Using Lens Studio lets them do that with ease.
Create Your Own Lens is great when you are going to a special event, birthday party or graduating, and you want a special graphic that comes up in all your snaps. It is very intuitive to use, and is available through the App Store as a download.
Part 2: How to Use Lens Studio
1. Download Lens Studio
The first step involves downloading Lens Studio, which you can do from your computer. It is compatible with both Windows and Mac computers, and will run on any semi-modern system. According to the Snapchat team, Lens Studio is similar to the program used by their AR teams to create lenses. That means you are getting similar functionality, but with an easier to manage interface.
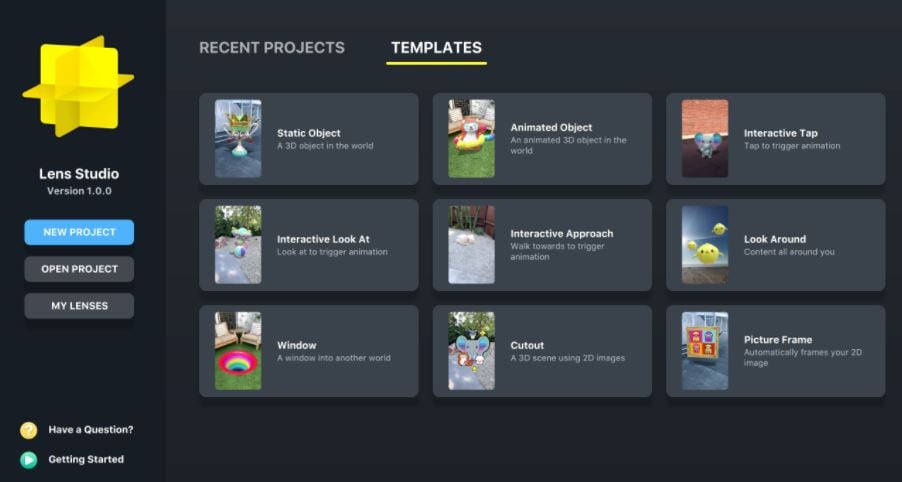
2. Choose Templates Page
It is normal to feel a little overwhelmed the first time you try and use this program. But that is why the templates page is so great. You can select from templates depending on the type of lens that you are hoping to create. You can just use a template, or you can incorporate your own ideas to customize the template.
There is also a Lens Studio Overview guide that you can access online, which will help you get acquainted with the program’s various features and quirks.

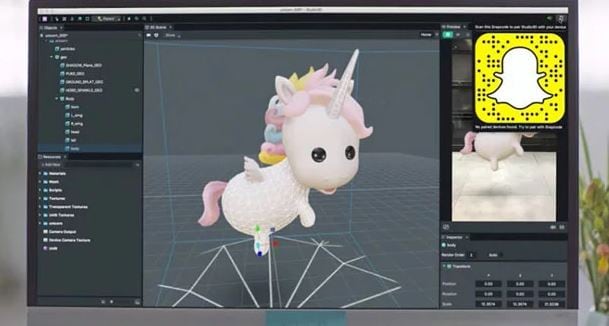
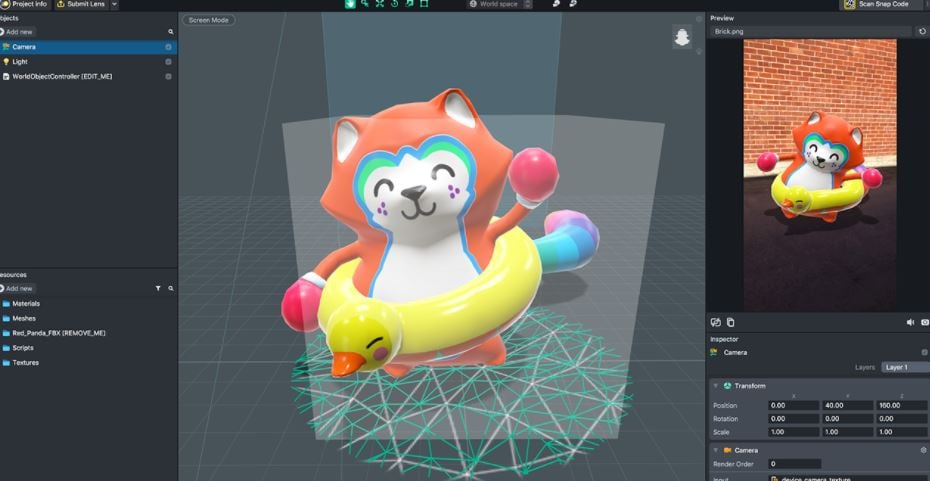
3. Use Studio Panels
Are you ready to create your own custom Snapchat lens? It is time to head over to Studio Panels on the application. This is the area where you can add your own 2D or 3D objects, and you can visualize how they would look as a Snapchat filter. You can add, remove, resize and drag objects to specific areas of the screen.
There are other tools accessible from the Resources panel. You can use these tools to ensure that your Snapchat lens is exactly as you want.
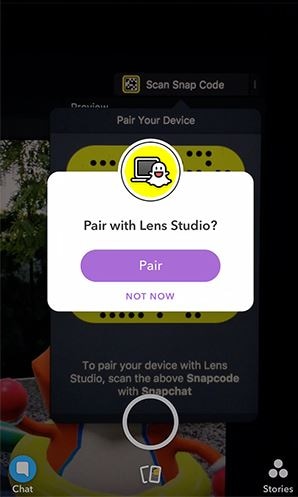
4. Preview the Snapchat Lens You Create
The great thing about this application is that you can preview the lens before you send it out to your phone. When you are satisfied with the image on the preview, you can pair your phone with the application, and you will be able to send that Snapchat lens onto your phone through your Snapcode. It is that simple!
 Easy and Safe Partition Software & Hard Disk Manager

Part 3: How to Create Snapchat Lenses Using Create Your Own Lens
- There are two ways that you can access the tool for creating fun Snapchat lenses. You can either visit the website snapchat.com/create, or you can go on the “filters and lenses” section on your iOS device. If you are using Snapchat on an Android device, you will only have the option for the website. But the feature is coming to the Android version of Snapchat very soon.
- When you are in the application or on the website, you may start to look at the different templates for Snapchat lenses. Now you can add other items into the templates, such as photographs, text or graphics.
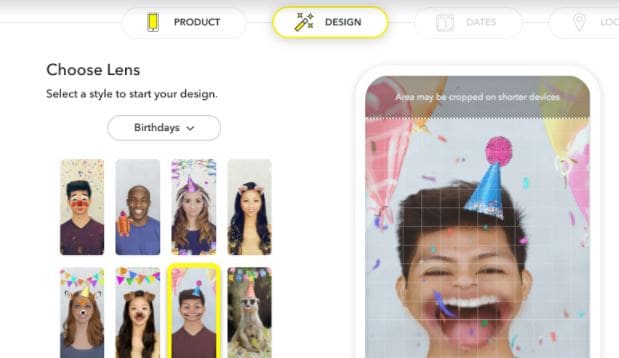
It is all up to your imagination. You can create the perfect Snapchat lens, which you can then send into your Snapchat account through your Snapcode. Of course, if you are using your iOS device to create the lens, it is already linked to your account.
Another cool feature is how you can set the location for where the Snapchat lens is available. Say you are hosting a party. You can have the Snapchat lens available to everyone who uses Snapchat within a set square footage of your home. That is an amazing way to let everyone share social media pictures and photos of your party, through the lens you created.
Conclusion
Creating Snapchat lenses has never been easier. Whether you are a business looking to add a custom lens, or you just want to create a fun lens for a graduation or party, there are tools that make the job very easy. Using these tools will allow you to create the perfect Snapchat lens for any occasion.

Ollie Mattison
Ollie Mattison is a writer and a lover of all things video.
Follow @Ollie Mattison
Ollie Mattison
Mar 27, 2024• Proven solutions
Are you feeling like creating your own Snapchat lens, so you can have an even better experience with the app? The good news is that two new Snapchat tools have been released – the Lens Studio and Create Your Own Lens applications.
If you are a regular Snapchat user, you may want to learn about the Snapchat lens and how it can help you. We will help you get started. Here is our step by step guide on how to make Snapchat lenses.
- Part1: Comparing Lens Studio and Creating Your Own Lens
- Part2: How to Use Lens Studio
- Part3: How to Create Snapchat Lenses Using Create Your Own Lens
The two programs that we are highlighting today are Lens Studio and Create Your Own Lens. These are both fantastic programs for creating your own Snapchat lens, but they do have slightly different uses. If you are the type of person who wants to design a professional Snapchat lens, you are going to prefer Lens Studio.
But if you are hoping to come up with something creative that you can share with your friends and family, then you may love Create Your Own Lens. It is a very easy program to use, and it offers a ton of features that you may be surprised to see.
Snapchat lenses is for fun
The beauty of Snapchat lenses is that you can now create your own environment, which you can use each time you are taking photos or videos. Sure, you can always use the filters that are already available in the application, but not everyone would find those enough.
If you want some customization, or you just want to mess around until you get the filter that makes sense for you, Snapchat lenses are the way to go.
Lens Studio is for business
Lens Studio is perfect for businesses that may want to create unique environments for their clients, or the times when they are releasing company Snapchat posts. Say the company is hosting an event. They may want a custom graphic for that event, which is used for all the pictures and videos posted to Snapchat about the event. Using Lens Studio lets them do that with ease.
Create Your Own Lens is great when you are going to a special event, birthday party or graduating, and you want a special graphic that comes up in all your snaps. It is very intuitive to use, and is available through the App Store as a download.

Part 2: How to Use Lens Studio
1. Download Lens Studio
The first step involves downloading Lens Studio, which you can do from your computer. It is compatible with both Windows and Mac computers, and will run on any semi-modern system. According to the Snapchat team, Lens Studio is similar to the program used by their AR teams to create lenses. That means you are getting similar functionality, but with an easier to manage interface.
2. Choose Templates Page
It is normal to feel a little overwhelmed the first time you try and use this program. But that is why the templates page is so great. You can select from templates depending on the type of lens that you are hoping to create. You can just use a template, or you can incorporate your own ideas to customize the template.
There is also a Lens Studio Overview guide that you can access online, which will help you get acquainted with the program’s various features and quirks.
3. Use Studio Panels
Are you ready to create your own custom Snapchat lens? It is time to head over to Studio Panels on the application. This is the area where you can add your own 2D or 3D objects, and you can visualize how they would look as a Snapchat filter. You can add, remove, resize and drag objects to specific areas of the screen.
There are other tools accessible from the Resources panel. You can use these tools to ensure that your Snapchat lens is exactly as you want.
 Jet Profiler for MySQL, Enterprise Version: Jet Profiler for MySQL is real-time query performance and diagnostics tool for the MySQL database server. Its detailed query information, graphical interface and ease of use makes this a great tool for finding performance bottlenecks in your MySQL databases.
4. Preview the Snapchat Lens You Create
The great thing about this application is that you can preview the lens before you send it out to your phone. When you are satisfied with the image on the preview, you can pair your phone with the application, and you will be able to send that Snapchat lens onto your phone through your Snapcode. It is that simple!
Part 3: How to Create Snapchat Lenses Using Create Your Own Lens
- There are two ways that you can access the tool for creating fun Snapchat lenses. You can either visit the website snapchat.com/create, or you can go on the “filters and lenses” section on your iOS device. If you are using Snapchat on an Android device, you will only have the option for the website. But the feature is coming to the Android version of Snapchat very soon.
- When you are in the application or on the website, you may start to look at the different templates for Snapchat lenses. Now you can add other items into the templates, such as photographs, text or graphics.
It is all up to your imagination. You can create the perfect Snapchat lens, which you can then send into your Snapchat account through your Snapcode. Of course, if you are using your iOS device to create the lens, it is already linked to your account.
Another cool feature is how you can set the location for where the Snapchat lens is available. Say you are hosting a party. You can have the Snapchat lens available to everyone who uses Snapchat within a set square footage of your home. That is an amazing way to let everyone share social media pictures and photos of your party, through the lens you created.
Conclusion
Creating Snapchat lenses has never been easier. Whether you are a business looking to add a custom lens, or you just want to create a fun lens for a graduation or party, there are tools that make the job very easy. Using these tools will allow you to create the perfect Snapchat lens for any occasion.
Ollie Mattison
Ollie Mattison is a writer and a lover of all things video.
Follow @Ollie Mattison
Ollie Mattison
Mar 27, 2024• Proven solutions
Are you feeling like creating your own Snapchat lens, so you can have an even better experience with the app? The good news is that two new Snapchat tools have been released – the Lens Studio and Create Your Own Lens applications.
If you are a regular Snapchat user, you may want to learn about the Snapchat lens and how it can help you. We will help you get started. Here is our step by step guide on how to make Snapchat lenses.
- Part1: Comparing Lens Studio and Creating Your Own Lens
- Part2: How to Use Lens Studio
- Part3: How to Create Snapchat Lenses Using Create Your Own Lens
Part 1: Comparing Lens Studio and Creating Your Own Lens
The two programs that we are highlighting today are Lens Studio and Create Your Own Lens. These are both fantastic programs for creating your own Snapchat lens, but they do have slightly different uses. If you are the type of person who wants to design a professional Snapchat lens, you are going to prefer Lens Studio.
But if you are hoping to come up with something creative that you can share with your friends and family, then you may love Create Your Own Lens. It is a very easy program to use, and it offers a ton of features that you may be surprised to see.
Snapchat lenses is for fun
The beauty of Snapchat lenses is that you can now create your own environment, which you can use each time you are taking photos or videos. Sure, you can always use the filters that are already available in the application, but not everyone would find those enough.
If you want some customization, or you just want to mess around until you get the filter that makes sense for you, Snapchat lenses are the way to go.
Lens Studio is for business
Lens Studio is perfect for businesses that may want to create unique environments for their clients, or the times when they are releasing company Snapchat posts. Say the company is hosting an event. They may want a custom graphic for that event, which is used for all the pictures and videos posted to Snapchat about the event. Using Lens Studio lets them do that with ease.
Create Your Own Lens is great when you are going to a special event, birthday party or graduating, and you want a special graphic that comes up in all your snaps. It is very intuitive to use, and is available through the App Store as a download.
Part 2: How to Use Lens Studio
1. Download Lens Studio
The first step involves downloading Lens Studio, which you can do from your computer. It is compatible with both Windows and Mac computers, and will run on any semi-modern system. According to the Snapchat team, Lens Studio is similar to the program used by their AR teams to create lenses. That means you are getting similar functionality, but with an easier to manage interface.
2. Choose Templates Page
It is normal to feel a little overwhelmed the first time you try and use this program. But that is why the templates page is so great. You can select from templates depending on the type of lens that you are hoping to create. You can just use a template, or you can incorporate your own ideas to customize the template.
There is also a Lens Studio Overview guide that you can access online, which will help you get acquainted with the program’s various features and quirks.
3. Use Studio Panels
Are you ready to create your own custom Snapchat lens? It is time to head over to Studio Panels on the application. This is the area where you can add your own 2D or 3D objects, and you can visualize how they would look as a Snapchat filter. You can add, remove, resize and drag objects to specific areas of the screen.
There are other tools accessible from the Resources panel. You can use these tools to ensure that your Snapchat lens is exactly as you want.
4. Preview the Snapchat Lens You Create
The great thing about this application is that you can preview the lens before you send it out to your phone. When you are satisfied with the image on the preview, you can pair your phone with the application, and you will be able to send that Snapchat lens onto your phone through your Snapcode. It is that simple!
Part 3: How to Create Snapchat Lenses Using Create Your Own Lens
- There are two ways that you can access the tool for creating fun Snapchat lenses. You can either visit the website snapchat.com/create, or you can go on the “filters and lenses” section on your iOS device. If you are using Snapchat on an Android device, you will only have the option for the website. But the feature is coming to the Android version of Snapchat very soon.
- When you are in the application or on the website, you may start to look at the different templates for Snapchat lenses. Now you can add other items into the templates, such as photographs, text or graphics.

WPS Office Premium ( File Recovery, Photo Scanning, Convert PDF)–Yearly
It is all up to your imagination. You can create the perfect Snapchat lens, which you can then send into your Snapchat account through your Snapcode. Of course, if you are using your iOS device to create the lens, it is already linked to your account.
Another cool feature is how you can set the location for where the Snapchat lens is available. Say you are hosting a party. You can have the Snapchat lens available to everyone who uses Snapchat within a set square footage of your home. That is an amazing way to let everyone share social media pictures and photos of your party, through the lens you created.

Conclusion
Creating Snapchat lenses has never been easier. Whether you are a business looking to add a custom lens, or you just want to create a fun lens for a graduation or party, there are tools that make the job very easy. Using these tools will allow you to create the perfect Snapchat lens for any occasion.
Ollie Mattison
Ollie Mattison is a writer and a lover of all things video.
Follow @Ollie Mattison
Ollie Mattison
Mar 27, 2024• Proven solutions
Are you feeling like creating your own Snapchat lens, so you can have an even better experience with the app? The good news is that two new Snapchat tools have been released – the Lens Studio and Create Your Own Lens applications.
If you are a regular Snapchat user, you may want to learn about the Snapchat lens and how it can help you. We will help you get started. Here is our step by step guide on how to make Snapchat lenses.
- Part1: Comparing Lens Studio and Creating Your Own Lens
- Part2: How to Use Lens Studio
- Part3: How to Create Snapchat Lenses Using Create Your Own Lens
Part 1: Comparing Lens Studio and Creating Your Own Lens
The two programs that we are highlighting today are Lens Studio and Create Your Own Lens. These are both fantastic programs for creating your own Snapchat lens, but they do have slightly different uses. If you are the type of person who wants to design a professional Snapchat lens, you are going to prefer Lens Studio.
But if you are hoping to come up with something creative that you can share with your friends and family, then you may love Create Your Own Lens. It is a very easy program to use, and it offers a ton of features that you may be surprised to see.
Snapchat lenses is for fun
The beauty of Snapchat lenses is that you can now create your own environment, which you can use each time you are taking photos or videos. Sure, you can always use the filters that are already available in the application, but not everyone would find those enough.
If you want some customization, or you just want to mess around until you get the filter that makes sense for you, Snapchat lenses are the way to go.
Lens Studio is for business
Lens Studio is perfect for businesses that may want to create unique environments for their clients, or the times when they are releasing company Snapchat posts. Say the company is hosting an event. They may want a custom graphic for that event, which is used for all the pictures and videos posted to Snapchat about the event. Using Lens Studio lets them do that with ease.
Create Your Own Lens is great when you are going to a special event, birthday party or graduating, and you want a special graphic that comes up in all your snaps. It is very intuitive to use, and is available through the App Store as a download.
Part 2: How to Use Lens Studio
1. Download Lens Studio
The first step involves downloading Lens Studio, which you can do from your computer. It is compatible with both Windows and Mac computers, and will run on any semi-modern system. According to the Snapchat team, Lens Studio is similar to the program used by their AR teams to create lenses. That means you are getting similar functionality, but with an easier to manage interface.
2. Choose Templates Page
It is normal to feel a little overwhelmed the first time you try and use this program. But that is why the templates page is so great. You can select from templates depending on the type of lens that you are hoping to create. You can just use a template, or you can incorporate your own ideas to customize the template.
There is also a Lens Studio Overview guide that you can access online, which will help you get acquainted with the program’s various features and quirks.
3. Use Studio Panels
Are you ready to create your own custom Snapchat lens? It is time to head over to Studio Panels on the application. This is the area where you can add your own 2D or 3D objects, and you can visualize how they would look as a Snapchat filter. You can add, remove, resize and drag objects to specific areas of the screen.
There are other tools accessible from the Resources panel. You can use these tools to ensure that your Snapchat lens is exactly as you want.
4. Preview the Snapchat Lens You Create
The great thing about this application is that you can preview the lens before you send it out to your phone. When you are satisfied with the image on the preview, you can pair your phone with the application, and you will be able to send that Snapchat lens onto your phone through your Snapcode. It is that simple!
Part 3: How to Create Snapchat Lenses Using Create Your Own Lens
- There are two ways that you can access the tool for creating fun Snapchat lenses. You can either visit the website snapchat.com/create, or you can go on the “filters and lenses” section on your iOS device. If you are using Snapchat on an Android device, you will only have the option for the website. But the feature is coming to the Android version of Snapchat very soon.
- When you are in the application or on the website, you may start to look at the different templates for Snapchat lenses. Now you can add other items into the templates, such as photographs, text or graphics.
It is all up to your imagination. You can create the perfect Snapchat lens, which you can then send into your Snapchat account through your Snapcode. Of course, if you are using your iOS device to create the lens, it is already linked to your account.
Another cool feature is how you can set the location for where the Snapchat lens is available. Say you are hosting a party. You can have the Snapchat lens available to everyone who uses Snapchat within a set square footage of your home. That is an amazing way to let everyone share social media pictures and photos of your party, through the lens you created.

Conclusion
Creating Snapchat lenses has never been easier. Whether you are a business looking to add a custom lens, or you just want to create a fun lens for a graduation or party, there are tools that make the job very easy. Using these tools will allow you to create the perfect Snapchat lens for any occasion.
Ollie Mattison
Ollie Mattison is a writer and a lover of all things video.
Follow @Ollie Mattison
Beneath the Surface: The Deeper Meanings in Snapchat Symbols
Snapchat Emojis: the Real Meaning You May not Know
Ollie Mattison
Mar 27, 2024• Proven solutions
If you’re a Snapchat user, you will have spotted the emojis that appear in your friends list next to the names of your friends. These Snapchat emojis don’t simply remain the same forever, but instead change over the course of time, and the changes themselves are based on the way that you interact with your friend. Only you are able to see the emojis. The Snapchat emojis themselves include stars, hearts, faces and more.
- Part1: What do exactly the Snapchat emojis mean?
- Part2: How to change the streak emojis on Snapchat
- Part3: How to get a Bitmoji on Snapchat
- Part4: Why to use Snapchat emojis
 SwifDoo PDF 2-Year Plan
Part 1: What do exactly the Snapchat emojis mean?
In this section, we will tell you all about the different emojis on Snapchat. If you’ve been wondering what the Snap emoji meanings actually are, read on. A Gold Star next to someone’s name means they have replaced your snaps during the past 24 hours. A Yellow Star means you are #1 best friends with one another. You will send your largest amount of snaps to them and vice versa.
A Red Heart snap emoji is used to say that you have been #1 Bfs for a fortnight without interruption, whilst a Pink Heart Snapchat best friend emoji tells that that this has been the case for two months. If you see a baby emoji, this means you have only recently become friends with the person.
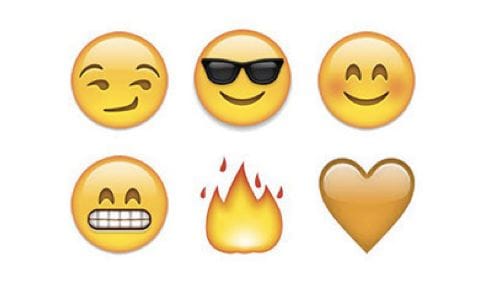
Have you seen a Face with Sunglasses? This means the person is B.Fs with one of your best friends and you send plenty of snaps to someone that they send many snaps to. A Grimacing Face tells you that your #1 is also their #1 friend and that the person you send the most snaps to is the same person they send the vast majority of their snaps to.
The Smirking Face shows that you are one of their B.Fs without this being reciprocated. In other words, they send you many snaps but you don’t return the favor. A Smiling Face means that you are good friends with someone but they aren’t quite your #1 B.F.
Part 2: How to change the streak emojis on Snapchat
If you’re not happy with the emojis that you are seeing or you feel that they are not accurate for the person in question, don’t worry – these can easily be changed. You can switch the emojis by taking the following steps.
- Open Snapchat and swipe down
- Tap Settings
- Tap Manage Preferences
- Tap Friend Emojis
- Tap the icon that you want to change
- Tap the emoji that you wish to use
Part 3: How to get a Bitmoji on Snapchat
Snapchat purchased Bitmoji creator Bitstrips in 2016 in an attempt to capitalise on the popularity of emojis. It is now possible to link your Bitmoji account to your Snapchat one, and it only takes a few moments to connect the two. By doing so, you can enjoy greater customisation options and enhance the experience of using Snapchat.
Take these steps if you wish to get a personal Bitmoji on Snapchat.
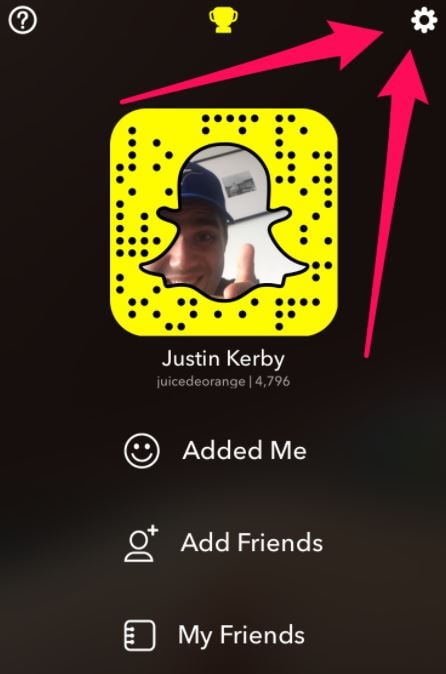
1. Open your Snapchat settings
Swipe down on your home screen, tapping the gear icon located in the top right-hand corner of your screen.
You can find this in the ‘My Account’ section. Those that have already registered with Bitmoji will be able to link their account in the next step, but if you haven’t, you will need to set up a new Bitmoji account.
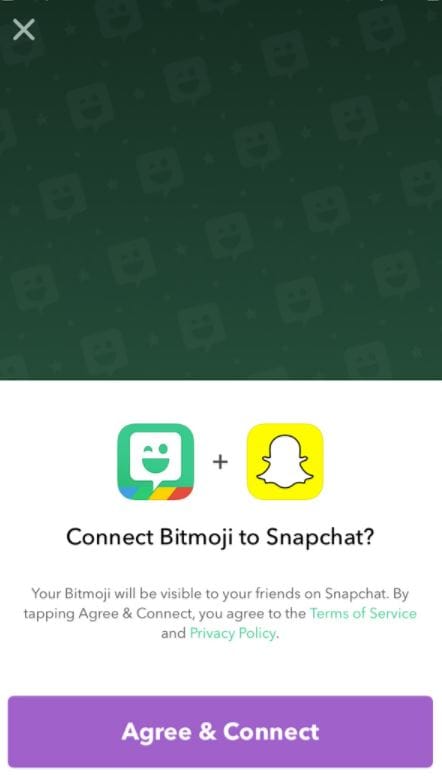
2. Agree and connect
You will now be able to link your Bitmoji account up to your Snapchat account. This means you can easily share your very own Bitmoji character with your followers on Snapchat and make the experience of using the service even more fun and personal to you.
3. Send Snaps using your new Bitmoji character
Everything is set up for you to make the most of linking Bitmoji to Snapchat. Your Bitmoji is now stored in your regular emoji tab and can be seen under the icon which resembles a face.
Part 4: Why to use Snapchat emojis
There are many great reasons for using Snapchat. The platform first appeared way back in September and has attracted millions upon millions of users since then. Snapchat may be strongly associated with teenagers, but it is used by adults of all ages. When you use Snapchat, the content you share is more direct and personal and is only seen by the people you want to see it, for ten seconds only. Snapchat is great for privacy, and if anyone attempts to take a screenshot of your content you will be notified.
Another reason so many people use Snapchat is that there are no complex settings to leave you confused. It also simplifies the video calling process and makes it much less complicated than other video communication platforms. Snapchat has also become a major marketing tool for businesses around the world, allowing them to connect with and promote their services to a wider range of tech-loving users.
You may also like: Add Emojis to Videos on YouTube/Facebook/Snapchat [Step by Step Guide] >>
 PCDJ DEX 3 for Windows & MAC is the total entertainment DJ software solution, offering audio, video, and karaoke mixing ability. Automatic beat-sync, smart looping, 4 decks, DJ MIDI controller support, Karaoke Streaming and much more.
Conclusion
More and more people are using Bitmoji to change the emojis on Snapchat. When you use Bitmoji to change your Snap emojis, you can make an excellent statement about yourself. Snapchat brings friends closer together, and it’s said that the platform had more daily users than Twitter in 2016. The creators of Snapchat actually failed 34 projects before their innovation became a success, which shows that perseverance can pay off. Why not change your Snapchat emojis today?
Ollie Mattison
Ollie Mattison is a writer and a lover of all things video.
Follow @Ollie Mattison
Ollie Mattison
Mar 27, 2024• Proven solutions
If you’re a Snapchat user, you will have spotted the emojis that appear in your friends list next to the names of your friends. These Snapchat emojis don’t simply remain the same forever, but instead change over the course of time, and the changes themselves are based on the way that you interact with your friend. Only you are able to see the emojis. The Snapchat emojis themselves include stars, hearts, faces and more.
- Part1: What do exactly the Snapchat emojis mean?
- Part2: How to change the streak emojis on Snapchat
- Part3: How to get a Bitmoji on Snapchat
- Part4: Why to use Snapchat emojis
Part 1: What do exactly the Snapchat emojis mean?
In this section, we will tell you all about the different emojis on Snapchat. If you’ve been wondering what the Snap emoji meanings actually are, read on. A Gold Star next to someone’s name means they have replaced your snaps during the past 24 hours. A Yellow Star means you are #1 best friends with one another. You will send your largest amount of snaps to them and vice versa.
A Red Heart snap emoji is used to say that you have been #1 Bfs for a fortnight without interruption, whilst a Pink Heart Snapchat best friend emoji tells that that this has been the case for two months. If you see a baby emoji, this means you have only recently become friends with the person.
Have you seen a Face with Sunglasses? This means the person is B.Fs with one of your best friends and you send plenty of snaps to someone that they send many snaps to. A Grimacing Face tells you that your #1 is also their #1 friend and that the person you send the most snaps to is the same person they send the vast majority of their snaps to.
The Smirking Face shows that you are one of their B.Fs without this being reciprocated. In other words, they send you many snaps but you don’t return the favor. A Smiling Face means that you are good friends with someone but they aren’t quite your #1 B.F.
Part 2: How to change the streak emojis on Snapchat
If you’re not happy with the emojis that you are seeing or you feel that they are not accurate for the person in question, don’t worry – these can easily be changed. You can switch the emojis by taking the following steps.
- Open Snapchat and swipe down
- Tap Settings
- Tap Manage Preferences
- Tap Friend Emojis
- Tap the icon that you want to change
- Tap the emoji that you wish to use
Part 3: How to get a Bitmoji on Snapchat
Snapchat purchased Bitmoji creator Bitstrips in 2016 in an attempt to capitalise on the popularity of emojis. It is now possible to link your Bitmoji account to your Snapchat one, and it only takes a few moments to connect the two. By doing so, you can enjoy greater customisation options and enhance the experience of using Snapchat.
Take these steps if you wish to get a personal Bitmoji on Snapchat.
1. Open your Snapchat settings
Swipe down on your home screen, tapping the gear icon located in the top right-hand corner of your screen.
You can find this in the ‘My Account’ section. Those that have already registered with Bitmoji will be able to link their account in the next step, but if you haven’t, you will need to set up a new Bitmoji account.
2. Agree and connect
You will now be able to link your Bitmoji account up to your Snapchat account. This means you can easily share your very own Bitmoji character with your followers on Snapchat and make the experience of using the service even more fun and personal to you.
 Lyric Video Creator Professional Version
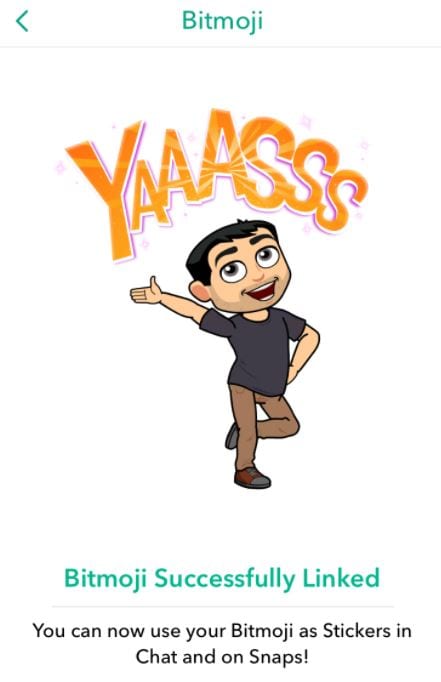
3. Send Snaps using your new Bitmoji character
Everything is set up for you to make the most of linking Bitmoji to Snapchat. Your Bitmoji is now stored in your regular emoji tab and can be seen under the icon which resembles a face.
There are many great reasons for using Snapchat. The platform first appeared way back in September and has attracted millions upon millions of users since then. Snapchat may be strongly associated with teenagers, but it is used by adults of all ages. When you use Snapchat, the content you share is more direct and personal and is only seen by the people you want to see it, for ten seconds only. Snapchat is great for privacy, and if anyone attempts to take a screenshot of your content you will be notified.
Another reason so many people use Snapchat is that there are no complex settings to leave you confused. It also simplifies the video calling process and makes it much less complicated than other video communication platforms. Snapchat has also become a major marketing tool for businesses around the world, allowing them to connect with and promote their services to a wider range of tech-loving users.
You may also like: Add Emojis to Videos on YouTube/Facebook/Snapchat [Step by Step Guide] >>
Conclusion
More and more people are using Bitmoji to change the emojis on Snapchat. When you use Bitmoji to change your Snap emojis, you can make an excellent statement about yourself. Snapchat brings friends closer together, and it’s said that the platform had more daily users than Twitter in 2016. The creators of Snapchat actually failed 34 projects before their innovation became a success, which shows that perseverance can pay off. Why not change your Snapchat emojis today?
 /a>
/a>
Ollie Mattison
Ollie Mattison is a writer and a lover of all things video.
Follow @Ollie Mattison
Ollie Mattison
Mar 27, 2024• Proven solutions
If you’re a Snapchat user, you will have spotted the emojis that appear in your friends list next to the names of your friends. These Snapchat emojis don’t simply remain the same forever, but instead change over the course of time, and the changes themselves are based on the way that you interact with your friend. Only you are able to see the emojis. The Snapchat emojis themselves include stars, hearts, faces and more.
- Part1: What do exactly the Snapchat emojis mean?
- Part2: How to change the streak emojis on Snapchat
- Part3: How to get a Bitmoji on Snapchat
- Part4: Why to use Snapchat emojis
Part 1: What do exactly the Snapchat emojis mean?
In this section, we will tell you all about the different emojis on Snapchat. If you’ve been wondering what the Snap emoji meanings actually are, read on. A Gold Star next to someone’s name means they have replaced your snaps during the past 24 hours. A Yellow Star means you are #1 best friends with one another. You will send your largest amount of snaps to them and vice versa.
A Red Heart snap emoji is used to say that you have been #1 Bfs for a fortnight without interruption, whilst a Pink Heart Snapchat best friend emoji tells that that this has been the case for two months. If you see a baby emoji, this means you have only recently become friends with the person.
Have you seen a Face with Sunglasses? This means the person is B.Fs with one of your best friends and you send plenty of snaps to someone that they send many snaps to. A Grimacing Face tells you that your #1 is also their #1 friend and that the person you send the most snaps to is the same person they send the vast majority of their snaps to.
The Smirking Face shows that you are one of their B.Fs without this being reciprocated. In other words, they send you many snaps but you don’t return the favor. A Smiling Face means that you are good friends with someone but they aren’t quite your #1 B.F.
Part 2: How to change the streak emojis on Snapchat
If you’re not happy with the emojis that you are seeing or you feel that they are not accurate for the person in question, don’t worry – these can easily be changed. You can switch the emojis by taking the following steps.
- Open Snapchat and swipe down
- Tap Settings
- Tap Manage Preferences
- Tap Friend Emojis
- Tap the icon that you want to change
- Tap the emoji that you wish to use
Part 3: How to get a Bitmoji on Snapchat
Snapchat purchased Bitmoji creator Bitstrips in 2016 in an attempt to capitalise on the popularity of emojis. It is now possible to link your Bitmoji account to your Snapchat one, and it only takes a few moments to connect the two. By doing so, you can enjoy greater customisation options and enhance the experience of using Snapchat.
Take these steps if you wish to get a personal Bitmoji on Snapchat.
1. Open your Snapchat settings
Swipe down on your home screen, tapping the gear icon located in the top right-hand corner of your screen.
You can find this in the ‘My Account’ section. Those that have already registered with Bitmoji will be able to link their account in the next step, but if you haven’t, you will need to set up a new Bitmoji account.
2. Agree and connect
You will now be able to link your Bitmoji account up to your Snapchat account. This means you can easily share your very own Bitmoji character with your followers on Snapchat and make the experience of using the service even more fun and personal to you.
 Project Manager - Asset Browser for 3Ds Max
3. Send Snaps using your new Bitmoji character
Everything is set up for you to make the most of linking Bitmoji to Snapchat. Your Bitmoji is now stored in your regular emoji tab and can be seen under the icon which resembles a face.
Part 4: Why to use Snapchat emojis
There are many great reasons for using Snapchat. The platform first appeared way back in September and has attracted millions upon millions of users since then. Snapchat may be strongly associated with teenagers, but it is used by adults of all ages. When you use Snapchat, the content you share is more direct and personal and is only seen by the people you want to see it, for ten seconds only. Snapchat is great for privacy, and if anyone attempts to take a screenshot of your content you will be notified.
Another reason so many people use Snapchat is that there are no complex settings to leave you confused. It also simplifies the video calling process and makes it much less complicated than other video communication platforms. Snapchat has also become a major marketing tool for businesses around the world, allowing them to connect with and promote their services to a wider range of tech-loving users.
You may also like: Add Emojis to Videos on YouTube/Facebook/Snapchat [Step by Step Guide] >>
Conclusion
More and more people are using Bitmoji to change the emojis on Snapchat. When you use Bitmoji to change your Snap emojis, you can make an excellent statement about yourself. Snapchat brings friends closer together, and it’s said that the platform had more daily users than Twitter in 2016. The creators of Snapchat actually failed 34 projects before their innovation became a success, which shows that perseverance can pay off. Why not change your Snapchat emojis today?
Ollie Mattison
Ollie Mattison is a writer and a lover of all things video.
Follow @Ollie Mattison
Ollie Mattison
Mar 27, 2024• Proven solutions
If you’re a Snapchat user, you will have spotted the emojis that appear in your friends list next to the names of your friends. These Snapchat emojis don’t simply remain the same forever, but instead change over the course of time, and the changes themselves are based on the way that you interact with your friend. Only you are able to see the emojis. The Snapchat emojis themselves include stars, hearts, faces and more.
- Part1: What do exactly the Snapchat emojis mean?
- Part2: How to change the streak emojis on Snapchat
- Part3: How to get a Bitmoji on Snapchat
- Part4: Why to use Snapchat emojis
Part 1: What do exactly the Snapchat emojis mean?
In this section, we will tell you all about the different emojis on Snapchat. If you’ve been wondering what the Snap emoji meanings actually are, read on. A Gold Star next to someone’s name means they have replaced your snaps during the past 24 hours. A Yellow Star means you are #1 best friends with one another. You will send your largest amount of snaps to them and vice versa.
A Red Heart snap emoji is used to say that you have been #1 Bfs for a fortnight without interruption, whilst a Pink Heart Snapchat best friend emoji tells that that this has been the case for two months. If you see a baby emoji, this means you have only recently become friends with the person.
Have you seen a Face with Sunglasses? This means the person is B.Fs with one of your best friends and you send plenty of snaps to someone that they send many snaps to. A Grimacing Face tells you that your #1 is also their #1 friend and that the person you send the most snaps to is the same person they send the vast majority of their snaps to.
The Smirking Face shows that you are one of their B.Fs without this being reciprocated. In other words, they send you many snaps but you don’t return the favor. A Smiling Face means that you are good friends with someone but they aren’t quite your #1 B.F.
Part 2: How to change the streak emojis on Snapchat
If you’re not happy with the emojis that you are seeing or you feel that they are not accurate for the person in question, don’t worry – these can easily be changed. You can switch the emojis by taking the following steps.
- Open Snapchat and swipe down
- Tap Settings
- Tap Manage Preferences
- Tap Friend Emojis
- Tap the icon that you want to change
- Tap the emoji that you wish to use
Part 3: How to get a Bitmoji on Snapchat
Snapchat purchased Bitmoji creator Bitstrips in 2016 in an attempt to capitalise on the popularity of emojis. It is now possible to link your Bitmoji account to your Snapchat one, and it only takes a few moments to connect the two. By doing so, you can enjoy greater customisation options and enhance the experience of using Snapchat.
Take these steps if you wish to get a personal Bitmoji on Snapchat.
1. Open your Snapchat settings
Swipe down on your home screen, tapping the gear icon located in the top right-hand corner of your screen.
You can find this in the ‘My Account’ section. Those that have already registered with Bitmoji will be able to link their account in the next step, but if you haven’t, you will need to set up a new Bitmoji account.
2. Agree and connect
You will now be able to link your Bitmoji account up to your Snapchat account. This means you can easily share your very own Bitmoji character with your followers on Snapchat and make the experience of using the service even more fun and personal to you.
3. Send Snaps using your new Bitmoji character
Everything is set up for you to make the most of linking Bitmoji to Snapchat. Your Bitmoji is now stored in your regular emoji tab and can be seen under the icon which resembles a face.
 Project Manager - Asset Browser for 3Ds Max
 PaperScan Professional: PaperScan Scanner Software is a powerful TWAIN & WIA scanning application centered on one idea: making document acquisition an unparalleled easy task for anyone.
Part 4: Why to use Snapchat emojis
There are many great reasons for using Snapchat. The platform first appeared way back in September and has attracted millions upon millions of users since then. Snapchat may be strongly associated with teenagers, but it is used by adults of all ages. When you use Snapchat, the content you share is more direct and personal and is only seen by the people you want to see it, for ten seconds only. Snapchat is great for privacy, and if anyone attempts to take a screenshot of your content you will be notified.
Another reason so many people use Snapchat is that there are no complex settings to leave you confused. It also simplifies the video calling process and makes it much less complicated than other video communication platforms. Snapchat has also become a major marketing tool for businesses around the world, allowing them to connect with and promote their services to a wider range of tech-loving users.
You may also like: Add Emojis to Videos on YouTube/Facebook/Snapchat [Step by Step Guide] >>
Conclusion
More and more people are using Bitmoji to change the emojis on Snapchat. When you use Bitmoji to change your Snap emojis, you can make an excellent statement about yourself. Snapchat brings friends closer together, and it’s said that the platform had more daily users than Twitter in 2016. The creators of Snapchat actually failed 34 projects before their innovation became a success, which shows that perseverance can pay off. Why not change your Snapchat emojis today?
Ollie Mattison
Ollie Mattison is a writer and a lover of all things video.
Follow @Ollie Mattison
- Title: [Updated] The Beginner's Pathway to Fashionable Snaps & Lenses
- Author: Scott
- Created at : 2024-07-25 11:57:52
- Updated at : 2024-07-26 11:57:52
- Link: https://snapchat-videos.techidaily.com/updated-the-beginners-pathway-to-fashionable-snaps-and-lenses/
- License: This work is licensed under CC BY-NC-SA 4.0.