
!["[Updated] Spin the Clock Back Inside the Art of Snapchat Flipping"](https://www.lifewire.com/thmb/4GZTLPOe6q523tAZNmvcN9uct_c=/400x300/filters:no_upscale():max_bytes(150000):strip_icc()/GettyImages-753288297-5b1837e631283400368d60e0.jpg)
"[Updated] Spin the Clock Back Inside the Art of Snapchat Flipping"
Spin the Clock Back: Inside the Art of Snapchat Flipping
Snapchat has become one of the foremost popular chat applications for young adults and teenagers worldwide. Released in 2011, it gives you a choice to feature captions, drawings, and filters to your photos and videos referred to as snaps. Few people want to see the videos in reverse on Snapchat.
But, only a few people know about the Snapchat reverse filter. Don’t worry if you are clueless about the reverse video Snapchat process. Since reversing a video, snap is as easy as applying a filter. This article will enable you to reverse Snapchat for iOS and Android versions quickly.
In this article
01 How to Record Reverse video on Snapchat for free with the built-in filter?
02 How to Add Reverse Effect to Existing Videos on Snapchat?
03 Best Apps to Create Reverse Video for Snapchat.
04 When Should You Apply the Reverse Filter to Video on Snapchat?
05 Tips for a good reverse video
Part 1: How to Record Reverse video on Snapchat for free with the built-in filter?
Now that you need to know how to invert a video on Snapchat do not remain absent from this dialog. As you all know, it is beautifully simple to record a specific video on Snapchat. Like recording a video, turning around is also a pretty easy one.
Let’s examine in detail how you’ll switch Snapchat video via a free built-in reverse feature on Snapchat.
Note: Video duration should not be more than 10 seconds.
Step 1: Begin to record the video.
Open your Snapchat, then move to the camera screen. Later, capture a specific video clip by holding down a button display within the middle of the screen.
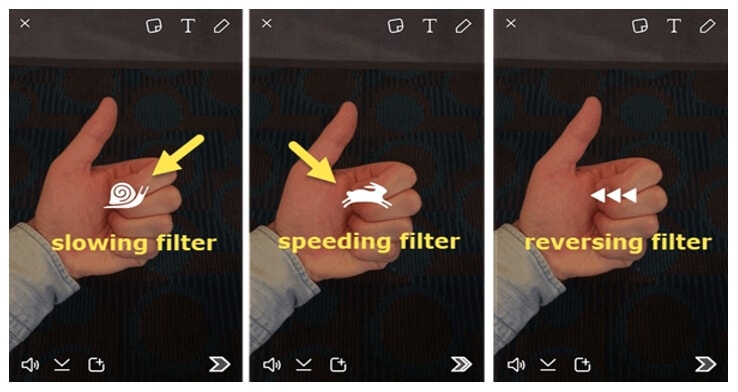
Step 2: T urn around the filter effect.
After capturing a video on Snapchat, another step for you’ll be to undertake to go for a turnaround channel there that is swipe to the left. By swiping, you’ll discover the reverse option alternative quickly. When you reach after swiping, you will find several types of filters. There, stay on the reverse screen.
Step 3: Share the altered video.
After switching your video to reverse mode, you’ll be able to share it with your companions. If you want to include more impacts in the video, tap the symbol button on your right side. Doing so will empower you to add effect. That’s all for turning around a video on Snapchat. Finally, you will get the reversed video with varying speed options.
You may also like: How to slow down video on Snapchat.
Part 2: How to Add Reverse Effect to Existing Videos on Snapchat?
This strategy works for both recordings you previously took with the Snapchat app and those you transfer from your phone’s collections. Follow the following step guidelines to reverse video on Snapchat.
Step 1: Open Snapchat and select the video
After landing on the main screen, you will see the camera icon. Swipe up the screen. You will see different options. Either choose the short video of duration less than 10 sec from ‘Snaps’ sections for a video you had previously recorded in Snapchat. Or else you can go for ‘Camera Roll’ to select a video from the phone camera Gallery.
Step 2: Edit Snap Menu and reverse video
Tap on the three-dot symbols on the upper right portion of the screen to open the menu. Tap on ‘Edit Snap’ from the given options. Swipe Left and find the reverse filter in Snapchat from all the filters. Selecting the reverse option will enable the Snapchat reverse filter effect on the selected video.
Part 3: Best Apps to Create Reverse Video for Snapchat
1. CapCut
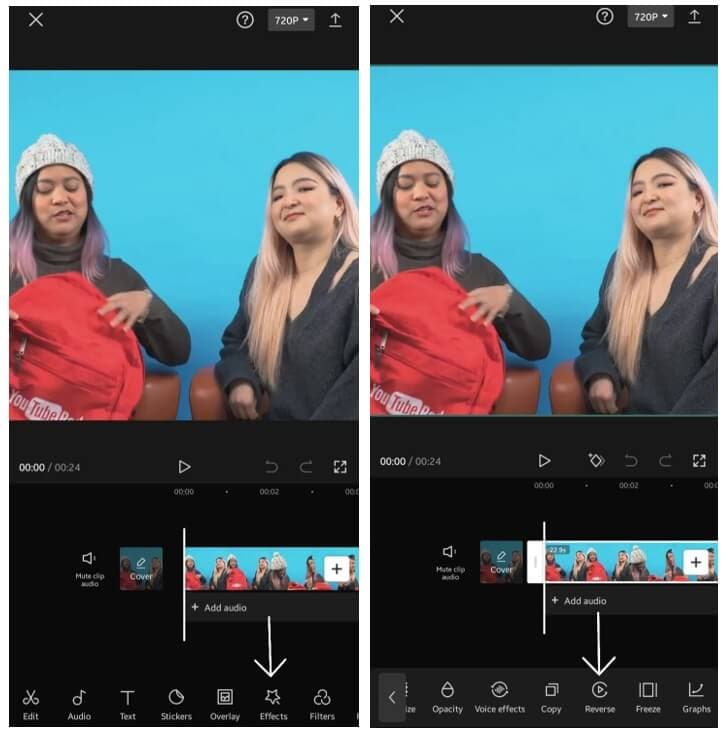
CapCut may be a portable app for iOS and Android gadgets, mainly created to complement the essential video altering highlights of the famous social stage. Several critical features of CapCut, bring it unique for social media. For example, Split function, Speed control, High defined filters, effect, and many more.
But if we talk about its reverse feature, a triangle-shaped figure inside a circle icon is known as the reverse feature in the software. This is not so tricky to use. But you can use this feature only on short videos. You can reverse it in slow motion after applying high-quality effects in your video. This version is available on iPhone as well as on Android devices.
You can check this article and find out the details about how to edit videos with CapCut.
2. Wondershare Filmora
Wondershare Filmora is the most recommended video-altering computer program that creates astonishing recordings productively employing a vast extent of powerful altering devices. Wondershare Filmora uses a delightfully realistic plan that makes it simple for anybody to become an incredible video editor.
Filmora is the most suitable app for video playback and reverses the video. And not only this, it has many other features that may facilitate your videos more engaging. If you’re trying to find an all-around video app, Filmora is the one for you. It has various kinds of critical features of Wondershare Filmora. For example, support to 4K editing, GIF, Noise removal, Advanced text editor, etc.
Talking its reverse feature is the ideal thing. It has professional tools for reversing video. Your videos will become more attractive through reverse, and additional features and concise videos will be on top.
3. Reverse Movie FX - Magic

If you need to turn around your recordings uploaded on Snapchat, Motion picture FX can make the difference. To begin with, record a video. Then, follow the steps to select the motion picture part, and press, begin. Switch Motion picture FX will start switching a video.
The main features of Reverse Movie FX- magic video are: Reverse Motion FX - Magic video carries colossal highlights for turning around a video. You will discover staggering liveliness and imaginative moves in this application. It has a smooth altering interface and timeline. You can include an inverted impact to your video by fair tapping an alternative.
Reverse Movie FX is a reverse video app available for Android and iOS devices. It offers reverse video options, including reversed + original (loop), original + reversed (loop), adding music, and many more.
Part 4: When Should You Apply the Reverse Filter to Video on Snapchat?
Reversing your video on Snapchat reflects how to show off a chain of occasions backward. This clear-out out is frequently satisfactory carried out to action-packed videos. For illustration, consider something as straightforward as dropping a shake onto a frozen pond that breaks through the ice. Rather than watching the ice smash after the video, you may apply the turnaround effect to appear the broken ice is coming back together as the video film plays in reverse.
Moving clouds, waterfall, hair flaunting, moving steps, playing with accessories, cycling, sky diving, breaking of glass, food making, makeup reverse videos, these kinds of videos easily catch trends on any social media platform.
Part 5: Tips for a good reverse video
Here are a few tips to assist you with the Snapchat reverse filter.
- Include voice: Once you utilize the turnaround effect, it’s not as it was the video that gets turned around. Any sound recorded with the video moreover gets turned around. This includes a tremendous impact on your clip as of now reversed video. So, beyond any doubt, say something while recording your video.
- Do the bizarre: If you’re aiming to be turning back time, your superior does it in fashion! Utilize the switch movement channel on things that don’t, as a rule, work that way. Like streaming water, flying feathered creatures, running mutts, you get the thought.
- Moderate that video down: Most phones these days have a few frames of slow-motion shooting mode in their camera app. Shoot your video in moderate movement, and after that, utilize the reverse motion channel on it.
- Shoot in great lighting: We know how terrible the Snapchat camera is. So, when shooting a video, shoot it in great characteristic light. Well, there you’ve got it! Have fun messing around with the reverse effect, and create a few intriguing science-defying snaps within the deal!
Conclusion
In the end, we hope that all your queries get cleared while reading this post. There are a few questions answered like:
- How to make a reverse video on Snapchat.
- Tips to make the reverse video better.
- How to use the in-built Snapchat reverse filter.
- Some apps create the best reverse videos.
Thus, I hope your queries are explicit after reading this post.
02 How to Add Reverse Effect to Existing Videos on Snapchat?
03 Best Apps to Create Reverse Video for Snapchat.
04 When Should You Apply the Reverse Filter to Video on Snapchat?
05 Tips for a good reverse video
Part 1: How to Record Reverse video on Snapchat for free with the built-in filter?
Now that you need to know how to invert a video on Snapchat do not remain absent from this dialog. As you all know, it is beautifully simple to record a specific video on Snapchat. Like recording a video, turning around is also a pretty easy one.
Let’s examine in detail how you’ll switch Snapchat video via a free built-in reverse feature on Snapchat.
Note: Video duration should not be more than 10 seconds.
Step 1: Begin to record the video.
Open your Snapchat, then move to the camera screen. Later, capture a specific video clip by holding down a button display within the middle of the screen.
Step 2: T urn around the filter effect.
After capturing a video on Snapchat, another step for you’ll be to undertake to go for a turnaround channel there that is swipe to the left. By swiping, you’ll discover the reverse option alternative quickly. When you reach after swiping, you will find several types of filters. There, stay on the reverse screen.
Step 3: Share the altered video.
After switching your video to reverse mode, you’ll be able to share it with your companions. If you want to include more impacts in the video, tap the symbol button on your right side. Doing so will empower you to add effect. That’s all for turning around a video on Snapchat. Finally, you will get the reversed video with varying speed options.
You may also like: How to slow down video on Snapchat.
Part 2: How to Add Reverse Effect to Existing Videos on Snapchat?
This strategy works for both recordings you previously took with the Snapchat app and those you transfer from your phone’s collections. Follow the following step guidelines to reverse video on Snapchat.
Step 1: Open Snapchat and select the video
After landing on the main screen, you will see the camera icon. Swipe up the screen. You will see different options. Either choose the short video of duration less than 10 sec from ‘Snaps’ sections for a video you had previously recorded in Snapchat. Or else you can go for ‘Camera Roll’ to select a video from the phone camera Gallery.
Step 2: Edit Snap Menu and reverse video
Tap on the three-dot symbols on the upper right portion of the screen to open the menu. Tap on ‘Edit Snap’ from the given options. Swipe Left and find the reverse filter in Snapchat from all the filters. Selecting the reverse option will enable the Snapchat reverse filter effect on the selected video.
Part 3: Best Apps to Create Reverse Video for Snapchat
1. CapCut
CapCut may be a portable app for iOS and Android gadgets, mainly created to complement the essential video altering highlights of the famous social stage. Several critical features of CapCut, bring it unique for social media. For example, Split function, Speed control, High defined filters, effect, and many more.
But if we talk about its reverse feature, a triangle-shaped figure inside a circle icon is known as the reverse feature in the software. This is not so tricky to use. But you can use this feature only on short videos. You can reverse it in slow motion after applying high-quality effects in your video. This version is available on iPhone as well as on Android devices.
You can check this article and find out the details about how to edit videos with CapCut.
2. Wondershare Filmora
Wondershare Filmora is the most recommended video-altering computer program that creates astonishing recordings productively employing a vast extent of powerful altering devices. Wondershare Filmora uses a delightfully realistic plan that makes it simple for anybody to become an incredible video editor.
Filmora is the most suitable app for video playback and reverses the video. And not only this, it has many other features that may facilitate your videos more engaging. If you’re trying to find an all-around video app, Filmora is the one for you. It has various kinds of critical features of Wondershare Filmora. For example, support to 4K editing, GIF, Noise removal, Advanced text editor, etc.
Talking its reverse feature is the ideal thing. It has professional tools for reversing video. Your videos will become more attractive through reverse, and additional features and concise videos will be on top.
3. Reverse Movie FX - Magic
If you need to turn around your recordings uploaded on Snapchat, Motion picture FX can make the difference. To begin with, record a video. Then, follow the steps to select the motion picture part, and press, begin. Switch Motion picture FX will start switching a video.
The main features of Reverse Movie FX- magic video are: Reverse Motion FX - Magic video carries colossal highlights for turning around a video. You will discover staggering liveliness and imaginative moves in this application. It has a smooth altering interface and timeline. You can include an inverted impact to your video by fair tapping an alternative.
Reverse Movie FX is a reverse video app available for Android and iOS devices. It offers reverse video options, including reversed + original (loop), original + reversed (loop), adding music, and many more.
Part 4: When Should You Apply the Reverse Filter to Video on Snapchat?
Reversing your video on Snapchat reflects how to show off a chain of occasions backward. This clear-out out is frequently satisfactory carried out to action-packed videos. For illustration, consider something as straightforward as dropping a shake onto a frozen pond that breaks through the ice. Rather than watching the ice smash after the video, you may apply the turnaround effect to appear the broken ice is coming back together as the video film plays in reverse.
Moving clouds, waterfall, hair flaunting, moving steps, playing with accessories, cycling, sky diving, breaking of glass, food making, makeup reverse videos, these kinds of videos easily catch trends on any social media platform.
Part 5: Tips for a good reverse video
Here are a few tips to assist you with the Snapchat reverse filter.
- Include voice: Once you utilize the turnaround effect, it’s not as it was the video that gets turned around. Any sound recorded with the video moreover gets turned around. This includes a tremendous impact on your clip as of now reversed video. So, beyond any doubt, say something while recording your video.
- Do the bizarre: If you’re aiming to be turning back time, your superior does it in fashion! Utilize the switch movement channel on things that don’t, as a rule, work that way. Like streaming water, flying feathered creatures, running mutts, you get the thought.
- Moderate that video down: Most phones these days have a few frames of slow-motion shooting mode in their camera app. Shoot your video in moderate movement, and after that, utilize the reverse motion channel on it.
- Shoot in great lighting: We know how terrible the Snapchat camera is. So, when shooting a video, shoot it in great characteristic light. Well, there you’ve got it! Have fun messing around with the reverse effect, and create a few intriguing science-defying snaps within the deal!
Conclusion
In the end, we hope that all your queries get cleared while reading this post. There are a few questions answered like:
- How to make a reverse video on Snapchat.
- Tips to make the reverse video better.
- How to use the in-built Snapchat reverse filter.
- Some apps create the best reverse videos.
Thus, I hope your queries are explicit after reading this post.
Quick & Easy: Capturing the Perfect Mac-Snapped Footage
How to Make a Video Best Fits Snapchat Size on Mac?

Liza Brown
Oct 26, 2023• Proven solutions
How to create a video best fit Snapchat? With more than 240 million active daily users, Snapchat is one of the most popular social media networks globally. It is also an instant messaging app that allows its users to express themselves visually in a diverse variety of manners including photos, videos, stories, stickers, emoji, and more.
One of the best features of Snapchat that makes it so attractive among the young audience is its mobile-oriented user interface. Snapchat was the first social networking platform to introduce the concept of daily stories which was widely adopted by other instant messengers as well including Instagram and WhatsApp. Since it is a mobile-oriented platform, you need to create and edit your videos in a certain way to make sure they are the best fit for Snapchat.
You May Also Like: The Ultimate Guide of Snapchat Filters
What Are the Ideal Features of a Snapchat Video?
Snapchat is highly optimized for vertical viewing which means that all the content needs to be served in portrait aspect ratio instead of landscape used by YouTube and other video platforms. You need to ensure that every aspect of your video is perfect before you can upload it for Snapchat on Mac. Here are some of the key features that you must not forget.
- Resolution - The ideal resolution of a Snapchat video is 1080 x 1920 pixels which is known as full HD. This resolution will ensure that your video loads in the right way and remains sharp and crisp for an excellent viewing experience.
- Video Format - The recommended video format for Snapchat clips is MP4 and MOV. You can use either of those formats on your Mac.
- Aspect Ratio - This is one of the key aspects of any video that determines the orientation of viewing. For a perfect Snapchat video, it is recommended that you keep the aspect ratio to 9:16.
- Video Length Size - Remember that Snapchat isn’t like YouTube and serves an audience that wants micro-entertainment. This is why the recommended time for your video is 3 to 10 seconds with the video size not exceeding 32 MB. Otherwise, the Snapchat audience may not respond well to your videos.
That is why it is crucial that your Snapchat video has all the ideal features so your audience can enjoy the viewing experience as intended instead of attempting to manipulate their phones to be able to see the video clearly. It will create an unpleasant and frustrating experience and your viewers might not stay with you.
How to Adjust the Video for Snapchat on Mac? [Step-by-Step]
- Part1. Changing Snapchat Video Format on Filmora
- Part2. Changing Snapchat Video Aspect Ratio on Filmora
- Part3. Changing Snapchat Video Size on Filmora
If your video doesn’t have the ideal features for Snapchat uploading, you don’t need to worry. You can easily edit your video on Filmora X to adjust everything including the aspect ratio, size, and format.


Part1. Changing Snapchat Video Format on Filmora
- Importing Video
The first step is to import the video using the option ‘Import Media Files’ in the import tab. You can also drag and drop the media files you need to work on.

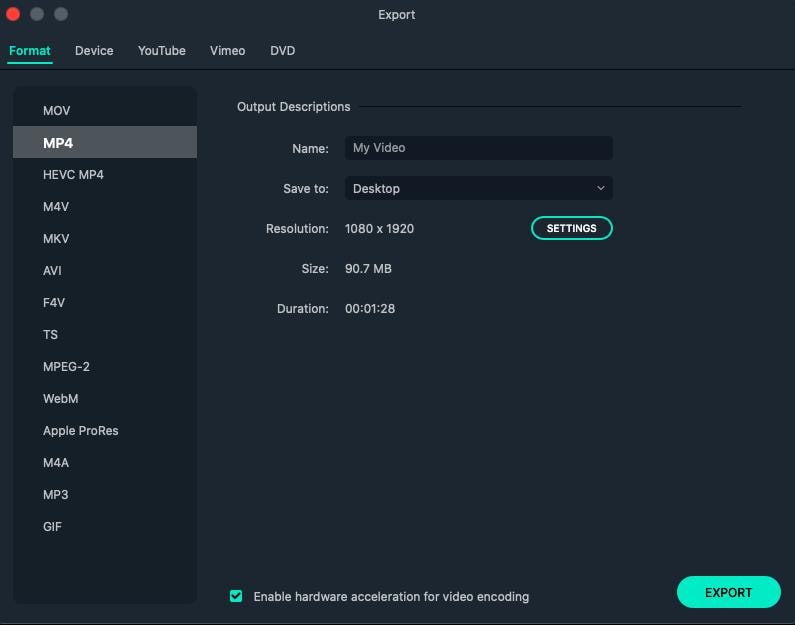
- Selecting the Right Output Format
Once you have imported the file, drag and drop it onto the Timeline. Now click on the ‘Export’ button. Here you will be able to select your output video format which needs to be either MOV or MP4.
- Exporting Your Snapchat Video
After you have defined the settings, you can click on the ‘Export’ button to start the saving process. Your video is now available to you in the right format.
Part2. Changing Snapchat Video Aspect Ratio on Filmora
You can use multiple methods to change the aspect ratio of your Snapchat video on Filmora. It depends on the nature of editing you need to perform on your video. You can choose from any of the methods given below to edit your video for Snapchat in a user-friendly manner on Mac.
● Method 1 - Launch the editor and click on the drop-down list. You will see the popular aspect ratios listed in the list from where you can choose any. Select the right one that is 9:16 for Snapchat and export the file right away.
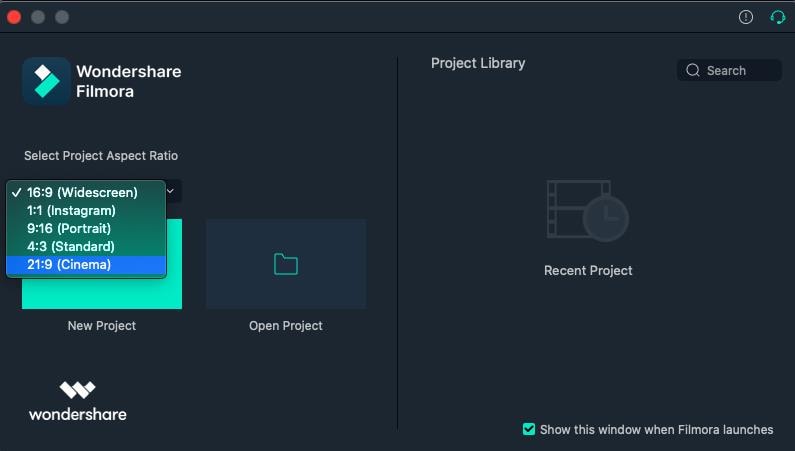
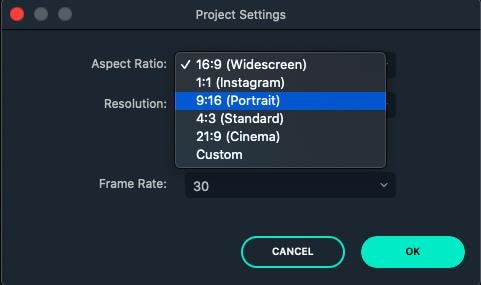
● Method 2 - The second method you can use is present under the Project Settings. You can also lock the aspect ratio using the features available here.

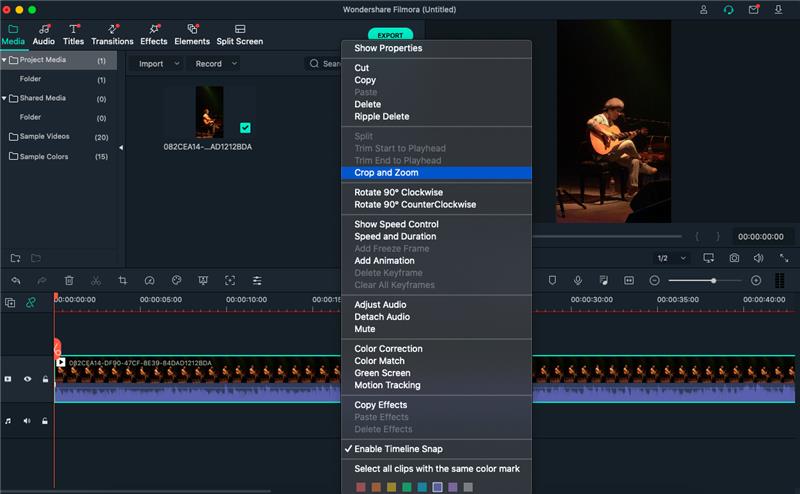
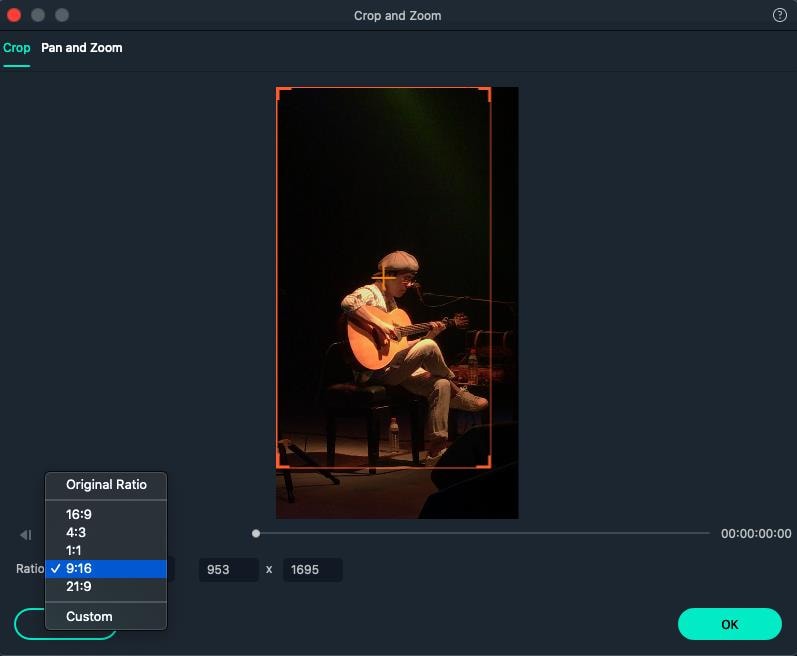
● Method 3 - The third method allows you to change the aspect ratio manually during the video editing process. You need to right-click on the timeline and select the ‘Crop and Zoom’ option. You will see a pop-up window where all the popular options will be available to you. You can choose either of them or select an aspect ratio manually.
● Step 4 - The final method to change the aspect ratio of your video on Mac is at the time of exporting your media file. Here you can select the aspect ratio for your local computer, a particular device, YouTube, or DVD TV.

Part3. Changing Snapchat Video Size on Filmora
- Importing Media File to Filmora
Using the ‘Import’ menu, import your media files, or simply drag and drop them from your Mac OS. Once the files are in the software, drag them to the Timeline track.
- Cropping Your Video for Snapchat
Here you can use the ‘Crop and Zoom’ button from the Timeline by right-clicking on it, so you can only focus on the aspect of the video that you want to show. This will resize the video as well.
- Cutting the Video
Another option you have is to delete the unnecessary parts of the video by selecting them through the indicator present on the timeline. Once you have selected the parts you don’t need, right-click on them and select ‘Delete’.
- Exporting Your Snapchat Video
Once you have resized your video by cropping and cutting the media file, you can now export it in the right resolution, bit rate, and format to ensure you get the minimum file size.
Liza Brown
Liza Brown is a writer and a lover of all things video.
Follow @Liza Brown
Liza Brown
Oct 26, 2023• Proven solutions
How to create a video best fit Snapchat? With more than 240 million active daily users, Snapchat is one of the most popular social media networks globally. It is also an instant messaging app that allows its users to express themselves visually in a diverse variety of manners including photos, videos, stories, stickers, emoji, and more.
One of the best features of Snapchat that makes it so attractive among the young audience is its mobile-oriented user interface. Snapchat was the first social networking platform to introduce the concept of daily stories which was widely adopted by other instant messengers as well including Instagram and WhatsApp. Since it is a mobile-oriented platform, you need to create and edit your videos in a certain way to make sure they are the best fit for Snapchat.
You May Also Like: The Ultimate Guide of Snapchat Filters
What Are the Ideal Features of a Snapchat Video?
Snapchat is highly optimized for vertical viewing which means that all the content needs to be served in portrait aspect ratio instead of landscape used by YouTube and other video platforms. You need to ensure that every aspect of your video is perfect before you can upload it for Snapchat on Mac. Here are some of the key features that you must not forget.
- Resolution - The ideal resolution of a Snapchat video is 1080 x 1920 pixels which is known as full HD. This resolution will ensure that your video loads in the right way and remains sharp and crisp for an excellent viewing experience.
- Video Format - The recommended video format for Snapchat clips is MP4 and MOV. You can use either of those formats on your Mac.
- Aspect Ratio - This is one of the key aspects of any video that determines the orientation of viewing. For a perfect Snapchat video, it is recommended that you keep the aspect ratio to 9:16.
- Video Length Size - Remember that Snapchat isn’t like YouTube and serves an audience that wants micro-entertainment. This is why the recommended time for your video is 3 to 10 seconds with the video size not exceeding 32 MB. Otherwise, the Snapchat audience may not respond well to your videos.
That is why it is crucial that your Snapchat video has all the ideal features so your audience can enjoy the viewing experience as intended instead of attempting to manipulate their phones to be able to see the video clearly. It will create an unpleasant and frustrating experience and your viewers might not stay with you.
How to Adjust the Video for Snapchat on Mac? [Step-by-Step]
- Part1. Changing Snapchat Video Format on Filmora
- Part2. Changing Snapchat Video Aspect Ratio on Filmora
- Part3. Changing Snapchat Video Size on Filmora
If your video doesn’t have the ideal features for Snapchat uploading, you don’t need to worry. You can easily edit your video on Filmora X to adjust everything including the aspect ratio, size, and format.
Part1. Changing Snapchat Video Format on Filmora
- Importing Video
The first step is to import the video using the option ‘Import Media Files’ in the import tab. You can also drag and drop the media files you need to work on.
- Selecting the Right Output Format
Once you have imported the file, drag and drop it onto the Timeline. Now click on the ‘Export’ button. Here you will be able to select your output video format which needs to be either MOV or MP4.
- Exporting Your Snapchat Video
After you have defined the settings, you can click on the ‘Export’ button to start the saving process. Your video is now available to you in the right format.
Part2. Changing Snapchat Video Aspect Ratio on Filmora
You can use multiple methods to change the aspect ratio of your Snapchat video on Filmora. It depends on the nature of editing you need to perform on your video. You can choose from any of the methods given below to edit your video for Snapchat in a user-friendly manner on Mac.
● Method 1 - Launch the editor and click on the drop-down list. You will see the popular aspect ratios listed in the list from where you can choose any. Select the right one that is 9:16 for Snapchat and export the file right away.
● Method 2 - The second method you can use is present under the Project Settings. You can also lock the aspect ratio using the features available here.
● Method 3 - The third method allows you to change the aspect ratio manually during the video editing process. You need to right-click on the timeline and select the ‘Crop and Zoom’ option. You will see a pop-up window where all the popular options will be available to you. You can choose either of them or select an aspect ratio manually.
● Step 4 - The final method to change the aspect ratio of your video on Mac is at the time of exporting your media file. Here you can select the aspect ratio for your local computer, a particular device, YouTube, or DVD TV.
Part3. Changing Snapchat Video Size on Filmora
- Importing Media File to Filmora
Using the ‘Import’ menu, import your media files, or simply drag and drop them from your Mac OS. Once the files are in the software, drag them to the Timeline track.
- Cropping Your Video for Snapchat
Here you can use the ‘Crop and Zoom’ button from the Timeline by right-clicking on it, so you can only focus on the aspect of the video that you want to show. This will resize the video as well.
- Cutting the Video
Another option you have is to delete the unnecessary parts of the video by selecting them through the indicator present on the timeline. Once you have selected the parts you don’t need, right-click on them and select ‘Delete’.
- Exporting Your Snapchat Video
Once you have resized your video by cropping and cutting the media file, you can now export it in the right resolution, bit rate, and format to ensure you get the minimum file size.
Liza Brown
Liza Brown is a writer and a lover of all things video.
Follow @Liza Brown
Also read:
- [New] In 2024, Elevate Your Biz Game Utilizing Snapchat Features
- [New] The Ultimate How-To for Advanced Snapchat Image Tweaks
- [Updated] 2024 Approved Explore Creative Horizons with Imaginative Snapchat Boomerang Techniques
- [New] Mac Users Adding the Social App Snapchat
- [Updated] In 2024, Vocal Ventures Merging Music & Video on Snapchat
- [New] In 2024, Efficient Mobile Methods for Snapchat Archive
- TuneUp Snapchat A Guide to Musical Video Clips
- In 2024, 15 Funny Snapchat Stickers That Deserve 99+ Million Views
- [New] A Visual Journey The Art of Editing with Snapchat Filters for 2024
- [New] In 2024, The Art of Snapchat Advertising Building Memorable Campaigns
- [New] Signs That You've Been Muted by Someone for 2024
- [New] 2024 Approved Strategies for Retrieving Private Chat Photos
- In 2024, Streamlined Processes How To Make & Modify Multi-Snap Chats
- [Updated] 2024 Approved Hilarious Snapchat Emotive Graphics Viral Edition
- [New] Long-Lasting Friendship on Snapchat Ideas and Insights for 2024
- [New] In 2024, Top Humorous Snapchat Emojis for Record-Breaking Engagement
- [Updated] 2024 Approved Unleash Creativity Best Snap Ideas of the Year
- [New] Hidden ScreenShotters Concealed Photography on the Snapchat App
- [New] Phonesnapshot Protocols Expert Tips for Mobile Capture on Snapchat
- [Updated] In 2024, Navigating TeamSnap Photo Functions for Effective Collaboration
- Swift Snapfile Reinstatement Guide for 2024
- [Updated] Snapchat Trick Turn Videos Upside Down for 2024
- [New] Mastering Cartoon Expressions with Snapchat's Fun Filter for 2024
- Snatching Your Secret Snaps Again for 2024
- In 2024, Convenient Tutorial Snapchat Installation macOS-Style
- In 2024, The Snapper's Playbook Advanced Tactics for Filter Fun
- [Updated] In 2024, Chromatic Charisma Mastering Colorful Filters on Snapchat
- [New] 2024 Approved Elevate Your Creativity 2 Routes to Perfect Snap Filters
- In 2024, Directing Your Camera Roll A Step-by-Step Snapchat Integration
- [New] Easily Connect to the Cloud and Post From Your Camera Roll
- [New] 2024 Approved How to Reverse a Video on Snapchat? [Complete Guide]
- [New] Eye-Catching Snaps Made Simple The 20 Must-Try Filters & Lenses for 2024
- In 2024, Effortlessly Pinning Friends on Snapchat with Confidence
- [Updated] Unravel Time The Art of Snapchat Video Reverse
- In 2024, Leveraging Snapchat for Professional Networking & Sales
- [Updated] In 2024, How-To Seamless Transition of Photos From Your Device to Snapchat
- In 2024, Easy Guide How To Bypass Motorola G54 5G FRP Android 10/11/12/13
- Fake Android Location without Rooting For Your Samsung Galaxy S23 FE | Dr.fone
- How to Send and Fake Live Location on Facebook Messenger Of your Samsung Galaxy A24 | Dr.fone
- Ways to Unbrick Your Android Device Various Ways for Recovery | Dr.fone
- How To Quick Guide for Making Google Slideshows
- [New] Adding Closed Captioning to Instagram Live and IGTV
- In 2024, 7 Ways to Lock Apps on iPhone 7 Plus and iPad Securely | Dr.fone
- [New] Crafting Engaging Videos with Adobe Captivate
- How To Use Allshare Cast To Turn On Screen Mirroring On Realme C55 | Dr.fone
- [New] 2024 Approved ScreenFlow Pro's Mac Saga - Full Evaluation Report
- In 2024, Unova Stone Pokémon Go Evolution List and How Catch Them For Apple iPhone 8 Plus | Dr.fone
- Title: "[Updated] Spin the Clock Back Inside the Art of Snapchat Flipping"
- Author: Scott
- Created at : 2024-05-23 10:33:26
- Updated at : 2024-05-24 10:33:26
- Link: https://snapchat-videos.techidaily.com/updated-spin-the-clock-back-inside-the-art-of-snapchat-flipping/
- License: This work is licensed under CC BY-NC-SA 4.0.
