![[Updated] Securing Your Snapchat Memories Mobile Recording Tips](https://thmb.techidaily.com/a4fdcd80183f244d65d1a43dcdc553851a248e6cf760faf0d85aa4162c1de5de.jpg)
"[Updated] Securing Your Snapchat Memories Mobile Recording Tips"
Securing Your Snapchat Memories: Mobile Recording Tips
Snapchat has 306 million users daily worldwide. It is considered the fastest way to share a moment and make a memory out of it. The article reflects upon screen record Snapchat and covers ways to do so via Android and iPhone devices. Let us commence this, shall we?
In this article
01 Will Snapchat Know When You Do Screen Recording?
02 How to Screen Record Snapchat on Android Phone?
03 How to Screen Record Snapchat on iPhone?
04 How to Make Screen Record on Snapchat without Notice?
Part 1: Will Snapchat Know When You Do Screen Recording?
Snapchat was designed in a way that it protects the privacy of the users. According to this social networking software policy, the messages and snaps disappear after 24 hours. It creates an urge to screenshot the snap or screen record the chat without getting noticed. The section reflects the answer to the concern if you screen record on Snapchat, does it show?”
The answer is yes. Snapchat sends a notification to the other person if you screen record on Snapchat. It plays a vital role as it helps steer clear from the stalkers and people who have no sense of boundaries.
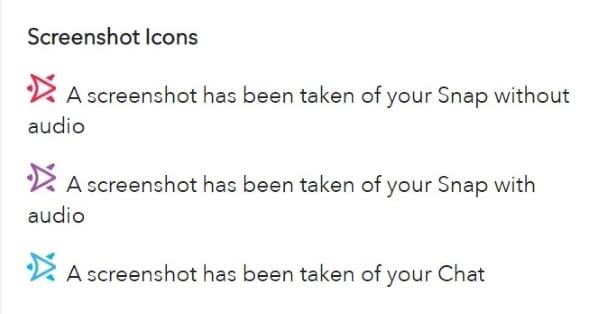
For taking a screenshot on Snapchat, the following notification show with specific colored arrows.
The red arrow displays that the screenshot was taken of snap without audio.
The purple arrow signifies that the screenshot was taken of snap with audio.
The blue arrows represent that a screenshot has been taken of chat.

It clearly shows that Snapchat takes the privacy of its users seriously. Therefore, to protect oneself from disappointment, it is crucial to avoid taking screenshots or screen recordings on Snapchat. You can use another phone to carry out the sneaky operation or download third-party software to screen capture and record safely.
Part 2: How to Screen Record Snapchat on Android Phone?
The Android users pretty much enhanced in the last decade exponentially. It is mainly because the workability of Android is more straightforward than that of iPhone. If you are a Snapchat addict on an Android phone, this section is designed for you.
Screen recording on Snapchat via Android phone is easy. There are no complications in the process, even for a beginner. For starters, make sure that the in-built screen recording functionality of Android is enabled via Settings. It will help initiate the recording immediately from the Action Center.
So, let us jump right into the step-by-step procedure to screen record on Snapchat.
Step 1: Enabling the Airplane Mode
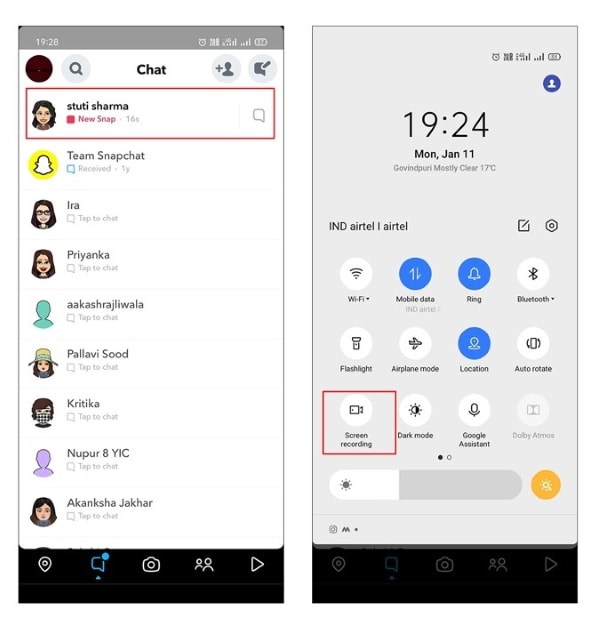
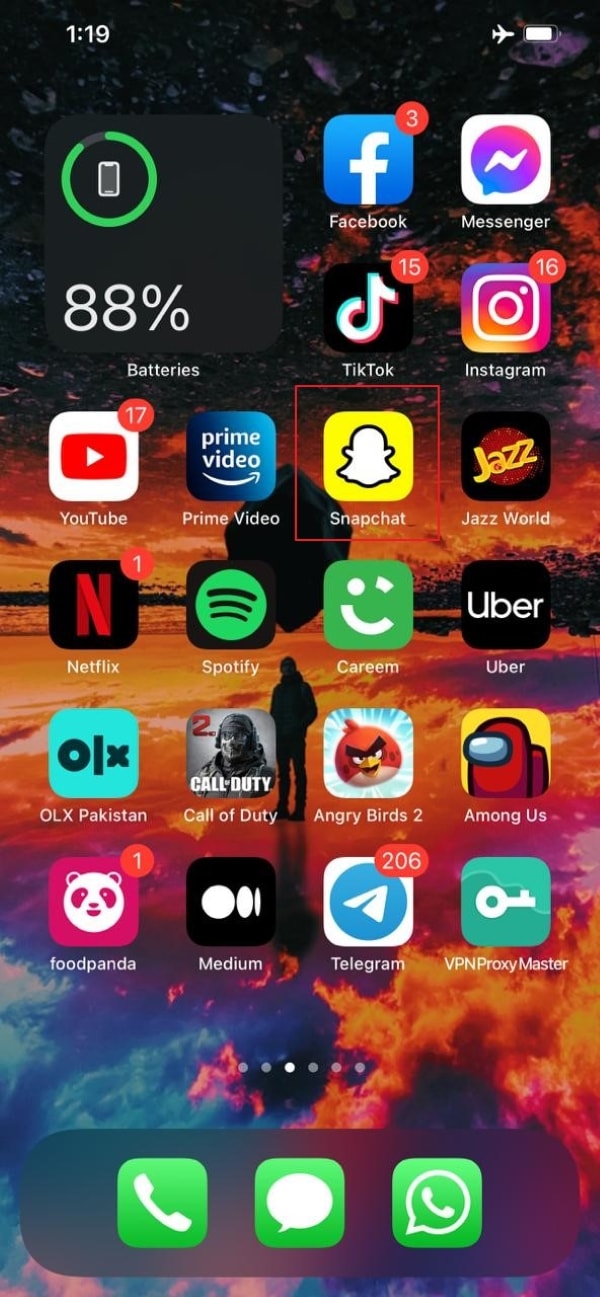
Open Snapchat from your Android phone. Refresh all the chats so that all new snaps can be accessed easily. After that, launch the “Action Center” and hit “Airplane Mode” to switch it on. It is shaped like an airplane.

Step 2: Start the Recording
Now, start screen recording by opening the “Action Center” again and clicking on “Screen Recorder.” As soon as the recording initiates, open the snap that you wish to record.
Step 3: Stop the Recording
After you are done, stop the recording. Disable the Airplane Mode and close the tool. The screen recording can be accessed from the Gallery.
 SwifDoo PDF Perpetual (2-PC) Free upgrade. No monthly fees ever.
Part 3: How to Screen Record Snapchat on iPhone?
Bringing more features and traits to the house, people have gone insane with every new model of the iPhone that is announced to the world. If you are an iPhone user looking to screen record on Snapchat, follow this section vividly.
Instead of using third-party software like AZ screen recorder Snapchat, the in-built tool of the iPhone is equally workable. There is no need to install new software on the device and play with the system’s memory. To initiate screen recording on Snapchat via iPhone, let us discuss the procedure extensively.
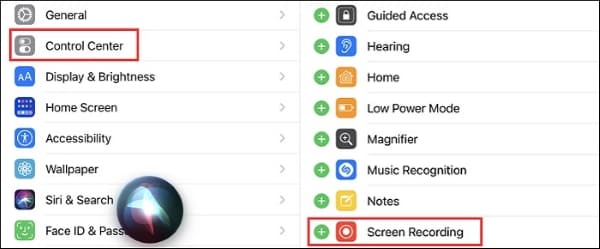
Step 1: Activating the Screen Recorder
Before starting, the user should make sure that the in-built screen recorder tool has been downloaded. Navigate to the “Control Center” and scroll down to find “Screen Recorder if it is not installed.” Hit the green (+) icon beside the tool to make it easily accessible.
Step 2: Accessing the Feature for iPhone Versions
The accessing of Screen Recorder in-built tool varies from one iPhone version to another. For instance, if you have iPhone 8 or older versions, swipe down to tap the “Screen Recording” icon. However, if you own iPhone X or advanced versions, swipe up from the top right corner of the screen. Find the relevant icon to continue with the targeted process.
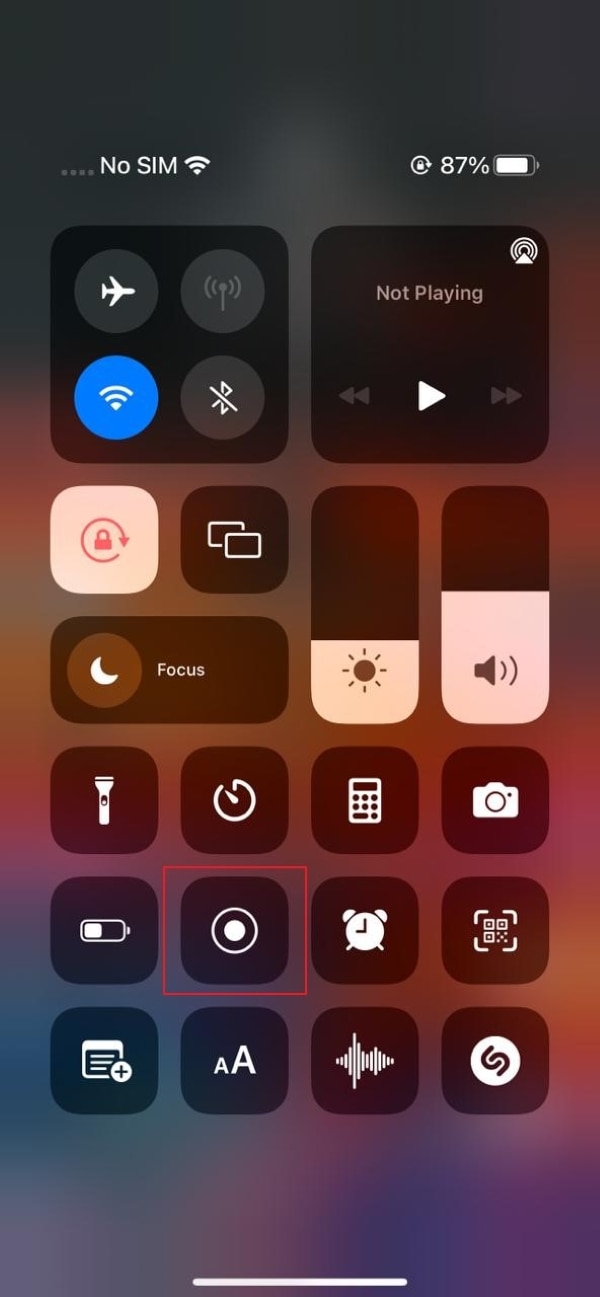Step 3: Starting the Recording
Launch Snapchat from your iPhone and refresh the feed. Now, open the Screen Recording tool and initiate the recording. You have to turn on the “Airplane” mode as well before recording the snap. Now, the user is expected to open the snap that needs to be recorded.
 Glarysoft File Recovery Pro - Helps to recover your lost file/data, even permanently deleted data.
Step 4: Stopping the Recording
Stop the recording by clicking on the red icon on the screen. The screen recording is performed successfully. You can find the recording in your Photos in seconds.
 Greeting Card Builder
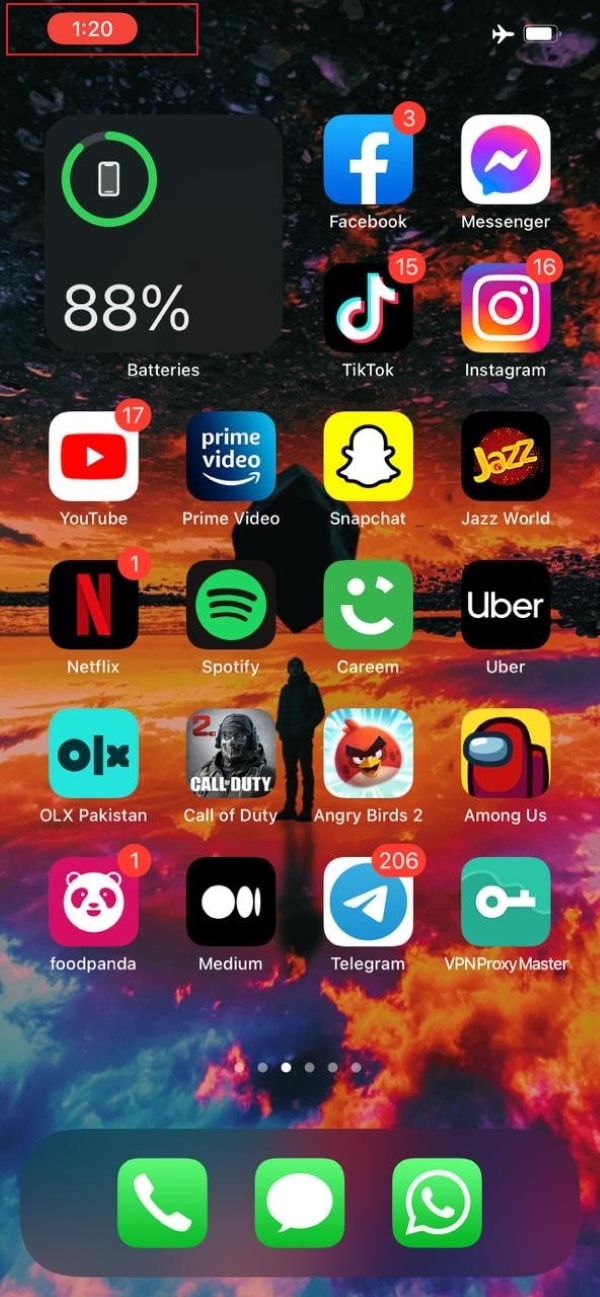
Part 4: How to Make Screen Record on Snapchat without Notice?
It looks pretty embarrassing if you capture a screenshot and the other person receives a notification. The screen recording on Snapchat makes you awkward. To get rid of this embarrassment, one should use tricky and workable methods. Luckily, the section covers some of those methods. Let us have a look at each of them!
Switching off the Internet Connection
The first method revolves around disabling the internet connection of your device. For starters, reload and refresh your Snapchat feed. Disconnect the Wi-Fi or data network, and then screen records the snap. It helps you get the task done without getting noticed, as the app doesn’t know what is happening without internet connectivity.
Enabling the Airplane Mode
One workable method is to enable the Airplane Mode before you plan to screen record Snapchat. What happens is that the app doesn’t respond to the operation occurring as Airplane Mode is switched on. The process doesn’t send the notification to the targeted person; thus, it always works.
Using a Third-Party Software
You can access the third-party screen recorder and then perform screen recording on Snapchat. The market offers numerous apps for a similar reason. Their usage is simple as well.
Mirroring Phone on PC
Another tricky method revolves around mirroring phones on PC. The Snapchat user can connect the device to the computer and then play the snap story. As Snapchat cannot read the computer’s activities, you can use the recorder to screen record Snapchat stories in seconds.

Using Another Phone
You can pick a phone of your sibling or a friend to record the snaps of the targeted person. It might not be a high-resolution output, but it would surely get your task done without getting noticed.
Final Remarks
Snapchat has become one of the most favorite software in the world. People like to capture the stories and screen record the chats that they find amusing, engaging, and other sneaky reasons. The article offered users a screen record on Snapchat via Android and iPhone. The tricky methods to screen record without getting noticed were also a part of this write-up.
02 How to Screen Record Snapchat on Android Phone?
03 How to Screen Record Snapchat on iPhone?
04 How to Make Screen Record on Snapchat without Notice?
Part 1: Will Snapchat Know When You Do Screen Recording?
Snapchat was designed in a way that it protects the privacy of the users. According to this social networking software policy, the messages and snaps disappear after 24 hours. It creates an urge to screenshot the snap or screen record the chat without getting noticed. The section reflects the answer to the concern if you screen record on Snapchat, does it show?”
The answer is yes. Snapchat sends a notification to the other person if you screen record on Snapchat. It plays a vital role as it helps steer clear from the stalkers and people who have no sense of boundaries.
For taking a screenshot on Snapchat, the following notification show with specific colored arrows.
The red arrow displays that the screenshot was taken of snap without audio.
The purple arrow signifies that the screenshot was taken of snap with audio.
The blue arrows represent that a screenshot has been taken of chat.
It clearly shows that Snapchat takes the privacy of its users seriously. Therefore, to protect oneself from disappointment, it is crucial to avoid taking screenshots or screen recordings on Snapchat. You can use another phone to carry out the sneaky operation or download third-party software to screen capture and record safely.
Part 2: How to Screen Record Snapchat on Android Phone?
The Android users pretty much enhanced in the last decade exponentially. It is mainly because the workability of Android is more straightforward than that of iPhone. If you are a Snapchat addict on an Android phone, this section is designed for you.
Screen recording on Snapchat via Android phone is easy. There are no complications in the process, even for a beginner. For starters, make sure that the in-built screen recording functionality of Android is enabled via Settings. It will help initiate the recording immediately from the Action Center.
So, let us jump right into the step-by-step procedure to screen record on Snapchat.
Step 1: Enabling the Airplane Mode
Open Snapchat from your Android phone. Refresh all the chats so that all new snaps can be accessed easily. After that, launch the “Action Center” and hit “Airplane Mode” to switch it on. It is shaped like an airplane.
 Project Manager - Asset Browser for 3Ds Max
Step 2: Start the Recording
Now, start screen recording by opening the “Action Center” again and clicking on “Screen Recorder.” As soon as the recording initiates, open the snap that you wish to record.
Step 3: Stop the Recording
After you are done, stop the recording. Disable the Airplane Mode and close the tool. The screen recording can be accessed from the Gallery.
Part 3: How to Screen Record Snapchat on iPhone?
Bringing more features and traits to the house, people have gone insane with every new model of the iPhone that is announced to the world. If you are an iPhone user looking to screen record on Snapchat, follow this section vividly.
Instead of using third-party software like AZ screen recorder Snapchat, the in-built tool of the iPhone is equally workable. There is no need to install new software on the device and play with the system’s memory. To initiate screen recording on Snapchat via iPhone, let us discuss the procedure extensively.

Step 1: Activating the Screen Recorder
Before starting, the user should make sure that the in-built screen recorder tool has been downloaded. Navigate to the “Control Center” and scroll down to find “Screen Recorder if it is not installed.” Hit the green (+) icon beside the tool to make it easily accessible.
Step 2: Accessing the Feature for iPhone Versions
The accessing of Screen Recorder in-built tool varies from one iPhone version to another. For instance, if you have iPhone 8 or older versions, swipe down to tap the “Screen Recording” icon. However, if you own iPhone X or advanced versions, swipe up from the top right corner of the screen. Find the relevant icon to continue with the targeted process.

Step 3: Starting the Recording
Launch Snapchat from your iPhone and refresh the feed. Now, open the Screen Recording tool and initiate the recording. You have to turn on the “Airplane” mode as well before recording the snap. Now, the user is expected to open the snap that needs to be recorded.

Step 4: Stopping the Recording
Stop the recording by clicking on the red icon on the screen. The screen recording is performed successfully. You can find the recording in your Photos in seconds.

WPS Office Premium ( File Recovery, Photo Scanning, Convert PDF)–Yearly
Part 4: How to Make Screen Record on Snapchat without Notice?
It looks pretty embarrassing if you capture a screenshot and the other person receives a notification. The screen recording on Snapchat makes you awkward. To get rid of this embarrassment, one should use tricky and workable methods. Luckily, the section covers some of those methods. Let us have a look at each of them!
Switching off the Internet Connection
The first method revolves around disabling the internet connection of your device. For starters, reload and refresh your Snapchat feed. Disconnect the Wi-Fi or data network, and then screen records the snap. It helps you get the task done without getting noticed, as the app doesn’t know what is happening without internet connectivity.
 KoolReport Pro is an advanced solution for creating data reports and dashboards in PHP. Equipped with all extended packages , KoolReport Pro is able to connect to various datasources, perform advanced data analysis, construct stunning charts and graphs and export your beautiful work to PDF, Excel, JPG or other formats. Plus, it includes powerful built-in reports such as pivot report and drill-down report which will save your time in building ones.
 It will help you to write dynamic data reports easily, to construct intuitive dashboards or to build a whole business intelligence cockpit.
KoolReport Pro package goes with Full Source Code, Royal Free, ONE (1) Year Priority Support, ONE (1) Year Free Upgrade and 30-Days Money Back Guarantee.
Developer License allows Single Developer to create Unlimited Reports, deploy on Unlimited Servers and able deliver the work to Unlimited Clients.
Enabling the Airplane Mode
One workable method is to enable the Airplane Mode before you plan to screen record Snapchat. What happens is that the app doesn’t respond to the operation occurring as Airplane Mode is switched on. The process doesn’t send the notification to the targeted person; thus, it always works.
Using a Third-Party Software
You can access the third-party screen recorder and then perform screen recording on Snapchat. The market offers numerous apps for a similar reason. Their usage is simple as well.

Mirroring Phone on PC
Another tricky method revolves around mirroring phones on PC. The Snapchat user can connect the device to the computer and then play the snap story. As Snapchat cannot read the computer’s activities, you can use the recorder to screen record Snapchat stories in seconds.
 PDF application, powered by AI-based OCR, for unified workflows with both digital and scanned documents.
 Using Another Phone
You can pick a phone of your sibling or a friend to record the snaps of the targeted person. It might not be a high-resolution output, but it would surely get your task done without getting noticed.
Final Remarks
Snapchat has become one of the most favorite software in the world. People like to capture the stories and screen record the chats that they find amusing, engaging, and other sneaky reasons. The article offered users a screen record on Snapchat via Android and iPhone. The tricky methods to screen record without getting noticed were also a part of this write-up.
02 How to Screen Record Snapchat on Android Phone?
03 How to Screen Record Snapchat on iPhone?
04 How to Make Screen Record on Snapchat without Notice?
Part 1: Will Snapchat Know When You Do Screen Recording?
Snapchat was designed in a way that it protects the privacy of the users. According to this social networking software policy, the messages and snaps disappear after 24 hours. It creates an urge to screenshot the snap or screen record the chat without getting noticed. The section reflects the answer to the concern if you screen record on Snapchat, does it show?”
The answer is yes. Snapchat sends a notification to the other person if you screen record on Snapchat. It plays a vital role as it helps steer clear from the stalkers and people who have no sense of boundaries.
For taking a screenshot on Snapchat, the following notification show with specific colored arrows.
The red arrow displays that the screenshot was taken of snap without audio.
The purple arrow signifies that the screenshot was taken of snap with audio.
The blue arrows represent that a screenshot has been taken of chat.
It clearly shows that Snapchat takes the privacy of its users seriously. Therefore, to protect oneself from disappointment, it is crucial to avoid taking screenshots or screen recordings on Snapchat. You can use another phone to carry out the sneaky operation or download third-party software to screen capture and record safely.
Part 2: How to Screen Record Snapchat on Android Phone?
The Android users pretty much enhanced in the last decade exponentially. It is mainly because the workability of Android is more straightforward than that of iPhone. If you are a Snapchat addict on an Android phone, this section is designed for you.
Screen recording on Snapchat via Android phone is easy. There are no complications in the process, even for a beginner. For starters, make sure that the in-built screen recording functionality of Android is enabled via Settings. It will help initiate the recording immediately from the Action Center.
So, let us jump right into the step-by-step procedure to screen record on Snapchat.
Step 1: Enabling the Airplane Mode
Open Snapchat from your Android phone. Refresh all the chats so that all new snaps can be accessed easily. After that, launch the “Action Center” and hit “Airplane Mode” to switch it on. It is shaped like an airplane.

Step 2: Start the Recording
Now, start screen recording by opening the “Action Center” again and clicking on “Screen Recorder.” As soon as the recording initiates, open the snap that you wish to record.
Step 3: Stop the Recording
After you are done, stop the recording. Disable the Airplane Mode and close the tool. The screen recording can be accessed from the Gallery.

Part 3: How to Screen Record Snapchat on iPhone?
Bringing more features and traits to the house, people have gone insane with every new model of the iPhone that is announced to the world. If you are an iPhone user looking to screen record on Snapchat, follow this section vividly.
Instead of using third-party software like AZ screen recorder Snapchat, the in-built tool of the iPhone is equally workable. There is no need to install new software on the device and play with the system’s memory. To initiate screen recording on Snapchat via iPhone, let us discuss the procedure extensively.
 PearlMountain Image Converter
Step 1: Activating the Screen Recorder
Before starting, the user should make sure that the in-built screen recorder tool has been downloaded. Navigate to the “Control Center” and scroll down to find “Screen Recorder if it is not installed.” Hit the green (+) icon beside the tool to make it easily accessible.
 ZoneAlarm Extreme Security NextGen
Step 2: Accessing the Feature for iPhone Versions
The accessing of Screen Recorder in-built tool varies from one iPhone version to another. For instance, if you have iPhone 8 or older versions, swipe down to tap the “Screen Recording” icon. However, if you own iPhone X or advanced versions, swipe up from the top right corner of the screen. Find the relevant icon to continue with the targeted process.
 The BootIt Collection covers multi-booting, partitioning, and disk imaging on traditional PC’s using the standard BIOS and newer PC’s using UEFI. The collection includes BootIt Bare Metal (BIBM) for standard BIOS systems and BootIt UEFI (BIU) for UEFI system.
Step 3: Starting the Recording
Launch Snapchat from your iPhone and refresh the feed. Now, open the Screen Recording tool and initiate the recording. You have to turn on the “Airplane” mode as well before recording the snap. Now, the user is expected to open the snap that needs to be recorded.
 Video Converter Factory Pro
Step 4: Stopping the Recording
Stop the recording by clicking on the red icon on the screen. The screen recording is performed successfully. You can find the recording in your Photos in seconds.
Part 4: How to Make Screen Record on Snapchat without Notice?
It looks pretty embarrassing if you capture a screenshot and the other person receives a notification. The screen recording on Snapchat makes you awkward. To get rid of this embarrassment, one should use tricky and workable methods. Luckily, the section covers some of those methods. Let us have a look at each of them!
Switching off the Internet Connection
The first method revolves around disabling the internet connection of your device. For starters, reload and refresh your Snapchat feed. Disconnect the Wi-Fi or data network, and then screen records the snap. It helps you get the task done without getting noticed, as the app doesn’t know what is happening without internet connectivity.
Enabling the Airplane Mode
One workable method is to enable the Airplane Mode before you plan to screen record Snapchat. What happens is that the app doesn’t respond to the operation occurring as Airplane Mode is switched on. The process doesn’t send the notification to the targeted person; thus, it always works.
Using a Third-Party Software
You can access the third-party screen recorder and then perform screen recording on Snapchat. The market offers numerous apps for a similar reason. Their usage is simple as well.
Mirroring Phone on PC
Another tricky method revolves around mirroring phones on PC. The Snapchat user can connect the device to the computer and then play the snap story. As Snapchat cannot read the computer’s activities, you can use the recorder to screen record Snapchat stories in seconds.
 Screensaver Factory, Create stunning professional screensavers within minutes. Create screensavers for yourself, for marketing or unlimited royalty-free commercial distribution. Make screensavers from images, video and swf flash, add background music and smooth sprite and transition effects. Screensaver Factory is very easy to use, and it enables you to make self-installing screensaver files and CDs for easy setup and distribution. Screensaver Factory is the most advanced software of its kind.
Using Another Phone
You can pick a phone of your sibling or a friend to record the snaps of the targeted person. It might not be a high-resolution output, but it would surely get your task done without getting noticed.
Final Remarks
Snapchat has become one of the most favorite software in the world. People like to capture the stories and screen record the chats that they find amusing, engaging, and other sneaky reasons. The article offered users a screen record on Snapchat via Android and iPhone. The tricky methods to screen record without getting noticed were also a part of this write-up.
02 How to Screen Record Snapchat on Android Phone?
03 How to Screen Record Snapchat on iPhone?
04 How to Make Screen Record on Snapchat without Notice?
Part 1: Will Snapchat Know When You Do Screen Recording?
Snapchat was designed in a way that it protects the privacy of the users. According to this social networking software policy, the messages and snaps disappear after 24 hours. It creates an urge to screenshot the snap or screen record the chat without getting noticed. The section reflects the answer to the concern if you screen record on Snapchat, does it show?”
The answer is yes. Snapchat sends a notification to the other person if you screen record on Snapchat. It plays a vital role as it helps steer clear from the stalkers and people who have no sense of boundaries.
For taking a screenshot on Snapchat, the following notification show with specific colored arrows.
The red arrow displays that the screenshot was taken of snap without audio.
The purple arrow signifies that the screenshot was taken of snap with audio.
The blue arrows represent that a screenshot has been taken of chat.
It clearly shows that Snapchat takes the privacy of its users seriously. Therefore, to protect oneself from disappointment, it is crucial to avoid taking screenshots or screen recordings on Snapchat. You can use another phone to carry out the sneaky operation or download third-party software to screen capture and record safely.
Part 2: How to Screen Record Snapchat on Android Phone?
The Android users pretty much enhanced in the last decade exponentially. It is mainly because the workability of Android is more straightforward than that of iPhone. If you are a Snapchat addict on an Android phone, this section is designed for you.
Screen recording on Snapchat via Android phone is easy. There are no complications in the process, even for a beginner. For starters, make sure that the in-built screen recording functionality of Android is enabled via Settings. It will help initiate the recording immediately from the Action Center.
So, let us jump right into the step-by-step procedure to screen record on Snapchat.
Step 1: Enabling the Airplane Mode
Open Snapchat from your Android phone. Refresh all the chats so that all new snaps can be accessed easily. After that, launch the “Action Center” and hit “Airplane Mode” to switch it on. It is shaped like an airplane.
Step 2: Start the Recording
Now, start screen recording by opening the “Action Center” again and clicking on “Screen Recorder.” As soon as the recording initiates, open the snap that you wish to record.
 With Screensaver Wonder you can easily make a screensaver from your own pictures and video files. Create screensavers for your own computer or create standalone, self-installing screensavers for easy sharing with your friends. Together with its sister product Screensaver Factory, Screensaver Wonder is one of the most popular screensaver software products in the world, helping thousands of users decorate their computer screens quickly and easily.
Step 3: Stop the Recording
After you are done, stop the recording. Disable the Airplane Mode and close the tool. The screen recording can be accessed from the Gallery.
Part 3: How to Screen Record Snapchat on iPhone?
Bringing more features and traits to the house, people have gone insane with every new model of the iPhone that is announced to the world. If you are an iPhone user looking to screen record on Snapchat, follow this section vividly.
Instead of using third-party software like AZ screen recorder Snapchat, the in-built tool of the iPhone is equally workable. There is no need to install new software on the device and play with the system’s memory. To initiate screen recording on Snapchat via iPhone, let us discuss the procedure extensively.
 LYRX is an easy-to-use karaoke software with the professional features karaoke hosts need to perform with precision. LYRX is karaoke show hosting software that supports all standard karaoke file types as well as HD video formats, and it’s truly fun to use.
Step 1: Activating the Screen Recorder
Before starting, the user should make sure that the in-built screen recorder tool has been downloaded. Navigate to the “Control Center” and scroll down to find “Screen Recorder if it is not installed.” Hit the green (+) icon beside the tool to make it easily accessible.
 SwifDoo PDF 2-Year Plan
Step 2: Accessing the Feature for iPhone Versions
The accessing of Screen Recorder in-built tool varies from one iPhone version to another. For instance, if you have iPhone 8 or older versions, swipe down to tap the “Screen Recording” icon. However, if you own iPhone X or advanced versions, swipe up from the top right corner of the screen. Find the relevant icon to continue with the targeted process.
Step 3: Starting the Recording
Launch Snapchat from your iPhone and refresh the feed. Now, open the Screen Recording tool and initiate the recording. You have to turn on the “Airplane” mode as well before recording the snap. Now, the user is expected to open the snap that needs to be recorded.
Step 4: Stopping the Recording
Stop the recording by clicking on the red icon on the screen. The screen recording is performed successfully. You can find the recording in your Photos in seconds.
Part 4: How to Make Screen Record on Snapchat without Notice?
It looks pretty embarrassing if you capture a screenshot and the other person receives a notification. The screen recording on Snapchat makes you awkward. To get rid of this embarrassment, one should use tricky and workable methods. Luckily, the section covers some of those methods. Let us have a look at each of them!

Switching off the Internet Connection
The first method revolves around disabling the internet connection of your device. For starters, reload and refresh your Snapchat feed. Disconnect the Wi-Fi or data network, and then screen records the snap. It helps you get the task done without getting noticed, as the app doesn’t know what is happening without internet connectivity.
Enabling the Airplane Mode
One workable method is to enable the Airplane Mode before you plan to screen record Snapchat. What happens is that the app doesn’t respond to the operation occurring as Airplane Mode is switched on. The process doesn’t send the notification to the targeted person; thus, it always works.
Using a Third-Party Software
You can access the third-party screen recorder and then perform screen recording on Snapchat. The market offers numerous apps for a similar reason. Their usage is simple as well.

Mirroring Phone on PC
Another tricky method revolves around mirroring phones on PC. The Snapchat user can connect the device to the computer and then play the snap story. As Snapchat cannot read the computer’s activities, you can use the recorder to screen record Snapchat stories in seconds.

WPS Office Premium ( File Recovery, Photo Scanning, Convert PDF)–Yearly
Using Another Phone
You can pick a phone of your sibling or a friend to record the snaps of the targeted person. It might not be a high-resolution output, but it would surely get your task done without getting noticed.
Final Remarks
Snapchat has become one of the most favorite software in the world. People like to capture the stories and screen record the chats that they find amusing, engaging, and other sneaky reasons. The article offered users a screen record on Snapchat via Android and iPhone. The tricky methods to screen record without getting noticed were also a part of this write-up.
Seamless Capture & Share: IPhone to Snapchat Backup Guide
Many people haven’t backed up their camera roll to Snapchat due to the default settings. If you want to save each photo or video from your device on the Snapchat cloud, backing up the camera to the Memories is necessary. By doing so, you cannot lose important photos or videos from your phone.
If you change the default settings of the Memories created from the camera roll, Snapchat will automatically create a backup of your Memories. In this regard, this article will guide you on how to back up the camera roll to Snapchat in the easiest way.
Part 1: Backing up automatically - Creating Snapchat Stories from your Camera Roll
If you don’t want to alter the settings of your camera roll, this part will offer you an easy method. Through this method, you can create Snapchat stories from the camera roll directly. By doing so, you can instantly save the camera roll photos to your Snapchat without backing up. To make a Snapchat story from your camera roll, read the following instructions:
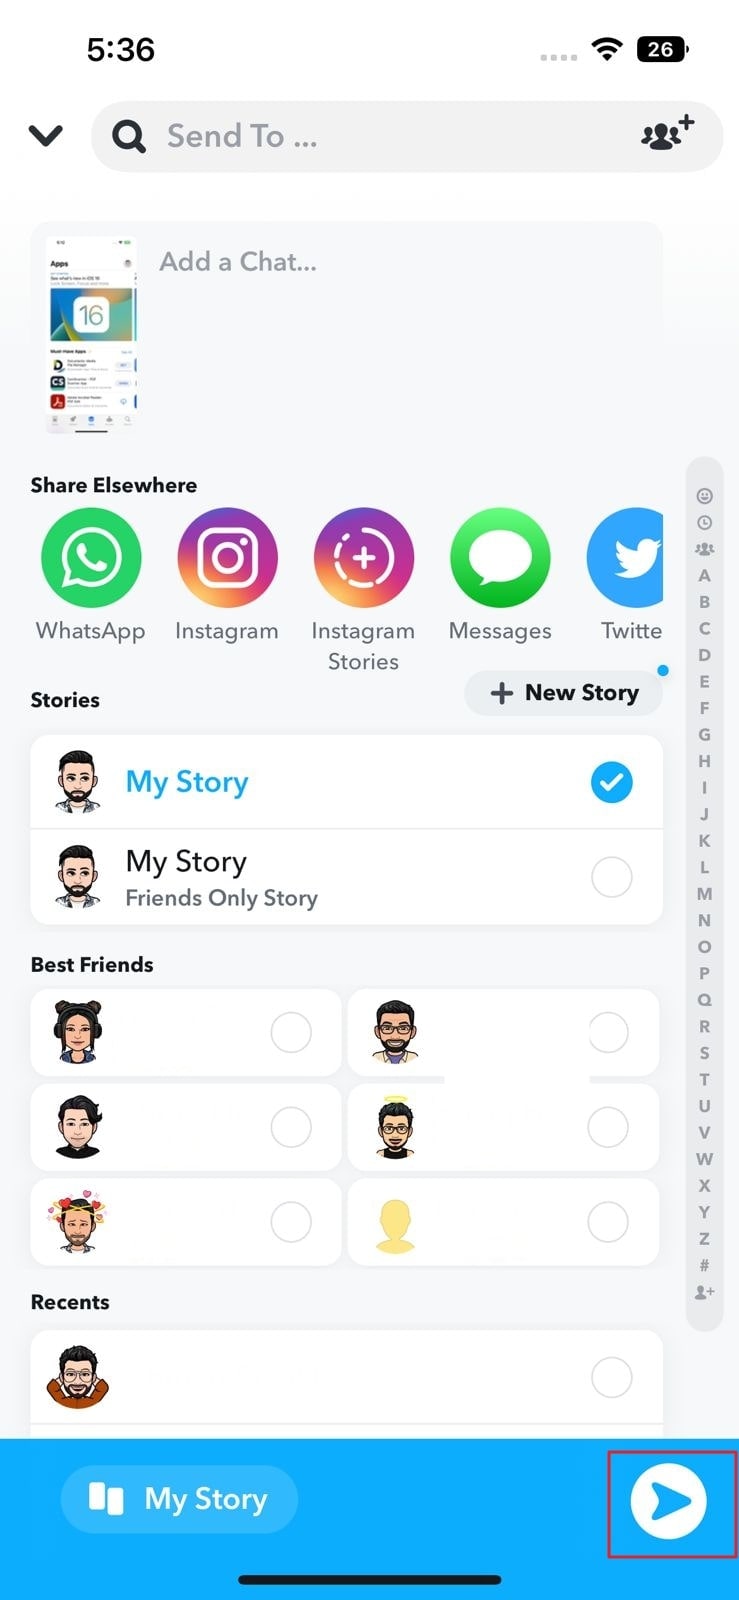
Step1 Open your Snapchat and swipe up from the bottom. Head to the Camera Roll section and select any photo.

Step2 After selecting a particular photo or video, hit the “Arrow” icon. Afterward, tap on the “My Story” option to create a story. For confirmation, press the “Arrow” icon again. This will create a Snapchat story instantly from your Camera Roll.
Part 2: How to Backup your Camera Roll to Snapchat without Creating Stories
In Snapchat, you can only save the camera roll videos having a maximum of 10-second length. It indicates that you cannot save the camera roll videos which exceed the 10-second limit. Furthermore, there are various ways that enable you to make a Camera Roll backup on Snapchat. In this part, we will guide you on how to save a Camera roll photo or video on Snapchat without creating a story. Also, these steps are applicable on both Android and iOS devices:
Step1 After opening your Snapchat app, open your Memories by swiping up. Proceed to your “Camera Roll” section and long-press on any picture. This will let you select any photo or video on your Camera Roll.

Step2 Once you have selected the picture, choose the “Create Story” option. Afterward, tap on the “Save Story” option, which will save the camera roll picture in the Memories section.

Part 3: How to Check Your Backup Progress
To ensure a complete backup of your Memories on Snapchat, a stable Wi-Fi connection is mandatory. That’s why make sure to connect your phone with a stable and strong internet connection. Moreover, if you have chosen multiple photos or videos from the Camera Roll, you can save them as a story on Snapchat. However, if you want to save individual images, you will need to make their backup separately in Memories. To check your backup progress on Snapchat, navigate to the following steps:
Step1 Once you have opened your Snapchat, tap on your Bitmoji icon. From there, proceed to the “Settings” by tapping on the gear icon.
 PaperScan Professional: PaperScan Scanner Software is a powerful TWAIN & WIA scanning application centered on one idea: making document acquisition an unparalleled easy task for anyone.
Step2 Scroll down a little to find the option “Memories.” Afterward, you can see the option “Backup Progress.” If you can see the word “Complete,” it means that your Memories are backed up completely. If not, connect your phone to a stable Wi-Fi connection.


 Allavsoft Batch Download Online Videos, Music Offline to MP4, MP3, MOV, etc format
Part 4: How to Turn On the Smart Backup
A Smart Backup is an advanced option on Snapchat that lets you back up memories automatically. If you enable this feature, Snapchat will automatically create a backup through a stable internet connection. This feature allows you to easily access your Memories even if you reinstall Snapchat on another device. Moreover, you can save your phone’s storage by saving photos or videos in Memories. To activate the Smart Backup feature, read the below instructions:
Step1 After opening Snapchat, head to its “Settings.” In the Settings menu, locate the option “Memories.”
 WonderFox DVD Ripper Pro
Step2 After tapping on Memories, you can see various options. Among multiple options, turn on the toggle of “Smart Backup.” Thus, Snapchat will automatically back up your Memories through this activated feature.

Part 5: FAQs
### 1\. How to Backup Memories to Camera Roll on Snapchat?Open your Snapchat and head to its “Memories.” From the “Snaps” section, select any snap that you want to save to Camera Roll. After choosing the snap, hit on the “Arrow” icon. Under the “Share Elsewhere” heading, press the “Download” icon. This will immediately save the snap on your Camera Roll.
2. How to Backup Pictures in Both Memories and Camera Roll?
To initiate, tap on your “Bitmoji” icon on Snapchat. Head to “Settings” and choose “Memories” from the displayed options. Afterward, tap on the “Save Button” option under the heading “Save Destinations.” In the “Save Button” menu, you can tap “Memories and Camera Roll” to backup pictures in both sections.
3. How to Get My Story Snaps to Auto-Save to Memories?
The process to auto-save the stories to Memories is quite simple. For this, open the “Settings” of Snapchat and head to the “Memories” option. Under the heading called “Save Destination,” tap on “Auto-Save My Story Snaps.” Once done, enable the option “Auto-Save to Memories.” Thus, your Snapchat stories will be automatically saved to your Memories.
 Forex Robotron Basic Package
Wrap Up
Snapchat allows you to save the captured pictures and videos in their Memories. By doing so, you can save your device’s storage space easily. Moreover, you can access the saved snaps in Memories by logging into your Snapchat from any device. That’s why this article has offered a well-described guide on how to back up the camera roll to Snapchat in a simple way.
Free Download For Win 7 or later(64-bit)
Free Download For macOS 10.14 or later
Free Download For macOS 10.14 or later
- Title: [Updated] Securing Your Snapchat Memories Mobile Recording Tips
- Author: Scott
- Created at : 2024-07-25 11:35:05
- Updated at : 2024-07-26 11:35:05
- Link: https://snapchat-videos.techidaily.com/updated-securing-your-snapchat-memories-mobile-recording-tips/
- License: This work is licensed under CC BY-NC-SA 4.0.