![[Updated] Perfect Timing Adjust Video Speed in Snapchat Easily](https://thmb.techidaily.com/482035835ea328d1609501451811446cad884a7a61227ca3ca092b735291d94d.jpg)
"[Updated] Perfect Timing Adjust Video Speed in Snapchat Easily"
Perfect Timing: Adjust Video Speed in Snapchat Easily
Snapchat is an instant messaging app that allows you to share your pictures and videos with your family members, friends, and colleagues. In addition, you can even create your stories in the form of movie clips and share them on the app. These stories remain available for the next 24 hours, after which they are automatically removed from the platform.
While sharing the videos, you can apply several filters that are already present in the app, and Slow Motion is one of them. You may want to learn how to slow down a video on Snapchat when you want to emphasize and draw viewers’ attention toward the scene, or wish to make the audience see your actions closely and in detail.
That said, in the following sections, you will see how to slow down videos on Snapchat, and what other methods you can use to reduce the playback speed more professionally.
In this article
01 How to Add Slow Motion Effects to Video Using the Snapchat App
02 How to Record a Slo-Mo Video and Upload to Snapchat
03 How to Make Flash and Smooth Slo Mo Video for Snapchat
04 FAQs about Slowing Down Snapchat Video
Part 1: How to Add Slow Motion Effects to Video Using the Snapchat App
Snapchat has a built-in Slow Motion filter that reduces the playback speed of a video when applied. You can learn how to slow down on Snapchat by following the instructions that are given below:
Step 1: Record a Video
Launch Snapchat on your smartphone (iPhone 13 Pro Max is used here for illustrations), make sure that the Camera section is selected from the bottom, tap and hold down the Capture button that is present at the lower part of the interface, and let go of it when you are done recording.

Step 2: Apply the Slow Motion Filter
Once the video is recorded, swipe the screen from left to right. Repeat this process until you see the Snail (Slow Motion) icon on the screen. This will reduce the playback speed of the clip.

Step 3: Decorate the Video (Optional)
Use the options present on the upper-right area of the screen to further decorate the video and/or add annotations to it.


Step 4: Share or Publish the Video
Once everything is done, tap Send To from the bottom-right corner to share the video with your family, friends, and colleagues, or publish it as a story that remains available for the next 24 hours.
Related: How to Record Slo-Mo videos on iPhone .

Part 2: How to Record a Slo-Mo Video and Upload to Snapchat
With Snapchat, even though you don’t require any third-party tool to reduce the playback speed of a video, the app has certain limitations. For example, it doesn’t allow you to set a zoom level, you are stuck with the framerate that the app has to offer, etc.
Because of this, many people prefer to use different methods to record a video in slow motion with their preferences, and then upload it to Snapchat. This approach also eliminates the need to swipe the screen several times merely to use a single slow-motion filter.
Fortunately, iPhone has a built-in SLO-MO mode in its Camera app that allows you to capture the videos in slow motion. To learn how to do slow mo on Snapchat with the iPhone’s Camera app, you can follow the instructions that are given below:
Step 1: Get to the iPhone’s SLO-MO Mode
Launch the Camera app on your iPhone (iPhone 13 Pro Max is used here for illustrations), and swipe the screen from left to right until you get to the SLO-MO mode.

Step 2: Set Recording Preferences
Tap the number that is present at the top-right corner (240 here) to toggle between different framerates, tap 1x from the lower-center area, swipe slightly up, and then use the wheel that appears next to define your preferred zoom level.

Step 3: Start and Stop the Recording
Tap the Record button to start the recording, and tap Stop when you’re done.
Note: Make sure that the duration of the recorded video doesn’t exceed 60 seconds.
Step 4: Upload the Slow-Motion Video to Snapchat
After the video is recorded in slow motion, close the Camera app, launch Snapchat, and tap the Gallery icon from the left side of the Capture button on the Camera section. From the Memories screen, go to the Camera Roll tab, and tap to select the video that you recorded in the previous step.
Next, optionally, tap the Edit icon from the bottom-left corner to decorate the video and/or add annotations to it, and follow the process as explained in the previous section to share the clip with your family, friends, or colleagues, or publish it as your story.


Part 3: How to Make Flash and Smooth Slo Mo Video for Snapchat
Although iPhone has the built-in SLO-MO mode that even enables you to set your preferred framerate and zoom level before recording, it still doesn’t allow you to slow down different parts of a video in different speed at your convenience. You can either record the entire video in slow motion or at a normal speed.
This is where a third-party app comes into play. While there are several video editing programs available online, the one of the best slow motion apps that helps you slow down the portions of a video with precision is CapCut.
Downloading and installing CapCut on your iPhone or Android phone is simple, and once it is done, you can follow the process given below to learn how to slow things down on Snapchat:
With CapCut, you can either slow down the whole clip or manage the speed for different segments. This section explains both methods.
Method 1: Slow Down the Whole Clip with CapCut
Step 1: Get to the Speed Panel
Launch CapCut, import the video that you want to slow down, and tap the imported media in the Timeline. Next, tap Speed from the bottom of the interface to get to the next window.

Step 2: Reduce the Speed of the Video
Tap Normal from the bottom of the screen that appears next, and drag the Speed slider to the left to reduce the playback speed. Tap OK from the bottom-right corner to save the changes.

Step 3: Upload the Video to Snapchat
Back on the previous interface, optionally tap Volume from the bottom and reduce the slider to 0 to mute the audio of the footage as it may get distorted due to the reduction in the speed.
Next, tap Share from the top-right corner to save the video on your iPhone, and then use the method explained in the previous section to access the clip from the Gallery within Snapchat for uploading.
Method 2: Reduce the Playback Speed of Different Parts of a Video
Step 1: Get to the Speed Panel
Use the process described in the previous method to get to the Speed panel.
Step 2: Reduce the Speed of Different Parts of the Video
Tap Curve from the bottom of the interface. On the next screen, tap Custom from the lower area, and then tap Edit. From the next panel, drag the beat points down to reduce the speed (or drag them above the line to increase).

Notice that each beat point represents a particular section of the video, and dragging it down reduces the playback speed of that segment. You can even tap anywhere on the line to add a new beat point and drag it down as needed for more precise speed management. Once done, tap OK from the bottom-right corner to save the modifications.

Optionally, you can also tap any of the available presets on the Curve screen to reduce the playback speed of the video accordingly.
Step 3: Upload the Video to Snapchat
Use the method explained in the previous method to export the video, upload it to Snapchat, and share the clip with your family, friends, and colleagues, or publish it as your story.

Part 4: FAQs about Slowing Down Snapchat Video
1. Can I record a slow mo video in Snapchat?
Technically speaking, no, you cannot. However, once you have recorded a video at a normal speed in Snapchat, you can apply the built-in Slow Motion filter to it by swiping the screen from left to right until you see the Snail icon at the center. The Snail icon represents the Slow Motion filter that reduces the playback speed when applied.
2. Besides slow-motion, which speed filters does Snapchat have?
In addition to slow motion Snapchat also has Forward and Fast Forward filters that increase the playback speed. While the Forward filter increases the speed slightly, the Fast Forward one enhances it drastically.
Conclusion
When using an iPhone, even though the SLO-MO mode enables you to record footage in slow motion, you don’t get many options. Therefore, it would be safe to say that it is easy to slow down the speed of a video if you have a dedicated third-party post-production app. However, if you want to go for a convenient method, learning how to slow down a video on Snapchat is an extremely simple and straightforward process.
02 How to Record a Slo-Mo Video and Upload to Snapchat
03 How to Make Flash and Smooth Slo Mo Video for Snapchat
04 FAQs about Slowing Down Snapchat Video
Part 1: How to Add Slow Motion Effects to Video Using the Snapchat App
Snapchat has a built-in Slow Motion filter that reduces the playback speed of a video when applied. You can learn how to slow down on Snapchat by following the instructions that are given below:
Step 1: Record a Video
Launch Snapchat on your smartphone (iPhone 13 Pro Max is used here for illustrations), make sure that the Camera section is selected from the bottom, tap and hold down the Capture button that is present at the lower part of the interface, and let go of it when you are done recording.
Step 2: Apply the Slow Motion Filter
Once the video is recorded, swipe the screen from left to right. Repeat this process until you see the Snail (Slow Motion) icon on the screen. This will reduce the playback speed of the clip.
Step 3: Decorate the Video (Optional)
Use the options present on the upper-right area of the screen to further decorate the video and/or add annotations to it.
Step 4: Share or Publish the Video
Once everything is done, tap Send To from the bottom-right corner to share the video with your family, friends, and colleagues, or publish it as a story that remains available for the next 24 hours.
Related: How to Record Slo-Mo videos on iPhone .
 PDF application, powered by AI-based OCR, for unified workflows with both digital and scanned documents.
 Part 2: How to Record a Slo-Mo Video and Upload to Snapchat
With Snapchat, even though you don’t require any third-party tool to reduce the playback speed of a video, the app has certain limitations. For example, it doesn’t allow you to set a zoom level, you are stuck with the framerate that the app has to offer, etc.
Because of this, many people prefer to use different methods to record a video in slow motion with their preferences, and then upload it to Snapchat. This approach also eliminates the need to swipe the screen several times merely to use a single slow-motion filter.
Fortunately, iPhone has a built-in SLO-MO mode in its Camera app that allows you to capture the videos in slow motion. To learn how to do slow mo on Snapchat with the iPhone’s Camera app, you can follow the instructions that are given below:
Step 1: Get to the iPhone’s SLO-MO Mode
Launch the Camera app on your iPhone (iPhone 13 Pro Max is used here for illustrations), and swipe the screen from left to right until you get to the SLO-MO mode.
Step 2: Set Recording Preferences
Tap the number that is present at the top-right corner (240 here) to toggle between different framerates, tap 1x from the lower-center area, swipe slightly up, and then use the wheel that appears next to define your preferred zoom level.
Step 3: Start and Stop the Recording
Tap the Record button to start the recording, and tap Stop when you’re done.
Note: Make sure that the duration of the recorded video doesn’t exceed 60 seconds.
Step 4: Upload the Slow-Motion Video to Snapchat
After the video is recorded in slow motion, close the Camera app, launch Snapchat, and tap the Gallery icon from the left side of the Capture button on the Camera section. From the Memories screen, go to the Camera Roll tab, and tap to select the video that you recorded in the previous step.
Next, optionally, tap the Edit icon from the bottom-left corner to decorate the video and/or add annotations to it, and follow the process as explained in the previous section to share the clip with your family, friends, or colleagues, or publish it as your story.
Part 3: How to Make Flash and Smooth Slo Mo Video for Snapchat
Although iPhone has the built-in SLO-MO mode that even enables you to set your preferred framerate and zoom level before recording, it still doesn’t allow you to slow down different parts of a video in different speed at your convenience. You can either record the entire video in slow motion or at a normal speed.
This is where a third-party app comes into play. While there are several video editing programs available online, the one of the best slow motion apps that helps you slow down the portions of a video with precision is CapCut.
Downloading and installing CapCut on your iPhone or Android phone is simple, and once it is done, you can follow the process given below to learn how to slow things down on Snapchat:
With CapCut, you can either slow down the whole clip or manage the speed for different segments. This section explains both methods.
Method 1: Slow Down the Whole Clip with CapCut
Step 1: Get to the Speed Panel
Launch CapCut, import the video that you want to slow down, and tap the imported media in the Timeline. Next, tap Speed from the bottom of the interface to get to the next window.
Step 2: Reduce the Speed of the Video
Tap Normal from the bottom of the screen that appears next, and drag the Speed slider to the left to reduce the playback speed. Tap OK from the bottom-right corner to save the changes.
Step 3: Upload the Video to Snapchat
Back on the previous interface, optionally tap Volume from the bottom and reduce the slider to 0 to mute the audio of the footage as it may get distorted due to the reduction in the speed.
Next, tap Share from the top-right corner to save the video on your iPhone, and then use the method explained in the previous section to access the clip from the Gallery within Snapchat for uploading.
Method 2: Reduce the Playback Speed of Different Parts of a Video
Step 1: Get to the Speed Panel
Use the process described in the previous method to get to the Speed panel.
Step 2: Reduce the Speed of Different Parts of the Video
Tap Curve from the bottom of the interface. On the next screen, tap Custom from the lower area, and then tap Edit. From the next panel, drag the beat points down to reduce the speed (or drag them above the line to increase).
Notice that each beat point represents a particular section of the video, and dragging it down reduces the playback speed of that segment. You can even tap anywhere on the line to add a new beat point and drag it down as needed for more precise speed management. Once done, tap OK from the bottom-right corner to save the modifications.
 Project Manager - Asset Browser for 3Ds Max
Optionally, you can also tap any of the available presets on the Curve screen to reduce the playback speed of the video accordingly.
Step 3: Upload the Video to Snapchat
Use the method explained in the previous method to export the video, upload it to Snapchat, and share the clip with your family, friends, and colleagues, or publish it as your story.
Part 4: FAQs about Slowing Down Snapchat Video
1. Can I record a slow mo video in Snapchat?
Technically speaking, no, you cannot. However, once you have recorded a video at a normal speed in Snapchat, you can apply the built-in Slow Motion filter to it by swiping the screen from left to right until you see the Snail icon at the center. The Snail icon represents the Slow Motion filter that reduces the playback speed when applied.
2. Besides slow-motion, which speed filters does Snapchat have?
In addition to slow motion Snapchat also has Forward and Fast Forward filters that increase the playback speed. While the Forward filter increases the speed slightly, the Fast Forward one enhances it drastically.
Conclusion
When using an iPhone, even though the SLO-MO mode enables you to record footage in slow motion, you don’t get many options. Therefore, it would be safe to say that it is easy to slow down the speed of a video if you have a dedicated third-party post-production app. However, if you want to go for a convenient method, learning how to slow down a video on Snapchat is an extremely simple and straightforward process.
02 How to Record a Slo-Mo Video and Upload to Snapchat
03 How to Make Flash and Smooth Slo Mo Video for Snapchat
04 FAQs about Slowing Down Snapchat Video
Part 1: How to Add Slow Motion Effects to Video Using the Snapchat App
Snapchat has a built-in Slow Motion filter that reduces the playback speed of a video when applied. You can learn how to slow down on Snapchat by following the instructions that are given below:
Step 1: Record a Video
Launch Snapchat on your smartphone (iPhone 13 Pro Max is used here for illustrations), make sure that the Camera section is selected from the bottom, tap and hold down the Capture button that is present at the lower part of the interface, and let go of it when you are done recording.
Step 2: Apply the Slow Motion Filter
Once the video is recorded, swipe the screen from left to right. Repeat this process until you see the Snail (Slow Motion) icon on the screen. This will reduce the playback speed of the clip.

Step 3: Decorate the Video (Optional)
Use the options present on the upper-right area of the screen to further decorate the video and/or add annotations to it.
Step 4: Share or Publish the Video
Once everything is done, tap Send To from the bottom-right corner to share the video with your family, friends, and colleagues, or publish it as a story that remains available for the next 24 hours.
Related: How to Record Slo-Mo videos on iPhone .
Part 2: How to Record a Slo-Mo Video and Upload to Snapchat
With Snapchat, even though you don’t require any third-party tool to reduce the playback speed of a video, the app has certain limitations. For example, it doesn’t allow you to set a zoom level, you are stuck with the framerate that the app has to offer, etc.
Because of this, many people prefer to use different methods to record a video in slow motion with their preferences, and then upload it to Snapchat. This approach also eliminates the need to swipe the screen several times merely to use a single slow-motion filter.
Fortunately, iPhone has a built-in SLO-MO mode in its Camera app that allows you to capture the videos in slow motion. To learn how to do slow mo on Snapchat with the iPhone’s Camera app, you can follow the instructions that are given below:
Step 1: Get to the iPhone’s SLO-MO Mode
Launch the Camera app on your iPhone (iPhone 13 Pro Max is used here for illustrations), and swipe the screen from left to right until you get to the SLO-MO mode.
Step 2: Set Recording Preferences
Tap the number that is present at the top-right corner (240 here) to toggle between different framerates, tap 1x from the lower-center area, swipe slightly up, and then use the wheel that appears next to define your preferred zoom level.
Step 3: Start and Stop the Recording
Tap the Record button to start the recording, and tap Stop when you’re done.
Note: Make sure that the duration of the recorded video doesn’t exceed 60 seconds.
Step 4: Upload the Slow-Motion Video to Snapchat
After the video is recorded in slow motion, close the Camera app, launch Snapchat, and tap the Gallery icon from the left side of the Capture button on the Camera section. From the Memories screen, go to the Camera Roll tab, and tap to select the video that you recorded in the previous step.
Next, optionally, tap the Edit icon from the bottom-left corner to decorate the video and/or add annotations to it, and follow the process as explained in the previous section to share the clip with your family, friends, or colleagues, or publish it as your story.
Part 3: How to Make Flash and Smooth Slo Mo Video for Snapchat
Although iPhone has the built-in SLO-MO mode that even enables you to set your preferred framerate and zoom level before recording, it still doesn’t allow you to slow down different parts of a video in different speed at your convenience. You can either record the entire video in slow motion or at a normal speed.
This is where a third-party app comes into play. While there are several video editing programs available online, the one of the best slow motion apps that helps you slow down the portions of a video with precision is CapCut.
Downloading and installing CapCut on your iPhone or Android phone is simple, and once it is done, you can follow the process given below to learn how to slow things down on Snapchat:
With CapCut, you can either slow down the whole clip or manage the speed for different segments. This section explains both methods.
Method 1: Slow Down the Whole Clip with CapCut
Step 1: Get to the Speed Panel
Launch CapCut, import the video that you want to slow down, and tap the imported media in the Timeline. Next, tap Speed from the bottom of the interface to get to the next window.
Step 2: Reduce the Speed of the Video
Tap Normal from the bottom of the screen that appears next, and drag the Speed slider to the left to reduce the playback speed. Tap OK from the bottom-right corner to save the changes.
Step 3: Upload the Video to Snapchat
Back on the previous interface, optionally tap Volume from the bottom and reduce the slider to 0 to mute the audio of the footage as it may get distorted due to the reduction in the speed.
Next, tap Share from the top-right corner to save the video on your iPhone, and then use the method explained in the previous section to access the clip from the Gallery within Snapchat for uploading.
Method 2: Reduce the Playback Speed of Different Parts of a Video
Step 1: Get to the Speed Panel
Use the process described in the previous method to get to the Speed panel.
Step 2: Reduce the Speed of Different Parts of the Video
Tap Curve from the bottom of the interface. On the next screen, tap Custom from the lower area, and then tap Edit. From the next panel, drag the beat points down to reduce the speed (or drag them above the line to increase).
Notice that each beat point represents a particular section of the video, and dragging it down reduces the playback speed of that segment. You can even tap anywhere on the line to add a new beat point and drag it down as needed for more precise speed management. Once done, tap OK from the bottom-right corner to save the modifications.
Optionally, you can also tap any of the available presets on the Curve screen to reduce the playback speed of the video accordingly.
Step 3: Upload the Video to Snapchat
Use the method explained in the previous method to export the video, upload it to Snapchat, and share the clip with your family, friends, and colleagues, or publish it as your story.
Part 4: FAQs about Slowing Down Snapchat Video
1. Can I record a slow mo video in Snapchat?
Technically speaking, no, you cannot. However, once you have recorded a video at a normal speed in Snapchat, you can apply the built-in Slow Motion filter to it by swiping the screen from left to right until you see the Snail icon at the center. The Snail icon represents the Slow Motion filter that reduces the playback speed when applied.
2. Besides slow-motion, which speed filters does Snapchat have?
In addition to slow motion Snapchat also has Forward and Fast Forward filters that increase the playback speed. While the Forward filter increases the speed slightly, the Fast Forward one enhances it drastically.
Conclusion
When using an iPhone, even though the SLO-MO mode enables you to record footage in slow motion, you don’t get many options. Therefore, it would be safe to say that it is easy to slow down the speed of a video if you have a dedicated third-party post-production app. However, if you want to go for a convenient method, learning how to slow down a video on Snapchat is an extremely simple and straightforward process.
02 How to Record a Slo-Mo Video and Upload to Snapchat
03 How to Make Flash and Smooth Slo Mo Video for Snapchat
04 FAQs about Slowing Down Snapchat Video
Part 1: How to Add Slow Motion Effects to Video Using the Snapchat App
Snapchat has a built-in Slow Motion filter that reduces the playback speed of a video when applied. You can learn how to slow down on Snapchat by following the instructions that are given below:
Step 1: Record a Video
Launch Snapchat on your smartphone (iPhone 13 Pro Max is used here for illustrations), make sure that the Camera section is selected from the bottom, tap and hold down the Capture button that is present at the lower part of the interface, and let go of it when you are done recording.
Step 2: Apply the Slow Motion Filter
Once the video is recorded, swipe the screen from left to right. Repeat this process until you see the Snail (Slow Motion) icon on the screen. This will reduce the playback speed of the clip.
 dotConnect for Oracle is an ADO.NET data provider for Oracle with Entity Framework Support.
Step 3: Decorate the Video (Optional)
Use the options present on the upper-right area of the screen to further decorate the video and/or add annotations to it.

Step 4: Share or Publish the Video
Once everything is done, tap Send To from the bottom-right corner to share the video with your family, friends, and colleagues, or publish it as a story that remains available for the next 24 hours.
Related: How to Record Slo-Mo videos on iPhone .
Part 2: How to Record a Slo-Mo Video and Upload to Snapchat
With Snapchat, even though you don’t require any third-party tool to reduce the playback speed of a video, the app has certain limitations. For example, it doesn’t allow you to set a zoom level, you are stuck with the framerate that the app has to offer, etc.
Because of this, many people prefer to use different methods to record a video in slow motion with their preferences, and then upload it to Snapchat. This approach also eliminates the need to swipe the screen several times merely to use a single slow-motion filter.
Fortunately, iPhone has a built-in SLO-MO mode in its Camera app that allows you to capture the videos in slow motion. To learn how to do slow mo on Snapchat with the iPhone’s Camera app, you can follow the instructions that are given below:
Step 1: Get to the iPhone’s SLO-MO Mode
Launch the Camera app on your iPhone (iPhone 13 Pro Max is used here for illustrations), and swipe the screen from left to right until you get to the SLO-MO mode.
Step 2: Set Recording Preferences
Tap the number that is present at the top-right corner (240 here) to toggle between different framerates, tap 1x from the lower-center area, swipe slightly up, and then use the wheel that appears next to define your preferred zoom level.
Step 3: Start and Stop the Recording
Tap the Record button to start the recording, and tap Stop when you’re done.
Note: Make sure that the duration of the recorded video doesn’t exceed 60 seconds.
Step 4: Upload the Slow-Motion Video to Snapchat
After the video is recorded in slow motion, close the Camera app, launch Snapchat, and tap the Gallery icon from the left side of the Capture button on the Camera section. From the Memories screen, go to the Camera Roll tab, and tap to select the video that you recorded in the previous step.
Next, optionally, tap the Edit icon from the bottom-left corner to decorate the video and/or add annotations to it, and follow the process as explained in the previous section to share the clip with your family, friends, or colleagues, or publish it as your story.
Part 3: How to Make Flash and Smooth Slo Mo Video for Snapchat
Although iPhone has the built-in SLO-MO mode that even enables you to set your preferred framerate and zoom level before recording, it still doesn’t allow you to slow down different parts of a video in different speed at your convenience. You can either record the entire video in slow motion or at a normal speed.
This is where a third-party app comes into play. While there are several video editing programs available online, the one of the best slow motion apps that helps you slow down the portions of a video with precision is CapCut.
Downloading and installing CapCut on your iPhone or Android phone is simple, and once it is done, you can follow the process given below to learn how to slow things down on Snapchat:
With CapCut, you can either slow down the whole clip or manage the speed for different segments. This section explains both methods.
Method 1: Slow Down the Whole Clip with CapCut
Step 1: Get to the Speed Panel
Launch CapCut, import the video that you want to slow down, and tap the imported media in the Timeline. Next, tap Speed from the bottom of the interface to get to the next window.
 Forex Robotron Basic Package
Step 2: Reduce the Speed of the Video
Tap Normal from the bottom of the screen that appears next, and drag the Speed slider to the left to reduce the playback speed. Tap OK from the bottom-right corner to save the changes.
Step 3: Upload the Video to Snapchat
Back on the previous interface, optionally tap Volume from the bottom and reduce the slider to 0 to mute the audio of the footage as it may get distorted due to the reduction in the speed.
Next, tap Share from the top-right corner to save the video on your iPhone, and then use the method explained in the previous section to access the clip from the Gallery within Snapchat for uploading.
Method 2: Reduce the Playback Speed of Different Parts of a Video
Step 1: Get to the Speed Panel
Use the process described in the previous method to get to the Speed panel.
Step 2: Reduce the Speed of Different Parts of the Video
Tap Curve from the bottom of the interface. On the next screen, tap Custom from the lower area, and then tap Edit. From the next panel, drag the beat points down to reduce the speed (or drag them above the line to increase).
Notice that each beat point represents a particular section of the video, and dragging it down reduces the playback speed of that segment. You can even tap anywhere on the line to add a new beat point and drag it down as needed for more precise speed management. Once done, tap OK from the bottom-right corner to save the modifications.
Optionally, you can also tap any of the available presets on the Curve screen to reduce the playback speed of the video accordingly.
Step 3: Upload the Video to Snapchat
Use the method explained in the previous method to export the video, upload it to Snapchat, and share the clip with your family, friends, and colleagues, or publish it as your story.
Part 4: FAQs about Slowing Down Snapchat Video
1. Can I record a slow mo video in Snapchat?
Technically speaking, no, you cannot. However, once you have recorded a video at a normal speed in Snapchat, you can apply the built-in Slow Motion filter to it by swiping the screen from left to right until you see the Snail icon at the center. The Snail icon represents the Slow Motion filter that reduces the playback speed when applied.
2. Besides slow-motion, which speed filters does Snapchat have?
In addition to slow motion Snapchat also has Forward and Fast Forward filters that increase the playback speed. While the Forward filter increases the speed slightly, the Fast Forward one enhances it drastically.
Conclusion
When using an iPhone, even though the SLO-MO mode enables you to record footage in slow motion, you don’t get many options. Therefore, it would be safe to say that it is easy to slow down the speed of a video if you have a dedicated third-party post-production app. However, if you want to go for a convenient method, learning how to slow down a video on Snapchat is an extremely simple and straightforward process.
Crafting Captivating Stories: 15 Best Snapchat Techniques
Snapchat is the 12th most popular social platform, with over 347 million daily active users, a market cap of $17.13B , and a net worth of $1.07B . The platform is incredibly engaging with the great potential, and providing opportunies for both individual and business.
However, how to make your Snaps stand out and make sure your Snaps and Snapchat videos are seen by as many audiences as possible and are interesting enough to hold their attention?
In this article, we’re going to give you some ideas to post on Snapchat. From generating inspiring ideas to using Snapchat for better marketing, we aim to provide you with guidance on the whole walkthrough of shining on Snapchat.
 /a>
/a>Part 1. Choosing Creative Topics for Snapchat Video
On the top of that, we will start with coming up with creative ideas for your Snapchat videos. If you’re struggling to develop ideas to post on Snapchat, don’t worry - we’ve got you covered.
Below we’ve provided some tips for your Snapchat videos:

Idea 1. Conduct Interviews Via Snaps
If you are running your Snapchat like a YouTube channel, conducting interviews on Snapchat is a perfect way to get quick, candid responses from your interviewees. To make it more fun, captivating, and engaging, you can also use captivating Snaps to add a personal touch.
All you need is: set lighting and sound, a 10-second snap with a question on it, and the interviewee. Start by introducing the person in the frame, put the snap on the screen, and let the interviewee answer your question.
To make things interesting, add filters , stickers, or lenses to reflect the scenarios or your personality. In the outro, provide a snap to thank the interviewee and share their Snapcode to let people follow them, a call to action, a positive phrase like thanks for watching, or your other social media handles.
Idea 2. Host A YouTube And Snapchat Q&A
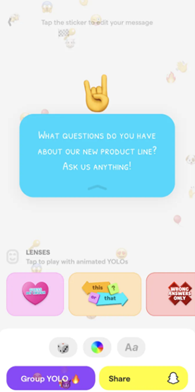
Another great idea is to host a YouTube and Snapchat Q&A. You can film with a famous snap chatter or YouTuber and ask them a few questions. You can also ask your followers/audience to send their questions via text message or response to your stories. This will help you get your viewers involved with your content and increase engagement.
To make sure your snap Q&A goes off without a hitch, be sure to:
- Set up your Snapchat settings of “Who Can Contact Me” to “Everyone” for a while to allow for questions.
- During the session, try to acknowledge who asked the question.
- After the session, change the “Who Can Contact Me” setting back to only friends to avoid spam overload.
Idea 3. Fun Tidbits
Snapchat is an excellent platform to get your audience engaged with your brand by creating fun tidbits to get more traffic.
You can create short videos or images designed to be entertaining and informative. For example, Amazon’s Snapchat posts stories of their employees carving pumpkins and posting them to their followers. This is a creative and fun solution to reach new customers and create a brand personality.

Idea 4. Behind-The-Scenes Footage
Sharing BTS footage of you and your team hard at work can be interesting and informative for your followers. This will give them a look at the inner workings of your company and how you create your products or services. This type of content can also be used to show off your team’s personality and culture.
We have listed why Behind-the-scenes footages are useful for your reference:
- Helps build trust with your audience.
- Allows you to humanize your brand or business and make it more relatable.
- Enables you to connect with your audience on a deeper level.
There are numerous ways to use BTS footage to boost your business. For example, you can use it to create a more personal connection with your customers, increase transparency and build trust.


Part 2. Snapchat Post Ideas for Content Creation
Above is about some creative ideas for picking topics for your Snapchat videos. Apart from that, the video’s content is also important to hold the audience’s attention. Whether you’re a blogger, a small business owner, or just someone who likes to create content, unique presenting ways can help you stand out on Snapchat.
If you’re not sure where to start, here are some ideas for Snapchat content that you can create:
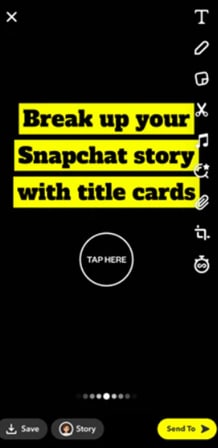
Idea 1. Create Title Cards For Longer Snapchat Stories
If you’re creating a Snapchat story that is longer than the standard 10 seconds, you can use title cards to help keep your viewers engaged.
Title cards are simply images with the text you can insert into your story to help identify what’s coming next. For example, if you’re sharing a story about your company’s history, you could use a title card at the beginning of each section to identify the different parts of the story.
For this, you can take a snap of a wall or perhaps block your camera to get a black screen and then paste your text on the picture. You can also play with the font size, style, or color to create engaging title cards.
Idea 2. Adding Music To Your Video
Adding music to your video on Snapchat is important because this can help set the mood and tone of your video, express yourself or your personality, and make the content more fun and interesting to watch.
You can add music from the Snapchat build-in library or find resources from third-party websites, such as:
Idea 3. Make Full Use of Snapchat’s Filters
One way to create shareable and fun content is by making full use of Snapchat’s filters. For this, the app offers a ton of different filters to choose from, so you can really get creative while using them
1. Utilizing Geofilters
These are location-based filters that you can use if you are planning an event or promoting your product. Creating your own on-demand geofilters are super affordable and are priced according to location, time frame, and square footage you want, starting from $5.
However, you can only target an area between 20,000 and 5 million square feet. Moreover, they can only stay active for up to 30 days.
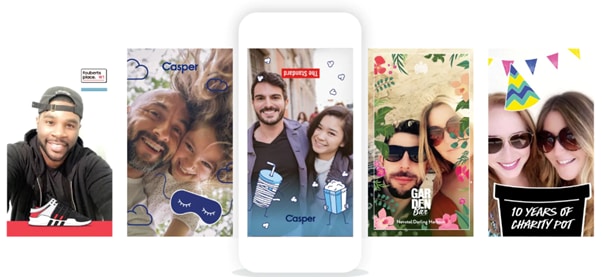
2. With AR/VR filters
We all love filters, don’t we? Whether it’s a dog filter or a flower crown, filters add a touch of fun and personality to our photos and videos. With the advent of augmented reality (AR) and virtual reality (VR) technology, filters are getting even more creative and immersive.
Snapchat’s AR/VR filters are some of the most fun and innovative on the market, and they’re constantly adding new ones to keep users engaged. You can also use these filters to create interactive content for your business.
For example, Dior created a Men Saddle Belt filter to promote its product and in turn, gained more sales, brand recognition as well as engagement.

3. Using Filters In Your Snaps Or Stories
When you are taking a Snap or creating a story, you can add filters to your photos or videos to add some visual interest and variation. These filters can change the color of your picture, add text or graphics, or even give them a fun effect.
Applying filters to your snaps is easy - just swipe through the options to find the perfect look. You can even use two or more filters at once by holding down on your screen to keep your current one set while you swipe to add more.
To find more fun and interesting hidden filters, read our article: How to find Snapchat hidden filters naturally .
Idea 4. Adopting Lenses
When it comes to Snapchat, there are two things that users love: filters and lenses!
While filters enhance your photos, lenses take Snapchat to a whole new level by adding animations and effects to your photos and videos. And the best part is, there are lenses for just about everything!
So, how can you use lenses to create engaging Snapchat content? Here are a few ideas:
- Add fun animations and effects to your photos and videos.
- Create custom snaps that show off your brand personality.
- Make your content unique and engaging to stand out from the rest.
You can even create your own fun and captivating lenses on Snapchat. To learn how click here .
Part 3. Snapchat Post Ideas For Marketing Promotion
There are endless possibilities when creating marketing and promotional content for Snapchat. So whether you’re looking to boost brand awareness, generate leads, or drive sales, there’s a Snapchat post idea for you.
Not sure where to start? Below, we’ll share some of our favorite marketing and promotional content ideas to post on Snapchat:
A Quick Guide:
1. Techniques for Better Marketing On Snapchat
Here are some techniques to create an engaging marketing campaign on Snapchat:

Idea 1. Newsletter Sign-up CTAs
Adding a newsletter sign-up CTA to your Snapchat marketing campaign can help you grow your email list and keep your audience engaged. Here’s how to do it:
- Create a beautiful and compelling newsletter sign-up CTA.
- Add the CTA to your Snapchat story.
- Encourage your audience to sign up for your newsletter.
- Follow up with your new subscribers and welcome them to your community.
Idea 2. Use Short Links
Since you cannot add clickable links to your snaps, using a shortened URL is an excellent approach to help people follow up on your links.
To get started, you need to find a URL shortener service such as bitly.com and then begin sharing your shortened URLs with your Snapchat followers. You can add them to your snaps or post them in your story.
Idea 3. Sneak Peeks Of New Products
Giving your followers/customers a sneak peek of new products before they hit the shelves can excite them about your brand. This not only builds anticipation and excitement but also gives your fans a chance to be the first to know how and when to get their hands on your new products.
You can provide sneak peeks of new products on Snapchat in a number of ways. For instance, you can give short previews or teasers of products in your upcoming collection or first look at new products. You can even use Snapchat to give your fans a behind-the-scenes look at how your products are made.
Whatever approach you take, ensure that you’re providing value to your audience. They should feel like they’re getting something special by having a sneak peek of your new products.
Idea 4. Attach Your Username, Username URL, Or Snapchat Code
To get more audiences and followers on Snapchat, you can also try attaching your username, username URL, or Snapcode to your stories. These three approaches can help your customers find your account or add you as a friend on Snapchat.
To share your Snapchat username URL, open Snapchat and click your Profile icon. Tap on your yellow Snapcode to access more options. Tap “Share My Profile Link” and select the platform you want to share it with.
To share your Snapcode, simply let others scan the code via their phone’s camera or tap “Profile > Snapcode icon > Share Snapcode.”
 CalendarBudget - Monthly subscription membership to CalendarBudget via web browser or mobile app. Support included.
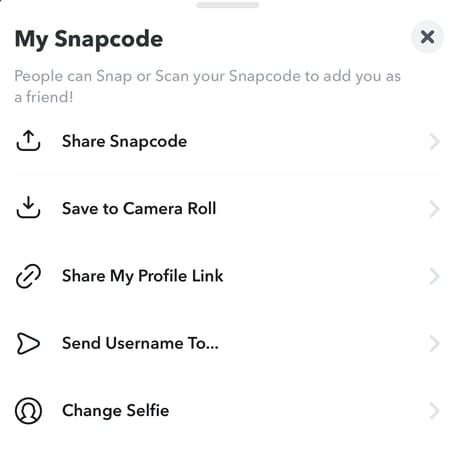
Idea 5. Publish Your Snaps To Other Platforms
Do you want to get more eyes on your snaps on Snapchat? If so, you should consider publishing them on other platforms. Doing this can help you can reach a wider audience and get more people interested in your brand.
You can download your Snaps and repost them on other platforms like Instagram, Facebook, Twitter, and more. To learn more, read: How to Save Snapchat Videos with Apps on Android and Mac.
2. Ideas for Better Promotion on Snapchat
Here are some quick ideas to post better promotional content on Snapchat:

Idea 1. Run Snapchat Ads
As a business, you always want to look for new ways to reach your target audience. With Snapchat being the 12th most popular social media platform today, it’s definitely worth considering running ads on Snapchat.
Let’s look into benefits of running ads on Snapchat:
- To reach a younger audience that might not be on other platforms like Facebook or Instagram.
- To make an ever-lasting impression on the viewers.
- To target a specific location or people of a certain age, hobbies, and other interests.
- To help you increase your exposure and grow your sale.

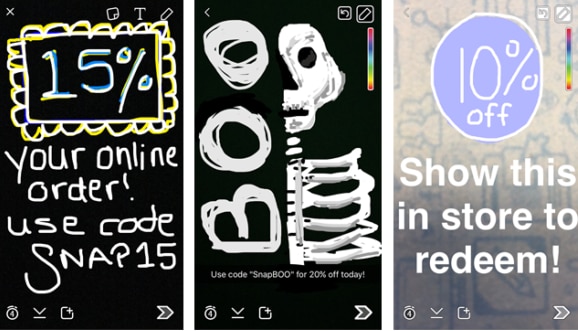
Idea 2. Coupon
You can quickly promote your business on Snapchat by offering coupons and use them to encourage customers to make a purchase or as loyalty rewards for existing customers.
Here’s a quick guide on how to create coupons and increase your sale:
Step1 Choose the type of coupon you want to create, i.e., a code or a task.
Step2 Next, open the Snapchat app on your device, and create or choose an image/video for your coupon. Make sure it’s captivating and related to the theme.
Step3 Add the coupon code or task to the Snap and share your coupon with your followers via your Stories.
Idea 3. Host A Contest Or Giveaway
You can also promote your business/brand on Snapchat by hosting a contest or giveaway. This can help you not only reach more people but also get them talking about your brand.
People love free products, so if you’re giving away prizes, you can bet that they will be eager to follow you.
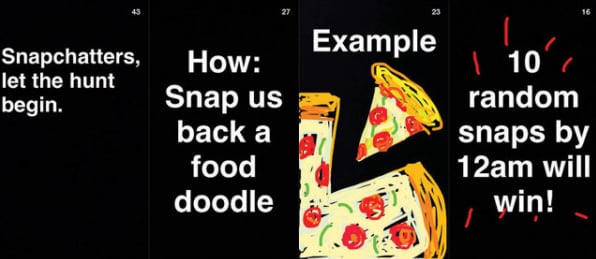
Such contests can also generate interest and excitement about your brand and can help your build relationships with your followers. By interacting with people and giving them a chance to win something, you’re showing that you care about them.
Part 4. A Bonus Tip: Tracking and Analysing Snap Stats
Tracking and analyzing your snap stats can be difficult, but it’s also important to do if you want to be successful on Snapchat. By understanding your snap stats, you can figure out what works and doesn’t and adjust your Snapchat strategy accordingly.
So what stats should you be tracking on Snapchat? Here are a few of the most important ones:
- Views: This is a good metric to track if you want to see how many people are actually seeing your content. Keep an eye on your views over time to see if you’re getting more or less engagement.
- Screenshots: Screenshots can be a good indicator of how viral your content is. If you’re getting a lot of screenshots, it means people are sharing your content with others.
- New Followers: This will help you understand how effective your Snapchat marketing efforts are.
- The Timing Of Your Snaps: This will help you understand when your audience is most engaged and when they’re most likely to see your snaps.
 Allavsoft Batch Download Online Videos, Music Offline to MP4, MP3, MOV, etc format
Conclusion
In this article, we’ve discussed 16 ideas to post on Snapchat to help you make your content better. We’ve covered ideas for post topics, content, marketing, and promotional campaigns.
By following the tips, techniques, and ideas in this guide, you can create Snapchats that can be truly unique and will stand out from the rest of the herd. So go out there, start snapping, and get the followers you need for success on Snapchat - A giant in the social media marketing platform!
Free Download For Win 7 or later(64-bit)
Free Download For macOS 10.14 or later
Free Download For macOS 10.14 or later
- Title: [Updated] Perfect Timing Adjust Video Speed in Snapchat Easily
- Author: Scott
- Created at : 2024-07-25 11:21:05
- Updated at : 2024-07-26 11:21:05
- Link: https://snapchat-videos.techidaily.com/updated-perfect-timing-adjust-video-speed-in-snapchat-easily/
- License: This work is licensed under CC BY-NC-SA 4.0.