![[Updated] Mastering Quick Snapchat Lens Creation Two Simple Techniques](https://thmb.techidaily.com/1441934e237c52f497a6fd0ab6f056661ecffacc05322a198ecbbd0ad48fbaf8.jpg)
"[Updated] Mastering Quick Snapchat Lens Creation Two Simple Techniques"
Mastering Quick Snapchat Lens Creation: Two Simple Techniques
How to Create Snapchat Lenses Easily: 2 Methods


Ollie Mattison
Mar 27, 2024• Proven solutions
Are you feeling like creating your own Snapchat lens, so you can have an even better experience with the app? The good news is that two new Snapchat tools have been released – the Lens Studio and Create Your Own Lens applications.
If you are a regular Snapchat user, you may want to learn about the Snapchat lens and how it can help you. We will help you get started. Here is our step by step guide on how to make Snapchat lenses.
- Part1: Comparing Lens Studio and Creating Your Own Lens
- Part2: How to Use Lens Studio
- Part3: How to Create Snapchat Lenses Using Create Your Own Lens
Part 1: Comparing Lens Studio and Creating Your Own Lens
The two programs that we are highlighting today are Lens Studio and Create Your Own Lens. These are both fantastic programs for creating your own Snapchat lens, but they do have slightly different uses. If you are the type of person who wants to design a professional Snapchat lens, you are going to prefer Lens Studio.
But if you are hoping to come up with something creative that you can share with your friends and family, then you may love Create Your Own Lens. It is a very easy program to use, and it offers a ton of features that you may be surprised to see.
Snapchat lenses is for fun
The beauty of Snapchat lenses is that you can now create your own environment, which you can use each time you are taking photos or videos. Sure, you can always use the filters that are already available in the application, but not everyone would find those enough.
If you want some customization, or you just want to mess around until you get the filter that makes sense for you, Snapchat lenses are the way to go.

Lens Studio is for business
Lens Studio is perfect for businesses that may want to create unique environments for their clients, or the times when they are releasing company Snapchat posts. Say the company is hosting an event. They may want a custom graphic for that event, which is used for all the pictures and videos posted to Snapchat about the event. Using Lens Studio lets them do that with ease.
Create Your Own Lens is great when you are going to a special event, birthday party or graduating, and you want a special graphic that comes up in all your snaps. It is very intuitive to use, and is available through the App Store as a download.
Part 2: How to Use Lens Studio
1. Download Lens Studio
The first step involves downloading Lens Studio, which you can do from your computer. It is compatible with both Windows and Mac computers, and will run on any semi-modern system. According to the Snapchat team, Lens Studio is similar to the program used by their AR teams to create lenses. That means you are getting similar functionality, but with an easier to manage interface.
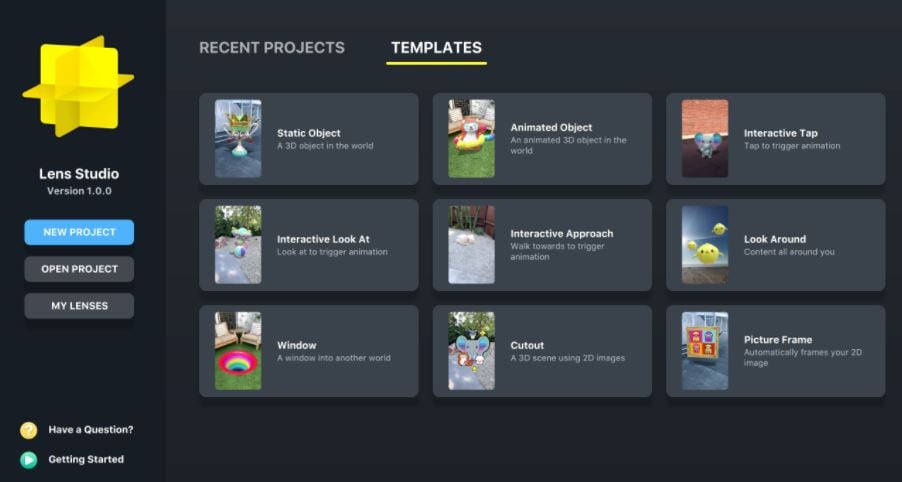
2. Choose Templates Page
It is normal to feel a little overwhelmed the first time you try and use this program. But that is why the templates page is so great. You can select from templates depending on the type of lens that you are hoping to create. You can just use a template, or you can incorporate your own ideas to customize the template.
There is also a Lens Studio Overview guide that you can access online, which will help you get acquainted with the program’s various features and quirks.
3. Use Studio Panels
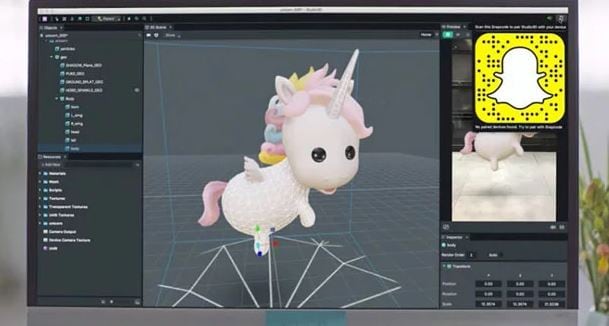
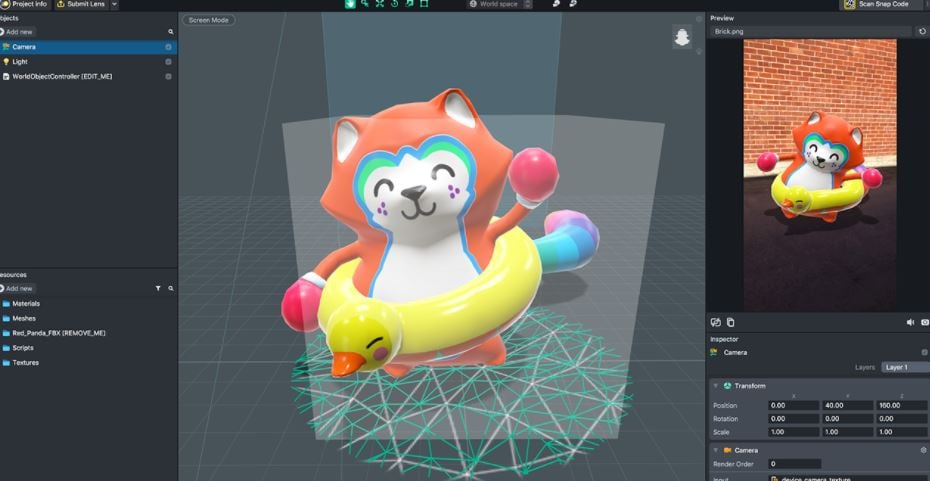
Are you ready to create your own custom Snapchat lens? It is time to head over to Studio Panels on the application. This is the area where you can add your own 2D or 3D objects, and you can visualize how they would look as a Snapchat filter. You can add, remove, resize and drag objects to specific areas of the screen.
There are other tools accessible from the Resources panel. You can use these tools to ensure that your Snapchat lens is exactly as you want.
 ZoneAlarm Extreme Security NextGen
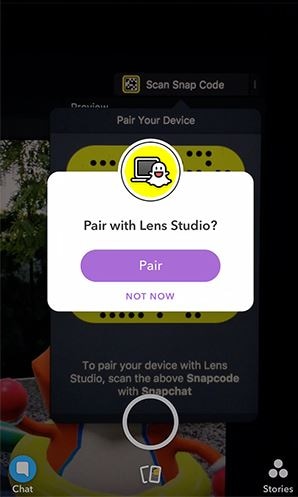
4. Preview the Snapchat Lens You Create
The great thing about this application is that you can preview the lens before you send it out to your phone. When you are satisfied with the image on the preview, you can pair your phone with the application, and you will be able to send that Snapchat lens onto your phone through your Snapcode. It is that simple!

 Easy and Safe Partition Software & Hard Disk Manager
Part 3: How to Create Snapchat Lenses Using Create Your Own Lens
- There are two ways that you can access the tool for creating fun Snapchat lenses. You can either visit the website snapchat.com/create, or you can go on the “filters and lenses” section on your iOS device. If you are using Snapchat on an Android device, you will only have the option for the website. But the feature is coming to the Android version of Snapchat very soon.
- When you are in the application or on the website, you may start to look at the different templates for Snapchat lenses. Now you can add other items into the templates, such as photographs, text or graphics.
 CalendarBudget - Monthly subscription membership to CalendarBudget via web browser or mobile app. Support included.
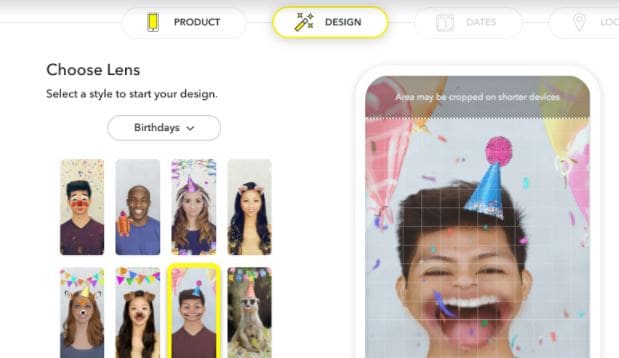
It is all up to your imagination. You can create the perfect Snapchat lens, which you can then send into your Snapchat account through your Snapcode. Of course, if you are using your iOS device to create the lens, it is already linked to your account.
Another cool feature is how you can set the location for where the Snapchat lens is available. Say you are hosting a party. You can have the Snapchat lens available to everyone who uses Snapchat within a set square footage of your home. That is an amazing way to let everyone share social media pictures and photos of your party, through the lens you created.
Conclusion
Creating Snapchat lenses has never been easier. Whether you are a business looking to add a custom lens, or you just want to create a fun lens for a graduation or party, there are tools that make the job very easy. Using these tools will allow you to create the perfect Snapchat lens for any occasion.

Ollie Mattison
Ollie Mattison is a writer and a lover of all things video.
Follow @Ollie Mattison
Ollie Mattison
Mar 27, 2024• Proven solutions
Are you feeling like creating your own Snapchat lens, so you can have an even better experience with the app? The good news is that two new Snapchat tools have been released – the Lens Studio and Create Your Own Lens applications.
If you are a regular Snapchat user, you may want to learn about the Snapchat lens and how it can help you. We will help you get started. Here is our step by step guide on how to make Snapchat lenses.
- Part1: Comparing Lens Studio and Creating Your Own Lens
- Part2: How to Use Lens Studio
- Part3: How to Create Snapchat Lenses Using Create Your Own Lens
Part 1: Comparing Lens Studio and Creating Your Own Lens
The two programs that we are highlighting today are Lens Studio and Create Your Own Lens. These are both fantastic programs for creating your own Snapchat lens, but they do have slightly different uses. If you are the type of person who wants to design a professional Snapchat lens, you are going to prefer Lens Studio.
But if you are hoping to come up with something creative that you can share with your friends and family, then you may love Create Your Own Lens. It is a very easy program to use, and it offers a ton of features that you may be surprised to see.
Snapchat lenses is for fun
The beauty of Snapchat lenses is that you can now create your own environment, which you can use each time you are taking photos or videos. Sure, you can always use the filters that are already available in the application, but not everyone would find those enough.
If you want some customization, or you just want to mess around until you get the filter that makes sense for you, Snapchat lenses are the way to go.
Lens Studio is for business
Lens Studio is perfect for businesses that may want to create unique environments for their clients, or the times when they are releasing company Snapchat posts. Say the company is hosting an event. They may want a custom graphic for that event, which is used for all the pictures and videos posted to Snapchat about the event. Using Lens Studio lets them do that with ease.
Create Your Own Lens is great when you are going to a special event, birthday party or graduating, and you want a special graphic that comes up in all your snaps. It is very intuitive to use, and is available through the App Store as a download.

Part 2: How to Use Lens Studio
1. Download Lens Studio
The first step involves downloading Lens Studio, which you can do from your computer. It is compatible with both Windows and Mac computers, and will run on any semi-modern system. According to the Snapchat team, Lens Studio is similar to the program used by their AR teams to create lenses. That means you are getting similar functionality, but with an easier to manage interface.
2. Choose Templates Page
It is normal to feel a little overwhelmed the first time you try and use this program. But that is why the templates page is so great. You can select from templates depending on the type of lens that you are hoping to create. You can just use a template, or you can incorporate your own ideas to customize the template.
There is also a Lens Studio Overview guide that you can access online, which will help you get acquainted with the program’s various features and quirks.
3. Use Studio Panels
Are you ready to create your own custom Snapchat lens? It is time to head over to Studio Panels on the application. This is the area where you can add your own 2D or 3D objects, and you can visualize how they would look as a Snapchat filter. You can add, remove, resize and drag objects to specific areas of the screen.
There are other tools accessible from the Resources panel. You can use these tools to ensure that your Snapchat lens is exactly as you want.
4. Preview the Snapchat Lens You Create
The great thing about this application is that you can preview the lens before you send it out to your phone. When you are satisfied with the image on the preview, you can pair your phone with the application, and you will be able to send that Snapchat lens onto your phone through your Snapcode. It is that simple!
Part 3: How to Create Snapchat Lenses Using Create Your Own Lens
- There are two ways that you can access the tool for creating fun Snapchat lenses. You can either visit the website snapchat.com/create, or you can go on the “filters and lenses” section on your iOS device. If you are using Snapchat on an Android device, you will only have the option for the website. But the feature is coming to the Android version of Snapchat very soon.
- When you are in the application or on the website, you may start to look at the different templates for Snapchat lenses. Now you can add other items into the templates, such as photographs, text or graphics.
It is all up to your imagination. You can create the perfect Snapchat lens, which you can then send into your Snapchat account through your Snapcode. Of course, if you are using your iOS device to create the lens, it is already linked to your account.
Another cool feature is how you can set the location for where the Snapchat lens is available. Say you are hosting a party. You can have the Snapchat lens available to everyone who uses Snapchat within a set square footage of your home. That is an amazing way to let everyone share social media pictures and photos of your party, through the lens you created.
Conclusion
Creating Snapchat lenses has never been easier. Whether you are a business looking to add a custom lens, or you just want to create a fun lens for a graduation or party, there are tools that make the job very easy. Using these tools will allow you to create the perfect Snapchat lens for any occasion.
Ollie Mattison
Ollie Mattison is a writer and a lover of all things video.
Follow @Ollie Mattison
Ollie Mattison
Mar 27, 2024• Proven solutions
Are you feeling like creating your own Snapchat lens, so you can have an even better experience with the app? The good news is that two new Snapchat tools have been released – the Lens Studio and Create Your Own Lens applications.
If you are a regular Snapchat user, you may want to learn about the Snapchat lens and how it can help you. We will help you get started. Here is our step by step guide on how to make Snapchat lenses.
- Part1: Comparing Lens Studio and Creating Your Own Lens
- Part2: How to Use Lens Studio
- Part3: How to Create Snapchat Lenses Using Create Your Own Lens
Part 1: Comparing Lens Studio and Creating Your Own Lens
The two programs that we are highlighting today are Lens Studio and Create Your Own Lens. These are both fantastic programs for creating your own Snapchat lens, but they do have slightly different uses. If you are the type of person who wants to design a professional Snapchat lens, you are going to prefer Lens Studio.
But if you are hoping to come up with something creative that you can share with your friends and family, then you may love Create Your Own Lens. It is a very easy program to use, and it offers a ton of features that you may be surprised to see.
Snapchat lenses is for fun
The beauty of Snapchat lenses is that you can now create your own environment, which you can use each time you are taking photos or videos. Sure, you can always use the filters that are already available in the application, but not everyone would find those enough.
If you want some customization, or you just want to mess around until you get the filter that makes sense for you, Snapchat lenses are the way to go.
Lens Studio is for business
Lens Studio is perfect for businesses that may want to create unique environments for their clients, or the times when they are releasing company Snapchat posts. Say the company is hosting an event. They may want a custom graphic for that event, which is used for all the pictures and videos posted to Snapchat about the event. Using Lens Studio lets them do that with ease.
Create Your Own Lens is great when you are going to a special event, birthday party or graduating, and you want a special graphic that comes up in all your snaps. It is very intuitive to use, and is available through the App Store as a download.
Part 2: How to Use Lens Studio
1. Download Lens Studio
The first step involves downloading Lens Studio, which you can do from your computer. It is compatible with both Windows and Mac computers, and will run on any semi-modern system. According to the Snapchat team, Lens Studio is similar to the program used by their AR teams to create lenses. That means you are getting similar functionality, but with an easier to manage interface.
2. Choose Templates Page
It is normal to feel a little overwhelmed the first time you try and use this program. But that is why the templates page is so great. You can select from templates depending on the type of lens that you are hoping to create. You can just use a template, or you can incorporate your own ideas to customize the template.
There is also a Lens Studio Overview guide that you can access online, which will help you get acquainted with the program’s various features and quirks.
3. Use Studio Panels
Are you ready to create your own custom Snapchat lens? It is time to head over to Studio Panels on the application. This is the area where you can add your own 2D or 3D objects, and you can visualize how they would look as a Snapchat filter. You can add, remove, resize and drag objects to specific areas of the screen.
There are other tools accessible from the Resources panel. You can use these tools to ensure that your Snapchat lens is exactly as you want.
4. Preview the Snapchat Lens You Create
The great thing about this application is that you can preview the lens before you send it out to your phone. When you are satisfied with the image on the preview, you can pair your phone with the application, and you will be able to send that Snapchat lens onto your phone through your Snapcode. It is that simple!
 PearlMountain Image Converter
Part 3: How to Create Snapchat Lenses Using Create Your Own Lens
- There are two ways that you can access the tool for creating fun Snapchat lenses. You can either visit the website snapchat.com/create, or you can go on the “filters and lenses” section on your iOS device. If you are using Snapchat on an Android device, you will only have the option for the website. But the feature is coming to the Android version of Snapchat very soon.
- When you are in the application or on the website, you may start to look at the different templates for Snapchat lenses. Now you can add other items into the templates, such as photographs, text or graphics.
It is all up to your imagination. You can create the perfect Snapchat lens, which you can then send into your Snapchat account through your Snapcode. Of course, if you are using your iOS device to create the lens, it is already linked to your account.
Another cool feature is how you can set the location for where the Snapchat lens is available. Say you are hosting a party. You can have the Snapchat lens available to everyone who uses Snapchat within a set square footage of your home. That is an amazing way to let everyone share social media pictures and photos of your party, through the lens you created.
 PCDJ Karaoki is the complete professional karaoke software designed for KJs and karaoke venues. Karaoki includes an advanced automatic singer rotation list with singer history, key control, news ticker, next singers screen, a song book exporter and printer, a jukebox background music player and many other features designed so you can host karaoke shows faster and easier!
Conclusion
Creating Snapchat lenses has never been easier. Whether you are a business looking to add a custom lens, or you just want to create a fun lens for a graduation or party, there are tools that make the job very easy. Using these tools will allow you to create the perfect Snapchat lens for any occasion.

Ollie Mattison
Ollie Mattison is a writer and a lover of all things video.
Follow @Ollie Mattison
Ollie Mattison
Mar 27, 2024• Proven solutions
Are you feeling like creating your own Snapchat lens, so you can have an even better experience with the app? The good news is that two new Snapchat tools have been released – the Lens Studio and Create Your Own Lens applications.
If you are a regular Snapchat user, you may want to learn about the Snapchat lens and how it can help you. We will help you get started. Here is our step by step guide on how to make Snapchat lenses.
- Part1: Comparing Lens Studio and Creating Your Own Lens
- Part2: How to Use Lens Studio
- Part3: How to Create Snapchat Lenses Using Create Your Own Lens

Part 1: Comparing Lens Studio and Creating Your Own Lens
The two programs that we are highlighting today are Lens Studio and Create Your Own Lens. These are both fantastic programs for creating your own Snapchat lens, but they do have slightly different uses. If you are the type of person who wants to design a professional Snapchat lens, you are going to prefer Lens Studio.
But if you are hoping to come up with something creative that you can share with your friends and family, then you may love Create Your Own Lens. It is a very easy program to use, and it offers a ton of features that you may be surprised to see.
Snapchat lenses is for fun
The beauty of Snapchat lenses is that you can now create your own environment, which you can use each time you are taking photos or videos. Sure, you can always use the filters that are already available in the application, but not everyone would find those enough.
If you want some customization, or you just want to mess around until you get the filter that makes sense for you, Snapchat lenses are the way to go.
Lens Studio is for business
Lens Studio is perfect for businesses that may want to create unique environments for their clients, or the times when they are releasing company Snapchat posts. Say the company is hosting an event. They may want a custom graphic for that event, which is used for all the pictures and videos posted to Snapchat about the event. Using Lens Studio lets them do that with ease.
Create Your Own Lens is great when you are going to a special event, birthday party or graduating, and you want a special graphic that comes up in all your snaps. It is very intuitive to use, and is available through the App Store as a download.

Part 2: How to Use Lens Studio
1. Download Lens Studio
The first step involves downloading Lens Studio, which you can do from your computer. It is compatible with both Windows and Mac computers, and will run on any semi-modern system. According to the Snapchat team, Lens Studio is similar to the program used by their AR teams to create lenses. That means you are getting similar functionality, but with an easier to manage interface.
2. Choose Templates Page
It is normal to feel a little overwhelmed the first time you try and use this program. But that is why the templates page is so great. You can select from templates depending on the type of lens that you are hoping to create. You can just use a template, or you can incorporate your own ideas to customize the template.
There is also a Lens Studio Overview guide that you can access online, which will help you get acquainted with the program’s various features and quirks.
3. Use Studio Panels
Are you ready to create your own custom Snapchat lens? It is time to head over to Studio Panels on the application. This is the area where you can add your own 2D or 3D objects, and you can visualize how they would look as a Snapchat filter. You can add, remove, resize and drag objects to specific areas of the screen.
There are other tools accessible from the Resources panel. You can use these tools to ensure that your Snapchat lens is exactly as you want.
4. Preview the Snapchat Lens You Create
The great thing about this application is that you can preview the lens before you send it out to your phone. When you are satisfied with the image on the preview, you can pair your phone with the application, and you will be able to send that Snapchat lens onto your phone through your Snapcode. It is that simple!
 Lyric Video Creator Professional Version
Part 3: How to Create Snapchat Lenses Using Create Your Own Lens
- There are two ways that you can access the tool for creating fun Snapchat lenses. You can either visit the website snapchat.com/create, or you can go on the “filters and lenses” section on your iOS device. If you are using Snapchat on an Android device, you will only have the option for the website. But the feature is coming to the Android version of Snapchat very soon.
- When you are in the application or on the website, you may start to look at the different templates for Snapchat lenses. Now you can add other items into the templates, such as photographs, text or graphics.
It is all up to your imagination. You can create the perfect Snapchat lens, which you can then send into your Snapchat account through your Snapcode. Of course, if you are using your iOS device to create the lens, it is already linked to your account.
Another cool feature is how you can set the location for where the Snapchat lens is available. Say you are hosting a party. You can have the Snapchat lens available to everyone who uses Snapchat within a set square footage of your home. That is an amazing way to let everyone share social media pictures and photos of your party, through the lens you created.
 CollageIt Pro
Conclusion
Creating Snapchat lenses has never been easier. Whether you are a business looking to add a custom lens, or you just want to create a fun lens for a graduation or party, there are tools that make the job very easy. Using these tools will allow you to create the perfect Snapchat lens for any occasion.
Ollie Mattison
Ollie Mattison is a writer and a lover of all things video.
Follow @Ollie Mattison

Transitioning Saved Snaps From Social Networks to Personal Archive
Snapchat is the most popular social media platform that is enjoyed by youngsters. The main reason lies in their unique filters that allow you to capture vibrant snaps. Moreover, the features of Snapchat, like emojis, drawings, and bitmojis, help you chat with your friends in an exciting manner. Hence, it’s an excellent app for taking interesting and vibrant snaps flawlessly.
If you are a regular user of Snapchat and want to learn how to save snaps to the camera roll, this article will help you. By applying the suggested methods, you can save your snaps to the smartphone.
Part 1: Save Snaps to Camera Roll or Gallery Instead of Memories
If you want to share your snaps on other social media platforms like Instagram and Facebook, you should save your snaps on your phone’s gallery. The saved snaps in your phone’s gallery can be located and shared on other platforms without hassle. Read the following instructions on how to save snaps to the camera roll or gallery quickly:
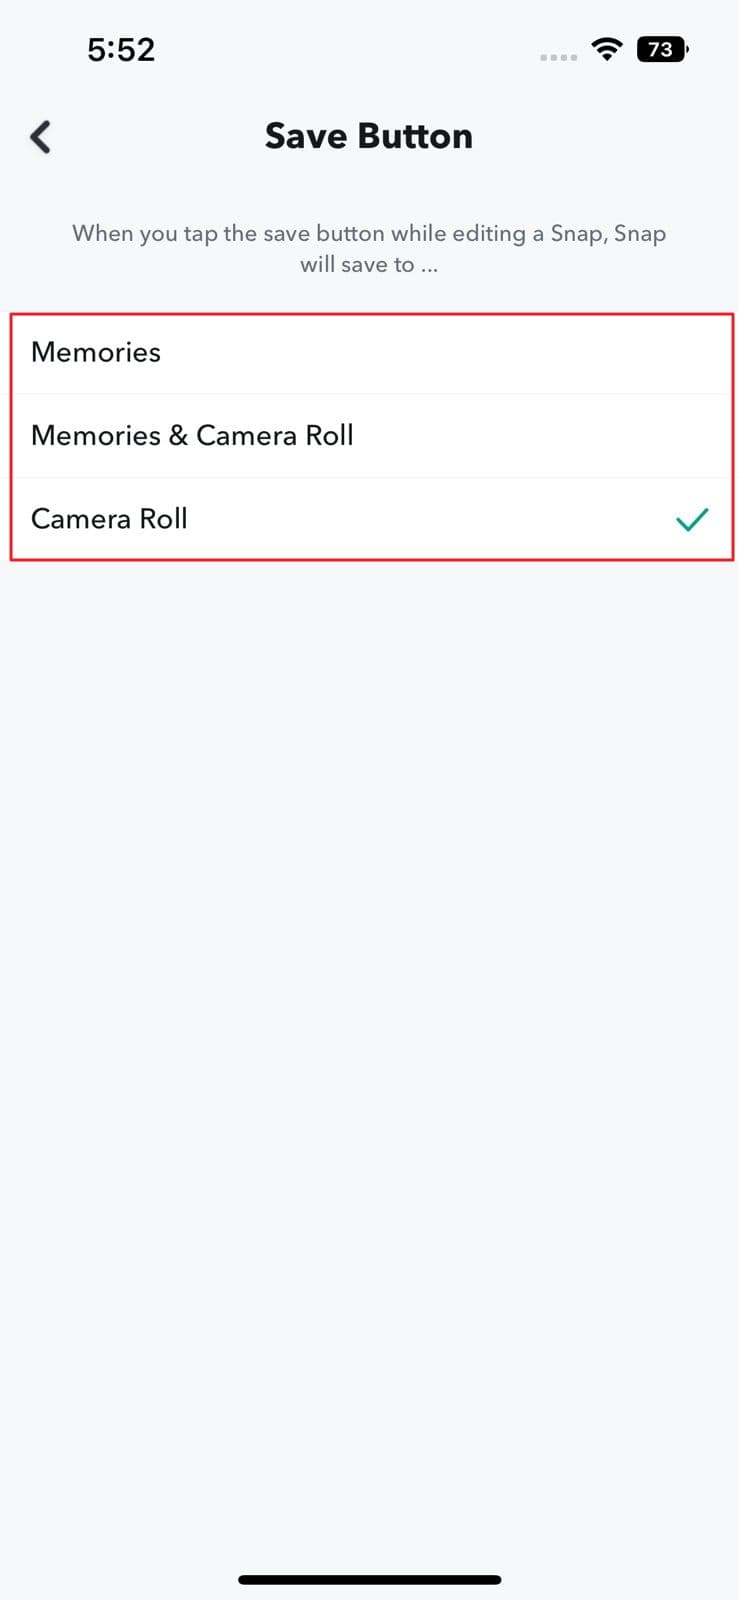
Step1 Navigate to your Snapchat and tap on your Bitmoji icon displayed in the top left corner. Afterward, select the “Settings” icon displayed at the top right corner.

Step2 On the Settings menu, head to the My Account section and tap “Memories.” In this new menu, tap on the “Save Button,” where you can choose to save your snaps on either Camera Roll and Memories or Only Camera Roll. Tap on your preferred choice to export your snaps to your phone’s gallery.

Part 2: Manually Export Snaps to Camera Roll
If you don’t want to alter the settings of Snapchat, you can still export snaps to the camera roll manually. In this solution, you can manually select a specific snap and export it directly to the camera roll. For this, the process is simple and quick, as described below:
Step1 Open your Snapchat and tap on the “Snaps” icon given below. This will open all the captured snaps on your phone.


Step2 Among all the snaps, select any snap that you want to send. Then, tap on the three-dot icon given at the top right.

Step3 After selecting the three-dot icon, tap on the “Export or Send Snap” option. Now under the heading of “Share Elsewhere,” tap on the “Download” icon, which will instantly export the snap to your camera roll.

Part 3: Save Multiple Snaps to Camera Roll at Once
Many people like to capture pictures of a particular event on their Snapchat. However, if your taken snaps are not saved in the camera roll, you may have difficulty sharing the images with others on other social media apps. You can save time by saving multiple snaps to the camera roll all at once. Through the following steps, you can learn how to save snaps to the camera roll all at once:
Step1 Open your Snapchat and swipe up from the bottom using your finger. This will open all the captured snaps on your screen.
Step2 Now tap and hold any specific snap that will allow you to select multiple snaps. You can see the “Tick” icon on the snaps that you have selected. Once you choose all the snaps you want to save to the camera roll, tap on the “Export” button displayed below.

Step3 Under the heading of “Share Elsewhere,” tap on the “Download” icon. This will quickly start exporting the snaps to your camera roll smoothly.


Part 4: How To Change Where Photos Are Saved in Snapchat
Some people like to save the phone’s storage by saving the snaps to memories. If you prefer saving the snaps in memories instead of the camera roll, you can save the phone’s storage space. Conversely, some people like to export their snaps to the camera roll if multiple people use their Snapchat.
For privacy matters, people like to save the snaps to the camera roll only. If you want to change the location where the photos are saved, you can check the below instructions:
Step1 Head to your Snapchat and tap on the Profile icon displayed in the top left corner. From there, select the “Settings” icon to proceed.

Step2 On the settings menu, locate the option called “Memories.” Now on the new menu, select the “Save Button” given under the section of “Save Destinations.”

Step3 In the Save Button menu, you can easily choose to save your photos to Camera Roll or Memories only. Or you can select the “Memories and Camera Roll” option to save the snaps on both memories and camera roll. Through these settings, you can change the location of saved snaps effortlessly.
Conclusion
Are you fond of using Snapchat regularly? If you take pictures from Snapchat frequently, this article will help you how to save snaps to the camera roll with multiple methods. Using the suggested methods, you can easily save your snaps to the camera roll without hassle.
Free Download For Win 7 or later(64-bit)
Free Download For macOS 10.14 or later
Free Download For macOS 10.14 or later
- Title: [Updated] Mastering Quick Snapchat Lens Creation Two Simple Techniques
- Author: Scott
- Created at : 2024-07-25 11:09:41
- Updated at : 2024-07-26 11:09:41
- Link: https://snapchat-videos.techidaily.com/updated-mastering-quick-snapchat-lens-creation-two-simple-techniques/
- License: This work is licensed under CC BY-NC-SA 4.0.