
!["[Updated] In 2024, Speed Control 101 Taming Video Velocity in Snapchat"](https://www.lifewire.com/thmb/kq2_pYjL3lBcvd_iWUGjf8TYdhc=/360x240/filters:no_upscale():max_bytes(150000):strip_icc():format(webp)/Sony-PS5-PlayStation-5-Gaming-Console-7-1434c073922c4bf59bca47a33013a6dd.jpg)
"[Updated] In 2024, Speed Control 101 Taming Video Velocity in Snapchat"
Speed Control 101: Taming Video Velocity in Snapchat
Snapchat is an instant messaging app that allows you to share your pictures and videos with your family members, friends, and colleagues. In addition, you can even create your stories in the form of movie clips and share them on the app. These stories remain available for the next 24 hours, after which they are automatically removed from the platform.
While sharing the videos, you can apply several filters that are already present in the app, and Slow Motion is one of them. You may want to learn how to slow down a video on Snapchat when you want to emphasize and draw viewers’ attention toward the scene, or wish to make the audience see your actions closely and in detail.
That said, in the following sections, you will see how to slow down videos on Snapchat, and what other methods you can use to reduce the playback speed more professionally.
In this article
01 How to Add Slow Motion Effects to Video Using the Snapchat App
02 How to Record a Slo-Mo Video and Upload to Snapchat
03 How to Make Flash and Smooth Slo Mo Video for Snapchat
04 FAQs about Slowing Down Snapchat Video
Part 1: How to Add Slow Motion Effects to Video Using the Snapchat App
Snapchat has a built-in Slow Motion filter that reduces the playback speed of a video when applied. You can learn how to slow down on Snapchat by following the instructions that are given below:
Step 1: Record a Video
Launch Snapchat on your smartphone (iPhone 13 Pro Max is used here for illustrations), make sure that the Camera section is selected from the bottom, tap and hold down the Capture button that is present at the lower part of the interface, and let go of it when you are done recording.

Step 2: Apply the Slow Motion Filter
Once the video is recorded, swipe the screen from left to right. Repeat this process until you see the Snail (Slow Motion) icon on the screen. This will reduce the playback speed of the clip.

Step 3: Decorate the Video (Optional)
Use the options present on the upper-right area of the screen to further decorate the video and/or add annotations to it.

Step 4: Share or Publish the Video
Once everything is done, tap Send To from the bottom-right corner to share the video with your family, friends, and colleagues, or publish it as a story that remains available for the next 24 hours.
Related: How to Record Slo-Mo videos on iPhone .
Part 2: How to Record a Slo-Mo Video and Upload to Snapchat
With Snapchat, even though you don’t require any third-party tool to reduce the playback speed of a video, the app has certain limitations. For example, it doesn’t allow you to set a zoom level, you are stuck with the framerate that the app has to offer, etc.
Because of this, many people prefer to use different methods to record a video in slow motion with their preferences, and then upload it to Snapchat. This approach also eliminates the need to swipe the screen several times merely to use a single slow-motion filter.
Fortunately, iPhone has a built-in SLO-MO mode in its Camera app that allows you to capture the videos in slow motion. To learn how to do slow mo on Snapchat with the iPhone’s Camera app, you can follow the instructions that are given below:
Step 1: Get to the iPhone’s SLO-MO Mode
Launch the Camera app on your iPhone (iPhone 13 Pro Max is used here for illustrations), and swipe the screen from left to right until you get to the SLO-MO mode.

Step 2: Set Recording Preferences
Tap the number that is present at the top-right corner (240 here) to toggle between different framerates, tap 1x from the lower-center area, swipe slightly up, and then use the wheel that appears next to define your preferred zoom level.

Step 3: Start and Stop the Recording
Tap the Record button to start the recording, and tap Stop when you’re done.
Note: Make sure that the duration of the recorded video doesn’t exceed 60 seconds.
Step 4: Upload the Slow-Motion Video to Snapchat
After the video is recorded in slow motion, close the Camera app, launch Snapchat, and tap the Gallery icon from the left side of the Capture button on the Camera section. From the Memories screen, go to the Camera Roll tab, and tap to select the video that you recorded in the previous step.
Next, optionally, tap the Edit icon from the bottom-left corner to decorate the video and/or add annotations to it, and follow the process as explained in the previous section to share the clip with your family, friends, or colleagues, or publish it as your story.

Part 3: How to Make Flash and Smooth Slo Mo Video for Snapchat
Although iPhone has the built-in SLO-MO mode that even enables you to set your preferred framerate and zoom level before recording, it still doesn’t allow you to slow down different parts of a video in different speed at your convenience. You can either record the entire video in slow motion or at a normal speed.
This is where a third-party app comes into play. While there are several video editing programs available online, the one of the best slow motion apps that helps you slow down the portions of a video with precision is CapCut.
Downloading and installing CapCut on your iPhone or Android phone is simple, and once it is done, you can follow the process given below to learn how to slow things down on Snapchat:
With CapCut, you can either slow down the whole clip or manage the speed for different segments. This section explains both methods.
Method 1: Slow Down the Whole Clip with CapCut
Step 1: Get to the Speed Panel
Launch CapCut, import the video that you want to slow down, and tap the imported media in the Timeline. Next, tap Speed from the bottom of the interface to get to the next window.

Step 2: Reduce the Speed of the Video
Tap Normal from the bottom of the screen that appears next, and drag the Speed slider to the left to reduce the playback speed. Tap OK from the bottom-right corner to save the changes.

Step 3: Upload the Video to Snapchat
Back on the previous interface, optionally tap Volume from the bottom and reduce the slider to 0 to mute the audio of the footage as it may get distorted due to the reduction in the speed.
Next, tap Share from the top-right corner to save the video on your iPhone, and then use the method explained in the previous section to access the clip from the Gallery within Snapchat for uploading.
Method 2: Reduce the Playback Speed of Different Parts of a Video
Step 1: Get to the Speed Panel
Use the process described in the previous method to get to the Speed panel.
Step 2: Reduce the Speed of Different Parts of the Video
Tap Curve from the bottom of the interface. On the next screen, tap Custom from the lower area, and then tap Edit. From the next panel, drag the beat points down to reduce the speed (or drag them above the line to increase).

Notice that each beat point represents a particular section of the video, and dragging it down reduces the playback speed of that segment. You can even tap anywhere on the line to add a new beat point and drag it down as needed for more precise speed management. Once done, tap OK from the bottom-right corner to save the modifications.

Optionally, you can also tap any of the available presets on the Curve screen to reduce the playback speed of the video accordingly.
Step 3: Upload the Video to Snapchat
Use the method explained in the previous method to export the video, upload it to Snapchat, and share the clip with your family, friends, and colleagues, or publish it as your story.
Part 4: FAQs about Slowing Down Snapchat Video
1. Can I record a slow mo video in Snapchat?
Technically speaking, no, you cannot. However, once you have recorded a video at a normal speed in Snapchat, you can apply the built-in Slow Motion filter to it by swiping the screen from left to right until you see the Snail icon at the center. The Snail icon represents the Slow Motion filter that reduces the playback speed when applied.
2. Besides slow-motion, which speed filters does Snapchat have?
In addition to slow motion Snapchat also has Forward and Fast Forward filters that increase the playback speed. While the Forward filter increases the speed slightly, the Fast Forward one enhances it drastically.
Conclusion
When using an iPhone, even though the SLO-MO mode enables you to record footage in slow motion, you don’t get many options. Therefore, it would be safe to say that it is easy to slow down the speed of a video if you have a dedicated third-party post-production app. However, if you want to go for a convenient method, learning how to slow down a video on Snapchat is an extremely simple and straightforward process.
02 How to Record a Slo-Mo Video and Upload to Snapchat
03 How to Make Flash and Smooth Slo Mo Video for Snapchat
04 FAQs about Slowing Down Snapchat Video
Part 1: How to Add Slow Motion Effects to Video Using the Snapchat App
Snapchat has a built-in Slow Motion filter that reduces the playback speed of a video when applied. You can learn how to slow down on Snapchat by following the instructions that are given below:
Step 1: Record a Video
Launch Snapchat on your smartphone (iPhone 13 Pro Max is used here for illustrations), make sure that the Camera section is selected from the bottom, tap and hold down the Capture button that is present at the lower part of the interface, and let go of it when you are done recording.
Step 2: Apply the Slow Motion Filter
Once the video is recorded, swipe the screen from left to right. Repeat this process until you see the Snail (Slow Motion) icon on the screen. This will reduce the playback speed of the clip.
Step 3: Decorate the Video (Optional)
Use the options present on the upper-right area of the screen to further decorate the video and/or add annotations to it.
Step 4: Share or Publish the Video
Once everything is done, tap Send To from the bottom-right corner to share the video with your family, friends, and colleagues, or publish it as a story that remains available for the next 24 hours.
Related: How to Record Slo-Mo videos on iPhone .
Part 2: How to Record a Slo-Mo Video and Upload to Snapchat
With Snapchat, even though you don’t require any third-party tool to reduce the playback speed of a video, the app has certain limitations. For example, it doesn’t allow you to set a zoom level, you are stuck with the framerate that the app has to offer, etc.
Because of this, many people prefer to use different methods to record a video in slow motion with their preferences, and then upload it to Snapchat. This approach also eliminates the need to swipe the screen several times merely to use a single slow-motion filter.
Fortunately, iPhone has a built-in SLO-MO mode in its Camera app that allows you to capture the videos in slow motion. To learn how to do slow mo on Snapchat with the iPhone’s Camera app, you can follow the instructions that are given below:
Step 1: Get to the iPhone’s SLO-MO Mode
Launch the Camera app on your iPhone (iPhone 13 Pro Max is used here for illustrations), and swipe the screen from left to right until you get to the SLO-MO mode.
Step 2: Set Recording Preferences
Tap the number that is present at the top-right corner (240 here) to toggle between different framerates, tap 1x from the lower-center area, swipe slightly up, and then use the wheel that appears next to define your preferred zoom level.
Step 3: Start and Stop the Recording
Tap the Record button to start the recording, and tap Stop when you’re done.
Note: Make sure that the duration of the recorded video doesn’t exceed 60 seconds.
Step 4: Upload the Slow-Motion Video to Snapchat
After the video is recorded in slow motion, close the Camera app, launch Snapchat, and tap the Gallery icon from the left side of the Capture button on the Camera section. From the Memories screen, go to the Camera Roll tab, and tap to select the video that you recorded in the previous step.
Next, optionally, tap the Edit icon from the bottom-left corner to decorate the video and/or add annotations to it, and follow the process as explained in the previous section to share the clip with your family, friends, or colleagues, or publish it as your story.
Part 3: How to Make Flash and Smooth Slo Mo Video for Snapchat
Although iPhone has the built-in SLO-MO mode that even enables you to set your preferred framerate and zoom level before recording, it still doesn’t allow you to slow down different parts of a video in different speed at your convenience. You can either record the entire video in slow motion or at a normal speed.
This is where a third-party app comes into play. While there are several video editing programs available online, the one of the best slow motion apps that helps you slow down the portions of a video with precision is CapCut.
Downloading and installing CapCut on your iPhone or Android phone is simple, and once it is done, you can follow the process given below to learn how to slow things down on Snapchat:
With CapCut, you can either slow down the whole clip or manage the speed for different segments. This section explains both methods.
Method 1: Slow Down the Whole Clip with CapCut
Step 1: Get to the Speed Panel
Launch CapCut, import the video that you want to slow down, and tap the imported media in the Timeline. Next, tap Speed from the bottom of the interface to get to the next window.
Step 2: Reduce the Speed of the Video
Tap Normal from the bottom of the screen that appears next, and drag the Speed slider to the left to reduce the playback speed. Tap OK from the bottom-right corner to save the changes.
Step 3: Upload the Video to Snapchat
Back on the previous interface, optionally tap Volume from the bottom and reduce the slider to 0 to mute the audio of the footage as it may get distorted due to the reduction in the speed.
Next, tap Share from the top-right corner to save the video on your iPhone, and then use the method explained in the previous section to access the clip from the Gallery within Snapchat for uploading.
Method 2: Reduce the Playback Speed of Different Parts of a Video
Step 1: Get to the Speed Panel
Use the process described in the previous method to get to the Speed panel.
Step 2: Reduce the Speed of Different Parts of the Video
Tap Curve from the bottom of the interface. On the next screen, tap Custom from the lower area, and then tap Edit. From the next panel, drag the beat points down to reduce the speed (or drag them above the line to increase).
Notice that each beat point represents a particular section of the video, and dragging it down reduces the playback speed of that segment. You can even tap anywhere on the line to add a new beat point and drag it down as needed for more precise speed management. Once done, tap OK from the bottom-right corner to save the modifications.
Optionally, you can also tap any of the available presets on the Curve screen to reduce the playback speed of the video accordingly.
Step 3: Upload the Video to Snapchat
Use the method explained in the previous method to export the video, upload it to Snapchat, and share the clip with your family, friends, and colleagues, or publish it as your story.
Part 4: FAQs about Slowing Down Snapchat Video
1. Can I record a slow mo video in Snapchat?
Technically speaking, no, you cannot. However, once you have recorded a video at a normal speed in Snapchat, you can apply the built-in Slow Motion filter to it by swiping the screen from left to right until you see the Snail icon at the center. The Snail icon represents the Slow Motion filter that reduces the playback speed when applied.
2. Besides slow-motion, which speed filters does Snapchat have?
In addition to slow motion Snapchat also has Forward and Fast Forward filters that increase the playback speed. While the Forward filter increases the speed slightly, the Fast Forward one enhances it drastically.
Conclusion
When using an iPhone, even though the SLO-MO mode enables you to record footage in slow motion, you don’t get many options. Therefore, it would be safe to say that it is easy to slow down the speed of a video if you have a dedicated third-party post-production app. However, if you want to go for a convenient method, learning how to slow down a video on Snapchat is an extremely simple and straightforward process.
Unleash Your Inner Manga: Learn Snapchat’s Anime Filter Magic
What Is Anime Filter On Snapchat?

Shanoon Cox
Mar 27, 2024• Proven solutions
Snapchat anime filter is the new sensation that is making waves all across social media. The best part about anime filter is that it has the ability to transform your videos and images into anime instantly. This filter has already gone viral on other social media platforms, such as TikTok, Instagram, and Twitter.
Filters and effects are not new when it comes to social media services, and almost all of them have their own versions, which you can use. Snapchat is here with a new lens, which is becoming immensely popular. If you have been trying to use the Snapchat anime filter and don’t know how to go about it, you have come to the right place because this article will talk about how to get this filter and how to use it. Keep reading!
Part 1: What is Anime Filter on Snapchat?
Out of the many AR lenses from Snapchat, the latest one is the anime lens. It’s a filter that will morph a person’s photo or video into an anime character and will customize the anime face based on the person’s facial features. So, rather than simply applying a generic image on top of your face, Snapchat makes sure that the anime image looks similar to your actual image. And as a result, each person’s anime face turns out to be different.
Since the hashtag #animefilter is trending, you can also apply the anime filter on your face and be a part of the trend. The reaction to this filter is lowkey amazing because the filter not only changes your face and makes it look like a part of a hit anime cartoon series or movie, but it sometimes also changes your hair color making you look like the King of the Pirates or Rapunzel. What this lens will do and how your image will turn out to be is highly fascinating.
What stands out is that after the anime filter of Snapchat was released, it has been used over 3 billion times. Snapchat has confirmed this statistic in its Third Quarter 2020 Financial report, and they even said that they already knew it would be a massive hit.
Part 2: How to Get the Anime Filter on Snapchat?
Now that you know how popular the Snapchat anime filter is. It’s worth knowing how to get it. Although this filter is available on Snapchat, many users are facing issues finding it. This section will show you two easy ways to get this filter. You can use one or both methods and start using the filter to show the world how you will look like an anime character. Here are the two ways:
Method 1: Get the Anime Face Filter on Snapchat via Link
Step 1: First, click on the link here . You will need this link to get the anime face filter.
Step 2: Once you click on the click, a pop-up window will open. If you haven’t downloaded the anime filter yet, then Snapchat will say, “New lens found.” Right below it, you will see the message “unlock for 48 hours.” Go ahead and click on that.
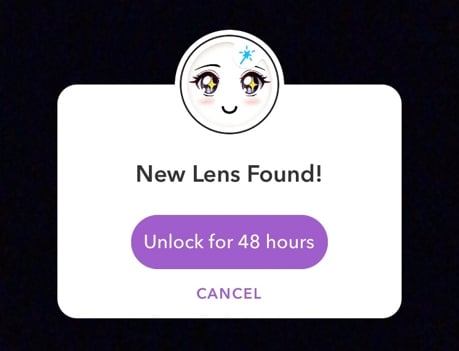
Step 3: By clicking on the purple button, your Snapchat anime filter will be available for use for 48 hours.
Here’s a pro tip, if you want to continue using this filter, once the 48 hours are over, simply repeat the steps, and you can use it for additional 48 hours. Simple!
If the pop-up says, “nothing to see here”, which means you have the filter already. In this case, you can go to Snapchat and click the filter accordingly.
Method 2: Get the Anime Style Filter via Explore on Snapchat
If you don’t want to click any unknown links, you can explore the anime filter by searching on Snapchat.
Step 1: Make sure your Snapchat is up-to-date. If not, update it to the latest version.
Step 2: Open Snapchat on your mobile or tablet, whichever you are using. Now, turn the lens towards you or someone else as if you are clicking a picture.
Step 3: Now, click on the smiley face filter button, and tap on the Explore button to continue.
Step 4: You can now search for Anime Styles. There are several anime filters available, just make sure that the creator of the filter is Snapchat.
Step 5: Once you have the anime filter, you can record a video of yourself, or take photos. You may also use both back and front cameras to turn anyone into an anime character.
Pro tip: This filter works on already saved photos and videos as well. Try them on too. This filter will work only on your face, though. So, it won’t turn your entire body into an anime character.
Part 3: How Do I Get More Filters on Snapchat?
Since Snapchat keeps coming up with attractive filters, you may wonder how you can get more filters to keep using them. Well, there are a few tricks that you can try. We will explain these tricks in detail, so make sure to follow them correctly.
Trick 1: Turn on Snapchat Geofilters
Before you try using Snapchat geofilters, you will first have to permit Snapchat to access your location. Whether you are using iOS or Android, enable location, and you will start seeing geofilters and all the other filters that you have saved.
Don’t expect a plethora of filters to suddenly turn up. For example, when you apply a geofilter, you will see that it adds an illustration and the place name to your Snap. So, the more you explore and go out, the more filters you will start seeing.
Trick 2: Check Online Resources on Lens Studio and Lenslist
You can also explore two filter libraries, which are Lens Studio and Lenslist. These are repositories of AR content. These two libraries have many attractive filters. All you need to do is scan the Snapcode available in the filters and unlock them. Both of them will have duplicate filters as well, though. But dig a bit deeper, and you will have enough codes of filters to keep using them every day. You will find these codes in your profile once you add them.
Trick 3: Share Snapcodes for Snapchat
The last way to add Snapcode of filters is by scanning other people’s codes. Once you go to your profile, you will see your Snapcodes, which other people can scan. Just like that, you can scan other people’s code as well. Some codes will be available for 24 hours, while others for 48 hours. After that, you can scan the code again when you want to reuse them. To scan a code, just hold your camera over the code and allow the screen to register it.
Bonus: How to Add Anime Effect to Video with Filmora
As we shared, Snapchat will only morph your face into an anime character. But if you are not satisfied with that and want to turn a whole video into anime or cartoon, then one of the best ways to go about it is by getting Wondershare Filmora. Filmora is an easy-to-use yet powerful enough video editing tool loaded with stunning effects, such as cartoons, sketches, color sketches, and more. The process is very easy to follow, and to use Filmora, you don’t need to be a pro. Here are the steps that you can follow:
Step 1: Launch Wondershare Filmora to your Mac or Windows computer. If you haven’t downloaded it yet, click the Try It Free button below to start.


Step 2: Now, import media files and load the video that you want to convert into a cartoon or anime to the media library, and then add that video to the timeline.

Step 3: Go to the Effects option, and type sketch in the search effects bar, which will be on the top of the screen.
Step 4: Currently, Filmora provides sketch and color sketch effects. Try each one of them to see which one works the best. If you want to add the filter to the entire video, just drag and drop the filter to the video, and it’s done.
Step 5: Finally, click on the Export button after everything is done to save the edited video on your computer.
Note: If you want to add the sketch effect to the person only, you can use the Human Segmentation in AI Portrait. In this way, you can also try the Cartoon effect to see the result.
Check the video tutorial below to explore more usage of the AI Portrait add-on.
Shanoon Cox
Shanoon Cox is a writer and a lover of all things video.
Follow @Shanoon Cox
Shanoon Cox
Mar 27, 2024• Proven solutions
Snapchat anime filter is the new sensation that is making waves all across social media. The best part about anime filter is that it has the ability to transform your videos and images into anime instantly. This filter has already gone viral on other social media platforms, such as TikTok, Instagram, and Twitter.
Filters and effects are not new when it comes to social media services, and almost all of them have their own versions, which you can use. Snapchat is here with a new lens, which is becoming immensely popular. If you have been trying to use the Snapchat anime filter and don’t know how to go about it, you have come to the right place because this article will talk about how to get this filter and how to use it. Keep reading!
Part 1: What is Anime Filter on Snapchat?
Out of the many AR lenses from Snapchat, the latest one is the anime lens. It’s a filter that will morph a person’s photo or video into an anime character and will customize the anime face based on the person’s facial features. So, rather than simply applying a generic image on top of your face, Snapchat makes sure that the anime image looks similar to your actual image. And as a result, each person’s anime face turns out to be different.
Since the hashtag #animefilter is trending, you can also apply the anime filter on your face and be a part of the trend. The reaction to this filter is lowkey amazing because the filter not only changes your face and makes it look like a part of a hit anime cartoon series or movie, but it sometimes also changes your hair color making you look like the King of the Pirates or Rapunzel. What this lens will do and how your image will turn out to be is highly fascinating.
What stands out is that after the anime filter of Snapchat was released, it has been used over 3 billion times. Snapchat has confirmed this statistic in its Third Quarter 2020 Financial report, and they even said that they already knew it would be a massive hit.
Part 2: How to Get the Anime Filter on Snapchat?
Now that you know how popular the Snapchat anime filter is. It’s worth knowing how to get it. Although this filter is available on Snapchat, many users are facing issues finding it. This section will show you two easy ways to get this filter. You can use one or both methods and start using the filter to show the world how you will look like an anime character. Here are the two ways:
Method 1: Get the Anime Face Filter on Snapchat via Link
Step 1: First, click on the link here . You will need this link to get the anime face filter.
Step 2: Once you click on the click, a pop-up window will open. If you haven’t downloaded the anime filter yet, then Snapchat will say, “New lens found.” Right below it, you will see the message “unlock for 48 hours.” Go ahead and click on that.
Step 3: By clicking on the purple button, your Snapchat anime filter will be available for use for 48 hours.
Here’s a pro tip, if you want to continue using this filter, once the 48 hours are over, simply repeat the steps, and you can use it for additional 48 hours. Simple!
If the pop-up says, “nothing to see here”, which means you have the filter already. In this case, you can go to Snapchat and click the filter accordingly.
Method 2: Get the Anime Style Filter via Explore on Snapchat
If you don’t want to click any unknown links, you can explore the anime filter by searching on Snapchat.
Step 1: Make sure your Snapchat is up-to-date. If not, update it to the latest version.
Step 2: Open Snapchat on your mobile or tablet, whichever you are using. Now, turn the lens towards you or someone else as if you are clicking a picture.
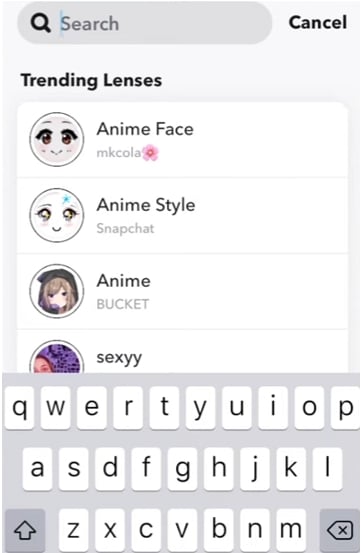
Step 3: Now, click on the smiley face filter button, and tap on the Explore button to continue.
Step 4: You can now search for Anime Styles. There are several anime filters available, just make sure that the creator of the filter is Snapchat.
Step 5: Once you have the anime filter, you can record a video of yourself, or take photos. You may also use both back and front cameras to turn anyone into an anime character.
Pro tip: This filter works on already saved photos and videos as well. Try them on too. This filter will work only on your face, though. So, it won’t turn your entire body into an anime character.
Part 3: How Do I Get More Filters on Snapchat?
Since Snapchat keeps coming up with attractive filters, you may wonder how you can get more filters to keep using them. Well, there are a few tricks that you can try. We will explain these tricks in detail, so make sure to follow them correctly.
Trick 1: Turn on Snapchat Geofilters
Before you try using Snapchat geofilters, you will first have to permit Snapchat to access your location. Whether you are using iOS or Android, enable location, and you will start seeing geofilters and all the other filters that you have saved.
Don’t expect a plethora of filters to suddenly turn up. For example, when you apply a geofilter, you will see that it adds an illustration and the place name to your Snap. So, the more you explore and go out, the more filters you will start seeing.
Trick 2: Check Online Resources on Lens Studio and Lenslist
You can also explore two filter libraries, which are Lens Studio and Lenslist. These are repositories of AR content. These two libraries have many attractive filters. All you need to do is scan the Snapcode available in the filters and unlock them. Both of them will have duplicate filters as well, though. But dig a bit deeper, and you will have enough codes of filters to keep using them every day. You will find these codes in your profile once you add them.
Trick 3: Share Snapcodes for Snapchat
The last way to add Snapcode of filters is by scanning other people’s codes. Once you go to your profile, you will see your Snapcodes, which other people can scan. Just like that, you can scan other people’s code as well. Some codes will be available for 24 hours, while others for 48 hours. After that, you can scan the code again when you want to reuse them. To scan a code, just hold your camera over the code and allow the screen to register it.
Bonus: How to Add Anime Effect to Video with Filmora
As we shared, Snapchat will only morph your face into an anime character. But if you are not satisfied with that and want to turn a whole video into anime or cartoon, then one of the best ways to go about it is by getting Wondershare Filmora. Filmora is an easy-to-use yet powerful enough video editing tool loaded with stunning effects, such as cartoons, sketches, color sketches, and more. The process is very easy to follow, and to use Filmora, you don’t need to be a pro. Here are the steps that you can follow:
Step 1: Launch Wondershare Filmora to your Mac or Windows computer. If you haven’t downloaded it yet, click the Try It Free button below to start.
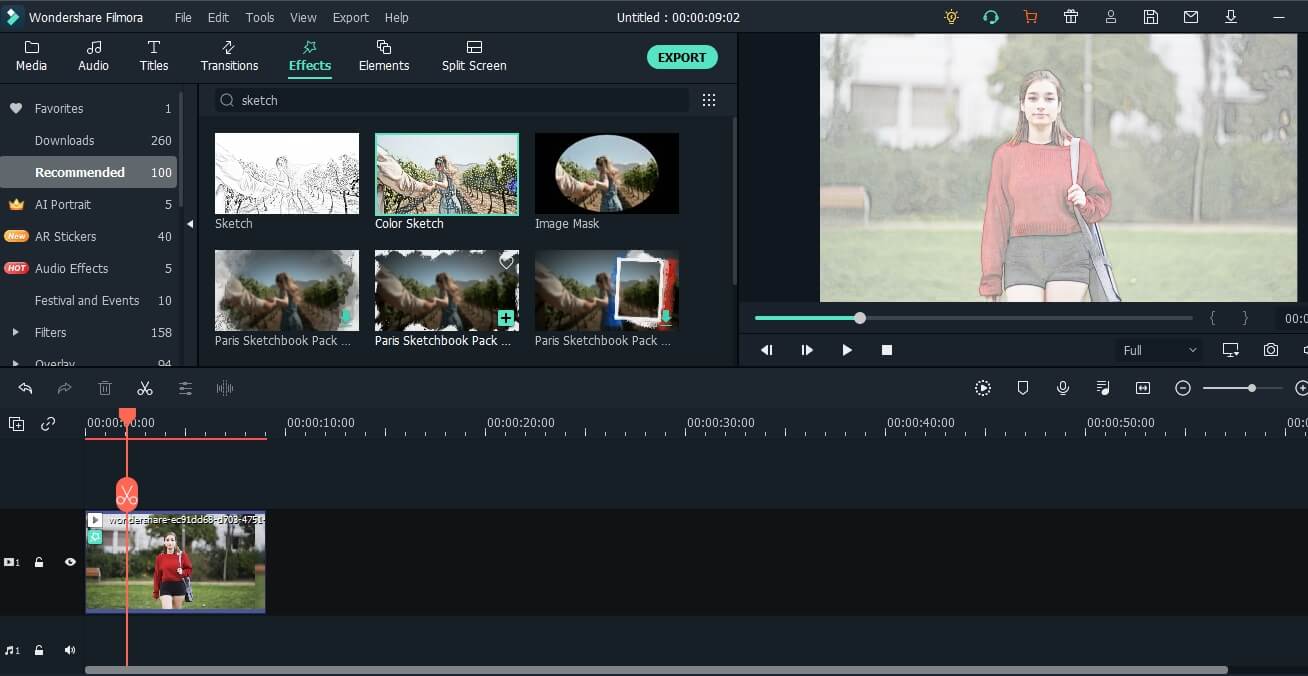
Step 2: Now, import media files and load the video that you want to convert into a cartoon or anime to the media library, and then add that video to the timeline.
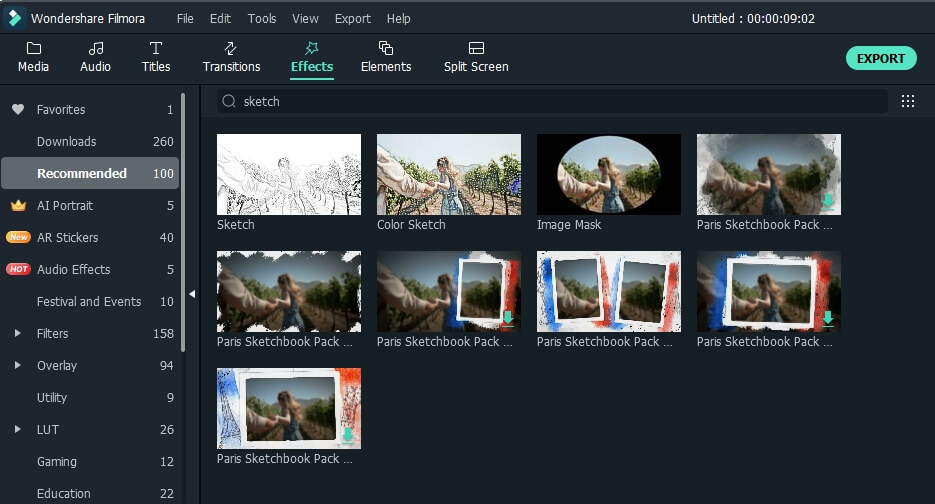
Step 3: Go to the Effects option, and type sketch in the search effects bar, which will be on the top of the screen.
Step 4: Currently, Filmora provides sketch and color sketch effects. Try each one of them to see which one works the best. If you want to add the filter to the entire video, just drag and drop the filter to the video, and it’s done.
Step 5: Finally, click on the Export button after everything is done to save the edited video on your computer.
Note: If you want to add the sketch effect to the person only, you can use the Human Segmentation in AI Portrait. In this way, you can also try the Cartoon effect to see the result.
Check the video tutorial below to explore more usage of the AI Portrait add-on.
Shanoon Cox
Shanoon Cox is a writer and a lover of all things video.
Follow @Shanoon Cox
Shanoon Cox
Mar 27, 2024• Proven solutions
Snapchat anime filter is the new sensation that is making waves all across social media. The best part about anime filter is that it has the ability to transform your videos and images into anime instantly. This filter has already gone viral on other social media platforms, such as TikTok, Instagram, and Twitter.
Filters and effects are not new when it comes to social media services, and almost all of them have their own versions, which you can use. Snapchat is here with a new lens, which is becoming immensely popular. If you have been trying to use the Snapchat anime filter and don’t know how to go about it, you have come to the right place because this article will talk about how to get this filter and how to use it. Keep reading!
Part 1: What is Anime Filter on Snapchat?
Out of the many AR lenses from Snapchat, the latest one is the anime lens. It’s a filter that will morph a person’s photo or video into an anime character and will customize the anime face based on the person’s facial features. So, rather than simply applying a generic image on top of your face, Snapchat makes sure that the anime image looks similar to your actual image. And as a result, each person’s anime face turns out to be different.
Since the hashtag #animefilter is trending, you can also apply the anime filter on your face and be a part of the trend. The reaction to this filter is lowkey amazing because the filter not only changes your face and makes it look like a part of a hit anime cartoon series or movie, but it sometimes also changes your hair color making you look like the King of the Pirates or Rapunzel. What this lens will do and how your image will turn out to be is highly fascinating.
What stands out is that after the anime filter of Snapchat was released, it has been used over 3 billion times. Snapchat has confirmed this statistic in its Third Quarter 2020 Financial report, and they even said that they already knew it would be a massive hit.
Part 2: How to Get the Anime Filter on Snapchat?
Now that you know how popular the Snapchat anime filter is. It’s worth knowing how to get it. Although this filter is available on Snapchat, many users are facing issues finding it. This section will show you two easy ways to get this filter. You can use one or both methods and start using the filter to show the world how you will look like an anime character. Here are the two ways:
Method 1: Get the Anime Face Filter on Snapchat via Link
Step 1: First, click on the link here . You will need this link to get the anime face filter.
Step 2: Once you click on the click, a pop-up window will open. If you haven’t downloaded the anime filter yet, then Snapchat will say, “New lens found.” Right below it, you will see the message “unlock for 48 hours.” Go ahead and click on that.
Step 3: By clicking on the purple button, your Snapchat anime filter will be available for use for 48 hours.
Here’s a pro tip, if you want to continue using this filter, once the 48 hours are over, simply repeat the steps, and you can use it for additional 48 hours. Simple!
If the pop-up says, “nothing to see here”, which means you have the filter already. In this case, you can go to Snapchat and click the filter accordingly.
Method 2: Get the Anime Style Filter via Explore on Snapchat
If you don’t want to click any unknown links, you can explore the anime filter by searching on Snapchat.
Step 1: Make sure your Snapchat is up-to-date. If not, update it to the latest version.
Step 2: Open Snapchat on your mobile or tablet, whichever you are using. Now, turn the lens towards you or someone else as if you are clicking a picture.
Step 3: Now, click on the smiley face filter button, and tap on the Explore button to continue.
Step 4: You can now search for Anime Styles. There are several anime filters available, just make sure that the creator of the filter is Snapchat.
Step 5: Once you have the anime filter, you can record a video of yourself, or take photos. You may also use both back and front cameras to turn anyone into an anime character.
Pro tip: This filter works on already saved photos and videos as well. Try them on too. This filter will work only on your face, though. So, it won’t turn your entire body into an anime character.
Part 3: How Do I Get More Filters on Snapchat?
Since Snapchat keeps coming up with attractive filters, you may wonder how you can get more filters to keep using them. Well, there are a few tricks that you can try. We will explain these tricks in detail, so make sure to follow them correctly.
Trick 1: Turn on Snapchat Geofilters
Before you try using Snapchat geofilters, you will first have to permit Snapchat to access your location. Whether you are using iOS or Android, enable location, and you will start seeing geofilters and all the other filters that you have saved.
Don’t expect a plethora of filters to suddenly turn up. For example, when you apply a geofilter, you will see that it adds an illustration and the place name to your Snap. So, the more you explore and go out, the more filters you will start seeing.
Trick 2: Check Online Resources on Lens Studio and Lenslist
You can also explore two filter libraries, which are Lens Studio and Lenslist. These are repositories of AR content. These two libraries have many attractive filters. All you need to do is scan the Snapcode available in the filters and unlock them. Both of them will have duplicate filters as well, though. But dig a bit deeper, and you will have enough codes of filters to keep using them every day. You will find these codes in your profile once you add them.
Trick 3: Share Snapcodes for Snapchat
The last way to add Snapcode of filters is by scanning other people’s codes. Once you go to your profile, you will see your Snapcodes, which other people can scan. Just like that, you can scan other people’s code as well. Some codes will be available for 24 hours, while others for 48 hours. After that, you can scan the code again when you want to reuse them. To scan a code, just hold your camera over the code and allow the screen to register it.
Bonus: How to Add Anime Effect to Video with Filmora
As we shared, Snapchat will only morph your face into an anime character. But if you are not satisfied with that and want to turn a whole video into anime or cartoon, then one of the best ways to go about it is by getting Wondershare Filmora. Filmora is an easy-to-use yet powerful enough video editing tool loaded with stunning effects, such as cartoons, sketches, color sketches, and more. The process is very easy to follow, and to use Filmora, you don’t need to be a pro. Here are the steps that you can follow:
Step 1: Launch Wondershare Filmora to your Mac or Windows computer. If you haven’t downloaded it yet, click the Try It Free button below to start.
Step 2: Now, import media files and load the video that you want to convert into a cartoon or anime to the media library, and then add that video to the timeline.
Step 3: Go to the Effects option, and type sketch in the search effects bar, which will be on the top of the screen.
Step 4: Currently, Filmora provides sketch and color sketch effects. Try each one of them to see which one works the best. If you want to add the filter to the entire video, just drag and drop the filter to the video, and it’s done.
Step 5: Finally, click on the Export button after everything is done to save the edited video on your computer.
Note: If you want to add the sketch effect to the person only, you can use the Human Segmentation in AI Portrait. In this way, you can also try the Cartoon effect to see the result.
Check the video tutorial below to explore more usage of the AI Portrait add-on.
Shanoon Cox
Shanoon Cox is a writer and a lover of all things video.
Follow @Shanoon Cox
Also read:
- In 2024, Decoding Snapchat Emoji Language
- [Updated] Unleash Creativity Your Comprehensible Guide to Sharing Animated Messages in Snapchat for 2024
- 2024 Approved Efficient Storage of Android/Mac Snaps for Longevity
- [New] 2024 Approved Perfect Pairing Transferring Camera Roll Content Effortlessly to Snapchat
- [Updated] The Soundtrack of Successful Snapchat Stories for 2024
- [Updated] How to Do Screen Record Snapchat on Mobile Phone?
- 2024 Approved Ensuring Long-Term Accessibility Transferring Photos From Snapchat
- [Updated] 2024 Approved Recording Success How to Grab Phonescreens with Snapchat Easily
- 2024 Approved Social Network Showdown 2021 The Battle Between TikTok and Snapchat
- [New] 2024 Approved Precise Process Installing Snapchat on a Mac OS
- [Updated] In 2024, How To Recover My Eyes Only Pictures On Snapchat
- [New] Decoding Displacement Your Snapchat Time-Turner Guide for 2024
- [New] In 2024, Navigate the Art of Snapchat Filters for Beginners
- [Updated] Elevate Your Social Media Presence with These Snapchat Strategies
- [New] Change Snapchat Voice in Minutes Using Twin Methods for 2024
- [New] Hasten Recovering Deleted Snaps
- IPhone Camera Roll Synergy with Snapchat Sharing for 2024
- 2024 Approved Slow Motion Mastery in Snapchat Tips & Tricks
- [New] 2024 Approved Best Practices for Sharing Visuals in MS Teams with Snap Camera
- How to Bypass FRP from Honor Magic 5 Pro?
- [Updated] In 2024, Unlocking Vidma's Potential as a Video Capturer
- In 2024, The Art of Documenting Digital Entertainment
- Easy Steps to Make Excel 2000 Hyperlinks Working
- [New] In 2024, Complete Self-Guided Tour to Host & Participate in Google Meet
- Updated 2024 Approved Unlocking Picture-in-Picture A Beginners Guide to Final Cut Pro
- 2024 Approved Easy Video Aspect Ratio Conversion No Expertise Needed
- Making Slow Motion Videos in Premiere Pro A Review on The Best Methods
- New 2024 Approved Guide To Using Luts Perfectly in Final Cut Pro
- [New] In 2024, Seamless FB to MP4 Conversion Service
- In 2024, Best Online Video Preview Creation Tools
- Updated Want to Find a High-Quality Video Editing Tool for Your 64 Bit Operating System? Youve Come to the Right Place for 2024
- [Updated] 2024 Approved 15 Top-Rated Screen Capture Tools to Support Education
- [Updated] 7 Tips for Capturing Live Online Classes Gratis for 2024
- [Updated] In 2024, Cutting-Edge Artisans Innovative Instagram HLV Designs
- Title: "[Updated] In 2024, Speed Control 101 Taming Video Velocity in Snapchat"
- Author: Scott
- Created at : 2024-05-23 11:50:16
- Updated at : 2024-05-24 11:50:16
- Link: https://snapchat-videos.techidaily.com/updated-in-2024-speed-control-101-taming-video-velocity-in-snapchat/
- License: This work is licensed under CC BY-NC-SA 4.0.
