![[Updated] In 2024, Invisible Snapshotting Hidden Image Recording on Snapchat](https://thmb.techidaily.com/dc0976bf992fc8f3795e090c13f66cb1c6f1455915fe3cbbbf65ceba836d3f9e.jpg)
"[Updated] In 2024, Invisible Snapshotting Hidden Image Recording on Snapchat"
Invisible Snapshotting: Hidden Image Recording on Snapchat
How to Screenshot on Snapchat [5 Ways]

Max Wales
Mar 27, 2024• Proven solutions
A great way to share specific memories with those not on the social platform, or even for those looking to make personalized and meaningful memoir collages for their friends and loved ones, there are plenty of ways to inconspicuously screenshot on Snapchat without the sender being made aware.
Becoming one of the most popular and highly favored Social Media platforms over the past several years, Snapchat is a great place to showcase 10-second snippets of your day-to-day life with your followers, friends, and family members. From selfies to shots of food, videos taken during nights on the town to holiday adventures, Snapchat is the perfect video and image-sharing platform for Social Media fans.
![]()

The All-in-One Screen Recorder & Video Editor
- Record PC screen , voiceover, and webcam simultaneously
- Edit recorded clips quickly with a wide range of professional tools
- Built-in plentiful templates and effects
- Export to MP4, MOV, MKV, GIF and multiple formats
For Win 7 or later (64-bit)
For macOS 10.12 or later
 Secure Download
How to screenshot on snapchat without stimulating a notification?
An incredible application that allows you to send and share videos and images with friends and followers, Snapchat is designed to help you stay connected in more ways than one. Featuring an anti-screenshot notification system that automatically notifies posters when a recipient or audience member screenshots a snap, it’s become increasingly harder to screenshot without being detected.
That being said, there are still plenty of other methods that offer a practical alternative to ensure you avoid that awkward automated notification.
Option 1. Use Another Phone or Mobile Device to Take Snapchat Screenshot
An easy and risk-free way to capture and store a specific snap with ease, utilizing another mobile device or camera is a great method that requires very little effort. Simply us a second phone, or a nearby tablet, to record the whole duration of the video or photo.
Although the quality of the recording won’t be as crisp and clear as it appears on the handheld, this is a reliable and fool-proof way to preserve those special snaps. From those video recordings, you should then be able to crop out the video or image you needed.
Missed it?
Why not take advantage of Snapchat’s “replay” mode to ensure you get the perfect shot – but be warned, posters also get notified of this too.
Option 2. Use the Built-In Screen Recoding Tool on iOS11
If you didn’t already know, there’s a built-in screen recording software within iOS11 that allows you to effectively capture and record snaps with ease. Lying within the Settings of any iPhone, follow these easy steps on how to live record your screen:
- Step 1: Head to Settings > Control Centre > Customize Controls
- Step 2: Locate the “Screen Recording” functionality
- Step 3: Select the small cross to add it to your Control Centre
- Step 4: To activate – Tap the icon with the 2 concentric circles to start recording. To complete a recording, simply tap the red bar that’s present at the top of the screen and select “End Recording”.
Although it’s not possible to start recording a snap whilst it’s already open, it’s best to start recording before you opt to open a specific message.
Please note: If you have updated to Snapchat version 10.17.5, the posters will be notified each and every time you initiate and capture a recording through the use of this built-in recorder.
Option 3. Use QuickTime Screen Capture on a Mac
A little more technical than simply using another mobile device to record a snap, using the QuickTime Player is an efficient and high-quality method for those looking to secretly store a snapchat post.
To start recording snaps, follow these simple steps:
- Step 1: Connect your iPhone to your Mac
- Step 2: Open the QuickTime Player application
- Step 3: Select File > New Movie Recording from the menu
- Step 4: Once loaded, simply hover the mouse beside the recording button. By clicking the small arrow, you’ll be provided with a range of different recording options
- Step 5: Select your Phone as the Movie Recording Input
Once connected, your Mac screen should now be mirroring your mobile device. Just like you would on your phone, simply hit record and head on over to the Snapchat application to begin recording.
Option 4. Use the Mirror Feature for Android
Similar to the use of QuickTime or the iOS11 Screen Recording software, Screen Mirroring is another effective method for capturing Snapchat screenshots without the poster being made aware. By connecting a HDMI cable to both your TV and laptop, or by accessing the “Screen Mirroring” application that’s often built-in to most Smart Phones and Android devices, it’s possible to mirror/cast the active screen on your device onto an external platform.
In doing so, you’re presented with the opportunity to utilize another device to record a playing snap or even share a recently received snap with other audience members that are present in the room.
Option 5. Delay the Snapchat Screenshot Notification
A method for those feeling a more confident or even for those that aren’t too bothered about their posters receiving a notification in the long run, this method is a great way to delay the arrival of that pop-down notification.
To delay the notification process, follow these simple steps:
- Step 1: Load the Snapchat application on your mobile device
- Step 2: Find the snap you want to open/record (ensure it is fully loaded)
- Step 3: Turn off WiFi, Bluetooth, Mobile Data
- Step 4: Turn on the Airplane Mode
- Step 5: Open the snap and take your screenshot
- Step 6: Wait approximately 30 seconds and then turn all your connections back on
Designed to postpone the process of the poster receiving a notification, but not allowing for viewers to screenshot undetected, this method allows audience members to screenshot snaps from those that are perhaps a little unobservant when it comes to checking their notifications.
Be warned though, some posters may catch on to this method of screenshotting and they may stop sharing their videos and images with you.
Summary
Despite there being plenty of reasons why there might be a need for you to record a Snapchat memory without the sender being made aware, it’s important to note that this can also be viewed as a breach of privacy with senders not only being informed of who has taken a screenshot, but also how many times they’ve done so and of which post.
With Snapchat designed to maintain the notion that any media sent between users is considered temporary, thanks to the 5-10 second duration limit, the methods listed above, although not fail-proof, are suggested as simple yet effective ways to avoid triggering an unwanted notification whilst using this highly popular social networking application.


Max Wales
Max Wales is a writer and a lover of all things video.
Follow @Max Wales
Max Wales
Mar 27, 2024• Proven solutions
A great way to share specific memories with those not on the social platform, or even for those looking to make personalized and meaningful memoir collages for their friends and loved ones, there are plenty of ways to inconspicuously screenshot on Snapchat without the sender being made aware.
Becoming one of the most popular and highly favored Social Media platforms over the past several years, Snapchat is a great place to showcase 10-second snippets of your day-to-day life with your followers, friends, and family members. From selfies to shots of food, videos taken during nights on the town to holiday adventures, Snapchat is the perfect video and image-sharing platform for Social Media fans.
![]()
The All-in-One Screen Recorder & Video Editor
- Record PC screen , voiceover, and webcam simultaneously
- Edit recorded clips quickly with a wide range of professional tools
- Built-in plentiful templates and effects
- Export to MP4, MOV, MKV, GIF and multiple formats
For Win 7 or later (64-bit)
For macOS 10.12 or later
Secure Download
How to screenshot on snapchat without stimulating a notification?
An incredible application that allows you to send and share videos and images with friends and followers, Snapchat is designed to help you stay connected in more ways than one. Featuring an anti-screenshot notification system that automatically notifies posters when a recipient or audience member screenshots a snap, it’s become increasingly harder to screenshot without being detected.
That being said, there are still plenty of other methods that offer a practical alternative to ensure you avoid that awkward automated notification.
Option 1. Use Another Phone or Mobile Device to Take Snapchat Screenshot
An easy and risk-free way to capture and store a specific snap with ease, utilizing another mobile device or camera is a great method that requires very little effort. Simply us a second phone, or a nearby tablet, to record the whole duration of the video or photo.
Although the quality of the recording won’t be as crisp and clear as it appears on the handheld, this is a reliable and fool-proof way to preserve those special snaps. From those video recordings, you should then be able to crop out the video or image you needed.
Missed it?
Why not take advantage of Snapchat’s “replay” mode to ensure you get the perfect shot – but be warned, posters also get notified of this too.
Option 2. Use the Built-In Screen Recoding Tool on iOS11
If you didn’t already know, there’s a built-in screen recording software within iOS11 that allows you to effectively capture and record snaps with ease. Lying within the Settings of any iPhone, follow these easy steps on how to live record your screen:
- Step 1: Head to Settings > Control Centre > Customize Controls
- Step 2: Locate the “Screen Recording” functionality
- Step 3: Select the small cross to add it to your Control Centre
- Step 4: To activate – Tap the icon with the 2 concentric circles to start recording. To complete a recording, simply tap the red bar that’s present at the top of the screen and select “End Recording”.
Although it’s not possible to start recording a snap whilst it’s already open, it’s best to start recording before you opt to open a specific message.
Please note: If you have updated to Snapchat version 10.17.5, the posters will be notified each and every time you initiate and capture a recording through the use of this built-in recorder.
Option 3. Use QuickTime Screen Capture on a Mac
A little more technical than simply using another mobile device to record a snap, using the QuickTime Player is an efficient and high-quality method for those looking to secretly store a snapchat post.
To start recording snaps, follow these simple steps:
- Step 1: Connect your iPhone to your Mac
- Step 2: Open the QuickTime Player application
- Step 3: Select File > New Movie Recording from the menu
- Step 4: Once loaded, simply hover the mouse beside the recording button. By clicking the small arrow, you’ll be provided with a range of different recording options
- Step 5: Select your Phone as the Movie Recording Input
Once connected, your Mac screen should now be mirroring your mobile device. Just like you would on your phone, simply hit record and head on over to the Snapchat application to begin recording.
Option 4. Use the Mirror Feature for Android
Similar to the use of QuickTime or the iOS11 Screen Recording software, Screen Mirroring is another effective method for capturing Snapchat screenshots without the poster being made aware. By connecting a HDMI cable to both your TV and laptop, or by accessing the “Screen Mirroring” application that’s often built-in to most Smart Phones and Android devices, it’s possible to mirror/cast the active screen on your device onto an external platform.
In doing so, you’re presented with the opportunity to utilize another device to record a playing snap or even share a recently received snap with other audience members that are present in the room.
Option 5. Delay the Snapchat Screenshot Notification
A method for those feeling a more confident or even for those that aren’t too bothered about their posters receiving a notification in the long run, this method is a great way to delay the arrival of that pop-down notification.
To delay the notification process, follow these simple steps:
- Step 1: Load the Snapchat application on your mobile device
- Step 2: Find the snap you want to open/record (ensure it is fully loaded)
- Step 3: Turn off WiFi, Bluetooth, Mobile Data
- Step 4: Turn on the Airplane Mode
- Step 5: Open the snap and take your screenshot
- Step 6: Wait approximately 30 seconds and then turn all your connections back on
Designed to postpone the process of the poster receiving a notification, but not allowing for viewers to screenshot undetected, this method allows audience members to screenshot snaps from those that are perhaps a little unobservant when it comes to checking their notifications.
Be warned though, some posters may catch on to this method of screenshotting and they may stop sharing their videos and images with you.
Summary
Despite there being plenty of reasons why there might be a need for you to record a Snapchat memory without the sender being made aware, it’s important to note that this can also be viewed as a breach of privacy with senders not only being informed of who has taken a screenshot, but also how many times they’ve done so and of which post.
With Snapchat designed to maintain the notion that any media sent between users is considered temporary, thanks to the 5-10 second duration limit, the methods listed above, although not fail-proof, are suggested as simple yet effective ways to avoid triggering an unwanted notification whilst using this highly popular social networking application.
Max Wales
Max Wales is a writer and a lover of all things video.
Follow @Max Wales
Smart Snapchat Gifting: Step-by-Step for Success

For all informal interactions between pals, Snapchat is the go-to app. Many configurable options are available on the platform, allowing you to express your inner creative sides. Snapchat helps to put your spin on anything, whether it’s just sharing random photos to your contacts or having extended chats.
The option to add GIFs to Snapchat is one such great feature. Because Snapchat is primarily a picture-sharing app, the emphasis is on making these images as engaging and imaginative as possible, and this is where animated GIFs come to play.
GIF stickers have exploded in popularity and for a good cause. The active emojis are mostly not amusing, but they also give life to your images, making your digital experience better overall.
Given how entertaining GIFs can be, knowing how to send gif on snapchat is essential. As a result, we’ve put up a detailed guide that explains how to send gif on snapchat in four distinct methods. Enjoy!
Do you want to know how to send gif on snapchat in different simple ways? Then you’ve arrived at the correct page. In this post, we’ll show you how to send gif on snapchat in just a few easy and simple steps.
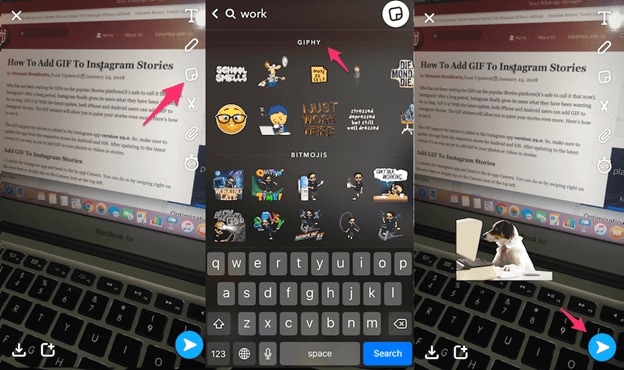
1.How to send gif on snapchat?
- On your phone, open Snapchat.
- Take a picture
- Select the Stickers symbol.
- Select a GIF.
- Choose the GIF you want to use.
- Finally, please include it in the picture.
2.How to make your animated GIFs
GIF means Graphics Interchange Format, and it’s simply a series of moving, dynamic pictures (think Harry Potter) that loop indefinitely. They give your image, which would otherwise be stagnant and dull, a new dimension.
GIFs are so entertaining that they can be used to carry a whole discussion. However, if you want to learn how to make your GIFs, follow the steps below.
You’ll need to utilize the GIPHY application to generate your unique GIFs for this.
On your phone, download the GIPHY app.
- Start the app on your Mobile and select the create option.
- Smile symbol: Take a Photo and Gallery Option are the three options available to you.
- Smile Icon: This option allows you to make GIFs using the edit button.
- Capture a Photo: This option allows the user to take a photo on the scene and convert it to a GIF.
- Option of Gallery: You may build a GIF by selecting a photo from your gallery and editing it.
- Select options and begin designing depending on your preferences.
- When you will finish, click on the arrow in the bottom right-hand corner to exit.
- To save all the GIFs, go to Generated GIFs, touch on the three vertical dots, and choose Save GIF.
That GIF has now been saved to your pictures folder and can be seen anytime you need that.
3.What is the best way to transmit GIFs on Snapchat?
Putting GIFs in your photos is easy and takes only a few minutes. Here’s how to accomplish it.
- Log in to your Snapchat account by opening the app on your phone.
- Click a photo or choose an image from your collection to upload.
- Select the sticker button to add extra components to the Snap.
- Choose the GIF choice and any GIF you wish.
- Once you’ve chosen a GIF, it’ll show on the Snap for you to adjust and position anywhere you’d like.
- Lastly, to send the Snap to your pals, select the arrow option in the lower right corner.
4.On Android, how to send gif on snapchat Messages?
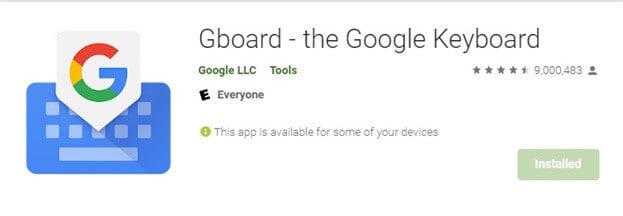
You must download the GBoard app on your phone to transfer GIFs to your pals immediately from a keypad on Android.
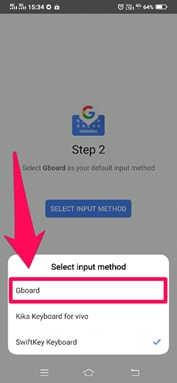
5.How can I get Gboard to work on Android?
To install and activate the Gboard application and transmit GIFs directly from it, follow the procedure.
- Download the Gboard application on your Android.
- Open the app and select Enable in Configurations from the menu.
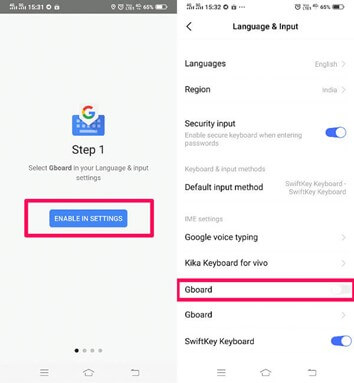
- The Communication and Input menu will appear in Preferences.
- Choose Gboard from the list of available keyboards.
6.In iOS, how to send gif on snapchat Messages?
Using the GIPHY keypad on your iPhone, you can share GIFs straight to your pals via Snapchat chats. However, you must first activate the keypad.
- Turn on the GIPHY keypad on your iPhone. Install the GIPHY phone app from the Apple Store. After you’ve downloaded the app, you’ll need to activate the GIPHY keypad on your iPhone.
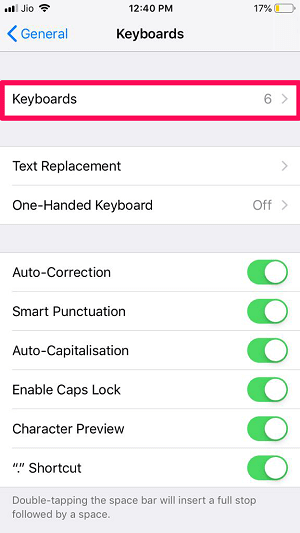
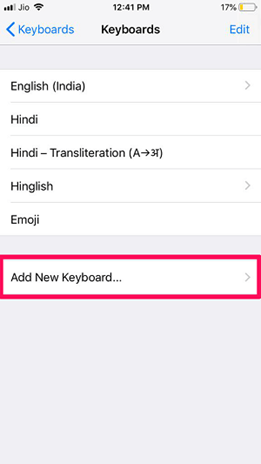
- To do just that, go over to the iPhone configuration menu and select “General” from the drop-down menu.
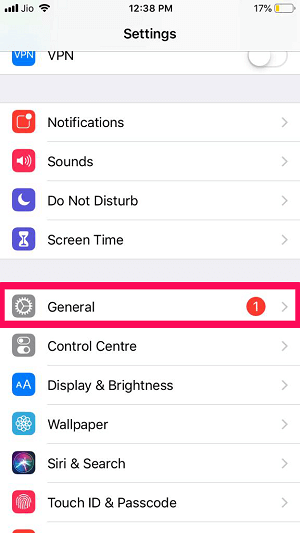
- Scroll to the bottom of the Keypad choice, then click “Keypads” once again.
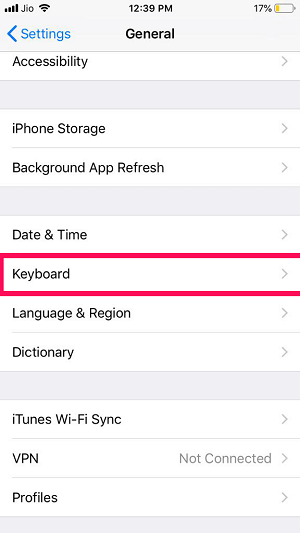
- All of the newly added keyboards will now be visible. Click the “Add Additional Keyboard” option to add GIPHY.
For Win 7 or later (64-bit)
For macOS 10.12 or later
For all informal interactions between pals, Snapchat is the go-to app. Many configurable options are available on the platform, allowing you to express your inner creative sides. Snapchat helps to put your spin on anything, whether it’s just sharing random photos to your contacts or having extended chats.
The option to add GIFs to Snapchat is one such great feature. Because Snapchat is primarily a picture-sharing app, the emphasis is on making these images as engaging and imaginative as possible, and this is where animated GIFs come to play.
GIF stickers have exploded in popularity and for a good cause. The active emojis are mostly not amusing, but they also give life to your images, making your digital experience better overall.
Given how entertaining GIFs can be, knowing how to send gif on snapchat is essential. As a result, we’ve put up a detailed guide that explains how to send gif on snapchat in four distinct methods. Enjoy!
Do you want to know how to send gif on snapchat in different simple ways? Then you’ve arrived at the correct page. In this post, we’ll show you how to send gif on snapchat in just a few easy and simple steps.
1.How to send gif on snapchat?
- On your phone, open Snapchat.
- Take a picture
- Select the Stickers symbol.
- Select a GIF.
- Choose the GIF you want to use.
- Finally, please include it in the picture.
2.How to make your animated GIFs
GIF means Graphics Interchange Format, and it’s simply a series of moving, dynamic pictures (think Harry Potter) that loop indefinitely. They give your image, which would otherwise be stagnant and dull, a new dimension.
GIFs are so entertaining that they can be used to carry a whole discussion. However, if you want to learn how to make your GIFs, follow the steps below.
You’ll need to utilize the GIPHY application to generate your unique GIFs for this.
On your phone, download the GIPHY app.
- Start the app on your Mobile and select the create option.
- Smile symbol: Take a Photo and Gallery Option are the three options available to you.
- Smile Icon: This option allows you to make GIFs using the edit button.
- Capture a Photo: This option allows the user to take a photo on the scene and convert it to a GIF.
- Option of Gallery: You may build a GIF by selecting a photo from your gallery and editing it.
- Select options and begin designing depending on your preferences.
- When you will finish, click on the arrow in the bottom right-hand corner to exit.
- To save all the GIFs, go to Generated GIFs, touch on the three vertical dots, and choose Save GIF.
That GIF has now been saved to your pictures folder and can be seen anytime you need that.
3.What is the best way to transmit GIFs on Snapchat?
Putting GIFs in your photos is easy and takes only a few minutes. Here’s how to accomplish it.
- Log in to your Snapchat account by opening the app on your phone.
- Click a photo or choose an image from your collection to upload.
- Select the sticker button to add extra components to the Snap.
- Choose the GIF choice and any GIF you wish.
- Once you’ve chosen a GIF, it’ll show on the Snap for you to adjust and position anywhere you’d like.
- Lastly, to send the Snap to your pals, select the arrow option in the lower right corner.
4.On Android, how to send gif on snapchat Messages?
You must download the GBoard app on your phone to transfer GIFs to your pals immediately from a keypad on Android.
5.How can I get Gboard to work on Android?
To install and activate the Gboard application and transmit GIFs directly from it, follow the procedure.
- Download the Gboard application on your Android.
- Open the app and select Enable in Configurations from the menu.
- The Communication and Input menu will appear in Preferences.
- Choose Gboard from the list of available keyboards.
6.In iOS, how to send gif on snapchat Messages?
Using the GIPHY keypad on your iPhone, you can share GIFs straight to your pals via Snapchat chats. However, you must first activate the keypad.
- Turn on the GIPHY keypad on your iPhone. Install the GIPHY phone app from the Apple Store. After you’ve downloaded the app, you’ll need to activate the GIPHY keypad on your iPhone.
- To do just that, go over to the iPhone configuration menu and select “General” from the drop-down menu.
- Scroll to the bottom of the Keypad choice, then click “Keypads” once again.
- All of the newly added keyboards will now be visible. Click the “Add Additional Keyboard” option to add GIPHY.
For Win 7 or later (64-bit)
For macOS 10.12 or later
Also read:
- [New] 2024 Approved Undisclosed Snapshotting Mastering Invisible Image Capture on Snapchat
- [New] In 2024, Prolong Your Snapstreak Legacy with Ease
- [New] Indispensable Sandbox Journeys Await for 2024
- [New] The Ultimate Guide to Book Trailers You Won't Miss for 2024
- [Updated] How to Record Gameplay and Webcam for 2024
- [Updated] In 2024, Optimal Metaverse Displays The Ultimate 8 Picks
- [Updated] In 2024, Setting Up Snapchat on Apple Computers Step by Step
- [Updated] Key Sites The 6 Most Vital Platforms for B2B Relationships
- [Updated] The Social Media Revolution A Side-By-Side Look at TikTok and Snapchat's Features
- How to unlock a disable iPhone 15 Pro Max using find my iphone
- The Beginner's Pathway to Fashionable Snaps & Lenses for 2024
- Title: [Updated] In 2024, Invisible Snapshotting Hidden Image Recording on Snapchat
- Author: Scott
- Created at : 2025-01-14 21:16:17
- Updated at : 2025-01-16 17:51:11
- Link: https://snapchat-videos.techidaily.com/updated-in-2024-invisible-snapshotting-hidden-image-recording-on-snapchat/
- License: This work is licensed under CC BY-NC-SA 4.0.