![[Updated] In 2024, Innovative Tips for Multisnap Creation on Snapchat](https://thmb.techidaily.com/d3a69700e0cb55adae67e72e210fb2f2a9d54f1a94f5e0b261b4ccf5f3207b46.jpg)
[Updated] In 2024, Innovative Tips for Multisnap Creation on Snapchat
Innovative Tips for Multisnap Creation on Snapchat
How to Make and Edit Multi Snapchat Videos Easily

Ollie Mattison
Mar 27, 2024• Proven solutions
Recording and sharing videos are now easy with Snapchat. With a maximum limit of 10 seconds, these videos are kept short in duration. Whether posting the Snapchat video to the story, sharing it with friends or in a Snapchat group, Snapchat was always a hit until numerous competitors started ripping its features.
But, Snapchat is back with a bounce with its multi snaps feature which is a new addition to video sharing feature in Snapchat. What is a multi snap? Snapchat, allows users to make more than 10 seconds snap video now, which is called multi snaps.
In this feature, you can record footages as long as 1 minute, which is divided into 6 snaps. Do you know how to make a video on Snapchat? Here you will learn how to make and edit multi Snapchat videos even without holding the button.
- Part1: How to Make Snapchat Multi Video Easily
- Part2: Notes About Multi Snapchat Videos
- Part3: How to Make Multi Video Without Holding the Button On iPhone
- Part4: How To Edit Video With The Built-In Features
Part1: How to Make Snapchat Multi Video Easily
If you wish to make a multi video in a few minutes very quickly, you just need to tap the big round button on the screen of the camera app and hold it.
Don’t leave the button even after the time is over. As you keep holding the button, the next snap starts recording automatically.
When you think it’s complete, at the bottom of the screen you can see the snaps appearing.
The ones you wish to keep must be saved and the rest can be dragged in order to delete.
Finally, you may edit the snaps and add effects like you do with any usual snap at the same time.

Part2: Notes About Multi Snapchat Videos
- In the Memories tab, you can find the multi snaps under the ‘Snaps’ icon and ‘All’ tabs
- When a multi snap is added and saved to the Camera Roll folder, it will be saved as a seamless single video. You cannot divide the video or break it into parts.
- One particular snap cannot be extracted from the multi snap
- Are you looking forward to sending multi snaps to My Story but facing difficulty? In such a situation you can always find it in My Stories screen and send each snap one by one.
- In multi snap, you cannot include 3D stickers, and it also cannot be reversed or looped at present.
Part3: How to Make Multi Video Without Holding the Button On iPhone
Pressing and holding the button constantly for recording multi snaps can be quite tiresome as it keeps your finger held down. But, the iPhone users can record multi video even without holding the button. Do your know how? Let’s learn the trick.
- Firstly, go to the Settings and select General from the drop-down menu. Tap on Accessibility and click the Assistive Touch. The Assistive Touch option helps to access the iPhone when you are unable to touch the screen.

- Turn the Assistive Touch On from the of mode and then Create New Gesture, under Custom Gestures. With this mode, you can record the gestures. You can activate it from the Favorites in Menu bar. Then, use one finger to press and hold your iPhone screen’s center to allow recording your Touch. You can see at the bottom there’s a blue bar which once filled indicates that your Touch is recorded. Now, Save the gesture and open Snapchat. You can find a grey dot on the screen, tap it. Now, tap on the Custom and the saved gesture.

- Once you click the saved gesture, you can see another grey dot on the screen. Drag the grey dot over record button of Snapchat and let go. One thing must be noted that you can only record 8 seconds video in iPhone than usual 10 seconds because gestures can be set only for 8 seconds.

Your hands are free to move anywhere, meanwhile, the Snapchat video is recording.
Part4: How To Edit Video With The Built-In Features
Editing snaps and videos have always been fun whether it’s for trial or for work. After recording a snapshot video, you can edit it by swiping right or left to add special effects.
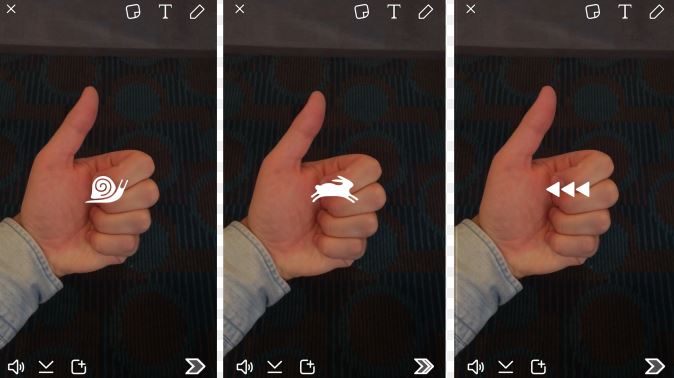
- Filters must be enabled to access the special effects. So turn it on. Rabbit will speed up your Snapchat video whereas, the snail will slow it down.
- If you wish to play your video is reverse mode then use the 3 backward arrows.The brightness of your Snapchat video can be adjusted with some of the filters. Your time, location, and speed can also be transformed by adding effects with some filters.
- There’s a magic eraser tool that can help you in erasing any object like a tree or your ex-girlfriend from the snap. You may also use a tint brush to pick a color and then touch the object you wish to tint with the brush. This feature is available for both the Android and iOS users.
Conclusion
If you want to have fun and better video effects, you can use Filmora to edit video on desktop before uploading Snapchat videos from the camera roll. Filmora is one of the best applications with a range of features. You can add graphic overlays and filters, color tuning, noise removal, 4k video resolution, pan zoom, and many more features to make your Snapchat video attractive and amazing. This article gives you a detailed information on how to make a video on Snapchat, even without pressing the button. Enjoy multi snaps feature on Snapchat videos and use by following the steps mentioned above.
Ollie Mattison
Ollie Mattison is a writer and a lover of all things video.
Follow @Ollie Mattison
Ollie Mattison
Mar 27, 2024• Proven solutions
Recording and sharing videos are now easy with Snapchat. With a maximum limit of 10 seconds, these videos are kept short in duration. Whether posting the Snapchat video to the story, sharing it with friends or in a Snapchat group, Snapchat was always a hit until numerous competitors started ripping its features.
But, Snapchat is back with a bounce with its multi snaps feature which is a new addition to video sharing feature in Snapchat. What is a multi snap? Snapchat, allows users to make more than 10 seconds snap video now, which is called multi snaps.
In this feature, you can record footages as long as 1 minute, which is divided into 6 snaps. Do you know how to make a video on Snapchat? Here you will learn how to make and edit multi Snapchat videos even without holding the button.
- Part1: How to Make Snapchat Multi Video Easily
- Part2: Notes About Multi Snapchat Videos
- Part3: How to Make Multi Video Without Holding the Button On iPhone
- Part4: How To Edit Video With The Built-In Features
Part1: How to Make Snapchat Multi Video Easily
If you wish to make a multi video in a few minutes very quickly, you just need to tap the big round button on the screen of the camera app and hold it.
Don’t leave the button even after the time is over. As you keep holding the button, the next snap starts recording automatically.
When you think it’s complete, at the bottom of the screen you can see the snaps appearing.
The ones you wish to keep must be saved and the rest can be dragged in order to delete.
Finally, you may edit the snaps and add effects like you do with any usual snap at the same time.
Part2: Notes About Multi Snapchat Videos
- In the Memories tab, you can find the multi snaps under the ‘Snaps’ icon and ‘All’ tabs
- When a multi snap is added and saved to the Camera Roll folder, it will be saved as a seamless single video. You cannot divide the video or break it into parts.
- One particular snap cannot be extracted from the multi snap
- Are you looking forward to sending multi snaps to My Story but facing difficulty? In such a situation you can always find it in My Stories screen and send each snap one by one.
- In multi snap, you cannot include 3D stickers, and it also cannot be reversed or looped at present.
Part3: How to Make Multi Video Without Holding the Button On iPhone
Pressing and holding the button constantly for recording multi snaps can be quite tiresome as it keeps your finger held down. But, the iPhone users can record multi video even without holding the button. Do your know how? Let’s learn the trick.
- Firstly, go to the Settings and select General from the drop-down menu. Tap on Accessibility and click the Assistive Touch. The Assistive Touch option helps to access the iPhone when you are unable to touch the screen.
- Turn the Assistive Touch On from the of mode and then Create New Gesture, under Custom Gestures. With this mode, you can record the gestures. You can activate it from the Favorites in Menu bar. Then, use one finger to press and hold your iPhone screen’s center to allow recording your Touch. You can see at the bottom there’s a blue bar which once filled indicates that your Touch is recorded. Now, Save the gesture and open Snapchat. You can find a grey dot on the screen, tap it. Now, tap on the Custom and the saved gesture.
- Once you click the saved gesture, you can see another grey dot on the screen. Drag the grey dot over record button of Snapchat and let go. One thing must be noted that you can only record 8 seconds video in iPhone than usual 10 seconds because gestures can be set only for 8 seconds.
Your hands are free to move anywhere, meanwhile, the Snapchat video is recording.
Part4: How To Edit Video With The Built-In Features
Editing snaps and videos have always been fun whether it’s for trial or for work. After recording a snapshot video, you can edit it by swiping right or left to add special effects.
- Filters must be enabled to access the special effects. So turn it on. Rabbit will speed up your Snapchat video whereas, the snail will slow it down.
- If you wish to play your video is reverse mode then use the 3 backward arrows.The brightness of your Snapchat video can be adjusted with some of the filters. Your time, location, and speed can also be transformed by adding effects with some filters.
- There’s a magic eraser tool that can help you in erasing any object like a tree or your ex-girlfriend from the snap. You may also use a tint brush to pick a color and then touch the object you wish to tint with the brush. This feature is available for both the Android and iOS users.
Conclusion
If you want to have fun and better video effects, you can use Filmora to edit video on desktop before uploading Snapchat videos from the camera roll. Filmora is one of the best applications with a range of features. You can add graphic overlays and filters, color tuning, noise removal, 4k video resolution, pan zoom, and many more features to make your Snapchat video attractive and amazing. This article gives you a detailed information on how to make a video on Snapchat, even without pressing the button. Enjoy multi snaps feature on Snapchat videos and use by following the steps mentioned above.
Ollie Mattison
Ollie Mattison is a writer and a lover of all things video.
Follow @Ollie Mattison
The Essential Mac Tips for Creating Perfect Snaps
How to Make a Video Best Fits Snapchat Size on Mac?

Liza Brown
Oct 26, 2023• Proven solutions
How to create a video best fit Snapchat? With more than 240 million active daily users, Snapchat is one of the most popular social media networks globally. It is also an instant messaging app that allows its users to express themselves visually in a diverse variety of manners including photos, videos, stories, stickers, emoji, and more.
One of the best features of Snapchat that makes it so attractive among the young audience is its mobile-oriented user interface. Snapchat was the first social networking platform to introduce the concept of daily stories which was widely adopted by other instant messengers as well including Instagram and WhatsApp. Since it is a mobile-oriented platform, you need to create and edit your videos in a certain way to make sure they are the best fit for Snapchat.
You May Also Like: The Ultimate Guide of Snapchat Filters
What Are the Ideal Features of a Snapchat Video?
Snapchat is highly optimized for vertical viewing which means that all the content needs to be served in portrait aspect ratio instead of landscape used by YouTube and other video platforms. You need to ensure that every aspect of your video is perfect before you can upload it for Snapchat on Mac. Here are some of the key features that you must not forget.

- Resolution - The ideal resolution of a Snapchat video is 1080 x 1920 pixels which is known as full HD. This resolution will ensure that your video loads in the right way and remains sharp and crisp for an excellent viewing experience.
- Video Format - The recommended video format for Snapchat clips is MP4 and MOV. You can use either of those formats on your Mac.
- Aspect Ratio - This is one of the key aspects of any video that determines the orientation of viewing. For a perfect Snapchat video, it is recommended that you keep the aspect ratio to 9:16.
- Video Length Size - Remember that Snapchat isn’t like YouTube and serves an audience that wants micro-entertainment. This is why the recommended time for your video is 3 to 10 seconds with the video size not exceeding 32 MB. Otherwise, the Snapchat audience may not respond well to your videos.
That is why it is crucial that your Snapchat video has all the ideal features so your audience can enjoy the viewing experience as intended instead of attempting to manipulate their phones to be able to see the video clearly. It will create an unpleasant and frustrating experience and your viewers might not stay with you.
How to Adjust the Video for Snapchat on Mac? [Step-by-Step]
- Part1. Changing Snapchat Video Format on Filmora
- Part2. Changing Snapchat Video Aspect Ratio on Filmora
- Part3. Changing Snapchat Video Size on Filmora
If your video doesn’t have the ideal features for Snapchat uploading, you don’t need to worry. You can easily edit your video on Filmora X to adjust everything including the aspect ratio, size, and format.


Part1. Changing Snapchat Video Format on Filmora
- Importing Video
The first step is to import the video using the option ‘Import Media Files’ in the import tab. You can also drag and drop the media files you need to work on.

- Selecting the Right Output Format
Once you have imported the file, drag and drop it onto the Timeline. Now click on the ‘Export’ button. Here you will be able to select your output video format which needs to be either MOV or MP4.
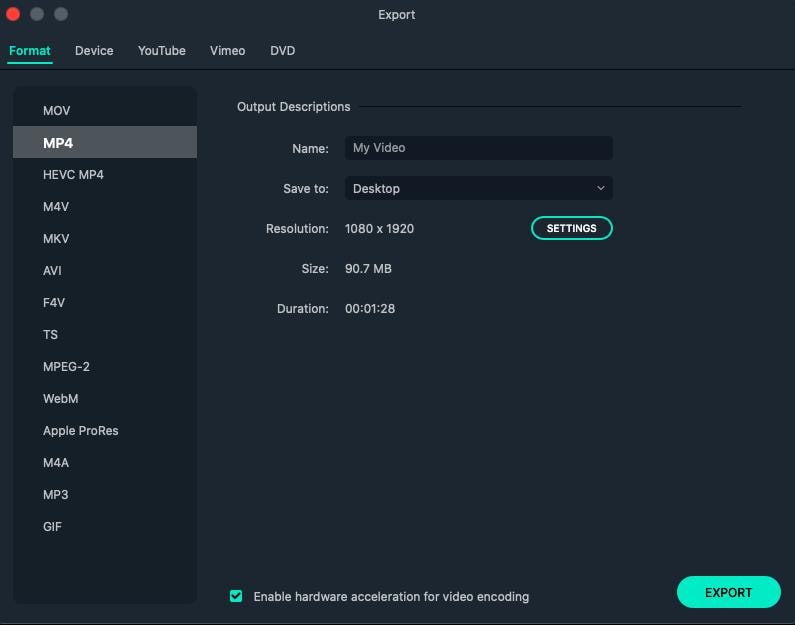
- Exporting Your Snapchat Video
After you have defined the settings, you can click on the ‘Export’ button to start the saving process. Your video is now available to you in the right format.
Part2. Changing Snapchat Video Aspect Ratio on Filmora
You can use multiple methods to change the aspect ratio of your Snapchat video on Filmora. It depends on the nature of editing you need to perform on your video. You can choose from any of the methods given below to edit your video for Snapchat in a user-friendly manner on Mac.
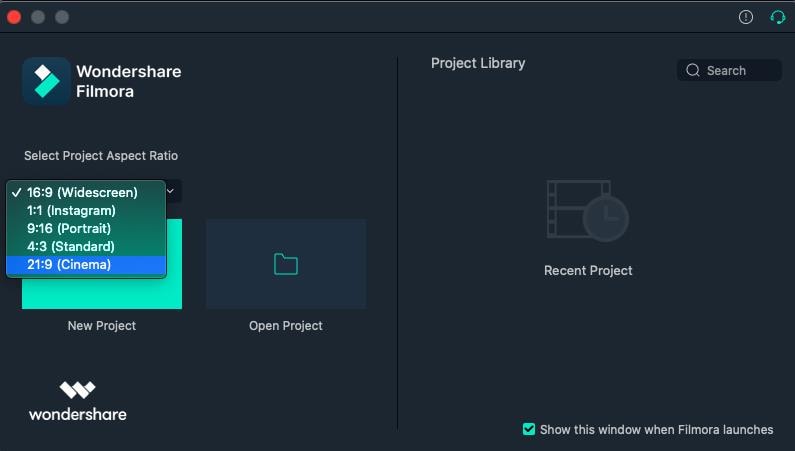
● Method 1 - Launch the editor and click on the drop-down list. You will see the popular aspect ratios listed in the list from where you can choose any. Select the right one that is 9:16 for Snapchat and export the file right away.
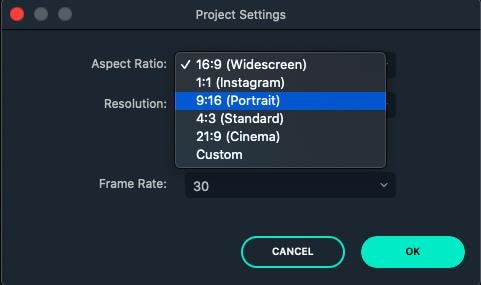
● Method 2 - The second method you can use is present under the Project Settings. You can also lock the aspect ratio using the features available here.

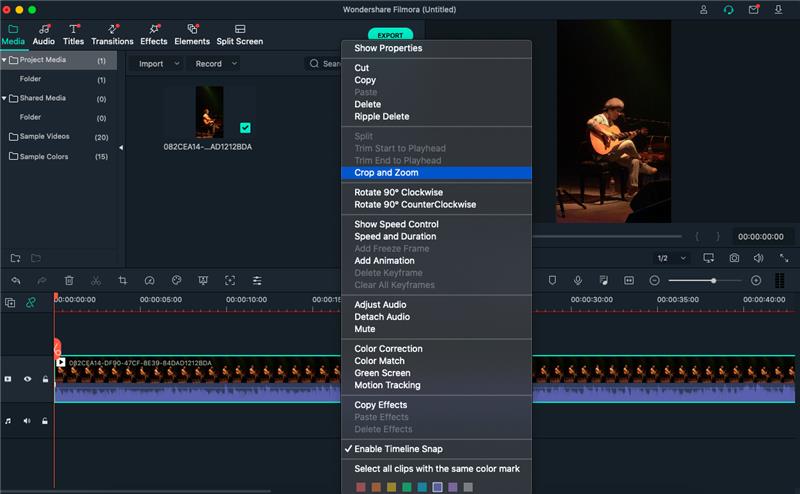
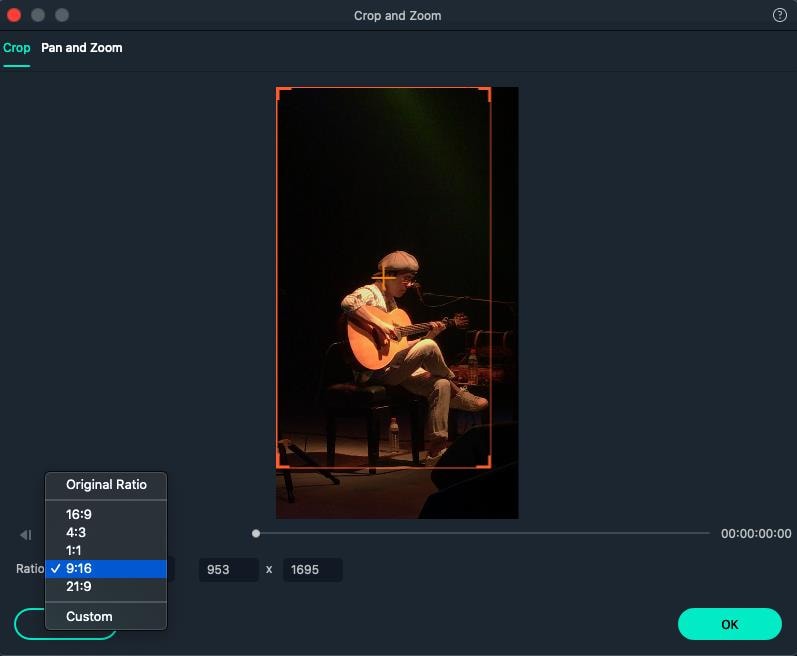
● Method 3 - The third method allows you to change the aspect ratio manually during the video editing process. You need to right-click on the timeline and select the ‘Crop and Zoom’ option. You will see a pop-up window where all the popular options will be available to you. You can choose either of them or select an aspect ratio manually.
● Step 4 - The final method to change the aspect ratio of your video on Mac is at the time of exporting your media file. Here you can select the aspect ratio for your local computer, a particular device, YouTube, or DVD TV.

Part3. Changing Snapchat Video Size on Filmora
- Importing Media File to Filmora
Using the ‘Import’ menu, import your media files, or simply drag and drop them from your Mac OS. Once the files are in the software, drag them to the Timeline track.
- Cropping Your Video for Snapchat
Here you can use the ‘Crop and Zoom’ button from the Timeline by right-clicking on it, so you can only focus on the aspect of the video that you want to show. This will resize the video as well.
- Cutting the Video
Another option you have is to delete the unnecessary parts of the video by selecting them through the indicator present on the timeline. Once you have selected the parts you don’t need, right-click on them and select ‘Delete’.
- Exporting Your Snapchat Video
Once you have resized your video by cropping and cutting the media file, you can now export it in the right resolution, bit rate, and format to ensure you get the minimum file size.
Liza Brown
Liza Brown is a writer and a lover of all things video.
Follow @Liza Brown
Liza Brown
Oct 26, 2023• Proven solutions
How to create a video best fit Snapchat? With more than 240 million active daily users, Snapchat is one of the most popular social media networks globally. It is also an instant messaging app that allows its users to express themselves visually in a diverse variety of manners including photos, videos, stories, stickers, emoji, and more.
One of the best features of Snapchat that makes it so attractive among the young audience is its mobile-oriented user interface. Snapchat was the first social networking platform to introduce the concept of daily stories which was widely adopted by other instant messengers as well including Instagram and WhatsApp. Since it is a mobile-oriented platform, you need to create and edit your videos in a certain way to make sure they are the best fit for Snapchat.
You May Also Like: The Ultimate Guide of Snapchat Filters
What Are the Ideal Features of a Snapchat Video?
Snapchat is highly optimized for vertical viewing which means that all the content needs to be served in portrait aspect ratio instead of landscape used by YouTube and other video platforms. You need to ensure that every aspect of your video is perfect before you can upload it for Snapchat on Mac. Here are some of the key features that you must not forget.
- Resolution - The ideal resolution of a Snapchat video is 1080 x 1920 pixels which is known as full HD. This resolution will ensure that your video loads in the right way and remains sharp and crisp for an excellent viewing experience.
- Video Format - The recommended video format for Snapchat clips is MP4 and MOV. You can use either of those formats on your Mac.
- Aspect Ratio - This is one of the key aspects of any video that determines the orientation of viewing. For a perfect Snapchat video, it is recommended that you keep the aspect ratio to 9:16.
- Video Length Size - Remember that Snapchat isn’t like YouTube and serves an audience that wants micro-entertainment. This is why the recommended time for your video is 3 to 10 seconds with the video size not exceeding 32 MB. Otherwise, the Snapchat audience may not respond well to your videos.
That is why it is crucial that your Snapchat video has all the ideal features so your audience can enjoy the viewing experience as intended instead of attempting to manipulate their phones to be able to see the video clearly. It will create an unpleasant and frustrating experience and your viewers might not stay with you.
How to Adjust the Video for Snapchat on Mac? [Step-by-Step]
- Part1. Changing Snapchat Video Format on Filmora
- Part2. Changing Snapchat Video Aspect Ratio on Filmora
- Part3. Changing Snapchat Video Size on Filmora
If your video doesn’t have the ideal features for Snapchat uploading, you don’t need to worry. You can easily edit your video on Filmora X to adjust everything including the aspect ratio, size, and format.
Part1. Changing Snapchat Video Format on Filmora
- Importing Video
The first step is to import the video using the option ‘Import Media Files’ in the import tab. You can also drag and drop the media files you need to work on.
- Selecting the Right Output Format
Once you have imported the file, drag and drop it onto the Timeline. Now click on the ‘Export’ button. Here you will be able to select your output video format which needs to be either MOV or MP4.
- Exporting Your Snapchat Video
After you have defined the settings, you can click on the ‘Export’ button to start the saving process. Your video is now available to you in the right format.
Part2. Changing Snapchat Video Aspect Ratio on Filmora
You can use multiple methods to change the aspect ratio of your Snapchat video on Filmora. It depends on the nature of editing you need to perform on your video. You can choose from any of the methods given below to edit your video for Snapchat in a user-friendly manner on Mac.
● Method 1 - Launch the editor and click on the drop-down list. You will see the popular aspect ratios listed in the list from where you can choose any. Select the right one that is 9:16 for Snapchat and export the file right away.
● Method 2 - The second method you can use is present under the Project Settings. You can also lock the aspect ratio using the features available here.
● Method 3 - The third method allows you to change the aspect ratio manually during the video editing process. You need to right-click on the timeline and select the ‘Crop and Zoom’ option. You will see a pop-up window where all the popular options will be available to you. You can choose either of them or select an aspect ratio manually.
● Step 4 - The final method to change the aspect ratio of your video on Mac is at the time of exporting your media file. Here you can select the aspect ratio for your local computer, a particular device, YouTube, or DVD TV.
Part3. Changing Snapchat Video Size on Filmora
- Importing Media File to Filmora
Using the ‘Import’ menu, import your media files, or simply drag and drop them from your Mac OS. Once the files are in the software, drag them to the Timeline track.
- Cropping Your Video for Snapchat
Here you can use the ‘Crop and Zoom’ button from the Timeline by right-clicking on it, so you can only focus on the aspect of the video that you want to show. This will resize the video as well.
- Cutting the Video
Another option you have is to delete the unnecessary parts of the video by selecting them through the indicator present on the timeline. Once you have selected the parts you don’t need, right-click on them and select ‘Delete’.
- Exporting Your Snapchat Video
Once you have resized your video by cropping and cutting the media file, you can now export it in the right resolution, bit rate, and format to ensure you get the minimum file size.
Liza Brown
Liza Brown is a writer and a lover of all things video.
Follow @Liza Brown
Also read:
- [New] Brand Collaboration for YouTube
- [New] In 2024, How To Keep Up the Snapstreak Game
- [New] Snapchat Trick Turn Videos Upside Down for 2024
- [Updated] 2024 Approved Adding the Latest Social Media Snapchat to Mac
- [Updated] 2024 Approved Identifying if Someone Has Removed You From Their Snap Circle
- [Updated] 2024 Approved Regaining Exclusive Snap Privacy
- [Updated] 2024 Approved The Easy Route to Capturing Every Gameplay Moment
- [Updated] Snapchat on Mac - Quick Setup Tips for 2024
- [Updated] Steady Snapstreaks Tips to Never Miss a Snap
- Best Troubleshooting Tips for Smooth Fallout 3 Gaming on Windows 11
- Crusader Kings III - Stable Gaming Experience on PC (No More Freezes)
- Enrich Engagement Tailored Questions for IG Story Boosting for 2024
- How to Transfer and Download La 1Ère TV Show Videos in HD as MP4 or AVI Files for Offline Viewing
- How to Unlock Disabled iPhone 15 Plus/iPad Without Computer | Dr.fone
- In 2024, Innovative Techniques for Stunning HDR Photography
- In 2024, Perfect Your Snapchat Boomerangs Quickly
- Quick Voice Fixes for Your Snapchat Snaps Using Dual Methods for 2024
- Unraveling the Mystery Behind the 500 Internal Server Blunder
- Why Your Vivo Y27s Screen Might be Unresponsive and How to Fix It | Dr.fone
- Title: [Updated] In 2024, Innovative Tips for Multisnap Creation on Snapchat
- Author: Scott
- Created at : 2025-01-18 18:33:55
- Updated at : 2025-01-22 21:46:33
- Link: https://snapchat-videos.techidaily.com/updated-in-2024-innovative-tips-for-multisnap-creation-on-snapchat/
- License: This work is licensed under CC BY-NC-SA 4.0.