![[Updated] In 2024, Effortless Communication Unveil the Three-Step Method for Snapchat Calls](https://thmb.techidaily.com/f00def1c04cb418f21da5c60f199b078da943127e970aa7acf9eb30479f71c91.jpg)
"[Updated] In 2024, Effortless Communication Unveil the Three-Step Method for Snapchat Calls"
Effortless Communication: Unveil the Three-Step Method for Snapchat Calls
How to Video Chat/Call on Snapchat with 3 Steps

Ollie Mattison
Mar 27, 2024• Proven solutions
Most people are not aware about Snapchat video chat facilities, though it’s been around since a long time. Sounds surprising though! Even few of our acquaintances approached us to know about Snapchat video call.
Well! We decided to decipher the fact and reveal the video calling feature of Snapchat, to make your life simpler. Your favorite social networking app is not restricted to sharing photos, videos, and stories, they can make you talk and see your family and friends anytime.
Here, in this article we are going to explain you the 3 steps to make a video call using Snapchat app.
Part 1: How to video chat/call on Snapchat
Least people had an idea that Snapchat offers a sleek video calling feature as well. So, we are bringing you the steps as how to video call someone using Snapchat without any trouble. Let’s see how you can enjoy communicating face to face from your respective places–
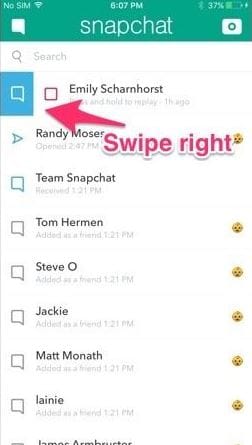
Step 1: Swipe right to start a video chat
First of all, launch the latest version of Snapchat on your mobile and then swipe right on the camera to get the ‘Friends’ list. You can also tap on the ‘Friends’ tab found at the bottom left corner of the screen. Now, find the contact you want to make a Snapchat video call with, and tap or right swipe on it.
Step 2: Press video camera icon
In this step, you will start calling your friend. For this, look for the video recorder icon on the next screen and tap on it to place the call. It should start ringing ASAP by sending them a chat request.

Step 3: Wait for answering
Their phone will start ringing if they have enabled Snapchat notifications. Enabling notification will also let them know that you’re calling even if they are not using the app that time. Or else, they can only get the call, while using Snapchat.
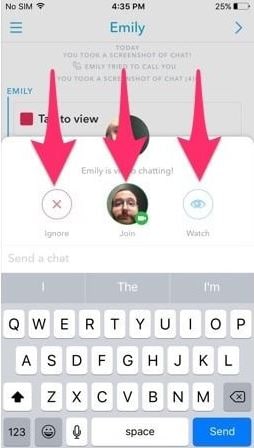
There are 3 options to respond to a call.
- If they click on ‘Watch’ option, they can see you, but you aren’t allowed for so.
- If they tap ‘Join’ option, it means both of you can see and talk to each other. In case they select ‘Ignore’ option, you will get a busy message.
- If you tap the green camera icon the video becomes one way, where only you can see them, but they won’t see you.
Note: By swiping the screen down, you can minimize the Snapchat video call.
Part 2: Tips for using video chat/call
Now that you are well aware of Snapchat video chat, how about some extra tips to add more fun to your chat sessions? So, get creative and enjoy the fun
1 Double check to switch
When you want to show your friend what your pet is up to, or that blooming rose on your balcony, you will definitely need to roam around and adjust the front camera. But, you can show him/her without switching your place. Just double-tap the screen of your Snapchat video chat and your friend can see everything. Switching or swapping between your cameras during a Snapchat video call is that easy.

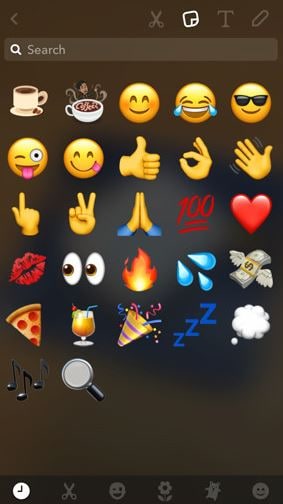
2 Add stickers
You are up to surprise your BFF with cute and funny stickers during the Snapchat video chat? Why not! On your screen, tap the ‘Smiley’ tab and select the stickers, they will be included in your video chat and both of you can view them.
3 Close the call
Well! Now that you guys ran out of topics for the day and want to end the call. It is very easy to close a Snapchat call. You just need to exit the video chat by going back to the recent conversations or switch to another app.
4 Make sure to upload the latest version
It is advised that you update to the latest version of Snapchat to get the best out of this app.
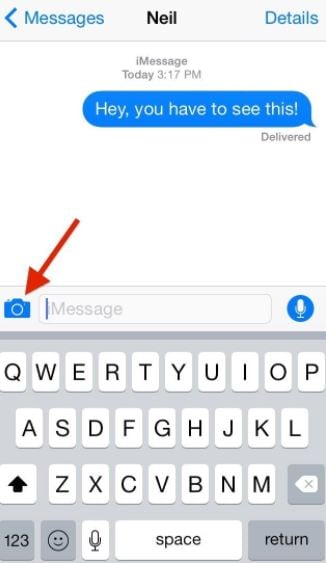
5 Send video message
When your friends are not online in Snapchat or haven’t enabled notifications for Snapchat video calls, you can still leave video messages for them. To share a video message, tap and hold the video recorder button in the chat, and record something up to 10 seconds, then send it. Your friends will get the video message when they open that message in their Snapchat.
Final Verdict
Moving towards the end, we hope you have got a broad idea about how to use Snapchat’s video call feature, and add cute and funny stickers as well to pep up the chat. So, what are you waiting for? Grab your mobile phone and start Snapchat video calling, we are sure that it will be so much fun than just sharing one sided snaps to each other. Thanks for going through the post. Please share your first experience with video calling with the Snapchat.
Ollie Mattison
Ollie Mattison is a writer and a lover of all things video.
Follow @Ollie Mattison
Ollie Mattison
Mar 27, 2024• Proven solutions
Most people are not aware about Snapchat video chat facilities, though it’s been around since a long time. Sounds surprising though! Even few of our acquaintances approached us to know about Snapchat video call.
Well! We decided to decipher the fact and reveal the video calling feature of Snapchat, to make your life simpler. Your favorite social networking app is not restricted to sharing photos, videos, and stories, they can make you talk and see your family and friends anytime.
Here, in this article we are going to explain you the 3 steps to make a video call using Snapchat app.
Part 1: How to video chat/call on Snapchat
Least people had an idea that Snapchat offers a sleek video calling feature as well. So, we are bringing you the steps as how to video call someone using Snapchat without any trouble. Let’s see how you can enjoy communicating face to face from your respective places–
Step 1: Swipe right to start a video chat
First of all, launch the latest version of Snapchat on your mobile and then swipe right on the camera to get the ‘Friends’ list. You can also tap on the ‘Friends’ tab found at the bottom left corner of the screen. Now, find the contact you want to make a Snapchat video call with, and tap or right swipe on it.
Step 2: Press video camera icon
In this step, you will start calling your friend. For this, look for the video recorder icon on the next screen and tap on it to place the call. It should start ringing ASAP by sending them a chat request.
Step 3: Wait for answering
Their phone will start ringing if they have enabled Snapchat notifications. Enabling notification will also let them know that you’re calling even if they are not using the app that time. Or else, they can only get the call, while using Snapchat.
There are 3 options to respond to a call.
- If they click on ‘Watch’ option, they can see you, but you aren’t allowed for so.
- If they tap ‘Join’ option, it means both of you can see and talk to each other. In case they select ‘Ignore’ option, you will get a busy message.
- If you tap the green camera icon the video becomes one way, where only you can see them, but they won’t see you.
Note: By swiping the screen down, you can minimize the Snapchat video call.
Part 2: Tips for using video chat/call
Now that you are well aware of Snapchat video chat, how about some extra tips to add more fun to your chat sessions? So, get creative and enjoy the fun
1 Double check to switch
When you want to show your friend what your pet is up to, or that blooming rose on your balcony, you will definitely need to roam around and adjust the front camera. But, you can show him/her without switching your place. Just double-tap the screen of your Snapchat video chat and your friend can see everything. Switching or swapping between your cameras during a Snapchat video call is that easy.
2 Add stickers
You are up to surprise your BFF with cute and funny stickers during the Snapchat video chat? Why not! On your screen, tap the ‘Smiley’ tab and select the stickers, they will be included in your video chat and both of you can view them.
3 Close the call
Well! Now that you guys ran out of topics for the day and want to end the call. It is very easy to close a Snapchat call. You just need to exit the video chat by going back to the recent conversations or switch to another app.
4 Make sure to upload the latest version
It is advised that you update to the latest version of Snapchat to get the best out of this app.
5 Send video message
When your friends are not online in Snapchat or haven’t enabled notifications for Snapchat video calls, you can still leave video messages for them. To share a video message, tap and hold the video recorder button in the chat, and record something up to 10 seconds, then send it. Your friends will get the video message when they open that message in their Snapchat.
Final Verdict
Moving towards the end, we hope you have got a broad idea about how to use Snapchat’s video call feature, and add cute and funny stickers as well to pep up the chat. So, what are you waiting for? Grab your mobile phone and start Snapchat video calling, we are sure that it will be so much fun than just sharing one sided snaps to each other. Thanks for going through the post. Please share your first experience with video calling with the Snapchat.
Ollie Mattison
Ollie Mattison is a writer and a lover of all things video.
Follow @Ollie Mattison
Quick Tips: Innovative Lens Creation on Snapchat
How to Create Snapchat Lenses Easily: 2 Methods
Ollie Mattison
Mar 27, 2024• Proven solutions
Are you feeling like creating your own Snapchat lens, so you can have an even better experience with the app? The good news is that two new Snapchat tools have been released – the Lens Studio and Create Your Own Lens applications.
If you are a regular Snapchat user, you may want to learn about the Snapchat lens and how it can help you. We will help you get started. Here is our step by step guide on how to make Snapchat lenses.
- Part1: Comparing Lens Studio and Creating Your Own Lens
- Part2: How to Use Lens Studio
- Part3: How to Create Snapchat Lenses Using Create Your Own Lens
Part 1: Comparing Lens Studio and Creating Your Own Lens
The two programs that we are highlighting today are Lens Studio and Create Your Own Lens. These are both fantastic programs for creating your own Snapchat lens, but they do have slightly different uses. If you are the type of person who wants to design a professional Snapchat lens, you are going to prefer Lens Studio.
But if you are hoping to come up with something creative that you can share with your friends and family, then you may love Create Your Own Lens. It is a very easy program to use, and it offers a ton of features that you may be surprised to see.
Snapchat lenses is for fun
The beauty of Snapchat lenses is that you can now create your own environment, which you can use each time you are taking photos or videos. Sure, you can always use the filters that are already available in the application, but not everyone would find those enough.
If you want some customization, or you just want to mess around until you get the filter that makes sense for you, Snapchat lenses are the way to go.

Lens Studio is for business
Lens Studio is perfect for businesses that may want to create unique environments for their clients, or the times when they are releasing company Snapchat posts. Say the company is hosting an event. They may want a custom graphic for that event, which is used for all the pictures and videos posted to Snapchat about the event. Using Lens Studio lets them do that with ease.
Create Your Own Lens is great when you are going to a special event, birthday party or graduating, and you want a special graphic that comes up in all your snaps. It is very intuitive to use, and is available through the App Store as a download.
Part 2: How to Use Lens Studio
1. Download Lens Studio
The first step involves downloading Lens Studio, which you can do from your computer. It is compatible with both Windows and Mac computers, and will run on any semi-modern system. According to the Snapchat team, Lens Studio is similar to the program used by their AR teams to create lenses. That means you are getting similar functionality, but with an easier to manage interface.
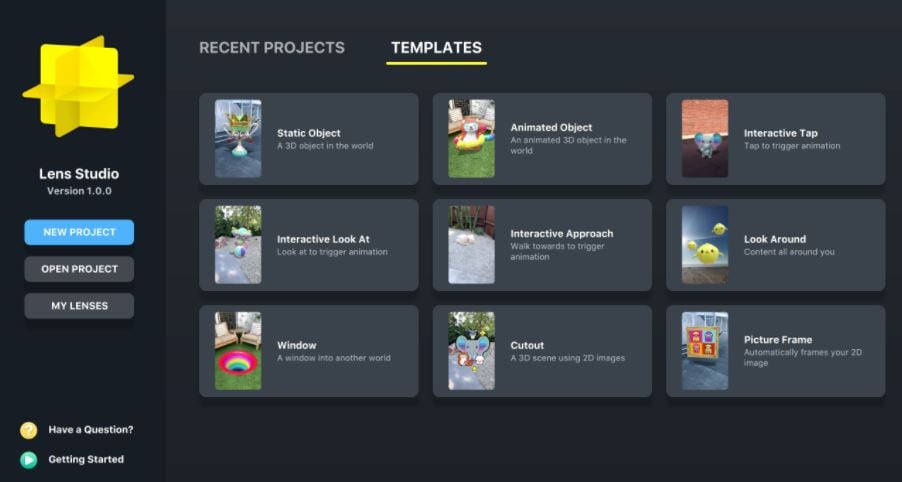
2. Choose Templates Page
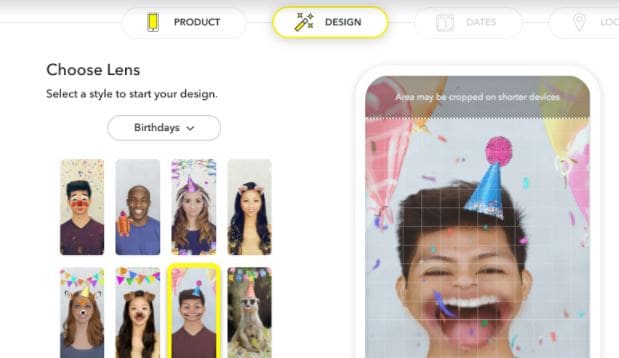
It is normal to feel a little overwhelmed the first time you try and use this program. But that is why the templates page is so great. You can select from templates depending on the type of lens that you are hoping to create. You can just use a template, or you can incorporate your own ideas to customize the template.
There is also a Lens Studio Overview guide that you can access online, which will help you get acquainted with the program’s various features and quirks.
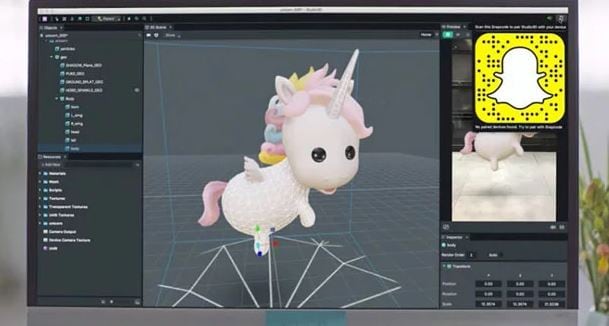
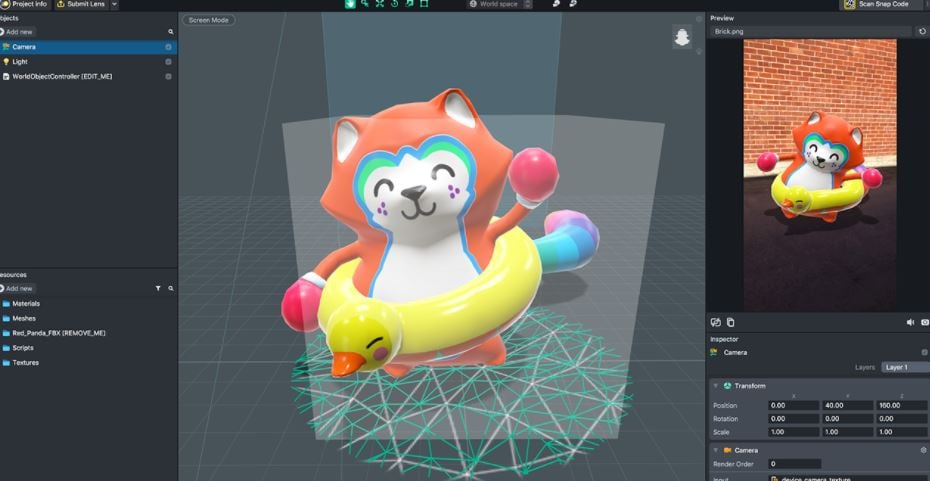
3. Use Studio Panels
Are you ready to create your own custom Snapchat lens? It is time to head over to Studio Panels on the application. This is the area where you can add your own 2D or 3D objects, and you can visualize how they would look as a Snapchat filter. You can add, remove, resize and drag objects to specific areas of the screen.
There are other tools accessible from the Resources panel. You can use these tools to ensure that your Snapchat lens is exactly as you want.
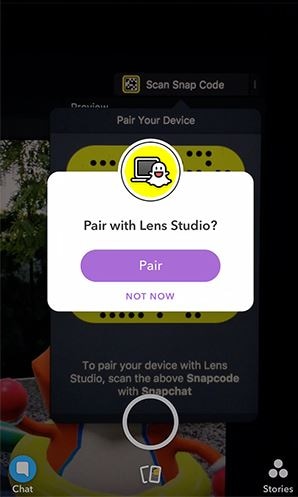
4. Preview the Snapchat Lens You Create
The great thing about this application is that you can preview the lens before you send it out to your phone. When you are satisfied with the image on the preview, you can pair your phone with the application, and you will be able to send that Snapchat lens onto your phone through your Snapcode. It is that simple!
Part 3: How to Create Snapchat Lenses Using Create Your Own Lens
- There are two ways that you can access the tool for creating fun Snapchat lenses. You can either visit the website snapchat.com/create, or you can go on the “filters and lenses” section on your iOS device. If you are using Snapchat on an Android device, you will only have the option for the website. But the feature is coming to the Android version of Snapchat very soon.
- When you are in the application or on the website, you may start to look at the different templates for Snapchat lenses. Now you can add other items into the templates, such as photographs, text or graphics.
It is all up to your imagination. You can create the perfect Snapchat lens, which you can then send into your Snapchat account through your Snapcode. Of course, if you are using your iOS device to create the lens, it is already linked to your account.
Another cool feature is how you can set the location for where the Snapchat lens is available. Say you are hosting a party. You can have the Snapchat lens available to everyone who uses Snapchat within a set square footage of your home. That is an amazing way to let everyone share social media pictures and photos of your party, through the lens you created.
Conclusion
Creating Snapchat lenses has never been easier. Whether you are a business looking to add a custom lens, or you just want to create a fun lens for a graduation or party, there are tools that make the job very easy. Using these tools will allow you to create the perfect Snapchat lens for any occasion.
Ollie Mattison
Ollie Mattison is a writer and a lover of all things video.
Follow @Ollie Mattison
Ollie Mattison
Mar 27, 2024• Proven solutions
Are you feeling like creating your own Snapchat lens, so you can have an even better experience with the app? The good news is that two new Snapchat tools have been released – the Lens Studio and Create Your Own Lens applications.
If you are a regular Snapchat user, you may want to learn about the Snapchat lens and how it can help you. We will help you get started. Here is our step by step guide on how to make Snapchat lenses.
- Part1: Comparing Lens Studio and Creating Your Own Lens
- Part2: How to Use Lens Studio
- Part3: How to Create Snapchat Lenses Using Create Your Own Lens
Part 1: Comparing Lens Studio and Creating Your Own Lens
The two programs that we are highlighting today are Lens Studio and Create Your Own Lens. These are both fantastic programs for creating your own Snapchat lens, but they do have slightly different uses. If you are the type of person who wants to design a professional Snapchat lens, you are going to prefer Lens Studio.
But if you are hoping to come up with something creative that you can share with your friends and family, then you may love Create Your Own Lens. It is a very easy program to use, and it offers a ton of features that you may be surprised to see.
Snapchat lenses is for fun
The beauty of Snapchat lenses is that you can now create your own environment, which you can use each time you are taking photos or videos. Sure, you can always use the filters that are already available in the application, but not everyone would find those enough.
If you want some customization, or you just want to mess around until you get the filter that makes sense for you, Snapchat lenses are the way to go.
Lens Studio is for business
Lens Studio is perfect for businesses that may want to create unique environments for their clients, or the times when they are releasing company Snapchat posts. Say the company is hosting an event. They may want a custom graphic for that event, which is used for all the pictures and videos posted to Snapchat about the event. Using Lens Studio lets them do that with ease.
Create Your Own Lens is great when you are going to a special event, birthday party or graduating, and you want a special graphic that comes up in all your snaps. It is very intuitive to use, and is available through the App Store as a download.
Part 2: How to Use Lens Studio
1. Download Lens Studio
The first step involves downloading Lens Studio, which you can do from your computer. It is compatible with both Windows and Mac computers, and will run on any semi-modern system. According to the Snapchat team, Lens Studio is similar to the program used by their AR teams to create lenses. That means you are getting similar functionality, but with an easier to manage interface.
2. Choose Templates Page
It is normal to feel a little overwhelmed the first time you try and use this program. But that is why the templates page is so great. You can select from templates depending on the type of lens that you are hoping to create. You can just use a template, or you can incorporate your own ideas to customize the template.
There is also a Lens Studio Overview guide that you can access online, which will help you get acquainted with the program’s various features and quirks.
3. Use Studio Panels
Are you ready to create your own custom Snapchat lens? It is time to head over to Studio Panels on the application. This is the area where you can add your own 2D or 3D objects, and you can visualize how they would look as a Snapchat filter. You can add, remove, resize and drag objects to specific areas of the screen.
There are other tools accessible from the Resources panel. You can use these tools to ensure that your Snapchat lens is exactly as you want.
4. Preview the Snapchat Lens You Create
The great thing about this application is that you can preview the lens before you send it out to your phone. When you are satisfied with the image on the preview, you can pair your phone with the application, and you will be able to send that Snapchat lens onto your phone through your Snapcode. It is that simple!
Part 3: How to Create Snapchat Lenses Using Create Your Own Lens
- There are two ways that you can access the tool for creating fun Snapchat lenses. You can either visit the website snapchat.com/create, or you can go on the “filters and lenses” section on your iOS device. If you are using Snapchat on an Android device, you will only have the option for the website. But the feature is coming to the Android version of Snapchat very soon.
- When you are in the application or on the website, you may start to look at the different templates for Snapchat lenses. Now you can add other items into the templates, such as photographs, text or graphics.
It is all up to your imagination. You can create the perfect Snapchat lens, which you can then send into your Snapchat account through your Snapcode. Of course, if you are using your iOS device to create the lens, it is already linked to your account.
Another cool feature is how you can set the location for where the Snapchat lens is available. Say you are hosting a party. You can have the Snapchat lens available to everyone who uses Snapchat within a set square footage of your home. That is an amazing way to let everyone share social media pictures and photos of your party, through the lens you created.
Conclusion
Creating Snapchat lenses has never been easier. Whether you are a business looking to add a custom lens, or you just want to create a fun lens for a graduation or party, there are tools that make the job very easy. Using these tools will allow you to create the perfect Snapchat lens for any occasion.
Ollie Mattison
Ollie Mattison is a writer and a lover of all things video.
Follow @Ollie Mattison
Also read:
- [New] 2024 Approved A Beginner's Pathway to Innovative Snapchat Expressions
- [New] 2024 Approved From Beginner to Maestro A Comprehensive Gif Tutorial for Snapchat
- [New] From Sketches to Screen Bringing Anime Filters Into Snaps for 2024
- [New] Sync Shutter Speed Blur Artistry in Photoshop
- [Updated] 2024 Approved Beneath the Surface A Deep Dive Into Private Story Making
- [Updated] 2024 Approved Reimagine Your Snapchat Chats with Ease Voice Change Guides Here
- [Updated] 2024 Approved The Ultimate Guide of Snapchat Filters
- [Updated] 2024 Approved Top 15 Snapchat Post Tips for Max Impact
- [Updated] In 2024, Dissecting DJi Flyer X20 FPV Headset Capabilities
- [Updated] In 2024, Navigating the Landscape of Snapchat for Enterprise
- Digital Filmmakers' Guide Converting AVI Media to Compact GIF Format in Filmora
- Enhanced Performance, Flawless Operation – Install Latest Nvidia Driver
- Exploring the Most Influential Cartoon Illustration Methods: A Guide for Aspiring Artists
- High Definition Gaming with LG 27UD68 Monitor Review
- In 2024, 3 Facts You Need to Know about Screen Mirroring Honor Play 8T | Dr.fone
- In 2024, How to Fake Snapchat Location without Jailbreak On Nubia Red Magic 9 Pro+ | Dr.fone
- The Best iSpoofer Alternative to Try On Realme 11 Pro | Dr.fone
- The Storage Solution How to Create More Room for FCPX Projects for 2024
- Unlock Your Individuality A Guide to 120+ Unique Snapchat Stories
- Title: [Updated] In 2024, Effortless Communication Unveil the Three-Step Method for Snapchat Calls
- Author: Scott
- Created at : 2025-02-28 17:59:53
- Updated at : 2025-03-02 23:04:12
- Link: https://snapchat-videos.techidaily.com/updated-in-2024-effortless-communication-unveil-the-three-step-method-for-snapchat-calls/
- License: This work is licensed under CC BY-NC-SA 4.0.