![[Updated] In 2024, Efficient Methods for Producing & Perfecting Multiple Snaps](https://thmb.techidaily.com/a876d99fc810824e790e14200a363bc8a24888dbe0f9cb4aa8918882c26356a6.jpeg)
[Updated] In 2024, Efficient Methods for Producing & Perfecting Multiple Snaps
Efficient Methods for Producing & Perfecting Multiple Snaps
How to Make and Edit Multi Snapchat Videos Easily

Ollie Mattison
Mar 27, 2024• Proven solutions
Recording and sharing videos are now easy with Snapchat. With a maximum limit of 10 seconds, these videos are kept short in duration. Whether posting the Snapchat video to the story, sharing it with friends or in a Snapchat group, Snapchat was always a hit until numerous competitors started ripping its features.
But, Snapchat is back with a bounce with its multi snaps feature which is a new addition to video sharing feature in Snapchat. What is a multi snap? Snapchat, allows users to make more than 10 seconds snap video now, which is called multi snaps.
In this feature, you can record footages as long as 1 minute, which is divided into 6 snaps. Do you know how to make a video on Snapchat? Here you will learn how to make and edit multi Snapchat videos even without holding the button.
- Part1: How to Make Snapchat Multi Video Easily
- Part2: Notes About Multi Snapchat Videos
- Part3: How to Make Multi Video Without Holding the Button On iPhone
- Part4: How To Edit Video With The Built-In Features
Part1: How to Make Snapchat Multi Video Easily
If you wish to make a multi video in a few minutes very quickly, you just need to tap the big round button on the screen of the camera app and hold it.
Don’t leave the button even after the time is over. As you keep holding the button, the next snap starts recording automatically.
When you think it’s complete, at the bottom of the screen you can see the snaps appearing.
The ones you wish to keep must be saved and the rest can be dragged in order to delete.
Finally, you may edit the snaps and add effects like you do with any usual snap at the same time.

Part2: Notes About Multi Snapchat Videos
- In the Memories tab, you can find the multi snaps under the ‘Snaps’ icon and ‘All’ tabs
- When a multi snap is added and saved to the Camera Roll folder, it will be saved as a seamless single video. You cannot divide the video or break it into parts.
- One particular snap cannot be extracted from the multi snap
- Are you looking forward to sending multi snaps to My Story but facing difficulty? In such a situation you can always find it in My Stories screen and send each snap one by one.
- In multi snap, you cannot include 3D stickers, and it also cannot be reversed or looped at present.
Part3: How to Make Multi Video Without Holding the Button On iPhone
Pressing and holding the button constantly for recording multi snaps can be quite tiresome as it keeps your finger held down. But, the iPhone users can record multi video even without holding the button. Do your know how? Let’s learn the trick.
- Firstly, go to the Settings and select General from the drop-down menu. Tap on Accessibility and click the Assistive Touch. The Assistive Touch option helps to access the iPhone when you are unable to touch the screen.

- Turn the Assistive Touch On from the of mode and then Create New Gesture, under Custom Gestures. With this mode, you can record the gestures. You can activate it from the Favorites in Menu bar. Then, use one finger to press and hold your iPhone screen’s center to allow recording your Touch. You can see at the bottom there’s a blue bar which once filled indicates that your Touch is recorded. Now, Save the gesture and open Snapchat. You can find a grey dot on the screen, tap it. Now, tap on the Custom and the saved gesture.

- Once you click the saved gesture, you can see another grey dot on the screen. Drag the grey dot over record button of Snapchat and let go. One thing must be noted that you can only record 8 seconds video in iPhone than usual 10 seconds because gestures can be set only for 8 seconds.

Your hands are free to move anywhere, meanwhile, the Snapchat video is recording.
Part4: How To Edit Video With The Built-In Features
Editing snaps and videos have always been fun whether it’s for trial or for work. After recording a snapshot video, you can edit it by swiping right or left to add special effects.
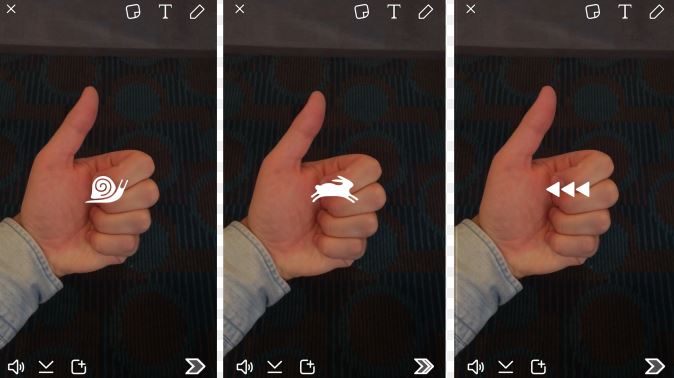
- Filters must be enabled to access the special effects. So turn it on. Rabbit will speed up your Snapchat video whereas, the snail will slow it down.
- If you wish to play your video is reverse mode then use the 3 backward arrows.The brightness of your Snapchat video can be adjusted with some of the filters. Your time, location, and speed can also be transformed by adding effects with some filters.
- There’s a magic eraser tool that can help you in erasing any object like a tree or your ex-girlfriend from the snap. You may also use a tint brush to pick a color and then touch the object you wish to tint with the brush. This feature is available for both the Android and iOS users.
Conclusion
If you want to have fun and better video effects, you can use Filmora to edit video on desktop before uploading Snapchat videos from the camera roll. Filmora is one of the best applications with a range of features. You can add graphic overlays and filters, color tuning, noise removal, 4k video resolution, pan zoom, and many more features to make your Snapchat video attractive and amazing. This article gives you a detailed information on how to make a video on Snapchat, even without pressing the button. Enjoy multi snaps feature on Snapchat videos and use by following the steps mentioned above.
Ollie Mattison
Ollie Mattison is a writer and a lover of all things video.
Follow @Ollie Mattison
Ollie Mattison
Mar 27, 2024• Proven solutions
Recording and sharing videos are now easy with Snapchat. With a maximum limit of 10 seconds, these videos are kept short in duration. Whether posting the Snapchat video to the story, sharing it with friends or in a Snapchat group, Snapchat was always a hit until numerous competitors started ripping its features.
But, Snapchat is back with a bounce with its multi snaps feature which is a new addition to video sharing feature in Snapchat. What is a multi snap? Snapchat, allows users to make more than 10 seconds snap video now, which is called multi snaps.
In this feature, you can record footages as long as 1 minute, which is divided into 6 snaps. Do you know how to make a video on Snapchat? Here you will learn how to make and edit multi Snapchat videos even without holding the button.
- Part1: How to Make Snapchat Multi Video Easily
- Part2: Notes About Multi Snapchat Videos
- Part3: How to Make Multi Video Without Holding the Button On iPhone
- Part4: How To Edit Video With The Built-In Features
Part1: How to Make Snapchat Multi Video Easily
If you wish to make a multi video in a few minutes very quickly, you just need to tap the big round button on the screen of the camera app and hold it.
Don’t leave the button even after the time is over. As you keep holding the button, the next snap starts recording automatically.
When you think it’s complete, at the bottom of the screen you can see the snaps appearing.
The ones you wish to keep must be saved and the rest can be dragged in order to delete.
Finally, you may edit the snaps and add effects like you do with any usual snap at the same time.
Part2: Notes About Multi Snapchat Videos
- In the Memories tab, you can find the multi snaps under the ‘Snaps’ icon and ‘All’ tabs
- When a multi snap is added and saved to the Camera Roll folder, it will be saved as a seamless single video. You cannot divide the video or break it into parts.
- One particular snap cannot be extracted from the multi snap
- Are you looking forward to sending multi snaps to My Story but facing difficulty? In such a situation you can always find it in My Stories screen and send each snap one by one.
- In multi snap, you cannot include 3D stickers, and it also cannot be reversed or looped at present.
Part3: How to Make Multi Video Without Holding the Button On iPhone
Pressing and holding the button constantly for recording multi snaps can be quite tiresome as it keeps your finger held down. But, the iPhone users can record multi video even without holding the button. Do your know how? Let’s learn the trick.
- Firstly, go to the Settings and select General from the drop-down menu. Tap on Accessibility and click the Assistive Touch. The Assistive Touch option helps to access the iPhone when you are unable to touch the screen.
- Turn the Assistive Touch On from the of mode and then Create New Gesture, under Custom Gestures. With this mode, you can record the gestures. You can activate it from the Favorites in Menu bar. Then, use one finger to press and hold your iPhone screen’s center to allow recording your Touch. You can see at the bottom there’s a blue bar which once filled indicates that your Touch is recorded. Now, Save the gesture and open Snapchat. You can find a grey dot on the screen, tap it. Now, tap on the Custom and the saved gesture.
- Once you click the saved gesture, you can see another grey dot on the screen. Drag the grey dot over record button of Snapchat and let go. One thing must be noted that you can only record 8 seconds video in iPhone than usual 10 seconds because gestures can be set only for 8 seconds.
Your hands are free to move anywhere, meanwhile, the Snapchat video is recording.
Part4: How To Edit Video With The Built-In Features
Editing snaps and videos have always been fun whether it’s for trial or for work. After recording a snapshot video, you can edit it by swiping right or left to add special effects.
- Filters must be enabled to access the special effects. So turn it on. Rabbit will speed up your Snapchat video whereas, the snail will slow it down.
- If you wish to play your video is reverse mode then use the 3 backward arrows.The brightness of your Snapchat video can be adjusted with some of the filters. Your time, location, and speed can also be transformed by adding effects with some filters.
- There’s a magic eraser tool that can help you in erasing any object like a tree or your ex-girlfriend from the snap. You may also use a tint brush to pick a color and then touch the object you wish to tint with the brush. This feature is available for both the Android and iOS users.
Conclusion
If you want to have fun and better video effects, you can use Filmora to edit video on desktop before uploading Snapchat videos from the camera roll. Filmora is one of the best applications with a range of features. You can add graphic overlays and filters, color tuning, noise removal, 4k video resolution, pan zoom, and many more features to make your Snapchat video attractive and amazing. This article gives you a detailed information on how to make a video on Snapchat, even without pressing the button. Enjoy multi snaps feature on Snapchat videos and use by following the steps mentioned above.
Ollie Mattison
Ollie Mattison is a writer and a lover of all things video.
Follow @Ollie Mattison
Elevate Your Conversation Game: Mastering the Art of Sending GIFs in Snapchat

For all informal interactions between pals, Snapchat is the go-to app. Many configurable options are available on the platform, allowing you to express your inner creative sides. Snapchat helps to put your spin on anything, whether it’s just sharing random photos to your contacts or having extended chats.
The option to add GIFs to Snapchat is one such great feature. Because Snapchat is primarily a picture-sharing app, the emphasis is on making these images as engaging and imaginative as possible, and this is where animated GIFs come to play.
GIF stickers have exploded in popularity and for a good cause. The active emojis are mostly not amusing, but they also give life to your images, making your digital experience better overall.
Given how entertaining GIFs can be, knowing how to send gif on snapchat is essential. As a result, we’ve put up a detailed guide that explains how to send gif on snapchat in four distinct methods. Enjoy!
Do you want to know how to send gif on snapchat in different simple ways? Then you’ve arrived at the correct page. In this post, we’ll show you how to send gif on snapchat in just a few easy and simple steps.
1.How to send gif on snapchat?
- On your phone, open Snapchat.
- Take a picture
- Select the Stickers symbol.
- Select a GIF.
- Choose the GIF you want to use.
- Finally, please include it in the picture.
2.How to make your animated GIFs
GIF means Graphics Interchange Format, and it’s simply a series of moving, dynamic pictures (think Harry Potter) that loop indefinitely. They give your image, which would otherwise be stagnant and dull, a new dimension.
GIFs are so entertaining that they can be used to carry a whole discussion. However, if you want to learn how to make your GIFs, follow the steps below.
You’ll need to utilize the GIPHY application to generate your unique GIFs for this.
On your phone, download the GIPHY app.
- Start the app on your Mobile and select the create option.
- Smile symbol: Take a Photo and Gallery Option are the three options available to you.
- Smile Icon: This option allows you to make GIFs using the edit button.
- Capture a Photo: This option allows the user to take a photo on the scene and convert it to a GIF.
- Option of Gallery: You may build a GIF by selecting a photo from your gallery and editing it.
- Select options and begin designing depending on your preferences.
- When you will finish, click on the arrow in the bottom right-hand corner to exit.
- To save all the GIFs, go to Generated GIFs, touch on the three vertical dots, and choose Save GIF.
That GIF has now been saved to your pictures folder and can be seen anytime you need that.
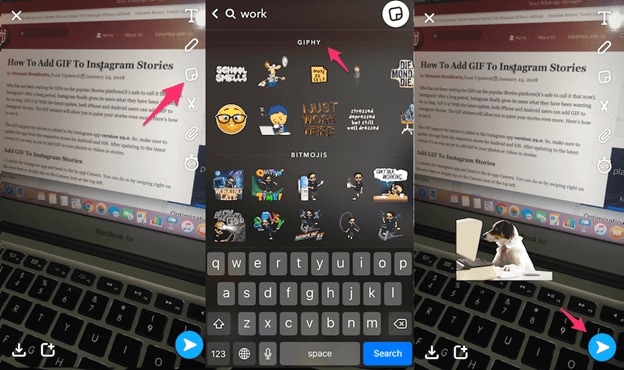
3.What is the best way to transmit GIFs on Snapchat?
Putting GIFs in your photos is easy and takes only a few minutes. Here’s how to accomplish it.
- Log in to your Snapchat account by opening the app on your phone.
- Click a photo or choose an image from your collection to upload.
- Select the sticker button to add extra components to the Snap.
- Choose the GIF choice and any GIF you wish.
- Once you’ve chosen a GIF, it’ll show on the Snap for you to adjust and position anywhere you’d like.
- Lastly, to send the Snap to your pals, select the arrow option in the lower right corner.
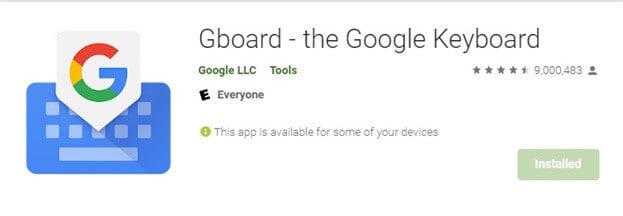
4.On Android, how to send gif on snapchat Messages?
You must download the GBoard app on your phone to transfer GIFs to your pals immediately from a keypad on Android.
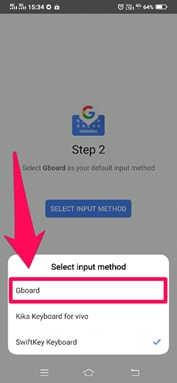
5.How can I get Gboard to work on Android?
To install and activate the Gboard application and transmit GIFs directly from it, follow the procedure.
- Download the Gboard application on your Android.
- Open the app and select Enable in Configurations from the menu.
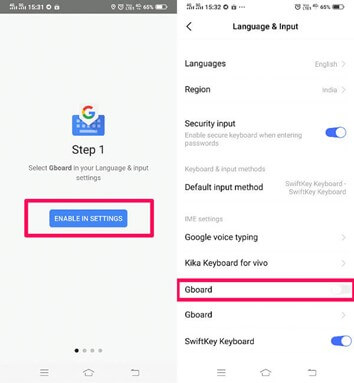
- The Communication and Input menu will appear in Preferences.
- Choose Gboard from the list of available keyboards.
6.In iOS, how to send gif on snapchat Messages?
Using the GIPHY keypad on your iPhone, you can share GIFs straight to your pals via Snapchat chats. However, you must first activate the keypad.
- Turn on the GIPHY keypad on your iPhone. Install the GIPHY phone app from the Apple Store. After you’ve downloaded the app, you’ll need to activate the GIPHY keypad on your iPhone.
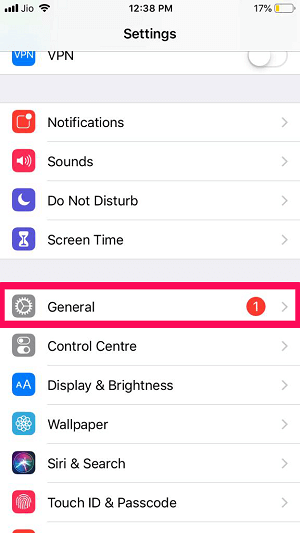
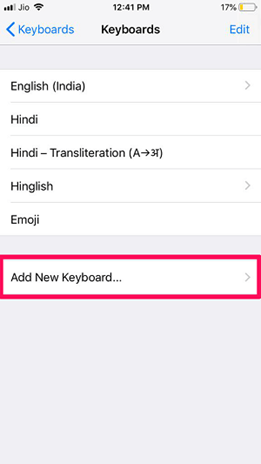
- To do just that, go over to the iPhone configuration menu and select “General” from the drop-down menu.
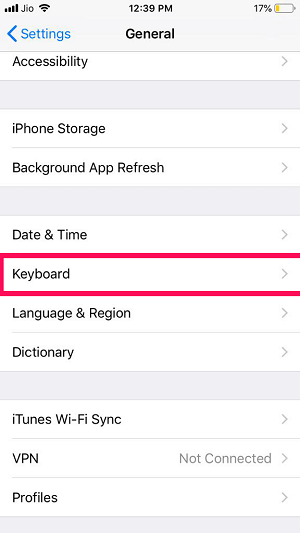
- Scroll to the bottom of the Keypad choice, then click “Keypads” once again.
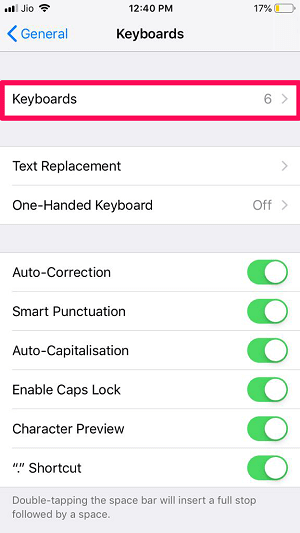
- All of the newly added keyboards will now be visible. Click the “Add Additional Keyboard” option to add GIPHY.
For Win 7 or later (64-bit)
For macOS 10.12 or later
For all informal interactions between pals, Snapchat is the go-to app. Many configurable options are available on the platform, allowing you to express your inner creative sides. Snapchat helps to put your spin on anything, whether it’s just sharing random photos to your contacts or having extended chats.
The option to add GIFs to Snapchat is one such great feature. Because Snapchat is primarily a picture-sharing app, the emphasis is on making these images as engaging and imaginative as possible, and this is where animated GIFs come to play.
GIF stickers have exploded in popularity and for a good cause. The active emojis are mostly not amusing, but they also give life to your images, making your digital experience better overall.
Given how entertaining GIFs can be, knowing how to send gif on snapchat is essential. As a result, we’ve put up a detailed guide that explains how to send gif on snapchat in four distinct methods. Enjoy!
Do you want to know how to send gif on snapchat in different simple ways? Then you’ve arrived at the correct page. In this post, we’ll show you how to send gif on snapchat in just a few easy and simple steps.
1.How to send gif on snapchat?
- On your phone, open Snapchat.
- Take a picture
- Select the Stickers symbol.
- Select a GIF.
- Choose the GIF you want to use.
- Finally, please include it in the picture.
2.How to make your animated GIFs
GIF means Graphics Interchange Format, and it’s simply a series of moving, dynamic pictures (think Harry Potter) that loop indefinitely. They give your image, which would otherwise be stagnant and dull, a new dimension.
GIFs are so entertaining that they can be used to carry a whole discussion. However, if you want to learn how to make your GIFs, follow the steps below.
You’ll need to utilize the GIPHY application to generate your unique GIFs for this.
On your phone, download the GIPHY app.
- Start the app on your Mobile and select the create option.
- Smile symbol: Take a Photo and Gallery Option are the three options available to you.
- Smile Icon: This option allows you to make GIFs using the edit button.
- Capture a Photo: This option allows the user to take a photo on the scene and convert it to a GIF.
- Option of Gallery: You may build a GIF by selecting a photo from your gallery and editing it.
- Select options and begin designing depending on your preferences.
- When you will finish, click on the arrow in the bottom right-hand corner to exit.
- To save all the GIFs, go to Generated GIFs, touch on the three vertical dots, and choose Save GIF.
That GIF has now been saved to your pictures folder and can be seen anytime you need that.
3.What is the best way to transmit GIFs on Snapchat?
Putting GIFs in your photos is easy and takes only a few minutes. Here’s how to accomplish it.
- Log in to your Snapchat account by opening the app on your phone.
- Click a photo or choose an image from your collection to upload.
- Select the sticker button to add extra components to the Snap.
- Choose the GIF choice and any GIF you wish.
- Once you’ve chosen a GIF, it’ll show on the Snap for you to adjust and position anywhere you’d like.
- Lastly, to send the Snap to your pals, select the arrow option in the lower right corner.
4.On Android, how to send gif on snapchat Messages?
You must download the GBoard app on your phone to transfer GIFs to your pals immediately from a keypad on Android.
5.How can I get Gboard to work on Android?
To install and activate the Gboard application and transmit GIFs directly from it, follow the procedure.
- Download the Gboard application on your Android.
- Open the app and select Enable in Configurations from the menu.
- The Communication and Input menu will appear in Preferences.
- Choose Gboard from the list of available keyboards.
6.In iOS, how to send gif on snapchat Messages?
Using the GIPHY keypad on your iPhone, you can share GIFs straight to your pals via Snapchat chats. However, you must first activate the keypad.
- Turn on the GIPHY keypad on your iPhone. Install the GIPHY phone app from the Apple Store. After you’ve downloaded the app, you’ll need to activate the GIPHY keypad on your iPhone.
- To do just that, go over to the iPhone configuration menu and select “General” from the drop-down menu.
- Scroll to the bottom of the Keypad choice, then click “Keypads” once again.
- All of the newly added keyboards will now be visible. Click the “Add Additional Keyboard” option to add GIPHY.
For Win 7 or later (64-bit)
For macOS 10.12 or later
Also read:
- [New] In 2024, Cryptic SnapShots Advanced Concealed Image Recording on Snapchat
- [New] In 2024, Enhancing Collaboration with Snap Camera Techniques
- [Updated] 2024 Approved The Entrepreneur's Guide to Snapchat E-Commerce
- [Updated] In 2024, Cross-Play Away in Apex Legends Optimal Platform Selection & Disabling
- [Updated] In 2024, Inverting Video Order on Snapchat
- [Updated] In 2024, The Time-Traveler's Guide to Snapchat'inasync Videos
- [Updated] Unmatched Download Experience with Our Top Tools List
- 2024 Approved How to Share Screen on Google Meet
- 2024 Approved The Ultimate Checklist Seamless Conversion of Phone Photos to Snapchat
- In 2024, 3 Ways to Change Location on Facebook Marketplace for Apple iPhone 8 Plus | Dr.fone
- In 2024, How to Reset Apple ID and Apple Password From iPhone 6
- No More Cod: Black Ops Cold War Issues - Error Code 80070057 Solution Guide
- Top Digital Communities: Connect on Facebook, Twitter, Instagram, or Youtube
- Title: [Updated] In 2024, Efficient Methods for Producing & Perfecting Multiple Snaps
- Author: Scott
- Created at : 2025-02-25 18:21:03
- Updated at : 2025-03-02 16:08:50
- Link: https://snapchat-videos.techidaily.com/updated-in-2024-efficient-methods-for-producing-and-perfecting-multiple-snaps/
- License: This work is licensed under CC BY-NC-SA 4.0.