![[Updated] Flipping the Script How to Invert Snapchat Movements for 2024](https://thmb.techidaily.com/6b8b8cd944b78f2fca9befdc6ff94bcc8ad2bce093f59dcdf2b6479e3403f82d.jpg)
"[Updated] Flipping the Script How to Invert Snapchat Movements for 2024"
Flipping the Script: How to Invert Snapchat Movements
Snapchat has become one of the foremost popular chat applications for young adults and teenagers worldwide. Released in 2011, it gives you a choice to feature captions, drawings, and filters to your photos and videos referred to as snaps. Few people want to see the videos in reverse on Snapchat.
But, only a few people know about the Snapchat reverse filter. Don’t worry if you are clueless about the reverse video Snapchat process. Since reversing a video, snap is as easy as applying a filter. This article will enable you to reverse Snapchat for iOS and Android versions quickly.
In this article
01 How to Record Reverse video on Snapchat for free with the built-in filter?
02 How to Add Reverse Effect to Existing Videos on Snapchat?
03 Best Apps to Create Reverse Video for Snapchat.
04 When Should You Apply the Reverse Filter to Video on Snapchat?
05 Tips for a good reverse video
Part 1: How to Record Reverse video on Snapchat for free with the built-in filter?
Now that you need to know how to invert a video on Snapchat do not remain absent from this dialog. As you all know, it is beautifully simple to record a specific video on Snapchat. Like recording a video, turning around is also a pretty easy one.
Let’s examine in detail how you’ll switch Snapchat video via a free built-in reverse feature on Snapchat.
Note: Video duration should not be more than 10 seconds.
Step 1: Begin to record the video.
Open your Snapchat, then move to the camera screen. Later, capture a specific video clip by holding down a button display within the middle of the screen.
Step 2: T urn around the filter effect.
After capturing a video on Snapchat, another step for you’ll be to undertake to go for a turnaround channel there that is swipe to the left. By swiping, you’ll discover the reverse option alternative quickly. When you reach after swiping, you will find several types of filters. There, stay on the reverse screen.
Step 3: Share the altered video.
After switching your video to reverse mode, you’ll be able to share it with your companions. If you want to include more impacts in the video, tap the symbol button on your right side. Doing so will empower you to add effect. That’s all for turning around a video on Snapchat. Finally, you will get the reversed video with varying speed options.
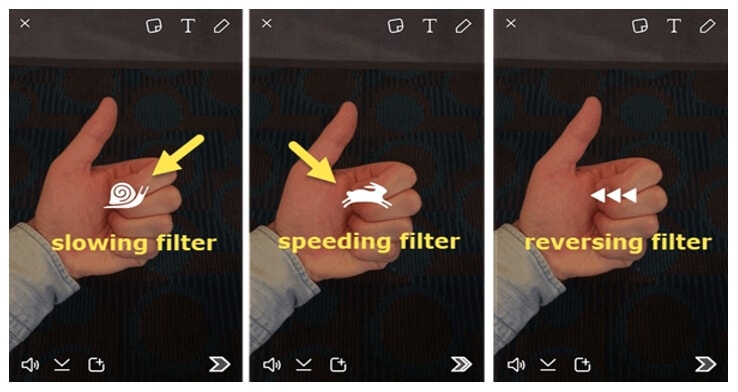
You may also like: How to slow down video on Snapchat.
Part 2: How to Add Reverse Effect to Existing Videos on Snapchat?
This strategy works for both recordings you previously took with the Snapchat app and those you transfer from your phone’s collections. Follow the following step guidelines to reverse video on Snapchat.
Step 1: Open Snapchat and select the video
After landing on the main screen, you will see the camera icon. Swipe up the screen. You will see different options. Either choose the short video of duration less than 10 sec from ‘Snaps’ sections for a video you had previously recorded in Snapchat. Or else you can go for ‘Camera Roll’ to select a video from the phone camera Gallery.
Step 2: Edit Snap Menu and reverse video
Tap on the three-dot symbols on the upper right portion of the screen to open the menu. Tap on ‘Edit Snap’ from the given options. Swipe Left and find the reverse filter in Snapchat from all the filters. Selecting the reverse option will enable the Snapchat reverse filter effect on the selected video.
Part 3: Best Apps to Create Reverse Video for Snapchat
1. CapCut
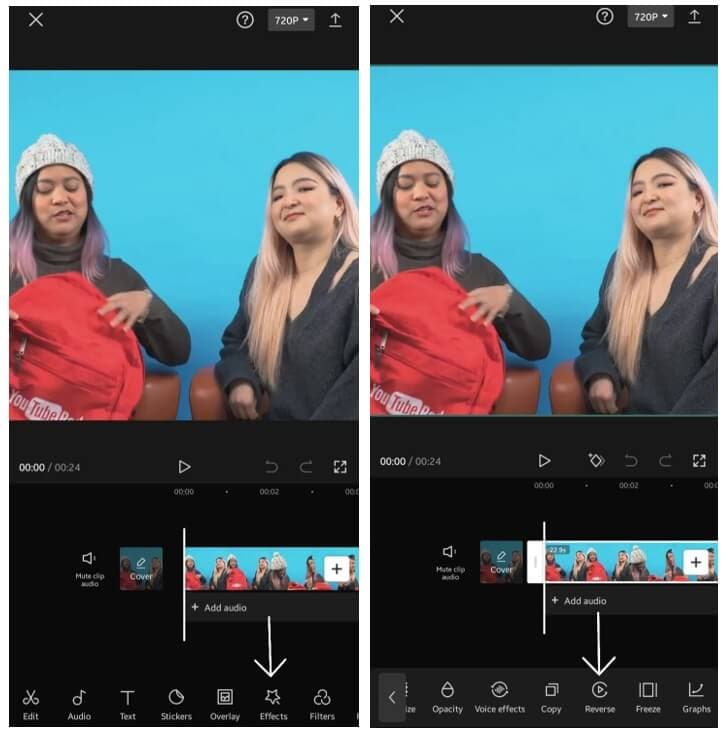
CapCut may be a portable app for iOS and Android gadgets, mainly created to complement the essential video altering highlights of the famous social stage. Several critical features of CapCut, bring it unique for social media. For example, Split function, Speed control, High defined filters, effect, and many more.
But if we talk about its reverse feature, a triangle-shaped figure inside a circle icon is known as the reverse feature in the software. This is not so tricky to use. But you can use this feature only on short videos. You can reverse it in slow motion after applying high-quality effects in your video. This version is available on iPhone as well as on Android devices.
You can check this article and find out the details about how to edit videos with CapCut.
2. Wondershare Filmora
Wondershare Filmora is the most recommended video-altering computer program that creates astonishing recordings productively employing a vast extent of powerful altering devices. Wondershare Filmora uses a delightfully realistic plan that makes it simple for anybody to become an incredible video editor.
Filmora is the most suitable app for video playback and reverses the video. And not only this, it has many other features that may facilitate your videos more engaging. If you’re trying to find an all-around video app, Filmora is the one for you. It has various kinds of critical features of Wondershare Filmora. For example, support to 4K editing, GIF, Noise removal, Advanced text editor, etc.
Talking its reverse feature is the ideal thing. It has professional tools for reversing video. Your videos will become more attractive through reverse, and additional features and concise videos will be on top.
3. Reverse Movie FX - Magic

If you need to turn around your recordings uploaded on Snapchat, Motion picture FX can make the difference. To begin with, record a video. Then, follow the steps to select the motion picture part, and press, begin. Switch Motion picture FX will start switching a video.
The main features of Reverse Movie FX- magic video are: Reverse Motion FX - Magic video carries colossal highlights for turning around a video. You will discover staggering liveliness and imaginative moves in this application. It has a smooth altering interface and timeline. You can include an inverted impact to your video by fair tapping an alternative.
Reverse Movie FX is a reverse video app available for Android and iOS devices. It offers reverse video options, including reversed + original (loop), original + reversed (loop), adding music, and many more.
Part 4: When Should You Apply the Reverse Filter to Video on Snapchat?
Reversing your video on Snapchat reflects how to show off a chain of occasions backward. This clear-out out is frequently satisfactory carried out to action-packed videos. For illustration, consider something as straightforward as dropping a shake onto a frozen pond that breaks through the ice. Rather than watching the ice smash after the video, you may apply the turnaround effect to appear the broken ice is coming back together as the video film plays in reverse.
Moving clouds, waterfall, hair flaunting, moving steps, playing with accessories, cycling, sky diving, breaking of glass, food making, makeup reverse videos, these kinds of videos easily catch trends on any social media platform.
Part 5: Tips for a good reverse video
Here are a few tips to assist you with the Snapchat reverse filter.
- Include voice: Once you utilize the turnaround effect, it’s not as it was the video that gets turned around. Any sound recorded with the video moreover gets turned around. This includes a tremendous impact on your clip as of now reversed video. So, beyond any doubt, say something while recording your video.
- Do the bizarre: If you’re aiming to be turning back time, your superior does it in fashion! Utilize the switch movement channel on things that don’t, as a rule, work that way. Like streaming water, flying feathered creatures, running mutts, you get the thought.
- Moderate that video down: Most phones these days have a few frames of slow-motion shooting mode in their camera app. Shoot your video in moderate movement, and after that, utilize the reverse motion channel on it.
- Shoot in great lighting: We know how terrible the Snapchat camera is. So, when shooting a video, shoot it in great characteristic light. Well, there you’ve got it! Have fun messing around with the reverse effect, and create a few intriguing science-defying snaps within the deal!
Conclusion
In the end, we hope that all your queries get cleared while reading this post. There are a few questions answered like:
- How to make a reverse video on Snapchat.
- Tips to make the reverse video better.
- How to use the in-built Snapchat reverse filter.
- Some apps create the best reverse videos.
Thus, I hope your queries are explicit after reading this post.
02 How to Add Reverse Effect to Existing Videos on Snapchat?
03 Best Apps to Create Reverse Video for Snapchat.
04 When Should You Apply the Reverse Filter to Video on Snapchat?
05 Tips for a good reverse video
Part 1: How to Record Reverse video on Snapchat for free with the built-in filter?
Now that you need to know how to invert a video on Snapchat do not remain absent from this dialog. As you all know, it is beautifully simple to record a specific video on Snapchat. Like recording a video, turning around is also a pretty easy one.
Let’s examine in detail how you’ll switch Snapchat video via a free built-in reverse feature on Snapchat.
Note: Video duration should not be more than 10 seconds.
Step 1: Begin to record the video.
Open your Snapchat, then move to the camera screen. Later, capture a specific video clip by holding down a button display within the middle of the screen.
Step 2: T urn around the filter effect.
After capturing a video on Snapchat, another step for you’ll be to undertake to go for a turnaround channel there that is swipe to the left. By swiping, you’ll discover the reverse option alternative quickly. When you reach after swiping, you will find several types of filters. There, stay on the reverse screen.
Step 3: Share the altered video.
After switching your video to reverse mode, you’ll be able to share it with your companions. If you want to include more impacts in the video, tap the symbol button on your right side. Doing so will empower you to add effect. That’s all for turning around a video on Snapchat. Finally, you will get the reversed video with varying speed options.
You may also like: How to slow down video on Snapchat.
Part 2: How to Add Reverse Effect to Existing Videos on Snapchat?
This strategy works for both recordings you previously took with the Snapchat app and those you transfer from your phone’s collections. Follow the following step guidelines to reverse video on Snapchat.
Step 1: Open Snapchat and select the video
After landing on the main screen, you will see the camera icon. Swipe up the screen. You will see different options. Either choose the short video of duration less than 10 sec from ‘Snaps’ sections for a video you had previously recorded in Snapchat. Or else you can go for ‘Camera Roll’ to select a video from the phone camera Gallery.
Step 2: Edit Snap Menu and reverse video
Tap on the three-dot symbols on the upper right portion of the screen to open the menu. Tap on ‘Edit Snap’ from the given options. Swipe Left and find the reverse filter in Snapchat from all the filters. Selecting the reverse option will enable the Snapchat reverse filter effect on the selected video.
Part 3: Best Apps to Create Reverse Video for Snapchat
1. CapCut
CapCut may be a portable app for iOS and Android gadgets, mainly created to complement the essential video altering highlights of the famous social stage. Several critical features of CapCut, bring it unique for social media. For example, Split function, Speed control, High defined filters, effect, and many more.
But if we talk about its reverse feature, a triangle-shaped figure inside a circle icon is known as the reverse feature in the software. This is not so tricky to use. But you can use this feature only on short videos. You can reverse it in slow motion after applying high-quality effects in your video. This version is available on iPhone as well as on Android devices.
You can check this article and find out the details about how to edit videos with CapCut.
2. Wondershare Filmora
Wondershare Filmora is the most recommended video-altering computer program that creates astonishing recordings productively employing a vast extent of powerful altering devices. Wondershare Filmora uses a delightfully realistic plan that makes it simple for anybody to become an incredible video editor.
Filmora is the most suitable app for video playback and reverses the video. And not only this, it has many other features that may facilitate your videos more engaging. If you’re trying to find an all-around video app, Filmora is the one for you. It has various kinds of critical features of Wondershare Filmora. For example, support to 4K editing, GIF, Noise removal, Advanced text editor, etc.
Talking its reverse feature is the ideal thing. It has professional tools for reversing video. Your videos will become more attractive through reverse, and additional features and concise videos will be on top.
3. Reverse Movie FX - Magic
If you need to turn around your recordings uploaded on Snapchat, Motion picture FX can make the difference. To begin with, record a video. Then, follow the steps to select the motion picture part, and press, begin. Switch Motion picture FX will start switching a video.
The main features of Reverse Movie FX- magic video are: Reverse Motion FX - Magic video carries colossal highlights for turning around a video. You will discover staggering liveliness and imaginative moves in this application. It has a smooth altering interface and timeline. You can include an inverted impact to your video by fair tapping an alternative.
Reverse Movie FX is a reverse video app available for Android and iOS devices. It offers reverse video options, including reversed + original (loop), original + reversed (loop), adding music, and many more.
Part 4: When Should You Apply the Reverse Filter to Video on Snapchat?
Reversing your video on Snapchat reflects how to show off a chain of occasions backward. This clear-out out is frequently satisfactory carried out to action-packed videos. For illustration, consider something as straightforward as dropping a shake onto a frozen pond that breaks through the ice. Rather than watching the ice smash after the video, you may apply the turnaround effect to appear the broken ice is coming back together as the video film plays in reverse.
Moving clouds, waterfall, hair flaunting, moving steps, playing with accessories, cycling, sky diving, breaking of glass, food making, makeup reverse videos, these kinds of videos easily catch trends on any social media platform.
Part 5: Tips for a good reverse video
Here are a few tips to assist you with the Snapchat reverse filter.
- Include voice: Once you utilize the turnaround effect, it’s not as it was the video that gets turned around. Any sound recorded with the video moreover gets turned around. This includes a tremendous impact on your clip as of now reversed video. So, beyond any doubt, say something while recording your video.
- Do the bizarre: If you’re aiming to be turning back time, your superior does it in fashion! Utilize the switch movement channel on things that don’t, as a rule, work that way. Like streaming water, flying feathered creatures, running mutts, you get the thought.
- Moderate that video down: Most phones these days have a few frames of slow-motion shooting mode in their camera app. Shoot your video in moderate movement, and after that, utilize the reverse motion channel on it.
- Shoot in great lighting: We know how terrible the Snapchat camera is. So, when shooting a video, shoot it in great characteristic light. Well, there you’ve got it! Have fun messing around with the reverse effect, and create a few intriguing science-defying snaps within the deal!
Conclusion
In the end, we hope that all your queries get cleared while reading this post. There are a few questions answered like:
- How to make a reverse video on Snapchat.
- Tips to make the reverse video better.
- How to use the in-built Snapchat reverse filter.
- Some apps create the best reverse videos.
Thus, I hope your queries are explicit after reading this post.
Unleash Creativity: Your Comprehensible Guide to Sharing Animated Messages in Snapchat
For all informal interactions between pals, Snapchat is the go-to app. Many configurable options are available on the platform, allowing you to express your inner creative sides. Snapchat helps to put your spin on anything, whether it’s just sharing random photos to your contacts or having extended chats.
The option to add GIFs to Snapchat is one such great feature. Because Snapchat is primarily a picture-sharing app, the emphasis is on making these images as engaging and imaginative as possible, and this is where animated GIFs come to play.
GIF stickers have exploded in popularity and for a good cause. The active emojis are mostly not amusing, but they also give life to your images, making your digital experience better overall.
Given how entertaining GIFs can be, knowing how to send gif on snapchat is essential. As a result, we’ve put up a detailed guide that explains how to send gif on snapchat in four distinct methods. Enjoy!
Do you want to know how to send gif on snapchat in different simple ways? Then you’ve arrived at the correct page. In this post, we’ll show you how to send gif on snapchat in just a few easy and simple steps.
1.How to send gif on snapchat?
- On your phone, open Snapchat.
- Take a picture
- Select the Stickers symbol.
- Select a GIF.
- Choose the GIF you want to use.
- Finally, please include it in the picture.
2.How to make your animated GIFs
GIF means Graphics Interchange Format, and it’s simply a series of moving, dynamic pictures (think Harry Potter) that loop indefinitely. They give your image, which would otherwise be stagnant and dull, a new dimension.
GIFs are so entertaining that they can be used to carry a whole discussion. However, if you want to learn how to make your GIFs, follow the steps below.
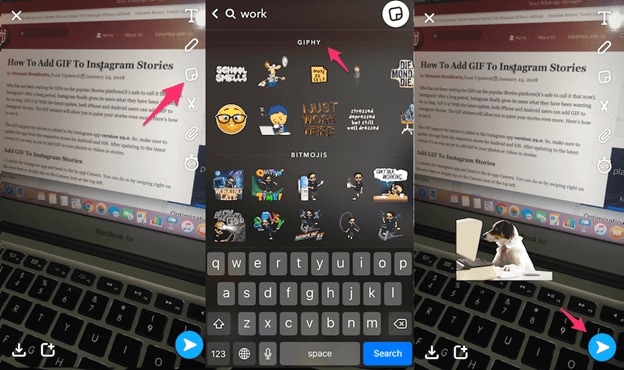
You’ll need to utilize the GIPHY application to generate your unique GIFs for this.
On your phone, download the GIPHY app.
- Start the app on your Mobile and select the create option.
- Smile symbol: Take a Photo and Gallery Option are the three options available to you.
- Smile Icon: This option allows you to make GIFs using the edit button.
- Capture a Photo: This option allows the user to take a photo on the scene and convert it to a GIF.
- Option of Gallery: You may build a GIF by selecting a photo from your gallery and editing it.
- Select options and begin designing depending on your preferences.
- When you will finish, click on the arrow in the bottom right-hand corner to exit.
- To save all the GIFs, go to Generated GIFs, touch on the three vertical dots, and choose Save GIF.
That GIF has now been saved to your pictures folder and can be seen anytime you need that.
3.What is the best way to transmit GIFs on Snapchat?
Putting GIFs in your photos is easy and takes only a few minutes. Here’s how to accomplish it.
- Log in to your Snapchat account by opening the app on your phone.
- Click a photo or choose an image from your collection to upload.
- Select the sticker button to add extra components to the Snap.
- Choose the GIF choice and any GIF you wish.
- Once you’ve chosen a GIF, it’ll show on the Snap for you to adjust and position anywhere you’d like.
- Lastly, to send the Snap to your pals, select the arrow option in the lower right corner.
4.On Android, how to send gif on snapchat Messages?
You must download the GBoard app on your phone to transfer GIFs to your pals immediately from a keypad on Android.
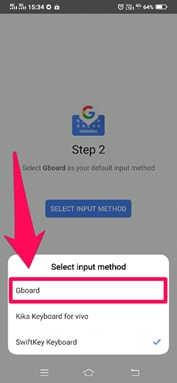
5.How can I get Gboard to work on Android?
To install and activate the Gboard application and transmit GIFs directly from it, follow the procedure.
- Download the Gboard application on your Android.
- Open the app and select Enable in Configurations from the menu.
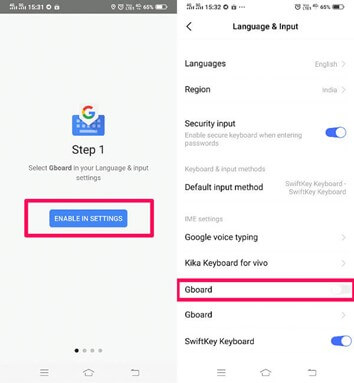
- The Communication and Input menu will appear in Preferences.
- Choose Gboard from the list of available keyboards.
6.In iOS, how to send gif on snapchat Messages?
Using the GIPHY keypad on your iPhone, you can share GIFs straight to your pals via Snapchat chats. However, you must first activate the keypad.
- Turn on the GIPHY keypad on your iPhone. Install the GIPHY phone app from the Apple Store. After you’ve downloaded the app, you’ll need to activate the GIPHY keypad on your iPhone.
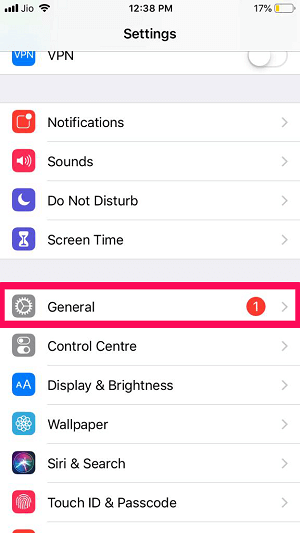
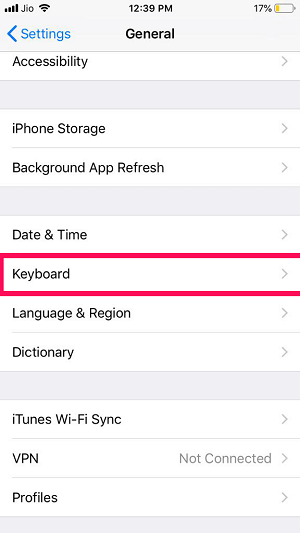
- To do just that, go over to the iPhone configuration menu and select “General” from the drop-down menu.
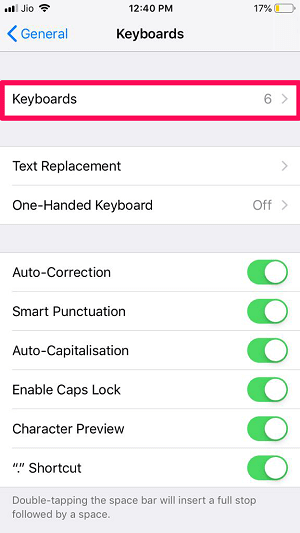
- Scroll to the bottom of the Keypad choice, then click “Keypads” once again.
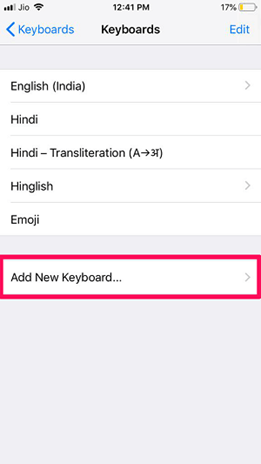
- All of the newly added keyboards will now be visible. Click the “Add Additional Keyboard” option to add GIPHY.
For Win 7 or later (64-bit)
For macOS 10.12 or later
For all informal interactions between pals, Snapchat is the go-to app. Many configurable options are available on the platform, allowing you to express your inner creative sides. Snapchat helps to put your spin on anything, whether it’s just sharing random photos to your contacts or having extended chats.
The option to add GIFs to Snapchat is one such great feature. Because Snapchat is primarily a picture-sharing app, the emphasis is on making these images as engaging and imaginative as possible, and this is where animated GIFs come to play.
GIF stickers have exploded in popularity and for a good cause. The active emojis are mostly not amusing, but they also give life to your images, making your digital experience better overall.
Given how entertaining GIFs can be, knowing how to send gif on snapchat is essential. As a result, we’ve put up a detailed guide that explains how to send gif on snapchat in four distinct methods. Enjoy!
Do you want to know how to send gif on snapchat in different simple ways? Then you’ve arrived at the correct page. In this post, we’ll show you how to send gif on snapchat in just a few easy and simple steps.
1.How to send gif on snapchat?
- On your phone, open Snapchat.
- Take a picture
- Select the Stickers symbol.
- Select a GIF.
- Choose the GIF you want to use.
- Finally, please include it in the picture.
2.How to make your animated GIFs
GIF means Graphics Interchange Format, and it’s simply a series of moving, dynamic pictures (think Harry Potter) that loop indefinitely. They give your image, which would otherwise be stagnant and dull, a new dimension.
GIFs are so entertaining that they can be used to carry a whole discussion. However, if you want to learn how to make your GIFs, follow the steps below.
You’ll need to utilize the GIPHY application to generate your unique GIFs for this.
On your phone, download the GIPHY app.
- Start the app on your Mobile and select the create option.
- Smile symbol: Take a Photo and Gallery Option are the three options available to you.
- Smile Icon: This option allows you to make GIFs using the edit button.
- Capture a Photo: This option allows the user to take a photo on the scene and convert it to a GIF.
- Option of Gallery: You may build a GIF by selecting a photo from your gallery and editing it.
- Select options and begin designing depending on your preferences.
- When you will finish, click on the arrow in the bottom right-hand corner to exit.
- To save all the GIFs, go to Generated GIFs, touch on the three vertical dots, and choose Save GIF.
That GIF has now been saved to your pictures folder and can be seen anytime you need that.
3.What is the best way to transmit GIFs on Snapchat?
Putting GIFs in your photos is easy and takes only a few minutes. Here’s how to accomplish it.
- Log in to your Snapchat account by opening the app on your phone.
- Click a photo or choose an image from your collection to upload.
- Select the sticker button to add extra components to the Snap.
- Choose the GIF choice and any GIF you wish.
- Once you’ve chosen a GIF, it’ll show on the Snap for you to adjust and position anywhere you’d like.
- Lastly, to send the Snap to your pals, select the arrow option in the lower right corner.
4.On Android, how to send gif on snapchat Messages?
You must download the GBoard app on your phone to transfer GIFs to your pals immediately from a keypad on Android.
5.How can I get Gboard to work on Android?
To install and activate the Gboard application and transmit GIFs directly from it, follow the procedure.
- Download the Gboard application on your Android.
- Open the app and select Enable in Configurations from the menu.
- The Communication and Input menu will appear in Preferences.
- Choose Gboard from the list of available keyboards.
6.In iOS, how to send gif on snapchat Messages?
Using the GIPHY keypad on your iPhone, you can share GIFs straight to your pals via Snapchat chats. However, you must first activate the keypad.
- Turn on the GIPHY keypad on your iPhone. Install the GIPHY phone app from the Apple Store. After you’ve downloaded the app, you’ll need to activate the GIPHY keypad on your iPhone.
- To do just that, go over to the iPhone configuration menu and select “General” from the drop-down menu.
- Scroll to the bottom of the Keypad choice, then click “Keypads” once again.
- All of the newly added keyboards will now be visible. Click the “Add Additional Keyboard” option to add GIPHY.
For Win 7 or later (64-bit)
For macOS 10.12 or later
Also read:
- [New] 2024 Approved Quick Share of Pics? Here's How You Do It Right
- [New] Effortless Selfie Sending - Learn the Technique Now for 2024
- [New] How to Create Snapchat Lenses Easily 2 Methods
- [Updated] 2024 Approved Boost Your Income with Effective Snapchat Ads
- [Updated] 2024 Approved Elegant Video Editing on iPhone Resizing Made Simple
- [Updated] In 2024, How to Make and Edit Multi Snapchat Videos Easily
- 2024 Approved 5 Traps for Newbies in Online Advertising – How to Evade Them
- 2024 Approved Samsung K850U BD+ 2023 Assessment
- Addressing Inverted Display in Windows 10
- Apple iPhone 7 Plus Asking for Passcode after iOS 17/14 Update, What to Do? | Dr.fone
- Download the White Dashboard Template for Laravel – No Cost, Professional UI/UX by Creative Tim
- In 2024, Conquer Snapchat's Boomerang Challenges Easily
- In 2024, How To Unlock SIM Cards Of OnePlus Nord CE 3 Lite 5G Without PUK Codes
- In 2024, Mastering Quick Snapchat Lens Creation Two Simple Techniques
- Instant Video Post How to Turn MP3s Into YouTube Playables
- PC Players Rejoice - WRC 10 Game Crashing Problems Solved! Enhanced Performance Guaranteed.
- The Essential Guide to Creating Stunning Boomerangs for 2024
- The Psychology Behind Successful Facebook Gifting Campaigns
- Undisclosed ScreenGrabbing Invisible Photography on Snapchat for 2024
- Title: [Updated] Flipping the Script How to Invert Snapchat Movements for 2024
- Author: Scott
- Created at : 2025-01-28 18:22:56
- Updated at : 2025-01-30 18:59:21
- Link: https://snapchat-videos.techidaily.com/updated-flipping-the-script-how-to-invert-snapchat-movements-for-2024/
- License: This work is licensed under CC BY-NC-SA 4.0.