
![[Updated] Exploring the World of Animated Lenses in Snapchat for 2024](https://www.lifewire.com/thmb/XUH2PwYnQnxL2aJCYqzrM26jUr0=/400x300/filters:no_upscale():max_bytes(150000):strip_icc()/Four_Types_Of-AI-ddd77c84af074c66987f6e8e6cdfa0a0.jpeg)
[Updated] Exploring the World of Animated Lenses in Snapchat for 2024
Exploring the World of Animated Lenses in Snapchat
How to Use Cartoon Face Lens in Snapchat?

Shanoon Cox
Mar 27, 2024• Proven solutions
The social media apps keep updating themselves and always keep their users thrilled and engaged with the new updates. People love to take selfies, and how exciting it would be, if the selfie turns into Disney and Pixar-style cartoon characters?
Back in 2020, Snapchat released the lens for Disney. Initially, it was tried on pets by the TikTok users, and people loved it. Later, looking to the response on the Disney lens, Snapchat released another filter as Voila AI Artist. Send a snap with the cartoon face lens to get the best response on your click. Also, the Snapchat cartoon face filter is so much famous on Instagram and Facebook.
Is your cellphone camera not good enough? Are you worried about that? You don’t need to now, as the Snapchat lens would help you get various lenses and filters to give you the best clicks. Try out the best lens which you love and get the best images.
Please don’t go away; here, we will get to know about the Snapchat cartoon filter.
- Part 1: What is Snapchat’s Cartoon Lens?
- Part 2: How to Find and Use Snapchat’s Cartoon Lenses?
- Part 3: How to Send a Snap Using the Cartoon Face Lens?
- Part 4: Best App for Disney and Pixal Effect
- Part 5: Differences between Snapchat Cartoon Lens and Anime Filter
Part 1: What is Snapchat’s Cartoon Lens?
Snapchat always keeps on giving the surprise to their users and maintain the selfie crazy on the social media. There are three types of the cartoon lens which is attracting the users and is the latest trend.
- Snapchat Cartoon face Lens - developed and launched way back in August 2020
- Snapchat Cartoon Lens – Quite similar to the Cartoon Face, but the most fantastic thing is it converts your face to a Disney-style character.
- Snapchat Cartoon 3D Style Lens: The most famous Cartoon 3D Style was launched in June 2021 with a Pixar-like funny appearance. Couples love this the most.
Part 2: How to Find and Use Snapchat’s Cartoon Lenses?
Snapchat allows you to use the cartoon lens and send a snap with the cartoon face lens. Ensure you have good internet to get the Snapchat installed first and follow below easy steps below to get your favorite cartoon selfie.
- Open the latest version of Snapchat, and then go to the Camera screen, opt for the smiling face icon as per below.
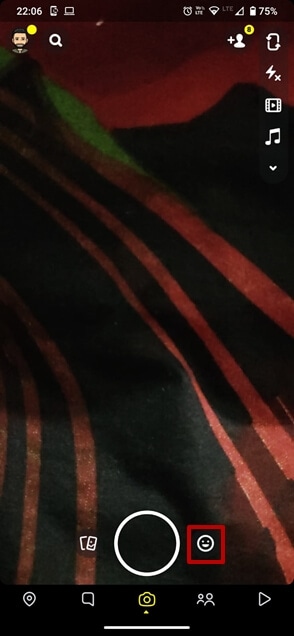
- You need to get to the cartoon lens and hence, click “explore” from the bottom right of the screen.
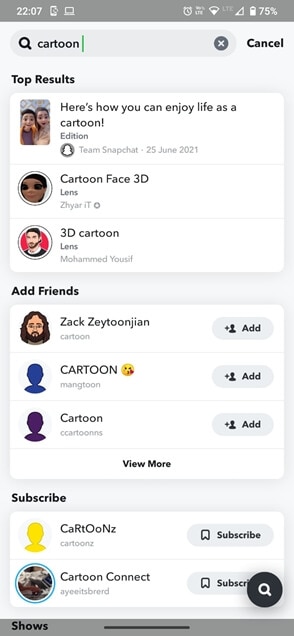
- There are a lot of options and lens; therefore, search for the “cartoon” word. Since there are many cartoon lens, make sure that you have selected the right one developed by Snapchat team. Of course, you can try the cartoon lens created by other creators.
That’s it. You are done. The wait is over. Push the camera button and start taking your video with Snapchat cartoon filter.
Still, if you face difficulty getting the lens for yourself, this link will help you download the cartoon lens and enjoy your video. Further, you can save it or send the stories to your friends. Using the funny lens was never so easy and is so much fun.
Part 3: How to Send a Snap Using the Cartoon Face Lens?
From the above points, you now might know how to get the cartoon lens on the screen. Take the image and video that would make you happy. And now you will be excited to know how it is from your family or friends by sending them the cartoon face Snapchat. But have you added your friends or family members as friends? Make sure to add them to your list or the group, allowing you to send the snap.
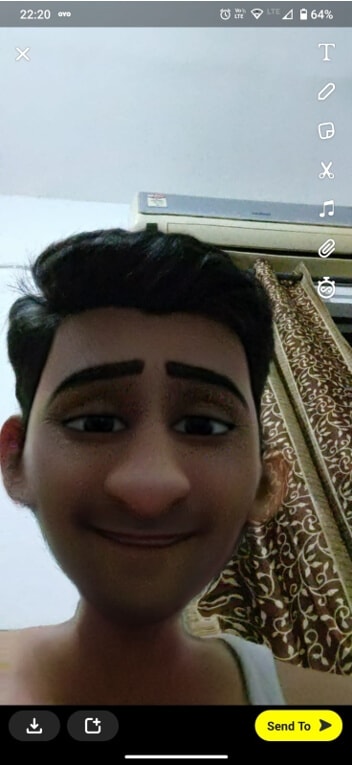
Once you take your snap, click the Send to option on the bottom of the screen to send the snap. Now you will see the list of your added friends or the groups. Tap the friend whom you want to send the snap and tap send.
Your snap has now reached your friends, and you can develop a streak with them. If you send a snap with the cartoon face lens daily to your friends, it will create a specific chain referred to as streak. You can make the streak with them for as long as you can, which means you need to use Snapchat daily. More friends, more fun. The different groups would allow you to stay in touch with more people, and also, you can share the snap with them at one go.
Part 4: Best App for for Disney and Pixal Eeffect
Snapchat is one of the most famous apps which allows the users to take the snap, exchange pictures, and the videos. The Disney Pixar Filter is exclusive on Snapchat. Though you find many similar apps copying the Snapchat filters, the original seems beautiful. You can search the Snapchat cartoon filter 3D style from the search options. Select the filer and click amazing pictures.
Voila Al Artist Carton Photo turns the image into the fantastic pictures of Disney and the Pixal effects. This is the best app giving the Disney and pixal effect specially designed with the help of human capability and artificial intelligence. You can easily take selfies, pictures, and videos with a unique look. If you have the version of 12.0 and Later on iOS , you can easily use this app and click amazing images. Moreover, it only requires 273.6 MB of storage space on iOS.
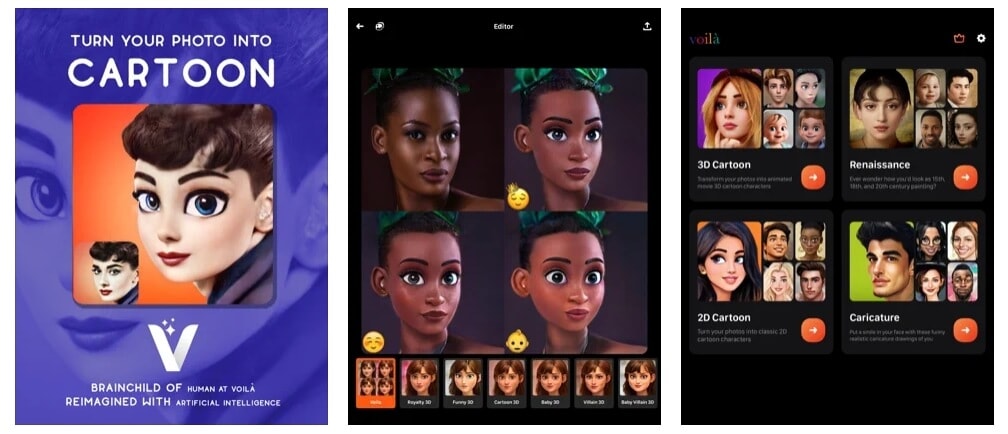
Voila Al Artist is also available on Android , quickly turning the images into cartoon replicas of faces. You can never get tired of this photo app as there are many themes available in the app which can increase your excitement.
The best thing about the Voila Al Artist app is, you can get the app for free. You can use the app on any version of Android. It doesn’t matter if your camera lens is not that good and equipped with high pixels; the Voila Al Artist photo app will make your day with unique photos. If you get tired of the advertisement, you can go for the subscription and enjoy the cartoon selfies.
Part 5: What are the differences between Snapchat Cartoon Lens and Anime Filters ?
Essentially, the difference between a filter and a lens is that the lens is an augmented reality animation, while the filter is a static image overlay.
To Distinguish the difference between Snapchat filters and lenses: Snapchat filters are static and located on top of images or videos. On the other hand, Snapchat lenses are augmented reality animations that can change your voice in addition to changing your appearance on the screen.
Conclusion
Snapchat is primarily known for its lens and filters. Many other apps even try to copy the filers but certainly couldn’t make it up. To develop the longest streak with your friends, you need to use Snapchat daily. Hence, Snapchat would never get you bored if you have to use it and send a snap with the cartoon face lens daily to friends. The regularly updating lens and the streak will keep you engaged in it every day. The app does not demand much high configuration and high storage. Hence, the app can fit into any individual and is easy to operate.
Shanoon Cox
Shanoon Cox is a writer and a lover of all things video.
Follow @Shanoon Cox
Shanoon Cox
Mar 27, 2024• Proven solutions
The social media apps keep updating themselves and always keep their users thrilled and engaged with the new updates. People love to take selfies, and how exciting it would be, if the selfie turns into Disney and Pixar-style cartoon characters?
Back in 2020, Snapchat released the lens for Disney. Initially, it was tried on pets by the TikTok users, and people loved it. Later, looking to the response on the Disney lens, Snapchat released another filter as Voila AI Artist. Send a snap with the cartoon face lens to get the best response on your click. Also, the Snapchat cartoon face filter is so much famous on Instagram and Facebook.
Is your cellphone camera not good enough? Are you worried about that? You don’t need to now, as the Snapchat lens would help you get various lenses and filters to give you the best clicks. Try out the best lens which you love and get the best images.
Please don’t go away; here, we will get to know about the Snapchat cartoon filter.
- Part 1: What is Snapchat’s Cartoon Lens?
- Part 2: How to Find and Use Snapchat’s Cartoon Lenses?
- Part 3: How to Send a Snap Using the Cartoon Face Lens?
- Part 4: Best App for Disney and Pixal Effect
- Part 5: Differences between Snapchat Cartoon Lens and Anime Filter
Part 1: What is Snapchat’s Cartoon Lens?
Snapchat always keeps on giving the surprise to their users and maintain the selfie crazy on the social media. There are three types of the cartoon lens which is attracting the users and is the latest trend.
- Snapchat Cartoon face Lens - developed and launched way back in August 2020
- Snapchat Cartoon Lens – Quite similar to the Cartoon Face, but the most fantastic thing is it converts your face to a Disney-style character.
- Snapchat Cartoon 3D Style Lens: The most famous Cartoon 3D Style was launched in June 2021 with a Pixar-like funny appearance. Couples love this the most.
Part 2: How to Find and Use Snapchat’s Cartoon Lenses?
Snapchat allows you to use the cartoon lens and send a snap with the cartoon face lens. Ensure you have good internet to get the Snapchat installed first and follow below easy steps below to get your favorite cartoon selfie.
- Open the latest version of Snapchat, and then go to the Camera screen, opt for the smiling face icon as per below.
- You need to get to the cartoon lens and hence, click “explore” from the bottom right of the screen.
- There are a lot of options and lens; therefore, search for the “cartoon” word. Since there are many cartoon lens, make sure that you have selected the right one developed by Snapchat team. Of course, you can try the cartoon lens created by other creators.
That’s it. You are done. The wait is over. Push the camera button and start taking your video with Snapchat cartoon filter.
Still, if you face difficulty getting the lens for yourself, this link will help you download the cartoon lens and enjoy your video. Further, you can save it or send the stories to your friends. Using the funny lens was never so easy and is so much fun.
Part 3: How to Send a Snap Using the Cartoon Face Lens?
From the above points, you now might know how to get the cartoon lens on the screen. Take the image and video that would make you happy. And now you will be excited to know how it is from your family or friends by sending them the cartoon face Snapchat. But have you added your friends or family members as friends? Make sure to add them to your list or the group, allowing you to send the snap.
Once you take your snap, click the Send to option on the bottom of the screen to send the snap. Now you will see the list of your added friends or the groups. Tap the friend whom you want to send the snap and tap send.
Your snap has now reached your friends, and you can develop a streak with them. If you send a snap with the cartoon face lens daily to your friends, it will create a specific chain referred to as streak. You can make the streak with them for as long as you can, which means you need to use Snapchat daily. More friends, more fun. The different groups would allow you to stay in touch with more people, and also, you can share the snap with them at one go.
Part 4: Best App for for Disney and Pixal Eeffect
Snapchat is one of the most famous apps which allows the users to take the snap, exchange pictures, and the videos. The Disney Pixar Filter is exclusive on Snapchat. Though you find many similar apps copying the Snapchat filters, the original seems beautiful. You can search the Snapchat cartoon filter 3D style from the search options. Select the filer and click amazing pictures.
Voila Al Artist Carton Photo turns the image into the fantastic pictures of Disney and the Pixal effects. This is the best app giving the Disney and pixal effect specially designed with the help of human capability and artificial intelligence. You can easily take selfies, pictures, and videos with a unique look. If you have the version of 12.0 and Later on iOS , you can easily use this app and click amazing images. Moreover, it only requires 273.6 MB of storage space on iOS.
Voila Al Artist is also available on Android , quickly turning the images into cartoon replicas of faces. You can never get tired of this photo app as there are many themes available in the app which can increase your excitement.
The best thing about the Voila Al Artist app is, you can get the app for free. You can use the app on any version of Android. It doesn’t matter if your camera lens is not that good and equipped with high pixels; the Voila Al Artist photo app will make your day with unique photos. If you get tired of the advertisement, you can go for the subscription and enjoy the cartoon selfies.
Part 5: What are the differences between Snapchat Cartoon Lens and Anime Filters ?
Essentially, the difference between a filter and a lens is that the lens is an augmented reality animation, while the filter is a static image overlay.
To Distinguish the difference between Snapchat filters and lenses: Snapchat filters are static and located on top of images or videos. On the other hand, Snapchat lenses are augmented reality animations that can change your voice in addition to changing your appearance on the screen.
Conclusion
Snapchat is primarily known for its lens and filters. Many other apps even try to copy the filers but certainly couldn’t make it up. To develop the longest streak with your friends, you need to use Snapchat daily. Hence, Snapchat would never get you bored if you have to use it and send a snap with the cartoon face lens daily to friends. The regularly updating lens and the streak will keep you engaged in it every day. The app does not demand much high configuration and high storage. Hence, the app can fit into any individual and is easy to operate.
Shanoon Cox
Shanoon Cox is a writer and a lover of all things video.
Follow @Shanoon Cox
Mastering the Art of Video: Optimal Mac & Snapchat Fit
How to Make a Video Best Fits Snapchat Size on Mac?

Liza Brown
Oct 26, 2023• Proven solutions
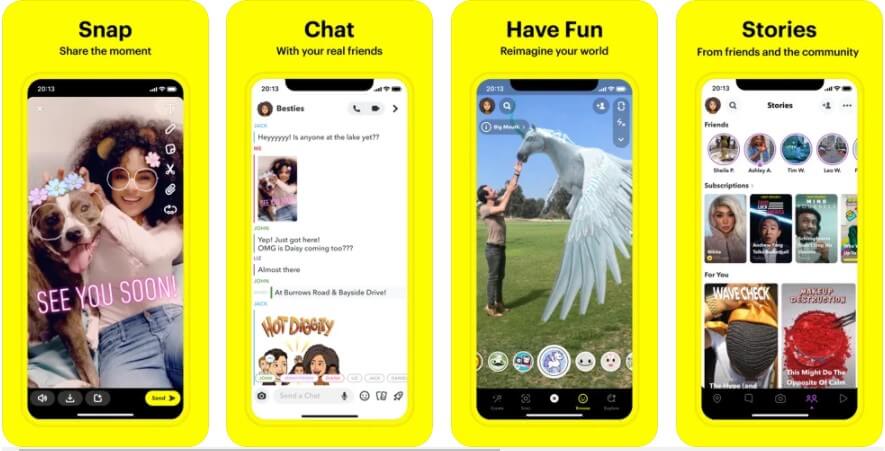
How to create a video best fit Snapchat? With more than 240 million active daily users, Snapchat is one of the most popular social media networks globally. It is also an instant messaging app that allows its users to express themselves visually in a diverse variety of manners including photos, videos, stories, stickers, emoji, and more.
One of the best features of Snapchat that makes it so attractive among the young audience is its mobile-oriented user interface. Snapchat was the first social networking platform to introduce the concept of daily stories which was widely adopted by other instant messengers as well including Instagram and WhatsApp. Since it is a mobile-oriented platform, you need to create and edit your videos in a certain way to make sure they are the best fit for Snapchat.
You May Also Like: The Ultimate Guide of Snapchat Filters
What Are the Ideal Features of a Snapchat Video?
Snapchat is highly optimized for vertical viewing which means that all the content needs to be served in portrait aspect ratio instead of landscape used by YouTube and other video platforms. You need to ensure that every aspect of your video is perfect before you can upload it for Snapchat on Mac. Here are some of the key features that you must not forget.
- Resolution - The ideal resolution of a Snapchat video is 1080 x 1920 pixels which is known as full HD. This resolution will ensure that your video loads in the right way and remains sharp and crisp for an excellent viewing experience.
- Video Format - The recommended video format for Snapchat clips is MP4 and MOV. You can use either of those formats on your Mac.
- Aspect Ratio - This is one of the key aspects of any video that determines the orientation of viewing. For a perfect Snapchat video, it is recommended that you keep the aspect ratio to 9:16.
- Video Length Size - Remember that Snapchat isn’t like YouTube and serves an audience that wants micro-entertainment. This is why the recommended time for your video is 3 to 10 seconds with the video size not exceeding 32 MB. Otherwise, the Snapchat audience may not respond well to your videos.
That is why it is crucial that your Snapchat video has all the ideal features so your audience can enjoy the viewing experience as intended instead of attempting to manipulate their phones to be able to see the video clearly. It will create an unpleasant and frustrating experience and your viewers might not stay with you.
How to Adjust the Video for Snapchat on Mac? [Step-by-Step]
- Part1. Changing Snapchat Video Format on Filmora
- Part2. Changing Snapchat Video Aspect Ratio on Filmora
- Part3. Changing Snapchat Video Size on Filmora
If your video doesn’t have the ideal features for Snapchat uploading, you don’t need to worry. You can easily edit your video on Filmora X to adjust everything including the aspect ratio, size, and format.


Part1. Changing Snapchat Video Format on Filmora
- Importing Video
The first step is to import the video using the option ‘Import Media Files’ in the import tab. You can also drag and drop the media files you need to work on.

- Selecting the Right Output Format
Once you have imported the file, drag and drop it onto the Timeline. Now click on the ‘Export’ button. Here you will be able to select your output video format which needs to be either MOV or MP4.
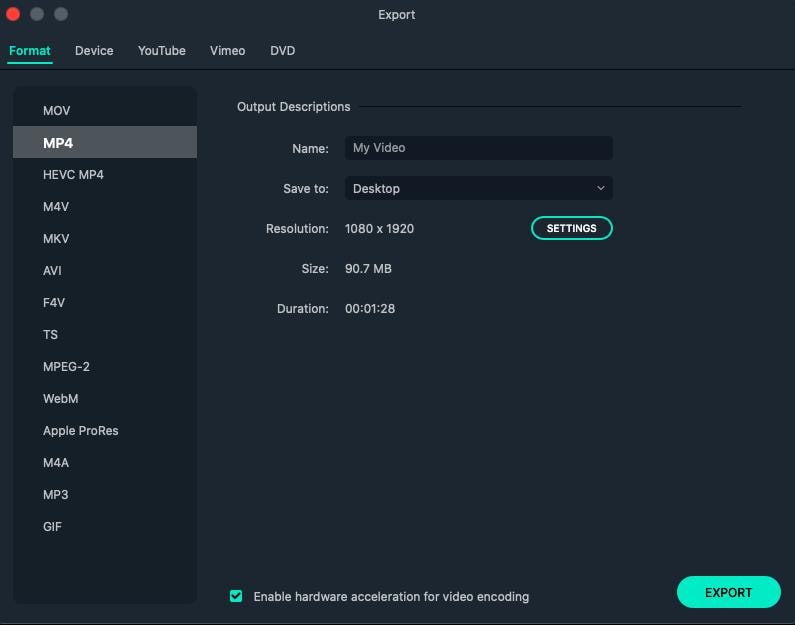
- Exporting Your Snapchat Video
After you have defined the settings, you can click on the ‘Export’ button to start the saving process. Your video is now available to you in the right format.
Part2. Changing Snapchat Video Aspect Ratio on Filmora
You can use multiple methods to change the aspect ratio of your Snapchat video on Filmora. It depends on the nature of editing you need to perform on your video. You can choose from any of the methods given below to edit your video for Snapchat in a user-friendly manner on Mac.
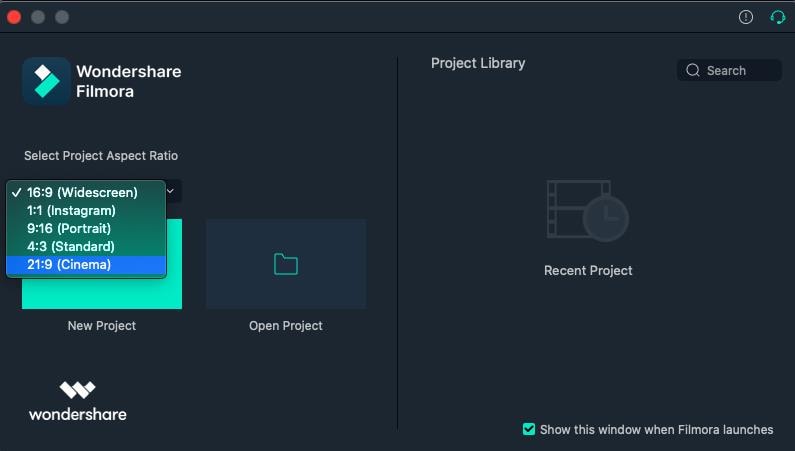
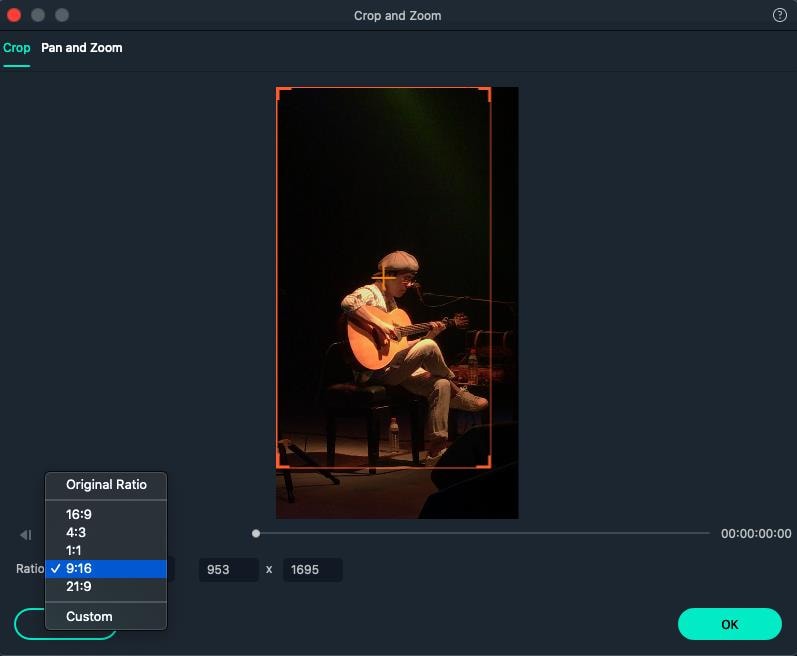
● Method 1 - Launch the editor and click on the drop-down list. You will see the popular aspect ratios listed in the list from where you can choose any. Select the right one that is 9:16 for Snapchat and export the file right away.
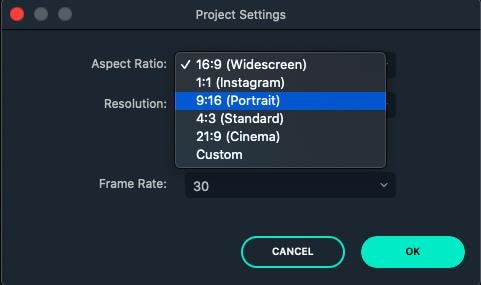
● Method 2 - The second method you can use is present under the Project Settings. You can also lock the aspect ratio using the features available here.

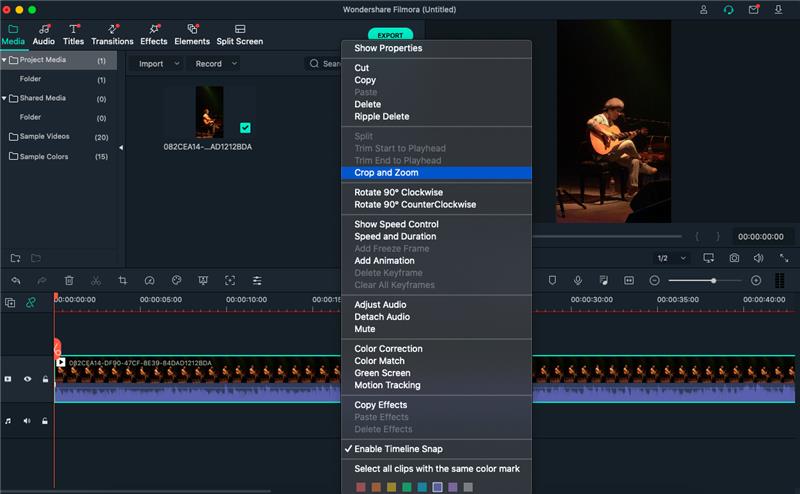
● Method 3 - The third method allows you to change the aspect ratio manually during the video editing process. You need to right-click on the timeline and select the ‘Crop and Zoom’ option. You will see a pop-up window where all the popular options will be available to you. You can choose either of them or select an aspect ratio manually.
● Step 4 - The final method to change the aspect ratio of your video on Mac is at the time of exporting your media file. Here you can select the aspect ratio for your local computer, a particular device, YouTube, or DVD TV.

Part3. Changing Snapchat Video Size on Filmora
- Importing Media File to Filmora
Using the ‘Import’ menu, import your media files, or simply drag and drop them from your Mac OS. Once the files are in the software, drag them to the Timeline track.
- Cropping Your Video for Snapchat
Here you can use the ‘Crop and Zoom’ button from the Timeline by right-clicking on it, so you can only focus on the aspect of the video that you want to show. This will resize the video as well.
- Cutting the Video
Another option you have is to delete the unnecessary parts of the video by selecting them through the indicator present on the timeline. Once you have selected the parts you don’t need, right-click on them and select ‘Delete’.
- Exporting Your Snapchat Video
Once you have resized your video by cropping and cutting the media file, you can now export it in the right resolution, bit rate, and format to ensure you get the minimum file size.
Liza Brown
Liza Brown is a writer and a lover of all things video.
Follow @Liza Brown
Liza Brown
Oct 26, 2023• Proven solutions
How to create a video best fit Snapchat? With more than 240 million active daily users, Snapchat is one of the most popular social media networks globally. It is also an instant messaging app that allows its users to express themselves visually in a diverse variety of manners including photos, videos, stories, stickers, emoji, and more.
One of the best features of Snapchat that makes it so attractive among the young audience is its mobile-oriented user interface. Snapchat was the first social networking platform to introduce the concept of daily stories which was widely adopted by other instant messengers as well including Instagram and WhatsApp. Since it is a mobile-oriented platform, you need to create and edit your videos in a certain way to make sure they are the best fit for Snapchat.
You May Also Like: The Ultimate Guide of Snapchat Filters
What Are the Ideal Features of a Snapchat Video?
Snapchat is highly optimized for vertical viewing which means that all the content needs to be served in portrait aspect ratio instead of landscape used by YouTube and other video platforms. You need to ensure that every aspect of your video is perfect before you can upload it for Snapchat on Mac. Here are some of the key features that you must not forget.
- Resolution - The ideal resolution of a Snapchat video is 1080 x 1920 pixels which is known as full HD. This resolution will ensure that your video loads in the right way and remains sharp and crisp for an excellent viewing experience.
- Video Format - The recommended video format for Snapchat clips is MP4 and MOV. You can use either of those formats on your Mac.
- Aspect Ratio - This is one of the key aspects of any video that determines the orientation of viewing. For a perfect Snapchat video, it is recommended that you keep the aspect ratio to 9:16.
- Video Length Size - Remember that Snapchat isn’t like YouTube and serves an audience that wants micro-entertainment. This is why the recommended time for your video is 3 to 10 seconds with the video size not exceeding 32 MB. Otherwise, the Snapchat audience may not respond well to your videos.
That is why it is crucial that your Snapchat video has all the ideal features so your audience can enjoy the viewing experience as intended instead of attempting to manipulate their phones to be able to see the video clearly. It will create an unpleasant and frustrating experience and your viewers might not stay with you.
How to Adjust the Video for Snapchat on Mac? [Step-by-Step]
- Part1. Changing Snapchat Video Format on Filmora
- Part2. Changing Snapchat Video Aspect Ratio on Filmora
- Part3. Changing Snapchat Video Size on Filmora
If your video doesn’t have the ideal features for Snapchat uploading, you don’t need to worry. You can easily edit your video on Filmora X to adjust everything including the aspect ratio, size, and format.
Part1. Changing Snapchat Video Format on Filmora
- Importing Video
The first step is to import the video using the option ‘Import Media Files’ in the import tab. You can also drag and drop the media files you need to work on.
- Selecting the Right Output Format
Once you have imported the file, drag and drop it onto the Timeline. Now click on the ‘Export’ button. Here you will be able to select your output video format which needs to be either MOV or MP4.
- Exporting Your Snapchat Video
After you have defined the settings, you can click on the ‘Export’ button to start the saving process. Your video is now available to you in the right format.
Part2. Changing Snapchat Video Aspect Ratio on Filmora
You can use multiple methods to change the aspect ratio of your Snapchat video on Filmora. It depends on the nature of editing you need to perform on your video. You can choose from any of the methods given below to edit your video for Snapchat in a user-friendly manner on Mac.
● Method 1 - Launch the editor and click on the drop-down list. You will see the popular aspect ratios listed in the list from where you can choose any. Select the right one that is 9:16 for Snapchat and export the file right away.
● Method 2 - The second method you can use is present under the Project Settings. You can also lock the aspect ratio using the features available here.
● Method 3 - The third method allows you to change the aspect ratio manually during the video editing process. You need to right-click on the timeline and select the ‘Crop and Zoom’ option. You will see a pop-up window where all the popular options will be available to you. You can choose either of them or select an aspect ratio manually.
● Step 4 - The final method to change the aspect ratio of your video on Mac is at the time of exporting your media file. Here you can select the aspect ratio for your local computer, a particular device, YouTube, or DVD TV.
Part3. Changing Snapchat Video Size on Filmora
- Importing Media File to Filmora
Using the ‘Import’ menu, import your media files, or simply drag and drop them from your Mac OS. Once the files are in the software, drag them to the Timeline track.
- Cropping Your Video for Snapchat
Here you can use the ‘Crop and Zoom’ button from the Timeline by right-clicking on it, so you can only focus on the aspect of the video that you want to show. This will resize the video as well.
- Cutting the Video
Another option you have is to delete the unnecessary parts of the video by selecting them through the indicator present on the timeline. Once you have selected the parts you don’t need, right-click on them and select ‘Delete’.
- Exporting Your Snapchat Video
Once you have resized your video by cropping and cutting the media file, you can now export it in the right resolution, bit rate, and format to ensure you get the minimum file size.
Liza Brown
Liza Brown is a writer and a lover of all things video.
Follow @Liza Brown
Also read:
- [Updated] Snaps for Cash A Guide to Profitability
- Elevate Your Snaps with These Top 20 Filters for 2024
- [Updated] 2024 Approved How To Move and Manage Your Social SnapShots Locally
- [New] In 2024, Enhance Photo Fun with the Coolest Snapchat Lenses
- [Updated] Step-by-Step Guide Perfecting Your Mobile Video Recording for 2024
- 2024 Approved The Complete Blueprint to Mastering Slow Motion in Snapchat
- In 2024, Analyzing Lack of Interaction Is It a Block?
- [Updated] 2024 Approved Comparing Snapchat & TikTok The Ultimate Guide
- [New] In 2024, Elevate Your Snaps Techniques for Captivating Marketing Visuals
- [Updated] A Visual Journey The Art of Editing with Snapchat Filters
- In 2024, From Novice to Pro A Tactical Guide to Snapchat Marketing
- [New] In 2024, Deciphering No Snaps, Possible Blocking
- [Updated] Unveiling the Secrets to Snap Success for 2024
- [New] From Freelance Filmmaker to Full-Time Financier Snapchat Storytelling
- 2024 Approved Unravel Time The Art of Snapchat Video Reverse
- [New] In 2024, Innovative Techniques Crafting Unique Boomerangs on Snapchat
- [Updated] 2024 Approved Silent SnapTaking The Art of Concealed Picture Recording
- [New] 2024 Approved Quick Tutorial Get Snapchat Running on macOS
- 2024 Approved From Choreographies to Filters A Comparison of Content Creation on TikTok & Snap
- [New] Unlock Your Phone's Potential for High-Quality Snapchat Recordings
- [New] Your Guide to Building Stylish Snapchat Filters
- [Updated] 2024 Approved Change Snapchat Voice in Minutes Using Twin Methods
- [Updated] 2024 Approved Exporting SnapChat Content to Your Phone's Gallery
- [Updated] 2024 Approved BuzzFeed Gurus Flashing with Snapchat
- [Updated] In 2024, Boosting Income via Social Media Snapchat's Methods
- Stand Out on Social Media Discover a Hundred+ Creative Frameworks for Your Snap Stories for 2024
- Unleash Your Inner Manga Learn Snapchat's Anime Filter Magic
- [New] 2024 Approved Unlocking Mobile Tech How to Record Your Snapchat Content
- Transform Snaps Into Anime Adventures with Snapchat Filters for 2024
- In 2024, Navigate the World of Snapchat Communication in a Blink
- [New] Wattpad Stars Moments on Snapchat for 2024
- [Updated] In 2024, Beyond Fun & Games Deciphering the Deep Meanings in Emojis
- In 2024, Unparalleled Snapchat Experience Top Editing Tools on Smartphones
- Captivating Your Audience Tactics for Powerful Snap Promotions for 2024
- [Updated] In 2024, 15 Best Ideas To Post On Snapchat
- [Updated] Secrets to a Never-Ending Snapstreak Inside Knowledge
- 2024 Approved Multi-Snapping Made Simple in Snapchat Video Edits
- [Updated] Navigating Snapback Automatically Adding Snapshots to Photos for 2024
- Mastering the Art of Mobile Video Recording with Snapchat for 2024
- [Updated] Quick Reinstatement Protocols for Snaps for 2024
- Top 7 Phone Number Locators To Track Xiaomi Mix Fold 3 Location | Dr.fone
- Updated 2024 Approved Chromebook Voice Memos Made Simple 8 Easy Techniques
- In 2024, Unlocking an iCloud Locked iPad and Apple iPhone 6s Plus
- In 2024, Remedy Non-Playing YouTube Tweet Clips
- New 2024 Approved A Complete Guide To Translate Video With Google
- How To Fix OEM Unlock Missing on Vivo X Fold 2?
- [New] 2024 Approved Aesir Clash Dawn of the Gods
- FREE 8 Best Plugins for Logic Pro X
- 5 Efficient Ways to Store Movies & Videos (.mov) in Windows
- In 2024, Fixing Foneazy MockGo Not Working On Vivo X100 Pro | Dr.fone
- In 2024, Time-Traveling Tactics Top 7 Historic Battles Reimagined
- Updated In 2024, Best Online Video Editors with Music Free and Paid
- Bricked Your Oppo Reno 11 Pro 5G? Heres A Full Solution | Dr.fone
- 2024 Approved Unleash Your Creativity Top Free Video Editing Software for 32-Bit Windows
- [New] 2024 Approved Top 10 Android MOBAs Essential Players' List
- In 2024, Ultimate Guide on Oppo K11x FRP Bypass
- 3uTools Virtual Location Not Working On Vivo X Flip? Fix Now | Dr.fone
- [Updated] How to Rectify Silent Streams with OBS for 2024
- Efficient Techniques to Preserve Webcam Dialogues
- [Updated] Navigating Screencastify's Screen Capture Feature
- Breaking Free From Windows Movie Maker Top Alternatives for 2024
- New In 2024, Free Video Hosting Solutions 10 Best Options for Individuals and Businesses
- The Ultimate Guide to Uniform Focus in Teamblend Calls
- How To Unlock Apple iPhone 14 Official Method to Unlock Your Apple iPhone 14
- [New] Remedy for Audio Pause in OBS Streams for 2024
- New In 2024, A Vacation Slideshow Is a Great Way to Relive the Vacation Memories and Also Share Them with Your Loved Ones. If You Are Looking for Ways to Create a Slideshow in Just a Few Minutes, We Will Help You with the Best Tool
- New 2024 Approved Multi-Platform Speech-to-MP3 Technology for Everyday Use
- [Updated] 2024 Approved Premier 9 Social-Media Screen Grabs
- Get the Best Audio Quality Expert Advice on FLAC Converters for 2024
- In 2024, How Can Realme Narzo N53Mirror Share to PC? | Dr.fone
- 15 Best Strongest Pokémon To Use in Pokémon GO PvP Leagues For Oppo Find X7 Ultra | Dr.fone
- 2024 Approved Capturing Your MacBook Pro Screens A Step-by-Step Tutorial
- New 2024 Approved Discover the Top 4 Audio Editing Programs Specifically Designed for Mac
- How Can I Unlock My Apple iPhone 13 After Forgetting my PIN Code?
- Title: [Updated] Exploring the World of Animated Lenses in Snapchat for 2024
- Author: Scott
- Created at : 2024-05-23 11:12:41
- Updated at : 2024-05-24 11:12:41
- Link: https://snapchat-videos.techidaily.com/updated-exploring-the-world-of-animated-lenses-in-snapchat-for-2024/
- License: This work is licensed under CC BY-NC-SA 4.0.
