![[Updated] Elevate Your Creativity 2 Routes to Perfect Snap Filters](https://thmb.techidaily.com/d558a627b87b79877888fadd197a60bce9f9f188240e22025a6fa593d0f053ec.jpg)
"[Updated] Elevate Your Creativity 2 Routes to Perfect Snap Filters"
Elevate Your Creativity: 2 Routes to Perfect Snap Filters
How to Create Snapchat Lenses Easily: 2 Methods


Ollie Mattison
Mar 27, 2024• Proven solutions
Are you feeling like creating your own Snapchat lens, so you can have an even better experience with the app? The good news is that two new Snapchat tools have been released – the Lens Studio and Create Your Own Lens applications.
If you are a regular Snapchat user, you may want to learn about the Snapchat lens and how it can help you. We will help you get started. Here is our step by step guide on how to make Snapchat lenses.
- Part1: Comparing Lens Studio and Creating Your Own Lens
- Part2: How to Use Lens Studio
- Part3: How to Create Snapchat Lenses Using Create Your Own Lens
 ZoneAlarm Extreme Security NextGen
Part 1: Comparing Lens Studio and Creating Your Own Lens
The two programs that we are highlighting today are Lens Studio and Create Your Own Lens. These are both fantastic programs for creating your own Snapchat lens, but they do have slightly different uses. If you are the type of person who wants to design a professional Snapchat lens, you are going to prefer Lens Studio.
But if you are hoping to come up with something creative that you can share with your friends and family, then you may love Create Your Own Lens. It is a very easy program to use, and it offers a ton of features that you may be surprised to see.
Snapchat lenses is for fun
The beauty of Snapchat lenses is that you can now create your own environment, which you can use each time you are taking photos or videos. Sure, you can always use the filters that are already available in the application, but not everyone would find those enough.
If you want some customization, or you just want to mess around until you get the filter that makes sense for you, Snapchat lenses are the way to go.

Lens Studio is for business
Lens Studio is perfect for businesses that may want to create unique environments for their clients, or the times when they are releasing company Snapchat posts. Say the company is hosting an event. They may want a custom graphic for that event, which is used for all the pictures and videos posted to Snapchat about the event. Using Lens Studio lets them do that with ease.
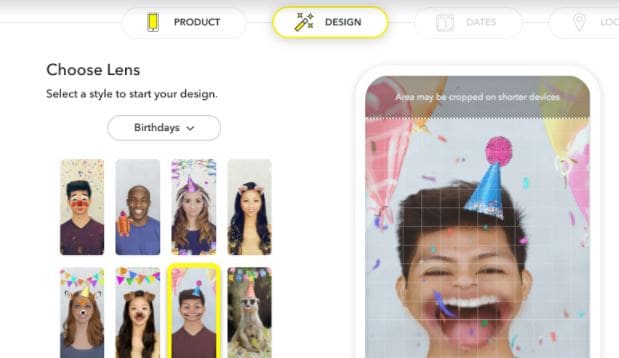
Create Your Own Lens is great when you are going to a special event, birthday party or graduating, and you want a special graphic that comes up in all your snaps. It is very intuitive to use, and is available through the App Store as a download.
 dotConnect for Oracle is an ADO.NET data provider for Oracle with Entity Framework Support.
Part 2: How to Use Lens Studio
1. Download Lens Studio
The first step involves downloading Lens Studio, which you can do from your computer. It is compatible with both Windows and Mac computers, and will run on any semi-modern system. According to the Snapchat team, Lens Studio is similar to the program used by their AR teams to create lenses. That means you are getting similar functionality, but with an easier to manage interface.
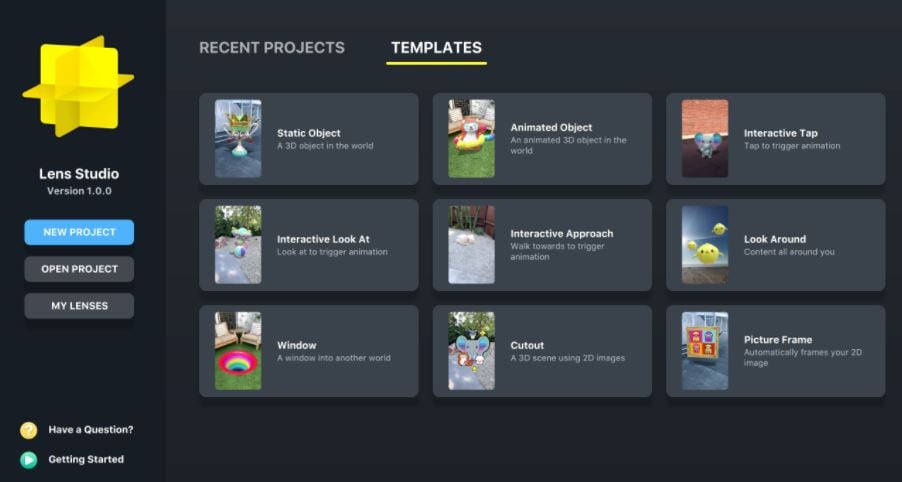
2. Choose Templates Page
It is normal to feel a little overwhelmed the first time you try and use this program. But that is why the templates page is so great. You can select from templates depending on the type of lens that you are hoping to create. You can just use a template, or you can incorporate your own ideas to customize the template.
There is also a Lens Studio Overview guide that you can access online, which will help you get acquainted with the program’s various features and quirks.
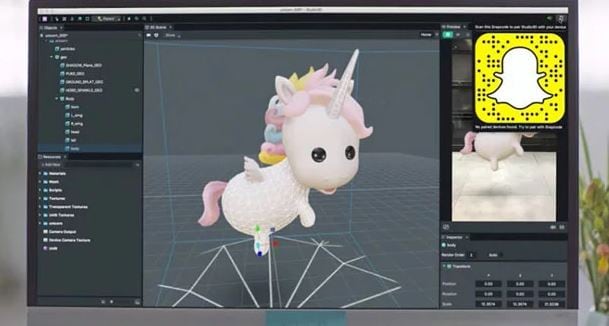
3. Use Studio Panels
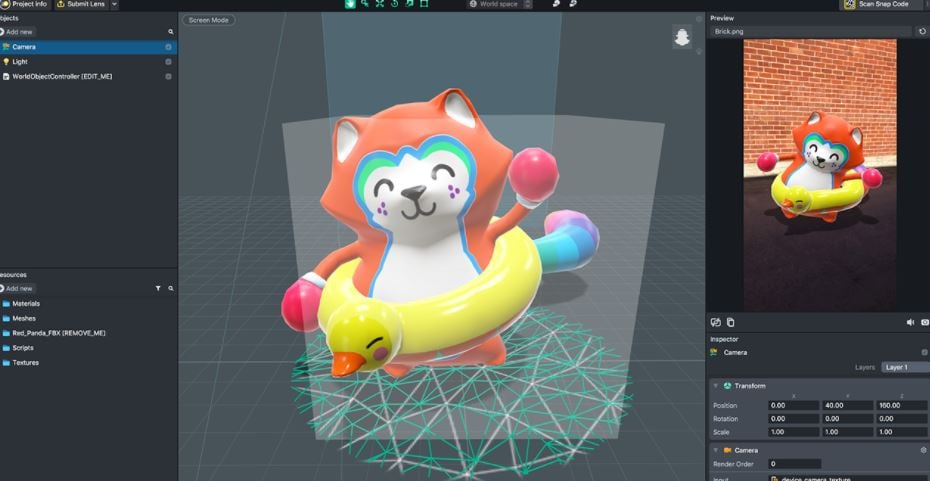
Are you ready to create your own custom Snapchat lens? It is time to head over to Studio Panels on the application. This is the area where you can add your own 2D or 3D objects, and you can visualize how they would look as a Snapchat filter. You can add, remove, resize and drag objects to specific areas of the screen.
There are other tools accessible from the Resources panel. You can use these tools to ensure that your Snapchat lens is exactly as you want.

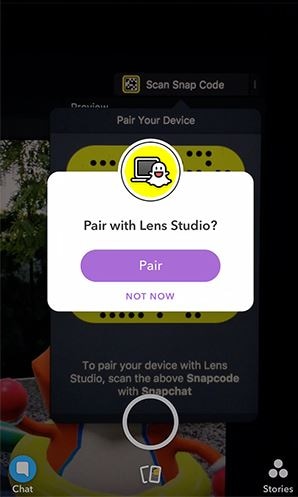
4. Preview the Snapchat Lens You Create
The great thing about this application is that you can preview the lens before you send it out to your phone. When you are satisfied with the image on the preview, you can pair your phone with the application, and you will be able to send that Snapchat lens onto your phone through your Snapcode. It is that simple!
Part 3: How to Create Snapchat Lenses Using Create Your Own Lens
- There are two ways that you can access the tool for creating fun Snapchat lenses. You can either visit the website snapchat.com/create, or you can go on the “filters and lenses” section on your iOS device. If you are using Snapchat on an Android device, you will only have the option for the website. But the feature is coming to the Android version of Snapchat very soon.
- When you are in the application or on the website, you may start to look at the different templates for Snapchat lenses. Now you can add other items into the templates, such as photographs, text or graphics.
It is all up to your imagination. You can create the perfect Snapchat lens, which you can then send into your Snapchat account through your Snapcode. Of course, if you are using your iOS device to create the lens, it is already linked to your account.
Another cool feature is how you can set the location for where the Snapchat lens is available. Say you are hosting a party. You can have the Snapchat lens available to everyone who uses Snapchat within a set square footage of your home. That is an amazing way to let everyone share social media pictures and photos of your party, through the lens you created.
Conclusion
Creating Snapchat lenses has never been easier. Whether you are a business looking to add a custom lens, or you just want to create a fun lens for a graduation or party, there are tools that make the job very easy. Using these tools will allow you to create the perfect Snapchat lens for any occasion.
Ollie Mattison
Ollie Mattison is a writer and a lover of all things video.
Follow @Ollie Mattison
Ollie Mattison
Mar 27, 2024• Proven solutions
Are you feeling like creating your own Snapchat lens, so you can have an even better experience with the app? The good news is that two new Snapchat tools have been released – the Lens Studio and Create Your Own Lens applications.
If you are a regular Snapchat user, you may want to learn about the Snapchat lens and how it can help you. We will help you get started. Here is our step by step guide on how to make Snapchat lenses.
- Part1: Comparing Lens Studio and Creating Your Own Lens
- Part2: How to Use Lens Studio
- Part3: How to Create Snapchat Lenses Using Create Your Own Lens

WPS Office Premium ( File Recovery, Photo Scanning, Convert PDF)–Yearly
Part 1: Comparing Lens Studio and Creating Your Own Lens
The two programs that we are highlighting today are Lens Studio and Create Your Own Lens. These are both fantastic programs for creating your own Snapchat lens, but they do have slightly different uses. If you are the type of person who wants to design a professional Snapchat lens, you are going to prefer Lens Studio.
But if you are hoping to come up with something creative that you can share with your friends and family, then you may love Create Your Own Lens. It is a very easy program to use, and it offers a ton of features that you may be surprised to see.
Snapchat lenses is for fun
The beauty of Snapchat lenses is that you can now create your own environment, which you can use each time you are taking photos or videos. Sure, you can always use the filters that are already available in the application, but not everyone would find those enough.
If you want some customization, or you just want to mess around until you get the filter that makes sense for you, Snapchat lenses are the way to go.

Lens Studio is for business
Lens Studio is perfect for businesses that may want to create unique environments for their clients, or the times when they are releasing company Snapchat posts. Say the company is hosting an event. They may want a custom graphic for that event, which is used for all the pictures and videos posted to Snapchat about the event. Using Lens Studio lets them do that with ease.
Create Your Own Lens is great when you are going to a special event, birthday party or graduating, and you want a special graphic that comes up in all your snaps. It is very intuitive to use, and is available through the App Store as a download.
Part 2: How to Use Lens Studio
1. Download Lens Studio
The first step involves downloading Lens Studio, which you can do from your computer. It is compatible with both Windows and Mac computers, and will run on any semi-modern system. According to the Snapchat team, Lens Studio is similar to the program used by their AR teams to create lenses. That means you are getting similar functionality, but with an easier to manage interface.
2. Choose Templates Page
It is normal to feel a little overwhelmed the first time you try and use this program. But that is why the templates page is so great. You can select from templates depending on the type of lens that you are hoping to create. You can just use a template, or you can incorporate your own ideas to customize the template.
There is also a Lens Studio Overview guide that you can access online, which will help you get acquainted with the program’s various features and quirks.
![]() FX PRO (Gold Robot + Silver Robot(Basic Package))
FX PRO (Gold Robot + Silver Robot(Basic Package))
3. Use Studio Panels
Are you ready to create your own custom Snapchat lens? It is time to head over to Studio Panels on the application. This is the area where you can add your own 2D or 3D objects, and you can visualize how they would look as a Snapchat filter. You can add, remove, resize and drag objects to specific areas of the screen.
There are other tools accessible from the Resources panel. You can use these tools to ensure that your Snapchat lens is exactly as you want.
4. Preview the Snapchat Lens You Create
The great thing about this application is that you can preview the lens before you send it out to your phone. When you are satisfied with the image on the preview, you can pair your phone with the application, and you will be able to send that Snapchat lens onto your phone through your Snapcode. It is that simple!

Part 3: How to Create Snapchat Lenses Using Create Your Own Lens
- There are two ways that you can access the tool for creating fun Snapchat lenses. You can either visit the website snapchat.com/create, or you can go on the “filters and lenses” section on your iOS device. If you are using Snapchat on an Android device, you will only have the option for the website. But the feature is coming to the Android version of Snapchat very soon.
- When you are in the application or on the website, you may start to look at the different templates for Snapchat lenses. Now you can add other items into the templates, such as photographs, text or graphics.
It is all up to your imagination. You can create the perfect Snapchat lens, which you can then send into your Snapchat account through your Snapcode. Of course, if you are using your iOS device to create the lens, it is already linked to your account.
Another cool feature is how you can set the location for where the Snapchat lens is available. Say you are hosting a party. You can have the Snapchat lens available to everyone who uses Snapchat within a set square footage of your home. That is an amazing way to let everyone share social media pictures and photos of your party, through the lens you created.
Conclusion
Creating Snapchat lenses has never been easier. Whether you are a business looking to add a custom lens, or you just want to create a fun lens for a graduation or party, there are tools that make the job very easy. Using these tools will allow you to create the perfect Snapchat lens for any occasion.
 PaperScan Professional: PaperScan Scanner Software is a powerful TWAIN & WIA scanning application centered on one idea: making document acquisition an unparalleled easy task for anyone.
Ollie Mattison
Ollie Mattison is a writer and a lover of all things video.
Follow @Ollie Mattison
Ollie Mattison
Mar 27, 2024• Proven solutions
Are you feeling like creating your own Snapchat lens, so you can have an even better experience with the app? The good news is that two new Snapchat tools have been released – the Lens Studio and Create Your Own Lens applications.
If you are a regular Snapchat user, you may want to learn about the Snapchat lens and how it can help you. We will help you get started. Here is our step by step guide on how to make Snapchat lenses.
- Part1: Comparing Lens Studio and Creating Your Own Lens
- Part2: How to Use Lens Studio
- Part3: How to Create Snapchat Lenses Using Create Your Own Lens
Part 1: Comparing Lens Studio and Creating Your Own Lens
The two programs that we are highlighting today are Lens Studio and Create Your Own Lens. These are both fantastic programs for creating your own Snapchat lens, but they do have slightly different uses. If you are the type of person who wants to design a professional Snapchat lens, you are going to prefer Lens Studio.
But if you are hoping to come up with something creative that you can share with your friends and family, then you may love Create Your Own Lens. It is a very easy program to use, and it offers a ton of features that you may be surprised to see.
Snapchat lenses is for fun
The beauty of Snapchat lenses is that you can now create your own environment, which you can use each time you are taking photos or videos. Sure, you can always use the filters that are already available in the application, but not everyone would find those enough.
If you want some customization, or you just want to mess around until you get the filter that makes sense for you, Snapchat lenses are the way to go.
 Glary Utilities PRO - Premium all-in-one utility to clean, speed up, maintain and protect your PC
Lens Studio is for business
Lens Studio is perfect for businesses that may want to create unique environments for their clients, or the times when they are releasing company Snapchat posts. Say the company is hosting an event. They may want a custom graphic for that event, which is used for all the pictures and videos posted to Snapchat about the event. Using Lens Studio lets them do that with ease.
Create Your Own Lens is great when you are going to a special event, birthday party or graduating, and you want a special graphic that comes up in all your snaps. It is very intuitive to use, and is available through the App Store as a download.

Part 2: How to Use Lens Studio
1. Download Lens Studio
The first step involves downloading Lens Studio, which you can do from your computer. It is compatible with both Windows and Mac computers, and will run on any semi-modern system. According to the Snapchat team, Lens Studio is similar to the program used by their AR teams to create lenses. That means you are getting similar functionality, but with an easier to manage interface.
2. Choose Templates Page
It is normal to feel a little overwhelmed the first time you try and use this program. But that is why the templates page is so great. You can select from templates depending on the type of lens that you are hoping to create. You can just use a template, or you can incorporate your own ideas to customize the template.
There is also a Lens Studio Overview guide that you can access online, which will help you get acquainted with the program’s various features and quirks.
3. Use Studio Panels
Are you ready to create your own custom Snapchat lens? It is time to head over to Studio Panels on the application. This is the area where you can add your own 2D or 3D objects, and you can visualize how they would look as a Snapchat filter. You can add, remove, resize and drag objects to specific areas of the screen.
There are other tools accessible from the Resources panel. You can use these tools to ensure that your Snapchat lens is exactly as you want.
 TubeDigger - online video downloader from mostly any site
4. Preview the Snapchat Lens You Create
The great thing about this application is that you can preview the lens before you send it out to your phone. When you are satisfied with the image on the preview, you can pair your phone with the application, and you will be able to send that Snapchat lens onto your phone through your Snapcode. It is that simple!
- There are two ways that you can access the tool for creating fun Snapchat lenses. You can either visit the website snapchat.com/create, or you can go on the “filters and lenses” section on your iOS device. If you are using Snapchat on an Android device, you will only have the option for the website. But the feature is coming to the Android version of Snapchat very soon.
- When you are in the application or on the website, you may start to look at the different templates for Snapchat lenses. Now you can add other items into the templates, such as photographs, text or graphics.
It is all up to your imagination. You can create the perfect Snapchat lens, which you can then send into your Snapchat account through your Snapcode. Of course, if you are using your iOS device to create the lens, it is already linked to your account.
Another cool feature is how you can set the location for where the Snapchat lens is available. Say you are hosting a party. You can have the Snapchat lens available to everyone who uses Snapchat within a set square footage of your home. That is an amazing way to let everyone share social media pictures and photos of your party, through the lens you created.
Conclusion
Creating Snapchat lenses has never been easier. Whether you are a business looking to add a custom lens, or you just want to create a fun lens for a graduation or party, there are tools that make the job very easy. Using these tools will allow you to create the perfect Snapchat lens for any occasion.
Ollie Mattison
Ollie Mattison is a writer and a lover of all things video.
Follow @Ollie Mattison
Ollie Mattison
Mar 27, 2024• Proven solutions
Are you feeling like creating your own Snapchat lens, so you can have an even better experience with the app? The good news is that two new Snapchat tools have been released – the Lens Studio and Create Your Own Lens applications.
If you are a regular Snapchat user, you may want to learn about the Snapchat lens and how it can help you. We will help you get started. Here is our step by step guide on how to make Snapchat lenses.
- Part1: Comparing Lens Studio and Creating Your Own Lens
- Part2: How to Use Lens Studio
- Part3: How to Create Snapchat Lenses Using Create Your Own Lens
Part 1: Comparing Lens Studio and Creating Your Own Lens
The two programs that we are highlighting today are Lens Studio and Create Your Own Lens. These are both fantastic programs for creating your own Snapchat lens, but they do have slightly different uses. If you are the type of person who wants to design a professional Snapchat lens, you are going to prefer Lens Studio.
But if you are hoping to come up with something creative that you can share with your friends and family, then you may love Create Your Own Lens. It is a very easy program to use, and it offers a ton of features that you may be surprised to see.
Snapchat lenses is for fun
The beauty of Snapchat lenses is that you can now create your own environment, which you can use each time you are taking photos or videos. Sure, you can always use the filters that are already available in the application, but not everyone would find those enough.
If you want some customization, or you just want to mess around until you get the filter that makes sense for you, Snapchat lenses are the way to go.
Lens Studio is for business
Lens Studio is perfect for businesses that may want to create unique environments for their clients, or the times when they are releasing company Snapchat posts. Say the company is hosting an event. They may want a custom graphic for that event, which is used for all the pictures and videos posted to Snapchat about the event. Using Lens Studio lets them do that with ease.
Create Your Own Lens is great when you are going to a special event, birthday party or graduating, and you want a special graphic that comes up in all your snaps. It is very intuitive to use, and is available through the App Store as a download.

Part 2: How to Use Lens Studio
1. Download Lens Studio
The first step involves downloading Lens Studio, which you can do from your computer. It is compatible with both Windows and Mac computers, and will run on any semi-modern system. According to the Snapchat team, Lens Studio is similar to the program used by their AR teams to create lenses. That means you are getting similar functionality, but with an easier to manage interface.
2. Choose Templates Page
It is normal to feel a little overwhelmed the first time you try and use this program. But that is why the templates page is so great. You can select from templates depending on the type of lens that you are hoping to create. You can just use a template, or you can incorporate your own ideas to customize the template.
There is also a Lens Studio Overview guide that you can access online, which will help you get acquainted with the program’s various features and quirks.
 Lyric Video Creator Professional Version
3. Use Studio Panels
Are you ready to create your own custom Snapchat lens? It is time to head over to Studio Panels on the application. This is the area where you can add your own 2D or 3D objects, and you can visualize how they would look as a Snapchat filter. You can add, remove, resize and drag objects to specific areas of the screen.
There are other tools accessible from the Resources panel. You can use these tools to ensure that your Snapchat lens is exactly as you want.
4. Preview the Snapchat Lens You Create
The great thing about this application is that you can preview the lens before you send it out to your phone. When you are satisfied with the image on the preview, you can pair your phone with the application, and you will be able to send that Snapchat lens onto your phone through your Snapcode. It is that simple!
Part 3: How to Create Snapchat Lenses Using Create Your Own Lens
- There are two ways that you can access the tool for creating fun Snapchat lenses. You can either visit the website snapchat.com/create, or you can go on the “filters and lenses” section on your iOS device. If you are using Snapchat on an Android device, you will only have the option for the website. But the feature is coming to the Android version of Snapchat very soon.
- When you are in the application or on the website, you may start to look at the different templates for Snapchat lenses. Now you can add other items into the templates, such as photographs, text or graphics.
It is all up to your imagination. You can create the perfect Snapchat lens, which you can then send into your Snapchat account through your Snapcode. Of course, if you are using your iOS device to create the lens, it is already linked to your account.
Another cool feature is how you can set the location for where the Snapchat lens is available. Say you are hosting a party. You can have the Snapchat lens available to everyone who uses Snapchat within a set square footage of your home. That is an amazing way to let everyone share social media pictures and photos of your party, through the lens you created.
Conclusion
Creating Snapchat lenses has never been easier. Whether you are a business looking to add a custom lens, or you just want to create a fun lens for a graduation or party, there are tools that make the job very easy. Using these tools will allow you to create the perfect Snapchat lens for any occasion.
Ollie Mattison
Ollie Mattison is a writer and a lover of all things video.
Follow @Ollie Mattison
 Project Manager - Asset Browser for 3Ds Max
Snapchat on Mac - Quick Setup Tips
It is the right place to know how to get Snapchat on Mac 2021. Being not officially available on the Mac App Store, users tend to find different ways of using Snapchat on Mac computers. And these different ways may include both reliable as well as non-reliable methods. However, the use of non-reliable methods won’t take you anywhere. Thus, we’d like to recommend our readers in simple ways only.
Before you dive into the article, let’s take a quick look at some interesting Snapchat facts!
- The Snap Camera by Snapchat is officially available for Mac users in different applications.
- Many successful brands, including Snapchat, Microsoft, and Apple, have already mentioned that they will be launching their apps in the Mac App Store very soon.
- People are currently obsessed and happy with using two favorite ways to install Snapchat on a Mac, i.e., the Nox and BlueStacks.
And, we’re here to provide you with a step-by-step guide on both ways. So, let’s begin with how to download Snapchat on Mac with BlueStacks.
 DLNow Video Downloader
Part 1: How to Download Snapchat on Mac with BlueStacks?
The BlueStacks is nothing but an Android Emulator for your Windows and Mac PC. It generally provides the means to run Android applications on a PC. So, it is similar to an Android phone inside your PC. Well, BlueStacks delivers one of the best ways how to use Snapchat on Mac.
Step-by-Step Guide on How to Use Snapchat on Mac
Step 1: Download the BlueStacks Android Emulator
Go to https://www.BlueStacks.com/ and click the Download BlueStacks tab to proceed.
Proceed for installation by selecting the Allow button.
Open the .dmg file and allow the prompts and instructions on the screen.
Click the Open > Install Now button afterward, as shown below on your Mac.
Step 2: Set Initial Boot
After you finish installing BlueStacks, know how to get Snapchat on Mac by following the instructions and setting it for initial boot. Then, you are required to allow all the permissions within the app.
Make sure to unblock BlueStacks if you are using the newer versions of macOS. Go to Security & Privacy > General > Allow and proceed.
Step 3: Link Your Google Account
Now, you need to sign in with your Google account to download apps from Play Store.
Step 4: Download Snapchat
Lookup for Snapchat in the Google Play Store and hit the Install button to download.
Once the installation is over, open the Snapchat app and start using it.
With the steps above, you can easily access Snapchat via BlueStacks. So, you will need to open the BlueStacks first every time!
Part 2: How to Download Snapchat on Mac without BlueStacks?
The Nox Player is another free Android Emulator for Mac and PC operating systems. So, let’s check out how to use Snapchat on Mac without BlueStacks.
Step-by-Step Guide to Using Snapchat on Mac without BlueStacks
Step 1: Download Nox Player
Go to https://www.bignox.com/ and hit the Download button to proceed.
Click on Agree after you complete installing the Nox Player application.
Step 2: Start the Nox Player Application
Drag the Nox Player to the Applications folder and double-click the icon to start.
Then, you need to click Open to start the Nox Player.
Step 3: Fix the Virtual Box Issue
The Nox Player will not start properly if you also get the following message.
Step 4: Install Virtual Box
Go to www.virtualbox.org and hit the Download button.
Then, you need to click the OS X Hosts to start downloading the Virtual Box.
Now, double-click the Virtual Box icon to start installing.
You will need to enter the Apple password to finish the installation.
Step 5: Restart Nox Player
Restart Nox Player after the installation of the Virtual Box application.
Sign in to your Google Account and check all the permissions. So, you need to click on the Play Store first.
After you complete all the Sign In procedure, you can open the Play Store and search for Snapchat.
So, this is how to get Snapchat on Mac without BlueStacks. Well, both the methods are pretty definitive and need the software to primarily open to access Snapchat.
Do you have more queries? Scroll to the section below to find more FAQs related to more on how to use Snapchat on Mac.

Part 3: FAQs about Using Snapchat on Mac
1. Is it possible to get Snapchat on a Mac?
Yes. Officially, it is not possible to use Snapchat on Mac without using any Android Emulator. Thus, we have mentioned how to use Snapchat on Mac with BlueStacks and Nox Player.
2. How do I log into Snapchat on my Mac?
You can log into Snapchat on Mac only after you’ve installed it over your Mac computer. And, we all know that the Snapchat app is not officially available for Mac. So, you need to primarily download the Android Emulator and then install Snapchat from the Google Play Store via the Emulator itself.
3. How can I use Snapchat on my Mac without BlueStacks?
There isn’t the best and free Android Emulator than the Nox Player if you want to replace BlueStacks.
4. Is BlueStacks Mac safe?
Yes, the BlueStacks is entirely safe for any operating system, regardless of Mac. It is legal as well.
5. Is Nox better than BlueStacks?
Both are Android Emulators and have their corresponding benefits. However, the Nox is said to be quick and smooth running software than BlueStacks. But then, there is no need to download software like Virtual Box on BlueStacks. So, each software comes with its merits and demerits.
Conclusion
Hopefully, you got how to get Snapchat on Mac via the different Android Emulators. You should consider using any of the emulator if you can’t resist using the all-time favorite Snapchat app. Also, check out the FAQs section for more clarity.
Wondershare Filmora
Get started easily with Filmora’s powerful performance, intuitive interface, and countless effects!
Try It Free Try It Free Try It Free 

And, we’re here to provide you with a step-by-step guide on both ways. So, let’s begin with how to download Snapchat on Mac with BlueStacks.
Part 1: How to Download Snapchat on Mac with BlueStacks?
The BlueStacks is nothing but an Android Emulator for your Windows and Mac PC. It generally provides the means to run Android applications on a PC. So, it is similar to an Android phone inside your PC. Well, BlueStacks delivers one of the best ways how to use Snapchat on Mac.
Step-by-Step Guide on How to Use Snapchat on Mac
Step 1: Download the BlueStacks Android Emulator
Go to https://www.BlueStacks.com/ and click the Download BlueStacks tab to proceed.
Proceed for installation by selecting the Allow button.
Open the .dmg file and allow the prompts and instructions on the screen.
Click the Open > Install Now button afterward, as shown below on your Mac.
Step 2: Set Initial Boot
After you finish installing BlueStacks, know how to get Snapchat on Mac by following the instructions and setting it for initial boot. Then, you are required to allow all the permissions within the app.
Make sure to unblock BlueStacks if you are using the newer versions of macOS. Go to Security & Privacy > General > Allow and proceed.
Step 3: Link Your Google Account
Now, you need to sign in with your Google account to download apps from Play Store.
Step 4: Download Snapchat
Lookup for Snapchat in the Google Play Store and hit the Install button to download.
Once the installation is over, open the Snapchat app and start using it.
With the steps above, you can easily access Snapchat via BlueStacks. So, you will need to open the BlueStacks first every time!

Part 2: How to Download Snapchat on Mac without BlueStacks?
The Nox Player is another free Android Emulator for Mac and PC operating systems. So, let’s check out how to use Snapchat on Mac without BlueStacks.
Step-by-Step Guide to Using Snapchat on Mac without BlueStacks
Step 1: Download Nox Player
Go to https://www.bignox.com/ and hit the Download button to proceed.
Click on Agree after you complete installing the Nox Player application.
Step 2: Start the Nox Player Application
Drag the Nox Player to the Applications folder and double-click the icon to start.
Then, you need to click Open to start the Nox Player.
Step 3: Fix the Virtual Box Issue
The Nox Player will not start properly if you also get the following message.
Step 4: Install Virtual Box
Go to www.virtualbox.org and hit the Download button.
Then, you need to click the OS X Hosts to start downloading the Virtual Box.
Now, double-click the Virtual Box icon to start installing.
You will need to enter the Apple password to finish the installation.
Step 5: Restart Nox Player
Restart Nox Player after the installation of the Virtual Box application.
Sign in to your Google Account and check all the permissions. So, you need to click on the Play Store first.
After you complete all the Sign In procedure, you can open the Play Store and search for Snapchat.
So, this is how to get Snapchat on Mac without BlueStacks. Well, both the methods are pretty definitive and need the software to primarily open to access Snapchat.
Do you have more queries? Scroll to the section below to find more FAQs related to more on how to use Snapchat on Mac.
Part 3: FAQs about Using Snapchat on Mac
1. Is it possible to get Snapchat on a Mac?
Yes. Officially, it is not possible to use Snapchat on Mac without using any Android Emulator. Thus, we have mentioned how to use Snapchat on Mac with BlueStacks and Nox Player.
2. How do I log into Snapchat on my Mac?
You can log into Snapchat on Mac only after you’ve installed it over your Mac computer. And, we all know that the Snapchat app is not officially available for Mac. So, you need to primarily download the Android Emulator and then install Snapchat from the Google Play Store via the Emulator itself.
3. How can I use Snapchat on my Mac without BlueStacks?
There isn’t the best and free Android Emulator than the Nox Player if you want to replace BlueStacks.
4. Is BlueStacks Mac safe?
Yes, the BlueStacks is entirely safe for any operating system, regardless of Mac. It is legal as well.
5. Is Nox better than BlueStacks?
Both are Android Emulators and have their corresponding benefits. However, the Nox is said to be quick and smooth running software than BlueStacks. But then, there is no need to download software like Virtual Box on BlueStacks. So, each software comes with its merits and demerits.

Conclusion
Hopefully, you got how to get Snapchat on Mac via the different Android Emulators. You should consider using any of the emulator if you can’t resist using the all-time favorite Snapchat app. Also, check out the FAQs section for more clarity.
Wondershare Filmora
Get started easily with Filmora’s powerful performance, intuitive interface, and countless effects!
Try It Free Try It Free Try It Free
And, we’re here to provide you with a step-by-step guide on both ways. So, let’s begin with how to download Snapchat on Mac with BlueStacks.
Part 1: How to Download Snapchat on Mac with BlueStacks?
The BlueStacks is nothing but an Android Emulator for your Windows and Mac PC. It generally provides the means to run Android applications on a PC. So, it is similar to an Android phone inside your PC. Well, BlueStacks delivers one of the best ways how to use Snapchat on Mac.

Step-by-Step Guide on How to Use Snapchat on Mac
Step 1: Download the BlueStacks Android Emulator
Go to https://www.BlueStacks.com/ and click the Download BlueStacks tab to proceed.
Proceed for installation by selecting the Allow button.
Open the .dmg file and allow the prompts and instructions on the screen.
Click the Open > Install Now button afterward, as shown below on your Mac.
Step 2: Set Initial Boot
After you finish installing BlueStacks, know how to get Snapchat on Mac by following the instructions and setting it for initial boot. Then, you are required to allow all the permissions within the app.
Make sure to unblock BlueStacks if you are using the newer versions of macOS. Go to Security & Privacy > General > Allow and proceed.
Step 3: Link Your Google Account
Now, you need to sign in with your Google account to download apps from Play Store.
Step 4: Download Snapchat
Lookup for Snapchat in the Google Play Store and hit the Install button to download.
Once the installation is over, open the Snapchat app and start using it.
With the steps above, you can easily access Snapchat via BlueStacks. So, you will need to open the BlueStacks first every time!
Part 2: How to Download Snapchat on Mac without BlueStacks?
The Nox Player is another free Android Emulator for Mac and PC operating systems. So, let’s check out how to use Snapchat on Mac without BlueStacks.
Step-by-Step Guide to Using Snapchat on Mac without BlueStacks
Step 1: Download Nox Player
Go to https://www.bignox.com/ and hit the Download button to proceed.
Click on Agree after you complete installing the Nox Player application.
Step 2: Start the Nox Player Application
Drag the Nox Player to the Applications folder and double-click the icon to start.
Then, you need to click Open to start the Nox Player.
Step 3: Fix the Virtual Box Issue
The Nox Player will not start properly if you also get the following message.
Step 4: Install Virtual Box
Go to www.virtualbox.org and hit the Download button.
Then, you need to click the OS X Hosts to start downloading the Virtual Box.
Now, double-click the Virtual Box icon to start installing.
You will need to enter the Apple password to finish the installation.
Step 5: Restart Nox Player
Restart Nox Player after the installation of the Virtual Box application.
Sign in to your Google Account and check all the permissions. So, you need to click on the Play Store first.
After you complete all the Sign In procedure, you can open the Play Store and search for Snapchat.
So, this is how to get Snapchat on Mac without BlueStacks. Well, both the methods are pretty definitive and need the software to primarily open to access Snapchat.
Do you have more queries? Scroll to the section below to find more FAQs related to more on how to use Snapchat on Mac.
 Nero Burning ROM:
The ultimate burning program for all your needs!
Part 3: FAQs about Using Snapchat on Mac
1. Is it possible to get Snapchat on a Mac?
Yes. Officially, it is not possible to use Snapchat on Mac without using any Android Emulator. Thus, we have mentioned how to use Snapchat on Mac with BlueStacks and Nox Player.
2. How do I log into Snapchat on my Mac?
You can log into Snapchat on Mac only after you’ve installed it over your Mac computer. And, we all know that the Snapchat app is not officially available for Mac. So, you need to primarily download the Android Emulator and then install Snapchat from the Google Play Store via the Emulator itself.
3. How can I use Snapchat on my Mac without BlueStacks?
There isn’t the best and free Android Emulator than the Nox Player if you want to replace BlueStacks.
4. Is BlueStacks Mac safe?
Yes, the BlueStacks is entirely safe for any operating system, regardless of Mac. It is legal as well.
5. Is Nox better than BlueStacks?
Both are Android Emulators and have their corresponding benefits. However, the Nox is said to be quick and smooth running software than BlueStacks. But then, there is no need to download software like Virtual Box on BlueStacks. So, each software comes with its merits and demerits.
Conclusion
Hopefully, you got how to get Snapchat on Mac via the different Android Emulators. You should consider using any of the emulator if you can’t resist using the all-time favorite Snapchat app. Also, check out the FAQs section for more clarity.
Wondershare Filmora
Get started easily with Filmora’s powerful performance, intuitive interface, and countless effects!

Try It Free Try It Free Try It Free

And, we’re here to provide you with a step-by-step guide on both ways. So, let’s begin with how to download Snapchat on Mac with BlueStacks.

Part 1: How to Download Snapchat on Mac with BlueStacks?
The BlueStacks is nothing but an Android Emulator for your Windows and Mac PC. It generally provides the means to run Android applications on a PC. So, it is similar to an Android phone inside your PC. Well, BlueStacks delivers one of the best ways how to use Snapchat on Mac.
Step-by-Step Guide on How to Use Snapchat on Mac
Step 1: Download the BlueStacks Android Emulator
Go to https://www.BlueStacks.com/ and click the Download BlueStacks tab to proceed.
Proceed for installation by selecting the Allow button.
Open the .dmg file and allow the prompts and instructions on the screen.
Click the Open > Install Now button afterward, as shown below on your Mac.
Step 2: Set Initial Boot
After you finish installing BlueStacks, know how to get Snapchat on Mac by following the instructions and setting it for initial boot. Then, you are required to allow all the permissions within the app.
Make sure to unblock BlueStacks if you are using the newer versions of macOS. Go to Security & Privacy > General > Allow and proceed.
Step 3: Link Your Google Account
Now, you need to sign in with your Google account to download apps from Play Store.
Step 4: Download Snapchat
Lookup for Snapchat in the Google Play Store and hit the Install button to download.
Once the installation is over, open the Snapchat app and start using it.
With the steps above, you can easily access Snapchat via BlueStacks. So, you will need to open the BlueStacks first every time!
Part 2: How to Download Snapchat on Mac without BlueStacks?
The Nox Player is another free Android Emulator for Mac and PC operating systems. So, let’s check out how to use Snapchat on Mac without BlueStacks.
Step-by-Step Guide to Using Snapchat on Mac without BlueStacks
Step 1: Download Nox Player
Go to https://www.bignox.com/ and hit the Download button to proceed.
Click on Agree after you complete installing the Nox Player application.
Step 2: Start the Nox Player Application
Drag the Nox Player to the Applications folder and double-click the icon to start.
Then, you need to click Open to start the Nox Player.
Step 3: Fix the Virtual Box Issue
The Nox Player will not start properly if you also get the following message.
Step 4: Install Virtual Box
Go to www.virtualbox.org and hit the Download button.
Then, you need to click the OS X Hosts to start downloading the Virtual Box.
Now, double-click the Virtual Box icon to start installing.
You will need to enter the Apple password to finish the installation.
Step 5: Restart Nox Player
Restart Nox Player after the installation of the Virtual Box application.
Sign in to your Google Account and check all the permissions. So, you need to click on the Play Store first.
After you complete all the Sign In procedure, you can open the Play Store and search for Snapchat.
So, this is how to get Snapchat on Mac without BlueStacks. Well, both the methods are pretty definitive and need the software to primarily open to access Snapchat.
Do you have more queries? Scroll to the section below to find more FAQs related to more on how to use Snapchat on Mac.
Part 3: FAQs about Using Snapchat on Mac
1. Is it possible to get Snapchat on a Mac?
Yes. Officially, it is not possible to use Snapchat on Mac without using any Android Emulator. Thus, we have mentioned how to use Snapchat on Mac with BlueStacks and Nox Player.
2. How do I log into Snapchat on my Mac?
You can log into Snapchat on Mac only after you’ve installed it over your Mac computer. And, we all know that the Snapchat app is not officially available for Mac. So, you need to primarily download the Android Emulator and then install Snapchat from the Google Play Store via the Emulator itself.
3. How can I use Snapchat on my Mac without BlueStacks?
There isn’t the best and free Android Emulator than the Nox Player if you want to replace BlueStacks.
4. Is BlueStacks Mac safe?
Yes, the BlueStacks is entirely safe for any operating system, regardless of Mac. It is legal as well.
5. Is Nox better than BlueStacks?
Both are Android Emulators and have their corresponding benefits. However, the Nox is said to be quick and smooth running software than BlueStacks. But then, there is no need to download software like Virtual Box on BlueStacks. So, each software comes with its merits and demerits.
Conclusion
Hopefully, you got how to get Snapchat on Mac via the different Android Emulators. You should consider using any of the emulator if you can’t resist using the all-time favorite Snapchat app. Also, check out the FAQs section for more clarity.
Wondershare Filmora
Get started easily with Filmora’s powerful performance, intuitive interface, and countless effects!
 /a>
/a>Try It Free Try It Free Try It Free
- Title: [Updated] Elevate Your Creativity 2 Routes to Perfect Snap Filters
- Author: Scott
- Created at : 2024-07-25 10:27:09
- Updated at : 2024-07-26 10:27:09
- Link: https://snapchat-videos.techidaily.com/updated-elevate-your-creativity-2-routes-to-perfect-snap-filters/
- License: This work is licensed under CC BY-NC-SA 4.0.