
!["[Updated] Breeze Through Snapchat Two Techniques for Dynamic Lenses for 2024"](https://www.lifewire.com/thmb/3T4om8_B6d6YEULAtPWYjhC-0sU=/300x200/filters:no_upscale():max_bytes(150000):strip_icc()/xxl-desktop-pc-98013994-5c4dcc47c9e77c0001380389.jpg)
"[Updated] Breeze Through Snapchat Two Techniques for Dynamic Lenses for 2024"
Breeze Through Snapchat: Two Techniques for Dynamic Lenses
How to Create Snapchat Lenses Easily: 2 Methods

Ollie Mattison
Mar 27, 2024• Proven solutions
Are you feeling like creating your own Snapchat lens, so you can have an even better experience with the app? The good news is that two new Snapchat tools have been released – the Lens Studio and Create Your Own Lens applications.
If you are a regular Snapchat user, you may want to learn about the Snapchat lens and how it can help you. We will help you get started. Here is our step by step guide on how to make Snapchat lenses.
- Part1: Comparing Lens Studio and Creating Your Own Lens
- Part2: How to Use Lens Studio
- Part3: How to Create Snapchat Lenses Using Create Your Own Lens
Part 1: Comparing Lens Studio and Creating Your Own Lens
The two programs that we are highlighting today are Lens Studio and Create Your Own Lens. These are both fantastic programs for creating your own Snapchat lens, but they do have slightly different uses. If you are the type of person who wants to design a professional Snapchat lens, you are going to prefer Lens Studio.
But if you are hoping to come up with something creative that you can share with your friends and family, then you may love Create Your Own Lens. It is a very easy program to use, and it offers a ton of features that you may be surprised to see.
Snapchat lenses is for fun
The beauty of Snapchat lenses is that you can now create your own environment, which you can use each time you are taking photos or videos. Sure, you can always use the filters that are already available in the application, but not everyone would find those enough.
If you want some customization, or you just want to mess around until you get the filter that makes sense for you, Snapchat lenses are the way to go.
Lens Studio is for business
Lens Studio is perfect for businesses that may want to create unique environments for their clients, or the times when they are releasing company Snapchat posts. Say the company is hosting an event. They may want a custom graphic for that event, which is used for all the pictures and videos posted to Snapchat about the event. Using Lens Studio lets them do that with ease.
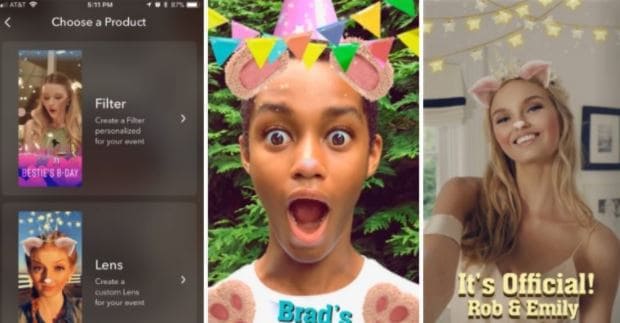
Create Your Own Lens is great when you are going to a special event, birthday party or graduating, and you want a special graphic that comes up in all your snaps. It is very intuitive to use, and is available through the App Store as a download.
Part 2: How to Use Lens Studio
1. Download Lens Studio
The first step involves downloading Lens Studio, which you can do from your computer. It is compatible with both Windows and Mac computers, and will run on any semi-modern system. According to the Snapchat team, Lens Studio is similar to the program used by their AR teams to create lenses. That means you are getting similar functionality, but with an easier to manage interface.
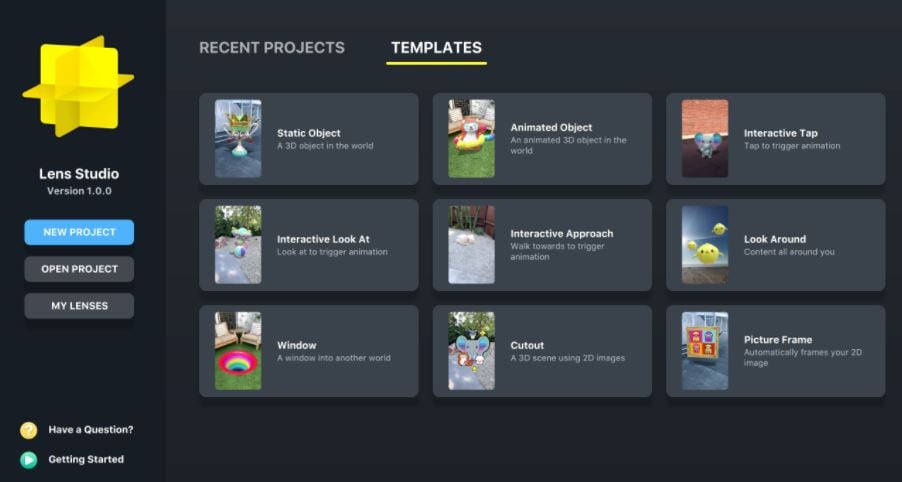
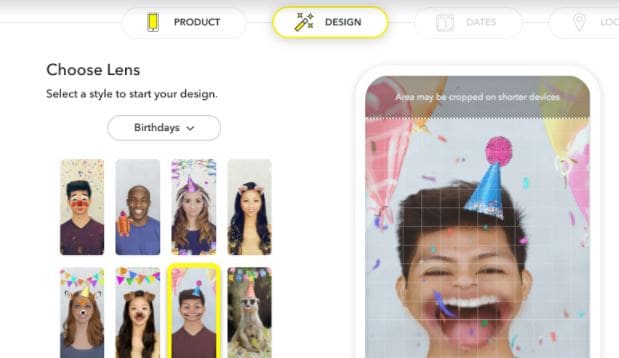
2. Choose Templates Page
It is normal to feel a little overwhelmed the first time you try and use this program. But that is why the templates page is so great. You can select from templates depending on the type of lens that you are hoping to create. You can just use a template, or you can incorporate your own ideas to customize the template.
There is also a Lens Studio Overview guide that you can access online, which will help you get acquainted with the program’s various features and quirks.
3. Use Studio Panels
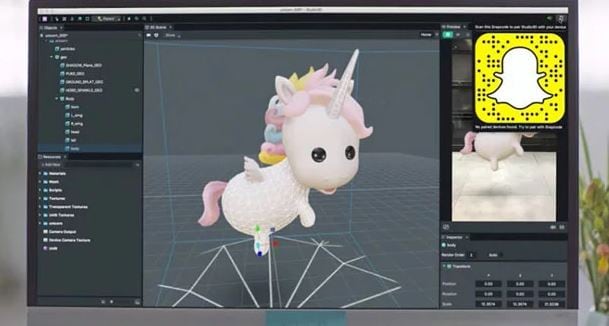
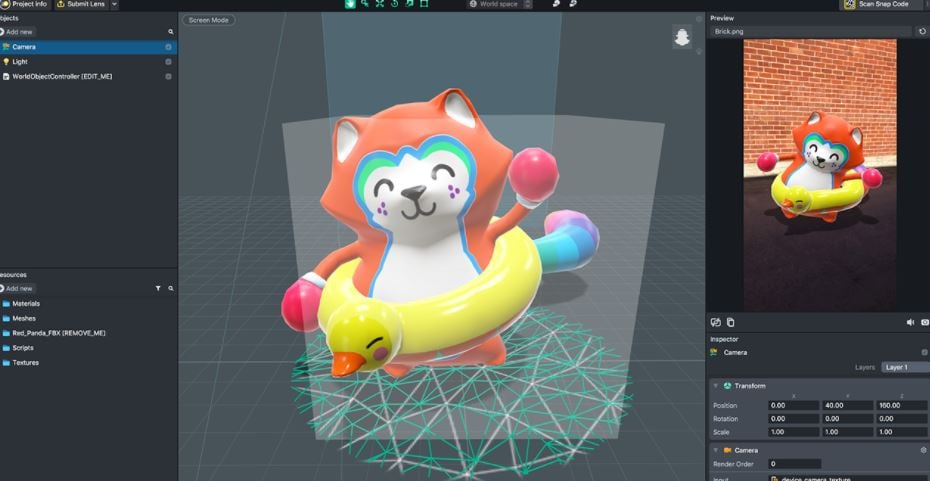
Are you ready to create your own custom Snapchat lens? It is time to head over to Studio Panels on the application. This is the area where you can add your own 2D or 3D objects, and you can visualize how they would look as a Snapchat filter. You can add, remove, resize and drag objects to specific areas of the screen.
There are other tools accessible from the Resources panel. You can use these tools to ensure that your Snapchat lens is exactly as you want.
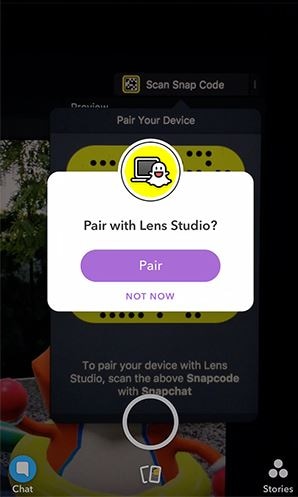
4. Preview the Snapchat Lens You Create
The great thing about this application is that you can preview the lens before you send it out to your phone. When you are satisfied with the image on the preview, you can pair your phone with the application, and you will be able to send that Snapchat lens onto your phone through your Snapcode. It is that simple!
Part 3: How to Create Snapchat Lenses Using Create Your Own Lens
- There are two ways that you can access the tool for creating fun Snapchat lenses. You can either visit the website snapchat.com/create, or you can go on the “filters and lenses” section on your iOS device. If you are using Snapchat on an Android device, you will only have the option for the website. But the feature is coming to the Android version of Snapchat very soon.
- When you are in the application or on the website, you may start to look at the different templates for Snapchat lenses. Now you can add other items into the templates, such as photographs, text or graphics.
It is all up to your imagination. You can create the perfect Snapchat lens, which you can then send into your Snapchat account through your Snapcode. Of course, if you are using your iOS device to create the lens, it is already linked to your account.
Another cool feature is how you can set the location for where the Snapchat lens is available. Say you are hosting a party. You can have the Snapchat lens available to everyone who uses Snapchat within a set square footage of your home. That is an amazing way to let everyone share social media pictures and photos of your party, through the lens you created.
Conclusion
Creating Snapchat lenses has never been easier. Whether you are a business looking to add a custom lens, or you just want to create a fun lens for a graduation or party, there are tools that make the job very easy. Using these tools will allow you to create the perfect Snapchat lens for any occasion.
Ollie Mattison
Ollie Mattison is a writer and a lover of all things video.
Follow @Ollie Mattison
Ollie Mattison
Mar 27, 2024• Proven solutions
Are you feeling like creating your own Snapchat lens, so you can have an even better experience with the app? The good news is that two new Snapchat tools have been released – the Lens Studio and Create Your Own Lens applications.
If you are a regular Snapchat user, you may want to learn about the Snapchat lens and how it can help you. We will help you get started. Here is our step by step guide on how to make Snapchat lenses.
- Part1: Comparing Lens Studio and Creating Your Own Lens
- Part2: How to Use Lens Studio
- Part3: How to Create Snapchat Lenses Using Create Your Own Lens
Part 1: Comparing Lens Studio and Creating Your Own Lens
The two programs that we are highlighting today are Lens Studio and Create Your Own Lens. These are both fantastic programs for creating your own Snapchat lens, but they do have slightly different uses. If you are the type of person who wants to design a professional Snapchat lens, you are going to prefer Lens Studio.
But if you are hoping to come up with something creative that you can share with your friends and family, then you may love Create Your Own Lens. It is a very easy program to use, and it offers a ton of features that you may be surprised to see.
Snapchat lenses is for fun
The beauty of Snapchat lenses is that you can now create your own environment, which you can use each time you are taking photos or videos. Sure, you can always use the filters that are already available in the application, but not everyone would find those enough.
If you want some customization, or you just want to mess around until you get the filter that makes sense for you, Snapchat lenses are the way to go.
Lens Studio is for business
Lens Studio is perfect for businesses that may want to create unique environments for their clients, or the times when they are releasing company Snapchat posts. Say the company is hosting an event. They may want a custom graphic for that event, which is used for all the pictures and videos posted to Snapchat about the event. Using Lens Studio lets them do that with ease.
Create Your Own Lens is great when you are going to a special event, birthday party or graduating, and you want a special graphic that comes up in all your snaps. It is very intuitive to use, and is available through the App Store as a download.
Part 2: How to Use Lens Studio
1. Download Lens Studio
The first step involves downloading Lens Studio, which you can do from your computer. It is compatible with both Windows and Mac computers, and will run on any semi-modern system. According to the Snapchat team, Lens Studio is similar to the program used by their AR teams to create lenses. That means you are getting similar functionality, but with an easier to manage interface.
2. Choose Templates Page
It is normal to feel a little overwhelmed the first time you try and use this program. But that is why the templates page is so great. You can select from templates depending on the type of lens that you are hoping to create. You can just use a template, or you can incorporate your own ideas to customize the template.
There is also a Lens Studio Overview guide that you can access online, which will help you get acquainted with the program’s various features and quirks.
3. Use Studio Panels
Are you ready to create your own custom Snapchat lens? It is time to head over to Studio Panels on the application. This is the area where you can add your own 2D or 3D objects, and you can visualize how they would look as a Snapchat filter. You can add, remove, resize and drag objects to specific areas of the screen.
There are other tools accessible from the Resources panel. You can use these tools to ensure that your Snapchat lens is exactly as you want.
4. Preview the Snapchat Lens You Create
The great thing about this application is that you can preview the lens before you send it out to your phone. When you are satisfied with the image on the preview, you can pair your phone with the application, and you will be able to send that Snapchat lens onto your phone through your Snapcode. It is that simple!
Part 3: How to Create Snapchat Lenses Using Create Your Own Lens
- There are two ways that you can access the tool for creating fun Snapchat lenses. You can either visit the website snapchat.com/create, or you can go on the “filters and lenses” section on your iOS device. If you are using Snapchat on an Android device, you will only have the option for the website. But the feature is coming to the Android version of Snapchat very soon.
- When you are in the application or on the website, you may start to look at the different templates for Snapchat lenses. Now you can add other items into the templates, such as photographs, text or graphics.
It is all up to your imagination. You can create the perfect Snapchat lens, which you can then send into your Snapchat account through your Snapcode. Of course, if you are using your iOS device to create the lens, it is already linked to your account.
Another cool feature is how you can set the location for where the Snapchat lens is available. Say you are hosting a party. You can have the Snapchat lens available to everyone who uses Snapchat within a set square footage of your home. That is an amazing way to let everyone share social media pictures and photos of your party, through the lens you created.
Conclusion
Creating Snapchat lenses has never been easier. Whether you are a business looking to add a custom lens, or you just want to create a fun lens for a graduation or party, there are tools that make the job very easy. Using these tools will allow you to create the perfect Snapchat lens for any occasion.
Ollie Mattison
Ollie Mattison is a writer and a lover of all things video.
Follow @Ollie Mattison
Snapchat’s Artistic Palette: The Anime Filter Experience
What Is Anime Filter On Snapchat?

Shanoon Cox
Mar 27, 2024• Proven solutions
Snapchat anime filter is the new sensation that is making waves all across social media. The best part about anime filter is that it has the ability to transform your videos and images into anime instantly. This filter has already gone viral on other social media platforms, such as TikTok, Instagram, and Twitter.
Filters and effects are not new when it comes to social media services, and almost all of them have their own versions, which you can use. Snapchat is here with a new lens, which is becoming immensely popular. If you have been trying to use the Snapchat anime filter and don’t know how to go about it, you have come to the right place because this article will talk about how to get this filter and how to use it. Keep reading!
Part 1: What is Anime Filter on Snapchat?
Out of the many AR lenses from Snapchat, the latest one is the anime lens. It’s a filter that will morph a person’s photo or video into an anime character and will customize the anime face based on the person’s facial features. So, rather than simply applying a generic image on top of your face, Snapchat makes sure that the anime image looks similar to your actual image. And as a result, each person’s anime face turns out to be different.
Since the hashtag #animefilter is trending, you can also apply the anime filter on your face and be a part of the trend. The reaction to this filter is lowkey amazing because the filter not only changes your face and makes it look like a part of a hit anime cartoon series or movie, but it sometimes also changes your hair color making you look like the King of the Pirates or Rapunzel. What this lens will do and how your image will turn out to be is highly fascinating.
What stands out is that after the anime filter of Snapchat was released, it has been used over 3 billion times. Snapchat has confirmed this statistic in its Third Quarter 2020 Financial report, and they even said that they already knew it would be a massive hit.
Part 2: How to Get the Anime Filter on Snapchat?
Now that you know how popular the Snapchat anime filter is. It’s worth knowing how to get it. Although this filter is available on Snapchat, many users are facing issues finding it. This section will show you two easy ways to get this filter. You can use one or both methods and start using the filter to show the world how you will look like an anime character. Here are the two ways:
Method 1: Get the Anime Face Filter on Snapchat via Link
Step 1: First, click on the link here . You will need this link to get the anime face filter.
Step 2: Once you click on the click, a pop-up window will open. If you haven’t downloaded the anime filter yet, then Snapchat will say, “New lens found.” Right below it, you will see the message “unlock for 48 hours.” Go ahead and click on that.
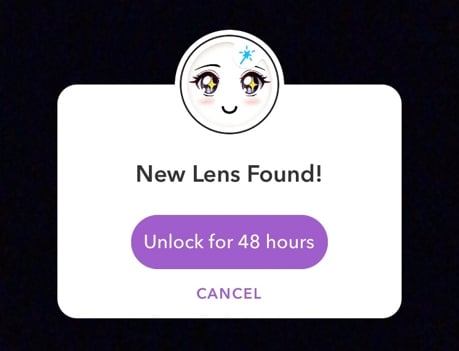
Step 3: By clicking on the purple button, your Snapchat anime filter will be available for use for 48 hours.
Here’s a pro tip, if you want to continue using this filter, once the 48 hours are over, simply repeat the steps, and you can use it for additional 48 hours. Simple!
If the pop-up says, “nothing to see here”, which means you have the filter already. In this case, you can go to Snapchat and click the filter accordingly.
Method 2: Get the Anime Style Filter via Explore on Snapchat
If you don’t want to click any unknown links, you can explore the anime filter by searching on Snapchat.
Step 1: Make sure your Snapchat is up-to-date. If not, update it to the latest version.
Step 2: Open Snapchat on your mobile or tablet, whichever you are using. Now, turn the lens towards you or someone else as if you are clicking a picture.
Step 3: Now, click on the smiley face filter button, and tap on the Explore button to continue.
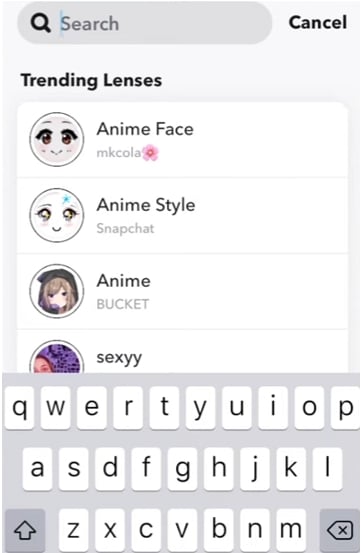
Step 4: You can now search for Anime Styles. There are several anime filters available, just make sure that the creator of the filter is Snapchat.
Step 5: Once you have the anime filter, you can record a video of yourself, or take photos. You may also use both back and front cameras to turn anyone into an anime character.
Pro tip: This filter works on already saved photos and videos as well. Try them on too. This filter will work only on your face, though. So, it won’t turn your entire body into an anime character.
Part 3: How Do I Get More Filters on Snapchat?
Since Snapchat keeps coming up with attractive filters, you may wonder how you can get more filters to keep using them. Well, there are a few tricks that you can try. We will explain these tricks in detail, so make sure to follow them correctly.
Trick 1: Turn on Snapchat Geofilters
Before you try using Snapchat geofilters, you will first have to permit Snapchat to access your location. Whether you are using iOS or Android, enable location, and you will start seeing geofilters and all the other filters that you have saved.
Don’t expect a plethora of filters to suddenly turn up. For example, when you apply a geofilter, you will see that it adds an illustration and the place name to your Snap. So, the more you explore and go out, the more filters you will start seeing.
Trick 2: Check Online Resources on Lens Studio and Lenslist
You can also explore two filter libraries, which are Lens Studio and Lenslist. These are repositories of AR content. These two libraries have many attractive filters. All you need to do is scan the Snapcode available in the filters and unlock them. Both of them will have duplicate filters as well, though. But dig a bit deeper, and you will have enough codes of filters to keep using them every day. You will find these codes in your profile once you add them.
Trick 3: Share Snapcodes for Snapchat
The last way to add Snapcode of filters is by scanning other people’s codes. Once you go to your profile, you will see your Snapcodes, which other people can scan. Just like that, you can scan other people’s code as well. Some codes will be available for 24 hours, while others for 48 hours. After that, you can scan the code again when you want to reuse them. To scan a code, just hold your camera over the code and allow the screen to register it.
Bonus: How to Add Anime Effect to Video with Filmora
As we shared, Snapchat will only morph your face into an anime character. But if you are not satisfied with that and want to turn a whole video into anime or cartoon, then one of the best ways to go about it is by getting Wondershare Filmora. Filmora is an easy-to-use yet powerful enough video editing tool loaded with stunning effects, such as cartoons, sketches, color sketches, and more. The process is very easy to follow, and to use Filmora, you don’t need to be a pro. Here are the steps that you can follow:
Step 1: Launch Wondershare Filmora to your Mac or Windows computer. If you haven’t downloaded it yet, click the Try It Free button below to start.


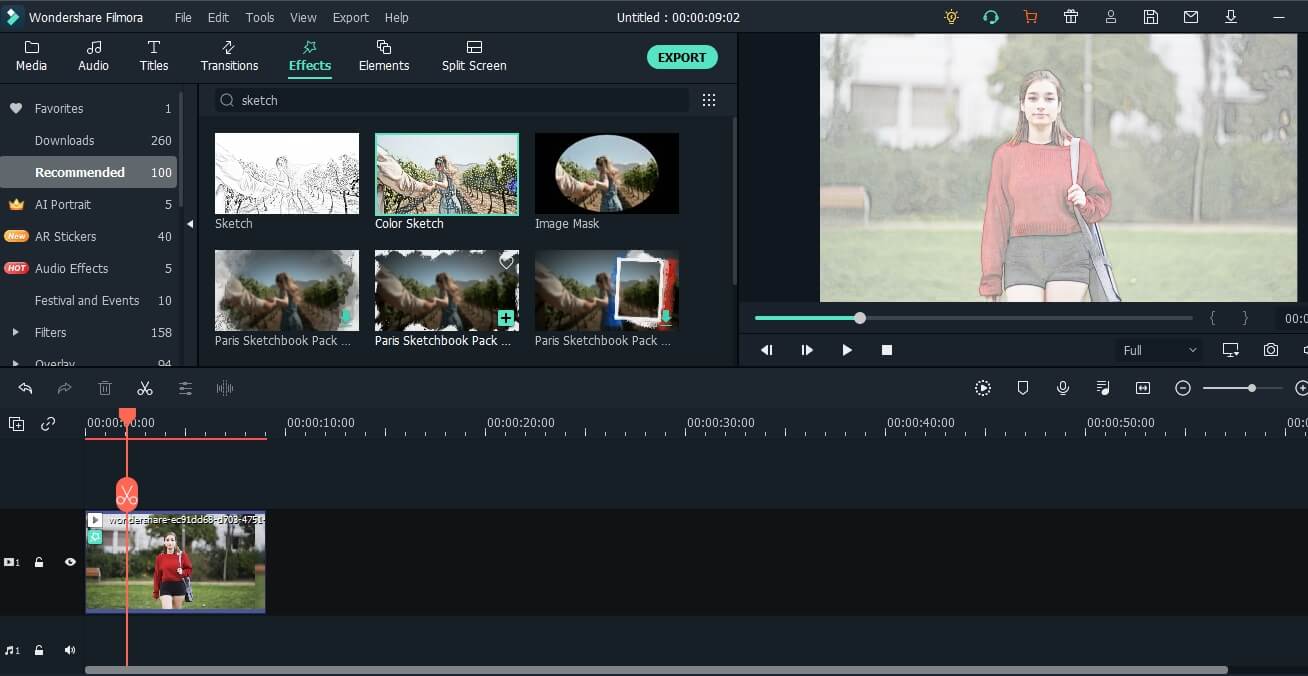
Step 2: Now, import media files and load the video that you want to convert into a cartoon or anime to the media library, and then add that video to the timeline.

Step 3: Go to the Effects option, and type sketch in the search effects bar, which will be on the top of the screen.
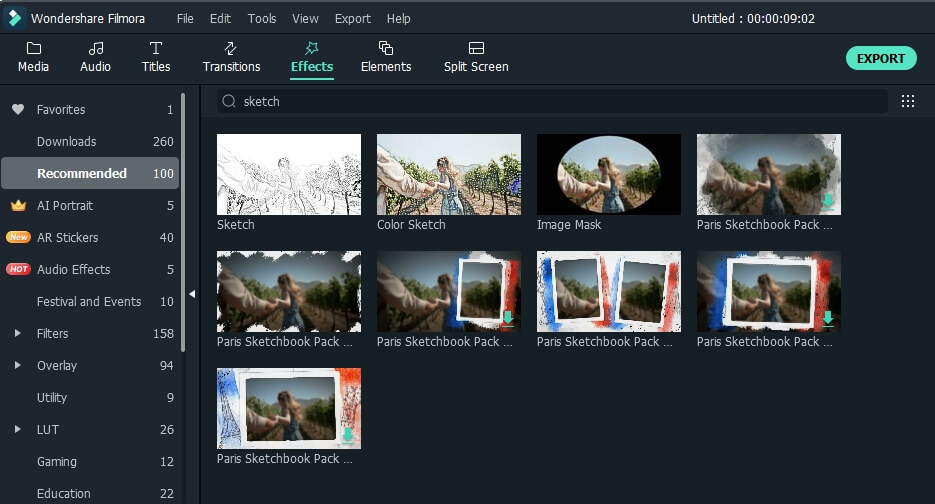
Step 4: Currently, Filmora provides sketch and color sketch effects. Try each one of them to see which one works the best. If you want to add the filter to the entire video, just drag and drop the filter to the video, and it’s done.
Step 5: Finally, click on the Export button after everything is done to save the edited video on your computer.
Note: If you want to add the sketch effect to the person only, you can use the Human Segmentation in AI Portrait. In this way, you can also try the Cartoon effect to see the result.
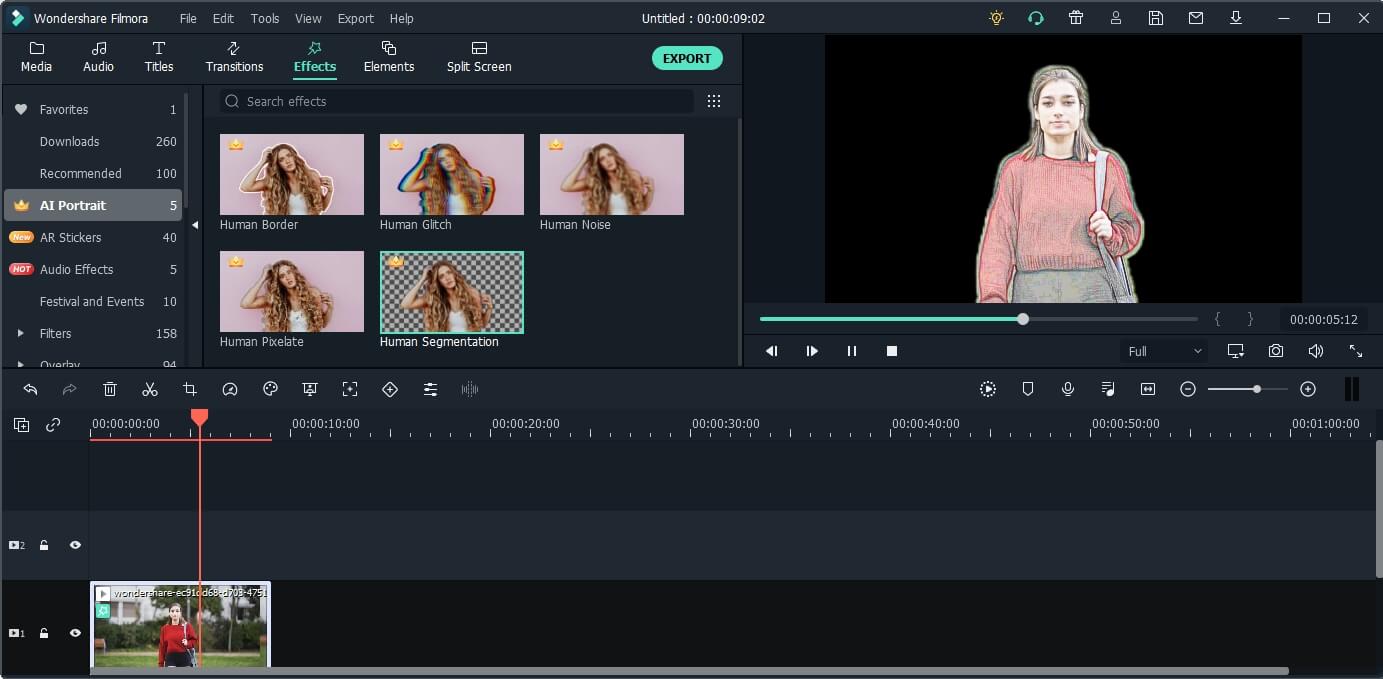
Check the video tutorial below to explore more usage of the AI Portrait add-on.
Shanoon Cox
Shanoon Cox is a writer and a lover of all things video.
Follow @Shanoon Cox
Shanoon Cox
Mar 27, 2024• Proven solutions
Snapchat anime filter is the new sensation that is making waves all across social media. The best part about anime filter is that it has the ability to transform your videos and images into anime instantly. This filter has already gone viral on other social media platforms, such as TikTok, Instagram, and Twitter.
Filters and effects are not new when it comes to social media services, and almost all of them have their own versions, which you can use. Snapchat is here with a new lens, which is becoming immensely popular. If you have been trying to use the Snapchat anime filter and don’t know how to go about it, you have come to the right place because this article will talk about how to get this filter and how to use it. Keep reading!
Part 1: What is Anime Filter on Snapchat?
Out of the many AR lenses from Snapchat, the latest one is the anime lens. It’s a filter that will morph a person’s photo or video into an anime character and will customize the anime face based on the person’s facial features. So, rather than simply applying a generic image on top of your face, Snapchat makes sure that the anime image looks similar to your actual image. And as a result, each person’s anime face turns out to be different.
Since the hashtag #animefilter is trending, you can also apply the anime filter on your face and be a part of the trend. The reaction to this filter is lowkey amazing because the filter not only changes your face and makes it look like a part of a hit anime cartoon series or movie, but it sometimes also changes your hair color making you look like the King of the Pirates or Rapunzel. What this lens will do and how your image will turn out to be is highly fascinating.
What stands out is that after the anime filter of Snapchat was released, it has been used over 3 billion times. Snapchat has confirmed this statistic in its Third Quarter 2020 Financial report, and they even said that they already knew it would be a massive hit.
Part 2: How to Get the Anime Filter on Snapchat?
Now that you know how popular the Snapchat anime filter is. It’s worth knowing how to get it. Although this filter is available on Snapchat, many users are facing issues finding it. This section will show you two easy ways to get this filter. You can use one or both methods and start using the filter to show the world how you will look like an anime character. Here are the two ways:
Method 1: Get the Anime Face Filter on Snapchat via Link
Step 1: First, click on the link here . You will need this link to get the anime face filter.
Step 2: Once you click on the click, a pop-up window will open. If you haven’t downloaded the anime filter yet, then Snapchat will say, “New lens found.” Right below it, you will see the message “unlock for 48 hours.” Go ahead and click on that.
Step 3: By clicking on the purple button, your Snapchat anime filter will be available for use for 48 hours.
Here’s a pro tip, if you want to continue using this filter, once the 48 hours are over, simply repeat the steps, and you can use it for additional 48 hours. Simple!
If the pop-up says, “nothing to see here”, which means you have the filter already. In this case, you can go to Snapchat and click the filter accordingly.
Method 2: Get the Anime Style Filter via Explore on Snapchat
If you don’t want to click any unknown links, you can explore the anime filter by searching on Snapchat.
Step 1: Make sure your Snapchat is up-to-date. If not, update it to the latest version.
Step 2: Open Snapchat on your mobile or tablet, whichever you are using. Now, turn the lens towards you or someone else as if you are clicking a picture.
Step 3: Now, click on the smiley face filter button, and tap on the Explore button to continue.
Step 4: You can now search for Anime Styles. There are several anime filters available, just make sure that the creator of the filter is Snapchat.
Step 5: Once you have the anime filter, you can record a video of yourself, or take photos. You may also use both back and front cameras to turn anyone into an anime character.
Pro tip: This filter works on already saved photos and videos as well. Try them on too. This filter will work only on your face, though. So, it won’t turn your entire body into an anime character.
Part 3: How Do I Get More Filters on Snapchat?
Since Snapchat keeps coming up with attractive filters, you may wonder how you can get more filters to keep using them. Well, there are a few tricks that you can try. We will explain these tricks in detail, so make sure to follow them correctly.
Trick 1: Turn on Snapchat Geofilters
Before you try using Snapchat geofilters, you will first have to permit Snapchat to access your location. Whether you are using iOS or Android, enable location, and you will start seeing geofilters and all the other filters that you have saved.
Don’t expect a plethora of filters to suddenly turn up. For example, when you apply a geofilter, you will see that it adds an illustration and the place name to your Snap. So, the more you explore and go out, the more filters you will start seeing.
Trick 2: Check Online Resources on Lens Studio and Lenslist
You can also explore two filter libraries, which are Lens Studio and Lenslist. These are repositories of AR content. These two libraries have many attractive filters. All you need to do is scan the Snapcode available in the filters and unlock them. Both of them will have duplicate filters as well, though. But dig a bit deeper, and you will have enough codes of filters to keep using them every day. You will find these codes in your profile once you add them.
Trick 3: Share Snapcodes for Snapchat
The last way to add Snapcode of filters is by scanning other people’s codes. Once you go to your profile, you will see your Snapcodes, which other people can scan. Just like that, you can scan other people’s code as well. Some codes will be available for 24 hours, while others for 48 hours. After that, you can scan the code again when you want to reuse them. To scan a code, just hold your camera over the code and allow the screen to register it.
Bonus: How to Add Anime Effect to Video with Filmora
As we shared, Snapchat will only morph your face into an anime character. But if you are not satisfied with that and want to turn a whole video into anime or cartoon, then one of the best ways to go about it is by getting Wondershare Filmora. Filmora is an easy-to-use yet powerful enough video editing tool loaded with stunning effects, such as cartoons, sketches, color sketches, and more. The process is very easy to follow, and to use Filmora, you don’t need to be a pro. Here are the steps that you can follow:
Step 1: Launch Wondershare Filmora to your Mac or Windows computer. If you haven’t downloaded it yet, click the Try It Free button below to start.
Step 2: Now, import media files and load the video that you want to convert into a cartoon or anime to the media library, and then add that video to the timeline.
Step 3: Go to the Effects option, and type sketch in the search effects bar, which will be on the top of the screen.
Step 4: Currently, Filmora provides sketch and color sketch effects. Try each one of them to see which one works the best. If you want to add the filter to the entire video, just drag and drop the filter to the video, and it’s done.
Step 5: Finally, click on the Export button after everything is done to save the edited video on your computer.
Note: If you want to add the sketch effect to the person only, you can use the Human Segmentation in AI Portrait. In this way, you can also try the Cartoon effect to see the result.
Check the video tutorial below to explore more usage of the AI Portrait add-on.
Shanoon Cox
Shanoon Cox is a writer and a lover of all things video.
Follow @Shanoon Cox
Also read:
- [New] 2024 Approved How to Make a Video Best Fits Snapchat Size on Mac?
- In 2024, The Essential Guide to Creating Snaps on Snapchat
- In 2024, Secret SnapSnapping Techniques Unseen Screen Captures
- [New] 2024 Approved Crafting Visual Stories with Snapchat Photo Edits
- [Updated] 2024 Approved Snap It Right 15 Innovative Posting Hacks
- 2024 Approved Unravel Time The Art of Snapchat Video Reverse
- [New] 2024 Approved A Novice's Guide to Making Unforgettable Snaps on Snapchat
- [New] In 2024, Spin the Clock Back Inside the Art of Snapchat Flipping
- [Updated] 2024 Approved Streamline Your Snapchat Chat and Calls with 3 Key Steps
- [New] In 2024, The Artisan's Path to Crafting Confidential Snaps
- [New] From Snaps to Savings on Snapchat for 2024
- Unleash Creativity Best Snap Ideas of the Year for 2024
- [Updated] Unleashing Your Camera Roll in a Snap A Snapchat Tutorial for 2024
- [New] Social Network Showdown 2 Written by a Computer Program, without Understanding Language or Culture for 2024
- [Updated] In 2024, Automate Your Snapshot Backup From Snapchat App
- [New] Captivating Comic Relief in Snapchat Graphics
- [Updated] 2024 Approved From Basic Snaps to Spectacular Shots Snapchat's Edits for Everyone
- [New] Capturing the Moment Mobile Phone Snapchat Recordings
- [New] Innovative Filters for Stunning Snapshots Top 20 Recommendations
- [New] In 2024, The Wizardry of Images Elevate Your Snapchat with Edits
- [Updated] 2024 Approved Quick Start Methods for Producing and Perfecting Multiple Snaps in Snapchat
- [Updated] In 2024, Invisible Stories Unveiled A Complete Snapguide
- [Updated] 2024 Approved Effortless Snapchat Integration Mac Tips & Tricks
- [New] In 2024, Learn to Modify Snapchat's Audio Effect in Two Ways
- [Updated] 2024 Approved Enhancing Connectivity IOS Photo Library & Snapchat Merge
- 2024 Approved Snapstreak Savvy Guidance to Prevent Interruptions
- 2024 Approved From Sketches to Screen Bringing Anime Filters Into Snaps
- [New] In 2024, Spotting a Block Snapchat Notifications Gone Mute
- [Updated] 2024 Approved Unleash Creativity Transformative Techniques with Snapchat Photos
- [Updated] Jumpstart Your Snapchat Learn to Create Top Boomers
- [Updated] Discover Effortless Pathways to Dynamic Snaps for 2024
- [New] Navigating iPhone Backup Flawless Integration with Snapchat Photos
- [Updated] 2024 Approved Making Moolah The Snapchat Way
- 2024 Approved Elevate Your Online Interactions Master Microsoft Teams Snap
- Enhancing Collaboration with Snap Camera Techniques for 2024
- From Raw to Rad Turning Up the Heat with Snapchat Filters for 2024
- 2024 Approved Discover Two Hands-On Approaches to Personalize Snapchat Audio
- [New] 2024 Approved Snap Sharing Made Simple Camera Roll to Social Now
- In 2024, Top 6 Mobile Phones Snapchat's Ultimate Video Editing Companions
- [New] Capturing Snapchat Moments Mobile Screen-Recording Guide
- 2024 Approved How to Turn Videos Reverse-Wave Style on Snapchat
- [New] In 2024, Seamlessly Connect The 3-Step Guide to Enhanced Communication on Snapchat
- [Updated] In 2024, Compact Guide Setting up Snapchat macOS-Style
- [New] 2024 Approved Easy-to-Follow Guide to Mobile Recording Snapchat Edition
- [New] Unleash Creativity on Snapchat with Immersive Boomerangs
- [Updated] Instant Recovery of Vanished Visuals for 2024
- 2024 Approved Essential Guide Affordable & User-Friendly Audio Noise Reduction Tools
- 2024 Approved Your Ultimate Source List The Top Picks of Copyright-Friendly Comic Soundtracks Websites
- iPogo will be the new iSpoofer On Nokia C12? | Dr.fone
- How To Unlock Any Samsung Galaxy A14 5G Phone Password Using Emergency Call
- [New] Battle of Broadcasting Is OBS or Twitch Studio Superior for 2024
- New 2024 Approved Top 6 Video Voiceover Tools for Windows Free to Try
- [Updated] Mac Magic Cost-Free Screen Tracker for 2024
- [New] 2024 Approved Achieve Mastery in Tracking Fb’s Recently Seen Videos
- In 2024, MP4 File Editing on Mavericks A Step-by-Step Tutorial
- [New] 2024 Approved Activating Screen Recording with Internal Devices in Huawei Mate and P Series (Mate 10/20; P20/10)
- [New] In 2024, Premier Techniques for FB Advertising Excellence
- [New] In 2024, Streamline Your Screencast The Best OBS Tools Insider Tips
- How to Factory Reset Infinix Note 30i without Losing Data | Dr.fone
- How to Fix Apple iPhone 14 Plus Passcode not Working?
- New In 2024, Cut to the Chase Get Direct Access to Filmora Discount Codes
- In 2024, Will Pokémon Go Ban the Account if You Use PGSharp On Realme 12 Pro+ 5G | Dr.fone
- How to remove Google FRP Lock on Nokia C12 Pro
- Updated 2024 Approved Unveiling the Secrets to Successful Sound Recording in GarageBand
- What Pokémon Evolve with A Dawn Stone For Oppo A18? | Dr.fone
- In 2024, Why Does iTools Virtual Location Not Work For Apple iPhone 11 Pro Max/iPad? Solved | Dr.fone
- [Updated] 2024 Approved From Basic to Breathtaking Storytelling Through Smart Bokeh Use
- In 2024, Access High-Quality Screen Capture for $0 (Windows, macOS)
- How to Hide/Fake Snapchat Location on Your Lava Agni 2 5G | Dr.fone
- New In 2024, What Is an AI Video Editor? | Wondershare Virbo Glossary
- Updated 2024 Approved The Art of Attention-Grabbing Thumbnails A YouTube Creators Handbook
- How can I get more stardust in pokemon go On Realme Note 50? | Dr.fone
- [New] Crafting Captivating Instagram Puzzles A Step-by-Step Approach
- New The New Frontier of Video Conversations A 2023 Guide to Non-Omegle Chat Websites
- In-Depth Analysis of ShareX Criticism & Replacements
- [Updated] 2024 Approved Revolutionize Social Sagas – No Cost for Online & Mobile Excellence
- [New] Streamline Techniques for Live Sports Video Archiving for 2024
- [New] The Future of Game Logging Exciting Alternatives to FBX-Centric Apps
- How to Remove a Previously Synced Google Account from Your Oppo A1 5G
- Title: "[Updated] Breeze Through Snapchat Two Techniques for Dynamic Lenses for 2024"
- Author: Scott
- Created at : 2024-05-23 10:56:45
- Updated at : 2024-05-24 10:56:45
- Link: https://snapchat-videos.techidaily.com/updated-breeze-through-snapchat-two-techniques-for-dynamic-lenses-for-2024/
- License: This work is licensed under CC BY-NC-SA 4.0.
