![[Updated] Best Practices for Secure Transfer of Phone's Camera Roll Content to Snapchat](https://thmb.techidaily.com/de4f0312e209bc69406fe77be7db4ffab9fd4723c69e6ec9a49854fd1e940559.jpg)
[Updated] Best Practices for Secure Transfer of Phone's Camera Roll Content to Snapchat
Best Practices for Secure Transfer of Phone’s Camera Roll Content to Snapchat
Many people haven’t backed up their camera roll to Snapchat due to the default settings. If you want to save each photo or video from your device on the Snapchat cloud, backing up the camera to the Memories is necessary. By doing so, you cannot lose important photos or videos from your phone.
If you change the default settings of the Memories created from the camera roll, Snapchat will automatically create a backup of your Memories. In this regard, this article will guide you on how to back up the camera roll to Snapchat in the easiest way.
Part 1: Backing up automatically - Creating Snapchat Stories from your Camera Roll
If you don’t want to alter the settings of your camera roll, this part will offer you an easy method. Through this method, you can create Snapchat stories from the camera roll directly. By doing so, you can instantly save the camera roll photos to your Snapchat without backing up. To make a Snapchat story from your camera roll, read the following instructions:
Step1 Open your Snapchat and swipe up from the bottom. Head to the Camera Roll section and select any photo.


Step2 After selecting a particular photo or video, hit the “Arrow” icon. Afterward, tap on the “My Story” option to create a story. For confirmation, press the “Arrow” icon again. This will create a Snapchat story instantly from your Camera Roll.


Part 2: How to Backup your Camera Roll to Snapchat without Creating Stories
In Snapchat, you can only save the camera roll videos having a maximum of 10-second length. It indicates that you cannot save the camera roll videos which exceed the 10-second limit. Furthermore, there are various ways that enable you to make a Camera Roll backup on Snapchat. In this part, we will guide you on how to save a Camera roll photo or video on Snapchat without creating a story. Also, these steps are applicable on both Android and iOS devices:
Step1 After opening your Snapchat app, open your Memories by swiping up. Proceed to your “Camera Roll” section and long-press on any picture. This will let you select any photo or video on your Camera Roll.

Step2 Once you have selected the picture, choose the “Create Story” option. Afterward, tap on the “Save Story” option, which will save the camera roll picture in the Memories section.


Part 3: How to Check Your Backup Progress
To ensure a complete backup of your Memories on Snapchat, a stable Wi-Fi connection is mandatory. That’s why make sure to connect your phone with a stable and strong internet connection. Moreover, if you have chosen multiple photos or videos from the Camera Roll, you can save them as a story on Snapchat. However, if you want to save individual images, you will need to make their backup separately in Memories. To check your backup progress on Snapchat, navigate to the following steps:
Step1 Once you have opened your Snapchat, tap on your Bitmoji icon. From there, proceed to the “Settings” by tapping on the gear icon.


Step2 Scroll down a little to find the option “Memories.” Afterward, you can see the option “Backup Progress.” If you can see the word “Complete,” it means that your Memories are backed up completely. If not, connect your phone to a stable Wi-Fi connection.

Part 4: How to Turn On the Smart Backup
A Smart Backup is an advanced option on Snapchat that lets you back up memories automatically. If you enable this feature, Snapchat will automatically create a backup through a stable internet connection. This feature allows you to easily access your Memories even if you reinstall Snapchat on another device. Moreover, you can save your phone’s storage by saving photos or videos in Memories. To activate the Smart Backup feature, read the below instructions:
Step1 After opening Snapchat, head to its “Settings.” In the Settings menu, locate the option “Memories.”


Step2 After tapping on Memories, you can see various options. Among multiple options, turn on the toggle of “Smart Backup.” Thus, Snapchat will automatically back up your Memories through this activated feature.

 Allavsoft Batch Download Online Videos, Music Offline to MP4, MP3, MOV, etc format
Part 5: FAQs
1. How to Backup Memories to Camera Roll on Snapchat?
Open your Snapchat and head to its “Memories.” From the “Snaps” section, select any snap that you want to save to Camera Roll. After choosing the snap, hit on the “Arrow” icon. Under the “Share Elsewhere” heading, press the “Download” icon. This will immediately save the snap on your Camera Roll.
2. How to Backup Pictures in Both Memories and Camera Roll?
To initiate, tap on your “Bitmoji” icon on Snapchat. Head to “Settings” and choose “Memories” from the displayed options. Afterward, tap on the “Save Button” option under the heading “Save Destinations.” In the “Save Button” menu, you can tap “Memories and Camera Roll” to backup pictures in both sections.
3. How to Get My Story Snaps to Auto-Save to Memories?
The process to auto-save the stories to Memories is quite simple. For this, open the “Settings” of Snapchat and head to the “Memories” option. Under the heading called “Save Destination,” tap on “Auto-Save My Story Snaps.” Once done, enable the option “Auto-Save to Memories.” Thus, your Snapchat stories will be automatically saved to your Memories.
Wrap Up
Snapchat allows you to save the captured pictures and videos in their Memories. By doing so, you can save your device’s storage space easily. Moreover, you can access the saved snaps in Memories by logging into your Snapchat from any device. That’s why this article has offered a well-described guide on how to back up the camera roll to Snapchat in a simple way.
Free Download For Win 7 or later(64-bit)
Free Download For macOS 10.14 or later
Free Download For macOS 10.14 or later
Intro to Using Snap Camera Effectively in Meetings
The trend of using vibrant filters and lenses during the pandemic time was first introduced by Snap Camera. There are various popular filters in the Snap Camera app that indulges people in creating captivating avatars. Moreover, people also use this popular app to enhance their visual presence in virtual conferences. You can apply unique filters or lenses through the Snap Camera app to make funny virtual meetings with friends.
This article will address how to properly download and launch the Snap Camera app. Moreover, you can also learn to link the Snap Camera on Microsoft Teams easily.
Part 1: How To Download Snap Camera on Your PC or Mac?
Snap Camera is a popular app that can change your visual appearance on many platforms. For instance, you can use the Snap Camera app on Skype, Microsoft Teams, Google Meetings, etc. This app offers attractive lenses and filters that can make your facial appearance interesting. To conduct a casual meeting with your friends, you can use the webcam of Snap Camera. The Snap Camera’s webcam lets you greet your friends or colleagues in a unique manner.
In this section, we will provide you with the exact system requirements of the Snap Camera. Also, we will guide you on how to install and launch the Snap Camera tool on your Windows or Mac device easily.
System Requirements of Snap Camera
- Required Operating System: Windows 10 (64 bit) or latest; macOS 10.13 or latest
- Minimum Hardware Requirements: Minimum of Intel Core i3 2.5Ghz or AMD FX 4300 2.6Ghz with 4 GB RAM / Intel HD Graphics 4000 / Nvidia GeForce 710 / AMD Radeon HD 6450 / Screen Resolution of 1280 x 768 or higher
Steps to Install and Launch Snap Camera on Windows or Mac
Step1 Visit the official website of Snap Camera and tap on the “Download” button. This will open a new page on your computer’s screen.


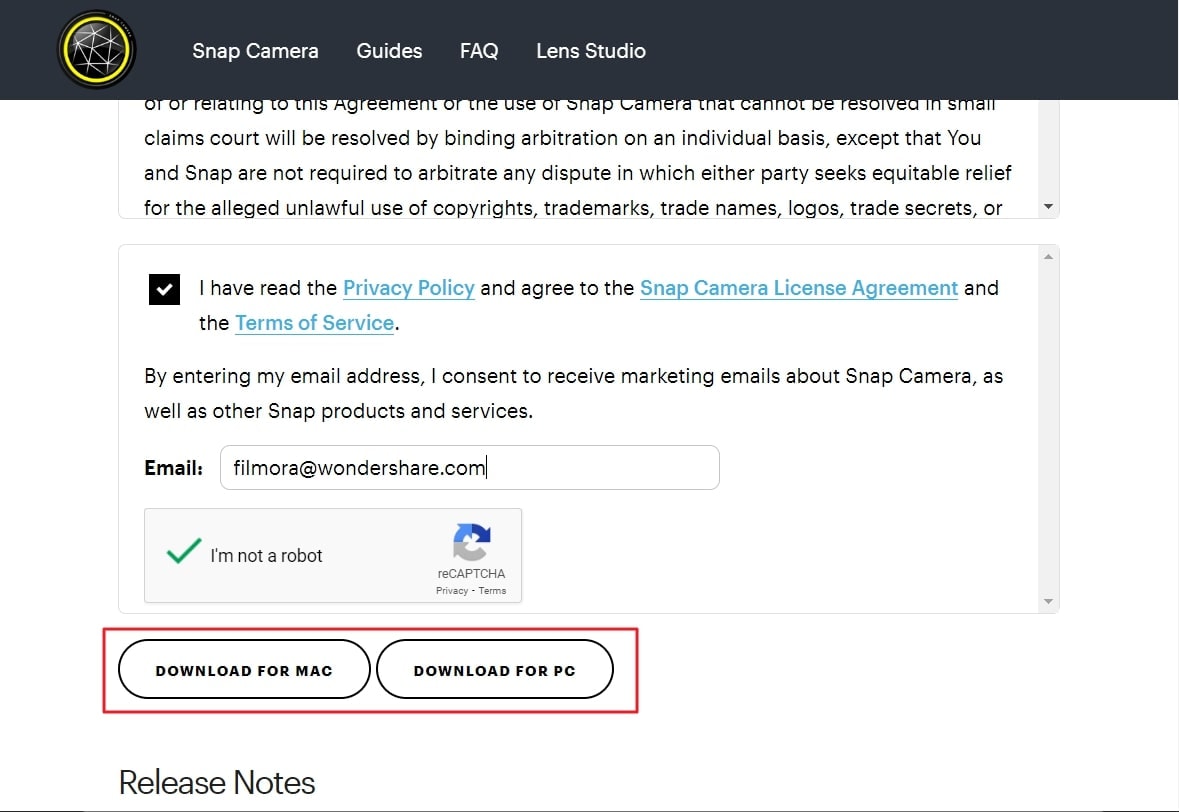
Step2 Click the “I agree” button and tap on the “I’m not a robot” option. Afterward, enter your email address in the given box.

Step3 Afterward, click either “Download for Mac” or “Download for PC,” depending on your need. Wait until the installer file gets downloaded on your computer completely. After that, double-click on the .exe file to install the Snap Camera for Microsoft Teams app.
Part 2: How To Set up Snap Camera on your PC
Do you want to set up the Snap Camera for Microsoft Teams on your computer? The setup process of the Snap Camera app is simple to follow. First, download the Snap Camera app on your computer successfully. Once done with launching the Snap Camera app, follow the below instructions:
Step1 After opening the Snap Camera app, click on the “Gear” icon. This will open the Settings of the Snap Camera.
 PaperScan Professional: PaperScan Scanner Software is a powerful TWAIN & WIA scanning application centered on one idea: making document acquisition an unparalleled easy task for anyone.
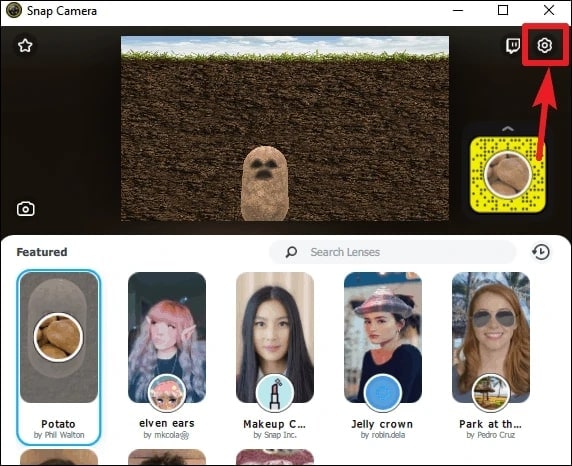
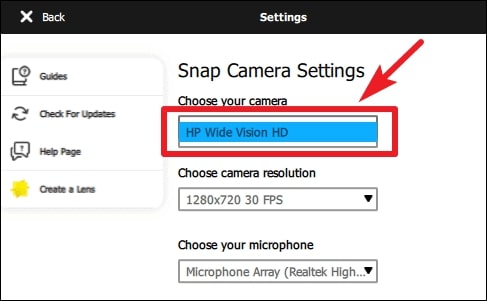
Step2 In Snap Camera Settings, head to the “Choose your Camera” option. Here, choose your desktop’s webcam to proceed. Afterward, select a filter on the app you want to apply during your virtual meeting.
Step3 Now, you can utilize the Snap Camera app on Microsoft Teams. For this, open the Microsoft Teams app after setting up the Snap Camera on your PC.
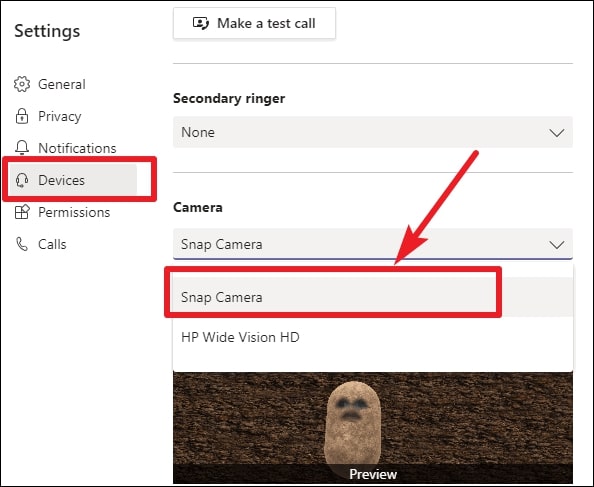
Step4 On your Microsoft Teams, tap on the “Profile” icon. Select “Settings” and tap on “Devices” from the left section. Afterward, scroll to the bottom until you can locate the “Camera” section.
 vMix HD - Software based live production. vMix HD includes everything in vMix Basic HD plus 1000 inputs, Video List, 4 Overlay Channels, and 1 vMix Call
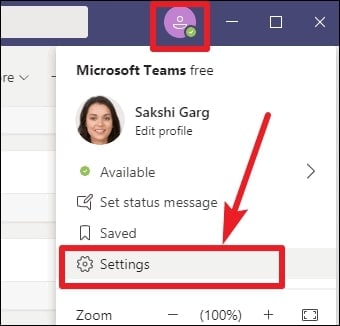
Step5 Under the Camera section, choose “Snap Camera” from the list. Thus, you conduct a virtual meeting using the Snap Camera for Microsoft Teams webcam and applied filters.
Part 3: Recommending Popular Snap Camera Filters
Do you want to try the trending filters of Snap Camera for Microsoft Teams? Read this part to discover the exciting filters that are exclusively provided in the Snap Camera tool:
1. Potato
This unique filter can be used to describe a funny situation in the form of a potato cartoon.

2. Invisible Person
This filter is for you if you want to highlight your presence by getting invisible!

 ZoneAlarm Extreme Security NextGen
3. Baby
Do you want to take the sympathies of your colleagues? Try this filter to make a baby face to prevent yourself in vulnerable situations.


4. Snorkle
Are you the one who is always punctual in attending the virtual meetings? This filter can describe your dedication to the team’s goals.

5. Drift Visor
Drift Visor is a vibrant filter that can be used by IT experts. If you are a technical expert, use this filter during virtual meetings.

Conclusion
Snap Camera is an advanced app that functions in altering the visual look. Using this app, you can try a different look in virtual sessions flawlessly. You can eliminate your facial flaws by applying the offered lenses and filters from the Snap Camera. This article taught you how to set up the Snap Camera on Microsoft Teams easily. If you are willing to use the Snap Camera app during your Zoom and Google Meet meetings, you can read their respective guides.
Free Download For Win 7 or later(64-bit)
Free Download For macOS 10.14 or later
Free Download For macOS 10.14 or later
- Title: [Updated] Best Practices for Secure Transfer of Phone's Camera Roll Content to Snapchat
- Author: Scott
- Created at : 2024-07-25 10:00:44
- Updated at : 2024-07-26 10:00:44
- Link: https://snapchat-videos.techidaily.com/updated-best-practices-for-secure-transfer-of-phones-camera-roll-content-to-snapchat/
- License: This work is licensed under CC BY-NC-SA 4.0.