
!["[Updated] 2024 Approved Spin the Clock Back Inside the Art of Snapchat Flipping"](https://thmb.techidaily.com/2e153e0e621bce9ac8484d65d8c4dd2eb6f5a3b85fbf991174fd2d0ac26c3edd.png)
"[Updated] 2024 Approved Spin the Clock Back Inside the Art of Snapchat Flipping"
Spin the Clock Back: Inside the Art of Snapchat Flipping
Snapchat has become one of the foremost popular chat applications for young adults and teenagers worldwide. Released in 2011, it gives you a choice to feature captions, drawings, and filters to your photos and videos referred to as snaps. Few people want to see the videos in reverse on Snapchat.
But, only a few people know about the Snapchat reverse filter. Don’t worry if you are clueless about the reverse video Snapchat process. Since reversing a video, snap is as easy as applying a filter. This article will enable you to reverse Snapchat for iOS and Android versions quickly.
In this article
01 How to Record Reverse video on Snapchat for free with the built-in filter?
02 How to Add Reverse Effect to Existing Videos on Snapchat?
03 Best Apps to Create Reverse Video for Snapchat.
04 When Should You Apply the Reverse Filter to Video on Snapchat?
05 Tips for a good reverse video
Part 1: How to Record Reverse video on Snapchat for free with the built-in filter?
Now that you need to know how to invert a video on Snapchat do not remain absent from this dialog. As you all know, it is beautifully simple to record a specific video on Snapchat. Like recording a video, turning around is also a pretty easy one.
Let’s examine in detail how you’ll switch Snapchat video via a free built-in reverse feature on Snapchat.
Note: Video duration should not be more than 10 seconds.
Step 1: Begin to record the video.
Open your Snapchat, then move to the camera screen. Later, capture a specific video clip by holding down a button display within the middle of the screen.
Step 2: T urn around the filter effect.
After capturing a video on Snapchat, another step for you’ll be to undertake to go for a turnaround channel there that is swipe to the left. By swiping, you’ll discover the reverse option alternative quickly. When you reach after swiping, you will find several types of filters. There, stay on the reverse screen.
Step 3: Share the altered video.
After switching your video to reverse mode, you’ll be able to share it with your companions. If you want to include more impacts in the video, tap the symbol button on your right side. Doing so will empower you to add effect. That’s all for turning around a video on Snapchat. Finally, you will get the reversed video with varying speed options.
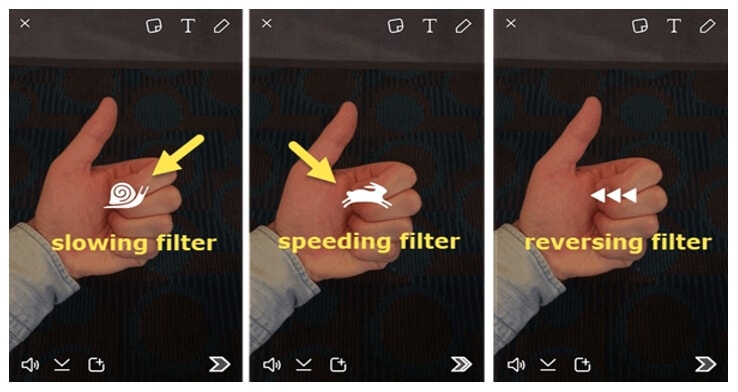
You may also like: How to slow down video on Snapchat.
Part 2: How to Add Reverse Effect to Existing Videos on Snapchat?
This strategy works for both recordings you previously took with the Snapchat app and those you transfer from your phone’s collections. Follow the following step guidelines to reverse video on Snapchat.
Step 1: Open Snapchat and select the video
After landing on the main screen, you will see the camera icon. Swipe up the screen. You will see different options. Either choose the short video of duration less than 10 sec from ‘Snaps’ sections for a video you had previously recorded in Snapchat. Or else you can go for ‘Camera Roll’ to select a video from the phone camera Gallery.
Step 2: Edit Snap Menu and reverse video
Tap on the three-dot symbols on the upper right portion of the screen to open the menu. Tap on ‘Edit Snap’ from the given options. Swipe Left and find the reverse filter in Snapchat from all the filters. Selecting the reverse option will enable the Snapchat reverse filter effect on the selected video.
Part 3: Best Apps to Create Reverse Video for Snapchat
1. CapCut
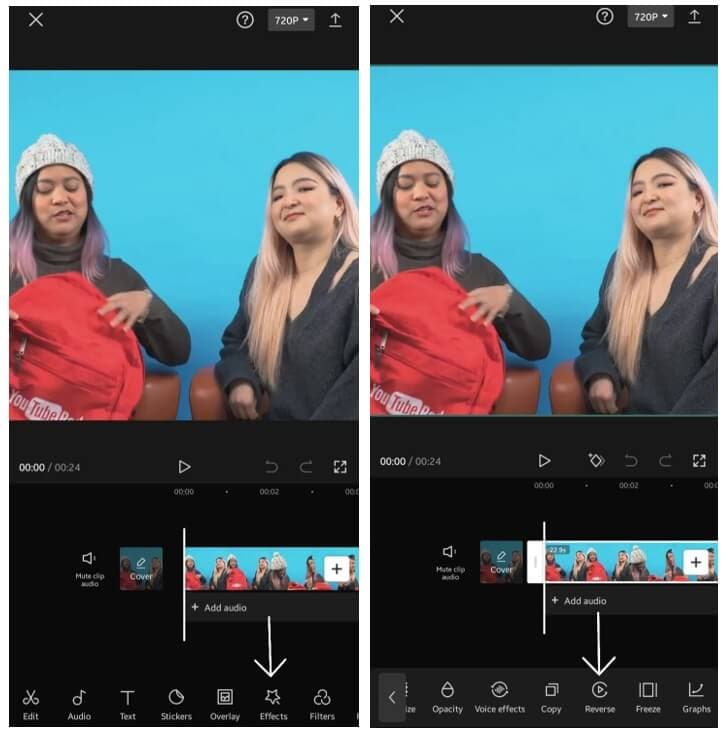
CapCut may be a portable app for iOS and Android gadgets, mainly created to complement the essential video altering highlights of the famous social stage. Several critical features of CapCut, bring it unique for social media. For example, Split function, Speed control, High defined filters, effect, and many more.
But if we talk about its reverse feature, a triangle-shaped figure inside a circle icon is known as the reverse feature in the software. This is not so tricky to use. But you can use this feature only on short videos. You can reverse it in slow motion after applying high-quality effects in your video. This version is available on iPhone as well as on Android devices.
You can check this article and find out the details about how to edit videos with CapCut.
2. Wondershare Filmora
Wondershare Filmora is the most recommended video-altering computer program that creates astonishing recordings productively employing a vast extent of powerful altering devices. Wondershare Filmora uses a delightfully realistic plan that makes it simple for anybody to become an incredible video editor.
Filmora is the most suitable app for video playback and reverses the video. And not only this, it has many other features that may facilitate your videos more engaging. If you’re trying to find an all-around video app, Filmora is the one for you. It has various kinds of critical features of Wondershare Filmora. For example, support to 4K editing, GIF, Noise removal, Advanced text editor, etc.
Talking its reverse feature is the ideal thing. It has professional tools for reversing video. Your videos will become more attractive through reverse, and additional features and concise videos will be on top.
3. Reverse Movie FX - Magic

If you need to turn around your recordings uploaded on Snapchat, Motion picture FX can make the difference. To begin with, record a video. Then, follow the steps to select the motion picture part, and press, begin. Switch Motion picture FX will start switching a video.
The main features of Reverse Movie FX- magic video are: Reverse Motion FX - Magic video carries colossal highlights for turning around a video. You will discover staggering liveliness and imaginative moves in this application. It has a smooth altering interface and timeline. You can include an inverted impact to your video by fair tapping an alternative.
Reverse Movie FX is a reverse video app available for Android and iOS devices. It offers reverse video options, including reversed + original (loop), original + reversed (loop), adding music, and many more.
Part 4: When Should You Apply the Reverse Filter to Video on Snapchat?
Reversing your video on Snapchat reflects how to show off a chain of occasions backward. This clear-out out is frequently satisfactory carried out to action-packed videos. For illustration, consider something as straightforward as dropping a shake onto a frozen pond that breaks through the ice. Rather than watching the ice smash after the video, you may apply the turnaround effect to appear the broken ice is coming back together as the video film plays in reverse.
Moving clouds, waterfall, hair flaunting, moving steps, playing with accessories, cycling, sky diving, breaking of glass, food making, makeup reverse videos, these kinds of videos easily catch trends on any social media platform.
Part 5: Tips for a good reverse video
Here are a few tips to assist you with the Snapchat reverse filter.
- Include voice: Once you utilize the turnaround effect, it’s not as it was the video that gets turned around. Any sound recorded with the video moreover gets turned around. This includes a tremendous impact on your clip as of now reversed video. So, beyond any doubt, say something while recording your video.
- Do the bizarre: If you’re aiming to be turning back time, your superior does it in fashion! Utilize the switch movement channel on things that don’t, as a rule, work that way. Like streaming water, flying feathered creatures, running mutts, you get the thought.
- Moderate that video down: Most phones these days have a few frames of slow-motion shooting mode in their camera app. Shoot your video in moderate movement, and after that, utilize the reverse motion channel on it.
- Shoot in great lighting: We know how terrible the Snapchat camera is. So, when shooting a video, shoot it in great characteristic light. Well, there you’ve got it! Have fun messing around with the reverse effect, and create a few intriguing science-defying snaps within the deal!
Conclusion
In the end, we hope that all your queries get cleared while reading this post. There are a few questions answered like:
- How to make a reverse video on Snapchat.
- Tips to make the reverse video better.
- How to use the in-built Snapchat reverse filter.
- Some apps create the best reverse videos.
Thus, I hope your queries are explicit after reading this post.
02 How to Add Reverse Effect to Existing Videos on Snapchat?
03 Best Apps to Create Reverse Video for Snapchat.
04 When Should You Apply the Reverse Filter to Video on Snapchat?
05 Tips for a good reverse video
Part 1: How to Record Reverse video on Snapchat for free with the built-in filter?
Now that you need to know how to invert a video on Snapchat do not remain absent from this dialog. As you all know, it is beautifully simple to record a specific video on Snapchat. Like recording a video, turning around is also a pretty easy one.
Let’s examine in detail how you’ll switch Snapchat video via a free built-in reverse feature on Snapchat.
Note: Video duration should not be more than 10 seconds.
Step 1: Begin to record the video.
Open your Snapchat, then move to the camera screen. Later, capture a specific video clip by holding down a button display within the middle of the screen.
Step 2: T urn around the filter effect.
After capturing a video on Snapchat, another step for you’ll be to undertake to go for a turnaround channel there that is swipe to the left. By swiping, you’ll discover the reverse option alternative quickly. When you reach after swiping, you will find several types of filters. There, stay on the reverse screen.
Step 3: Share the altered video.
After switching your video to reverse mode, you’ll be able to share it with your companions. If you want to include more impacts in the video, tap the symbol button on your right side. Doing so will empower you to add effect. That’s all for turning around a video on Snapchat. Finally, you will get the reversed video with varying speed options.
You may also like: How to slow down video on Snapchat.
Part 2: How to Add Reverse Effect to Existing Videos on Snapchat?
This strategy works for both recordings you previously took with the Snapchat app and those you transfer from your phone’s collections. Follow the following step guidelines to reverse video on Snapchat.
Step 1: Open Snapchat and select the video
After landing on the main screen, you will see the camera icon. Swipe up the screen. You will see different options. Either choose the short video of duration less than 10 sec from ‘Snaps’ sections for a video you had previously recorded in Snapchat. Or else you can go for ‘Camera Roll’ to select a video from the phone camera Gallery.
Step 2: Edit Snap Menu and reverse video
Tap on the three-dot symbols on the upper right portion of the screen to open the menu. Tap on ‘Edit Snap’ from the given options. Swipe Left and find the reverse filter in Snapchat from all the filters. Selecting the reverse option will enable the Snapchat reverse filter effect on the selected video.
Part 3: Best Apps to Create Reverse Video for Snapchat
1. CapCut
CapCut may be a portable app for iOS and Android gadgets, mainly created to complement the essential video altering highlights of the famous social stage. Several critical features of CapCut, bring it unique for social media. For example, Split function, Speed control, High defined filters, effect, and many more.
But if we talk about its reverse feature, a triangle-shaped figure inside a circle icon is known as the reverse feature in the software. This is not so tricky to use. But you can use this feature only on short videos. You can reverse it in slow motion after applying high-quality effects in your video. This version is available on iPhone as well as on Android devices.
You can check this article and find out the details about how to edit videos with CapCut.
2. Wondershare Filmora
Wondershare Filmora is the most recommended video-altering computer program that creates astonishing recordings productively employing a vast extent of powerful altering devices. Wondershare Filmora uses a delightfully realistic plan that makes it simple for anybody to become an incredible video editor.
Filmora is the most suitable app for video playback and reverses the video. And not only this, it has many other features that may facilitate your videos more engaging. If you’re trying to find an all-around video app, Filmora is the one for you. It has various kinds of critical features of Wondershare Filmora. For example, support to 4K editing, GIF, Noise removal, Advanced text editor, etc.
Talking its reverse feature is the ideal thing. It has professional tools for reversing video. Your videos will become more attractive through reverse, and additional features and concise videos will be on top.
3. Reverse Movie FX - Magic
If you need to turn around your recordings uploaded on Snapchat, Motion picture FX can make the difference. To begin with, record a video. Then, follow the steps to select the motion picture part, and press, begin. Switch Motion picture FX will start switching a video.
The main features of Reverse Movie FX- magic video are: Reverse Motion FX - Magic video carries colossal highlights for turning around a video. You will discover staggering liveliness and imaginative moves in this application. It has a smooth altering interface and timeline. You can include an inverted impact to your video by fair tapping an alternative.
Reverse Movie FX is a reverse video app available for Android and iOS devices. It offers reverse video options, including reversed + original (loop), original + reversed (loop), adding music, and many more.
Part 4: When Should You Apply the Reverse Filter to Video on Snapchat?
Reversing your video on Snapchat reflects how to show off a chain of occasions backward. This clear-out out is frequently satisfactory carried out to action-packed videos. For illustration, consider something as straightforward as dropping a shake onto a frozen pond that breaks through the ice. Rather than watching the ice smash after the video, you may apply the turnaround effect to appear the broken ice is coming back together as the video film plays in reverse.
Moving clouds, waterfall, hair flaunting, moving steps, playing with accessories, cycling, sky diving, breaking of glass, food making, makeup reverse videos, these kinds of videos easily catch trends on any social media platform.
Part 5: Tips for a good reverse video
Here are a few tips to assist you with the Snapchat reverse filter.
- Include voice: Once you utilize the turnaround effect, it’s not as it was the video that gets turned around. Any sound recorded with the video moreover gets turned around. This includes a tremendous impact on your clip as of now reversed video. So, beyond any doubt, say something while recording your video.
- Do the bizarre: If you’re aiming to be turning back time, your superior does it in fashion! Utilize the switch movement channel on things that don’t, as a rule, work that way. Like streaming water, flying feathered creatures, running mutts, you get the thought.
- Moderate that video down: Most phones these days have a few frames of slow-motion shooting mode in their camera app. Shoot your video in moderate movement, and after that, utilize the reverse motion channel on it.
- Shoot in great lighting: We know how terrible the Snapchat camera is. So, when shooting a video, shoot it in great characteristic light. Well, there you’ve got it! Have fun messing around with the reverse effect, and create a few intriguing science-defying snaps within the deal!
Conclusion
In the end, we hope that all your queries get cleared while reading this post. There are a few questions answered like:
- How to make a reverse video on Snapchat.
- Tips to make the reverse video better.
- How to use the in-built Snapchat reverse filter.
- Some apps create the best reverse videos.
Thus, I hope your queries are explicit after reading this post.
Make Snapchat Memories Shine: 2 Lens-Creation Methods
How to Create Snapchat Lenses Easily: 2 Methods

Ollie Mattison
Mar 27, 2024• Proven solutions
Are you feeling like creating your own Snapchat lens, so you can have an even better experience with the app? The good news is that two new Snapchat tools have been released – the Lens Studio and Create Your Own Lens applications.
If you are a regular Snapchat user, you may want to learn about the Snapchat lens and how it can help you. We will help you get started. Here is our step by step guide on how to make Snapchat lenses.
- Part1: Comparing Lens Studio and Creating Your Own Lens
- Part2: How to Use Lens Studio
- Part3: How to Create Snapchat Lenses Using Create Your Own Lens
Part 1: Comparing Lens Studio and Creating Your Own Lens
The two programs that we are highlighting today are Lens Studio and Create Your Own Lens. These are both fantastic programs for creating your own Snapchat lens, but they do have slightly different uses. If you are the type of person who wants to design a professional Snapchat lens, you are going to prefer Lens Studio.
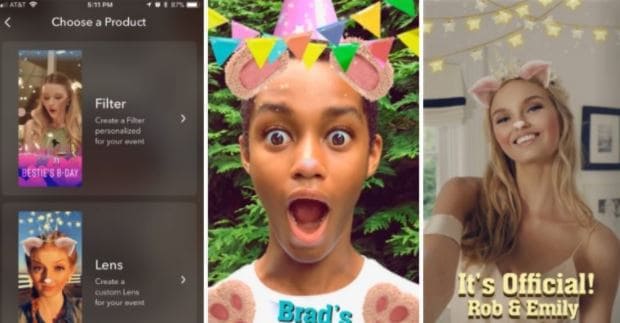
But if you are hoping to come up with something creative that you can share with your friends and family, then you may love Create Your Own Lens. It is a very easy program to use, and it offers a ton of features that you may be surprised to see.
Snapchat lenses is for fun
The beauty of Snapchat lenses is that you can now create your own environment, which you can use each time you are taking photos or videos. Sure, you can always use the filters that are already available in the application, but not everyone would find those enough.
If you want some customization, or you just want to mess around until you get the filter that makes sense for you, Snapchat lenses are the way to go.
Lens Studio is for business
Lens Studio is perfect for businesses that may want to create unique environments for their clients, or the times when they are releasing company Snapchat posts. Say the company is hosting an event. They may want a custom graphic for that event, which is used for all the pictures and videos posted to Snapchat about the event. Using Lens Studio lets them do that with ease.
Create Your Own Lens is great when you are going to a special event, birthday party or graduating, and you want a special graphic that comes up in all your snaps. It is very intuitive to use, and is available through the App Store as a download.
Part 2: How to Use Lens Studio
1. Download Lens Studio
The first step involves downloading Lens Studio, which you can do from your computer. It is compatible with both Windows and Mac computers, and will run on any semi-modern system. According to the Snapchat team, Lens Studio is similar to the program used by their AR teams to create lenses. That means you are getting similar functionality, but with an easier to manage interface.
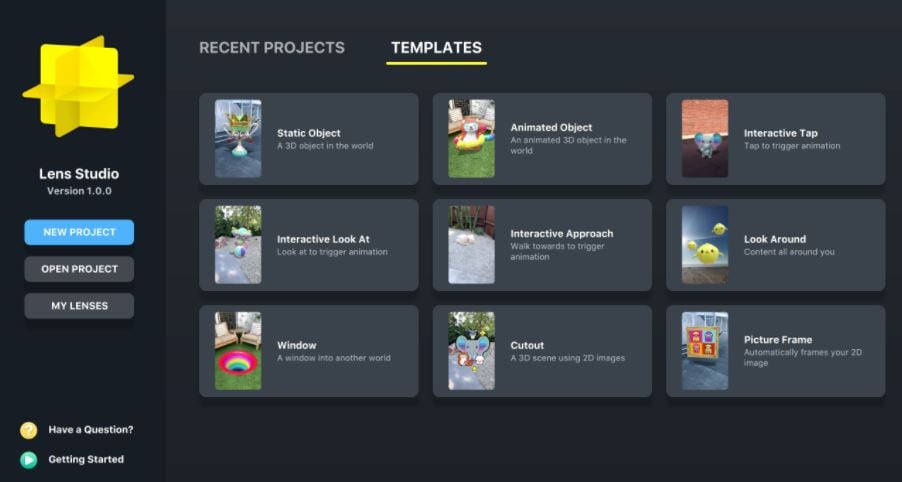
2. Choose Templates Page
It is normal to feel a little overwhelmed the first time you try and use this program. But that is why the templates page is so great. You can select from templates depending on the type of lens that you are hoping to create. You can just use a template, or you can incorporate your own ideas to customize the template.
There is also a Lens Studio Overview guide that you can access online, which will help you get acquainted with the program’s various features and quirks.
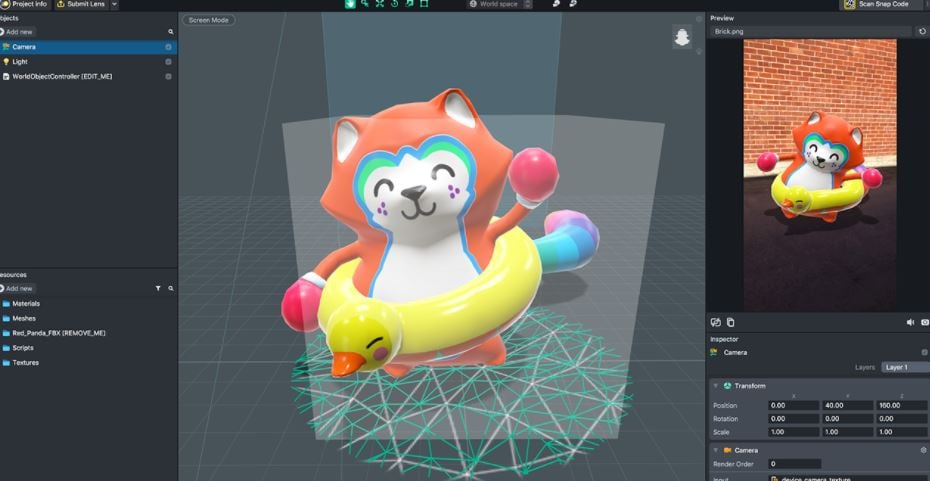
3. Use Studio Panels
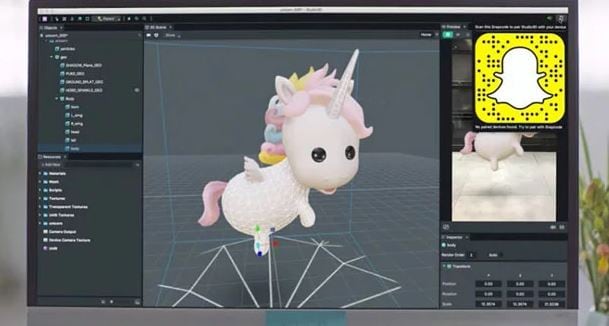
Are you ready to create your own custom Snapchat lens? It is time to head over to Studio Panels on the application. This is the area where you can add your own 2D or 3D objects, and you can visualize how they would look as a Snapchat filter. You can add, remove, resize and drag objects to specific areas of the screen.
There are other tools accessible from the Resources panel. You can use these tools to ensure that your Snapchat lens is exactly as you want.
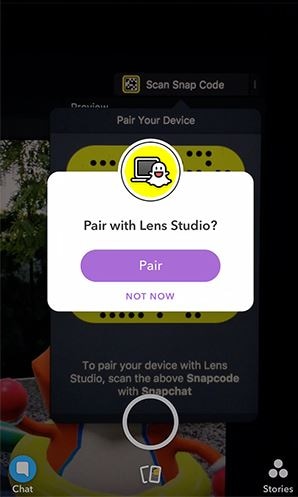
4. Preview the Snapchat Lens You Create
The great thing about this application is that you can preview the lens before you send it out to your phone. When you are satisfied with the image on the preview, you can pair your phone with the application, and you will be able to send that Snapchat lens onto your phone through your Snapcode. It is that simple!
Part 3: How to Create Snapchat Lenses Using Create Your Own Lens
- There are two ways that you can access the tool for creating fun Snapchat lenses. You can either visit the website snapchat.com/create, or you can go on the “filters and lenses” section on your iOS device. If you are using Snapchat on an Android device, you will only have the option for the website. But the feature is coming to the Android version of Snapchat very soon.
- When you are in the application or on the website, you may start to look at the different templates for Snapchat lenses. Now you can add other items into the templates, such as photographs, text or graphics.
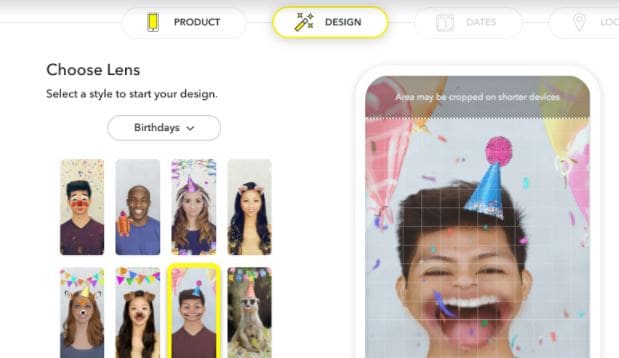
It is all up to your imagination. You can create the perfect Snapchat lens, which you can then send into your Snapchat account through your Snapcode. Of course, if you are using your iOS device to create the lens, it is already linked to your account.
Another cool feature is how you can set the location for where the Snapchat lens is available. Say you are hosting a party. You can have the Snapchat lens available to everyone who uses Snapchat within a set square footage of your home. That is an amazing way to let everyone share social media pictures and photos of your party, through the lens you created.
Conclusion
Creating Snapchat lenses has never been easier. Whether you are a business looking to add a custom lens, or you just want to create a fun lens for a graduation or party, there are tools that make the job very easy. Using these tools will allow you to create the perfect Snapchat lens for any occasion.
Ollie Mattison
Ollie Mattison is a writer and a lover of all things video.
Follow @Ollie Mattison
Ollie Mattison
Mar 27, 2024• Proven solutions
Are you feeling like creating your own Snapchat lens, so you can have an even better experience with the app? The good news is that two new Snapchat tools have been released – the Lens Studio and Create Your Own Lens applications.
If you are a regular Snapchat user, you may want to learn about the Snapchat lens and how it can help you. We will help you get started. Here is our step by step guide on how to make Snapchat lenses.
- Part1: Comparing Lens Studio and Creating Your Own Lens
- Part2: How to Use Lens Studio
- Part3: How to Create Snapchat Lenses Using Create Your Own Lens
Part 1: Comparing Lens Studio and Creating Your Own Lens
The two programs that we are highlighting today are Lens Studio and Create Your Own Lens. These are both fantastic programs for creating your own Snapchat lens, but they do have slightly different uses. If you are the type of person who wants to design a professional Snapchat lens, you are going to prefer Lens Studio.
But if you are hoping to come up with something creative that you can share with your friends and family, then you may love Create Your Own Lens. It is a very easy program to use, and it offers a ton of features that you may be surprised to see.
Snapchat lenses is for fun
The beauty of Snapchat lenses is that you can now create your own environment, which you can use each time you are taking photos or videos. Sure, you can always use the filters that are already available in the application, but not everyone would find those enough.
If you want some customization, or you just want to mess around until you get the filter that makes sense for you, Snapchat lenses are the way to go.
Lens Studio is for business
Lens Studio is perfect for businesses that may want to create unique environments for their clients, or the times when they are releasing company Snapchat posts. Say the company is hosting an event. They may want a custom graphic for that event, which is used for all the pictures and videos posted to Snapchat about the event. Using Lens Studio lets them do that with ease.
Create Your Own Lens is great when you are going to a special event, birthday party or graduating, and you want a special graphic that comes up in all your snaps. It is very intuitive to use, and is available through the App Store as a download.
Part 2: How to Use Lens Studio
1. Download Lens Studio
The first step involves downloading Lens Studio, which you can do from your computer. It is compatible with both Windows and Mac computers, and will run on any semi-modern system. According to the Snapchat team, Lens Studio is similar to the program used by their AR teams to create lenses. That means you are getting similar functionality, but with an easier to manage interface.
2. Choose Templates Page
It is normal to feel a little overwhelmed the first time you try and use this program. But that is why the templates page is so great. You can select from templates depending on the type of lens that you are hoping to create. You can just use a template, or you can incorporate your own ideas to customize the template.
There is also a Lens Studio Overview guide that you can access online, which will help you get acquainted with the program’s various features and quirks.
3. Use Studio Panels
Are you ready to create your own custom Snapchat lens? It is time to head over to Studio Panels on the application. This is the area where you can add your own 2D or 3D objects, and you can visualize how they would look as a Snapchat filter. You can add, remove, resize and drag objects to specific areas of the screen.
There are other tools accessible from the Resources panel. You can use these tools to ensure that your Snapchat lens is exactly as you want.
4. Preview the Snapchat Lens You Create
The great thing about this application is that you can preview the lens before you send it out to your phone. When you are satisfied with the image on the preview, you can pair your phone with the application, and you will be able to send that Snapchat lens onto your phone through your Snapcode. It is that simple!
Part 3: How to Create Snapchat Lenses Using Create Your Own Lens
- There are two ways that you can access the tool for creating fun Snapchat lenses. You can either visit the website snapchat.com/create, or you can go on the “filters and lenses” section on your iOS device. If you are using Snapchat on an Android device, you will only have the option for the website. But the feature is coming to the Android version of Snapchat very soon.
- When you are in the application or on the website, you may start to look at the different templates for Snapchat lenses. Now you can add other items into the templates, such as photographs, text or graphics.
It is all up to your imagination. You can create the perfect Snapchat lens, which you can then send into your Snapchat account through your Snapcode. Of course, if you are using your iOS device to create the lens, it is already linked to your account.
Another cool feature is how you can set the location for where the Snapchat lens is available. Say you are hosting a party. You can have the Snapchat lens available to everyone who uses Snapchat within a set square footage of your home. That is an amazing way to let everyone share social media pictures and photos of your party, through the lens you created.
Conclusion
Creating Snapchat lenses has never been easier. Whether you are a business looking to add a custom lens, or you just want to create a fun lens for a graduation or party, there are tools that make the job very easy. Using these tools will allow you to create the perfect Snapchat lens for any occasion.
Ollie Mattison
Ollie Mattison is a writer and a lover of all things video.
Follow @Ollie Mattison
Also read:
- Make Every Interaction Count How to Add and Share GIFs on Snapchat for 2024
- [New] 2024 Approved Streamlined Recording Procedures for Snapchat-Ready Videos
- [Updated] Mastering Snapchat Posts Top 15 Game-Changers for 2024
- [New] Master the Art of Backup Phone's Camera Roll Upload to Social Apps
- [Updated] In 2024, Harnessing Microsoft Teams' Power with Simple Snap Camera Use
- [New] In 2024, Sneak Peek SnapCapture Unseen Image Capturing Tactics
- [New] In 2024, Automate the Savvy Storage of Your Social Media Images
- [Updated] Installation Instructions for Snapchat on a Mac for 2024
- [Updated] Hidden ScreenShotters Concealed Photography on the Snapchat App
- [Updated] Time's Tail in Snapchat Video Backtracking Guide
- [New] Snap Into Fun Step-by-Step Guide for Adding Gifs in Conversations for 2024
- [Updated] A Step-by-Step Guide to Snapchat's Boomerang Magic for 2024
- [New] In 2024, Unleash Creativity Using Snapchat to Edit and Enhance Photos
- In 2024, Navigating Snapchat's Hidden Story Arena
- [Updated] Tricks for High-Quality Snapchat Recordings on Phone
- [New] In 2024, Unveiling User Experiences TikTok and Snap's Comparison
- [New] Mastering Simple Multi-Snap Chat Video Creation & Editing
- [Updated] The Exclusion Dilemma Is Someone Hidden On Snapchat?
- [Updated] In 2024, Master Your Message 15 Powerful Snap Ideas
- [Updated] The Guide to Creating a Lucrative Snapchat Lifestyle Brand for 2024
- [New] 2024 Approved Snapchat Enhancements The Most Acclaimed Video Editing Tools
- Making Memories Special The Best 20 Snapchat Filter Ideas for 2024
- [New] Understanding Absence of Direct Messages
- [New] Instant Upload Share Pics Directly From Your Camera Roll for 2024
- In 2024, The Great Debate Who Outshines the Other? - TikTok vs Snapchat
- [New] Mastering the Art of Snapchat Sponsored Content
- [Updated] Mastering Mac Recording Settings for Snapchat Use
- [New] Optimal Techniques to Record Your Snapchat Stories
- [New] In 2024, A Step-by-Step Guide to Mastering Business on Snap
- [Updated] In 2024, Realizing Unseen Friend Requests
- [Updated] 2024 Approved Easy-Peasy Guide to Crafting and Tweaking Multiple Snaps in Snapchat
- [Updated] Top 20 Snapchat Filters & Lenses to Make Your Snaps Special for 2024
- [Updated] In 2024, The Secrets of Negative Video Spinning in Snapchat
- [New] In 2024, Discover Two Hands-On Approaches to Personalize Snapchat Audio
- [Updated] Invisible SnapGrabber Secrets to Undetected Photo-Taking
- [Updated] Innovative Snapchat Techniques for Lens Makers
- In 2024, Identifying a User' Writes Silent, Unseen Snapshots
- Transform Snaps Into Anime Adventures with Snapchat Filters for 2024
- [Updated] Speedy Retrieval for Elusive Snaps
- [Updated] Maximizing Your Monetary Gains on Social Media with Snapchat
- In 2024, Intuitive Camera Roll Consolidation Step-by-Step Snapchat Guide
- [Updated] Mood Makers Best Filter Choices to Improve Your Snap for 2024
- [Updated] In 2024, Crafting Compact Snaps via Mac Techniques
- [Updated] Fashionable Filters for Every Occasion Our Top 20 Snap Lenses Guide
- [Updated] In 2024, Innovative Approaches to Keeping Your Snaps Connected
- In 2024, Precision in Photograph Preservation Phone to Snapchat Guide
- [New] Cut the Clutter Reducing Speeds and Frames on Snapchat Videos for 2024
- [New] Melody Manual Grab, Listen & Scrutinize Songs for 2024
- Unlock Realme C51 Phone Password Without Factory Reset Full Guide Here
- Updated 2024 Approved Effective Ways to Decelerate Audio Pieces without Impacting Tonal Integrity
- Updated 2024 Approved Unearthing the Echoes From Whistling Sounds
- New 2024 Approved From Beginner to Appreciator Grasping the Fundamentals of Jazz
- Complete guide for recovering music files on Realme 10T 5G
- 3 Top Picks of Voice Capture Apps for Your iPad
- [Updated] In 2024, Discover the Best 4K Capture Software for Live Recording
- Optimal Echoes Lecture Recording Experts for 2024
- New In 2024, Top Video Editing Software for Windows 10
- Thinking About Changing Your Netflix Region Without a VPN On Xiaomi 13 Ultra? | Dr.fone
- In 2024, How to Unlock iPhone XS Max Without Passcode?
- In 2024, How to Bypass iCloud Lock from Apple iPhone 6 Plus
- [Updated] Unlocking Team Potential Expert Tips on Slack and Filmora Integration for 2024
- In 2024, How To Remove Screen Lock PIN On Vivo V29 Like A Pro 5 Easy Ways
- Everything You Need to Know about Lock Screen Settings on your Xiaomi Redmi Note 12 Pro 5G
- Hard Resetting an Samsung Galaxy S24 Device Made Easy | Dr.fone
- Basic Routines Preserving Google Voice Conversations for 2024
- [Updated] 2024 Approved Immediate Recording of FaceTime Conversations Made Simple
- 2024 Approved Unlocking the Power of Words in Google Meet Discussions
- Title: "[Updated] 2024 Approved Spin the Clock Back Inside the Art of Snapchat Flipping"
- Author: Scott
- Created at : 2024-06-19 15:36:04
- Updated at : 2024-06-20 15:36:04
- Link: https://snapchat-videos.techidaily.com/updated-2024-approved-spin-the-clock-back-inside-the-art-of-snapchat-flipping/
- License: This work is licensed under CC BY-NC-SA 4.0.
