![[Updated] 2024 Approved Maximize Your Snapchat Impact with Mac Footage](https://thmb.techidaily.com/59fadab74810371b89474ece0e1afaf00b25fe1d9d17efc006ec62a9fbd8fe50.jpg)
"[Updated] 2024 Approved Maximize Your Snapchat Impact with Mac Footage"
Maximize Your Snapchat Impact with Mac Footage
How to Make a Video Best Fits Snapchat Size on Mac?

Liza Brown
Oct 26, 2023• Proven solutions
How to create a video best fit Snapchat? With more than 240 million active daily users, Snapchat is one of the most popular social media networks globally. It is also an instant messaging app that allows its users to express themselves visually in a diverse variety of manners including photos, videos, stories, stickers, emoji, and more.
One of the best features of Snapchat that makes it so attractive among the young audience is its mobile-oriented user interface. Snapchat was the first social networking platform to introduce the concept of daily stories which was widely adopted by other instant messengers as well including Instagram and WhatsApp. Since it is a mobile-oriented platform, you need to create and edit your videos in a certain way to make sure they are the best fit for Snapchat.
You May Also Like: The Ultimate Guide of Snapchat Filters
What Are the Ideal Features of a Snapchat Video?
Snapchat is highly optimized for vertical viewing which means that all the content needs to be served in portrait aspect ratio instead of landscape used by YouTube and other video platforms. You need to ensure that every aspect of your video is perfect before you can upload it for Snapchat on Mac. Here are some of the key features that you must not forget.

- Resolution - The ideal resolution of a Snapchat video is 1080 x 1920 pixels which is known as full HD. This resolution will ensure that your video loads in the right way and remains sharp and crisp for an excellent viewing experience.
- Video Format - The recommended video format for Snapchat clips is MP4 and MOV. You can use either of those formats on your Mac.
- Aspect Ratio - This is one of the key aspects of any video that determines the orientation of viewing. For a perfect Snapchat video, it is recommended that you keep the aspect ratio to 9:16.
- Video Length Size - Remember that Snapchat isn’t like YouTube and serves an audience that wants micro-entertainment. This is why the recommended time for your video is 3 to 10 seconds with the video size not exceeding 32 MB. Otherwise, the Snapchat audience may not respond well to your videos.
That is why it is crucial that your Snapchat video has all the ideal features so your audience can enjoy the viewing experience as intended instead of attempting to manipulate their phones to be able to see the video clearly. It will create an unpleasant and frustrating experience and your viewers might not stay with you.
How to Adjust the Video for Snapchat on Mac? [Step-by-Step]
- Part1. Changing Snapchat Video Format on Filmora
- Part2. Changing Snapchat Video Aspect Ratio on Filmora
- Part3. Changing Snapchat Video Size on Filmora
If your video doesn’t have the ideal features for Snapchat uploading, you don’t need to worry. You can easily edit your video on Filmora X to adjust everything including the aspect ratio, size, and format.


Part1. Changing Snapchat Video Format on Filmora
- Importing Video
The first step is to import the video using the option ‘Import Media Files’ in the import tab. You can also drag and drop the media files you need to work on.

- Selecting the Right Output Format
Once you have imported the file, drag and drop it onto the Timeline. Now click on the ‘Export’ button. Here you will be able to select your output video format which needs to be either MOV or MP4.
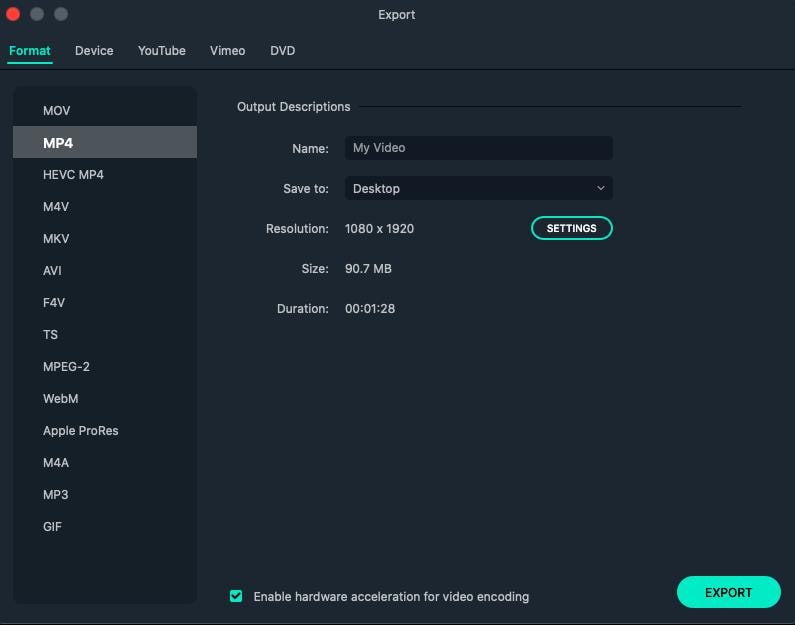
- Exporting Your Snapchat Video
After you have defined the settings, you can click on the ‘Export’ button to start the saving process. Your video is now available to you in the right format.
Part2. Changing Snapchat Video Aspect Ratio on Filmora
You can use multiple methods to change the aspect ratio of your Snapchat video on Filmora. It depends on the nature of editing you need to perform on your video. You can choose from any of the methods given below to edit your video for Snapchat in a user-friendly manner on Mac.
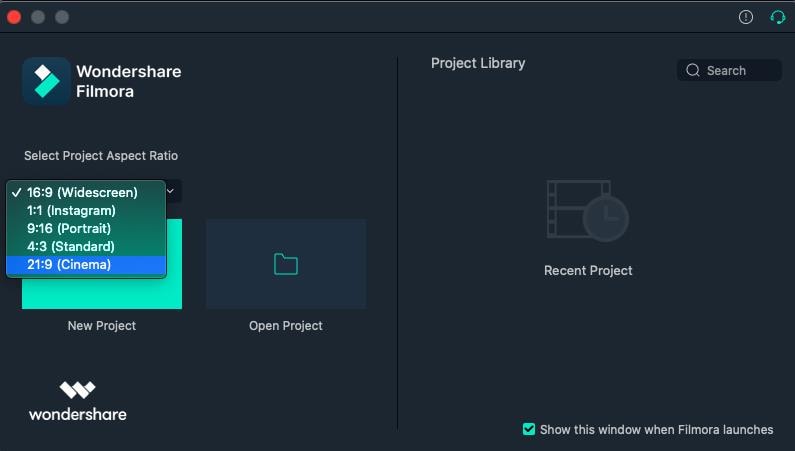
● Method 1 - Launch the editor and click on the drop-down list. You will see the popular aspect ratios listed in the list from where you can choose any. Select the right one that is 9:16 for Snapchat and export the file right away.
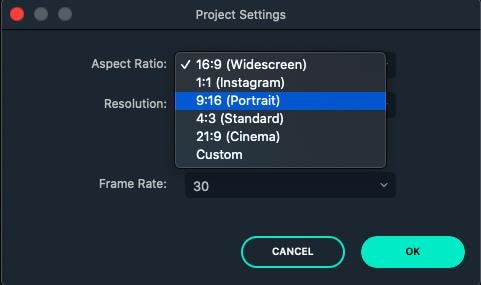
● Method 2 - The second method you can use is present under the Project Settings. You can also lock the aspect ratio using the features available here.

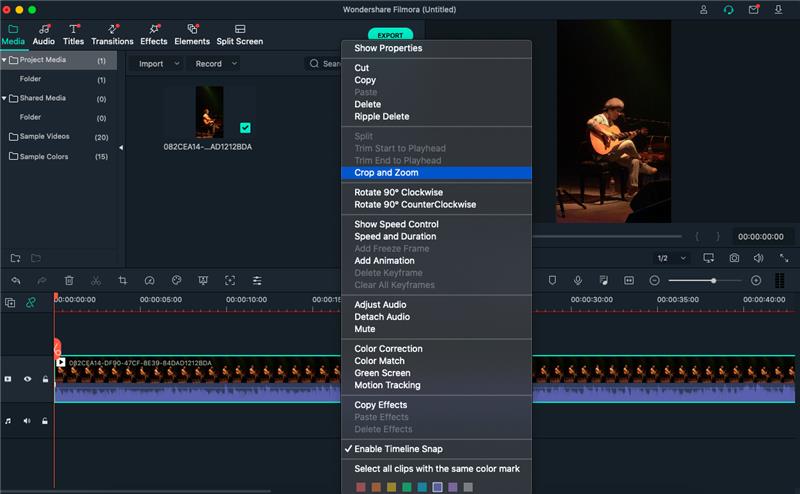
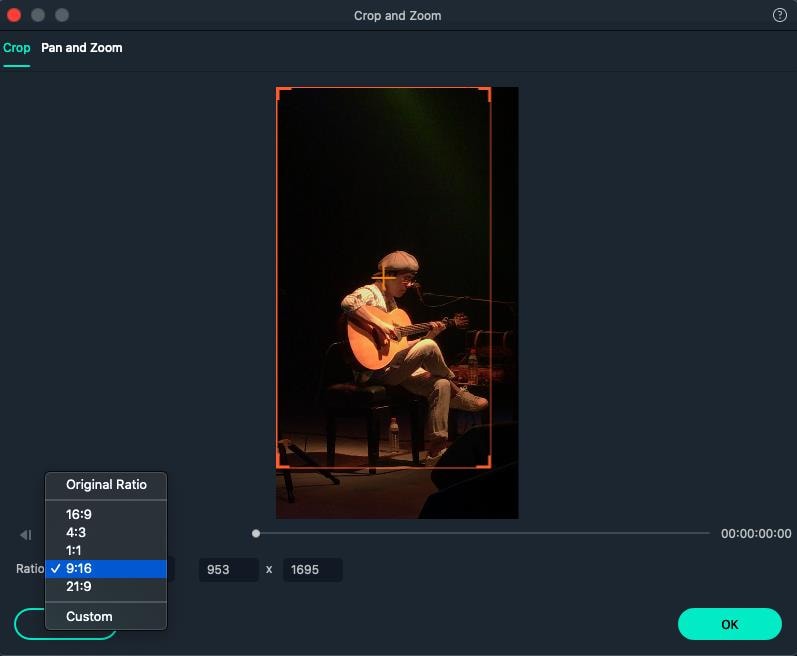
● Method 3 - The third method allows you to change the aspect ratio manually during the video editing process. You need to right-click on the timeline and select the ‘Crop and Zoom’ option. You will see a pop-up window where all the popular options will be available to you. You can choose either of them or select an aspect ratio manually.
● Step 4 - The final method to change the aspect ratio of your video on Mac is at the time of exporting your media file. Here you can select the aspect ratio for your local computer, a particular device, YouTube, or DVD TV.

Part3. Changing Snapchat Video Size on Filmora
- Importing Media File to Filmora
Using the ‘Import’ menu, import your media files, or simply drag and drop them from your Mac OS. Once the files are in the software, drag them to the Timeline track.
- Cropping Your Video for Snapchat
Here you can use the ‘Crop and Zoom’ button from the Timeline by right-clicking on it, so you can only focus on the aspect of the video that you want to show. This will resize the video as well.
- Cutting the Video
Another option you have is to delete the unnecessary parts of the video by selecting them through the indicator present on the timeline. Once you have selected the parts you don’t need, right-click on them and select ‘Delete’.
- Exporting Your Snapchat Video
Once you have resized your video by cropping and cutting the media file, you can now export it in the right resolution, bit rate, and format to ensure you get the minimum file size.
Liza Brown
Liza Brown is a writer and a lover of all things video.
Follow @Liza Brown
Liza Brown
Oct 26, 2023• Proven solutions
How to create a video best fit Snapchat? With more than 240 million active daily users, Snapchat is one of the most popular social media networks globally. It is also an instant messaging app that allows its users to express themselves visually in a diverse variety of manners including photos, videos, stories, stickers, emoji, and more.
One of the best features of Snapchat that makes it so attractive among the young audience is its mobile-oriented user interface. Snapchat was the first social networking platform to introduce the concept of daily stories which was widely adopted by other instant messengers as well including Instagram and WhatsApp. Since it is a mobile-oriented platform, you need to create and edit your videos in a certain way to make sure they are the best fit for Snapchat.
You May Also Like: The Ultimate Guide of Snapchat Filters
What Are the Ideal Features of a Snapchat Video?
Snapchat is highly optimized for vertical viewing which means that all the content needs to be served in portrait aspect ratio instead of landscape used by YouTube and other video platforms. You need to ensure that every aspect of your video is perfect before you can upload it for Snapchat on Mac. Here are some of the key features that you must not forget.
- Resolution - The ideal resolution of a Snapchat video is 1080 x 1920 pixels which is known as full HD. This resolution will ensure that your video loads in the right way and remains sharp and crisp for an excellent viewing experience.
- Video Format - The recommended video format for Snapchat clips is MP4 and MOV. You can use either of those formats on your Mac.
- Aspect Ratio - This is one of the key aspects of any video that determines the orientation of viewing. For a perfect Snapchat video, it is recommended that you keep the aspect ratio to 9:16.
- Video Length Size - Remember that Snapchat isn’t like YouTube and serves an audience that wants micro-entertainment. This is why the recommended time for your video is 3 to 10 seconds with the video size not exceeding 32 MB. Otherwise, the Snapchat audience may not respond well to your videos.
That is why it is crucial that your Snapchat video has all the ideal features so your audience can enjoy the viewing experience as intended instead of attempting to manipulate their phones to be able to see the video clearly. It will create an unpleasant and frustrating experience and your viewers might not stay with you.
How to Adjust the Video for Snapchat on Mac? [Step-by-Step]
- Part1. Changing Snapchat Video Format on Filmora
- Part2. Changing Snapchat Video Aspect Ratio on Filmora
- Part3. Changing Snapchat Video Size on Filmora
If your video doesn’t have the ideal features for Snapchat uploading, you don’t need to worry. You can easily edit your video on Filmora X to adjust everything including the aspect ratio, size, and format.
Part1. Changing Snapchat Video Format on Filmora
- Importing Video
The first step is to import the video using the option ‘Import Media Files’ in the import tab. You can also drag and drop the media files you need to work on.
- Selecting the Right Output Format
Once you have imported the file, drag and drop it onto the Timeline. Now click on the ‘Export’ button. Here you will be able to select your output video format which needs to be either MOV or MP4.
- Exporting Your Snapchat Video
After you have defined the settings, you can click on the ‘Export’ button to start the saving process. Your video is now available to you in the right format.
Part2. Changing Snapchat Video Aspect Ratio on Filmora
You can use multiple methods to change the aspect ratio of your Snapchat video on Filmora. It depends on the nature of editing you need to perform on your video. You can choose from any of the methods given below to edit your video for Snapchat in a user-friendly manner on Mac.
● Method 1 - Launch the editor and click on the drop-down list. You will see the popular aspect ratios listed in the list from where you can choose any. Select the right one that is 9:16 for Snapchat and export the file right away.
● Method 2 - The second method you can use is present under the Project Settings. You can also lock the aspect ratio using the features available here.
● Method 3 - The third method allows you to change the aspect ratio manually during the video editing process. You need to right-click on the timeline and select the ‘Crop and Zoom’ option. You will see a pop-up window where all the popular options will be available to you. You can choose either of them or select an aspect ratio manually.
● Step 4 - The final method to change the aspect ratio of your video on Mac is at the time of exporting your media file. Here you can select the aspect ratio for your local computer, a particular device, YouTube, or DVD TV.
Part3. Changing Snapchat Video Size on Filmora
- Importing Media File to Filmora
Using the ‘Import’ menu, import your media files, or simply drag and drop them from your Mac OS. Once the files are in the software, drag them to the Timeline track.
- Cropping Your Video for Snapchat
Here you can use the ‘Crop and Zoom’ button from the Timeline by right-clicking on it, so you can only focus on the aspect of the video that you want to show. This will resize the video as well.
- Cutting the Video
Another option you have is to delete the unnecessary parts of the video by selecting them through the indicator present on the timeline. Once you have selected the parts you don’t need, right-click on them and select ‘Delete’.
- Exporting Your Snapchat Video
Once you have resized your video by cropping and cutting the media file, you can now export it in the right resolution, bit rate, and format to ensure you get the minimum file size.
Liza Brown
Liza Brown is a writer and a lover of all things video.
Follow @Liza Brown
Quick Guide: Integrating Snap Camera with Teams
The trend of using vibrant filters and lenses during the pandemic time was first introduced by Snap Camera. There are various popular filters in the Snap Camera app that indulges people in creating captivating avatars. Moreover, people also use this popular app to enhance their visual presence in virtual conferences. You can apply unique filters or lenses through the Snap Camera app to make funny virtual meetings with friends.
This article will address how to properly download and launch the Snap Camera app. Moreover, you can also learn to link the Snap Camera on Microsoft Teams easily.
Part 1: How To Download Snap Camera on Your PC or Mac?
Snap Camera is a popular app that can change your visual appearance on many platforms. For instance, you can use the Snap Camera app on Skype, Microsoft Teams, Google Meetings, etc. This app offers attractive lenses and filters that can make your facial appearance interesting. To conduct a casual meeting with your friends, you can use the webcam of Snap Camera. The Snap Camera’s webcam lets you greet your friends or colleagues in a unique manner.
In this section, we will provide you with the exact system requirements of the Snap Camera. Also, we will guide you on how to install and launch the Snap Camera tool on your Windows or Mac device easily.
System Requirements of Snap Camera
- Required Operating System: Windows 10 (64 bit) or latest; macOS 10.13 or latest
- Minimum Hardware Requirements: Minimum of Intel Core i3 2.5Ghz or AMD FX 4300 2.6Ghz with 4 GB RAM / Intel HD Graphics 4000 / Nvidia GeForce 710 / AMD Radeon HD 6450 / Screen Resolution of 1280 x 768 or higher
Steps to Install and Launch Snap Camera on Windows or Mac
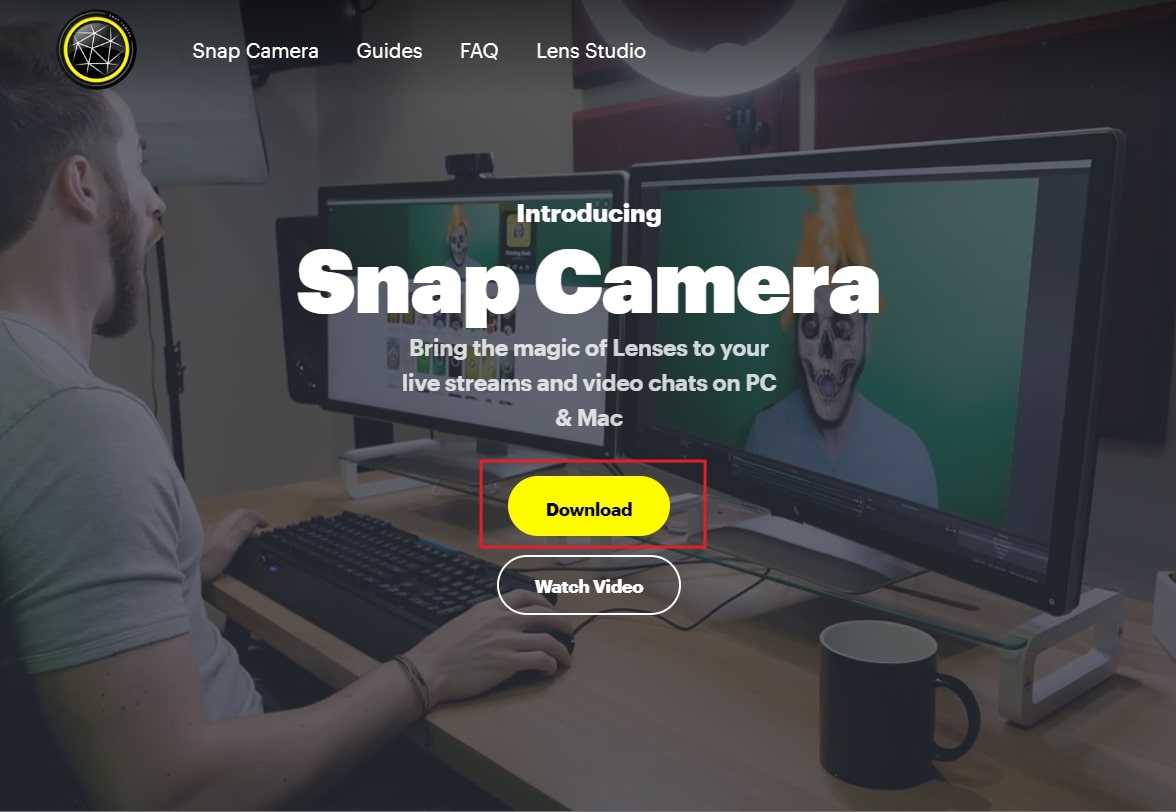
Step1 Visit the official website of Snap Camera and tap on the “Download” button. This will open a new page on your computer’s screen.
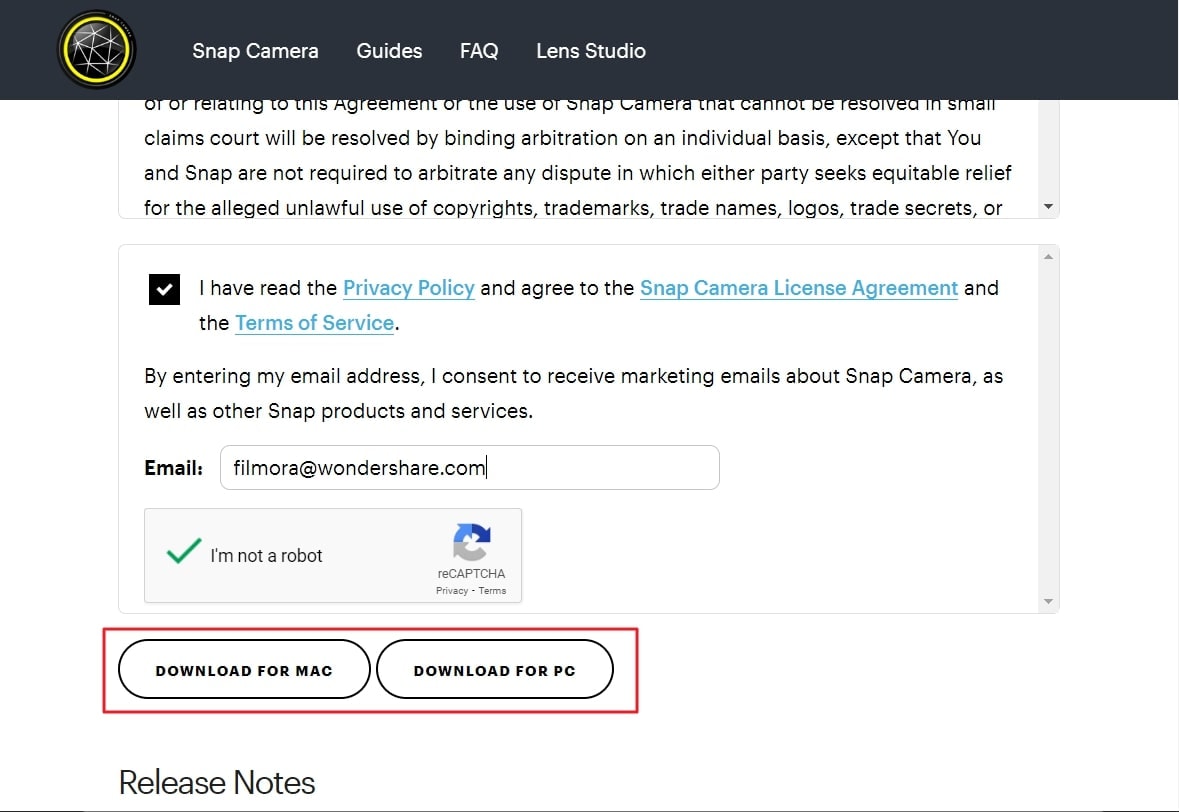
Step2 Click the “I agree” button and tap on the “I’m not a robot” option. Afterward, enter your email address in the given box.

Step3 Afterward, click either “Download for Mac” or “Download for PC,” depending on your need. Wait until the installer file gets downloaded on your computer completely. After that, double-click on the .exe file to install the Snap Camera for Microsoft Teams app.
Part 2: How To Set up Snap Camera on your PC
Do you want to set up the Snap Camera for Microsoft Teams on your computer? The setup process of the Snap Camera app is simple to follow. First, download the Snap Camera app on your computer successfully. Once done with launching the Snap Camera app, follow the below instructions:
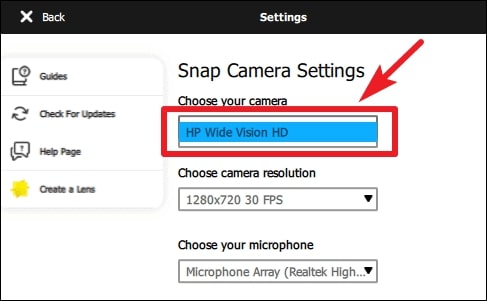
Step1 After opening the Snap Camera app, click on the “Gear” icon. This will open the Settings of the Snap Camera.
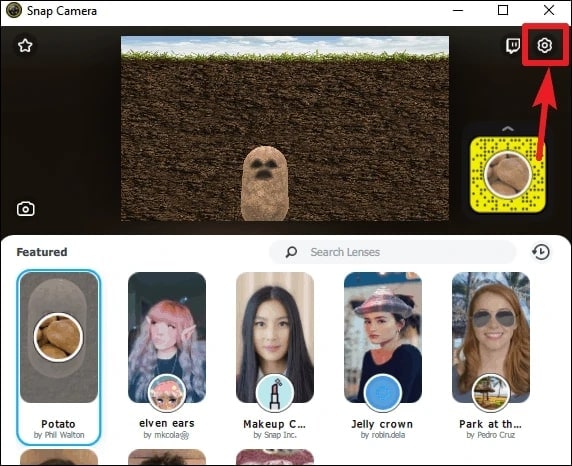
Step2 In Snap Camera Settings, head to the “Choose your Camera” option. Here, choose your desktop’s webcam to proceed. Afterward, select a filter on the app you want to apply during your virtual meeting.
Step3 Now, you can utilize the Snap Camera app on Microsoft Teams. For this, open the Microsoft Teams app after setting up the Snap Camera on your PC.
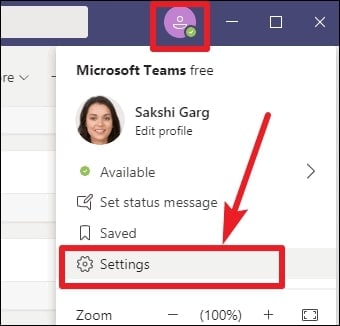
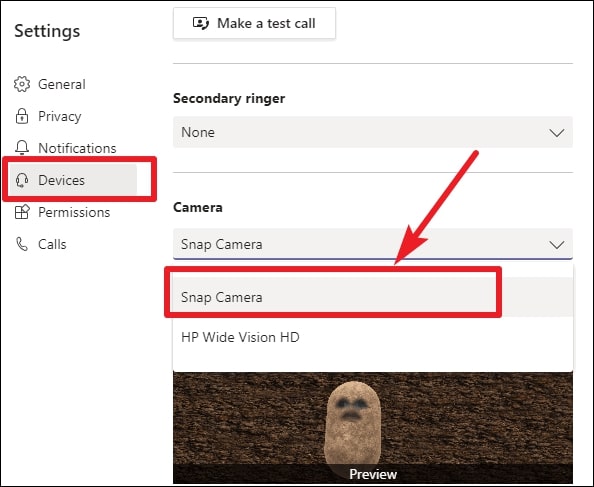
Step4 On your Microsoft Teams, tap on the “Profile” icon. Select “Settings” and tap on “Devices” from the left section. Afterward, scroll to the bottom until you can locate the “Camera” section.
Step5 Under the Camera section, choose “Snap Camera” from the list. Thus, you conduct a virtual meeting using the Snap Camera for Microsoft Teams webcam and applied filters.
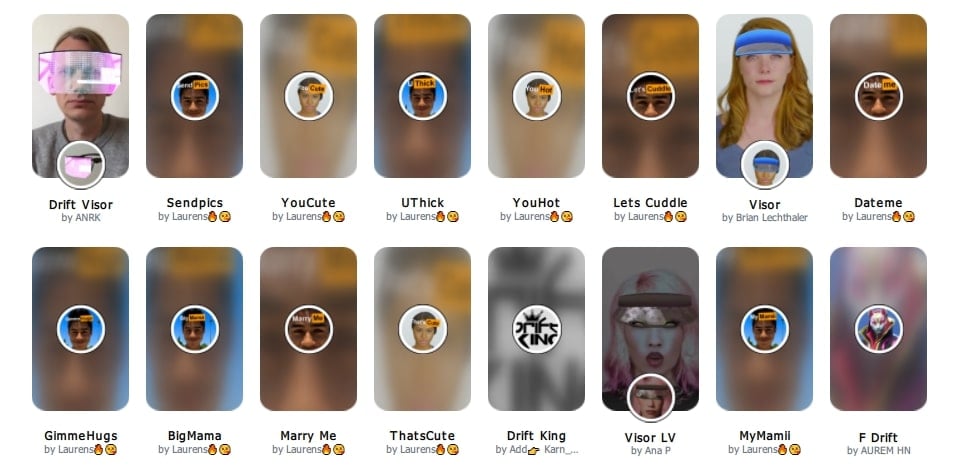
Part 3: Recommending Popular Snap Camera Filters
Do you want to try the trending filters of Snap Camera for Microsoft Teams? Read this part to discover the exciting filters that are exclusively provided in the Snap Camera tool:
1. Potato
This unique filter can be used to describe a funny situation in the form of a potato cartoon.

2. Invisible Person
This filter is for you if you want to highlight your presence by getting invisible!

3. Baby
Do you want to take the sympathies of your colleagues? Try this filter to make a baby face to prevent yourself in vulnerable situations.

4. Snorkle
Are you the one who is always punctual in attending the virtual meetings? This filter can describe your dedication to the team’s goals.

5. Drift Visor
Drift Visor is a vibrant filter that can be used by IT experts. If you are a technical expert, use this filter during virtual meetings.
Conclusion
Snap Camera is an advanced app that functions in altering the visual look. Using this app, you can try a different look in virtual sessions flawlessly. You can eliminate your facial flaws by applying the offered lenses and filters from the Snap Camera. This article taught you how to set up the Snap Camera on Microsoft Teams easily. If you are willing to use the Snap Camera app during your Zoom and Google Meet meetings, you can read their respective guides.
Free Download For Win 7 or later(64-bit)
Free Download For macOS 10.14 or later
Free Download For macOS 10.14 or later
Also read:
- [New] 2024 Approved Charting the Course to Trending YouTubers
- [New] In 2024, Audiovisual Symphony Adding Music to Your YouTube Masterpieces
- [New] In 2024, Revolutionize Your Snapchat Experience A Compendium of Over 120 Innovative Story Titles
- [New] Unveiling the Simple Path to Video Conversations on Snapchat
- [Updated] 2024 Approved The Ultimate List of Effective Snapchat Techniques
- [Updated] 2024 Approved Unravel Time The Art of Snapchat Video Reverse
- [Updated] Effortlessly Post Videos on YouTube with Our Expert Guide for 2024
- [Updated] How To Keep Up the Snapstreak Game
- [Updated] Secret ScreenSnapper's Guide Discreet Techniques for Photo-Taking
- Finden Sie Verschobene Dateien in Windows 10 Wieder: Schnelllösungen Und Tipps
- In 2024, A Perfect Guide To Remove or Disable Google Smart Lock On Huawei Nova Y91
- In 2024, How to Change Oppo Find N3 Flip Location on Skout | Dr.fone
- In 2024, How To Unlock SIM Cards Of Tecno Pova 5 Without PUK Codes
- In 2024, Streamline Your Projects Expert Techniques for Mac DVD Creation
- Revisiting Your Secret Snap Archive for 2024
- Title: [Updated] 2024 Approved Maximize Your Snapchat Impact with Mac Footage
- Author: Scott
- Created at : 2024-12-30 17:24:47
- Updated at : 2025-01-04 17:04:32
- Link: https://snapchat-videos.techidaily.com/updated-2024-approved-maximize-your-snapchat-impact-with-mac-footage/
- License: This work is licensed under CC BY-NC-SA 4.0.