![[Updated] 2024 Approved Harnessing Microsoft Teams' Power with Simple Snap Camera Use](https://thmb.techidaily.com/e849b3433ae861a98a41e422ed19bb8502406c23628dc5175ac052fdfbe1c181.jpg)
"[Updated] 2024 Approved Harnessing Microsoft Teams' Power with Simple Snap Camera Use"
Harnessing Microsoft Teams’ Power with Simple Snap Camera Use
The trend of using vibrant filters and lenses during the pandemic time was first introduced by Snap Camera. There are various popular filters in the Snap Camera app that indulges people in creating captivating avatars. Moreover, people also use this popular app to enhance their visual presence in virtual conferences. You can apply unique filters or lenses through the Snap Camera app to make funny virtual meetings with friends.
This article will address how to properly download and launch the Snap Camera app. Moreover, you can also learn to link the Snap Camera on Microsoft Teams easily.
Part 1: How To Download Snap Camera on Your PC or Mac?
Snap Camera is a popular app that can change your visual appearance on many platforms. For instance, you can use the Snap Camera app on Skype, Microsoft Teams, Google Meetings, etc. This app offers attractive lenses and filters that can make your facial appearance interesting. To conduct a casual meeting with your friends, you can use the webcam of Snap Camera. The Snap Camera’s webcam lets you greet your friends or colleagues in a unique manner.
In this section, we will provide you with the exact system requirements of the Snap Camera. Also, we will guide you on how to install and launch the Snap Camera tool on your Windows or Mac device easily.
System Requirements of Snap Camera
- Required Operating System: Windows 10 (64 bit) or latest; macOS 10.13 or latest
- Minimum Hardware Requirements: Minimum of Intel Core i3 2.5Ghz or AMD FX 4300 2.6Ghz with 4 GB RAM / Intel HD Graphics 4000 / Nvidia GeForce 710 / AMD Radeon HD 6450 / Screen Resolution of 1280 x 768 or higher
Steps to Install and Launch Snap Camera on Windows or Mac
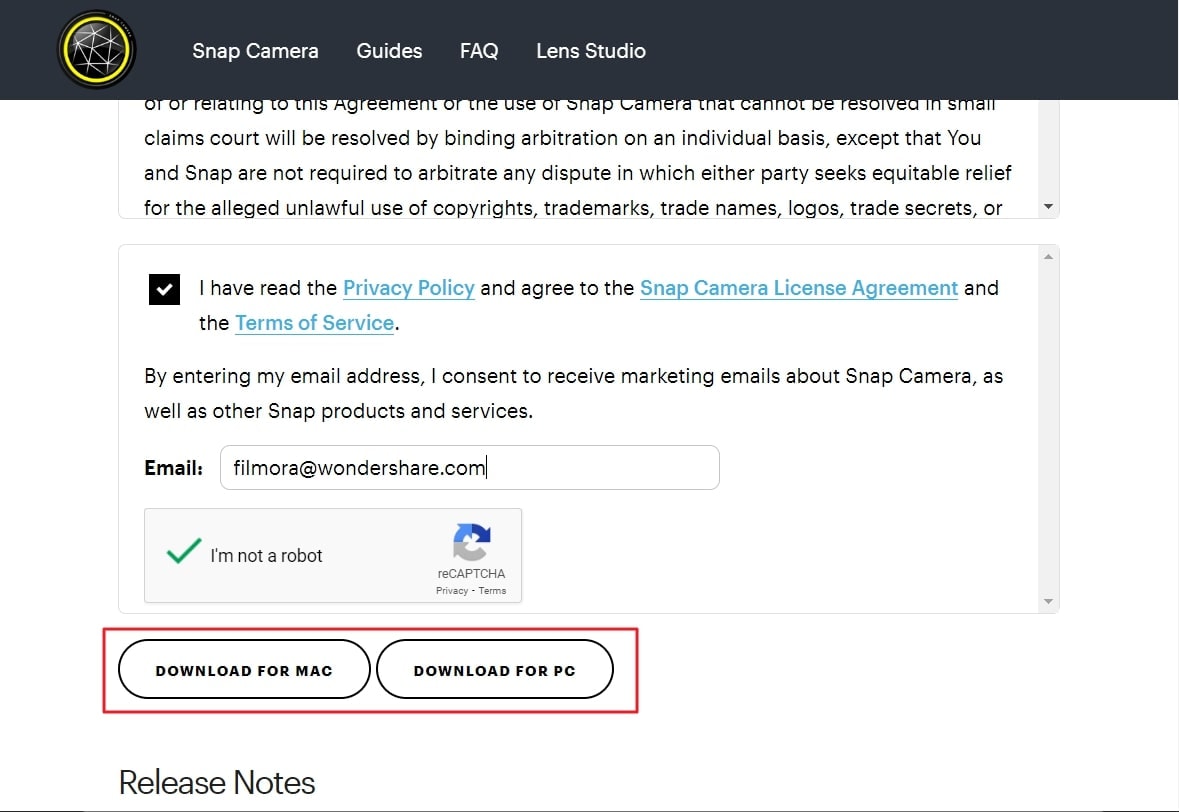
Step1 Visit the official website of Snap Camera and tap on the “Download” button. This will open a new page on your computer’s screen.

Step2 Click the “I agree” button and tap on the “I’m not a robot” option. Afterward, enter your email address in the given box.

Step3 Afterward, click either “Download for Mac” or “Download for PC,” depending on your need. Wait until the installer file gets downloaded on your computer completely. After that, double-click on the .exe file to install the Snap Camera for Microsoft Teams app.
Part 2: How To Set up Snap Camera on your PC
Do you want to set up the Snap Camera for Microsoft Teams on your computer? The setup process of the Snap Camera app is simple to follow. First, download the Snap Camera app on your computer successfully. Once done with launching the Snap Camera app, follow the below instructions:
Step1 After opening the Snap Camera app, click on the “Gear” icon. This will open the Settings of the Snap Camera.
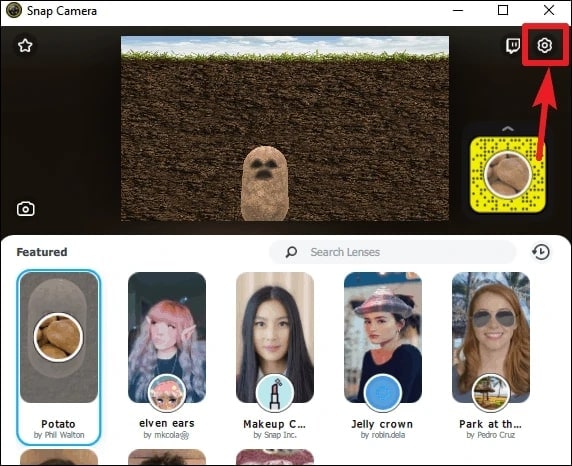
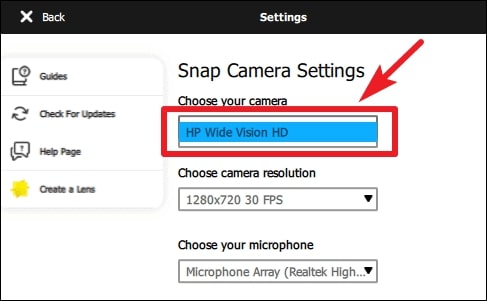
Step2 In Snap Camera Settings, head to the “Choose your Camera” option. Here, choose your desktop’s webcam to proceed. Afterward, select a filter on the app you want to apply during your virtual meeting.
Step3 Now, you can utilize the Snap Camera app on Microsoft Teams. For this, open the Microsoft Teams app after setting up the Snap Camera on your PC.
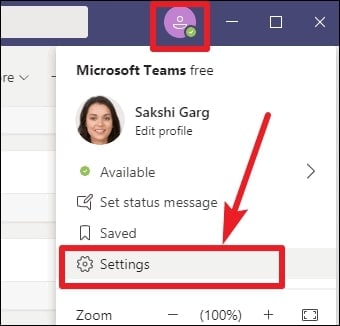
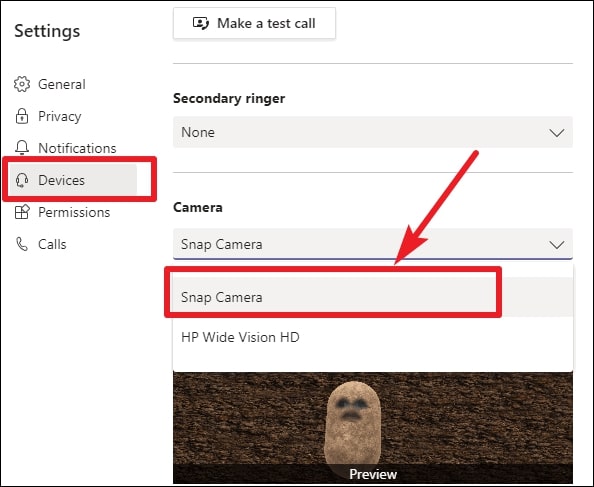
Step4 On your Microsoft Teams, tap on the “Profile” icon. Select “Settings” and tap on “Devices” from the left section. Afterward, scroll to the bottom until you can locate the “Camera” section.
Step5 Under the Camera section, choose “Snap Camera” from the list. Thus, you conduct a virtual meeting using the Snap Camera for Microsoft Teams webcam and applied filters.
Part 3: Recommending Popular Snap Camera Filters
Do you want to try the trending filters of Snap Camera for Microsoft Teams? Read this part to discover the exciting filters that are exclusively provided in the Snap Camera tool:
1. Potato
This unique filter can be used to describe a funny situation in the form of a potato cartoon.

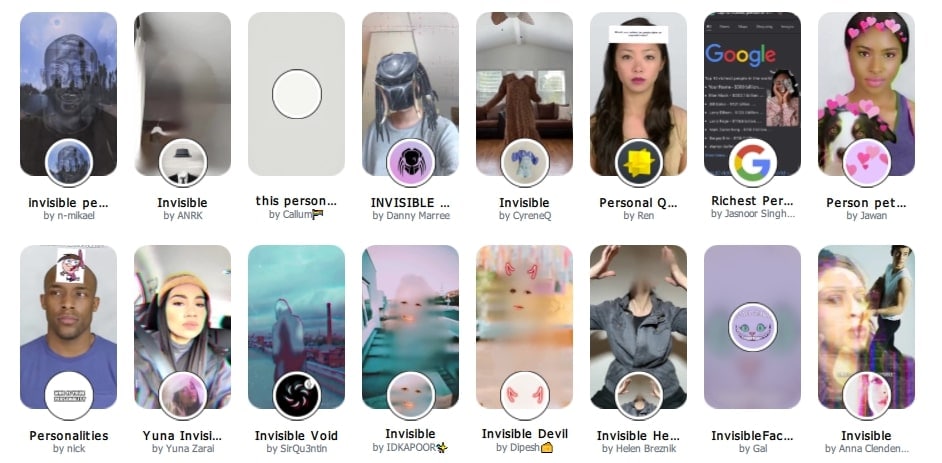
2. Invisible Person
This filter is for you if you want to highlight your presence by getting invisible!
3. Baby
Do you want to take the sympathies of your colleagues? Try this filter to make a baby face to prevent yourself in vulnerable situations.

4. Snorkle
Are you the one who is always punctual in attending the virtual meetings? This filter can describe your dedication to the team’s goals.

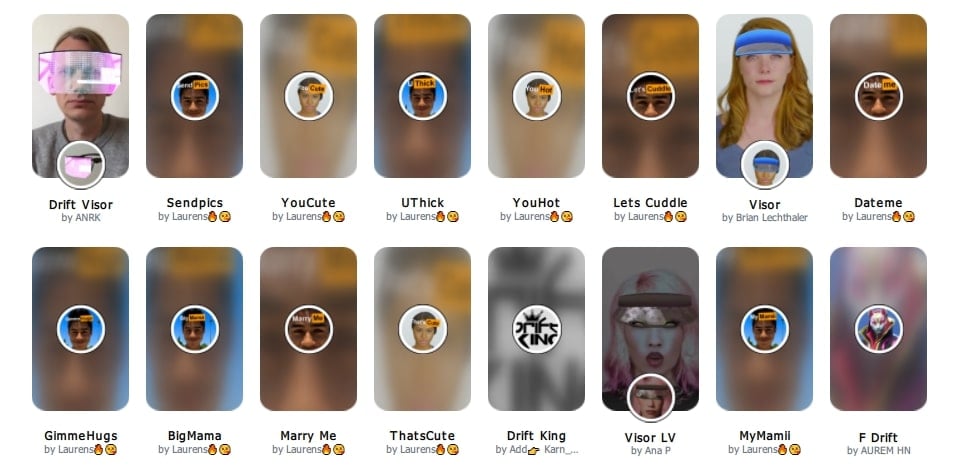
5. Drift Visor
Drift Visor is a vibrant filter that can be used by IT experts. If you are a technical expert, use this filter during virtual meetings.
Conclusion
Snap Camera is an advanced app that functions in altering the visual look. Using this app, you can try a different look in virtual sessions flawlessly. You can eliminate your facial flaws by applying the offered lenses and filters from the Snap Camera. This article taught you how to set up the Snap Camera on Microsoft Teams easily. If you are willing to use the Snap Camera app during your Zoom and Google Meet meetings, you can read their respective guides.
Free Download For Win 7 or later(64-bit)
Free Download For macOS 10.14 or later
Free Download For macOS 10.14 or later
Elevate Every Moment: Mastering Snapchat Photo Edits
Since its inception in 2011, Snapchat has steadily evolved into one of the best social media platforms over time, with over 347 million daily active users today. And it’s not just millennials who are using the app - Snapchat is popular with people of all ages.
But have you ever wondered and thought about how people get those amazing images on Snapchat? Well, wonder no more! In this article, we’re going to show you how to edit photos on Snapchat so that you can make them look even better!

Therefore, without any further delay, let’s dive in!
Part 1. What are Snapchat’s Image Editing Tools?
If you desire to add some extra flair to your photos, Snapchat’s image editing tools are a great way to do it. These tools let you add filters, stickers, and other effects to your photos and videos.
Snapchat photo editing tools are easy-to-use and can help you turn dull pictures into something fun and interesting. You can even edit images that were not originally taken on Snapchat.
Want to know how? Keep reading to find out what is behind the curtain!
Part 2. How to Edit Pictures Taken from the Camera Roll
Have you taken a photo but don’t think it’s worth sharing with the public and want to edit it? Don’t worry; Snapchat has got you covered!
A Quick Guide:
- How to Add Pictures from Your Camera Roll to Snapchat
- How To Edit Photos On Snapchat
- How To Add Stickers To Your Images?
- How to Use the Snapchat Text Tool
- How to Draw on your Images
- How To Add A Theme
- How To Attach A URL
- How To Crop Images On Snapchat
- How to Set a Time Limit
How to Add Pictures from Your Camera Roll to Snapchat
Here’s a quick rundown of how to add pictures from your camera roll to Snapchat:
Step1 Open the Snapchat app on your device and tap the “Two Overlayed Pictures” icon beside the Camera button.

Step2 This will take you to Memories. Click the Camera Roll tab, scroll the pictures to add the one you want, and tap it.

Step3 Now, you can send the picture to your friends, add it to your story, or edit it to create a masterpiece.
How To Edit Photos On Snapchat
Now that you’ve added your picture from the Camera roll, follow the steps below to edit it using the Snapchat image editing tools:
Step1 Click the Edit icon at the bottom-right of the selected picture. To add text, click the T icons, type whatever you want, select color by dragging the icon in the color pane and add the text style.

Step2 If you want to draw something on your picture, use the pencil icon. The draw function offers color panes, an emojis pen, and a color picker.
Step3 You can also use the Scissor icon to cut a portion of your picture and create a sticker or add a URL to your image using the paperclip icon.
Step4 To set a time limit on your snap, click the Clock icon and set the limit. Finally, tap the Done icon to save a copy of the photo, or use the Export icon to share your picture on other social media platforms.
How To Add Stickers To Your Images?
To create your own or add a premade sticker to your picture, do the following steps in sequence:
Step1 Tap the paper icon to the right side of your selected picture. This will take you to the Snapchat stickers library.
Step2 Since the stickers are placed in different categories, including recently used, popular, Bitmojis, etc., swipe right/left to get to the desired page.
Step3 Next, swipe up and down to find the sticker you want and tap it to add to your picture. To know more about Snapchat filters, read “Top 20 Snapchat Filters & Lenses to Make Your Snaps Special .”

How to Use the Snapchat Text Tool
Want to add a caption or something interesting to your picture? With the following steps, you can easily add any text to your photos while editing them on Snapchat:
Step1 Tap the “T” icons at the top-right side of the screen to open the Text tool.
Step2 Type your text and use the font gallery to change the text style. Tap the Align option to set the alignment of your text.
Step3 Next, use the color meter to change the font color. Tap the white icon on the color bar and drag it to select your preferred color. Finally, tap the Back icon at the top-left of the screen to apply the text.

How to Draw on your Images
Snapchat comes with a drawing tool that you can use to add a personal touch to your photos or create fun and unique designs in the following way:
Step1 On your selected picture, tap the Pencil icon to open the drawing tool. Drag your finger on the Color meter to select the color.
Step2 Tap the Color wheel to change the color palette and then choose the color you want. To draw emojis on your picture, tap the Emoji icon and select the one you want to use.
Step3 Finally, use your finger to draw on the picture. You can use the Undo icon to take back any action that goes wrong.

How To Add A Theme
Adding a theme to your images on Snapchat is a great way to add some personality and style. Here’s how you can do this:
Step1 Tap the Paintbrush icon from the Snapchat editing tools at the left of your picture.
Step2 Search for the theme using the Search box or scroll up and down to find the one you like.
Step3 Select the theme you want and tap on it to add to your photo. Keep in mind that Snapchat only adds themes to the original images, not from the Camera Roll.
How To Attach A URL
Do you want to share a clickable website URL on your story to help your audience know the true meaning and concept behind the image? The Snapchat URL tool can help you!
Here’s a quick and easy breakdown of the steps to attach a URL to your pictures:
Step1 On your selected picture, click the Paperclip icon to launch the URL tool.
Step2 Type your URL in the search field, and tap Enter on your keyboard.
Step3 Snapchat will open the website for your review. Tap the “Attach to Snap” option and adjust the link on your picture.
How To Crop Images On Snapchat
The following steps can help your crop images on Snapchat:
Step1 Tap the Crop icon below the Paperclip option on your selected picture.
Step2 Use your fingers to adjust the picture size and remove unwanted areas. You can also use the Rotation icon to rotate your image.
Step3 Finally, tap the blue Check icon to save your cropped image.

If you want to learn how to zoom your videos or images on Snapchat, click here to find out!
How to Set a Time Limit
You can set a time limit on your photo to limit their visibility while editing it on Snapchat. To do so, follow the below instructions step-by-step:
Step1 To set the time limit on your picture, tap the Clock icon from the Snapchat photo editing tools on the right side of the screen.
Step2 Swipe up and down to select the time limit and tap it.
Step3 Finally, tap the Clock icon at the top right side of the screen to apply the time limit.

Part 3. How to Save Snaps for Later Sharing
When you take a Snap, you can directly send it to your friends. But sometimes, you want to keep a Snap around for a while before sharing it. Maybe you want to edit it first, or you want to wait for the perfect moment to share it.
Whatever the reason, there are two scenarios in which you can save your Snaps for later sharing:
A Quick Guide:
Saving the Original Snapchat Pictures
Here’s how you can save the original Snaps as a Snapchat user:
Step1 Launch the Snapchat app and take a picture.
Step2 Tap the Save icon in the lower left-hand corner of the screen.
Step3 Tap the “Save image.”

Saving the Edited Camera Roll’s Pictures
Follow the instructions below to save your edited Camera Roll pictures on Snapchat:
Step1 Once you’ve edited your picture, tap the Done option.
Step2 Tap “Save as Copy,” and your picture will be saved to your gallery.
Step3 Alternatively, you can tap the Export option and select “Download” to save the image to your phone’s Gallery.
A Bonus Tips: How to Save Snapchat Videos with Apps on Android and Mac
Do you want to record your Snapchat stories like a movie or slideshow on Android or Mac? Well, you can save your Snapchat videos using apps or software programs.
For your Mac system, we recommend using Filmora - an easy-to-use video editing software with an excellent recording feature. With this tool, you can record the full screen, part of it, or a specific window on your system.
Free Download For Win 7 or later(64-bit)
Free Download For macOS 10.14 or later
For Android, download the AZ video recorder - an app that does not require any root access and lets you record your screen with a high resolution and frame rate. To learn more, click here!
Conclusion
In this article, we’ve explained how to edit photos on Snapchat with simple and easy-to-follow instructions. We’ve discussed adding stickers, text, URL, time limit, theme, and cropping the image to remove unwanted sections from it.
Hopefully, you’ll find this step-by-step guide helpful and can now use Snapchat photo editing tools without any issues.
Also read:
- [New] 2024 Approved Elevate Your Twitter Presence Essential Unfollowing Apps Guide
- [New] 2024 Approved Pitch Perfect How to Add Songs to Your Snapchat Content
- [New] In 2024, Prime Filters to Elevate Submerged Photography
- [New] In 2024, Snapchat Screen Recording Mobile Tips and Tricks
- [New] Masterclass Reclaiming Personal Eyes-Only Images for 2024
- [New] Your Essential Guide to Unblocking on Instagram
- [Updated] Behind-the-Scenes How to Flip Your Snaps
- [Updated] Elevate Snaps with Precision Boomerang Techniques
- [Updated] In 2024, A Visual Journey The Art of Editing with Snapchat Filters
- [Updated] Making History a Present - Using Camera Roll in Snaps for 2024
- Download & Install Intel HD/UHD Graphics Drivers on Windows 10/11
- Easily Manage Your Snapchat Video Speed for 2024
- Fixing the Issue: Why Your iPhone Won't Connect to iTunes on Windows 11
- How Can You Screen Record Snapchat on Mobile Phone for 2024
- How To Fix Unresponsive Phone Touchscreen Of Samsung Galaxy A14 5G | Dr.fone
- In 2024, Smart Strategies for Buying Economical GoPros
- In 2024, TikTok Audio Integrity Overcoming Silent Intervals in Videos
- Pathfinder: Wrath of the Righteous - Resolved: Fixes for Continuous Game Crashes
- Perfecting the Synergy of Visuals and Voiceovers in Videos for 2024
- Title: [Updated] 2024 Approved Harnessing Microsoft Teams' Power with Simple Snap Camera Use
- Author: Scott
- Created at : 2025-01-21 03:42:37
- Updated at : 2025-01-23 05:31:10
- Link: https://snapchat-videos.techidaily.com/updated-2024-approved-harnessing-microsoft-teams-power-with-simple-snap-camera-use/
- License: This work is licensed under CC BY-NC-SA 4.0.