![[Updated] 2024 Approved From Camera Roll to Screen Share Photos Fast and Simple](https://thmb.techidaily.com/dce6bc9a112b3f049356452f785b8eb72027385ba75d849bd9c5cf60929a80d0.png)
"[Updated] 2024 Approved From Camera Roll to Screen Share Photos Fast and Simple"
From Camera Roll to Screen: Share Photos Fast and Simple
Snapchat enables you to communicate with your friends in an engaging way. To send a normal snap to your friends, you need to take a live photo or video from the Snapchat camera. This may be out of your comfort zone to send normal live snaps every time.
This article will explain how to send a picture from your memories or camera roll as a normal snap. By using our recommended apps and methods, you can also hide that the sent picture is from the camera roll. Let’s dive into the details to learn how to send snaps from the camera roll.
Wondershare Filmora Easily Snapchat Videos on PC and Mac.
Free Download Free Download Learn More


![]()
How to Send a Snap from Memories/Camera Roll as a Snap
Are you tired of sending your live selfies as snaps to your friends? In this section, you can learn how to send snaps from the camera roll without capturing a live snap. For this, we will explain some manual methods as well as some reliable apps in a detailed manner.
Method 1: Using a Snapchat Filter
Snapchat allows you to apply its filters on any of your camera roll’s pictures. By selecting a particular photo or video from your memories or snap, you can instantly add a filter to them. Afterward, you can send the filtered image to your friends as a regular snap. However, this solution has a significant drawback that you must know. The limitation is that the receiver of the snap would be able to see that the sent picture is from the camera roll.
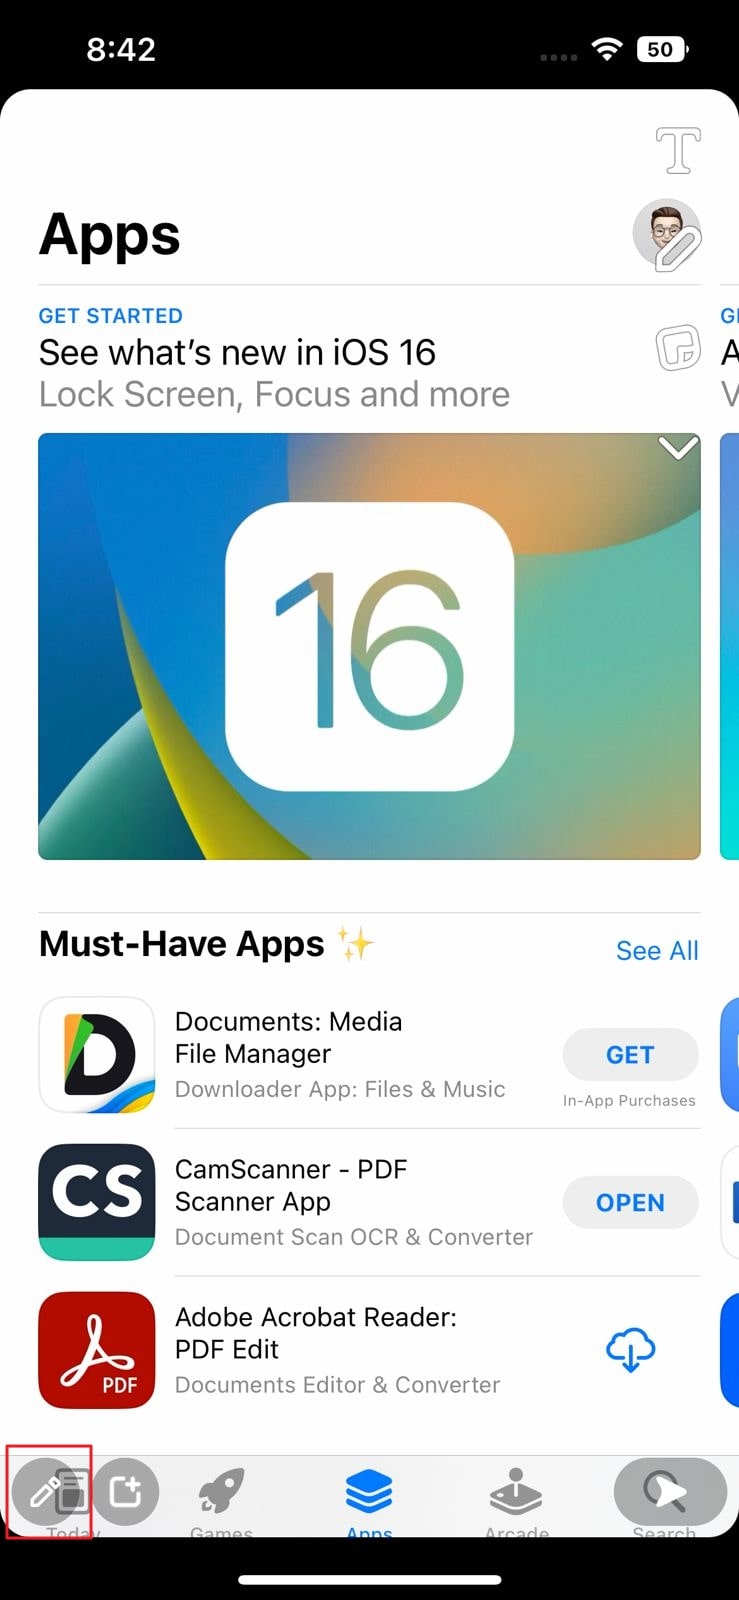
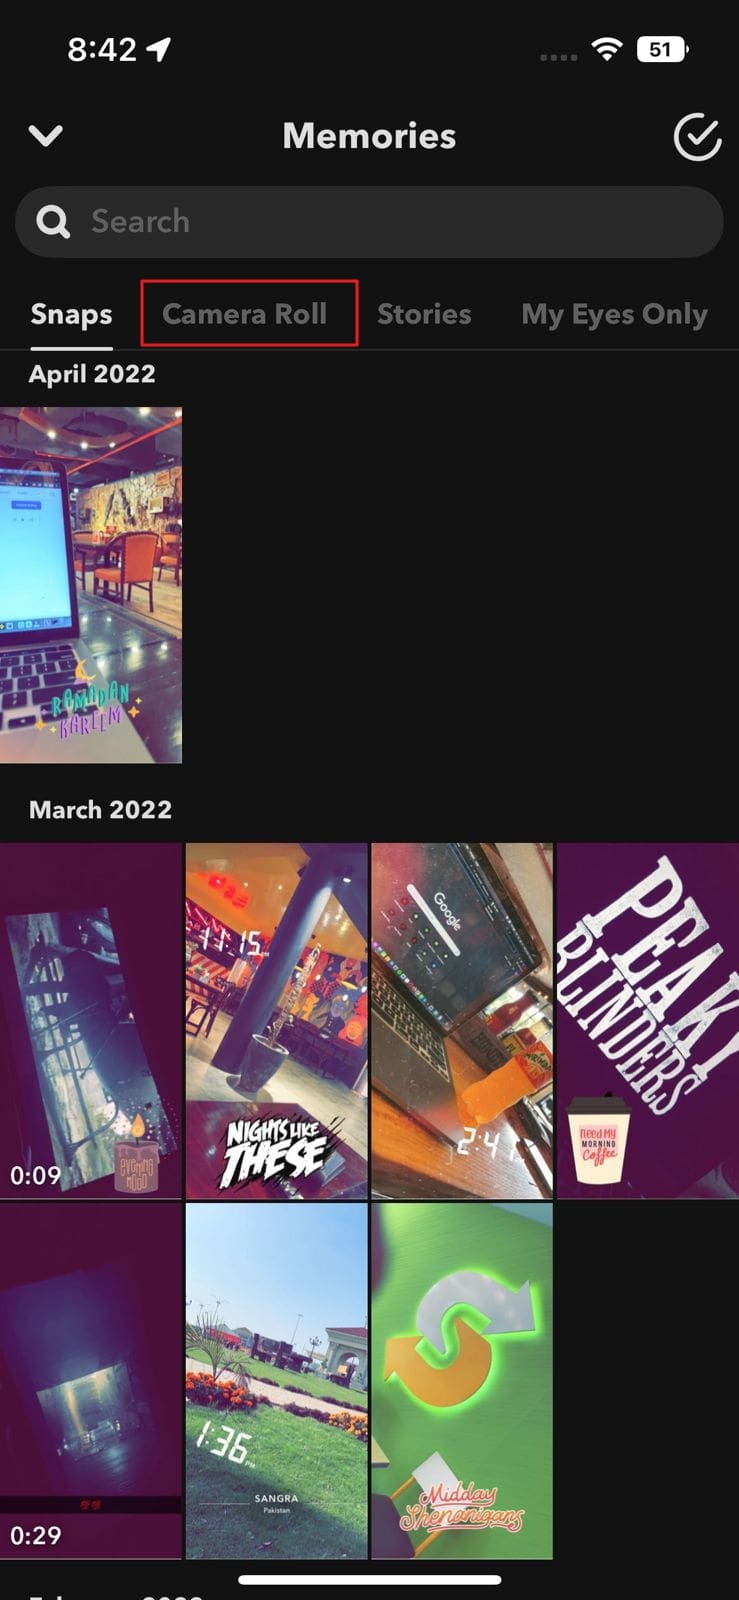
Step1 Open your Snapchat and swipe up to open the ‘Memories’. Go to your Camera Roll and select any particular picture from there.

Step2 After choosing a particular photo, tap on the “Edit“ icon at the bottom left corner. You can apply filters to the photo by swiping from right to left. Keep swiping until you can find your preferred filter.
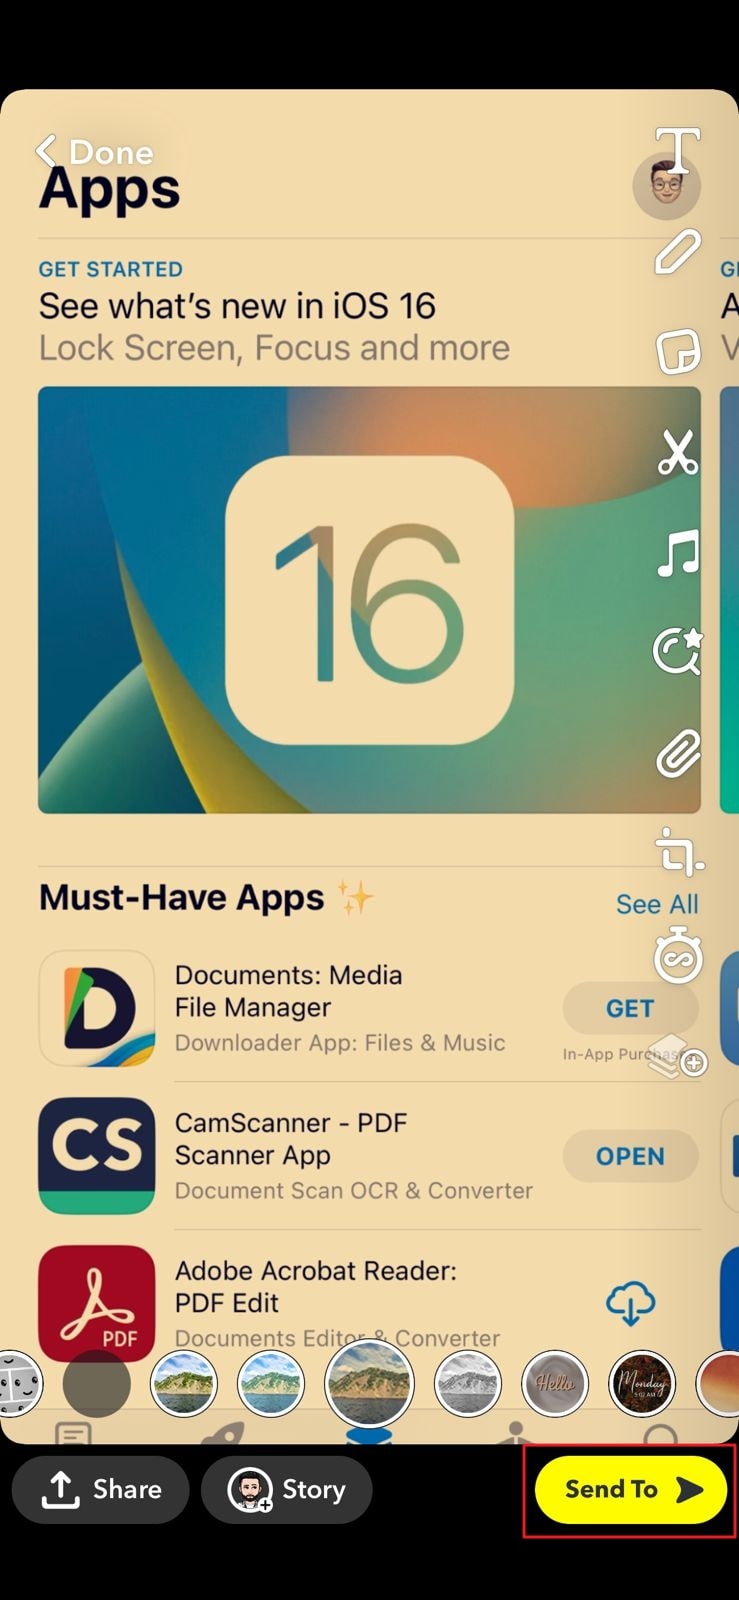
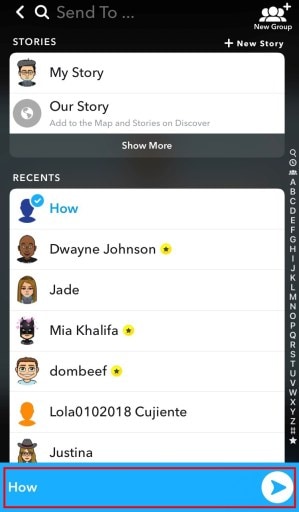
Step1 Once you have applied the filter to the photo, touch on the “Send To” button. Choose any Snapchat friend to whom you want to send the picture. Next, hit the “Send” icon again to send the photo successfully.
Method 2: Using a Sticker
If you want to make your camera roll picture funny and entertaining, you can add stickers to it. Through Snapchat, you can make your customized sticker of any interesting face or object. Moreover, Snapchat also offers a huge variety of built-in stickers. If you don’t want to create a customized sticker, you can easily add the built-in sticker with a single tap.
Step1 Once you have opened your Snapchat, go to Memories. From there, you can access and select any picture from the Camera Roll.
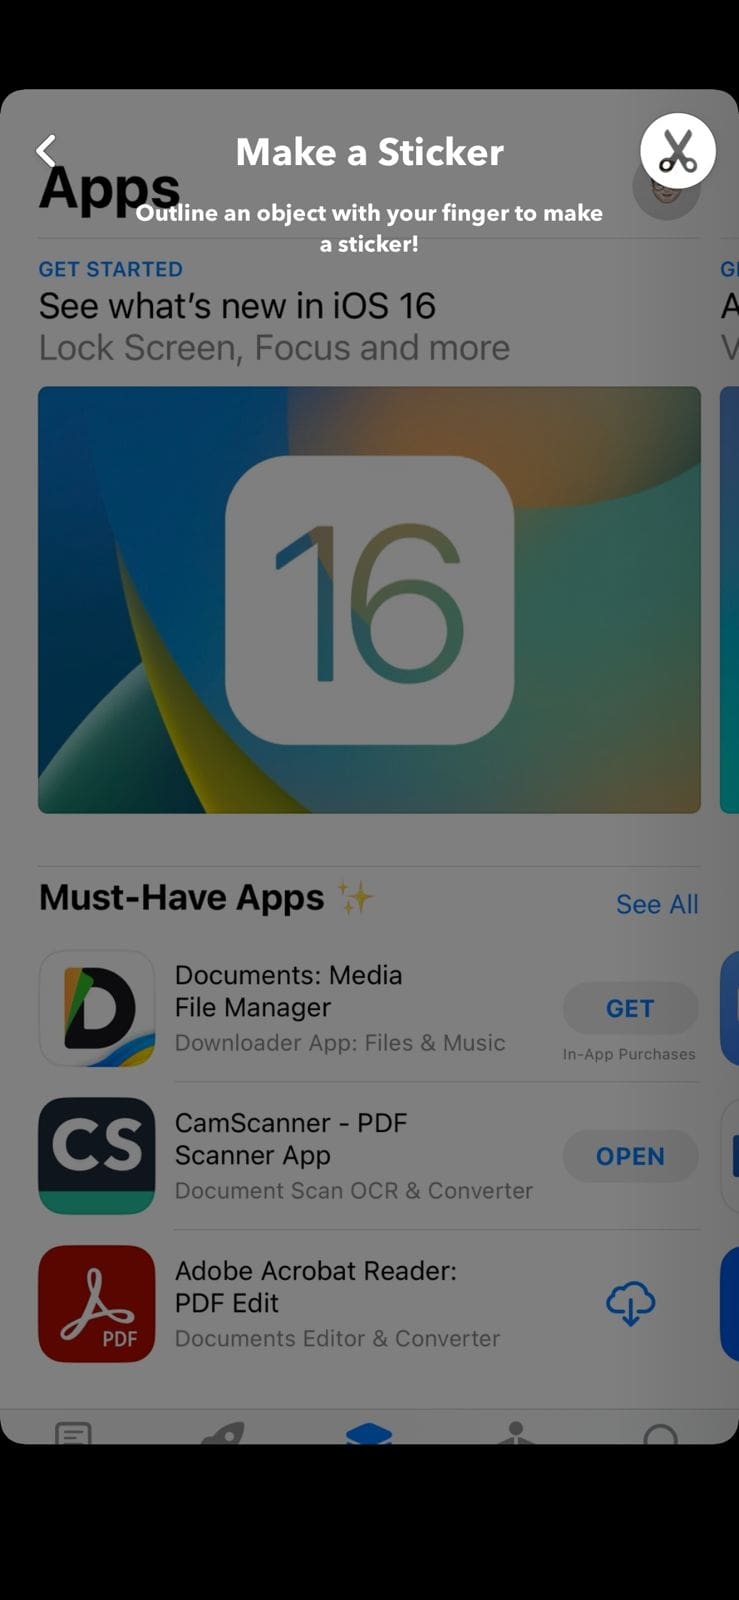
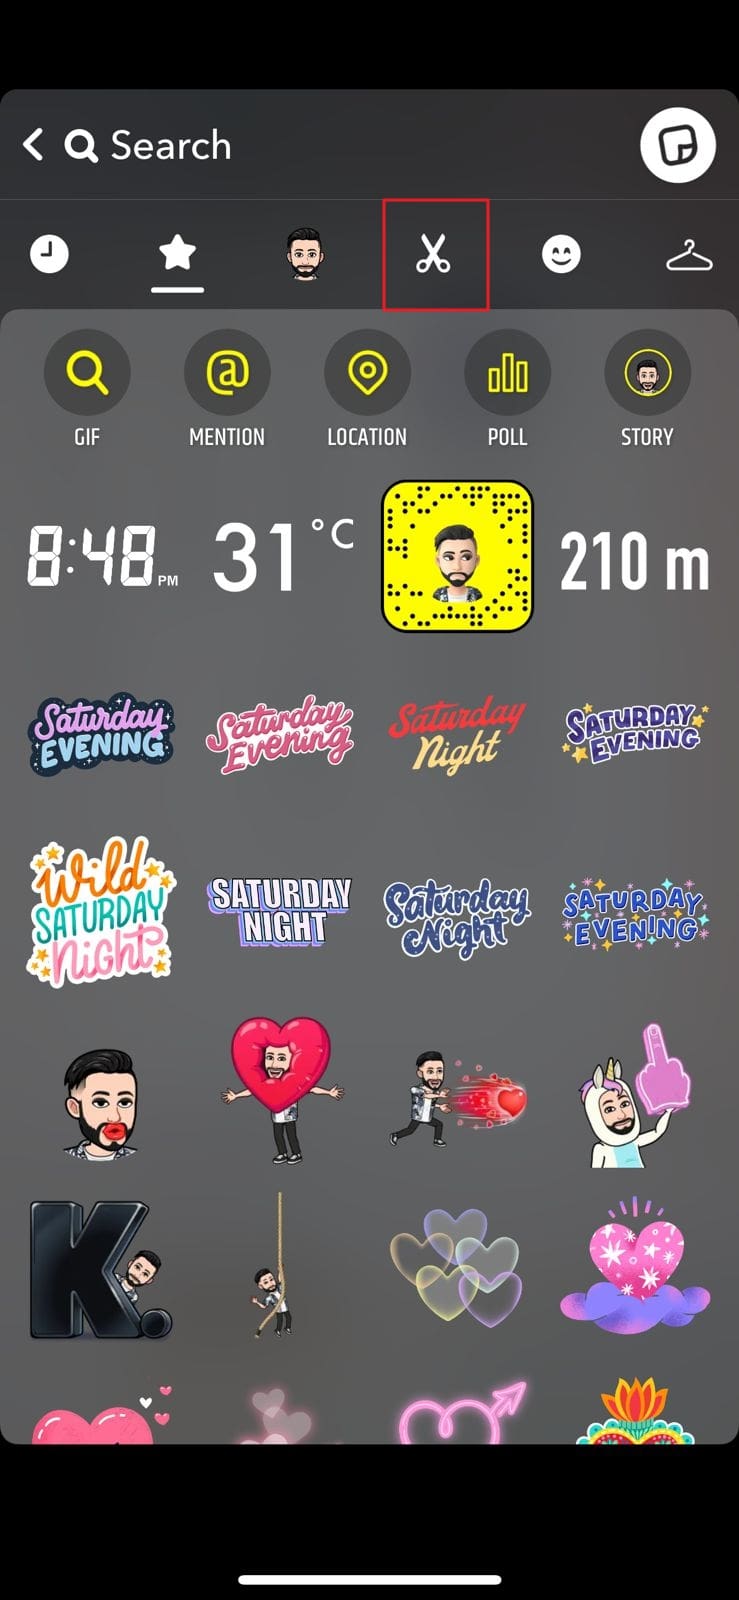
Step2 After selecting a specific picture from Camera Roll, tap on the “Pencil” icon at the bottom left corner to edit the photo. Afterward, select the “Scissor” icon from the right section. Using the Snapchat Scissor, you can create a sticker of any face or object you find interesting. Just select any area of the photo using your finger.
Step3 Now close the picture opened for creating the sticker. Once done, take a snap from your Snapchat to proceed. Now from the right section, tap on the “Sticker” icon. Here, you can choose the built-in stickers easily. Or you can navigate to the “Scissor” icon to select your created sticker.
Step4 Once done with adding and adjusting the sticker, hit the “Send To” button. Choose your preferred contact and tap on the “Send” icon again.
Method 3: Using the LMK App
Another efficient way to send a camera roll picture as a regular snap is by using a third-party app. LMK is a reliable social media platform that enables you to communicate with friends having similar interests. You can craft your profile by adding your interests and hobbies.
It helps people to create a safe and healthy community for enhanced communication. In this solution, we will guide you on how to send snaps from the camera roll using the LMK app. Through this app, you can send snaps to your friends without mentioning the camera roll.
Step1 Open your Snapchat either from your Android or iOS device. Proceed to the Memories section and select Camera Roll. Here, tap on any picture that you want to send.

Step2 Now hit the “Arrow” button to share the selected snap. From the displayed options, tap on the “Download” icon to save the picture on your device gallery.

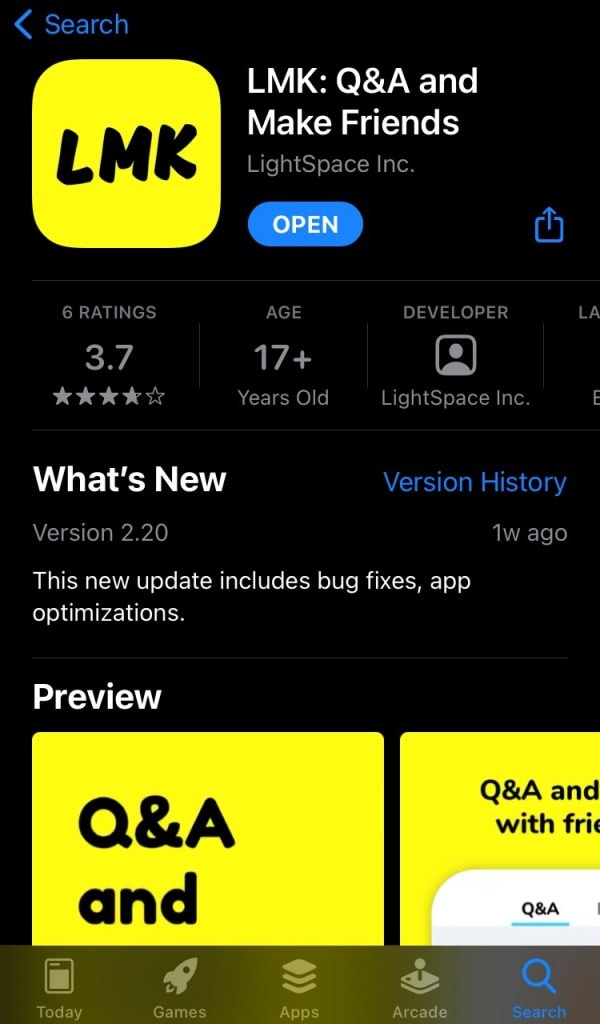
Step3 Now head to your Play Store or App Store according to the OS of your mobile device. From there, download the LMK app. After its complete installation, open this app using your Snapchat login.
Step4 On the LMK app, tap on the “Plus” icon to proceed. Afterward, tap on “Post” and hit the “Camera” icon from the bottom left side. Now choose the photo that you have recently saved in your gallery.

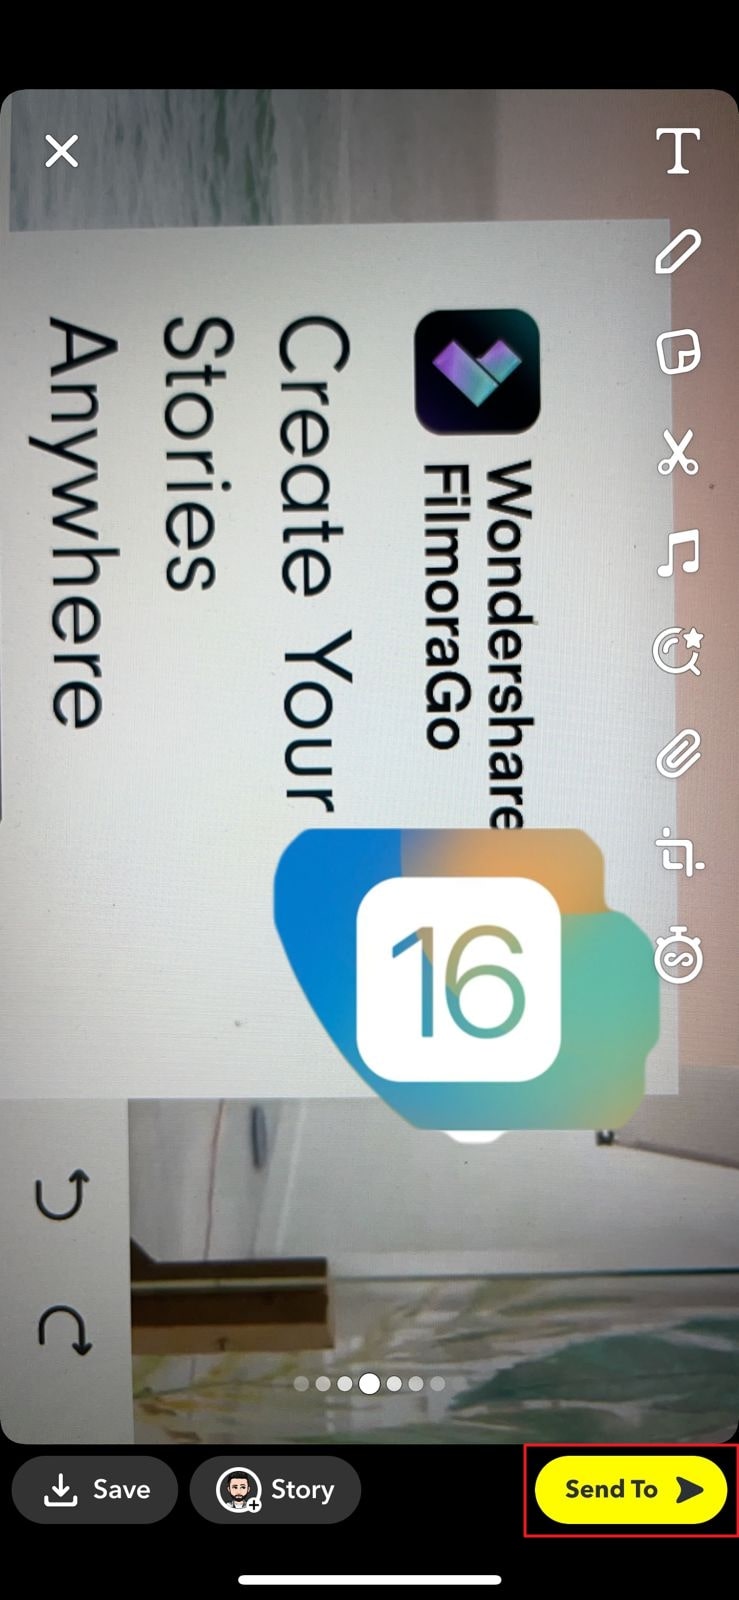
Step5 After choosing the photo from the gallery, tap “Post to Snapchat.” By doing so, you will be redirected to your Snapchat. From your image, remove the added stickers of the LMK app. You can drag the sticker to the trash bin icon. Afterward, tap on the “Paper Clip” icon to remove the added attachment.

Step6 Once done with removing the sticker and attached link, hit the “Send” button. Now choose a Snapchat contact and hit the “Send” button.
Method 4: Casper APK for Android
Casper is an excellent alternative for Snapchat users. Using this app, you can instantly add stickers and filters to the captured snaps. You can also save and forward snaps using this app to other platforms. However, Casper is not available on the Play Store. You can download the Casper APK from your web browser easily. Before installing it, you should alter some settings from your phone, as described below:
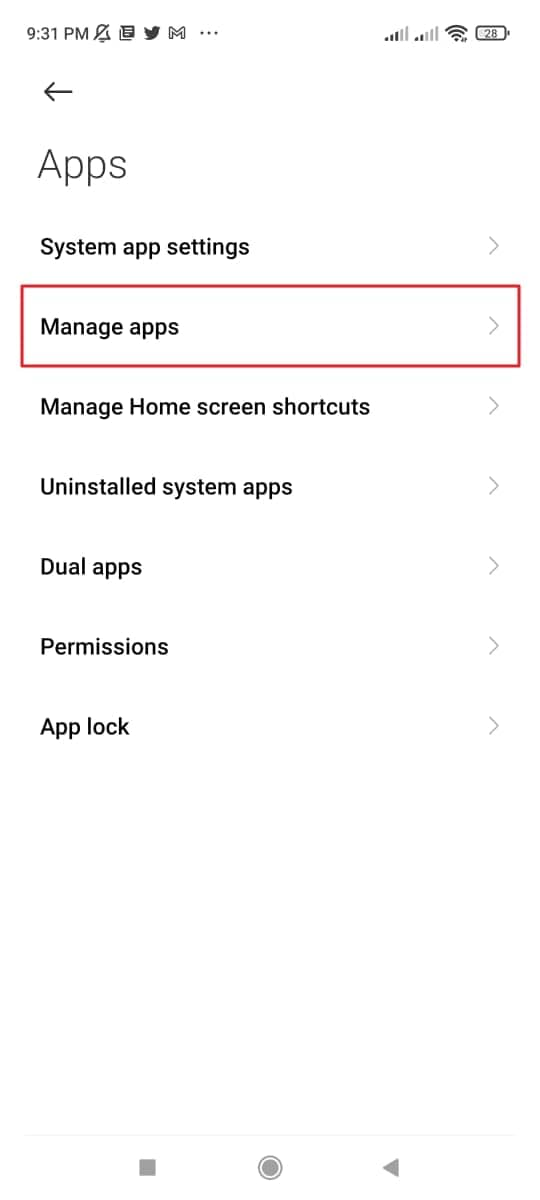
Step1 Open Settings from your phone and tap “Apps.” Afterward, select “Manage Apps” to proceed.
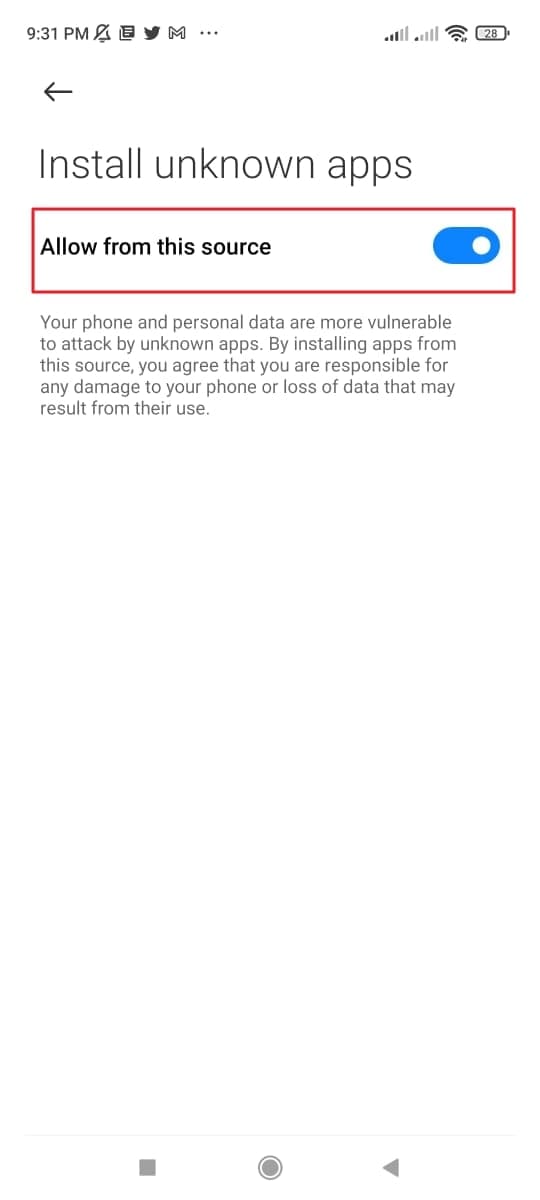
Step2 Once done, locate the “Google Chrome” option and turn on the toggle of “Install from unknown sources.”
Once you are done with installing Casper APK, you can take help from the following steps:
Step1 Sign out from your Snapchat account to initiate. Open Casper and sign into your Snapchat account.
Step2 Hit the “Plus” icon and tap on “Choose from Gallery.” After selecting a picture from your phone’s gallery, press the “Send” button.
Step3 Choose your preferred contact to whom you want to send the picture. For confirmation, tap on the “Send” button again.
Conclusion
Many youngsters are addicted to Snapchat to provide daily updates to their friends. You can utilize the offered filters, lenses, and stickers on Snapchat to make your snaps vibrant. However, this article has guided you on how to send snaps from the camera roll as a regular snap. You can send everyday snaps to your friends without mentioning the camera roll picture. For this, you can rely upon our recommended solutions and applications.
Free Download For Win 7 or later(64-bit)
Free Download For macOS 10.14 or later
Free Download Free Download Learn More
![]()
How to Send a Snap from Memories/Camera Roll as a Snap
Are you tired of sending your live selfies as snaps to your friends? In this section, you can learn how to send snaps from the camera roll without capturing a live snap. For this, we will explain some manual methods as well as some reliable apps in a detailed manner.
Method 1: Using a Snapchat Filter
Snapchat allows you to apply its filters on any of your camera roll’s pictures. By selecting a particular photo or video from your memories or snap, you can instantly add a filter to them. Afterward, you can send the filtered image to your friends as a regular snap. However, this solution has a significant drawback that you must know. The limitation is that the receiver of the snap would be able to see that the sent picture is from the camera roll.
Step1 Open your Snapchat and swipe up to open the ‘Memories’. Go to your Camera Roll and select any particular picture from there.
Step2 After choosing a particular photo, tap on the “Edit“ icon at the bottom left corner. You can apply filters to the photo by swiping from right to left. Keep swiping until you can find your preferred filter.
Step1 Once you have applied the filter to the photo, touch on the “Send To” button. Choose any Snapchat friend to whom you want to send the picture. Next, hit the “Send” icon again to send the photo successfully.
Method 2: Using a Sticker
If you want to make your camera roll picture funny and entertaining, you can add stickers to it. Through Snapchat, you can make your customized sticker of any interesting face or object. Moreover, Snapchat also offers a huge variety of built-in stickers. If you don’t want to create a customized sticker, you can easily add the built-in sticker with a single tap.
Step1 Once you have opened your Snapchat, go to Memories. From there, you can access and select any picture from the Camera Roll.
Step2 After selecting a specific picture from Camera Roll, tap on the “Pencil” icon at the bottom left corner to edit the photo. Afterward, select the “Scissor” icon from the right section. Using the Snapchat Scissor, you can create a sticker of any face or object you find interesting. Just select any area of the photo using your finger.
Step3 Now close the picture opened for creating the sticker. Once done, take a snap from your Snapchat to proceed. Now from the right section, tap on the “Sticker” icon. Here, you can choose the built-in stickers easily. Or you can navigate to the “Scissor” icon to select your created sticker.
Step4 Once done with adding and adjusting the sticker, hit the “Send To” button. Choose your preferred contact and tap on the “Send” icon again.
Method 3: Using the LMK App
Another efficient way to send a camera roll picture as a regular snap is by using a third-party app. LMK is a reliable social media platform that enables you to communicate with friends having similar interests. You can craft your profile by adding your interests and hobbies.
It helps people to create a safe and healthy community for enhanced communication. In this solution, we will guide you on how to send snaps from the camera roll using the LMK app. Through this app, you can send snaps to your friends without mentioning the camera roll.
Step1 Open your Snapchat either from your Android or iOS device. Proceed to the Memories section and select Camera Roll. Here, tap on any picture that you want to send.
Step2 Now hit the “Arrow” button to share the selected snap. From the displayed options, tap on the “Download” icon to save the picture on your device gallery.
Step3 Now head to your Play Store or App Store according to the OS of your mobile device. From there, download the LMK app. After its complete installation, open this app using your Snapchat login.
Step4 On the LMK app, tap on the “Plus” icon to proceed. Afterward, tap on “Post” and hit the “Camera” icon from the bottom left side. Now choose the photo that you have recently saved in your gallery.
Step5 After choosing the photo from the gallery, tap “Post to Snapchat.” By doing so, you will be redirected to your Snapchat. From your image, remove the added stickers of the LMK app. You can drag the sticker to the trash bin icon. Afterward, tap on the “Paper Clip” icon to remove the added attachment.
Step6 Once done with removing the sticker and attached link, hit the “Send” button. Now choose a Snapchat contact and hit the “Send” button.
Method 4: Casper APK for Android
Casper is an excellent alternative for Snapchat users. Using this app, you can instantly add stickers and filters to the captured snaps. You can also save and forward snaps using this app to other platforms. However, Casper is not available on the Play Store. You can download the Casper APK from your web browser easily. Before installing it, you should alter some settings from your phone, as described below:
Step1 Open Settings from your phone and tap “Apps.” Afterward, select “Manage Apps” to proceed.
Step2 Once done, locate the “Google Chrome” option and turn on the toggle of “Install from unknown sources.”
Once you are done with installing Casper APK, you can take help from the following steps:
Step1 Sign out from your Snapchat account to initiate. Open Casper and sign into your Snapchat account.
Step2 Hit the “Plus” icon and tap on “Choose from Gallery.” After selecting a picture from your phone’s gallery, press the “Send” button.
Step3 Choose your preferred contact to whom you want to send the picture. For confirmation, tap on the “Send” button again.
Conclusion
Many youngsters are addicted to Snapchat to provide daily updates to their friends. You can utilize the offered filters, lenses, and stickers on Snapchat to make your snaps vibrant. However, this article has guided you on how to send snaps from the camera roll as a regular snap. You can send everyday snaps to your friends without mentioning the camera roll picture. For this, you can rely upon our recommended solutions and applications.
Free Download For Win 7 or later(64-bit)
Free Download For macOS 10.14 or later
Setting Up Snapchat on Apple Computers Step by Step
It is the right place to know how to get Snapchat on Mac 2021. Being not officially available on the Mac App Store, users tend to find different ways of using Snapchat on Mac computers. And these different ways may include both reliable as well as non-reliable methods. However, the use of non-reliable methods won’t take you anywhere. Thus, we’d like to recommend our readers in simple ways only.
Before you dive into the article, let’s take a quick look at some interesting Snapchat facts!
- The Snap Camera by Snapchat is officially available for Mac users in different applications.
- Many successful brands, including Snapchat, Microsoft, and Apple, have already mentioned that they will be launching their apps in the Mac App Store very soon.
- People are currently obsessed and happy with using two favorite ways to install Snapchat on a Mac, i.e., the Nox and BlueStacks.
And, we’re here to provide you with a step-by-step guide on both ways. So, let’s begin with how to download Snapchat on Mac with BlueStacks.
Part 1: How to Download Snapchat on Mac with BlueStacks?
The BlueStacks is nothing but an Android Emulator for your Windows and Mac PC. It generally provides the means to run Android applications on a PC. So, it is similar to an Android phone inside your PC. Well, BlueStacks delivers one of the best ways how to use Snapchat on Mac.
Step-by-Step Guide on How to Use Snapchat on Mac
Step 1: Download the BlueStacks Android Emulator
Go to https://www.BlueStacks.com/ and click the Download BlueStacks tab to proceed.
Proceed for installation by selecting the Allow button.
Open the .dmg file and allow the prompts and instructions on the screen.
Click the Open > Install Now button afterward, as shown below on your Mac.
Step 2: Set Initial Boot
After you finish installing BlueStacks, know how to get Snapchat on Mac by following the instructions and setting it for initial boot. Then, you are required to allow all the permissions within the app.
Make sure to unblock BlueStacks if you are using the newer versions of macOS. Go to Security & Privacy > General > Allow and proceed.
Step 3: Link Your Google Account
Now, you need to sign in with your Google account to download apps from Play Store.
Step 4: Download Snapchat
Lookup for Snapchat in the Google Play Store and hit the Install button to download.
Once the installation is over, open the Snapchat app and start using it.
With the steps above, you can easily access Snapchat via BlueStacks. So, you will need to open the BlueStacks first every time!
Part 2: How to Download Snapchat on Mac without BlueStacks?
The Nox Player is another free Android Emulator for Mac and PC operating systems. So, let’s check out how to use Snapchat on Mac without BlueStacks.
Step-by-Step Guide to Using Snapchat on Mac without BlueStacks
Step 1: Download Nox Player
Go to https://www.bignox.com/ and hit the Download button to proceed.
Click on Agree after you complete installing the Nox Player application.
Step 2: Start the Nox Player Application
Drag the Nox Player to the Applications folder and double-click the icon to start.
Then, you need to click Open to start the Nox Player.
Step 3: Fix the Virtual Box Issue
The Nox Player will not start properly if you also get the following message.
Step 4: Install Virtual Box
Go to www.virtualbox.org and hit the Download button.
Then, you need to click the OS X Hosts to start downloading the Virtual Box.
Now, double-click the Virtual Box icon to start installing.
You will need to enter the Apple password to finish the installation.
Step 5: Restart Nox Player
Restart Nox Player after the installation of the Virtual Box application.
Sign in to your Google Account and check all the permissions. So, you need to click on the Play Store first.
After you complete all the Sign In procedure, you can open the Play Store and search for Snapchat.
So, this is how to get Snapchat on Mac without BlueStacks. Well, both the methods are pretty definitive and need the software to primarily open to access Snapchat.
Do you have more queries? Scroll to the section below to find more FAQs related to more on how to use Snapchat on Mac.
Part 3: FAQs about Using Snapchat on Mac
1. Is it possible to get Snapchat on a Mac?
Yes. Officially, it is not possible to use Snapchat on Mac without using any Android Emulator. Thus, we have mentioned how to use Snapchat on Mac with BlueStacks and Nox Player.
2. How do I log into Snapchat on my Mac?
You can log into Snapchat on Mac only after you’ve installed it over your Mac computer. And, we all know that the Snapchat app is not officially available for Mac. So, you need to primarily download the Android Emulator and then install Snapchat from the Google Play Store via the Emulator itself.
3. How can I use Snapchat on my Mac without BlueStacks?
There isn’t the best and free Android Emulator than the Nox Player if you want to replace BlueStacks.
4. Is BlueStacks Mac safe?
Yes, the BlueStacks is entirely safe for any operating system, regardless of Mac. It is legal as well.
5. Is Nox better than BlueStacks?
Both are Android Emulators and have their corresponding benefits. However, the Nox is said to be quick and smooth running software than BlueStacks. But then, there is no need to download software like Virtual Box on BlueStacks. So, each software comes with its merits and demerits.
Conclusion
Hopefully, you got how to get Snapchat on Mac via the different Android Emulators. You should consider using any of the emulator if you can’t resist using the all-time favorite Snapchat app. Also, check out the FAQs section for more clarity.
Wondershare Filmora
Get started easily with Filmora’s powerful performance, intuitive interface, and countless effects!
Try It Free Try It Free Try It Free 

And, we’re here to provide you with a step-by-step guide on both ways. So, let’s begin with how to download Snapchat on Mac with BlueStacks.
Part 1: How to Download Snapchat on Mac with BlueStacks?
The BlueStacks is nothing but an Android Emulator for your Windows and Mac PC. It generally provides the means to run Android applications on a PC. So, it is similar to an Android phone inside your PC. Well, BlueStacks delivers one of the best ways how to use Snapchat on Mac.
Step-by-Step Guide on How to Use Snapchat on Mac
Step 1: Download the BlueStacks Android Emulator
Go to https://www.BlueStacks.com/ and click the Download BlueStacks tab to proceed.
Proceed for installation by selecting the Allow button.
Open the .dmg file and allow the prompts and instructions on the screen.
Click the Open > Install Now button afterward, as shown below on your Mac.
Step 2: Set Initial Boot
After you finish installing BlueStacks, know how to get Snapchat on Mac by following the instructions and setting it for initial boot. Then, you are required to allow all the permissions within the app.
Make sure to unblock BlueStacks if you are using the newer versions of macOS. Go to Security & Privacy > General > Allow and proceed.
Step 3: Link Your Google Account
Now, you need to sign in with your Google account to download apps from Play Store.
Step 4: Download Snapchat
Lookup for Snapchat in the Google Play Store and hit the Install button to download.
Once the installation is over, open the Snapchat app and start using it.
With the steps above, you can easily access Snapchat via BlueStacks. So, you will need to open the BlueStacks first every time!
Part 2: How to Download Snapchat on Mac without BlueStacks?
The Nox Player is another free Android Emulator for Mac and PC operating systems. So, let’s check out how to use Snapchat on Mac without BlueStacks.
Step-by-Step Guide to Using Snapchat on Mac without BlueStacks
Step 1: Download Nox Player
Go to https://www.bignox.com/ and hit the Download button to proceed.
Click on Agree after you complete installing the Nox Player application.
Step 2: Start the Nox Player Application
Drag the Nox Player to the Applications folder and double-click the icon to start.
Then, you need to click Open to start the Nox Player.
Step 3: Fix the Virtual Box Issue
The Nox Player will not start properly if you also get the following message.
Step 4: Install Virtual Box
Go to www.virtualbox.org and hit the Download button.
Then, you need to click the OS X Hosts to start downloading the Virtual Box.
Now, double-click the Virtual Box icon to start installing.
You will need to enter the Apple password to finish the installation.
Step 5: Restart Nox Player
Restart Nox Player after the installation of the Virtual Box application.
Sign in to your Google Account and check all the permissions. So, you need to click on the Play Store first.
After you complete all the Sign In procedure, you can open the Play Store and search for Snapchat.
So, this is how to get Snapchat on Mac without BlueStacks. Well, both the methods are pretty definitive and need the software to primarily open to access Snapchat.
Do you have more queries? Scroll to the section below to find more FAQs related to more on how to use Snapchat on Mac.
Part 3: FAQs about Using Snapchat on Mac
1. Is it possible to get Snapchat on a Mac?
Yes. Officially, it is not possible to use Snapchat on Mac without using any Android Emulator. Thus, we have mentioned how to use Snapchat on Mac with BlueStacks and Nox Player.
2. How do I log into Snapchat on my Mac?
You can log into Snapchat on Mac only after you’ve installed it over your Mac computer. And, we all know that the Snapchat app is not officially available for Mac. So, you need to primarily download the Android Emulator and then install Snapchat from the Google Play Store via the Emulator itself.
3. How can I use Snapchat on my Mac without BlueStacks?
There isn’t the best and free Android Emulator than the Nox Player if you want to replace BlueStacks.
4. Is BlueStacks Mac safe?
Yes, the BlueStacks is entirely safe for any operating system, regardless of Mac. It is legal as well.
5. Is Nox better than BlueStacks?
Both are Android Emulators and have their corresponding benefits. However, the Nox is said to be quick and smooth running software than BlueStacks. But then, there is no need to download software like Virtual Box on BlueStacks. So, each software comes with its merits and demerits.
Conclusion
Hopefully, you got how to get Snapchat on Mac via the different Android Emulators. You should consider using any of the emulator if you can’t resist using the all-time favorite Snapchat app. Also, check out the FAQs section for more clarity.
Wondershare Filmora
Get started easily with Filmora’s powerful performance, intuitive interface, and countless effects!
Try It Free Try It Free Try It Free
Also read:
- [New] 2024 Approved Mastery of Storing Snaps on Devices Post-Snapchat Use
- [New] 2024 Approved Step-by-Step Manual Upside Down Movies in Snap
- [New] Innovating Quickly 2 Approaches to Making Snapchat Filters for 2024
- [Updated] 2024 Approved Revamping Subtitles From SRT with Ease
- [Updated] 2024 Approved Seamless Transitions Smooth Editing Techniques for YouTube Content
- [Updated] In 2024, Direct Transfer Techniques Camera Roll Images to Snapchat
- 2024 Approved Launching Professional Instagram Starting an Enterprise Account
- 2024 Approved Unlocking YouTube Potential with Extended Video Submissions
- Elevate Social Media Impact Mastering Snapchat's Boomerang Art for 2024
- How to share/fake gps on Uber for Lava Yuva 3 Pro | Dr.fone
- In 2024, Explore 5 Pro Game Record Methods in Windows 11
- In 2024, Innovative Approaches to Keeping Your Snaps Connected
- In 2024, Insight Into Watermark Functionality for Fb Media
- Mastering Currency Conversion: A Step-by-Step Guide to Retrieving Live Exchange Rates in Excel
- The Ultimate Guide to Scouting for Best Free SRT Translation Tools for 2024
- Transforming Images on Snapchat An Editor's Playbook for 2024
- Unveiling Secrets to Effective Snapchat Pins for 2024
- Title: [Updated] 2024 Approved From Camera Roll to Screen Share Photos Fast and Simple
- Author: Scott
- Created at : 2025-01-25 16:31:54
- Updated at : 2025-01-30 18:03:33
- Link: https://snapchat-videos.techidaily.com/updated-2024-approved-from-camera-roll-to-screen-share-photos-fast-and-simple/
- License: This work is licensed under CC BY-NC-SA 4.0.