
!["[Updated] 2024 Approved Easily Manage Your Snapchat Video Speed"](https://www.lifewire.com/thmb/e3OdPe2ekhPfBH2xRv177miEbUc=/540x405/filters:no_upscale():max_bytes(150000):strip_icc()/turnofffindmyiphone-742865e7d4d64f158e9f290e09062826.jpg)
"[Updated] 2024 Approved Easily Manage Your Snapchat Video Speed"
Easily Manage Your Snapchat Video Speed
Snapchat is an instant messaging app that allows you to share your pictures and videos with your family members, friends, and colleagues. In addition, you can even create your stories in the form of movie clips and share them on the app. These stories remain available for the next 24 hours, after which they are automatically removed from the platform.
While sharing the videos, you can apply several filters that are already present in the app, and Slow Motion is one of them. You may want to learn how to slow down a video on Snapchat when you want to emphasize and draw viewers’ attention toward the scene, or wish to make the audience see your actions closely and in detail.
That said, in the following sections, you will see how to slow down videos on Snapchat, and what other methods you can use to reduce the playback speed more professionally.
In this article
01 How to Add Slow Motion Effects to Video Using the Snapchat App
02 How to Record a Slo-Mo Video and Upload to Snapchat
03 How to Make Flash and Smooth Slo Mo Video for Snapchat
04 FAQs about Slowing Down Snapchat Video
Part 1: How to Add Slow Motion Effects to Video Using the Snapchat App
Snapchat has a built-in Slow Motion filter that reduces the playback speed of a video when applied. You can learn how to slow down on Snapchat by following the instructions that are given below:
Step 1: Record a Video
Launch Snapchat on your smartphone (iPhone 13 Pro Max is used here for illustrations), make sure that the Camera section is selected from the bottom, tap and hold down the Capture button that is present at the lower part of the interface, and let go of it when you are done recording.

Step 2: Apply the Slow Motion Filter
Once the video is recorded, swipe the screen from left to right. Repeat this process until you see the Snail (Slow Motion) icon on the screen. This will reduce the playback speed of the clip.

Step 3: Decorate the Video (Optional)
Use the options present on the upper-right area of the screen to further decorate the video and/or add annotations to it.

Step 4: Share or Publish the Video
Once everything is done, tap Send To from the bottom-right corner to share the video with your family, friends, and colleagues, or publish it as a story that remains available for the next 24 hours.
Related: How to Record Slo-Mo videos on iPhone .
Part 2: How to Record a Slo-Mo Video and Upload to Snapchat
With Snapchat, even though you don’t require any third-party tool to reduce the playback speed of a video, the app has certain limitations. For example, it doesn’t allow you to set a zoom level, you are stuck with the framerate that the app has to offer, etc.
Because of this, many people prefer to use different methods to record a video in slow motion with their preferences, and then upload it to Snapchat. This approach also eliminates the need to swipe the screen several times merely to use a single slow-motion filter.
Fortunately, iPhone has a built-in SLO-MO mode in its Camera app that allows you to capture the videos in slow motion. To learn how to do slow mo on Snapchat with the iPhone’s Camera app, you can follow the instructions that are given below:
Step 1: Get to the iPhone’s SLO-MO Mode
Launch the Camera app on your iPhone (iPhone 13 Pro Max is used here for illustrations), and swipe the screen from left to right until you get to the SLO-MO mode.

Step 2: Set Recording Preferences
Tap the number that is present at the top-right corner (240 here) to toggle between different framerates, tap 1x from the lower-center area, swipe slightly up, and then use the wheel that appears next to define your preferred zoom level.

Step 3: Start and Stop the Recording
Tap the Record button to start the recording, and tap Stop when you’re done.
Note: Make sure that the duration of the recorded video doesn’t exceed 60 seconds.
Step 4: Upload the Slow-Motion Video to Snapchat
After the video is recorded in slow motion, close the Camera app, launch Snapchat, and tap the Gallery icon from the left side of the Capture button on the Camera section. From the Memories screen, go to the Camera Roll tab, and tap to select the video that you recorded in the previous step.
Next, optionally, tap the Edit icon from the bottom-left corner to decorate the video and/or add annotations to it, and follow the process as explained in the previous section to share the clip with your family, friends, or colleagues, or publish it as your story.

Part 3: How to Make Flash and Smooth Slo Mo Video for Snapchat
Although iPhone has the built-in SLO-MO mode that even enables you to set your preferred framerate and zoom level before recording, it still doesn’t allow you to slow down different parts of a video in different speed at your convenience. You can either record the entire video in slow motion or at a normal speed.
This is where a third-party app comes into play. While there are several video editing programs available online, the one of the best slow motion apps that helps you slow down the portions of a video with precision is CapCut.
Downloading and installing CapCut on your iPhone or Android phone is simple, and once it is done, you can follow the process given below to learn how to slow things down on Snapchat:
With CapCut, you can either slow down the whole clip or manage the speed for different segments. This section explains both methods.
Method 1: Slow Down the Whole Clip with CapCut
Step 1: Get to the Speed Panel
Launch CapCut, import the video that you want to slow down, and tap the imported media in the Timeline. Next, tap Speed from the bottom of the interface to get to the next window.

Step 2: Reduce the Speed of the Video
Tap Normal from the bottom of the screen that appears next, and drag the Speed slider to the left to reduce the playback speed. Tap OK from the bottom-right corner to save the changes.

Step 3: Upload the Video to Snapchat
Back on the previous interface, optionally tap Volume from the bottom and reduce the slider to 0 to mute the audio of the footage as it may get distorted due to the reduction in the speed.
Next, tap Share from the top-right corner to save the video on your iPhone, and then use the method explained in the previous section to access the clip from the Gallery within Snapchat for uploading.
Method 2: Reduce the Playback Speed of Different Parts of a Video
Step 1: Get to the Speed Panel
Use the process described in the previous method to get to the Speed panel.
Step 2: Reduce the Speed of Different Parts of the Video
Tap Curve from the bottom of the interface. On the next screen, tap Custom from the lower area, and then tap Edit. From the next panel, drag the beat points down to reduce the speed (or drag them above the line to increase).

Notice that each beat point represents a particular section of the video, and dragging it down reduces the playback speed of that segment. You can even tap anywhere on the line to add a new beat point and drag it down as needed for more precise speed management. Once done, tap OK from the bottom-right corner to save the modifications.

Optionally, you can also tap any of the available presets on the Curve screen to reduce the playback speed of the video accordingly.
Step 3: Upload the Video to Snapchat
Use the method explained in the previous method to export the video, upload it to Snapchat, and share the clip with your family, friends, and colleagues, or publish it as your story.
Part 4: FAQs about Slowing Down Snapchat Video
1. Can I record a slow mo video in Snapchat?
Technically speaking, no, you cannot. However, once you have recorded a video at a normal speed in Snapchat, you can apply the built-in Slow Motion filter to it by swiping the screen from left to right until you see the Snail icon at the center. The Snail icon represents the Slow Motion filter that reduces the playback speed when applied.
2. Besides slow-motion, which speed filters does Snapchat have?
In addition to slow motion Snapchat also has Forward and Fast Forward filters that increase the playback speed. While the Forward filter increases the speed slightly, the Fast Forward one enhances it drastically.
Conclusion
When using an iPhone, even though the SLO-MO mode enables you to record footage in slow motion, you don’t get many options. Therefore, it would be safe to say that it is easy to slow down the speed of a video if you have a dedicated third-party post-production app. However, if you want to go for a convenient method, learning how to slow down a video on Snapchat is an extremely simple and straightforward process.
02 How to Record a Slo-Mo Video and Upload to Snapchat
03 How to Make Flash and Smooth Slo Mo Video for Snapchat
04 FAQs about Slowing Down Snapchat Video
Part 1: How to Add Slow Motion Effects to Video Using the Snapchat App
Snapchat has a built-in Slow Motion filter that reduces the playback speed of a video when applied. You can learn how to slow down on Snapchat by following the instructions that are given below:
Step 1: Record a Video
Launch Snapchat on your smartphone (iPhone 13 Pro Max is used here for illustrations), make sure that the Camera section is selected from the bottom, tap and hold down the Capture button that is present at the lower part of the interface, and let go of it when you are done recording.
Step 2: Apply the Slow Motion Filter
Once the video is recorded, swipe the screen from left to right. Repeat this process until you see the Snail (Slow Motion) icon on the screen. This will reduce the playback speed of the clip.
Step 3: Decorate the Video (Optional)
Use the options present on the upper-right area of the screen to further decorate the video and/or add annotations to it.
Step 4: Share or Publish the Video
Once everything is done, tap Send To from the bottom-right corner to share the video with your family, friends, and colleagues, or publish it as a story that remains available for the next 24 hours.
Related: How to Record Slo-Mo videos on iPhone .
Part 2: How to Record a Slo-Mo Video and Upload to Snapchat
With Snapchat, even though you don’t require any third-party tool to reduce the playback speed of a video, the app has certain limitations. For example, it doesn’t allow you to set a zoom level, you are stuck with the framerate that the app has to offer, etc.
Because of this, many people prefer to use different methods to record a video in slow motion with their preferences, and then upload it to Snapchat. This approach also eliminates the need to swipe the screen several times merely to use a single slow-motion filter.
Fortunately, iPhone has a built-in SLO-MO mode in its Camera app that allows you to capture the videos in slow motion. To learn how to do slow mo on Snapchat with the iPhone’s Camera app, you can follow the instructions that are given below:
Step 1: Get to the iPhone’s SLO-MO Mode
Launch the Camera app on your iPhone (iPhone 13 Pro Max is used here for illustrations), and swipe the screen from left to right until you get to the SLO-MO mode.
Step 2: Set Recording Preferences
Tap the number that is present at the top-right corner (240 here) to toggle between different framerates, tap 1x from the lower-center area, swipe slightly up, and then use the wheel that appears next to define your preferred zoom level.
Step 3: Start and Stop the Recording
Tap the Record button to start the recording, and tap Stop when you’re done.
Note: Make sure that the duration of the recorded video doesn’t exceed 60 seconds.
Step 4: Upload the Slow-Motion Video to Snapchat
After the video is recorded in slow motion, close the Camera app, launch Snapchat, and tap the Gallery icon from the left side of the Capture button on the Camera section. From the Memories screen, go to the Camera Roll tab, and tap to select the video that you recorded in the previous step.
Next, optionally, tap the Edit icon from the bottom-left corner to decorate the video and/or add annotations to it, and follow the process as explained in the previous section to share the clip with your family, friends, or colleagues, or publish it as your story.
Part 3: How to Make Flash and Smooth Slo Mo Video for Snapchat
Although iPhone has the built-in SLO-MO mode that even enables you to set your preferred framerate and zoom level before recording, it still doesn’t allow you to slow down different parts of a video in different speed at your convenience. You can either record the entire video in slow motion or at a normal speed.
This is where a third-party app comes into play. While there are several video editing programs available online, the one of the best slow motion apps that helps you slow down the portions of a video with precision is CapCut.
Downloading and installing CapCut on your iPhone or Android phone is simple, and once it is done, you can follow the process given below to learn how to slow things down on Snapchat:
With CapCut, you can either slow down the whole clip or manage the speed for different segments. This section explains both methods.
Method 1: Slow Down the Whole Clip with CapCut
Step 1: Get to the Speed Panel
Launch CapCut, import the video that you want to slow down, and tap the imported media in the Timeline. Next, tap Speed from the bottom of the interface to get to the next window.
Step 2: Reduce the Speed of the Video
Tap Normal from the bottom of the screen that appears next, and drag the Speed slider to the left to reduce the playback speed. Tap OK from the bottom-right corner to save the changes.
Step 3: Upload the Video to Snapchat
Back on the previous interface, optionally tap Volume from the bottom and reduce the slider to 0 to mute the audio of the footage as it may get distorted due to the reduction in the speed.
Next, tap Share from the top-right corner to save the video on your iPhone, and then use the method explained in the previous section to access the clip from the Gallery within Snapchat for uploading.
Method 2: Reduce the Playback Speed of Different Parts of a Video
Step 1: Get to the Speed Panel
Use the process described in the previous method to get to the Speed panel.
Step 2: Reduce the Speed of Different Parts of the Video
Tap Curve from the bottom of the interface. On the next screen, tap Custom from the lower area, and then tap Edit. From the next panel, drag the beat points down to reduce the speed (or drag them above the line to increase).
Notice that each beat point represents a particular section of the video, and dragging it down reduces the playback speed of that segment. You can even tap anywhere on the line to add a new beat point and drag it down as needed for more precise speed management. Once done, tap OK from the bottom-right corner to save the modifications.
Optionally, you can also tap any of the available presets on the Curve screen to reduce the playback speed of the video accordingly.
Step 3: Upload the Video to Snapchat
Use the method explained in the previous method to export the video, upload it to Snapchat, and share the clip with your family, friends, and colleagues, or publish it as your story.
Part 4: FAQs about Slowing Down Snapchat Video
1. Can I record a slow mo video in Snapchat?
Technically speaking, no, you cannot. However, once you have recorded a video at a normal speed in Snapchat, you can apply the built-in Slow Motion filter to it by swiping the screen from left to right until you see the Snail icon at the center. The Snail icon represents the Slow Motion filter that reduces the playback speed when applied.
2. Besides slow-motion, which speed filters does Snapchat have?
In addition to slow motion Snapchat also has Forward and Fast Forward filters that increase the playback speed. While the Forward filter increases the speed slightly, the Fast Forward one enhances it drastically.
Conclusion
When using an iPhone, even though the SLO-MO mode enables you to record footage in slow motion, you don’t get many options. Therefore, it would be safe to say that it is easy to slow down the speed of a video if you have a dedicated third-party post-production app. However, if you want to go for a convenient method, learning how to slow down a video on Snapchat is an extremely simple and straightforward process.
Pinpointing Personalities: Pinning Friends on Snapchat
How to Pin Someone on Snapchat: All You Need to Know

Ollie Mattison
Mar 27, 2024• Proven solutions
One of the features that Snapchat provides is the ability to pin your contacts or conversations that you deem important. This will make the contacts or the conversations appear on top of the feed in your account. It saves you time from having to scroll through notifications from others to the ones that hold your interest. The process of how to pin someone on Snapchat is easy to do and is a helpful feature. Here we will explore how to do it and ways of making eye-catching Snapchat videos.
- Part 1: What Does a Pin Mean on Snapchat?
- Part 2: How to Pin/Unpin Someone on Snapchat?
- Part 3: Create Eye-Catching Snapchat Videos with Incredible Video Editor
What Does a Pin Mean on Snapchat?
If you are new to the term Pin in Snapchat, it is simply a function to help keep certain contacts or messages on top of your Snapchat feed. Pinning feature is available for the iOS app only till now. All you need to do is swipe right to go to the chat screen. Here you need to tap and hold the finger on a friend’s name or a conversation. Tap on chat settings to select ‘Pin Conversation’ as an option. This will set the friends and the conversations you have with them on top of the feed on your Snapchat account.
It helps you to communicate with a person easily and not have to scroll through other notifications to find a message or conversation chain that you want to access frequently.
How to Pin/Unpin Someone on Snapchat?
It is a small step that helps you pin conversations at the top of your Snapchat feed. However, with this simple feature, you can easily navigate through the app, making the process faster and convenient. How to pin someone on Snapchat might be a small aspect but definitely helps upgrade your Snapchat experience. Once conversations are pinned on top, new snaps or chats from such friends or groups would show up foremost.
Steps to do so are as follows:
- 1.Visit Friends Screen
- 2.Press and Hold on Contact or Entry
- 3.Choose Pin Option
- 4.Customize the Pins
1.Visit Friends Screen
Once you are on the app, visit the Friends screen. To do so you need to swipe right from the Camera screen.
source:i1.wp.com
2.Press and Hold on Contact or Entry
To pin a contact or a conversation thread, press and hold down on the same.
source:webtrickz.com
3.Choose Pin Option
There would be a number of options that would show up and tap on ‘Chat Settings’. Here you will find Pin Conversation as an option.
4.Customize the Pins
When you pin a contact or a conversation, it is represented by a pushpin in red by default. You can customize the pins to give them character and differentiate one contact from another. Visit Settings in My Profile. Scroll down and select Manage under the Additional Settings option. Tap on Friend emojis. This option allows you to change push pins to different emojis.

source:miro.medium.com
You can also unpin contact or conversation. Steps to do so remain similar. You can visit Chat Settings and choose Unpin Conversation. Also, an important thing to know is that your contacts would not be notified if you pin or even unpin their conversations. Hence, there is no social pressure when you use this feature. Also, you can pin at most three conversations on your Snapchat feed.
Create Eye-Catching Snapchat Videos with Incredible Video Editor
Filmora is a video editing tool that has a free as well as paid, premium version. Even with the free version users can edit and make videos of high quality. The software is useful if you wish to edit 4K videos. There are tools that support audio as well as video. It offers many options to add on styling, customizing, and other effects. The tool helps users add on overlays, audio, insert texts as well as animation effects.
If you wish to make your Snapchat videos impressive, this tool can come in handy. You can add on different kinds of effects, some of Hollywood movie standards. It allows you to crop and personalize video areas easily. For professional touches, you can add on dedications, tributes, stories in such videos. You can also increase or decrease video size, tilt, and shift or blur certain parts of a video. You can even rotate or flip audio or video content using this tool. It helps to remove video noise as well.


If you wish to make funny videos on Snapchat here are some ways to do so with the editor software:
1.Use Basic Edit Tools
If you wish to edit a video shot using Snapchat, you can easily do so with Filmora. You can start by touching up the video and enhancing the audio. Even if the original video shot is a funny one, you can enhance the effect by using all the basic handy editing tools on Filmora. Trim out portions that are unnecessary, add in background music, color corrections. You can double click on a clip that you add to the timeline of Filmora. The video then enters the editing panel and all edits are easy to do here.
2.Picture-In-Picture
To make funny videos you could put in several video clips in a frame. This helps tell different threads of a storyline. With Filmora it is easy to achieve such an effect. You simply need to drag and then drop a video or an overlay image. Do so above a background video. You can then adjust the duration of the overlay clip to match the background video. It is also possible to choose a template and apply it to your video with a single click. You can then drag a funny image or photo to the timeline and customize the position.
3.Record Voiceover
No funny video is complete without a strange and funny voice narrating the incidents. It is easy to replace audio as well as record voiceover for your Snapchat video using Filmora. All you need to do is click on the record button which captures voice recording in good quality. You can even change your voice or playing speed. Additionally, you can also remove or mute the original audio track and replace the same with a new recording.
4.Apply Different Effects
There are several templates included with Filmora. It can turn video clips and common photos into exciting and funny videos. You can add effects like a laugh, scream, fire, and snow with simple drag and drop gestures.
The tools that Filmora offers are several for making your Snapchat videos funny. You can add amazing effects effortlessly. For instance, you could toggle around with features such as Face-off, Mosaic, or Tilt-shift. These are professional editing features that can make your Snapchat video stand out and impress.
Once you have saved the effects on your video, you can preview the final output in the preview area. It is easy to share the video through the Export feature. You can also upload it to your Snapchat account and then share it with your friends and groups.
Conclusion
Snapchat enables you to share your favorite moments with your friends or different groups. You can easily know how to pin someone on Snapchat on top of your feed using the settings options elaborated above. Finally, to make your Snapchat videos funny and impressive, make use of the film editor software Filmora. It has easy tools that can make your video look professional and impressive.
Ollie Mattison
Ollie Mattison is a writer and a lover of all things video.
Follow @Ollie Mattison
Ollie Mattison
Mar 27, 2024• Proven solutions
One of the features that Snapchat provides is the ability to pin your contacts or conversations that you deem important. This will make the contacts or the conversations appear on top of the feed in your account. It saves you time from having to scroll through notifications from others to the ones that hold your interest. The process of how to pin someone on Snapchat is easy to do and is a helpful feature. Here we will explore how to do it and ways of making eye-catching Snapchat videos.
- Part 1: What Does a Pin Mean on Snapchat?
- Part 2: How to Pin/Unpin Someone on Snapchat?
- Part 3: Create Eye-Catching Snapchat Videos with Incredible Video Editor
What Does a Pin Mean on Snapchat?
If you are new to the term Pin in Snapchat, it is simply a function to help keep certain contacts or messages on top of your Snapchat feed. Pinning feature is available for the iOS app only till now. All you need to do is swipe right to go to the chat screen. Here you need to tap and hold the finger on a friend’s name or a conversation. Tap on chat settings to select ‘Pin Conversation’ as an option. This will set the friends and the conversations you have with them on top of the feed on your Snapchat account.
It helps you to communicate with a person easily and not have to scroll through other notifications to find a message or conversation chain that you want to access frequently.
How to Pin/Unpin Someone on Snapchat?
It is a small step that helps you pin conversations at the top of your Snapchat feed. However, with this simple feature, you can easily navigate through the app, making the process faster and convenient. How to pin someone on Snapchat might be a small aspect but definitely helps upgrade your Snapchat experience. Once conversations are pinned on top, new snaps or chats from such friends or groups would show up foremost.
Steps to do so are as follows:
- 1.Visit Friends Screen
- 2.Press and Hold on Contact or Entry
- 3.Choose Pin Option
- 4.Customize the Pins
1.Visit Friends Screen
Once you are on the app, visit the Friends screen. To do so you need to swipe right from the Camera screen.
source:i1.wp.com
2.Press and Hold on Contact or Entry
To pin a contact or a conversation thread, press and hold down on the same.
source:webtrickz.com
3.Choose Pin Option
There would be a number of options that would show up and tap on ‘Chat Settings’. Here you will find Pin Conversation as an option.
4.Customize the Pins
When you pin a contact or a conversation, it is represented by a pushpin in red by default. You can customize the pins to give them character and differentiate one contact from another. Visit Settings in My Profile. Scroll down and select Manage under the Additional Settings option. Tap on Friend emojis. This option allows you to change push pins to different emojis.
source:miro.medium.com
You can also unpin contact or conversation. Steps to do so remain similar. You can visit Chat Settings and choose Unpin Conversation. Also, an important thing to know is that your contacts would not be notified if you pin or even unpin their conversations. Hence, there is no social pressure when you use this feature. Also, you can pin at most three conversations on your Snapchat feed.
Create Eye-Catching Snapchat Videos with Incredible Video Editor
Filmora is a video editing tool that has a free as well as paid, premium version. Even with the free version users can edit and make videos of high quality. The software is useful if you wish to edit 4K videos. There are tools that support audio as well as video. It offers many options to add on styling, customizing, and other effects. The tool helps users add on overlays, audio, insert texts as well as animation effects.
If you wish to make your Snapchat videos impressive, this tool can come in handy. You can add on different kinds of effects, some of Hollywood movie standards. It allows you to crop and personalize video areas easily. For professional touches, you can add on dedications, tributes, stories in such videos. You can also increase or decrease video size, tilt, and shift or blur certain parts of a video. You can even rotate or flip audio or video content using this tool. It helps to remove video noise as well.
If you wish to make funny videos on Snapchat here are some ways to do so with the editor software:
1.Use Basic Edit Tools
If you wish to edit a video shot using Snapchat, you can easily do so with Filmora. You can start by touching up the video and enhancing the audio. Even if the original video shot is a funny one, you can enhance the effect by using all the basic handy editing tools on Filmora. Trim out portions that are unnecessary, add in background music, color corrections. You can double click on a clip that you add to the timeline of Filmora. The video then enters the editing panel and all edits are easy to do here.
2.Picture-In-Picture
To make funny videos you could put in several video clips in a frame. This helps tell different threads of a storyline. With Filmora it is easy to achieve such an effect. You simply need to drag and then drop a video or an overlay image. Do so above a background video. You can then adjust the duration of the overlay clip to match the background video. It is also possible to choose a template and apply it to your video with a single click. You can then drag a funny image or photo to the timeline and customize the position.
3.Record Voiceover
No funny video is complete without a strange and funny voice narrating the incidents. It is easy to replace audio as well as record voiceover for your Snapchat video using Filmora. All you need to do is click on the record button which captures voice recording in good quality. You can even change your voice or playing speed. Additionally, you can also remove or mute the original audio track and replace the same with a new recording.
4.Apply Different Effects
There are several templates included with Filmora. It can turn video clips and common photos into exciting and funny videos. You can add effects like a laugh, scream, fire, and snow with simple drag and drop gestures.
The tools that Filmora offers are several for making your Snapchat videos funny. You can add amazing effects effortlessly. For instance, you could toggle around with features such as Face-off, Mosaic, or Tilt-shift. These are professional editing features that can make your Snapchat video stand out and impress.
Once you have saved the effects on your video, you can preview the final output in the preview area. It is easy to share the video through the Export feature. You can also upload it to your Snapchat account and then share it with your friends and groups.
Conclusion
Snapchat enables you to share your favorite moments with your friends or different groups. You can easily know how to pin someone on Snapchat on top of your feed using the settings options elaborated above. Finally, to make your Snapchat videos funny and impressive, make use of the film editor software Filmora. It has easy tools that can make your video look professional and impressive.
Ollie Mattison
Ollie Mattison is a writer and a lover of all things video.
Follow @Ollie Mattison
Ollie Mattison
Mar 27, 2024• Proven solutions
One of the features that Snapchat provides is the ability to pin your contacts or conversations that you deem important. This will make the contacts or the conversations appear on top of the feed in your account. It saves you time from having to scroll through notifications from others to the ones that hold your interest. The process of how to pin someone on Snapchat is easy to do and is a helpful feature. Here we will explore how to do it and ways of making eye-catching Snapchat videos.
- Part 1: What Does a Pin Mean on Snapchat?
- Part 2: How to Pin/Unpin Someone on Snapchat?
- Part 3: Create Eye-Catching Snapchat Videos with Incredible Video Editor
What Does a Pin Mean on Snapchat?
If you are new to the term Pin in Snapchat, it is simply a function to help keep certain contacts or messages on top of your Snapchat feed. Pinning feature is available for the iOS app only till now. All you need to do is swipe right to go to the chat screen. Here you need to tap and hold the finger on a friend’s name or a conversation. Tap on chat settings to select ‘Pin Conversation’ as an option. This will set the friends and the conversations you have with them on top of the feed on your Snapchat account.
It helps you to communicate with a person easily and not have to scroll through other notifications to find a message or conversation chain that you want to access frequently.
How to Pin/Unpin Someone on Snapchat?
It is a small step that helps you pin conversations at the top of your Snapchat feed. However, with this simple feature, you can easily navigate through the app, making the process faster and convenient. How to pin someone on Snapchat might be a small aspect but definitely helps upgrade your Snapchat experience. Once conversations are pinned on top, new snaps or chats from such friends or groups would show up foremost.
Steps to do so are as follows:
- 1.Visit Friends Screen
- 2.Press and Hold on Contact or Entry
- 3.Choose Pin Option
- 4.Customize the Pins
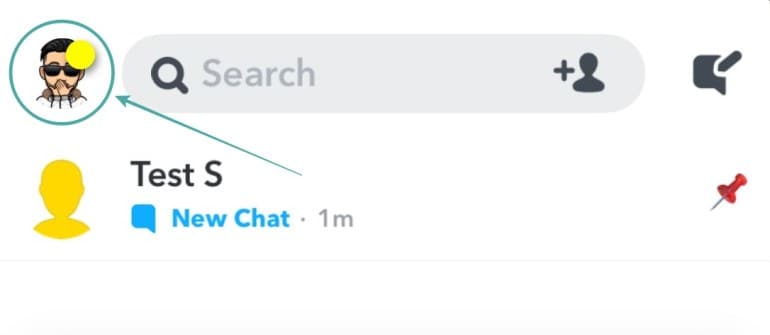
1.Visit Friends Screen
Once you are on the app, visit the Friends screen. To do so you need to swipe right from the Camera screen.
source:i1.wp.com
2.Press and Hold on Contact or Entry
To pin a contact or a conversation thread, press and hold down on the same.
source:webtrickz.com
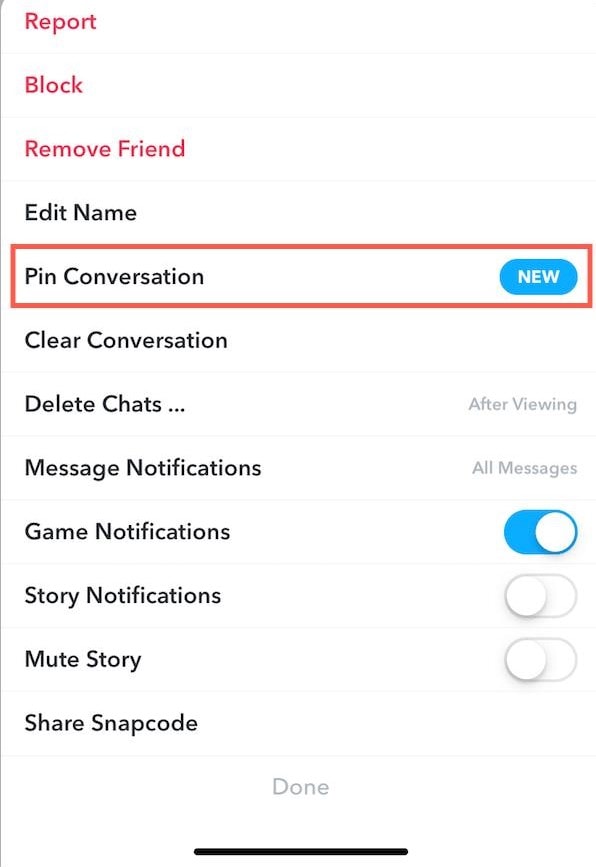
3.Choose Pin Option
There would be a number of options that would show up and tap on ‘Chat Settings’. Here you will find Pin Conversation as an option.
4.Customize the Pins
When you pin a contact or a conversation, it is represented by a pushpin in red by default. You can customize the pins to give them character and differentiate one contact from another. Visit Settings in My Profile. Scroll down and select Manage under the Additional Settings option. Tap on Friend emojis. This option allows you to change push pins to different emojis.
source:miro.medium.com
You can also unpin contact or conversation. Steps to do so remain similar. You can visit Chat Settings and choose Unpin Conversation. Also, an important thing to know is that your contacts would not be notified if you pin or even unpin their conversations. Hence, there is no social pressure when you use this feature. Also, you can pin at most three conversations on your Snapchat feed.
Create Eye-Catching Snapchat Videos with Incredible Video Editor
Filmora is a video editing tool that has a free as well as paid, premium version. Even with the free version users can edit and make videos of high quality. The software is useful if you wish to edit 4K videos. There are tools that support audio as well as video. It offers many options to add on styling, customizing, and other effects. The tool helps users add on overlays, audio, insert texts as well as animation effects.
If you wish to make your Snapchat videos impressive, this tool can come in handy. You can add on different kinds of effects, some of Hollywood movie standards. It allows you to crop and personalize video areas easily. For professional touches, you can add on dedications, tributes, stories in such videos. You can also increase or decrease video size, tilt, and shift or blur certain parts of a video. You can even rotate or flip audio or video content using this tool. It helps to remove video noise as well.
If you wish to make funny videos on Snapchat here are some ways to do so with the editor software:
1.Use Basic Edit Tools
If you wish to edit a video shot using Snapchat, you can easily do so with Filmora. You can start by touching up the video and enhancing the audio. Even if the original video shot is a funny one, you can enhance the effect by using all the basic handy editing tools on Filmora. Trim out portions that are unnecessary, add in background music, color corrections. You can double click on a clip that you add to the timeline of Filmora. The video then enters the editing panel and all edits are easy to do here.
2.Picture-In-Picture
To make funny videos you could put in several video clips in a frame. This helps tell different threads of a storyline. With Filmora it is easy to achieve such an effect. You simply need to drag and then drop a video or an overlay image. Do so above a background video. You can then adjust the duration of the overlay clip to match the background video. It is also possible to choose a template and apply it to your video with a single click. You can then drag a funny image or photo to the timeline and customize the position.
3.Record Voiceover
No funny video is complete without a strange and funny voice narrating the incidents. It is easy to replace audio as well as record voiceover for your Snapchat video using Filmora. All you need to do is click on the record button which captures voice recording in good quality. You can even change your voice or playing speed. Additionally, you can also remove or mute the original audio track and replace the same with a new recording.
4.Apply Different Effects
There are several templates included with Filmora. It can turn video clips and common photos into exciting and funny videos. You can add effects like a laugh, scream, fire, and snow with simple drag and drop gestures.
The tools that Filmora offers are several for making your Snapchat videos funny. You can add amazing effects effortlessly. For instance, you could toggle around with features such as Face-off, Mosaic, or Tilt-shift. These are professional editing features that can make your Snapchat video stand out and impress.
Once you have saved the effects on your video, you can preview the final output in the preview area. It is easy to share the video through the Export feature. You can also upload it to your Snapchat account and then share it with your friends and groups.
Conclusion
Snapchat enables you to share your favorite moments with your friends or different groups. You can easily know how to pin someone on Snapchat on top of your feed using the settings options elaborated above. Finally, to make your Snapchat videos funny and impressive, make use of the film editor software Filmora. It has easy tools that can make your video look professional and impressive.
Ollie Mattison
Ollie Mattison is a writer and a lover of all things video.
Follow @Ollie Mattison
Ollie Mattison
Mar 27, 2024• Proven solutions
One of the features that Snapchat provides is the ability to pin your contacts or conversations that you deem important. This will make the contacts or the conversations appear on top of the feed in your account. It saves you time from having to scroll through notifications from others to the ones that hold your interest. The process of how to pin someone on Snapchat is easy to do and is a helpful feature. Here we will explore how to do it and ways of making eye-catching Snapchat videos.
- Part 1: What Does a Pin Mean on Snapchat?
- Part 2: How to Pin/Unpin Someone on Snapchat?
- Part 3: Create Eye-Catching Snapchat Videos with Incredible Video Editor
What Does a Pin Mean on Snapchat?
If you are new to the term Pin in Snapchat, it is simply a function to help keep certain contacts or messages on top of your Snapchat feed. Pinning feature is available for the iOS app only till now. All you need to do is swipe right to go to the chat screen. Here you need to tap and hold the finger on a friend’s name or a conversation. Tap on chat settings to select ‘Pin Conversation’ as an option. This will set the friends and the conversations you have with them on top of the feed on your Snapchat account.
It helps you to communicate with a person easily and not have to scroll through other notifications to find a message or conversation chain that you want to access frequently.
How to Pin/Unpin Someone on Snapchat?
It is a small step that helps you pin conversations at the top of your Snapchat feed. However, with this simple feature, you can easily navigate through the app, making the process faster and convenient. How to pin someone on Snapchat might be a small aspect but definitely helps upgrade your Snapchat experience. Once conversations are pinned on top, new snaps or chats from such friends or groups would show up foremost.
Steps to do so are as follows:
- 1.Visit Friends Screen
- 2.Press and Hold on Contact or Entry
- 3.Choose Pin Option
- 4.Customize the Pins
1.Visit Friends Screen
Once you are on the app, visit the Friends screen. To do so you need to swipe right from the Camera screen.
source:i1.wp.com
2.Press and Hold on Contact or Entry
To pin a contact or a conversation thread, press and hold down on the same.
source:webtrickz.com
3.Choose Pin Option
There would be a number of options that would show up and tap on ‘Chat Settings’. Here you will find Pin Conversation as an option.
4.Customize the Pins
When you pin a contact or a conversation, it is represented by a pushpin in red by default. You can customize the pins to give them character and differentiate one contact from another. Visit Settings in My Profile. Scroll down and select Manage under the Additional Settings option. Tap on Friend emojis. This option allows you to change push pins to different emojis.
source:miro.medium.com
You can also unpin contact or conversation. Steps to do so remain similar. You can visit Chat Settings and choose Unpin Conversation. Also, an important thing to know is that your contacts would not be notified if you pin or even unpin their conversations. Hence, there is no social pressure when you use this feature. Also, you can pin at most three conversations on your Snapchat feed.
Create Eye-Catching Snapchat Videos with Incredible Video Editor
Filmora is a video editing tool that has a free as well as paid, premium version. Even with the free version users can edit and make videos of high quality. The software is useful if you wish to edit 4K videos. There are tools that support audio as well as video. It offers many options to add on styling, customizing, and other effects. The tool helps users add on overlays, audio, insert texts as well as animation effects.
If you wish to make your Snapchat videos impressive, this tool can come in handy. You can add on different kinds of effects, some of Hollywood movie standards. It allows you to crop and personalize video areas easily. For professional touches, you can add on dedications, tributes, stories in such videos. You can also increase or decrease video size, tilt, and shift or blur certain parts of a video. You can even rotate or flip audio or video content using this tool. It helps to remove video noise as well.
If you wish to make funny videos on Snapchat here are some ways to do so with the editor software:
1.Use Basic Edit Tools
If you wish to edit a video shot using Snapchat, you can easily do so with Filmora. You can start by touching up the video and enhancing the audio. Even if the original video shot is a funny one, you can enhance the effect by using all the basic handy editing tools on Filmora. Trim out portions that are unnecessary, add in background music, color corrections. You can double click on a clip that you add to the timeline of Filmora. The video then enters the editing panel and all edits are easy to do here.
2.Picture-In-Picture
To make funny videos you could put in several video clips in a frame. This helps tell different threads of a storyline. With Filmora it is easy to achieve such an effect. You simply need to drag and then drop a video or an overlay image. Do so above a background video. You can then adjust the duration of the overlay clip to match the background video. It is also possible to choose a template and apply it to your video with a single click. You can then drag a funny image or photo to the timeline and customize the position.
3.Record Voiceover
No funny video is complete without a strange and funny voice narrating the incidents. It is easy to replace audio as well as record voiceover for your Snapchat video using Filmora. All you need to do is click on the record button which captures voice recording in good quality. You can even change your voice or playing speed. Additionally, you can also remove or mute the original audio track and replace the same with a new recording.
4.Apply Different Effects
There are several templates included with Filmora. It can turn video clips and common photos into exciting and funny videos. You can add effects like a laugh, scream, fire, and snow with simple drag and drop gestures.
The tools that Filmora offers are several for making your Snapchat videos funny. You can add amazing effects effortlessly. For instance, you could toggle around with features such as Face-off, Mosaic, or Tilt-shift. These are professional editing features that can make your Snapchat video stand out and impress.
Once you have saved the effects on your video, you can preview the final output in the preview area. It is easy to share the video through the Export feature. You can also upload it to your Snapchat account and then share it with your friends and groups.
Conclusion
Snapchat enables you to share your favorite moments with your friends or different groups. You can easily know how to pin someone on Snapchat on top of your feed using the settings options elaborated above. Finally, to make your Snapchat videos funny and impressive, make use of the film editor software Filmora. It has easy tools that can make your video look professional and impressive.
Ollie Mattison
Ollie Mattison is a writer and a lover of all things video.
Follow @Ollie Mattison
Also read:
- [Updated] Mastering Camera Roll Sharing in Just a Few Steps for 2024
- [New] Crafting Unique Snapchat Experiences with 120+ Innovative Ideas for Personal Stories for 2024
- 2024 Approved Best Practices for Sharing Visuals in MS Teams with Snap Camera
- In 2024, Mastering Camera Roll Sharing in Just a Few Steps
- [Updated] 2024 Approved Creating Characterful Images with Animated Filters
- 2024 Approved Pixel Prowess Unleashed Pro Techniques for Filters Mastery
- [New] The Duel of Apps Comparative Analysis of TikTok and Snapchat for 2024
- [New] Quick & Easy Capturing the Perfect Mac-Snapped Footage
- [Updated] The Essential Guide to Creating Snaps on Snapchat
- Analyzing Lack of Interaction Is It a Block, In 2024
- [New] In 2024, Bring Your Imagination to Life Using Cartoony Filters in Snapchat
- [New] 2024 Approved Kinja Celebs Chatting via Snapchat
- [New] 2024 Approved Navigating the World of Snapchat for Professional Growth
- In 2024, Keep It Hot - Ideas for Uninterrupted Snapchat Connections
- 2024 Approved Cutting-Edge Tips for Making Masterpieces with Snaps
- In 2024, TuneUp Snapchat A Guide to Musical Video Clips
- [Updated] Most Popular Snapchat Filters and Lenses That You Want to Try
- [New] 2024 Approved The Art of Targeting Optimizing Ad Reach on Snap
- [Updated] Differentiate with Style on Snapchat Top 120+ Narratives for Your Private Stories
- [Updated] In 2024, Digital Memory Management Saving Snaps From Social Platforms
- [Updated] Snapchat-Friendly How to Use Your Camera Roll Effectively for 2024
- 2024 Approved 99+ Million View Snapshot Amusing Emoji Lore
- [New] 2024 Approved Snapchat Emojis Explained More Than Meets the Eye
- Unleash Your Inner Animator Easily Share Gifs on Snapchat
- 2024 Approved Unlocking Creative Expression Tips for Sharing GIFs on Snapchat
- [New] In 2024, Unleash Your Inner Manga Learn Snapchat's Anime Filter Magic
- [Updated] Elevate Your Social Media Presence with These Snapchat Strategies for 2024
- [New] In 2024, Crafting Personalized Storytelling on Snapchat
- [New] Quick Guide to Achieving Video Freeze Effects on Snapchat
- 2024 Approved The Ultimate Guide to Reverse Playback in Snapchat
- [New] 2024 Approved Easy Guide to Crafting Fun Snapchat Lenses
- [New] Snapchat for MAC Quick Installation Tips for 2024
- 2024 Approved Earning Through Snaps A Guide
- In 2024, KakaoTalk Elites' Flash Chats on Snapchat
- [New] Perfect the Art of Posting on Snapchat (15 Tips) for 2024
- [Updated] 2024 Approved Continuous Connection Avoiding Streak Breakers on Snapchat
- [Updated] Unlock the Power of Your Camera with Snapchat's Tools
- 2024 Approved Snapchat’s Artistic Palette The Anime Filter Experience
- [New] Mastery Guide Installing Snapchat on Mac OS for 2024
- [Updated] The 10 Steps to Crafting Captivating & Click-Worthy Snap Ads for 2024
- [New] Boosting Income via Social Media Snapchat's Methods
- [New] Snapchat's Creative Frontier Mastering More than 120 Stories with Individual Flair for 2024
- In 2024, Quick Tips for Crafting and Perfecting Multisnapping Snapchat Stories
- Securely Transferring Camera Photos to Snapchat Correctly for 2024
- [New] 2024 Approved Unlocking the Potential of Cartoon Face Lens in Snapchat
- [Updated] Innovative Ideas to Make Money From Your Snapchat Community
- [Updated] 2024 Approved Becoming a Snapchat Illustration Wizard
- In 2024, Essential Mobile Tips for Saving Your Snapchat Videos
- [New] A Step-by-Step Guide to Mastering Business on Snap for 2024
- In 2024, Your Snap Chronicles Await Over 120 Ideas to Craft Personal and Distinctive Story Titles
- Updated Best Online Tools to Extract Audio From Video Files for 2024
- Will Pokémon Go Ban the Account if You Use PGSharp On Honor 80 Pro Straight Screen Edition | Dr.fone
- In 2024, Rapid Renders of PowerPoint Plays
- [New] In 2024, Advanced Techniques for Quieter Video Calls on Skype
- [Updated] Becoming an Expert in Video Capturing Streamlabs OBS Guide
- [Updated] Precision Playbacks Mastering 4 Methods of Recording on Xbox for 2024
- In 2024, VideoHarvest Downloading Fb Content
- How to Unlock SIM Card on OnePlus Ace 3 online without jailbreak
- How to make a digital signature for Word 2000
- [Updated] Laptop & Web Navigating Live Video Communication in WhatsApp
- Can I use iTools gpx file to catch the rare Pokemon On Oppo A78 5G | Dr.fone
- [New] In 2024, 2023 | How to Find Facebook Recently Watched Videos?
- In 2024, Recommended Best Applications for Mirroring Your Sony Xperia 10 V Screen | Dr.fone
- Twitta Visuals Audio Extraction Services for 2024
- How to Find iSpoofer Pro Activation Key On Honor X50? | Dr.fone
- New The Top Free AVI Video Editors You Need to Try for 2024
- How to Cast Motorola Moto G34 5G Screen to PC Using WiFi | Dr.fone
- Updated In 2024, Pinpoint Synthetic Soundscapes Mimicking Brushwork
- [Updated] In 2024, Instagram Insights Identifying Your Post's Audience
- Updated 2024 Approved Hear & Save Discovering the Best Audio Devices for Effortless Voice Recording
- [New] In 2024, Beats in Pictures The Insta Storytelling Wave
- [New] Top Mac Frame Freezes Collection (Limit 156 Chars) for 2024
- Ultimate Guide to Action Film Snapshotting for 2024
- [Updated] In 2024, Strategies for Succeeding with Facebook Video Marketing and Revenue
- Updated How to Remove Audio From MP4 Video
- Updated 2024 Approved Top 10 Free Video Stabilization Tools Online for Smooth Footage
- In 2024, The Best iSpoofer Alternative to Try On Vivo S18e | Dr.fone
- Transform Any Audio with These 7 Innovative, Cost-Free Online Trimming Applications for 2024
- In 2024, How Many Attempts To Unlock iPhone 13 Pro Max | Dr.fone
- 8 Workable Fixes to the SIM not provisioned MM#2 Error on Honor 90 Pro | Dr.fone
- How to Fix Samsung Galaxy A24 Find My Friends No Location Found? | Dr.fone
- Identify missing or malfunctioning hardware drivers with Windows Device Manager on Windows 11/10/7
- Updated Sleek and Powerful The Best Lightweight Video Editing Tools
- New Create Stunning Videos Best Collage Makers for iOS Devices for 2024
- Accessing & Saving FB Stories Made Simple 5 Top Tactics (Mobile/Desktop) for 2024
- IMovie for Windows 10? No! Here Are the Top Alternatives for 2024
- Updated 2024 Approved Methods for Designing Audio Gradual Reduction Effect
- The Easiest Way to Edit AVI Files Split, Cut, and Trim in Minutes for 2024
- In 2024, How to get the dragon scale and evolution-enabled pokemon On Vivo V29 Pro? | Dr.fone
- [New] Seamless Live Broadcasting on Facebook A Simple Guide for 2024
- [New] Avoid Being Disconnected Key Steps for FB Freedom
- Title: "[Updated] 2024 Approved Easily Manage Your Snapchat Video Speed"
- Author: Scott
- Created at : 2024-05-23 11:05:17
- Updated at : 2024-05-24 11:05:17
- Link: https://snapchat-videos.techidaily.com/updated-2024-approved-easily-manage-your-snapchat-video-speed/
- License: This work is licensed under CC BY-NC-SA 4.0.
