
!["[Updated] 2024 Approved Clandestine SnapSnapper Concealed Techniques for Image Capturing"](https://www.lifewire.com/thmb/o7l_Dn7Ptjx09bR0D-TWUViQhpU=/400x300/filters:no_upscale():max_bytes(150000):strip_icc()/Neurons-c0191b68778e4529a26a159c12733ed9.jpg)
"[Updated] 2024 Approved Clandestine SnapSnapper Concealed Techniques for Image Capturing"
Clandestine SnapSnapper: Concealed Techniques for Image Capturing
How to Screenshot on Snapchat [5 Ways]

Max Wales
Mar 27, 2024• Proven solutions
A great way to share specific memories with those not on the social platform, or even for those looking to make personalized and meaningful memoir collages for their friends and loved ones, there are plenty of ways to inconspicuously screenshot on Snapchat without the sender being made aware.
Becoming one of the most popular and highly favored Social Media platforms over the past several years, Snapchat is a great place to showcase 10-second snippets of your day-to-day life with your followers, friends, and family members. From selfies to shots of food, videos taken during nights on the town to holiday adventures, Snapchat is the perfect video and image-sharing platform for Social Media fans.
![]()

The All-in-One Screen Recorder & Video Editor
- Record PC screen , voiceover, and webcam simultaneously
- Edit recorded clips quickly with a wide range of professional tools
- Built-in plentiful templates and effects
- Export to MP4, MOV, MKV, GIF and multiple formats
For Win 7 or later (64-bit)
For macOS 10.12 or later
 Secure Download
How to screenshot on snapchat without stimulating a notification?
An incredible application that allows you to send and share videos and images with friends and followers, Snapchat is designed to help you stay connected in more ways than one. Featuring an anti-screenshot notification system that automatically notifies posters when a recipient or audience member screenshots a snap, it’s become increasingly harder to screenshot without being detected.
That being said, there are still plenty of other methods that offer a practical alternative to ensure you avoid that awkward automated notification.
Option 1. Use Another Phone or Mobile Device to Take Snapchat Screenshot
An easy and risk-free way to capture and store a specific snap with ease, utilizing another mobile device or camera is a great method that requires very little effort. Simply us a second phone, or a nearby tablet, to record the whole duration of the video or photo.
Although the quality of the recording won’t be as crisp and clear as it appears on the handheld, this is a reliable and fool-proof way to preserve those special snaps. From those video recordings, you should then be able to crop out the video or image you needed.
Missed it?
Why not take advantage of Snapchat’s “replay” mode to ensure you get the perfect shot – but be warned, posters also get notified of this too.
Option 2. Use the Built-In Screen Recoding Tool on iOS11
If you didn’t already know, there’s a built-in screen recording software within iOS11 that allows you to effectively capture and record snaps with ease. Lying within the Settings of any iPhone, follow these easy steps on how to live record your screen:
- Step 1: Head to Settings > Control Centre > Customize Controls
- Step 2: Locate the “Screen Recording” functionality
- Step 3: Select the small cross to add it to your Control Centre
- Step 4: To activate – Tap the icon with the 2 concentric circles to start recording. To complete a recording, simply tap the red bar that’s present at the top of the screen and select “End Recording”.
Although it’s not possible to start recording a snap whilst it’s already open, it’s best to start recording before you opt to open a specific message.
Please note: If you have updated to Snapchat version 10.17.5, the posters will be notified each and every time you initiate and capture a recording through the use of this built-in recorder.
Option 3. Use QuickTime Screen Capture on a Mac
A little more technical than simply using another mobile device to record a snap, using the QuickTime Player is an efficient and high-quality method for those looking to secretly store a snapchat post.
To start recording snaps, follow these simple steps:
- Step 1: Connect your iPhone to your Mac
- Step 2: Open the QuickTime Player application
- Step 3: Select File > New Movie Recording from the menu
- Step 4: Once loaded, simply hover the mouse beside the recording button. By clicking the small arrow, you’ll be provided with a range of different recording options
- Step 5: Select your Phone as the Movie Recording Input
Once connected, your Mac screen should now be mirroring your mobile device. Just like you would on your phone, simply hit record and head on over to the Snapchat application to begin recording.
Option 4. Use the Mirror Feature for Android
Similar to the use of QuickTime or the iOS11 Screen Recording software, Screen Mirroring is another effective method for capturing Snapchat screenshots without the poster being made aware. By connecting a HDMI cable to both your TV and laptop, or by accessing the “Screen Mirroring” application that’s often built-in to most Smart Phones and Android devices, it’s possible to mirror/cast the active screen on your device onto an external platform.
In doing so, you’re presented with the opportunity to utilize another device to record a playing snap or even share a recently received snap with other audience members that are present in the room.
Option 5. Delay the Snapchat Screenshot Notification
A method for those feeling a more confident or even for those that aren’t too bothered about their posters receiving a notification in the long run, this method is a great way to delay the arrival of that pop-down notification.
To delay the notification process, follow these simple steps:
- Step 1: Load the Snapchat application on your mobile device
- Step 2: Find the snap you want to open/record (ensure it is fully loaded)
- Step 3: Turn off WiFi, Bluetooth, Mobile Data
- Step 4: Turn on the Airplane Mode
- Step 5: Open the snap and take your screenshot
- Step 6: Wait approximately 30 seconds and then turn all your connections back on
Designed to postpone the process of the poster receiving a notification, but not allowing for viewers to screenshot undetected, this method allows audience members to screenshot snaps from those that are perhaps a little unobservant when it comes to checking their notifications.
Be warned though, some posters may catch on to this method of screenshotting and they may stop sharing their videos and images with you.
Summary
Despite there being plenty of reasons why there might be a need for you to record a Snapchat memory without the sender being made aware, it’s important to note that this can also be viewed as a breach of privacy with senders not only being informed of who has taken a screenshot, but also how many times they’ve done so and of which post.
With Snapchat designed to maintain the notion that any media sent between users is considered temporary, thanks to the 5-10 second duration limit, the methods listed above, although not fail-proof, are suggested as simple yet effective ways to avoid triggering an unwanted notification whilst using this highly popular social networking application.


Max Wales
Max Wales is a writer and a lover of all things video.
Follow @Max Wales
Max Wales
Mar 27, 2024• Proven solutions
A great way to share specific memories with those not on the social platform, or even for those looking to make personalized and meaningful memoir collages for their friends and loved ones, there are plenty of ways to inconspicuously screenshot on Snapchat without the sender being made aware.
Becoming one of the most popular and highly favored Social Media platforms over the past several years, Snapchat is a great place to showcase 10-second snippets of your day-to-day life with your followers, friends, and family members. From selfies to shots of food, videos taken during nights on the town to holiday adventures, Snapchat is the perfect video and image-sharing platform for Social Media fans.
![]()
The All-in-One Screen Recorder & Video Editor
- Record PC screen , voiceover, and webcam simultaneously
- Edit recorded clips quickly with a wide range of professional tools
- Built-in plentiful templates and effects
- Export to MP4, MOV, MKV, GIF and multiple formats
For Win 7 or later (64-bit)
For macOS 10.12 or later
Secure Download
How to screenshot on snapchat without stimulating a notification?
An incredible application that allows you to send and share videos and images with friends and followers, Snapchat is designed to help you stay connected in more ways than one. Featuring an anti-screenshot notification system that automatically notifies posters when a recipient or audience member screenshots a snap, it’s become increasingly harder to screenshot without being detected.
That being said, there are still plenty of other methods that offer a practical alternative to ensure you avoid that awkward automated notification.
Option 1. Use Another Phone or Mobile Device to Take Snapchat Screenshot
An easy and risk-free way to capture and store a specific snap with ease, utilizing another mobile device or camera is a great method that requires very little effort. Simply us a second phone, or a nearby tablet, to record the whole duration of the video or photo.
Although the quality of the recording won’t be as crisp and clear as it appears on the handheld, this is a reliable and fool-proof way to preserve those special snaps. From those video recordings, you should then be able to crop out the video or image you needed.
Missed it?
Why not take advantage of Snapchat’s “replay” mode to ensure you get the perfect shot – but be warned, posters also get notified of this too.
Option 2. Use the Built-In Screen Recoding Tool on iOS11
If you didn’t already know, there’s a built-in screen recording software within iOS11 that allows you to effectively capture and record snaps with ease. Lying within the Settings of any iPhone, follow these easy steps on how to live record your screen:
- Step 1: Head to Settings > Control Centre > Customize Controls
- Step 2: Locate the “Screen Recording” functionality
- Step 3: Select the small cross to add it to your Control Centre
- Step 4: To activate – Tap the icon with the 2 concentric circles to start recording. To complete a recording, simply tap the red bar that’s present at the top of the screen and select “End Recording”.
Although it’s not possible to start recording a snap whilst it’s already open, it’s best to start recording before you opt to open a specific message.
Please note: If you have updated to Snapchat version 10.17.5, the posters will be notified each and every time you initiate and capture a recording through the use of this built-in recorder.
Option 3. Use QuickTime Screen Capture on a Mac
A little more technical than simply using another mobile device to record a snap, using the QuickTime Player is an efficient and high-quality method for those looking to secretly store a snapchat post.
To start recording snaps, follow these simple steps:
- Step 1: Connect your iPhone to your Mac
- Step 2: Open the QuickTime Player application
- Step 3: Select File > New Movie Recording from the menu
- Step 4: Once loaded, simply hover the mouse beside the recording button. By clicking the small arrow, you’ll be provided with a range of different recording options
- Step 5: Select your Phone as the Movie Recording Input
Once connected, your Mac screen should now be mirroring your mobile device. Just like you would on your phone, simply hit record and head on over to the Snapchat application to begin recording.
Option 4. Use the Mirror Feature for Android
Similar to the use of QuickTime or the iOS11 Screen Recording software, Screen Mirroring is another effective method for capturing Snapchat screenshots without the poster being made aware. By connecting a HDMI cable to both your TV and laptop, or by accessing the “Screen Mirroring” application that’s often built-in to most Smart Phones and Android devices, it’s possible to mirror/cast the active screen on your device onto an external platform.
In doing so, you’re presented with the opportunity to utilize another device to record a playing snap or even share a recently received snap with other audience members that are present in the room.
Option 5. Delay the Snapchat Screenshot Notification
A method for those feeling a more confident or even for those that aren’t too bothered about their posters receiving a notification in the long run, this method is a great way to delay the arrival of that pop-down notification.
To delay the notification process, follow these simple steps:
- Step 1: Load the Snapchat application on your mobile device
- Step 2: Find the snap you want to open/record (ensure it is fully loaded)
- Step 3: Turn off WiFi, Bluetooth, Mobile Data
- Step 4: Turn on the Airplane Mode
- Step 5: Open the snap and take your screenshot
- Step 6: Wait approximately 30 seconds and then turn all your connections back on
Designed to postpone the process of the poster receiving a notification, but not allowing for viewers to screenshot undetected, this method allows audience members to screenshot snaps from those that are perhaps a little unobservant when it comes to checking their notifications.
Be warned though, some posters may catch on to this method of screenshotting and they may stop sharing their videos and images with you.
Summary
Despite there being plenty of reasons why there might be a need for you to record a Snapchat memory without the sender being made aware, it’s important to note that this can also be viewed as a breach of privacy with senders not only being informed of who has taken a screenshot, but also how many times they’ve done so and of which post.
With Snapchat designed to maintain the notion that any media sent between users is considered temporary, thanks to the 5-10 second duration limit, the methods listed above, although not fail-proof, are suggested as simple yet effective ways to avoid triggering an unwanted notification whilst using this highly popular social networking application.
Max Wales
Max Wales is a writer and a lover of all things video.
Follow @Max Wales
Mastering Snapchat: Flip Your Videos Backwards
Snapchat has become one of the foremost popular chat applications for young adults and teenagers worldwide. Released in 2011, it gives you a choice to feature captions, drawings, and filters to your photos and videos referred to as snaps. Few people want to see the videos in reverse on Snapchat.
But, only a few people know about the Snapchat reverse filter. Don’t worry if you are clueless about the reverse video Snapchat process. Since reversing a video, snap is as easy as applying a filter. This article will enable you to reverse Snapchat for iOS and Android versions quickly.
In this article
01 How to Record Reverse video on Snapchat for free with the built-in filter?
02 How to Add Reverse Effect to Existing Videos on Snapchat?
03 Best Apps to Create Reverse Video for Snapchat.
04 When Should You Apply the Reverse Filter to Video on Snapchat?
05 Tips for a good reverse video
Part 1: How to Record Reverse video on Snapchat for free with the built-in filter?
Now that you need to know how to invert a video on Snapchat do not remain absent from this dialog. As you all know, it is beautifully simple to record a specific video on Snapchat. Like recording a video, turning around is also a pretty easy one.
Let’s examine in detail how you’ll switch Snapchat video via a free built-in reverse feature on Snapchat.
Note: Video duration should not be more than 10 seconds.
Step 1: Begin to record the video.
Open your Snapchat, then move to the camera screen. Later, capture a specific video clip by holding down a button display within the middle of the screen.
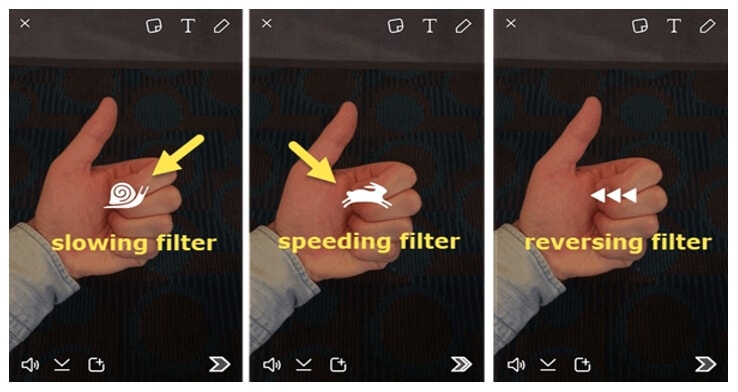
Step 2: T urn around the filter effect.
After capturing a video on Snapchat, another step for you’ll be to undertake to go for a turnaround channel there that is swipe to the left. By swiping, you’ll discover the reverse option alternative quickly. When you reach after swiping, you will find several types of filters. There, stay on the reverse screen.
Step 3: Share the altered video.
After switching your video to reverse mode, you’ll be able to share it with your companions. If you want to include more impacts in the video, tap the symbol button on your right side. Doing so will empower you to add effect. That’s all for turning around a video on Snapchat. Finally, you will get the reversed video with varying speed options.
You may also like: How to slow down video on Snapchat.
Part 2: How to Add Reverse Effect to Existing Videos on Snapchat?
This strategy works for both recordings you previously took with the Snapchat app and those you transfer from your phone’s collections. Follow the following step guidelines to reverse video on Snapchat.
Step 1: Open Snapchat and select the video
After landing on the main screen, you will see the camera icon. Swipe up the screen. You will see different options. Either choose the short video of duration less than 10 sec from ‘Snaps’ sections for a video you had previously recorded in Snapchat. Or else you can go for ‘Camera Roll’ to select a video from the phone camera Gallery.
Step 2: Edit Snap Menu and reverse video
Tap on the three-dot symbols on the upper right portion of the screen to open the menu. Tap on ‘Edit Snap’ from the given options. Swipe Left and find the reverse filter in Snapchat from all the filters. Selecting the reverse option will enable the Snapchat reverse filter effect on the selected video.
Part 3: Best Apps to Create Reverse Video for Snapchat
1. CapCut
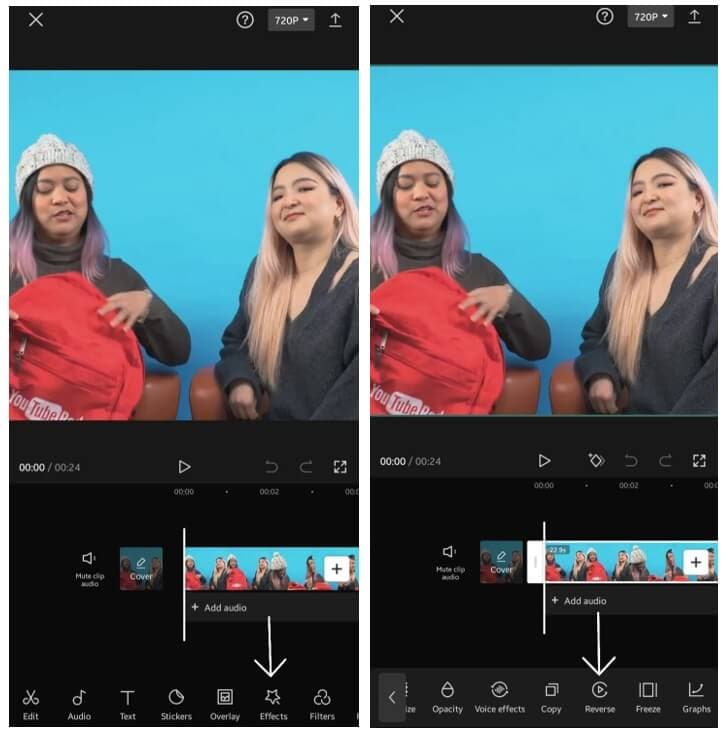
CapCut may be a portable app for iOS and Android gadgets, mainly created to complement the essential video altering highlights of the famous social stage. Several critical features of CapCut, bring it unique for social media. For example, Split function, Speed control, High defined filters, effect, and many more.
But if we talk about its reverse feature, a triangle-shaped figure inside a circle icon is known as the reverse feature in the software. This is not so tricky to use. But you can use this feature only on short videos. You can reverse it in slow motion after applying high-quality effects in your video. This version is available on iPhone as well as on Android devices.
You can check this article and find out the details about how to edit videos with CapCut.
2. Wondershare Filmora
Wondershare Filmora is the most recommended video-altering computer program that creates astonishing recordings productively employing a vast extent of powerful altering devices. Wondershare Filmora uses a delightfully realistic plan that makes it simple for anybody to become an incredible video editor.
Filmora is the most suitable app for video playback and reverses the video. And not only this, it has many other features that may facilitate your videos more engaging. If you’re trying to find an all-around video app, Filmora is the one for you. It has various kinds of critical features of Wondershare Filmora. For example, support to 4K editing, GIF, Noise removal, Advanced text editor, etc.
Talking its reverse feature is the ideal thing. It has professional tools for reversing video. Your videos will become more attractive through reverse, and additional features and concise videos will be on top.
3. Reverse Movie FX - Magic

If you need to turn around your recordings uploaded on Snapchat, Motion picture FX can make the difference. To begin with, record a video. Then, follow the steps to select the motion picture part, and press, begin. Switch Motion picture FX will start switching a video.
The main features of Reverse Movie FX- magic video are: Reverse Motion FX - Magic video carries colossal highlights for turning around a video. You will discover staggering liveliness and imaginative moves in this application. It has a smooth altering interface and timeline. You can include an inverted impact to your video by fair tapping an alternative.
Reverse Movie FX is a reverse video app available for Android and iOS devices. It offers reverse video options, including reversed + original (loop), original + reversed (loop), adding music, and many more.
Part 4: When Should You Apply the Reverse Filter to Video on Snapchat?
Reversing your video on Snapchat reflects how to show off a chain of occasions backward. This clear-out out is frequently satisfactory carried out to action-packed videos. For illustration, consider something as straightforward as dropping a shake onto a frozen pond that breaks through the ice. Rather than watching the ice smash after the video, you may apply the turnaround effect to appear the broken ice is coming back together as the video film plays in reverse.
Moving clouds, waterfall, hair flaunting, moving steps, playing with accessories, cycling, sky diving, breaking of glass, food making, makeup reverse videos, these kinds of videos easily catch trends on any social media platform.
Part 5: Tips for a good reverse video
Here are a few tips to assist you with the Snapchat reverse filter.
- Include voice: Once you utilize the turnaround effect, it’s not as it was the video that gets turned around. Any sound recorded with the video moreover gets turned around. This includes a tremendous impact on your clip as of now reversed video. So, beyond any doubt, say something while recording your video.
- Do the bizarre: If you’re aiming to be turning back time, your superior does it in fashion! Utilize the switch movement channel on things that don’t, as a rule, work that way. Like streaming water, flying feathered creatures, running mutts, you get the thought.
- Moderate that video down: Most phones these days have a few frames of slow-motion shooting mode in their camera app. Shoot your video in moderate movement, and after that, utilize the reverse motion channel on it.
- Shoot in great lighting: We know how terrible the Snapchat camera is. So, when shooting a video, shoot it in great characteristic light. Well, there you’ve got it! Have fun messing around with the reverse effect, and create a few intriguing science-defying snaps within the deal!
Conclusion
In the end, we hope that all your queries get cleared while reading this post. There are a few questions answered like:
- How to make a reverse video on Snapchat.
- Tips to make the reverse video better.
- How to use the in-built Snapchat reverse filter.
- Some apps create the best reverse videos.
Thus, I hope your queries are explicit after reading this post.
02 How to Add Reverse Effect to Existing Videos on Snapchat?
03 Best Apps to Create Reverse Video for Snapchat.
04 When Should You Apply the Reverse Filter to Video on Snapchat?
05 Tips for a good reverse video
Part 1: How to Record Reverse video on Snapchat for free with the built-in filter?
Now that you need to know how to invert a video on Snapchat do not remain absent from this dialog. As you all know, it is beautifully simple to record a specific video on Snapchat. Like recording a video, turning around is also a pretty easy one.
Let’s examine in detail how you’ll switch Snapchat video via a free built-in reverse feature on Snapchat.
Note: Video duration should not be more than 10 seconds.
Step 1: Begin to record the video.
Open your Snapchat, then move to the camera screen. Later, capture a specific video clip by holding down a button display within the middle of the screen.
Step 2: T urn around the filter effect.
After capturing a video on Snapchat, another step for you’ll be to undertake to go for a turnaround channel there that is swipe to the left. By swiping, you’ll discover the reverse option alternative quickly. When you reach after swiping, you will find several types of filters. There, stay on the reverse screen.
Step 3: Share the altered video.
After switching your video to reverse mode, you’ll be able to share it with your companions. If you want to include more impacts in the video, tap the symbol button on your right side. Doing so will empower you to add effect. That’s all for turning around a video on Snapchat. Finally, you will get the reversed video with varying speed options.
You may also like: How to slow down video on Snapchat.
Part 2: How to Add Reverse Effect to Existing Videos on Snapchat?
This strategy works for both recordings you previously took with the Snapchat app and those you transfer from your phone’s collections. Follow the following step guidelines to reverse video on Snapchat.
Step 1: Open Snapchat and select the video
After landing on the main screen, you will see the camera icon. Swipe up the screen. You will see different options. Either choose the short video of duration less than 10 sec from ‘Snaps’ sections for a video you had previously recorded in Snapchat. Or else you can go for ‘Camera Roll’ to select a video from the phone camera Gallery.
Step 2: Edit Snap Menu and reverse video
Tap on the three-dot symbols on the upper right portion of the screen to open the menu. Tap on ‘Edit Snap’ from the given options. Swipe Left and find the reverse filter in Snapchat from all the filters. Selecting the reverse option will enable the Snapchat reverse filter effect on the selected video.
Part 3: Best Apps to Create Reverse Video for Snapchat
1. CapCut
CapCut may be a portable app for iOS and Android gadgets, mainly created to complement the essential video altering highlights of the famous social stage. Several critical features of CapCut, bring it unique for social media. For example, Split function, Speed control, High defined filters, effect, and many more.
But if we talk about its reverse feature, a triangle-shaped figure inside a circle icon is known as the reverse feature in the software. This is not so tricky to use. But you can use this feature only on short videos. You can reverse it in slow motion after applying high-quality effects in your video. This version is available on iPhone as well as on Android devices.
You can check this article and find out the details about how to edit videos with CapCut.
2. Wondershare Filmora
Wondershare Filmora is the most recommended video-altering computer program that creates astonishing recordings productively employing a vast extent of powerful altering devices. Wondershare Filmora uses a delightfully realistic plan that makes it simple for anybody to become an incredible video editor.
Filmora is the most suitable app for video playback and reverses the video. And not only this, it has many other features that may facilitate your videos more engaging. If you’re trying to find an all-around video app, Filmora is the one for you. It has various kinds of critical features of Wondershare Filmora. For example, support to 4K editing, GIF, Noise removal, Advanced text editor, etc.
Talking its reverse feature is the ideal thing. It has professional tools for reversing video. Your videos will become more attractive through reverse, and additional features and concise videos will be on top.
3. Reverse Movie FX - Magic
If you need to turn around your recordings uploaded on Snapchat, Motion picture FX can make the difference. To begin with, record a video. Then, follow the steps to select the motion picture part, and press, begin. Switch Motion picture FX will start switching a video.
The main features of Reverse Movie FX- magic video are: Reverse Motion FX - Magic video carries colossal highlights for turning around a video. You will discover staggering liveliness and imaginative moves in this application. It has a smooth altering interface and timeline. You can include an inverted impact to your video by fair tapping an alternative.
Reverse Movie FX is a reverse video app available for Android and iOS devices. It offers reverse video options, including reversed + original (loop), original + reversed (loop), adding music, and many more.
Part 4: When Should You Apply the Reverse Filter to Video on Snapchat?
Reversing your video on Snapchat reflects how to show off a chain of occasions backward. This clear-out out is frequently satisfactory carried out to action-packed videos. For illustration, consider something as straightforward as dropping a shake onto a frozen pond that breaks through the ice. Rather than watching the ice smash after the video, you may apply the turnaround effect to appear the broken ice is coming back together as the video film plays in reverse.
Moving clouds, waterfall, hair flaunting, moving steps, playing with accessories, cycling, sky diving, breaking of glass, food making, makeup reverse videos, these kinds of videos easily catch trends on any social media platform.
Part 5: Tips for a good reverse video
Here are a few tips to assist you with the Snapchat reverse filter.
- Include voice: Once you utilize the turnaround effect, it’s not as it was the video that gets turned around. Any sound recorded with the video moreover gets turned around. This includes a tremendous impact on your clip as of now reversed video. So, beyond any doubt, say something while recording your video.
- Do the bizarre: If you’re aiming to be turning back time, your superior does it in fashion! Utilize the switch movement channel on things that don’t, as a rule, work that way. Like streaming water, flying feathered creatures, running mutts, you get the thought.
- Moderate that video down: Most phones these days have a few frames of slow-motion shooting mode in their camera app. Shoot your video in moderate movement, and after that, utilize the reverse motion channel on it.
- Shoot in great lighting: We know how terrible the Snapchat camera is. So, when shooting a video, shoot it in great characteristic light. Well, there you’ve got it! Have fun messing around with the reverse effect, and create a few intriguing science-defying snaps within the deal!
Conclusion
In the end, we hope that all your queries get cleared while reading this post. There are a few questions answered like:
- How to make a reverse video on Snapchat.
- Tips to make the reverse video better.
- How to use the in-built Snapchat reverse filter.
- Some apps create the best reverse videos.
Thus, I hope your queries are explicit after reading this post.
Also read:
- [New] MySpace Gurus Gabbing via Snapchat for 2024
- [New] 2024 Approved 15 Snapshot Strategies for Social Success on Snapchat
- 2024 Approved Easy Steps for Screening Snapchat on the Go
- [New] Snapchat-Friendly How to Use Your Camera Roll Effectively for 2024
- [Updated] 2024 Approved Top 15 Creative Ways to Use Filters on Snapchat
- [Updated] In 2024, The Complete Blueprint to Mastering Slow Motion in Snapchat
- [New] 2024 Approved TikTok & Snapchat Face-Off A User's Perspective Guide
- [Updated] The Essential Snapshot Strategies Snapchat Boomerangs Unveiled for 2024
- [New] Exclusive Crafting Uniqueness with 120+ Original Story Titles on Snapchat for 2024
- [New] No Trace SnapCaptures Discreet Photo-Taking Techniques for 2024
- [Updated] Optimize Video Playback with Snapchat Tricks
- [New] The Essential Guide to Snap Mastery for 2024
- Creating Impressive Slideshows with Video Delays in Snapchat for 2024
- [Updated] 2024 Approved Speedy Retrieval of Snap Archive
- [Updated] Maximizing Video Longevity Saving Snaps on Android & Mac for 2024
- [New] Captivating Content Perfecting Pictures Through Snapchat Edits for 2024
- [Updated] Securing Your Snapchat Memories Mobile Recorders' Guide for 2024
- [Updated] Ultimate Guide to Maximum Fitness Mac Recordings for Snapchat for 2024
- [New] Restoring Lost Eyes-Only Snapshots on Snapchat for 2024
- In 2024, Snapshot Savvy Exploring the Depths of Snapchat Filters
- [New] 2024 Approved MySpace Gurus Gabbing via Snapchat
- [New] The Essential Mac Tips for Creating Perfect Snaps
- [Updated] Elevate Your Digital Selfie Game with Top 20 Snap Filters
- [New] In 2024, Unraveling the Mystery What Hides in Snapchat Emoji Meanings?
- [New] The Soundtrack of Successful Snapchat Stories for 2024
- [New] Streamlined iPhone-Snapchat Linkage for Photographs & Memories
- [New] 2024 Approved Mood Makers Best Filter Choices to Improve Your Snap
- Guide to Flawless Transition of Phone' Cookies From Device to Social Media for 2024
- Unlocking Potential Snapchat Insights for Companies
- [Updated] Connect and Conquer Tips for Eternal Snapstreaks
- Captivating Comic Relief in Snapchat Graphics for 2024
- Digital Artistry Top-Ranked Snapchat Creativity Enhancers for 2024
- [Updated] Unleashing Creativity A Gif Sharing Blueprint on Snapchat for 2024
- [Updated] In 2024, The Ultimate Snapchat Slideshow Technique
- [Updated] Peeling Back Layers What Hides Beneath Each Snapchat Emoji for 2024
- [Updated] 2024 Approved Quick Voice Fixes for Your Snapchat Snaps Using Dual Methods
- [New] Elevate Your Social Narrative on Snapchat A Selection of Over 120 Storytelling Ideas for 2024
- [Updated] Step-by-Step Screen Recording Snapshots on Mobile
- The Ultimate Guide to Snapchat Video Opposites for 2024
- [New] In 2024, How to Create Snapchat Lenses Easily 2 Methods
- 2024 Approved Elevate Your Snapstreak Game with Savvy Tactics
- [New] 2024 Approved Revisiting Old Photos Sending Them as Snaps on Snapchat
- In 2024, A Step-by-Step Guide to Microsoft Teams Snap Photos
- [New] Must-Try Snap Filters The Ultimate Guide to Creativity
- 2024 Approved Avoid a Snapbreak Ways to Maintain Your Snapstreaks
- Gain Recovery of Personal Snapshots for 2024
- 2024 Approved Bring Your Imagination to Life Anime Style Filters on Snapchat
- [New] 2024 Approved Securely Saving Your Instagram Videos on PC and MacOS
- Proven Ways in How To Hide Location on Life360 For Apple iPhone XS Max | Dr.fone
- [Updated] 2024 Approved Maintain Proper Aspect Ratio for Tweeted Movies
- [New] Synergy in Copywriting The Trio Technique to Boost Your FB Campaign's Performance for 2024
- Updated The Newcomers Manual to Lexis Sound-Wave Processor
- In-Depth Analysis of Sound Purification with Adobe Audition Tools for 2024
- Full Guide to Hard Reset Your Lava Yuva 2 | Dr.fone
- Updated How to Make Every Call a Chuckle A List of 10 Voice Alteration Tricks for 2024
- In 2024, The Ultimate List 10 Vegas Pro Alternatives for Mac Users (Free and Paid)
- In 2024, How to Delete or Deactivate An Instagram Account Permanently
- [Updated] In 2024, Top 6 Mac Screen Capture Tools - Expert Picks
- Jumpstart with VRecorder Easy Installation Walkthrough for 2024
- Detailed guide of ispoofer for pogo installation On Vivo T2 5G | Dr.fone
- New In 2024, Your Search for the Best GIF Creator Tools Ends Here
- Free GIF Animation Studios for Looping Fun
- Essential Introduction Audio Tracks The Top 8 for Digital Creators
- In 2024, 7 Ways to Unlock a Locked Xiaomi 14 Phone
- [New] 2024 Approved Navigating Twitter's Reaction Videos Explained
- In 2024, Is Fake GPS Location Spoofer a Good Choice On Motorola Moto E13? | Dr.fone
- [New] Unraveling the Power of Video in Facebook Marketing for 2024
- Updated In 2024, Say Goodbye to Shaky Footage Advanced Stabilization in After Effects
- Title: "[Updated] 2024 Approved Clandestine SnapSnapper Concealed Techniques for Image Capturing"
- Author: Scott
- Created at : 2024-05-23 10:59:11
- Updated at : 2024-05-24 10:59:11
- Link: https://snapchat-videos.techidaily.com/updated-2024-approved-clandestine-snapsnapper-concealed-techniques-for-image-capturing/
- License: This work is licensed under CC BY-NC-SA 4.0.
