
:max_bytes(150000):strip_icc()/Familyroadtrip_Maskot_Getty-c760389eb6e64d6682aa79ceb9552967.jpg)
Unmasking the Significance of Snapchat Emojis
Unmasking the Significance of Snapchat Emojis
Snapchat Emojis: the Real Meaning You May not Know

Ollie Mattison
Mar 27, 2024• Proven solutions
If you’re a Snapchat user, you will have spotted the emojis that appear in your friends list next to the names of your friends. These Snapchat emojis don’t simply remain the same forever, but instead change over the course of time, and the changes themselves are based on the way that you interact with your friend. Only you are able to see the emojis. The Snapchat emojis themselves include stars, hearts, faces and more.
- Part1: What do exactly the Snapchat emojis mean?
- Part2: How to change the streak emojis on Snapchat
- Part3: How to get a Bitmoji on Snapchat
- Part4: Why to use Snapchat emojis
Part 1: What do exactly the Snapchat emojis mean?
In this section, we will tell you all about the different emojis on Snapchat. If you’ve been wondering what the Snap emoji meanings actually are, read on. A Gold Star next to someone’s name means they have replaced your snaps during the past 24 hours. A Yellow Star means you are #1 best friends with one another. You will send your largest amount of snaps to them and vice versa.
A Red Heart snap emoji is used to say that you have been #1 Bfs for a fortnight without interruption, whilst a Pink Heart Snapchat best friend emoji tells that that this has been the case for two months. If you see a baby emoji, this means you have only recently become friends with the person.
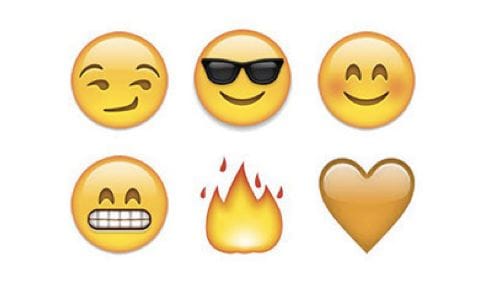
Have you seen a Face with Sunglasses? This means the person is B.Fs with one of your best friends and you send plenty of snaps to someone that they send many snaps to. A Grimacing Face tells you that your #1 is also their #1 friend and that the person you send the most snaps to is the same person they send the vast majority of their snaps to.
The Smirking Face shows that you are one of their B.Fs without this being reciprocated. In other words, they send you many snaps but you don’t return the favor. A Smiling Face means that you are good friends with someone but they aren’t quite your #1 B.F.
Part 2: How to change the streak emojis on Snapchat
If you’re not happy with the emojis that you are seeing or you feel that they are not accurate for the person in question, don’t worry – these can easily be changed. You can switch the emojis by taking the following steps.
- Open Snapchat and swipe down
- Tap Settings
- Tap Manage Preferences
- Tap Friend Emojis
- Tap the icon that you want to change
- Tap the emoji that you wish to use
Part 3: How to get a Bitmoji on Snapchat
Snapchat purchased Bitmoji creator Bitstrips in 2016 in an attempt to capitalise on the popularity of emojis. It is now possible to link your Bitmoji account to your Snapchat one, and it only takes a few moments to connect the two. By doing so, you can enjoy greater customisation options and enhance the experience of using Snapchat.
Take these steps if you wish to get a personal Bitmoji on Snapchat.
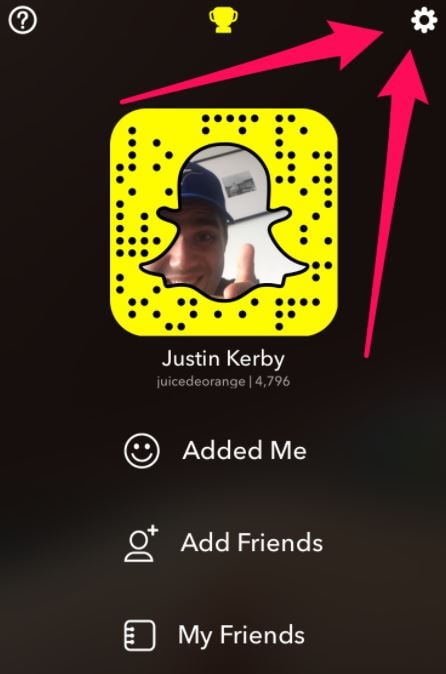
1. Open your Snapchat settings
Swipe down on your home screen, tapping the gear icon located in the top right-hand corner of your screen.
You can find this in the ‘My Account’ section. Those that have already registered with Bitmoji will be able to link their account in the next step, but if you haven’t, you will need to set up a new Bitmoji account.
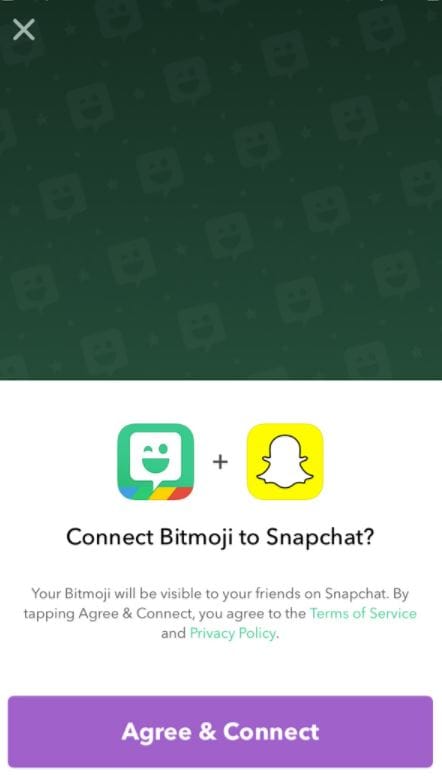
2. Agree and connect
You will now be able to link your Bitmoji account up to your Snapchat account. This means you can easily share your very own Bitmoji character with your followers on Snapchat and make the experience of using the service even more fun and personal to you.
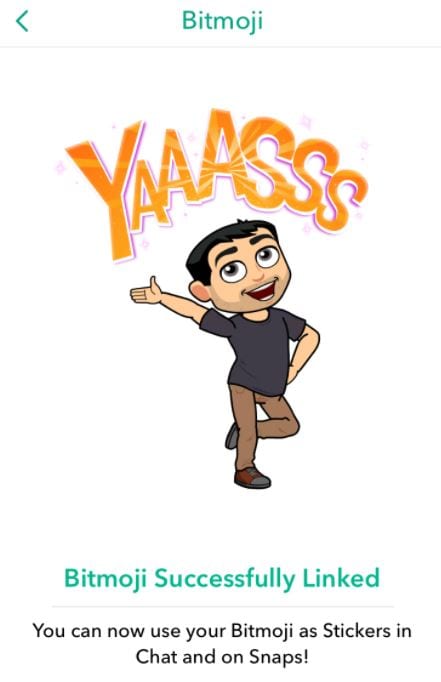
3. Send Snaps using your new Bitmoji character
Everything is set up for you to make the most of linking Bitmoji to Snapchat. Your Bitmoji is now stored in your regular emoji tab and can be seen under the icon which resembles a face.
Part 4: Why to use Snapchat emojis
There are many great reasons for using Snapchat. The platform first appeared way back in September and has attracted millions upon millions of users since then. Snapchat may be strongly associated with teenagers, but it is used by adults of all ages. When you use Snapchat, the content you share is more direct and personal and is only seen by the people you want to see it, for ten seconds only. Snapchat is great for privacy, and if anyone attempts to take a screenshot of your content you will be notified.
Another reason so many people use Snapchat is that there are no complex settings to leave you confused. It also simplifies the video calling process and makes it much less complicated than other video communication platforms. Snapchat has also become a major marketing tool for businesses around the world, allowing them to connect with and promote their services to a wider range of tech-loving users.
You may also like: Add Emojis to Videos on YouTube/Facebook/Snapchat [Step by Step Guide] >>
Conclusion
More and more people are using Bitmoji to change the emojis on Snapchat. When you use Bitmoji to change your Snap emojis, you can make an excellent statement about yourself. Snapchat brings friends closer together, and it’s said that the platform had more daily users than Twitter in 2016. The creators of Snapchat actually failed 34 projects before their innovation became a success, which shows that perseverance can pay off. Why not change your Snapchat emojis today?
Ollie Mattison
Ollie Mattison is a writer and a lover of all things video.
Follow @Ollie Mattison
Ollie Mattison
Mar 27, 2024• Proven solutions
If you’re a Snapchat user, you will have spotted the emojis that appear in your friends list next to the names of your friends. These Snapchat emojis don’t simply remain the same forever, but instead change over the course of time, and the changes themselves are based on the way that you interact with your friend. Only you are able to see the emojis. The Snapchat emojis themselves include stars, hearts, faces and more.
- Part1: What do exactly the Snapchat emojis mean?
- Part2: How to change the streak emojis on Snapchat
- Part3: How to get a Bitmoji on Snapchat
- Part4: Why to use Snapchat emojis
Part 1: What do exactly the Snapchat emojis mean?
In this section, we will tell you all about the different emojis on Snapchat. If you’ve been wondering what the Snap emoji meanings actually are, read on. A Gold Star next to someone’s name means they have replaced your snaps during the past 24 hours. A Yellow Star means you are #1 best friends with one another. You will send your largest amount of snaps to them and vice versa.
A Red Heart snap emoji is used to say that you have been #1 Bfs for a fortnight without interruption, whilst a Pink Heart Snapchat best friend emoji tells that that this has been the case for two months. If you see a baby emoji, this means you have only recently become friends with the person.
Have you seen a Face with Sunglasses? This means the person is B.Fs with one of your best friends and you send plenty of snaps to someone that they send many snaps to. A Grimacing Face tells you that your #1 is also their #1 friend and that the person you send the most snaps to is the same person they send the vast majority of their snaps to.
The Smirking Face shows that you are one of their B.Fs without this being reciprocated. In other words, they send you many snaps but you don’t return the favor. A Smiling Face means that you are good friends with someone but they aren’t quite your #1 B.F.
Part 2: How to change the streak emojis on Snapchat
If you’re not happy with the emojis that you are seeing or you feel that they are not accurate for the person in question, don’t worry – these can easily be changed. You can switch the emojis by taking the following steps.
- Open Snapchat and swipe down
- Tap Settings
- Tap Manage Preferences
- Tap Friend Emojis
- Tap the icon that you want to change
- Tap the emoji that you wish to use
Part 3: How to get a Bitmoji on Snapchat
Snapchat purchased Bitmoji creator Bitstrips in 2016 in an attempt to capitalise on the popularity of emojis. It is now possible to link your Bitmoji account to your Snapchat one, and it only takes a few moments to connect the two. By doing so, you can enjoy greater customisation options and enhance the experience of using Snapchat.
Take these steps if you wish to get a personal Bitmoji on Snapchat.
1. Open your Snapchat settings
Swipe down on your home screen, tapping the gear icon located in the top right-hand corner of your screen.
You can find this in the ‘My Account’ section. Those that have already registered with Bitmoji will be able to link their account in the next step, but if you haven’t, you will need to set up a new Bitmoji account.
2. Agree and connect
You will now be able to link your Bitmoji account up to your Snapchat account. This means you can easily share your very own Bitmoji character with your followers on Snapchat and make the experience of using the service even more fun and personal to you.
3. Send Snaps using your new Bitmoji character
Everything is set up for you to make the most of linking Bitmoji to Snapchat. Your Bitmoji is now stored in your regular emoji tab and can be seen under the icon which resembles a face.
Part 4: Why to use Snapchat emojis
There are many great reasons for using Snapchat. The platform first appeared way back in September and has attracted millions upon millions of users since then. Snapchat may be strongly associated with teenagers, but it is used by adults of all ages. When you use Snapchat, the content you share is more direct and personal and is only seen by the people you want to see it, for ten seconds only. Snapchat is great for privacy, and if anyone attempts to take a screenshot of your content you will be notified.
Another reason so many people use Snapchat is that there are no complex settings to leave you confused. It also simplifies the video calling process and makes it much less complicated than other video communication platforms. Snapchat has also become a major marketing tool for businesses around the world, allowing them to connect with and promote their services to a wider range of tech-loving users.
You may also like: Add Emojis to Videos on YouTube/Facebook/Snapchat [Step by Step Guide] >>
Conclusion
More and more people are using Bitmoji to change the emojis on Snapchat. When you use Bitmoji to change your Snap emojis, you can make an excellent statement about yourself. Snapchat brings friends closer together, and it’s said that the platform had more daily users than Twitter in 2016. The creators of Snapchat actually failed 34 projects before their innovation became a success, which shows that perseverance can pay off. Why not change your Snapchat emojis today?
Ollie Mattison
Ollie Mattison is a writer and a lover of all things video.
Follow @Ollie Mattison
Tame Fast-Paced Vids: A Slowdown Strategy for Snapchat
Snapchat is an instant messaging app that allows you to share your pictures and videos with your family members, friends, and colleagues. In addition, you can even create your stories in the form of movie clips and share them on the app. These stories remain available for the next 24 hours, after which they are automatically removed from the platform.
While sharing the videos, you can apply several filters that are already present in the app, and Slow Motion is one of them. You may want to learn how to slow down a video on Snapchat when you want to emphasize and draw viewers’ attention toward the scene, or wish to make the audience see your actions closely and in detail.
That said, in the following sections, you will see how to slow down videos on Snapchat, and what other methods you can use to reduce the playback speed more professionally.
In this article
01 How to Add Slow Motion Effects to Video Using the Snapchat App
02 How to Record a Slo-Mo Video and Upload to Snapchat
03 How to Make Flash and Smooth Slo Mo Video for Snapchat
04 FAQs about Slowing Down Snapchat Video
Part 1: How to Add Slow Motion Effects to Video Using the Snapchat App
Snapchat has a built-in Slow Motion filter that reduces the playback speed of a video when applied. You can learn how to slow down on Snapchat by following the instructions that are given below:
Step 1: Record a Video
Launch Snapchat on your smartphone (iPhone 13 Pro Max is used here for illustrations), make sure that the Camera section is selected from the bottom, tap and hold down the Capture button that is present at the lower part of the interface, and let go of it when you are done recording.

Step 2: Apply the Slow Motion Filter
Once the video is recorded, swipe the screen from left to right. Repeat this process until you see the Snail (Slow Motion) icon on the screen. This will reduce the playback speed of the clip.

Step 3: Decorate the Video (Optional)
Use the options present on the upper-right area of the screen to further decorate the video and/or add annotations to it.

Step 4: Share or Publish the Video
Once everything is done, tap Send To from the bottom-right corner to share the video with your family, friends, and colleagues, or publish it as a story that remains available for the next 24 hours.
Related: How to Record Slo-Mo videos on iPhone .
Part 2: How to Record a Slo-Mo Video and Upload to Snapchat
With Snapchat, even though you don’t require any third-party tool to reduce the playback speed of a video, the app has certain limitations. For example, it doesn’t allow you to set a zoom level, you are stuck with the framerate that the app has to offer, etc.
Because of this, many people prefer to use different methods to record a video in slow motion with their preferences, and then upload it to Snapchat. This approach also eliminates the need to swipe the screen several times merely to use a single slow-motion filter.
Fortunately, iPhone has a built-in SLO-MO mode in its Camera app that allows you to capture the videos in slow motion. To learn how to do slow mo on Snapchat with the iPhone’s Camera app, you can follow the instructions that are given below:
Step 1: Get to the iPhone’s SLO-MO Mode
Launch the Camera app on your iPhone (iPhone 13 Pro Max is used here for illustrations), and swipe the screen from left to right until you get to the SLO-MO mode.

Step 2: Set Recording Preferences
Tap the number that is present at the top-right corner (240 here) to toggle between different framerates, tap 1x from the lower-center area, swipe slightly up, and then use the wheel that appears next to define your preferred zoom level.

Step 3: Start and Stop the Recording
Tap the Record button to start the recording, and tap Stop when you’re done.
Note: Make sure that the duration of the recorded video doesn’t exceed 60 seconds.
Step 4: Upload the Slow-Motion Video to Snapchat
After the video is recorded in slow motion, close the Camera app, launch Snapchat, and tap the Gallery icon from the left side of the Capture button on the Camera section. From the Memories screen, go to the Camera Roll tab, and tap to select the video that you recorded in the previous step.
Next, optionally, tap the Edit icon from the bottom-left corner to decorate the video and/or add annotations to it, and follow the process as explained in the previous section to share the clip with your family, friends, or colleagues, or publish it as your story.

Part 3: How to Make Flash and Smooth Slo Mo Video for Snapchat
Although iPhone has the built-in SLO-MO mode that even enables you to set your preferred framerate and zoom level before recording, it still doesn’t allow you to slow down different parts of a video in different speed at your convenience. You can either record the entire video in slow motion or at a normal speed.
This is where a third-party app comes into play. While there are several video editing programs available online, the one of the best slow motion apps that helps you slow down the portions of a video with precision is CapCut.
Downloading and installing CapCut on your iPhone or Android phone is simple, and once it is done, you can follow the process given below to learn how to slow things down on Snapchat:
With CapCut, you can either slow down the whole clip or manage the speed for different segments. This section explains both methods.
Method 1: Slow Down the Whole Clip with CapCut
Step 1: Get to the Speed Panel
Launch CapCut, import the video that you want to slow down, and tap the imported media in the Timeline. Next, tap Speed from the bottom of the interface to get to the next window.

Step 2: Reduce the Speed of the Video
Tap Normal from the bottom of the screen that appears next, and drag the Speed slider to the left to reduce the playback speed. Tap OK from the bottom-right corner to save the changes.

Step 3: Upload the Video to Snapchat
Back on the previous interface, optionally tap Volume from the bottom and reduce the slider to 0 to mute the audio of the footage as it may get distorted due to the reduction in the speed.
Next, tap Share from the top-right corner to save the video on your iPhone, and then use the method explained in the previous section to access the clip from the Gallery within Snapchat for uploading.
Method 2: Reduce the Playback Speed of Different Parts of a Video
Step 1: Get to the Speed Panel
Use the process described in the previous method to get to the Speed panel.
Step 2: Reduce the Speed of Different Parts of the Video
Tap Curve from the bottom of the interface. On the next screen, tap Custom from the lower area, and then tap Edit. From the next panel, drag the beat points down to reduce the speed (or drag them above the line to increase).

Notice that each beat point represents a particular section of the video, and dragging it down reduces the playback speed of that segment. You can even tap anywhere on the line to add a new beat point and drag it down as needed for more precise speed management. Once done, tap OK from the bottom-right corner to save the modifications.

Optionally, you can also tap any of the available presets on the Curve screen to reduce the playback speed of the video accordingly.
Step 3: Upload the Video to Snapchat
Use the method explained in the previous method to export the video, upload it to Snapchat, and share the clip with your family, friends, and colleagues, or publish it as your story.
Part 4: FAQs about Slowing Down Snapchat Video
1. Can I record a slow mo video in Snapchat?
Technically speaking, no, you cannot. However, once you have recorded a video at a normal speed in Snapchat, you can apply the built-in Slow Motion filter to it by swiping the screen from left to right until you see the Snail icon at the center. The Snail icon represents the Slow Motion filter that reduces the playback speed when applied.
2. Besides slow-motion, which speed filters does Snapchat have?
In addition to slow motion Snapchat also has Forward and Fast Forward filters that increase the playback speed. While the Forward filter increases the speed slightly, the Fast Forward one enhances it drastically.
Conclusion
When using an iPhone, even though the SLO-MO mode enables you to record footage in slow motion, you don’t get many options. Therefore, it would be safe to say that it is easy to slow down the speed of a video if you have a dedicated third-party post-production app. However, if you want to go for a convenient method, learning how to slow down a video on Snapchat is an extremely simple and straightforward process.
02 How to Record a Slo-Mo Video and Upload to Snapchat
03 How to Make Flash and Smooth Slo Mo Video for Snapchat
04 FAQs about Slowing Down Snapchat Video
Part 1: How to Add Slow Motion Effects to Video Using the Snapchat App
Snapchat has a built-in Slow Motion filter that reduces the playback speed of a video when applied. You can learn how to slow down on Snapchat by following the instructions that are given below:
Step 1: Record a Video
Launch Snapchat on your smartphone (iPhone 13 Pro Max is used here for illustrations), make sure that the Camera section is selected from the bottom, tap and hold down the Capture button that is present at the lower part of the interface, and let go of it when you are done recording.
Step 2: Apply the Slow Motion Filter
Once the video is recorded, swipe the screen from left to right. Repeat this process until you see the Snail (Slow Motion) icon on the screen. This will reduce the playback speed of the clip.
Step 3: Decorate the Video (Optional)
Use the options present on the upper-right area of the screen to further decorate the video and/or add annotations to it.
Step 4: Share or Publish the Video
Once everything is done, tap Send To from the bottom-right corner to share the video with your family, friends, and colleagues, or publish it as a story that remains available for the next 24 hours.
Related: How to Record Slo-Mo videos on iPhone .
Part 2: How to Record a Slo-Mo Video and Upload to Snapchat
With Snapchat, even though you don’t require any third-party tool to reduce the playback speed of a video, the app has certain limitations. For example, it doesn’t allow you to set a zoom level, you are stuck with the framerate that the app has to offer, etc.
Because of this, many people prefer to use different methods to record a video in slow motion with their preferences, and then upload it to Snapchat. This approach also eliminates the need to swipe the screen several times merely to use a single slow-motion filter.
Fortunately, iPhone has a built-in SLO-MO mode in its Camera app that allows you to capture the videos in slow motion. To learn how to do slow mo on Snapchat with the iPhone’s Camera app, you can follow the instructions that are given below:
Step 1: Get to the iPhone’s SLO-MO Mode
Launch the Camera app on your iPhone (iPhone 13 Pro Max is used here for illustrations), and swipe the screen from left to right until you get to the SLO-MO mode.
Step 2: Set Recording Preferences
Tap the number that is present at the top-right corner (240 here) to toggle between different framerates, tap 1x from the lower-center area, swipe slightly up, and then use the wheel that appears next to define your preferred zoom level.
Step 3: Start and Stop the Recording
Tap the Record button to start the recording, and tap Stop when you’re done.
Note: Make sure that the duration of the recorded video doesn’t exceed 60 seconds.
Step 4: Upload the Slow-Motion Video to Snapchat
After the video is recorded in slow motion, close the Camera app, launch Snapchat, and tap the Gallery icon from the left side of the Capture button on the Camera section. From the Memories screen, go to the Camera Roll tab, and tap to select the video that you recorded in the previous step.
Next, optionally, tap the Edit icon from the bottom-left corner to decorate the video and/or add annotations to it, and follow the process as explained in the previous section to share the clip with your family, friends, or colleagues, or publish it as your story.
Part 3: How to Make Flash and Smooth Slo Mo Video for Snapchat
Although iPhone has the built-in SLO-MO mode that even enables you to set your preferred framerate and zoom level before recording, it still doesn’t allow you to slow down different parts of a video in different speed at your convenience. You can either record the entire video in slow motion or at a normal speed.
This is where a third-party app comes into play. While there are several video editing programs available online, the one of the best slow motion apps that helps you slow down the portions of a video with precision is CapCut.
Downloading and installing CapCut on your iPhone or Android phone is simple, and once it is done, you can follow the process given below to learn how to slow things down on Snapchat:
With CapCut, you can either slow down the whole clip or manage the speed for different segments. This section explains both methods.
Method 1: Slow Down the Whole Clip with CapCut
Step 1: Get to the Speed Panel
Launch CapCut, import the video that you want to slow down, and tap the imported media in the Timeline. Next, tap Speed from the bottom of the interface to get to the next window.
Step 2: Reduce the Speed of the Video
Tap Normal from the bottom of the screen that appears next, and drag the Speed slider to the left to reduce the playback speed. Tap OK from the bottom-right corner to save the changes.
Step 3: Upload the Video to Snapchat
Back on the previous interface, optionally tap Volume from the bottom and reduce the slider to 0 to mute the audio of the footage as it may get distorted due to the reduction in the speed.
Next, tap Share from the top-right corner to save the video on your iPhone, and then use the method explained in the previous section to access the clip from the Gallery within Snapchat for uploading.
Method 2: Reduce the Playback Speed of Different Parts of a Video
Step 1: Get to the Speed Panel
Use the process described in the previous method to get to the Speed panel.
Step 2: Reduce the Speed of Different Parts of the Video
Tap Curve from the bottom of the interface. On the next screen, tap Custom from the lower area, and then tap Edit. From the next panel, drag the beat points down to reduce the speed (or drag them above the line to increase).
Notice that each beat point represents a particular section of the video, and dragging it down reduces the playback speed of that segment. You can even tap anywhere on the line to add a new beat point and drag it down as needed for more precise speed management. Once done, tap OK from the bottom-right corner to save the modifications.
Optionally, you can also tap any of the available presets on the Curve screen to reduce the playback speed of the video accordingly.
Step 3: Upload the Video to Snapchat
Use the method explained in the previous method to export the video, upload it to Snapchat, and share the clip with your family, friends, and colleagues, or publish it as your story.
Part 4: FAQs about Slowing Down Snapchat Video
1. Can I record a slow mo video in Snapchat?
Technically speaking, no, you cannot. However, once you have recorded a video at a normal speed in Snapchat, you can apply the built-in Slow Motion filter to it by swiping the screen from left to right until you see the Snail icon at the center. The Snail icon represents the Slow Motion filter that reduces the playback speed when applied.
2. Besides slow-motion, which speed filters does Snapchat have?
In addition to slow motion Snapchat also has Forward and Fast Forward filters that increase the playback speed. While the Forward filter increases the speed slightly, the Fast Forward one enhances it drastically.
Conclusion
When using an iPhone, even though the SLO-MO mode enables you to record footage in slow motion, you don’t get many options. Therefore, it would be safe to say that it is easy to slow down the speed of a video if you have a dedicated third-party post-production app. However, if you want to go for a convenient method, learning how to slow down a video on Snapchat is an extremely simple and straightforward process.
Also read:
- 2024 Approved Amplify Your Snapchat Experience with Easy Voice Customization
- [Updated] In 2024, From Simple Scenes Advanced Techniques for Snapchat Edits
- Best Practices for Mobile Snapchat Recording Techniques for 2024
- [Updated] Pixel Prowess Unleashed Pro Techniques for Filters Mastery
- [New] Masterclass Reclaiming Personal Eyes-Only Images for 2024
- [Updated] Optimize Your Presence Mastering Snapchat Business Use for 2024
- [New] Inventive Story Naming Mastering Over 120 Ways for Snapchat Exclusivity for 2024
- In 2024, Tailoring Mac Videos to Fit Snapchat Dimensions
- [New] Learn the Art of Live Screen Sharing on Snapchat
- [New] In 2024, Rewind & Play An In-Depth Look at Snapchat's Reversal Feature
- [Updated] Snapchat Integration for the Tech-Savvy Mac User
- [Updated] Quick Reinstatement Protocols for Snaps for 2024
- Enhancing Video Longeayer Android/Mac App Utilization for 2024
- [New] Maximizing Snapchat Earning Potential Step by Step for 2024
- 2024 Approved Quick Start Methods for Producing and Perfecting Multiple Snaps in Snapchat
- [New] Exclusive Snap Chronicles An In-Depth Walkthrough for 2024
- [New] Saving Snaps From Snapchat on Camera Roll – A Guide
- [Updated] Sonic Boom The Guide to Musical Snapchat Videos
- [New] Boosting Your Snapchat Presence with Easy Voice Modification Tricks
- [Updated] In 2024, Get a Grip on Frame Rates to Improve Snapchat Videos
- [New] 2024 Approved Enhance Viewing Experience by Adjusting Snapchat's Frame Rate
- In 2024, Innovative Approaches to Keeping Your Snaps Connected
- [New] The Insider's Guide to Concealed Snap Content for 2024
- [Updated] Unveiling the Vanished Rediscovering Exclusive Chats
- [Updated] In 2024, Spark Interest on Snapchat 15 Innovative Strategies
- [New] Best of Breed Snapchat Augmentations Await
- 2024 Approved The Ultimate Snapchat Checklist for Engaging Content
- 2024 Approved Accelerate Lost Snap Content Find
- [New] The Ultimate Guide to Photo Perfection on Snapchat for 2024
- [New] Speedy Retrieval of Snap Archive
- [Updated] Maximizing Team Productivity with Snap Camera Integration
- [New] In 2024, Fundamentals of Designing High-Converting Snap Ads
- 2024 Approved Snap Protection Android & Mac App Recommendations
- [Updated] Crafting Personalized Storytelling on Snapchat
- In 2024, What Is Anime Filter On Snapchat?
- [New] 2024 Approved Snap Sensation Filter Favorites for Every Moment
- [New] 2024 Approved Capturing Memories Efficiently Phones' Screen Save for Snaps
- [New] In 2024, Photosynth Pros A Quick Snapchat Peek
- [Updated] Most Popular Snapchat Filters and Lenses That You Want to Try for 2024
- [Updated] 2024 Approved Unleash Creative Expression Your Guide to Sending Gifs via Snapchat
- [New] In 2024, Reviving Old Photos Through Snapchat's Memories Feature
- In 2024, Unlock Your Vivo Y36 Phone with Ease The 3 Best Lock Screen Removal Tools
- In 2024, Dose Life360 Notify Me When Someone Checks My Location On Apple iPhone X? | Dr.fone
- Decoding Music Copyright Rules in the World of Instagram
- In 2024, How to Change GPS Location on Realme 12 Pro 5G Easily & Safely | Dr.fone
- In 2024, Are You Trying to Make Your Video Pause on a Specific Frame? Learn How to Do so Quickly and with Ease by Adding a Freeze-Frame Effect in These Freeze-Frame Video Editing Apps
- In 2024, How to Bypass iPhone 6s Plus Passcode Easily Video Inside | Dr.fone
- Undelete lost music from Motorola
- In 2024, Still Using Pattern Locks with Nubia Red Magic 9 Pro? Tips, Tricks and Helpful Advice
- FB Videobot Downloader Tool for 2024
- How Can We Unlock Our Lava Blaze 2 5G Phone Screen?
- [New] Behind the Lens on Your MacBook Webcam
- In 2024, What Does Enter PUK Code Mean And Why Did The Sim Get PUK Blocked On Vivo Y78 5G Device
- What Does Jailbreaking Apple iPhone XS Max i Do? Get Answers here | Dr.fone
- Apply These Techniques to Improve How to Detect Fake GPS Location On Vivo Y27 4G | Dr.fone
- [Updated] In 2024, Unveiling the Ideal Video Sizes for Instagram Success
- [Updated] The Artisan's Approach to Profiling Brilliance
- 2024 Approved Relaxation Reigns Top PC Titles
- New 2024 Approved The Art of Auditory Purity Advanced Strategies to Dismiss Background Noises Using Offline and Online Technologies
- How to Show Wi-Fi Password on Vivo Y27 5G
- Updated In This Article Ill Share to You some of the Skin Care Vlog Ideas for You to Start Doing a Skin Care Review on Your YouTube Channel. But Before that Ill Share with You How Important Is Skin Care, In 2024
- Social Media Sensation Spotlights for 2024
- In 2024, ScreenSnapper ProX The Premier PC Screen Recorder by Apowersoft
- [New] Commanders' Crown The Ultimate Ranking of 7 Total War Classics
- Hacks to do pokemon go trainer battles For OnePlus Ace 2V | Dr.fone
- How to Detect and Remove Spyware on Apple iPhone 15 Pro Max? | Dr.fone
- In 2024, The Insiders Selection Top 8 High-Quality Rain Sound Packs
- In 2024, The Best Free Video Editing Solutions for Chromebook Users
- [Updated] Superior Screen Capture for Ubuntu Users
- Title: Unmasking the Significance of Snapchat Emojis
- Author: Scott
- Created at : 2024-05-23 09:42:37
- Updated at : 2024-05-24 09:42:37
- Link: https://snapchat-videos.techidaily.com/unmasking-the-significance-of-snapchat-emojis/
- License: This work is licensed under CC BY-NC-SA 4.0.
