
The Comprehensible Approach to Multisnapping Videos for 2024
The Comprehensible Approach to Multisnapping Videos
How to Make and Edit Multi Snapchat Videos Easily

Ollie Mattison
Mar 27, 2024• Proven solutions
Recording and sharing videos are now easy with Snapchat. With a maximum limit of 10 seconds, these videos are kept short in duration. Whether posting the Snapchat video to the story, sharing it with friends or in a Snapchat group, Snapchat was always a hit until numerous competitors started ripping its features.
But, Snapchat is back with a bounce with its multi snaps feature which is a new addition to video sharing feature in Snapchat. What is a multi snap? Snapchat, allows users to make more than 10 seconds snap video now, which is called multi snaps.
In this feature, you can record footages as long as 1 minute, which is divided into 6 snaps. Do you know how to make a video on Snapchat? Here you will learn how to make and edit multi Snapchat videos even without holding the button.
- Part1: How to Make Snapchat Multi Video Easily
- Part2: Notes About Multi Snapchat Videos
- Part3: How to Make Multi Video Without Holding the Button On iPhone
- Part4: How To Edit Video With The Built-In Features
Part1: How to Make Snapchat Multi Video Easily
If you wish to make a multi video in a few minutes very quickly, you just need to tap the big round button on the screen of the camera app and hold it.
Don’t leave the button even after the time is over. As you keep holding the button, the next snap starts recording automatically.
When you think it’s complete, at the bottom of the screen you can see the snaps appearing.
The ones you wish to keep must be saved and the rest can be dragged in order to delete.
Finally, you may edit the snaps and add effects like you do with any usual snap at the same time.
 Easy and Safe Partition Software & Hard Disk Manager

Part2: Notes About Multi Snapchat Videos
- In the Memories tab, you can find the multi snaps under the ‘Snaps’ icon and ‘All’ tabs
- When a multi snap is added and saved to the Camera Roll folder, it will be saved as a seamless single video. You cannot divide the video or break it into parts.
- One particular snap cannot be extracted from the multi snap
- Are you looking forward to sending multi snaps to My Story but facing difficulty? In such a situation you can always find it in My Stories screen and send each snap one by one.
- In multi snap, you cannot include 3D stickers, and it also cannot be reversed or looped at present.
Part3: How to Make Multi Video Without Holding the Button On iPhone
Pressing and holding the button constantly for recording multi snaps can be quite tiresome as it keeps your finger held down. But, the iPhone users can record multi video even without holding the button. Do your know how? Let’s learn the trick.
- Firstly, go to the Settings and select General from the drop-down menu. Tap on Accessibility and click the Assistive Touch. The Assistive Touch option helps to access the iPhone when you are unable to touch the screen.
 ZoneAlarm Extreme Security NextGen

- Turn the Assistive Touch On from the of mode and then Create New Gesture, under Custom Gestures. With this mode, you can record the gestures. You can activate it from the Favorites in Menu bar. Then, use one finger to press and hold your iPhone screen’s center to allow recording your Touch. You can see at the bottom there’s a blue bar which once filled indicates that your Touch is recorded. Now, Save the gesture and open Snapchat. You can find a grey dot on the screen, tap it. Now, tap on the Custom and the saved gesture.

- Once you click the saved gesture, you can see another grey dot on the screen. Drag the grey dot over record button of Snapchat and let go. One thing must be noted that you can only record 8 seconds video in iPhone than usual 10 seconds because gestures can be set only for 8 seconds.


Your hands are free to move anywhere, meanwhile, the Snapchat video is recording.
Part4: How To Edit Video With The Built-In Features
Editing snaps and videos have always been fun whether it’s for trial or for work. After recording a snapshot video, you can edit it by swiping right or left to add special effects.
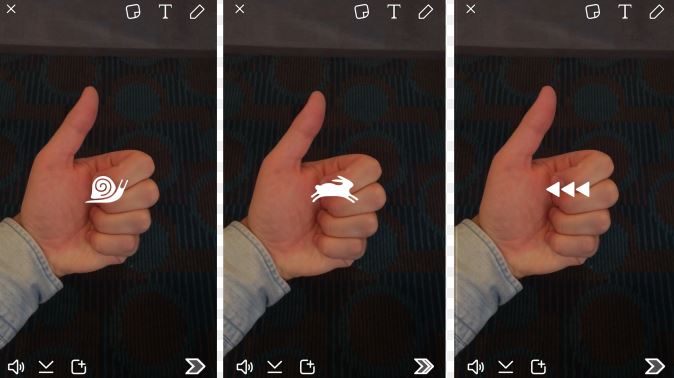
- Filters must be enabled to access the special effects. So turn it on. Rabbit will speed up your Snapchat video whereas, the snail will slow it down.
- If you wish to play your video is reverse mode then use the 3 backward arrows.The brightness of your Snapchat video can be adjusted with some of the filters. Your time, location, and speed can also be transformed by adding effects with some filters.
- There’s a magic eraser tool that can help you in erasing any object like a tree or your ex-girlfriend from the snap. You may also use a tint brush to pick a color and then touch the object you wish to tint with the brush. This feature is available for both the Android and iOS users.
Conclusion
If you want to have fun and better video effects, you can use Filmora to edit video on desktop before uploading Snapchat videos from the camera roll. Filmora is one of the best applications with a range of features. You can add graphic overlays and filters, color tuning, noise removal, 4k video resolution, pan zoom, and many more features to make your Snapchat video attractive and amazing. This article gives you a detailed information on how to make a video on Snapchat, even without pressing the button. Enjoy multi snaps feature on Snapchat videos and use by following the steps mentioned above.
Ollie Mattison
Ollie Mattison is a writer and a lover of all things video.
Follow @Ollie Mattison
Ollie Mattison
Mar 27, 2024• Proven solutions
Recording and sharing videos are now easy with Snapchat. With a maximum limit of 10 seconds, these videos are kept short in duration. Whether posting the Snapchat video to the story, sharing it with friends or in a Snapchat group, Snapchat was always a hit until numerous competitors started ripping its features.
But, Snapchat is back with a bounce with its multi snaps feature which is a new addition to video sharing feature in Snapchat. What is a multi snap? Snapchat, allows users to make more than 10 seconds snap video now, which is called multi snaps.
In this feature, you can record footages as long as 1 minute, which is divided into 6 snaps. Do you know how to make a video on Snapchat? Here you will learn how to make and edit multi Snapchat videos even without holding the button.
- Part1: How to Make Snapchat Multi Video Easily
- Part2: Notes About Multi Snapchat Videos
- Part3: How to Make Multi Video Without Holding the Button On iPhone
- Part4: How To Edit Video With The Built-In Features

Part1: How to Make Snapchat Multi Video Easily
If you wish to make a multi video in a few minutes very quickly, you just need to tap the big round button on the screen of the camera app and hold it.
Don’t leave the button even after the time is over. As you keep holding the button, the next snap starts recording automatically.
When you think it’s complete, at the bottom of the screen you can see the snaps appearing.
The ones you wish to keep must be saved and the rest can be dragged in order to delete.
Finally, you may edit the snaps and add effects like you do with any usual snap at the same time.
Part2: Notes About Multi Snapchat Videos
- In the Memories tab, you can find the multi snaps under the ‘Snaps’ icon and ‘All’ tabs
- When a multi snap is added and saved to the Camera Roll folder, it will be saved as a seamless single video. You cannot divide the video or break it into parts.
- One particular snap cannot be extracted from the multi snap
- Are you looking forward to sending multi snaps to My Story but facing difficulty? In such a situation you can always find it in My Stories screen and send each snap one by one.
- In multi snap, you cannot include 3D stickers, and it also cannot be reversed or looped at present.
 Greeting Card Builder
Part3: How to Make Multi Video Without Holding the Button On iPhone
Pressing and holding the button constantly for recording multi snaps can be quite tiresome as it keeps your finger held down. But, the iPhone users can record multi video even without holding the button. Do your know how? Let’s learn the trick.
- Firstly, go to the Settings and select General from the drop-down menu. Tap on Accessibility and click the Assistive Touch. The Assistive Touch option helps to access the iPhone when you are unable to touch the screen.
- Turn the Assistive Touch On from the of mode and then Create New Gesture, under Custom Gestures. With this mode, you can record the gestures. You can activate it from the Favorites in Menu bar. Then, use one finger to press and hold your iPhone screen’s center to allow recording your Touch. You can see at the bottom there’s a blue bar which once filled indicates that your Touch is recorded. Now, Save the gesture and open Snapchat. You can find a grey dot on the screen, tap it. Now, tap on the Custom and the saved gesture.
- Once you click the saved gesture, you can see another grey dot on the screen. Drag the grey dot over record button of Snapchat and let go. One thing must be noted that you can only record 8 seconds video in iPhone than usual 10 seconds because gestures can be set only for 8 seconds.

WPS Office Premium ( File Recovery, Photo Scanning, Convert PDF)–Yearly
Your hands are free to move anywhere, meanwhile, the Snapchat video is recording.
Part4: How To Edit Video With The Built-In Features
Editing snaps and videos have always been fun whether it’s for trial or for work. After recording a snapshot video, you can edit it by swiping right or left to add special effects.
- Filters must be enabled to access the special effects. So turn it on. Rabbit will speed up your Snapchat video whereas, the snail will slow it down.
- If you wish to play your video is reverse mode then use the 3 backward arrows.The brightness of your Snapchat video can be adjusted with some of the filters. Your time, location, and speed can also be transformed by adding effects with some filters.
- There’s a magic eraser tool that can help you in erasing any object like a tree or your ex-girlfriend from the snap. You may also use a tint brush to pick a color and then touch the object you wish to tint with the brush. This feature is available for both the Android and iOS users.
Conclusion
If you want to have fun and better video effects, you can use Filmora to edit video on desktop before uploading Snapchat videos from the camera roll. Filmora is one of the best applications with a range of features. You can add graphic overlays and filters, color tuning, noise removal, 4k video resolution, pan zoom, and many more features to make your Snapchat video attractive and amazing. This article gives you a detailed information on how to make a video on Snapchat, even without pressing the button. Enjoy multi snaps feature on Snapchat videos and use by following the steps mentioned above.
Ollie Mattison
Ollie Mattison is a writer and a lover of all things video.
Follow @Ollie Mattison
Ollie Mattison
Mar 27, 2024• Proven solutions
Recording and sharing videos are now easy with Snapchat. With a maximum limit of 10 seconds, these videos are kept short in duration. Whether posting the Snapchat video to the story, sharing it with friends or in a Snapchat group, Snapchat was always a hit until numerous competitors started ripping its features.
But, Snapchat is back with a bounce with its multi snaps feature which is a new addition to video sharing feature in Snapchat. What is a multi snap? Snapchat, allows users to make more than 10 seconds snap video now, which is called multi snaps.
In this feature, you can record footages as long as 1 minute, which is divided into 6 snaps. Do you know how to make a video on Snapchat? Here you will learn how to make and edit multi Snapchat videos even without holding the button.
- Part1: How to Make Snapchat Multi Video Easily
- Part2: Notes About Multi Snapchat Videos
- Part3: How to Make Multi Video Without Holding the Button On iPhone
- Part4: How To Edit Video With The Built-In Features
Part1: How to Make Snapchat Multi Video Easily
If you wish to make a multi video in a few minutes very quickly, you just need to tap the big round button on the screen of the camera app and hold it.
Don’t leave the button even after the time is over. As you keep holding the button, the next snap starts recording automatically.
When you think it’s complete, at the bottom of the screen you can see the snaps appearing.
The ones you wish to keep must be saved and the rest can be dragged in order to delete.
Finally, you may edit the snaps and add effects like you do with any usual snap at the same time.
Part2: Notes About Multi Snapchat Videos
- In the Memories tab, you can find the multi snaps under the ‘Snaps’ icon and ‘All’ tabs
- When a multi snap is added and saved to the Camera Roll folder, it will be saved as a seamless single video. You cannot divide the video or break it into parts.
- One particular snap cannot be extracted from the multi snap
- Are you looking forward to sending multi snaps to My Story but facing difficulty? In such a situation you can always find it in My Stories screen and send each snap one by one.
- In multi snap, you cannot include 3D stickers, and it also cannot be reversed or looped at present.
Part3: How to Make Multi Video Without Holding the Button On iPhone
Pressing and holding the button constantly for recording multi snaps can be quite tiresome as it keeps your finger held down. But, the iPhone users can record multi video even without holding the button. Do your know how? Let’s learn the trick.
- Firstly, go to the Settings and select General from the drop-down menu. Tap on Accessibility and click the Assistive Touch. The Assistive Touch option helps to access the iPhone when you are unable to touch the screen.
- Turn the Assistive Touch On from the of mode and then Create New Gesture, under Custom Gestures. With this mode, you can record the gestures. You can activate it from the Favorites in Menu bar. Then, use one finger to press and hold your iPhone screen’s center to allow recording your Touch. You can see at the bottom there’s a blue bar which once filled indicates that your Touch is recorded. Now, Save the gesture and open Snapchat. You can find a grey dot on the screen, tap it. Now, tap on the Custom and the saved gesture.
- Once you click the saved gesture, you can see another grey dot on the screen. Drag the grey dot over record button of Snapchat and let go. One thing must be noted that you can only record 8 seconds video in iPhone than usual 10 seconds because gestures can be set only for 8 seconds.
Your hands are free to move anywhere, meanwhile, the Snapchat video is recording.
Part4: How To Edit Video With The Built-In Features
Editing snaps and videos have always been fun whether it’s for trial or for work. After recording a snapshot video, you can edit it by swiping right or left to add special effects.
- Filters must be enabled to access the special effects. So turn it on. Rabbit will speed up your Snapchat video whereas, the snail will slow it down.
- If you wish to play your video is reverse mode then use the 3 backward arrows.The brightness of your Snapchat video can be adjusted with some of the filters. Your time, location, and speed can also be transformed by adding effects with some filters.
- There’s a magic eraser tool that can help you in erasing any object like a tree or your ex-girlfriend from the snap. You may also use a tint brush to pick a color and then touch the object you wish to tint with the brush. This feature is available for both the Android and iOS users.
Conclusion
If you want to have fun and better video effects, you can use Filmora to edit video on desktop before uploading Snapchat videos from the camera roll. Filmora is one of the best applications with a range of features. You can add graphic overlays and filters, color tuning, noise removal, 4k video resolution, pan zoom, and many more features to make your Snapchat video attractive and amazing. This article gives you a detailed information on how to make a video on Snapchat, even without pressing the button. Enjoy multi snaps feature on Snapchat videos and use by following the steps mentioned above.
Ollie Mattison
Ollie Mattison is a writer and a lover of all things video.
Follow @Ollie Mattison
Ollie Mattison
Mar 27, 2024• Proven solutions
Recording and sharing videos are now easy with Snapchat. With a maximum limit of 10 seconds, these videos are kept short in duration. Whether posting the Snapchat video to the story, sharing it with friends or in a Snapchat group, Snapchat was always a hit until numerous competitors started ripping its features.
But, Snapchat is back with a bounce with its multi snaps feature which is a new addition to video sharing feature in Snapchat. What is a multi snap? Snapchat, allows users to make more than 10 seconds snap video now, which is called multi snaps.
In this feature, you can record footages as long as 1 minute, which is divided into 6 snaps. Do you know how to make a video on Snapchat? Here you will learn how to make and edit multi Snapchat videos even without holding the button.
- Part1: How to Make Snapchat Multi Video Easily
- Part2: Notes About Multi Snapchat Videos
- Part3: How to Make Multi Video Without Holding the Button On iPhone
- Part4: How To Edit Video With The Built-In Features
Part1: How to Make Snapchat Multi Video Easily
If you wish to make a multi video in a few minutes very quickly, you just need to tap the big round button on the screen of the camera app and hold it.
Don’t leave the button even after the time is over. As you keep holding the button, the next snap starts recording automatically.
When you think it’s complete, at the bottom of the screen you can see the snaps appearing.
The ones you wish to keep must be saved and the rest can be dragged in order to delete.
Finally, you may edit the snaps and add effects like you do with any usual snap at the same time.
 KoolReport Pro is an advanced solution for creating data reports and dashboards in PHP. Equipped with all extended packages , KoolReport Pro is able to connect to various datasources, perform advanced data analysis, construct stunning charts and graphs and export your beautiful work to PDF, Excel, JPG or other formats. Plus, it includes powerful built-in reports such as pivot report and drill-down report which will save your time in building ones.
 It will help you to write dynamic data reports easily, to construct intuitive dashboards or to build a whole business intelligence cockpit.
KoolReport Pro package goes with Full Source Code, Royal Free, ONE (1) Year Priority Support, ONE (1) Year Free Upgrade and 30-Days Money Back Guarantee.
Developer License allows Single Developer to create Unlimited Reports, deploy on Unlimited Servers and able deliver the work to Unlimited Clients.
Part2: Notes About Multi Snapchat Videos
- In the Memories tab, you can find the multi snaps under the ‘Snaps’ icon and ‘All’ tabs
- When a multi snap is added and saved to the Camera Roll folder, it will be saved as a seamless single video. You cannot divide the video or break it into parts.
- One particular snap cannot be extracted from the multi snap
- Are you looking forward to sending multi snaps to My Story but facing difficulty? In such a situation you can always find it in My Stories screen and send each snap one by one.
- In multi snap, you cannot include 3D stickers, and it also cannot be reversed or looped at present.

Part3: How to Make Multi Video Without Holding the Button On iPhone
Pressing and holding the button constantly for recording multi snaps can be quite tiresome as it keeps your finger held down. But, the iPhone users can record multi video even without holding the button. Do your know how? Let’s learn the trick.
- Firstly, go to the Settings and select General from the drop-down menu. Tap on Accessibility and click the Assistive Touch. The Assistive Touch option helps to access the iPhone when you are unable to touch the screen.
- Turn the Assistive Touch On from the of mode and then Create New Gesture, under Custom Gestures. With this mode, you can record the gestures. You can activate it from the Favorites in Menu bar. Then, use one finger to press and hold your iPhone screen’s center to allow recording your Touch. You can see at the bottom there’s a blue bar which once filled indicates that your Touch is recorded. Now, Save the gesture and open Snapchat. You can find a grey dot on the screen, tap it. Now, tap on the Custom and the saved gesture.
 PaperScan Professional: PaperScan Scanner Software is a powerful TWAIN & WIA scanning application centered on one idea: making document acquisition an unparalleled easy task for anyone.
- Once you click the saved gesture, you can see another grey dot on the screen. Drag the grey dot over record button of Snapchat and let go. One thing must be noted that you can only record 8 seconds video in iPhone than usual 10 seconds because gestures can be set only for 8 seconds.
 dotConnect for Oracle is an ADO.NET data provider for Oracle with Entity Framework Support.
Your hands are free to move anywhere, meanwhile, the Snapchat video is recording.
## Part4: How To Edit Video With The Built-In FeaturesEditing snaps and videos have always been fun whether it’s for trial or for work. After recording a snapshot video, you can edit it by swiping right or left to add special effects.
- Filters must be enabled to access the special effects. So turn it on. Rabbit will speed up your Snapchat video whereas, the snail will slow it down.
- If you wish to play your video is reverse mode then use the 3 backward arrows.The brightness of your Snapchat video can be adjusted with some of the filters. Your time, location, and speed can also be transformed by adding effects with some filters.
- There’s a magic eraser tool that can help you in erasing any object like a tree or your ex-girlfriend from the snap. You may also use a tint brush to pick a color and then touch the object you wish to tint with the brush. This feature is available for both the Android and iOS users.

Conclusion
If you want to have fun and better video effects, you can use Filmora to edit video on desktop before uploading Snapchat videos from the camera roll. Filmora is one of the best applications with a range of features. You can add graphic overlays and filters, color tuning, noise removal, 4k video resolution, pan zoom, and many more features to make your Snapchat video attractive and amazing. This article gives you a detailed information on how to make a video on Snapchat, even without pressing the button. Enjoy multi snaps feature on Snapchat videos and use by following the steps mentioned above.
Ollie Mattison
Ollie Mattison is a writer and a lover of all things video.
Follow @Ollie Mattison
The Beginner’s Pathway to Fashionable Snaps & Lenses
How to Create Snapchat Lenses Easily: 2 Methods
Ollie Mattison
Mar 27, 2024• Proven solutions
Are you feeling like creating your own Snapchat lens, so you can have an even better experience with the app? The good news is that two new Snapchat tools have been released – the Lens Studio and Create Your Own Lens applications.
If you are a regular Snapchat user, you may want to learn about the Snapchat lens and how it can help you. We will help you get started. Here is our step by step guide on how to make Snapchat lenses.
- Part1: Comparing Lens Studio and Creating Your Own Lens
- Part2: How to Use Lens Studio
- Part3: How to Create Snapchat Lenses Using Create Your Own Lens
Part 1: Comparing Lens Studio and Creating Your Own Lens
The two programs that we are highlighting today are Lens Studio and Create Your Own Lens. These are both fantastic programs for creating your own Snapchat lens, but they do have slightly different uses. If you are the type of person who wants to design a professional Snapchat lens, you are going to prefer Lens Studio.
But if you are hoping to come up with something creative that you can share with your friends and family, then you may love Create Your Own Lens. It is a very easy program to use, and it offers a ton of features that you may be surprised to see.
Snapchat lenses is for fun
The beauty of Snapchat lenses is that you can now create your own environment, which you can use each time you are taking photos or videos. Sure, you can always use the filters that are already available in the application, but not everyone would find those enough.
If you want some customization, or you just want to mess around until you get the filter that makes sense for you, Snapchat lenses are the way to go.

Lens Studio is for business
Lens Studio is perfect for businesses that may want to create unique environments for their clients, or the times when they are releasing company Snapchat posts. Say the company is hosting an event. They may want a custom graphic for that event, which is used for all the pictures and videos posted to Snapchat about the event. Using Lens Studio lets them do that with ease.
Create Your Own Lens is great when you are going to a special event, birthday party or graduating, and you want a special graphic that comes up in all your snaps. It is very intuitive to use, and is available through the App Store as a download.
Part 2: How to Use Lens Studio
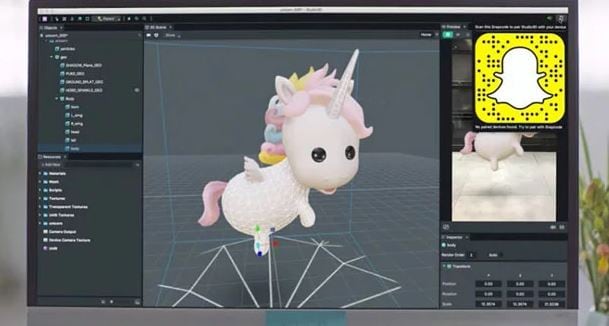
1. Download Lens Studio
The first step involves downloading Lens Studio, which you can do from your computer. It is compatible with both Windows and Mac computers, and will run on any semi-modern system. According to the Snapchat team, Lens Studio is similar to the program used by their AR teams to create lenses. That means you are getting similar functionality, but with an easier to manage interface.
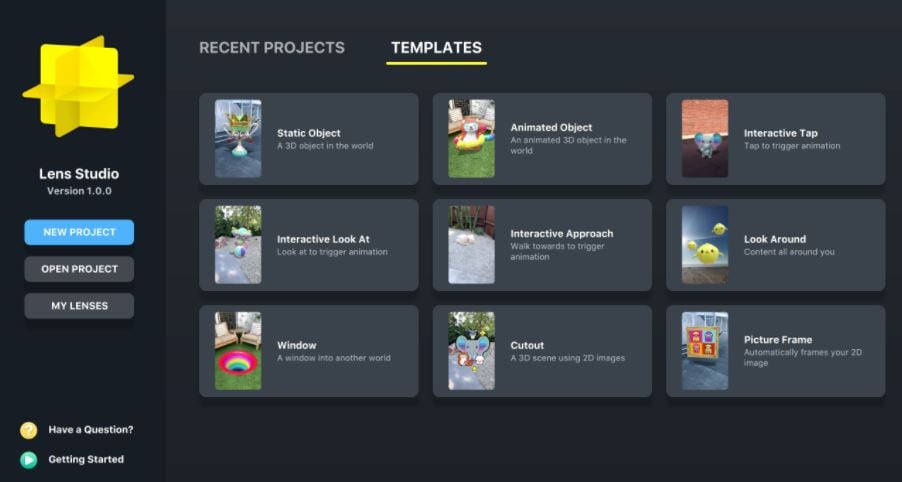
2. Choose Templates Page
It is normal to feel a little overwhelmed the first time you try and use this program. But that is why the templates page is so great. You can select from templates depending on the type of lens that you are hoping to create. You can just use a template, or you can incorporate your own ideas to customize the template.
There is also a Lens Studio Overview guide that you can access online, which will help you get acquainted with the program’s various features and quirks.
3. Use Studio Panels
Are you ready to create your own custom Snapchat lens? It is time to head over to Studio Panels on the application. This is the area where you can add your own 2D or 3D objects, and you can visualize how they would look as a Snapchat filter. You can add, remove, resize and drag objects to specific areas of the screen.
There are other tools accessible from the Resources panel. You can use these tools to ensure that your Snapchat lens is exactly as you want.

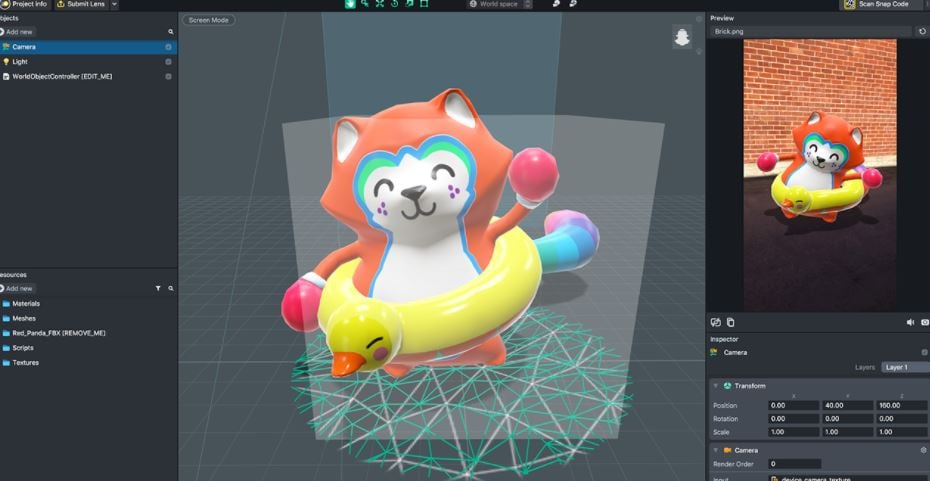
4. Preview the Snapchat Lens You Create
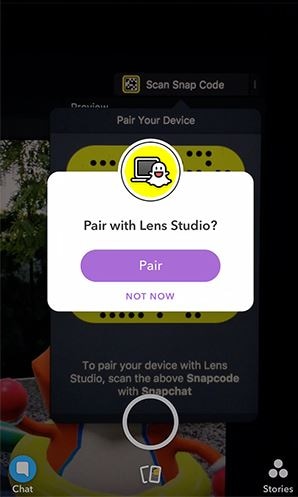
The great thing about this application is that you can preview the lens before you send it out to your phone. When you are satisfied with the image on the preview, you can pair your phone with the application, and you will be able to send that Snapchat lens onto your phone through your Snapcode. It is that simple!
Part 3: How to Create Snapchat Lenses Using Create Your Own Lens
- There are two ways that you can access the tool for creating fun Snapchat lenses. You can either visit the website snapchat.com/create, or you can go on the “filters and lenses” section on your iOS device. If you are using Snapchat on an Android device, you will only have the option for the website. But the feature is coming to the Android version of Snapchat very soon.
- When you are in the application or on the website, you may start to look at the different templates for Snapchat lenses. Now you can add other items into the templates, such as photographs, text or graphics.
It is all up to your imagination. You can create the perfect Snapchat lens, which you can then send into your Snapchat account through your Snapcode. Of course, if you are using your iOS device to create the lens, it is already linked to your account.
Another cool feature is how you can set the location for where the Snapchat lens is available. Say you are hosting a party. You can have the Snapchat lens available to everyone who uses Snapchat within a set square footage of your home. That is an amazing way to let everyone share social media pictures and photos of your party, through the lens you created.
Conclusion
Creating Snapchat lenses has never been easier. Whether you are a business looking to add a custom lens, or you just want to create a fun lens for a graduation or party, there are tools that make the job very easy. Using these tools will allow you to create the perfect Snapchat lens for any occasion.
Ollie Mattison
Ollie Mattison is a writer and a lover of all things video.
Follow @Ollie Mattison
Ollie Mattison
Mar 27, 2024• Proven solutions
Are you feeling like creating your own Snapchat lens, so you can have an even better experience with the app? The good news is that two new Snapchat tools have been released – the Lens Studio and Create Your Own Lens applications.
If you are a regular Snapchat user, you may want to learn about the Snapchat lens and how it can help you. We will help you get started. Here is our step by step guide on how to make Snapchat lenses.
- Part1: Comparing Lens Studio and Creating Your Own Lens
- Part2: How to Use Lens Studio
- Part3: How to Create Snapchat Lenses Using Create Your Own Lens
 Simple and intuitive video editing
Part 1: Comparing Lens Studio and Creating Your Own Lens
The two programs that we are highlighting today are Lens Studio and Create Your Own Lens. These are both fantastic programs for creating your own Snapchat lens, but they do have slightly different uses. If you are the type of person who wants to design a professional Snapchat lens, you are going to prefer Lens Studio.
But if you are hoping to come up with something creative that you can share with your friends and family, then you may love Create Your Own Lens. It is a very easy program to use, and it offers a ton of features that you may be surprised to see.
Snapchat lenses is for fun
The beauty of Snapchat lenses is that you can now create your own environment, which you can use each time you are taking photos or videos. Sure, you can always use the filters that are already available in the application, but not everyone would find those enough.
If you want some customization, or you just want to mess around until you get the filter that makes sense for you, Snapchat lenses are the way to go.
Lens Studio is for business
Lens Studio is perfect for businesses that may want to create unique environments for their clients, or the times when they are releasing company Snapchat posts. Say the company is hosting an event. They may want a custom graphic for that event, which is used for all the pictures and videos posted to Snapchat about the event. Using Lens Studio lets them do that with ease.
Create Your Own Lens is great when you are going to a special event, birthday party or graduating, and you want a special graphic that comes up in all your snaps. It is very intuitive to use, and is available through the App Store as a download.
 NeoDownloader - Fast and fully automatic image/video/music downloader.
Part 2: How to Use Lens Studio
1. Download Lens Studio
The first step involves downloading Lens Studio, which you can do from your computer. It is compatible with both Windows and Mac computers, and will run on any semi-modern system. According to the Snapchat team, Lens Studio is similar to the program used by their AR teams to create lenses. That means you are getting similar functionality, but with an easier to manage interface.
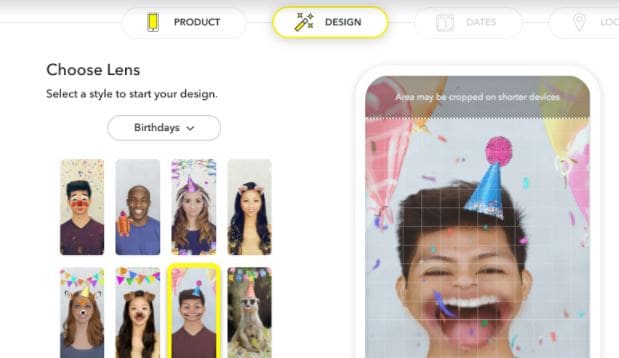
2. Choose Templates Page
It is normal to feel a little overwhelmed the first time you try and use this program. But that is why the templates page is so great. You can select from templates depending on the type of lens that you are hoping to create. You can just use a template, or you can incorporate your own ideas to customize the template.
There is also a Lens Studio Overview guide that you can access online, which will help you get acquainted with the program’s various features and quirks.

3. Use Studio Panels
Are you ready to create your own custom Snapchat lens? It is time to head over to Studio Panels on the application. This is the area where you can add your own 2D or 3D objects, and you can visualize how they would look as a Snapchat filter. You can add, remove, resize and drag objects to specific areas of the screen.
There are other tools accessible from the Resources panel. You can use these tools to ensure that your Snapchat lens is exactly as you want.
 CollageIt Pro
4. Preview the Snapchat Lens You Create
The great thing about this application is that you can preview the lens before you send it out to your phone. When you are satisfied with the image on the preview, you can pair your phone with the application, and you will be able to send that Snapchat lens onto your phone through your Snapcode. It is that simple!
Part 3: How to Create Snapchat Lenses Using Create Your Own Lens
- There are two ways that you can access the tool for creating fun Snapchat lenses. You can either visit the website snapchat.com/create, or you can go on the “filters and lenses” section on your iOS device. If you are using Snapchat on an Android device, you will only have the option for the website. But the feature is coming to the Android version of Snapchat very soon.
- When you are in the application or on the website, you may start to look at the different templates for Snapchat lenses. Now you can add other items into the templates, such as photographs, text or graphics.
 SwifDoo PDF Perpetual (2-PC) Free upgrade. No monthly fees ever.
It is all up to your imagination. You can create the perfect Snapchat lens, which you can then send into your Snapchat account through your Snapcode. Of course, if you are using your iOS device to create the lens, it is already linked to your account.
Another cool feature is how you can set the location for where the Snapchat lens is available. Say you are hosting a party. You can have the Snapchat lens available to everyone who uses Snapchat within a set square footage of your home. That is an amazing way to let everyone share social media pictures and photos of your party, through the lens you created.
Conclusion
Creating Snapchat lenses has never been easier. Whether you are a business looking to add a custom lens, or you just want to create a fun lens for a graduation or party, there are tools that make the job very easy. Using these tools will allow you to create the perfect Snapchat lens for any occasion.
Ollie Mattison
Ollie Mattison is a writer and a lover of all things video.
Follow @Ollie Mattison
Ollie Mattison
Mar 27, 2024• Proven solutions
Are you feeling like creating your own Snapchat lens, so you can have an even better experience with the app? The good news is that two new Snapchat tools have been released – the Lens Studio and Create Your Own Lens applications.
If you are a regular Snapchat user, you may want to learn about the Snapchat lens and how it can help you. We will help you get started. Here is our step by step guide on how to make Snapchat lenses.
- Part1: Comparing Lens Studio and Creating Your Own Lens
- Part2: How to Use Lens Studio
- Part3: How to Create Snapchat Lenses Using Create Your Own Lens
Part 1: Comparing Lens Studio and Creating Your Own Lens
The two programs that we are highlighting today are Lens Studio and Create Your Own Lens. These are both fantastic programs for creating your own Snapchat lens, but they do have slightly different uses. If you are the type of person who wants to design a professional Snapchat lens, you are going to prefer Lens Studio.
But if you are hoping to come up with something creative that you can share with your friends and family, then you may love Create Your Own Lens. It is a very easy program to use, and it offers a ton of features that you may be surprised to see.
Snapchat lenses is for fun
The beauty of Snapchat lenses is that you can now create your own environment, which you can use each time you are taking photos or videos. Sure, you can always use the filters that are already available in the application, but not everyone would find those enough.
If you want some customization, or you just want to mess around until you get the filter that makes sense for you, Snapchat lenses are the way to go.
Lens Studio is for business
Lens Studio is perfect for businesses that may want to create unique environments for their clients, or the times when they are releasing company Snapchat posts. Say the company is hosting an event. They may want a custom graphic for that event, which is used for all the pictures and videos posted to Snapchat about the event. Using Lens Studio lets them do that with ease.
Create Your Own Lens is great when you are going to a special event, birthday party or graduating, and you want a special graphic that comes up in all your snaps. It is very intuitive to use, and is available through the App Store as a download.

Part 2: How to Use Lens Studio
1. Download Lens Studio
The first step involves downloading Lens Studio, which you can do from your computer. It is compatible with both Windows and Mac computers, and will run on any semi-modern system. According to the Snapchat team, Lens Studio is similar to the program used by their AR teams to create lenses. That means you are getting similar functionality, but with an easier to manage interface.
2. Choose Templates Page
It is normal to feel a little overwhelmed the first time you try and use this program. But that is why the templates page is so great. You can select from templates depending on the type of lens that you are hoping to create. You can just use a template, or you can incorporate your own ideas to customize the template.
There is also a Lens Studio Overview guide that you can access online, which will help you get acquainted with the program’s various features and quirks.
3. Use Studio Panels
Are you ready to create your own custom Snapchat lens? It is time to head over to Studio Panels on the application. This is the area where you can add your own 2D or 3D objects, and you can visualize how they would look as a Snapchat filter. You can add, remove, resize and drag objects to specific areas of the screen.
There are other tools accessible from the Resources panel. You can use these tools to ensure that your Snapchat lens is exactly as you want.
4. Preview the Snapchat Lens You Create
The great thing about this application is that you can preview the lens before you send it out to your phone. When you are satisfied with the image on the preview, you can pair your phone with the application, and you will be able to send that Snapchat lens onto your phone through your Snapcode. It is that simple!
 SwifDoo PDF 2-Year Plan
Part 3: How to Create Snapchat Lenses Using Create Your Own Lens
- There are two ways that you can access the tool for creating fun Snapchat lenses. You can either visit the website snapchat.com/create, or you can go on the “filters and lenses” section on your iOS device. If you are using Snapchat on an Android device, you will only have the option for the website. But the feature is coming to the Android version of Snapchat very soon.
- When you are in the application or on the website, you may start to look at the different templates for Snapchat lenses. Now you can add other items into the templates, such as photographs, text or graphics.
It is all up to your imagination. You can create the perfect Snapchat lens, which you can then send into your Snapchat account through your Snapcode. Of course, if you are using your iOS device to create the lens, it is already linked to your account.
Another cool feature is how you can set the location for where the Snapchat lens is available. Say you are hosting a party. You can have the Snapchat lens available to everyone who uses Snapchat within a set square footage of your home. That is an amazing way to let everyone share social media pictures and photos of your party, through the lens you created.

company, user or members of the same household. Action! - screen and game recorder</a>
Conclusion
Creating Snapchat lenses has never been easier. Whether you are a business looking to add a custom lens, or you just want to create a fun lens for a graduation or party, there are tools that make the job very easy. Using these tools will allow you to create the perfect Snapchat lens for any occasion.
 TubeDigger - online video downloader from mostly any site
Ollie Mattison
Ollie Mattison is a writer and a lover of all things video.
Follow @Ollie Mattison
Ollie Mattison
Mar 27, 2024• Proven solutions
Are you feeling like creating your own Snapchat lens, so you can have an even better experience with the app? The good news is that two new Snapchat tools have been released – the Lens Studio and Create Your Own Lens applications.
If you are a regular Snapchat user, you may want to learn about the Snapchat lens and how it can help you. We will help you get started. Here is our step by step guide on how to make Snapchat lenses.
- Part1: Comparing Lens Studio and Creating Your Own Lens
- Part2: How to Use Lens Studio
- Part3: How to Create Snapchat Lenses Using Create Your Own Lens
 The Tube Sites Submitter is a fast and efficient tool for anyone who needs to upload videos quickly, easily and automatically to hundreds of tube sites in mere minutes .
 Part 1: Comparing Lens Studio and Creating Your Own Lens
The two programs that we are highlighting today are Lens Studio and Create Your Own Lens. These are both fantastic programs for creating your own Snapchat lens, but they do have slightly different uses. If you are the type of person who wants to design a professional Snapchat lens, you are going to prefer Lens Studio.
But if you are hoping to come up with something creative that you can share with your friends and family, then you may love Create Your Own Lens. It is a very easy program to use, and it offers a ton of features that you may be surprised to see.
Snapchat lenses is for fun
The beauty of Snapchat lenses is that you can now create your own environment, which you can use each time you are taking photos or videos. Sure, you can always use the filters that are already available in the application, but not everyone would find those enough.
If you want some customization, or you just want to mess around until you get the filter that makes sense for you, Snapchat lenses are the way to go.
Lens Studio is for business
Lens Studio is perfect for businesses that may want to create unique environments for their clients, or the times when they are releasing company Snapchat posts. Say the company is hosting an event. They may want a custom graphic for that event, which is used for all the pictures and videos posted to Snapchat about the event. Using Lens Studio lets them do that with ease.
Create Your Own Lens is great when you are going to a special event, birthday party or graduating, and you want a special graphic that comes up in all your snaps. It is very intuitive to use, and is available through the App Store as a download.
Part 2: How to Use Lens Studio
1. Download Lens Studio
The first step involves downloading Lens Studio, which you can do from your computer. It is compatible with both Windows and Mac computers, and will run on any semi-modern system. According to the Snapchat team, Lens Studio is similar to the program used by their AR teams to create lenses. That means you are getting similar functionality, but with an easier to manage interface.
2. Choose Templates Page
It is normal to feel a little overwhelmed the first time you try and use this program. But that is why the templates page is so great. You can select from templates depending on the type of lens that you are hoping to create. You can just use a template, or you can incorporate your own ideas to customize the template.
There is also a Lens Studio Overview guide that you can access online, which will help you get acquainted with the program’s various features and quirks.
3. Use Studio Panels
Are you ready to create your own custom Snapchat lens? It is time to head over to Studio Panels on the application. This is the area where you can add your own 2D or 3D objects, and you can visualize how they would look as a Snapchat filter. You can add, remove, resize and drag objects to specific areas of the screen.
There are other tools accessible from the Resources panel. You can use these tools to ensure that your Snapchat lens is exactly as you want.
4. Preview the Snapchat Lens You Create
The great thing about this application is that you can preview the lens before you send it out to your phone. When you are satisfied with the image on the preview, you can pair your phone with the application, and you will be able to send that Snapchat lens onto your phone through your Snapcode. It is that simple!
Part 3: How to Create Snapchat Lenses Using Create Your Own Lens
- There are two ways that you can access the tool for creating fun Snapchat lenses. You can either visit the website snapchat.com/create, or you can go on the “filters and lenses” section on your iOS device. If you are using Snapchat on an Android device, you will only have the option for the website. But the feature is coming to the Android version of Snapchat very soon.
- When you are in the application or on the website, you may start to look at the different templates for Snapchat lenses. Now you can add other items into the templates, such as photographs, text or graphics.
It is all up to your imagination. You can create the perfect Snapchat lens, which you can then send into your Snapchat account through your Snapcode. Of course, if you are using your iOS device to create the lens, it is already linked to your account.
Another cool feature is how you can set the location for where the Snapchat lens is available. Say you are hosting a party. You can have the Snapchat lens available to everyone who uses Snapchat within a set square footage of your home. That is an amazing way to let everyone share social media pictures and photos of your party, through the lens you created.

Conclusion
Creating Snapchat lenses has never been easier. Whether you are a business looking to add a custom lens, or you just want to create a fun lens for a graduation or party, there are tools that make the job very easy. Using these tools will allow you to create the perfect Snapchat lens for any occasion.
Ollie Mattison
 is a writer and a lover of all things video.
Follow @Ollie Mattison
- Title: The Comprehensible Approach to Multisnapping Videos for 2024
- Author: Scott
- Created at : 2024-07-25 11:59:11
- Updated at : 2024-07-26 11:59:11
- Link: https://snapchat-videos.techidaily.com/the-comprehensible-approach-to-multisnapping-videos-for-2024/
- License: This work is licensed under CC BY-NC-SA 4.0.