
:max_bytes(150000):strip_icc():format(webp)/how-to-choose-a-wireless-charger-5191283-cb27ceee3fea4547b5720b4934713a93.jpg)
Step by Step Guide to Managing Video Speed on Snapchat for 2024
Step by Step Guide to Managing Video Speed on Snapchat
Snapchat is an instant messaging app that allows you to share your pictures and videos with your family members, friends, and colleagues. In addition, you can even create your stories in the form of movie clips and share them on the app. These stories remain available for the next 24 hours, after which they are automatically removed from the platform.
While sharing the videos, you can apply several filters that are already present in the app, and Slow Motion is one of them. You may want to learn how to slow down a video on Snapchat when you want to emphasize and draw viewers’ attention toward the scene, or wish to make the audience see your actions closely and in detail.
That said, in the following sections, you will see how to slow down videos on Snapchat, and what other methods you can use to reduce the playback speed more professionally.
In this article
01 How to Add Slow Motion Effects to Video Using the Snapchat App
02 How to Record a Slo-Mo Video and Upload to Snapchat
03 How to Make Flash and Smooth Slo Mo Video for Snapchat
04 FAQs about Slowing Down Snapchat Video
Part 1: How to Add Slow Motion Effects to Video Using the Snapchat App
Snapchat has a built-in Slow Motion filter that reduces the playback speed of a video when applied. You can learn how to slow down on Snapchat by following the instructions that are given below:
Step 1: Record a Video
Launch Snapchat on your smartphone (iPhone 13 Pro Max is used here for illustrations), make sure that the Camera section is selected from the bottom, tap and hold down the Capture button that is present at the lower part of the interface, and let go of it when you are done recording.

Step 2: Apply the Slow Motion Filter
Once the video is recorded, swipe the screen from left to right. Repeat this process until you see the Snail (Slow Motion) icon on the screen. This will reduce the playback speed of the clip.

Step 3: Decorate the Video (Optional)
Use the options present on the upper-right area of the screen to further decorate the video and/or add annotations to it.

Step 4: Share or Publish the Video
Once everything is done, tap Send To from the bottom-right corner to share the video with your family, friends, and colleagues, or publish it as a story that remains available for the next 24 hours.
Related: How to Record Slo-Mo videos on iPhone .
Part 2: How to Record a Slo-Mo Video and Upload to Snapchat
With Snapchat, even though you don’t require any third-party tool to reduce the playback speed of a video, the app has certain limitations. For example, it doesn’t allow you to set a zoom level, you are stuck with the framerate that the app has to offer, etc.
Because of this, many people prefer to use different methods to record a video in slow motion with their preferences, and then upload it to Snapchat. This approach also eliminates the need to swipe the screen several times merely to use a single slow-motion filter.
Fortunately, iPhone has a built-in SLO-MO mode in its Camera app that allows you to capture the videos in slow motion. To learn how to do slow mo on Snapchat with the iPhone’s Camera app, you can follow the instructions that are given below:
Step 1: Get to the iPhone’s SLO-MO Mode
Launch the Camera app on your iPhone (iPhone 13 Pro Max is used here for illustrations), and swipe the screen from left to right until you get to the SLO-MO mode.

Step 2: Set Recording Preferences
Tap the number that is present at the top-right corner (240 here) to toggle between different framerates, tap 1x from the lower-center area, swipe slightly up, and then use the wheel that appears next to define your preferred zoom level.

Step 3: Start and Stop the Recording
Tap the Record button to start the recording, and tap Stop when you’re done.
Note: Make sure that the duration of the recorded video doesn’t exceed 60 seconds.
Step 4: Upload the Slow-Motion Video to Snapchat
After the video is recorded in slow motion, close the Camera app, launch Snapchat, and tap the Gallery icon from the left side of the Capture button on the Camera section. From the Memories screen, go to the Camera Roll tab, and tap to select the video that you recorded in the previous step.
Next, optionally, tap the Edit icon from the bottom-left corner to decorate the video and/or add annotations to it, and follow the process as explained in the previous section to share the clip with your family, friends, or colleagues, or publish it as your story.

Part 3: How to Make Flash and Smooth Slo Mo Video for Snapchat
Although iPhone has the built-in SLO-MO mode that even enables you to set your preferred framerate and zoom level before recording, it still doesn’t allow you to slow down different parts of a video in different speed at your convenience. You can either record the entire video in slow motion or at a normal speed.
This is where a third-party app comes into play. While there are several video editing programs available online, the one of the best slow motion apps that helps you slow down the portions of a video with precision is CapCut.
Downloading and installing CapCut on your iPhone or Android phone is simple, and once it is done, you can follow the process given below to learn how to slow things down on Snapchat:
With CapCut, you can either slow down the whole clip or manage the speed for different segments. This section explains both methods.
Method 1: Slow Down the Whole Clip with CapCut
Step 1: Get to the Speed Panel
Launch CapCut, import the video that you want to slow down, and tap the imported media in the Timeline. Next, tap Speed from the bottom of the interface to get to the next window.

Step 2: Reduce the Speed of the Video
Tap Normal from the bottom of the screen that appears next, and drag the Speed slider to the left to reduce the playback speed. Tap OK from the bottom-right corner to save the changes.

Step 3: Upload the Video to Snapchat
Back on the previous interface, optionally tap Volume from the bottom and reduce the slider to 0 to mute the audio of the footage as it may get distorted due to the reduction in the speed.
Next, tap Share from the top-right corner to save the video on your iPhone, and then use the method explained in the previous section to access the clip from the Gallery within Snapchat for uploading.
Method 2: Reduce the Playback Speed of Different Parts of a Video
Step 1: Get to the Speed Panel
Use the process described in the previous method to get to the Speed panel.
Step 2: Reduce the Speed of Different Parts of the Video
Tap Curve from the bottom of the interface. On the next screen, tap Custom from the lower area, and then tap Edit. From the next panel, drag the beat points down to reduce the speed (or drag them above the line to increase).

Notice that each beat point represents a particular section of the video, and dragging it down reduces the playback speed of that segment. You can even tap anywhere on the line to add a new beat point and drag it down as needed for more precise speed management. Once done, tap OK from the bottom-right corner to save the modifications.

Optionally, you can also tap any of the available presets on the Curve screen to reduce the playback speed of the video accordingly.
Step 3: Upload the Video to Snapchat
Use the method explained in the previous method to export the video, upload it to Snapchat, and share the clip with your family, friends, and colleagues, or publish it as your story.
Part 4: FAQs about Slowing Down Snapchat Video
1. Can I record a slow mo video in Snapchat?
Technically speaking, no, you cannot. However, once you have recorded a video at a normal speed in Snapchat, you can apply the built-in Slow Motion filter to it by swiping the screen from left to right until you see the Snail icon at the center. The Snail icon represents the Slow Motion filter that reduces the playback speed when applied.
2. Besides slow-motion, which speed filters does Snapchat have?
In addition to slow motion Snapchat also has Forward and Fast Forward filters that increase the playback speed. While the Forward filter increases the speed slightly, the Fast Forward one enhances it drastically.
Conclusion
When using an iPhone, even though the SLO-MO mode enables you to record footage in slow motion, you don’t get many options. Therefore, it would be safe to say that it is easy to slow down the speed of a video if you have a dedicated third-party post-production app. However, if you want to go for a convenient method, learning how to slow down a video on Snapchat is an extremely simple and straightforward process.
02 How to Record a Slo-Mo Video and Upload to Snapchat
03 How to Make Flash and Smooth Slo Mo Video for Snapchat
04 FAQs about Slowing Down Snapchat Video
Part 1: How to Add Slow Motion Effects to Video Using the Snapchat App
Snapchat has a built-in Slow Motion filter that reduces the playback speed of a video when applied. You can learn how to slow down on Snapchat by following the instructions that are given below:
Step 1: Record a Video
Launch Snapchat on your smartphone (iPhone 13 Pro Max is used here for illustrations), make sure that the Camera section is selected from the bottom, tap and hold down the Capture button that is present at the lower part of the interface, and let go of it when you are done recording.
Step 2: Apply the Slow Motion Filter
Once the video is recorded, swipe the screen from left to right. Repeat this process until you see the Snail (Slow Motion) icon on the screen. This will reduce the playback speed of the clip.
Step 3: Decorate the Video (Optional)
Use the options present on the upper-right area of the screen to further decorate the video and/or add annotations to it.
Step 4: Share or Publish the Video
Once everything is done, tap Send To from the bottom-right corner to share the video with your family, friends, and colleagues, or publish it as a story that remains available for the next 24 hours.
Related: How to Record Slo-Mo videos on iPhone .
Part 2: How to Record a Slo-Mo Video and Upload to Snapchat
With Snapchat, even though you don’t require any third-party tool to reduce the playback speed of a video, the app has certain limitations. For example, it doesn’t allow you to set a zoom level, you are stuck with the framerate that the app has to offer, etc.
Because of this, many people prefer to use different methods to record a video in slow motion with their preferences, and then upload it to Snapchat. This approach also eliminates the need to swipe the screen several times merely to use a single slow-motion filter.
Fortunately, iPhone has a built-in SLO-MO mode in its Camera app that allows you to capture the videos in slow motion. To learn how to do slow mo on Snapchat with the iPhone’s Camera app, you can follow the instructions that are given below:
Step 1: Get to the iPhone’s SLO-MO Mode
Launch the Camera app on your iPhone (iPhone 13 Pro Max is used here for illustrations), and swipe the screen from left to right until you get to the SLO-MO mode.
Step 2: Set Recording Preferences
Tap the number that is present at the top-right corner (240 here) to toggle between different framerates, tap 1x from the lower-center area, swipe slightly up, and then use the wheel that appears next to define your preferred zoom level.
Step 3: Start and Stop the Recording
Tap the Record button to start the recording, and tap Stop when you’re done.
Note: Make sure that the duration of the recorded video doesn’t exceed 60 seconds.
Step 4: Upload the Slow-Motion Video to Snapchat
After the video is recorded in slow motion, close the Camera app, launch Snapchat, and tap the Gallery icon from the left side of the Capture button on the Camera section. From the Memories screen, go to the Camera Roll tab, and tap to select the video that you recorded in the previous step.
Next, optionally, tap the Edit icon from the bottom-left corner to decorate the video and/or add annotations to it, and follow the process as explained in the previous section to share the clip with your family, friends, or colleagues, or publish it as your story.
Part 3: How to Make Flash and Smooth Slo Mo Video for Snapchat
Although iPhone has the built-in SLO-MO mode that even enables you to set your preferred framerate and zoom level before recording, it still doesn’t allow you to slow down different parts of a video in different speed at your convenience. You can either record the entire video in slow motion or at a normal speed.
This is where a third-party app comes into play. While there are several video editing programs available online, the one of the best slow motion apps that helps you slow down the portions of a video with precision is CapCut.
Downloading and installing CapCut on your iPhone or Android phone is simple, and once it is done, you can follow the process given below to learn how to slow things down on Snapchat:
With CapCut, you can either slow down the whole clip or manage the speed for different segments. This section explains both methods.
Method 1: Slow Down the Whole Clip with CapCut
Step 1: Get to the Speed Panel
Launch CapCut, import the video that you want to slow down, and tap the imported media in the Timeline. Next, tap Speed from the bottom of the interface to get to the next window.
Step 2: Reduce the Speed of the Video
Tap Normal from the bottom of the screen that appears next, and drag the Speed slider to the left to reduce the playback speed. Tap OK from the bottom-right corner to save the changes.
Step 3: Upload the Video to Snapchat
Back on the previous interface, optionally tap Volume from the bottom and reduce the slider to 0 to mute the audio of the footage as it may get distorted due to the reduction in the speed.
Next, tap Share from the top-right corner to save the video on your iPhone, and then use the method explained in the previous section to access the clip from the Gallery within Snapchat for uploading.
Method 2: Reduce the Playback Speed of Different Parts of a Video
Step 1: Get to the Speed Panel
Use the process described in the previous method to get to the Speed panel.
Step 2: Reduce the Speed of Different Parts of the Video
Tap Curve from the bottom of the interface. On the next screen, tap Custom from the lower area, and then tap Edit. From the next panel, drag the beat points down to reduce the speed (or drag them above the line to increase).
Notice that each beat point represents a particular section of the video, and dragging it down reduces the playback speed of that segment. You can even tap anywhere on the line to add a new beat point and drag it down as needed for more precise speed management. Once done, tap OK from the bottom-right corner to save the modifications.
Optionally, you can also tap any of the available presets on the Curve screen to reduce the playback speed of the video accordingly.
Step 3: Upload the Video to Snapchat
Use the method explained in the previous method to export the video, upload it to Snapchat, and share the clip with your family, friends, and colleagues, or publish it as your story.
Part 4: FAQs about Slowing Down Snapchat Video
1. Can I record a slow mo video in Snapchat?
Technically speaking, no, you cannot. However, once you have recorded a video at a normal speed in Snapchat, you can apply the built-in Slow Motion filter to it by swiping the screen from left to right until you see the Snail icon at the center. The Snail icon represents the Slow Motion filter that reduces the playback speed when applied.
2. Besides slow-motion, which speed filters does Snapchat have?
In addition to slow motion Snapchat also has Forward and Fast Forward filters that increase the playback speed. While the Forward filter increases the speed slightly, the Fast Forward one enhances it drastically.
Conclusion
When using an iPhone, even though the SLO-MO mode enables you to record footage in slow motion, you don’t get many options. Therefore, it would be safe to say that it is easy to slow down the speed of a video if you have a dedicated third-party post-production app. However, if you want to go for a convenient method, learning how to slow down a video on Snapchat is an extremely simple and straightforward process.
Visual Virtuosos: The Ultimate Resource for Filters Perfection
The Ultimate Guide of Snapchat Filters

Ollie Mattison
Mar 27, 2024• Proven solutions
Snapchat is getting widely popular with its interesting, beautiful and yes, hilarious filters. Understanding how to use the best Snapchat filters, as well as unleashing the Snapchat hidden filters would make the pictures super attractive. Not just this, you can also enjoy using those funny filters, especially those with automated voice.
Well! This interesting social media app is all about creative and chuckle-some filters, that garnered a huge fan following. We, through this article are going to show you how to use the various amusing filters of Snapchat.
- Part1: How to use Snapchat filters
- Part2: Best Snapchat filters people prefer to use
- Part3: How to find Snapchat hidden filters
Part 1: How to use Snapchat filters
With their plethora of features these filters add so much fun to your pictures. To get the best out of Snapchat filters, let’s divulge deeper. Here we have explained the basic steps as how to make use of these filters.
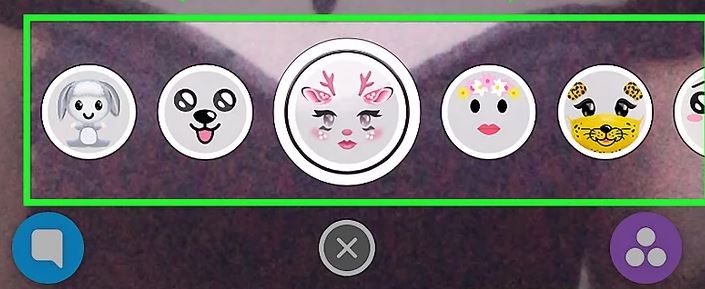
Step 1: Tap the camera screen to activate filters
Login to your Snapchat account using the credentials and launch the Snapchat camera. Tap the camera once to activate the filters. Now, you can see the filters show up adjacent to the camera button. Swipe them right or left to choose a desired filter and pose as instructed.
Step 2: Capture a snap
Once you have selected the filter, you can tap the camera button once to click a snap, or hold the camera button in case you want to record a video with that filter.
Step 3: Choose filters
The best part about Snapchat filters is, you not only can use them while clicking a picture, but can also add filters post clicking picture. There are 2 ways to select filters after clicking your picture.
- As soon as you are done clicking a snap, slide the screen to left and you can find the latest filters. Choose whatever filters from the list catches your fancy.
- If you are not happy with these filters from option ‘a’, then don’t get sad. We have a lot more for you, like a set of secret Snapchat filters. After clicking the picture you will see a ‘smiley icon’ on the right side of the screen. Tap the ‘smiley icon’ and then scroll up or down to pick the most enchanting filter for you.
Once you are done finalizing the effects (filters), you can save or share the snap.

Step 4: Share your work
After snapping an interesting picture of you or a loved one, now it’s time to share it on Snapchat. You can either send them directly to your contacts on Snapchat or share it as a story.
- Tap the ‘Send to’ button to send it as a personal snap to your friends. When the list appears tap on the respective names and then click ‘Send’.
- To share it as a story, you can tap the ‘My Story’ tab and then the ‘Send’ button. There is another feature called ‘Our Story’, select it and then ‘Send’.
Note: ‘Our Story’ images are shared with the world, and they are pinned to the map for your location. It is searchable over the internet on or off Snapchat.
Read More to Get : How to Screenshot on Snapchat without Them Knowing >>
Part 2: Best Snapchat filters people prefer to use
After experimenting on the varied range of selfie-enhancing filters on Snapchat, our team rated these 5 Snapchat filters as the best ones. If you haven’t explored the galore of humorous filters yet, then here is the chance to snap and get entertained –
Rainbow Vomit
This funny filter from Snapchat is worth trying. This filter in fact inspired plenty of people to get their chins painted with rainbows on Halloween. AR (Augmented Reality) filters from Snapchat have stepped ahead to allow such magic like features. When you open your mouth in selfie mode, a rainbow comes out of your mouth.
Puppy
There is nobody who would say that they don’t like this Puppy filter. It’s icing on the cake for those dog lovers. When you click or record a Snap using this filter, you can see the puppy ears, puppy nose, and an interactive tongue that makes your Snap super cute. Moreover, you can twin with your BFF using this cutesy puppy filter and share the fun.
Face Swap
Have you tried this nightmarish filter yet? If you are a fantasy lover and love to try stuffs straight out of dreams, then try this filter with a friend. The smart technology in this filter swaps your face with the friend in frame with you. Your face gets masked on your friend’s face, and vise-a-versa.
Flower Crown
We personally are in awe with this beautiful filter from Snapchat. One of the best Snapchat filters, that adorned Snapchat stories and profile pictures of other social media sites as well. This basic filter from Snapchat makes your skin look flawless, adding an instant glow to your picture and enhancing your eyes. The floral crown does the added magical effect to your looks. Like the Puppy filter, you can share screen with your BFF and pose as the flower angels.
Bearded Filters
This filter is really funny for people without beard, more fun for the ladies. Pose as a beard pirate with that mysterious stubble and moustache and up the fun quotient.

Part 3: How to find Snapchat hidden filters
Well, if you want to explore more filters from Snapchat, then we have this amazing solution for you. You can unlock secret Snapchat filters through a Snapcode. Either a hyperlink or a photo can unlock a code and allow you to use interesting filters in your Snaps. Here are the steps –
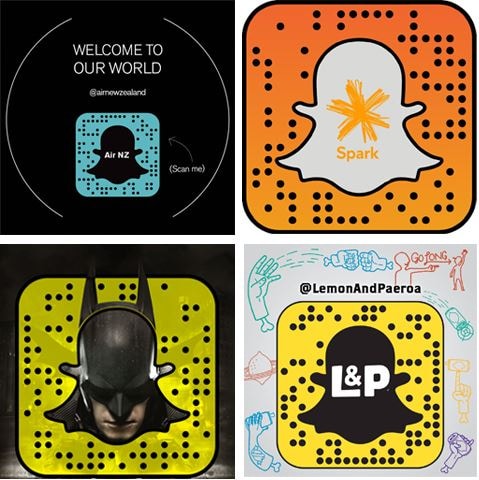
Step 1: Find Snapcode
Firstly, What is Snapcode exactly? A Snapcode is nothing but a Snapchat version of a QR code, as well as a hyperlink. Using such Snapcodes you unlock third-party filters with a lot of AR effects to pep-up your fun quotient.
There are multiple ways to find a Snapcode. It can be integrated with a picture, a hyperlink or within a tweet. You can find it by paying a close look. There are multiple sites over the internet which can allow you to use these hidden filters.
Step 2: Open Snapcode
You can open a Snapcode pretty easily, as the process is very user-friendly. Locate a Snapcode using a hyperlink, tweet, or in a picture. You download the filter by clicking the picture with the Snapcode, using the Snapchat camera, or browsing the hyperlink on your mobile phone. In your view finder, you need to long-press on the Snapcode till it gets recognized by the phone.
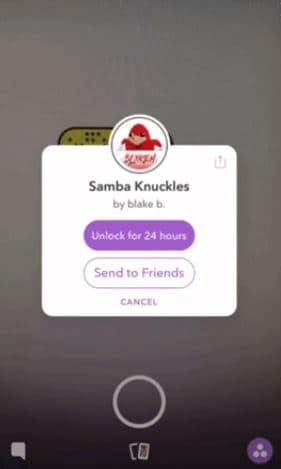
Step 3: Unlock hidden Snapcode
As soon as you snap the picture, it will get the filter activated for 24 hours on your Snapchat you will be prompted with a pop-up saying ‘Unlock for 24 hours’. Click on it to unlock the secret Snapchat filters. You can also send it to your friends.
Final Verdict
We are positive that this article has helped you uncover plenty of features in Snapchat. Apart from how to use Snapchat filters, you also got a fair idea about how to unlock Snapchat hidden filters. So, what are waiting for? Pick your mobile and start Snapping.
Images come from the Internet
Ollie Mattison
Ollie Mattison is a writer and a lover of all things video.
Follow @Ollie Mattison
Ollie Mattison
Mar 27, 2024• Proven solutions
Snapchat is getting widely popular with its interesting, beautiful and yes, hilarious filters. Understanding how to use the best Snapchat filters, as well as unleashing the Snapchat hidden filters would make the pictures super attractive. Not just this, you can also enjoy using those funny filters, especially those with automated voice.
Well! This interesting social media app is all about creative and chuckle-some filters, that garnered a huge fan following. We, through this article are going to show you how to use the various amusing filters of Snapchat.
- Part1: How to use Snapchat filters
- Part2: Best Snapchat filters people prefer to use
- Part3: How to find Snapchat hidden filters
Part 1: How to use Snapchat filters
With their plethora of features these filters add so much fun to your pictures. To get the best out of Snapchat filters, let’s divulge deeper. Here we have explained the basic steps as how to make use of these filters.
Step 1: Tap the camera screen to activate filters
Login to your Snapchat account using the credentials and launch the Snapchat camera. Tap the camera once to activate the filters. Now, you can see the filters show up adjacent to the camera button. Swipe them right or left to choose a desired filter and pose as instructed.
Step 2: Capture a snap
Once you have selected the filter, you can tap the camera button once to click a snap, or hold the camera button in case you want to record a video with that filter.
Step 3: Choose filters
The best part about Snapchat filters is, you not only can use them while clicking a picture, but can also add filters post clicking picture. There are 2 ways to select filters after clicking your picture.
- As soon as you are done clicking a snap, slide the screen to left and you can find the latest filters. Choose whatever filters from the list catches your fancy.
- If you are not happy with these filters from option ‘a’, then don’t get sad. We have a lot more for you, like a set of secret Snapchat filters. After clicking the picture you will see a ‘smiley icon’ on the right side of the screen. Tap the ‘smiley icon’ and then scroll up or down to pick the most enchanting filter for you.
Once you are done finalizing the effects (filters), you can save or share the snap.
Step 4: Share your work
After snapping an interesting picture of you or a loved one, now it’s time to share it on Snapchat. You can either send them directly to your contacts on Snapchat or share it as a story.
- Tap the ‘Send to’ button to send it as a personal snap to your friends. When the list appears tap on the respective names and then click ‘Send’.
- To share it as a story, you can tap the ‘My Story’ tab and then the ‘Send’ button. There is another feature called ‘Our Story’, select it and then ‘Send’.
Note: ‘Our Story’ images are shared with the world, and they are pinned to the map for your location. It is searchable over the internet on or off Snapchat.
Read More to Get : How to Screenshot on Snapchat without Them Knowing >>
Part 2: Best Snapchat filters people prefer to use
After experimenting on the varied range of selfie-enhancing filters on Snapchat, our team rated these 5 Snapchat filters as the best ones. If you haven’t explored the galore of humorous filters yet, then here is the chance to snap and get entertained –
Rainbow Vomit
This funny filter from Snapchat is worth trying. This filter in fact inspired plenty of people to get their chins painted with rainbows on Halloween. AR (Augmented Reality) filters from Snapchat have stepped ahead to allow such magic like features. When you open your mouth in selfie mode, a rainbow comes out of your mouth.
Puppy
There is nobody who would say that they don’t like this Puppy filter. It’s icing on the cake for those dog lovers. When you click or record a Snap using this filter, you can see the puppy ears, puppy nose, and an interactive tongue that makes your Snap super cute. Moreover, you can twin with your BFF using this cutesy puppy filter and share the fun.
Face Swap
Have you tried this nightmarish filter yet? If you are a fantasy lover and love to try stuffs straight out of dreams, then try this filter with a friend. The smart technology in this filter swaps your face with the friend in frame with you. Your face gets masked on your friend’s face, and vise-a-versa.
Flower Crown
We personally are in awe with this beautiful filter from Snapchat. One of the best Snapchat filters, that adorned Snapchat stories and profile pictures of other social media sites as well. This basic filter from Snapchat makes your skin look flawless, adding an instant glow to your picture and enhancing your eyes. The floral crown does the added magical effect to your looks. Like the Puppy filter, you can share screen with your BFF and pose as the flower angels.
Bearded Filters
This filter is really funny for people without beard, more fun for the ladies. Pose as a beard pirate with that mysterious stubble and moustache and up the fun quotient.
Part 3: How to find Snapchat hidden filters
Well, if you want to explore more filters from Snapchat, then we have this amazing solution for you. You can unlock secret Snapchat filters through a Snapcode. Either a hyperlink or a photo can unlock a code and allow you to use interesting filters in your Snaps. Here are the steps –
Step 1: Find Snapcode
Firstly, What is Snapcode exactly? A Snapcode is nothing but a Snapchat version of a QR code, as well as a hyperlink. Using such Snapcodes you unlock third-party filters with a lot of AR effects to pep-up your fun quotient.
There are multiple ways to find a Snapcode. It can be integrated with a picture, a hyperlink or within a tweet. You can find it by paying a close look. There are multiple sites over the internet which can allow you to use these hidden filters.
Step 2: Open Snapcode
You can open a Snapcode pretty easily, as the process is very user-friendly. Locate a Snapcode using a hyperlink, tweet, or in a picture. You download the filter by clicking the picture with the Snapcode, using the Snapchat camera, or browsing the hyperlink on your mobile phone. In your view finder, you need to long-press on the Snapcode till it gets recognized by the phone.
Step 3: Unlock hidden Snapcode
As soon as you snap the picture, it will get the filter activated for 24 hours on your Snapchat you will be prompted with a pop-up saying ‘Unlock for 24 hours’. Click on it to unlock the secret Snapchat filters. You can also send it to your friends.
Final Verdict
We are positive that this article has helped you uncover plenty of features in Snapchat. Apart from how to use Snapchat filters, you also got a fair idea about how to unlock Snapchat hidden filters. So, what are waiting for? Pick your mobile and start Snapping.
Images come from the Internet
Ollie Mattison
Ollie Mattison is a writer and a lover of all things video.
Follow @Ollie Mattison
Also read:
- 2024 Approved Transforming Snaps Into Animated Characters in Snapchat
- 2024 Approved Fast Track Installing Snapchat on Your Mac Device
- [New] Mastering Snapchat's Photo Alterations A Step-by-Step Guide
- [New] 2024 Approved Innovate Your Images with Leading Snapchat Effects
- [Updated] Unveiling the Secrets to Snap Success for 2024
- [Updated] 2024 Approved Saving Snaps From Snapchat on Camera Roll – A Guide
- [New] 2024 Approved Hidden ShotShaper Advanced Stealthy Methods for Capturing Images
- [New] In 2024, Fine-Tune Your Snaps with Mac-Produced Content
- [New] 2024 Approved Unravel the Mystery of Reversed Videos on Snapchat
- 2024 Approved Achieving Maximum Compactness with Mac Recordings on Snapchat
- In 2024, The Ultimate Tutorial for Sharing Photos From Phone Memory
- A Journey Through Snapchat's Creative Edit Features for 2024
- [Updated] Echoes of Entertainment Adding Sound to Snapchat Vids for 2024
- Snapchat Integration for the Tech-Savvy Mac User for 2024
- 2024 Approved Quick Tips Transferring Camera Roll From Your Device to Snapchat App
- [New] How-To Guide for Adding Friends as Pins on Snapchat for 2024
- Optimize and Protect Transferring Your Camera Roll Efficiently to Snapchat for 2024
- In 2024, 120+ Snapchat Private Story Name Ideas
- [New] Smart Snapchat Gifting Step-by-Step for Success for 2024
- [New] 2024 Approved Go Digital, Go Social Send Snaps Instantly
- [Updated] In 2024, Getting Started with Snapchat A Mac User's Guide
- [Updated] Masterful Backup Techniques for iPhone to Snapchat Content
- [New] 2024 Approved Inside Out The True Significance Behind Snapchat's Emojis
- [New] The Ultimate Guide to Photo Perfection on Snapchat
- Old Memories, New Snaps Utilizing Snapchat’s Camera Roll for 2024
- [New] 2024 Approved Unleashing Creativity Quick Lens Building on Snapchat
- [New] In 2024, KakaoTalk Elites' Flash Chats on Snapchat
- [New] Quick Tips for Converting Snapshots Directly From the App for 2024
- [New] MySpace Gurus Gabbing via Snapchat
- [New] In 2024, Snapchat Emojis Explained More Than Meets the Eye
- [New] The Entrepreneur's Guide to Snapchat Advertising for 2024
- [Updated] 2024 Approved From Novice to Pro Becoming a Boomerang Connoisseur on Snapchat
- 2024 Approved Conquer Snapchat's Boomerang Challenges Easily
- [New] Tips for Finding Hidden, Exclusive Photos on Snapchat
- [Updated] Behind the Scenes of Gif Sharing in Snapchat Steps for 2024
- [New] 2024 Approved Making a Lasting Impact with Office Meetings via Snap Camera
- [New] In 2024, SnapChat Savvy Constructing Innovative and Memorable Boomers
- [Updated] Elevate Your Photo Game Essential Filters for Stunning Snaps for 2024
- [New] Boosting Snapchat Impact Select 6 Excellent Video Editors for 2024
- [Updated] Targeted Success Using SnapAds for Business Growth for 2024
- [New] In 2024, Quick Guide to Achieving Video Freeze Effects on Snapchat
- [New] Revamping Your Snapchat Speech Two Straightforward Steps
- [New] Mastering Video Storage of Snapchat Stories
- [New] Snapchat Voice Overhaul Two Efficient Ways Revealed
- [Updated] In 2024, Installing Snapchat Efficiently on Your Mac
- [New] SnapChat Commerce Masterclass Essentials Unveiled for 2024
- In 2024, Snapchat How to Record, Share & Edit Mobile Content
- Updated 2024 Approved 15 Animated Characters We All Had A Crush On
- Factory Reset Apple iPhone 6 | Dr.fone
- In 2024, The Ultimate Guide How to Bypass Swipe Screen to Unlock on Honor Magic 6 Pro Device
- The Ultimate Guide to Bypassing iCloud Activation Lock on iPhone 15
- 2024 Approved Mastering How to Fix Videos Not Sent in Facebook Message Apps
- [Updated] Steps for Capturing HD Content on FB
- Studio Sound Techniques Mac Basics
- iPogo will be the new iSpoofer On Oppo A56s 5G? | Dr.fone
- [New] In 2024, Empowering Your Brand Top 20 Strategies for High-Impact FB Video Campaigns
- Updated This Article Shows You How to Do Freeze-Frames and Slow Motion in Final Cut Pro X
- [New] In 2024, Techniques for Storing Live Video Calls
- Title: Step by Step Guide to Managing Video Speed on Snapchat for 2024
- Author: Scott
- Created at : 2024-05-23 10:34:11
- Updated at : 2024-05-24 10:34:11
- Link: https://snapchat-videos.techidaily.com/step-by-step-guide-to-managing-video-speed-on-snapchat-for-2024/
- License: This work is licensed under CC BY-NC-SA 4.0.
