![[New] Transform Your Snapshots Into Shares – Here's How](https://thmb.techidaily.com/d52ef143e5ac406fb5edcd5e28a24a2a1379f299efd751d4b382d0440e3e89ad.jpg)
[New] Transform Your Snapshots Into Shares – Here's How
Transform Your Snapshots Into Shares – Here’s How
Snapchat enables you to communicate with your friends in an engaging way. To send a normal snap to your friends, you need to take a live photo or video from the Snapchat camera. This may be out of your comfort zone to send normal live snaps every time.
This article will explain how to send a picture from your memories or camera roll as a normal snap. By using our recommended apps and methods, you can also hide that the sent picture is from the camera roll. Let’s dive into the details to learn how to send snaps from the camera roll.
Wondershare Filmora Easily Snapchat Videos on PC and Mac.
Free Download Free Download Learn More


![]()
How to Send a Snap from Memories/Camera Roll as a Snap
Are you tired of sending your live selfies as snaps to your friends? In this section, you can learn how to send snaps from the camera roll without capturing a live snap. For this, we will explain some manual methods as well as some reliable apps in a detailed manner.
Method 1: Using a Snapchat Filter
Snapchat allows you to apply its filters on any of your camera roll’s pictures. By selecting a particular photo or video from your memories or snap, you can instantly add a filter to them. Afterward, you can send the filtered image to your friends as a regular snap. However, this solution has a significant drawback that you must know. The limitation is that the receiver of the snap would be able to see that the sent picture is from the camera roll.
Step1 Open your Snapchat and swipe up to open the ‘Memories’. Go to your Camera Roll and select any particular picture from there.


Step2 After choosing a particular photo, tap on the “Edit“ icon at the bottom left corner. You can apply filters to the photo by swiping from right to left. Keep swiping until you can find your preferred filter.
 Screensaver Factory, Create stunning professional screensavers within minutes. Create screensavers for yourself, for marketing or unlimited royalty-free commercial distribution. Make screensavers from images, video and swf flash, add background music and smooth sprite and transition effects. Screensaver Factory is very easy to use, and it enables you to make self-installing screensaver files and CDs for easy setup and distribution. Screensaver Factory is the most advanced software of its kind.
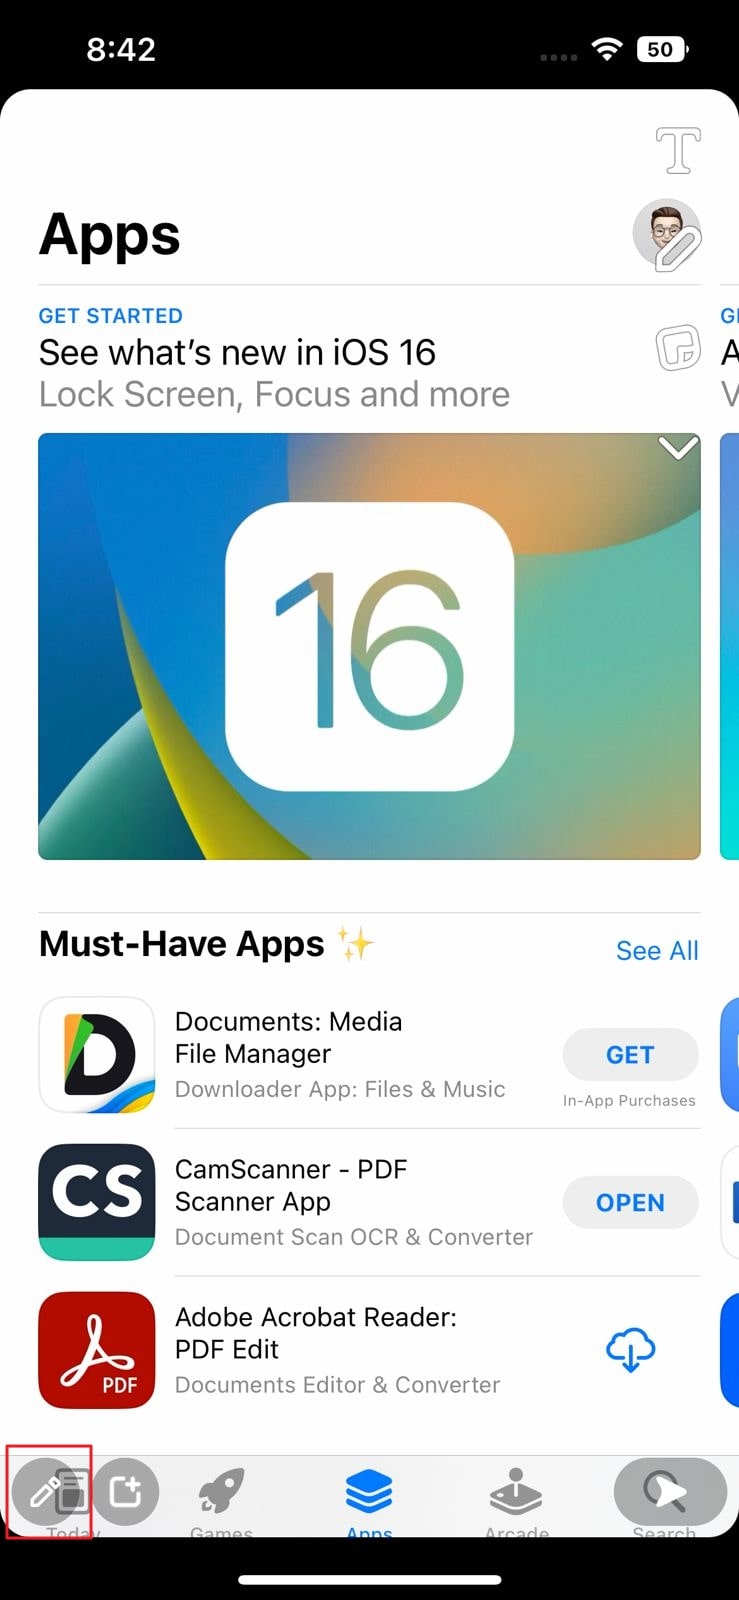
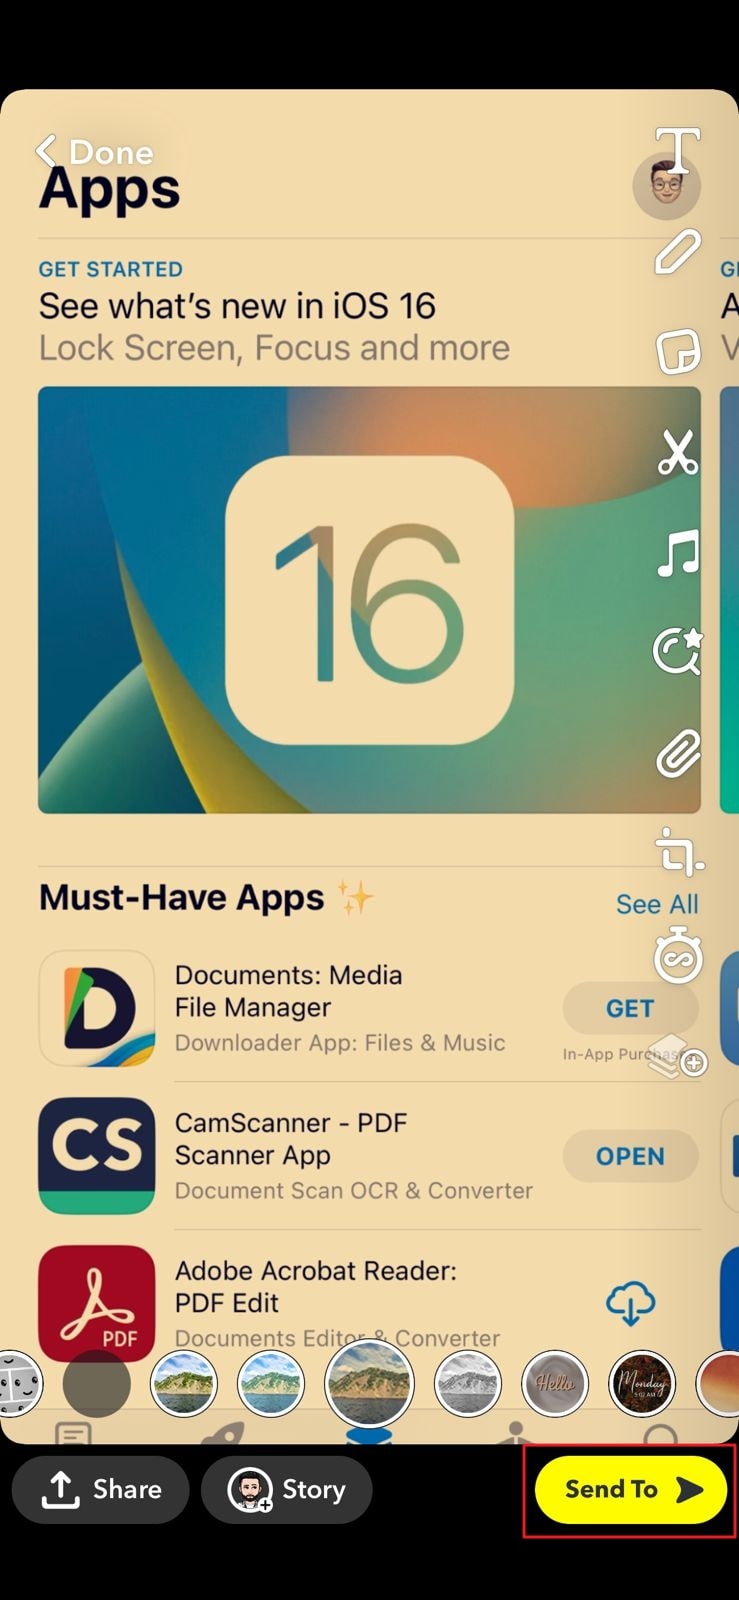
Step1 Once you have applied the filter to the photo, touch on the “Send To” button. Choose any Snapchat friend to whom you want to send the picture. Next, hit the “Send” icon again to send the photo successfully.
 Nero Burning ROM:
The ultimate burning program for all your needs!
Method 2: Using a Sticker
If you want to make your camera roll picture funny and entertaining, you can add stickers to it. Through Snapchat, you can make your customized sticker of any interesting face or object. Moreover, Snapchat also offers a huge variety of built-in stickers. If you don’t want to create a customized sticker, you can easily add the built-in sticker with a single tap.
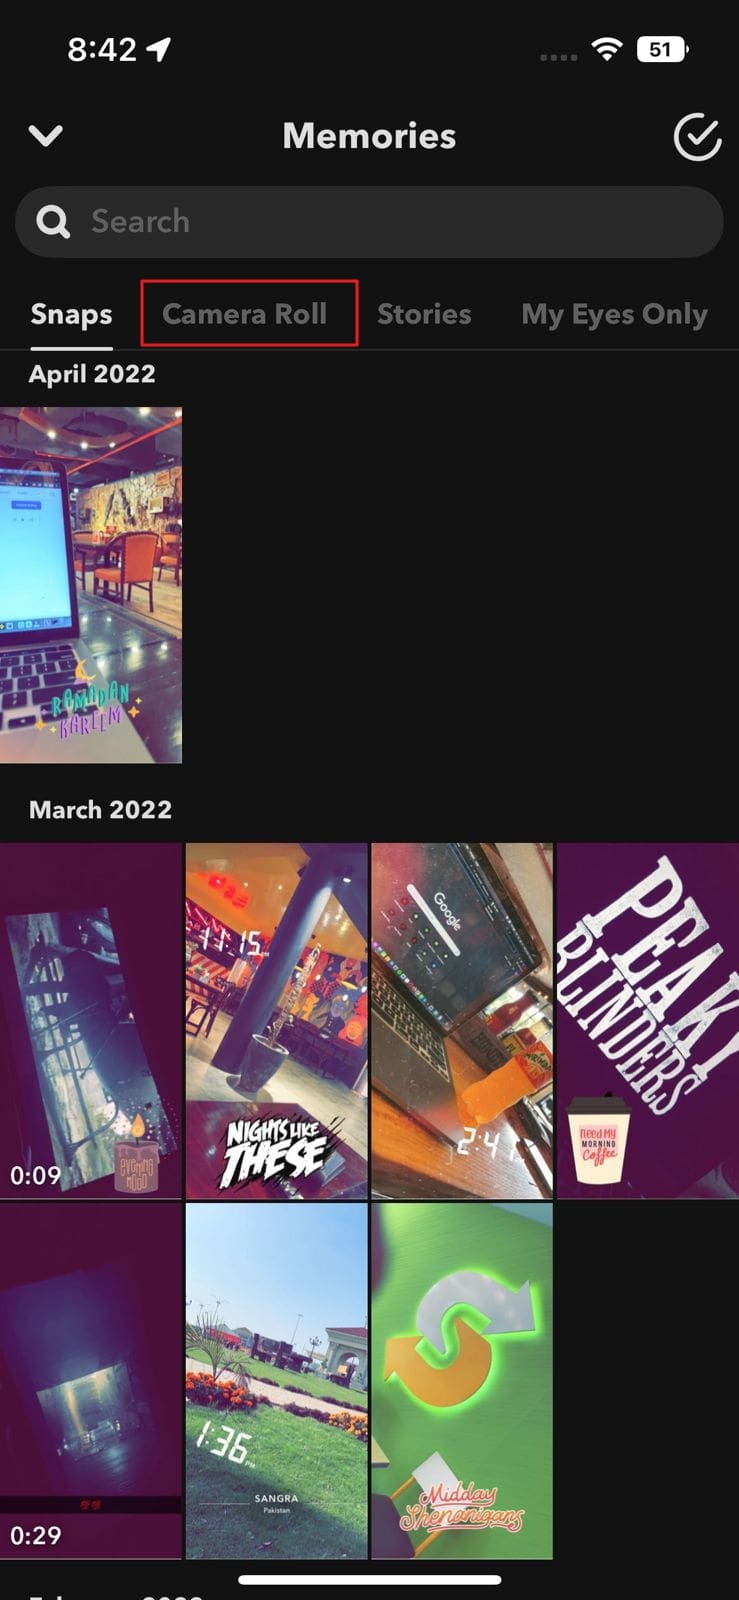
Step1 Once you have opened your Snapchat, go to Memories. From there, you can access and select any picture from the Camera Roll.

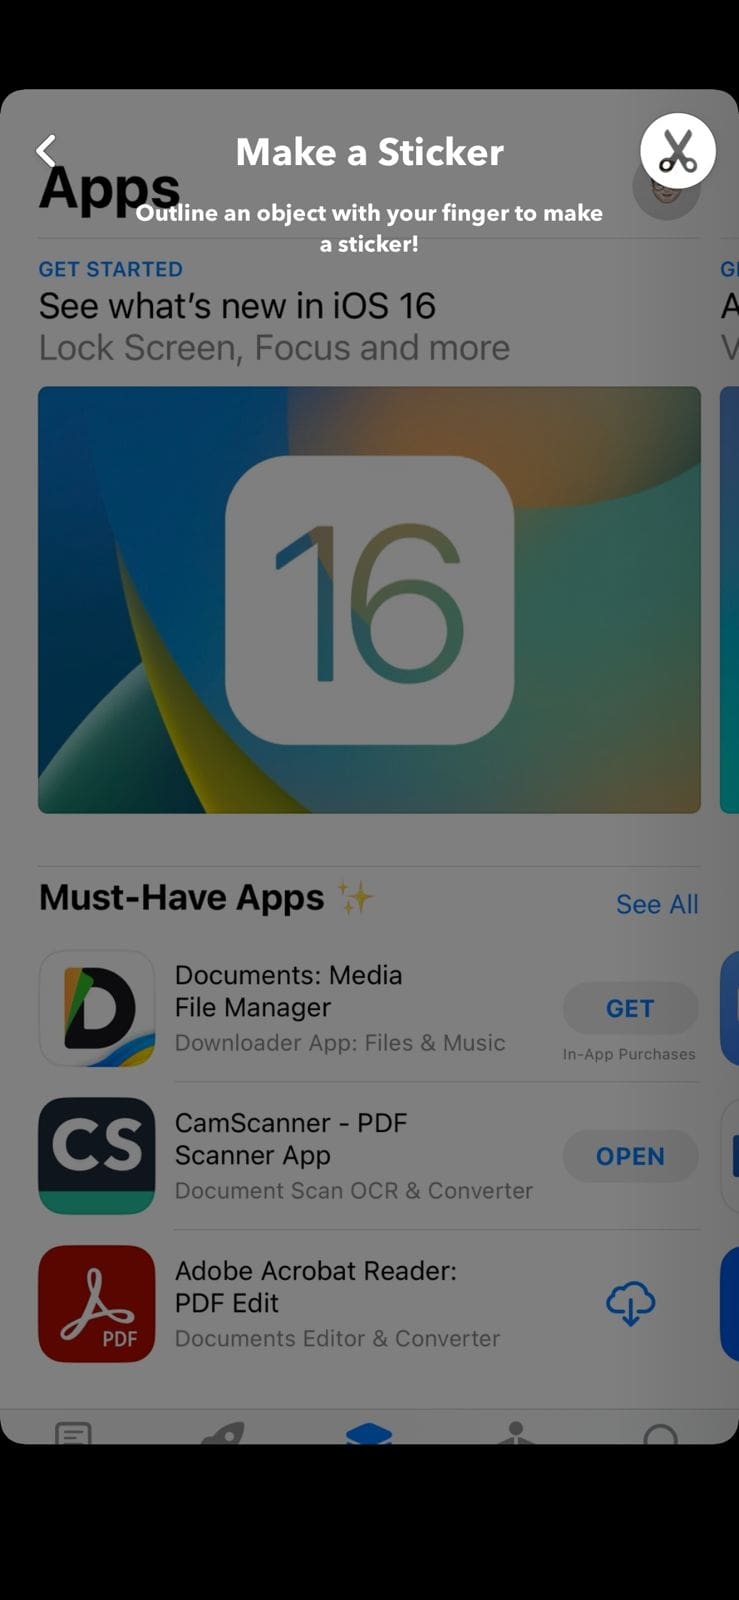
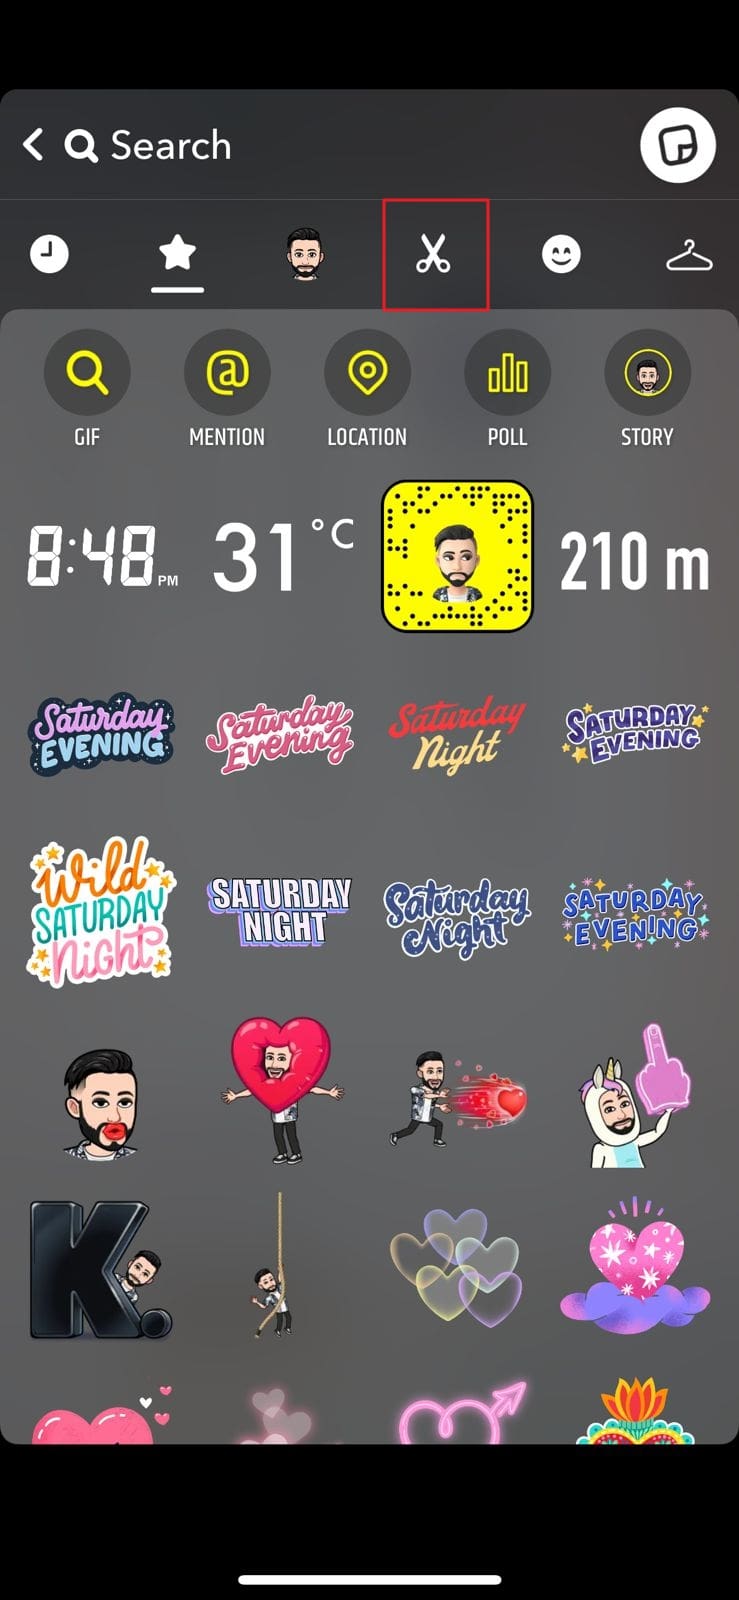
Step2 After selecting a specific picture from Camera Roll, tap on the “Pencil” icon at the bottom left corner to edit the photo. Afterward, select the “Scissor” icon from the right section. Using the Snapchat Scissor, you can create a sticker of any face or object you find interesting. Just select any area of the photo using your finger.
 DEX 3 RE is Easy-To-Use DJ Mixing Software for MAC and Windows Designed for Today’s Versatile DJ.
Mix from your own library of music, iTunes or use the Pulselocker subsciprtion service for in-app access to over 44 million songs. Use with over 85 supported DJ controllers or mix with a keyboard and mouse.
DEX 3 RE is everything you need without the clutter - the perfect 2-deck mixing software solution for mobile DJs or hard-core hobbiests.
PCDJ DEX 3 RE (DJ Software for Win & MAC - Product Activation For 3 Machines)
Step3 Now close the picture opened for creating the sticker. Once done, take a snap from your Snapchat to proceed. Now from the right section, tap on the “Sticker” icon. Here, you can choose the built-in stickers easily. Or you can navigate to the “Scissor” icon to select your created sticker.
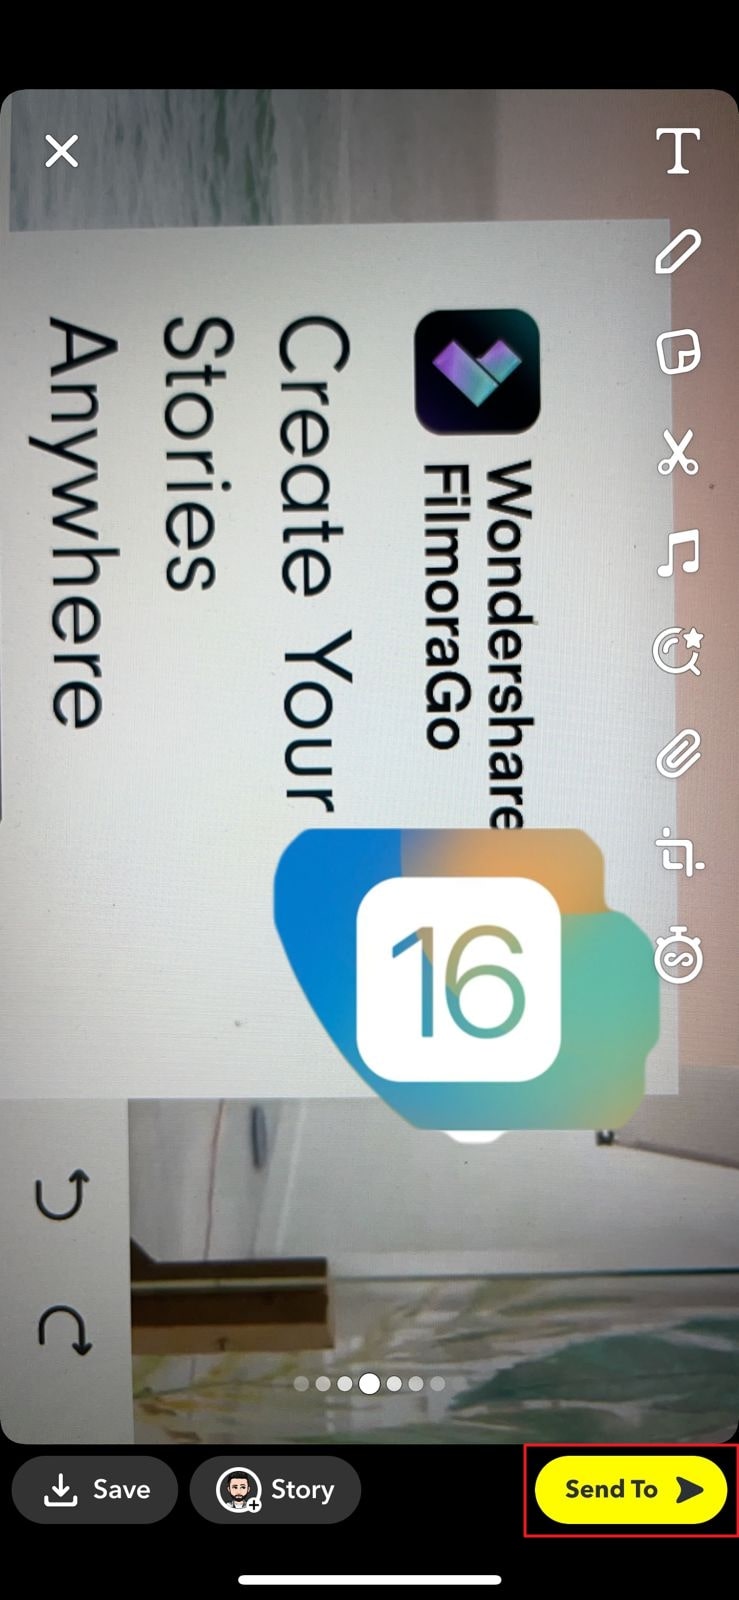
Step4 Once done with adding and adjusting the sticker, hit the “Send To” button. Choose your preferred contact and tap on the “Send” icon again.

Method 3: Using the LMK App
Another efficient way to send a camera roll picture as a regular snap is by using a third-party app. LMK is a reliable social media platform that enables you to communicate with friends having similar interests. You can craft your profile by adding your interests and hobbies.
It helps people to create a safe and healthy community for enhanced communication. In this solution, we will guide you on how to send snaps from the camera roll using the LMK app. Through this app, you can send snaps to your friends without mentioning the camera roll.
Step1 Open your Snapchat either from your Android or iOS device. Proceed to the Memories section and select Camera Roll. Here, tap on any picture that you want to send.

Step2 Now hit the “Arrow” button to share the selected snap. From the displayed options, tap on the “Download” icon to save the picture on your device gallery.

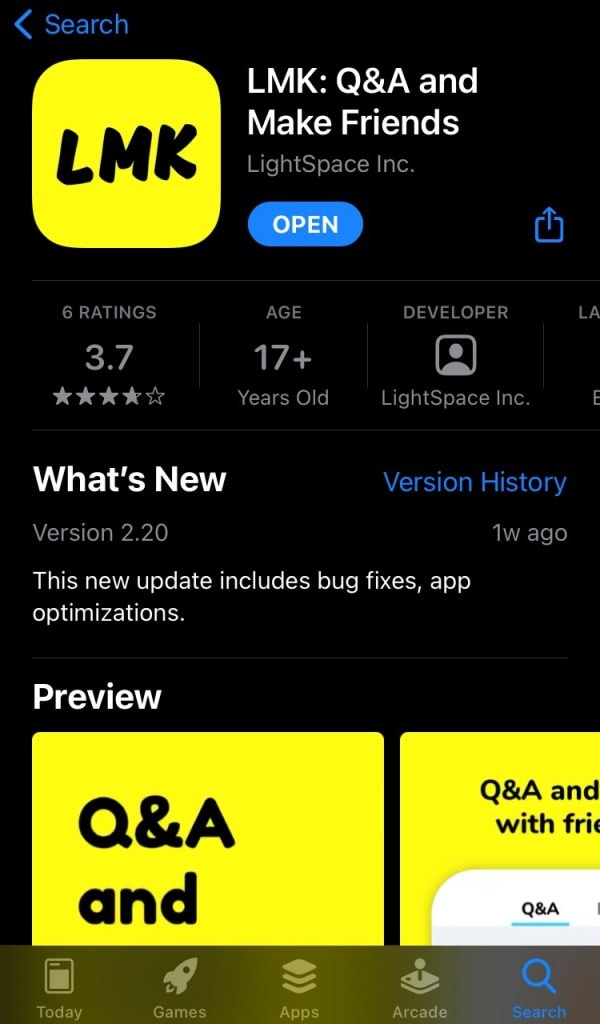
Step3 Now head to your Play Store or App Store according to the OS of your mobile device. From there, download the LMK app. After its complete installation, open this app using your Snapchat login.

Step4 On the LMK app, tap on the “Plus” icon to proceed. Afterward, tap on “Post” and hit the “Camera” icon from the bottom left side. Now choose the photo that you have recently saved in your gallery.

Step5 After choosing the photo from the gallery, tap “Post to Snapchat.” By doing so, you will be redirected to your Snapchat. From your image, remove the added stickers of the LMK app. You can drag the sticker to the trash bin icon. Afterward, tap on the “Paper Clip” icon to remove the added attachment.
 PaperScan Professional: PaperScan Scanner Software is a powerful TWAIN & WIA scanning application centered on one idea: making document acquisition an unparalleled easy task for anyone.
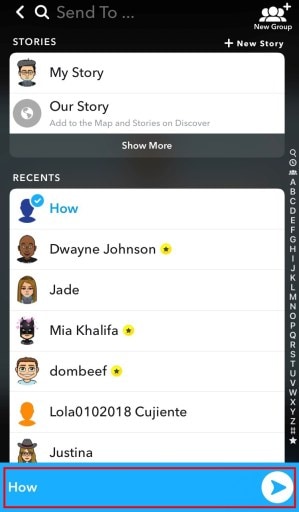
Step6 Once done with removing the sticker and attached link, hit the “Send” button. Now choose a Snapchat contact and hit the “Send” button.
 NeoDownloader - Fast and fully automatic image/video/music downloader.
Method 4: Casper APK for Android
Casper is an excellent alternative for Snapchat users. Using this app, you can instantly add stickers and filters to the captured snaps. You can also save and forward snaps using this app to other platforms. However, Casper is not available on the Play Store. You can download the Casper APK from your web browser easily. Before installing it, you should alter some settings from your phone, as described below:
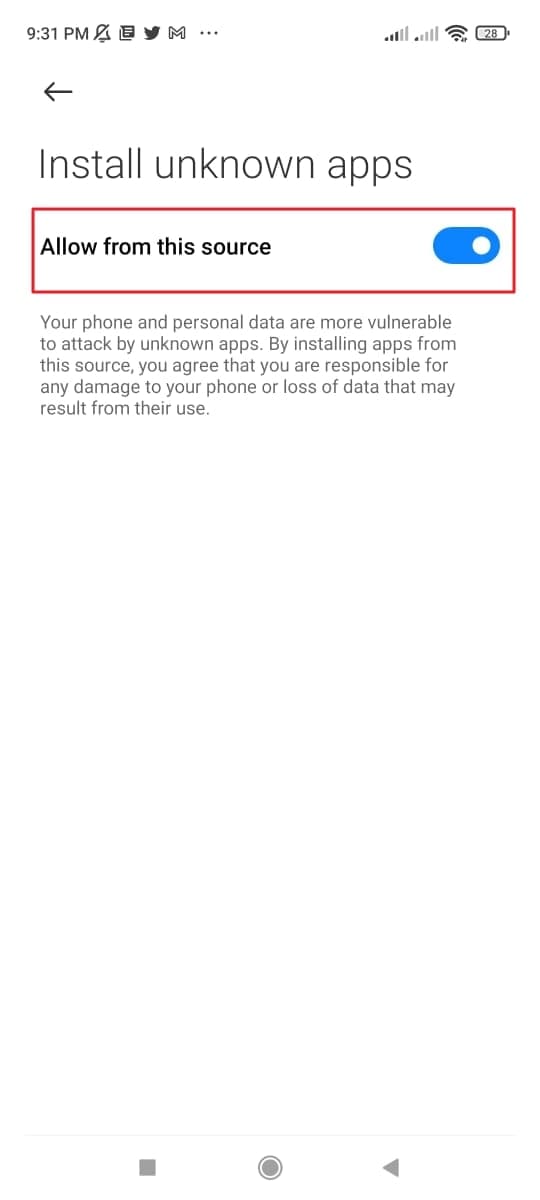
Step1 Open Settings from your phone and tap “Apps.” Afterward, select “Manage Apps” to proceed.

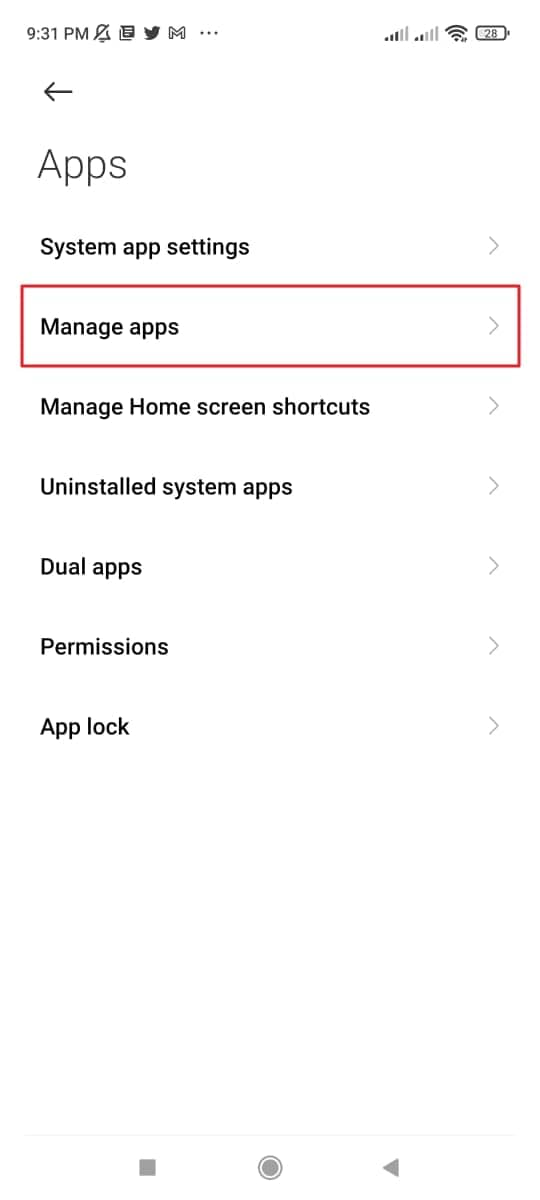
Step2 Once done, locate the “Google Chrome” option and turn on the toggle of “Install from unknown sources.”
Once you are done with installing Casper APK, you can take help from the following steps:
Step1 Sign out from your Snapchat account to initiate. Open Casper and sign into your Snapchat account.
Step2 Hit the “Plus” icon and tap on “Choose from Gallery.” After selecting a picture from your phone’s gallery, press the “Send” button.
Step3 Choose your preferred contact to whom you want to send the picture. For confirmation, tap on the “Send” button again.
 SwifDoo PDF Perpetual (1 PC) Free upgrade. No monthly fees ever.
Conclusion
Many youngsters are addicted to Snapchat to provide daily updates to their friends. You can utilize the offered filters, lenses, and stickers on Snapchat to make your snaps vibrant. However, this article has guided you on how to send snaps from the camera roll as a regular snap. You can send everyday snaps to your friends without mentioning the camera roll picture. For this, you can rely upon our recommended solutions and applications.
Free Download For Win 7 or later(64-bit)
Free Download For macOS 10.14 or later
 LYRX is an easy-to-use karaoke software with the professional features karaoke hosts need to perform with precision. LYRX is karaoke show hosting software that supports all standard karaoke file types as well as HD video formats, and it’s truly fun to use.
Free Download Free Download Learn More
![]()
How to Send a Snap from Memories/Camera Roll as a Snap
Are you tired of sending your live selfies as snaps to your friends? In this section, you can learn how to send snaps from the camera roll without capturing a live snap. For this, we will explain some manual methods as well as some reliable apps in a detailed manner.
 EmEditor Professional (Lifetime License, non-store app)
Method 1: Using a Snapchat Filter
Snapchat allows you to apply its filters on any of your camera roll’s pictures. By selecting a particular photo or video from your memories or snap, you can instantly add a filter to them. Afterward, you can send the filtered image to your friends as a regular snap. However, this solution has a significant drawback that you must know. The limitation is that the receiver of the snap would be able to see that the sent picture is from the camera roll.
Step1 Open your Snapchat and swipe up to open the ‘Memories’. Go to your Camera Roll and select any particular picture from there.
Step2 After choosing a particular photo, tap on the “Edit“ icon at the bottom left corner. You can apply filters to the photo by swiping from right to left. Keep swiping until you can find your preferred filter.
Step1 Once you have applied the filter to the photo, touch on the “Send To” button. Choose any Snapchat friend to whom you want to send the picture. Next, hit the “Send” icon again to send the photo successfully.
Method 2: Using a Sticker
If you want to make your camera roll picture funny and entertaining, you can add stickers to it. Through Snapchat, you can make your customized sticker of any interesting face or object. Moreover, Snapchat also offers a huge variety of built-in stickers. If you don’t want to create a customized sticker, you can easily add the built-in sticker with a single tap.
Step1 Once you have opened your Snapchat, go to Memories. From there, you can access and select any picture from the Camera Roll.
Step2 After selecting a specific picture from Camera Roll, tap on the “Pencil” icon at the bottom left corner to edit the photo. Afterward, select the “Scissor” icon from the right section. Using the Snapchat Scissor, you can create a sticker of any face or object you find interesting. Just select any area of the photo using your finger.
Step3 Now close the picture opened for creating the sticker. Once done, take a snap from your Snapchat to proceed. Now from the right section, tap on the “Sticker” icon. Here, you can choose the built-in stickers easily. Or you can navigate to the “Scissor” icon to select your created sticker.
Step4 Once done with adding and adjusting the sticker, hit the “Send To” button. Choose your preferred contact and tap on the “Send” icon again.
Method 3: Using the LMK App
Another efficient way to send a camera roll picture as a regular snap is by using a third-party app. LMK is a reliable social media platform that enables you to communicate with friends having similar interests. You can craft your profile by adding your interests and hobbies.
It helps people to create a safe and healthy community for enhanced communication. In this solution, we will guide you on how to send snaps from the camera roll using the LMK app. Through this app, you can send snaps to your friends without mentioning the camera roll.
Step1 Open your Snapchat either from your Android or iOS device. Proceed to the Memories section and select Camera Roll. Here, tap on any picture that you want to send.
Step2 Now hit the “Arrow” button to share the selected snap. From the displayed options, tap on the “Download” icon to save the picture on your device gallery.
Step3 Now head to your Play Store or App Store according to the OS of your mobile device. From there, download the LMK app. After its complete installation, open this app using your Snapchat login.
Step4 On the LMK app, tap on the “Plus” icon to proceed. Afterward, tap on “Post” and hit the “Camera” icon from the bottom left side. Now choose the photo that you have recently saved in your gallery.
Step5 After choosing the photo from the gallery, tap “Post to Snapchat.” By doing so, you will be redirected to your Snapchat. From your image, remove the added stickers of the LMK app. You can drag the sticker to the trash bin icon. Afterward, tap on the “Paper Clip” icon to remove the added attachment.
 WonderFox DVD Ripper Pro
Step6 Once done with removing the sticker and attached link, hit the “Send” button. Now choose a Snapchat contact and hit the “Send” button.
Method 4: Casper APK for Android
Casper is an excellent alternative for Snapchat users. Using this app, you can instantly add stickers and filters to the captured snaps. You can also save and forward snaps using this app to other platforms. However, Casper is not available on the Play Store. You can download the Casper APK from your web browser easily. Before installing it, you should alter some settings from your phone, as described below:
Step1 Open Settings from your phone and tap “Apps.” Afterward, select “Manage Apps” to proceed.
Step2 Once done, locate the “Google Chrome” option and turn on the toggle of “Install from unknown sources.”
Once you are done with installing Casper APK, you can take help from the following steps:
Step1 Sign out from your Snapchat account to initiate. Open Casper and sign into your Snapchat account.
Step2 Hit the “Plus” icon and tap on “Choose from Gallery.” After selecting a picture from your phone’s gallery, press the “Send” button.
Step3 Choose your preferred contact to whom you want to send the picture. For confirmation, tap on the “Send” button again.

Conclusion
Many youngsters are addicted to Snapchat to provide daily updates to their friends. You can utilize the offered filters, lenses, and stickers on Snapchat to make your snaps vibrant. However, this article has guided you on how to send snaps from the camera roll as a regular snap. You can send everyday snaps to your friends without mentioning the camera roll picture. For this, you can rely upon our recommended solutions and applications.
Free Download For Win 7 or later(64-bit)
Free Download For macOS 10.14 or later
Capture and Save Your Snapchat Screen Seamlessly
Snapchat has 306 million users daily worldwide. It is considered the fastest way to share a moment and make a memory out of it. The article reflects upon screen record Snapchat and covers ways to do so via Android and iPhone devices. Let us commence this, shall we?
In this article
01 Will Snapchat Know When You Do Screen Recording?
02 How to Screen Record Snapchat on Android Phone?
03 How to Screen Record Snapchat on iPhone?
04 How to Make Screen Record on Snapchat without Notice?
Part 1: Will Snapchat Know When You Do Screen Recording?
Snapchat was designed in a way that it protects the privacy of the users. According to this social networking software policy, the messages and snaps disappear after 24 hours. It creates an urge to screenshot the snap or screen record the chat without getting noticed. The section reflects the answer to the concern if you screen record on Snapchat, does it show?”
The answer is yes. Snapchat sends a notification to the other person if you screen record on Snapchat. It plays a vital role as it helps steer clear from the stalkers and people who have no sense of boundaries.
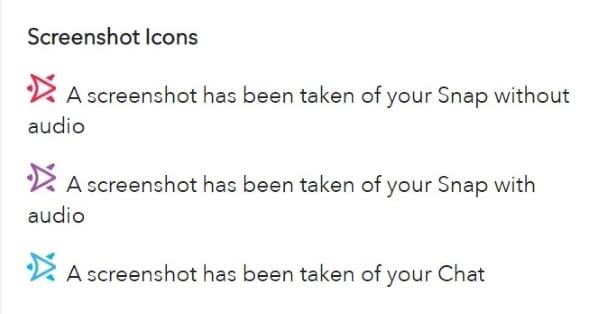
For taking a screenshot on Snapchat, the following notification show with specific colored arrows.
The red arrow displays that the screenshot was taken of snap without audio.
The purple arrow signifies that the screenshot was taken of snap with audio.
The blue arrows represent that a screenshot has been taken of chat.
It clearly shows that Snapchat takes the privacy of its users seriously. Therefore, to protect oneself from disappointment, it is crucial to avoid taking screenshots or screen recordings on Snapchat. You can use another phone to carry out the sneaky operation or download third-party software to screen capture and record safely.
Part 2: How to Screen Record Snapchat on Android Phone?
The Android users pretty much enhanced in the last decade exponentially. It is mainly because the workability of Android is more straightforward than that of iPhone. If you are a Snapchat addict on an Android phone, this section is designed for you.
Screen recording on Snapchat via Android phone is easy. There are no complications in the process, even for a beginner. For starters, make sure that the in-built screen recording functionality of Android is enabled via Settings. It will help initiate the recording immediately from the Action Center.
So, let us jump right into the step-by-step procedure to screen record on Snapchat.
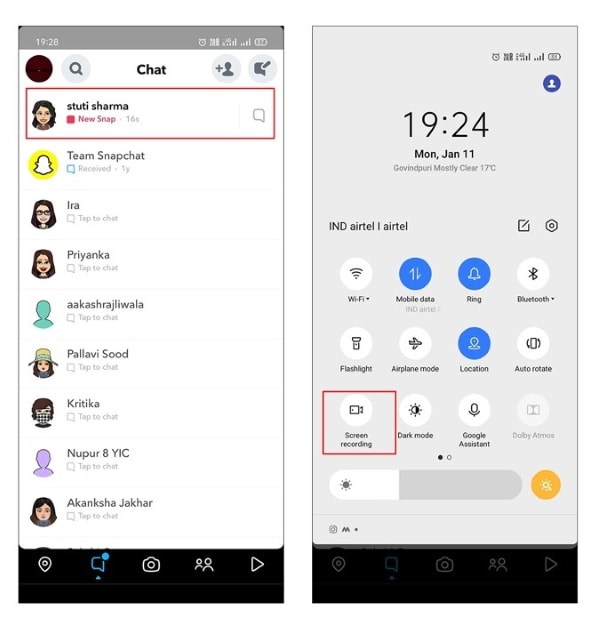
Step 1: Enabling the Airplane Mode
Open Snapchat from your Android phone. Refresh all the chats so that all new snaps can be accessed easily. After that, launch the “Action Center” and hit “Airplane Mode” to switch it on. It is shaped like an airplane.

Step 2: Start the Recording
Now, start screen recording by opening the “Action Center” again and clicking on “Screen Recorder.” As soon as the recording initiates, open the snap that you wish to record.
Step 3: Stop the Recording
After you are done, stop the recording. Disable the Airplane Mode and close the tool. The screen recording can be accessed from the Gallery.
Part 3: How to Screen Record Snapchat on iPhone?
Bringing more features and traits to the house, people have gone insane with every new model of the iPhone that is announced to the world. If you are an iPhone user looking to screen record on Snapchat, follow this section vividly.
Instead of using third-party software like AZ screen recorder Snapchat, the in-built tool of the iPhone is equally workable. There is no need to install new software on the device and play with the system’s memory. To initiate screen recording on Snapchat via iPhone, let us discuss the procedure extensively.
 CalendarBudget - Monthly subscription membership to CalendarBudget via web browser or mobile app. Support included.
 Step 1: Activating the Screen Recorder
Before starting, the user should make sure that the in-built screen recorder tool has been downloaded. Navigate to the “Control Center” and scroll down to find “Screen Recorder if it is not installed.” Hit the green (+) icon beside the tool to make it easily accessible.
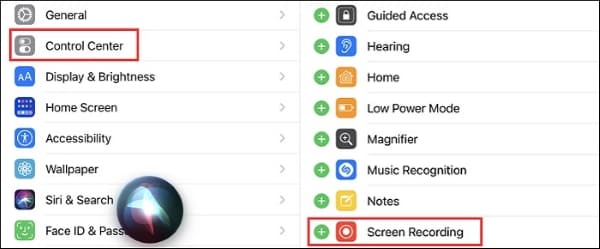
Step 2: Accessing the Feature for iPhone Versions
The accessing of Screen Recorder in-built tool varies from one iPhone version to another. For instance, if you have iPhone 8 or older versions, swipe down to tap the “Screen Recording” icon. However, if you own iPhone X or advanced versions, swipe up from the top right corner of the screen. Find the relevant icon to continue with the targeted process.
 Glarysoft File Recovery Pro - Helps to recover your lost file/data, even permanently deleted data.
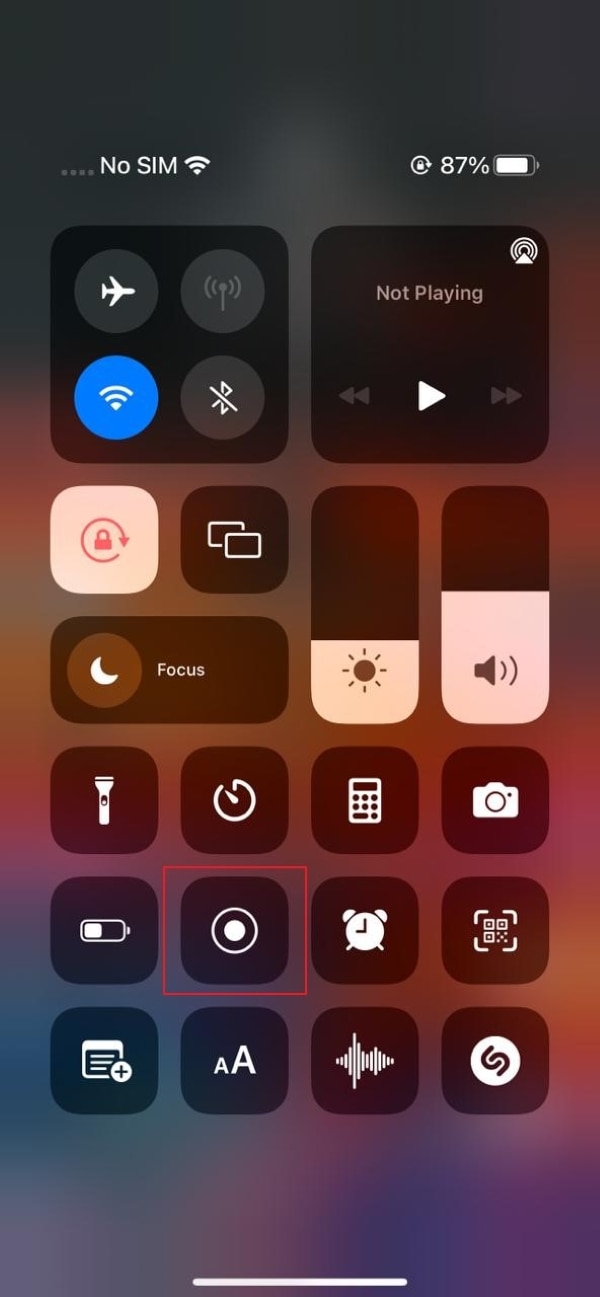
Step 3: Starting the Recording
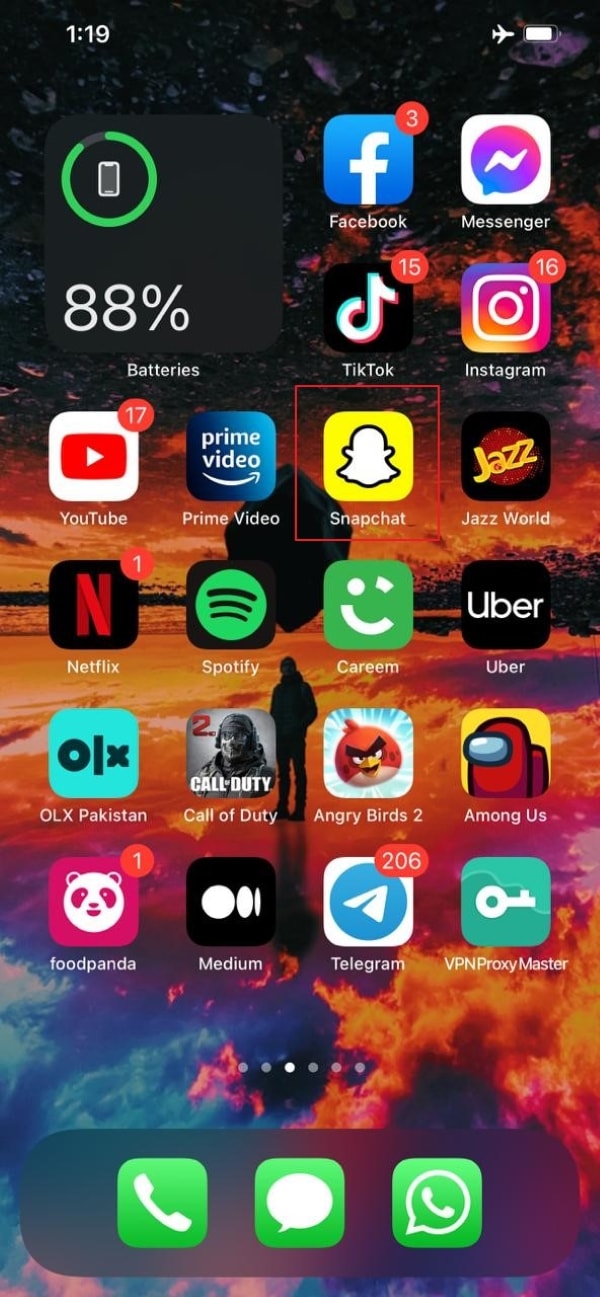
Launch Snapchat from your iPhone and refresh the feed. Now, open the Screen Recording tool and initiate the recording. You have to turn on the “Airplane” mode as well before recording the snap. Now, the user is expected to open the snap that needs to be recorded.
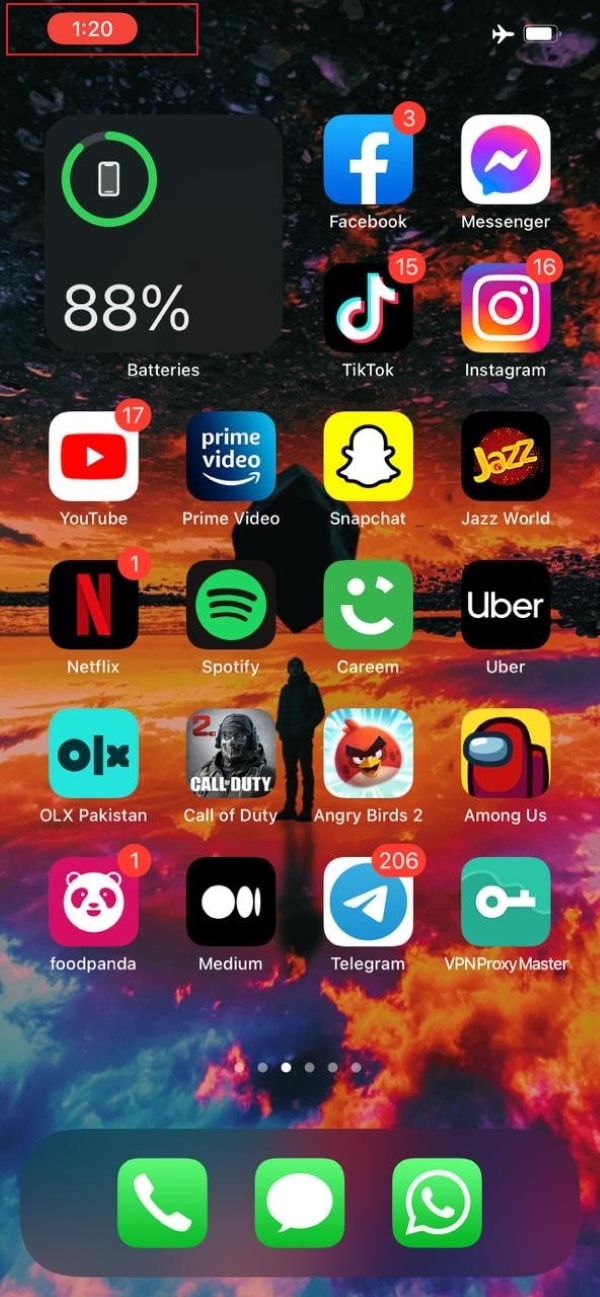
Step 4: Stopping the Recording
Stop the recording by clicking on the red icon on the screen. The screen recording is performed successfully. You can find the recording in your Photos in seconds.

Part 4: How to Make Screen Record on Snapchat without Notice?
It looks pretty embarrassing if you capture a screenshot and the other person receives a notification. The screen recording on Snapchat makes you awkward. To get rid of this embarrassment, one should use tricky and workable methods. Luckily, the section covers some of those methods. Let us have a look at each of them!
Switching off the Internet Connection
The first method revolves around disabling the internet connection of your device. For starters, reload and refresh your Snapchat feed. Disconnect the Wi-Fi or data network, and then screen records the snap. It helps you get the task done without getting noticed, as the app doesn’t know what is happening without internet connectivity.
Enabling the Airplane Mode
One workable method is to enable the Airplane Mode before you plan to screen record Snapchat. What happens is that the app doesn’t respond to the operation occurring as Airplane Mode is switched on. The process doesn’t send the notification to the targeted person; thus, it always works.
Using a Third-Party Software
You can access the third-party screen recorder and then perform screen recording on Snapchat. The market offers numerous apps for a similar reason. Their usage is simple as well.
Mirroring Phone on PC
Another tricky method revolves around mirroring phones on PC. The Snapchat user can connect the device to the computer and then play the snap story. As Snapchat cannot read the computer’s activities, you can use the recorder to screen record Snapchat stories in seconds.
### Using Another PhoneYou can pick a phone of your sibling or a friend to record the snaps of the targeted person. It might not be a high-resolution output, but it would surely get your task done without getting noticed.
Final Remarks
Snapchat has become one of the most favorite software in the world. People like to capture the stories and screen record the chats that they find amusing, engaging, and other sneaky reasons. The article offered users a screen record on Snapchat via Android and iPhone. The tricky methods to screen record without getting noticed were also a part of this write-up.
02 How to Screen Record Snapchat on Android Phone?
03 How to Screen Record Snapchat on iPhone?
04 How to Make Screen Record on Snapchat without Notice?
Part 1: Will Snapchat Know When You Do Screen Recording?
Snapchat was designed in a way that it protects the privacy of the users. According to this social networking software policy, the messages and snaps disappear after 24 hours. It creates an urge to screenshot the snap or screen record the chat without getting noticed. The section reflects the answer to the concern if you screen record on Snapchat, does it show?”
The answer is yes. Snapchat sends a notification to the other person if you screen record on Snapchat. It plays a vital role as it helps steer clear from the stalkers and people who have no sense of boundaries.
For taking a screenshot on Snapchat, the following notification show with specific colored arrows.
The red arrow displays that the screenshot was taken of snap without audio.
The purple arrow signifies that the screenshot was taken of snap with audio.
The blue arrows represent that a screenshot has been taken of chat.
It clearly shows that Snapchat takes the privacy of its users seriously. Therefore, to protect oneself from disappointment, it is crucial to avoid taking screenshots or screen recordings on Snapchat. You can use another phone to carry out the sneaky operation or download third-party software to screen capture and record safely.
Part 2: How to Screen Record Snapchat on Android Phone?
The Android users pretty much enhanced in the last decade exponentially. It is mainly because the workability of Android is more straightforward than that of iPhone. If you are a Snapchat addict on an Android phone, this section is designed for you.
Screen recording on Snapchat via Android phone is easy. There are no complications in the process, even for a beginner. For starters, make sure that the in-built screen recording functionality of Android is enabled via Settings. It will help initiate the recording immediately from the Action Center.
So, let us jump right into the step-by-step procedure to screen record on Snapchat.
Step 1: Enabling the Airplane Mode
Open Snapchat from your Android phone. Refresh all the chats so that all new snaps can be accessed easily. After that, launch the “Action Center” and hit “Airplane Mode” to switch it on. It is shaped like an airplane.
 dotConnect for Oracle is an ADO.NET data provider for Oracle with Entity Framework Support.
Step 2: Start the Recording
Now, start screen recording by opening the “Action Center” again and clicking on “Screen Recorder.” As soon as the recording initiates, open the snap that you wish to record.
 Allavsoft Batch Download Online Videos, Music Offline to MP4, MP3, MOV, etc format
Step 3: Stop the Recording
After you are done, stop the recording. Disable the Airplane Mode and close the tool. The screen recording can be accessed from the Gallery.

Part 3: How to Screen Record Snapchat on iPhone?
Bringing more features and traits to the house, people have gone insane with every new model of the iPhone that is announced to the world. If you are an iPhone user looking to screen record on Snapchat, follow this section vividly.
Instead of using third-party software like AZ screen recorder Snapchat, the in-built tool of the iPhone is equally workable. There is no need to install new software on the device and play with the system’s memory. To initiate screen recording on Snapchat via iPhone, let us discuss the procedure extensively.
Step 1: Activating the Screen Recorder
Before starting, the user should make sure that the in-built screen recorder tool has been downloaded. Navigate to the “Control Center” and scroll down to find “Screen Recorder if it is not installed.” Hit the green (+) icon beside the tool to make it easily accessible.

Step 2: Accessing the Feature for iPhone Versions
The accessing of Screen Recorder in-built tool varies from one iPhone version to another. For instance, if you have iPhone 8 or older versions, swipe down to tap the “Screen Recording” icon. However, if you own iPhone X or advanced versions, swipe up from the top right corner of the screen. Find the relevant icon to continue with the targeted process.
 Forex Robotron Gold Package
Step 3: Starting the Recording
Launch Snapchat from your iPhone and refresh the feed. Now, open the Screen Recording tool and initiate the recording. You have to turn on the “Airplane” mode as well before recording the snap. Now, the user is expected to open the snap that needs to be recorded.
Step 4: Stopping the Recording
Stop the recording by clicking on the red icon on the screen. The screen recording is performed successfully. You can find the recording in your Photos in seconds.
Part 4: How to Make Screen Record on Snapchat without Notice?
It looks pretty embarrassing if you capture a screenshot and the other person receives a notification. The screen recording on Snapchat makes you awkward. To get rid of this embarrassment, one should use tricky and workable methods. Luckily, the section covers some of those methods. Let us have a look at each of them!
Switching off the Internet Connection
The first method revolves around disabling the internet connection of your device. For starters, reload and refresh your Snapchat feed. Disconnect the Wi-Fi or data network, and then screen records the snap. It helps you get the task done without getting noticed, as the app doesn’t know what is happening without internet connectivity.
Enabling the Airplane Mode
One workable method is to enable the Airplane Mode before you plan to screen record Snapchat. What happens is that the app doesn’t respond to the operation occurring as Airplane Mode is switched on. The process doesn’t send the notification to the targeted person; thus, it always works.
Using a Third-Party Software
You can access the third-party screen recorder and then perform screen recording on Snapchat. The market offers numerous apps for a similar reason. Their usage is simple as well.
Mirroring Phone on PC
Another tricky method revolves around mirroring phones on PC. The Snapchat user can connect the device to the computer and then play the snap story. As Snapchat cannot read the computer’s activities, you can use the recorder to screen record Snapchat stories in seconds.
Using Another Phone
You can pick a phone of your sibling or a friend to record the snaps of the targeted person. It might not be a high-resolution output, but it would surely get your task done without getting noticed.
 TubeDigger - online video downloader from mostly any site
Final Remarks
Snapchat has become one of the most favorite software in the world. People like to capture the stories and screen record the chats that they find amusing, engaging, and other sneaky reasons. The article offered users a screen record on Snapchat via Android and iPhone. The tricky methods to screen record without getting noticed were also a part of this write-up.
02 How to Screen Record Snapchat on Android Phone?
03 How to Screen Record Snapchat on iPhone?
04 How to Make Screen Record on Snapchat without Notice?
Part 1: Will Snapchat Know When You Do Screen Recording?
Snapchat was designed in a way that it protects the privacy of the users. According to this social networking software policy, the messages and snaps disappear after 24 hours. It creates an urge to screenshot the snap or screen record the chat without getting noticed. The section reflects the answer to the concern if you screen record on Snapchat, does it show?”
The answer is yes. Snapchat sends a notification to the other person if you screen record on Snapchat. It plays a vital role as it helps steer clear from the stalkers and people who have no sense of boundaries.
For taking a screenshot on Snapchat, the following notification show with specific colored arrows.
The red arrow displays that the screenshot was taken of snap without audio.
The purple arrow signifies that the screenshot was taken of snap with audio.
The blue arrows represent that a screenshot has been taken of chat.
It clearly shows that Snapchat takes the privacy of its users seriously. Therefore, to protect oneself from disappointment, it is crucial to avoid taking screenshots or screen recordings on Snapchat. You can use another phone to carry out the sneaky operation or download third-party software to screen capture and record safely.

Part 2: How to Screen Record Snapchat on Android Phone?
The Android users pretty much enhanced in the last decade exponentially. It is mainly because the workability of Android is more straightforward than that of iPhone. If you are a Snapchat addict on an Android phone, this section is designed for you.
Screen recording on Snapchat via Android phone is easy. There are no complications in the process, even for a beginner. For starters, make sure that the in-built screen recording functionality of Android is enabled via Settings. It will help initiate the recording immediately from the Action Center.
So, let us jump right into the step-by-step procedure to screen record on Snapchat.
Step 1: Enabling the Airplane Mode
Open Snapchat from your Android phone. Refresh all the chats so that all new snaps can be accessed easily. After that, launch the “Action Center” and hit “Airplane Mode” to switch it on. It is shaped like an airplane.
Step 2: Start the Recording
Now, start screen recording by opening the “Action Center” again and clicking on “Screen Recorder.” As soon as the recording initiates, open the snap that you wish to record.
After you are done, stop the recording. Disable the Airplane Mode and close the tool. The screen recording can be accessed from the Gallery.
Part 3: How to Screen Record Snapchat on iPhone?
Bringing more features and traits to the house, people have gone insane with every new model of the iPhone that is announced to the world. If you are an iPhone user looking to screen record on Snapchat, follow this section vividly.
Instead of using third-party software like AZ screen recorder Snapchat, the in-built tool of the iPhone is equally workable. There is no need to install new software on the device and play with the system’s memory. To initiate screen recording on Snapchat via iPhone, let us discuss the procedure extensively.
Step 1: Activating the Screen Recorder
Before starting, the user should make sure that the in-built screen recorder tool has been downloaded. Navigate to the “Control Center” and scroll down to find “Screen Recorder if it is not installed.” Hit the green (+) icon beside the tool to make it easily accessible.

Step 2: Accessing the Feature for iPhone Versions
The accessing of Screen Recorder in-built tool varies from one iPhone version to another. For instance, if you have iPhone 8 or older versions, swipe down to tap the “Screen Recording” icon. However, if you own iPhone X or advanced versions, swipe up from the top right corner of the screen. Find the relevant icon to continue with the targeted process.
Step 3: Starting the Recording
Launch Snapchat from your iPhone and refresh the feed. Now, open the Screen Recording tool and initiate the recording. You have to turn on the “Airplane” mode as well before recording the snap. Now, the user is expected to open the snap that needs to be recorded.


Step 4: Stopping the Recording
Stop the recording by clicking on the red icon on the screen. The screen recording is performed successfully. You can find the recording in your Photos in seconds.
Parental Control Software
## Part 4: How to Make Screen Record on Snapchat without Notice?It looks pretty embarrassing if you capture a screenshot and the other person receives a notification. The screen recording on Snapchat makes you awkward. To get rid of this embarrassment, one should use tricky and workable methods. Luckily, the section covers some of those methods. Let us have a look at each of them!
Switching off the Internet Connection
The first method revolves around disabling the internet connection of your device. For starters, reload and refresh your Snapchat feed. Disconnect the Wi-Fi or data network, and then screen records the snap. It helps you get the task done without getting noticed, as the app doesn’t know what is happening without internet connectivity.
Enabling the Airplane Mode
One workable method is to enable the Airplane Mode before you plan to screen record Snapchat. What happens is that the app doesn’t respond to the operation occurring as Airplane Mode is switched on. The process doesn’t send the notification to the targeted person; thus, it always works.
Using a Third-Party Software
You can access the third-party screen recorder and then perform screen recording on Snapchat. The market offers numerous apps for a similar reason. Their usage is simple as well.
Mirroring Phone on PC
Another tricky method revolves around mirroring phones on PC. The Snapchat user can connect the device to the computer and then play the snap story. As Snapchat cannot read the computer’s activities, you can use the recorder to screen record Snapchat stories in seconds.
Using Another Phone
You can pick a phone of your sibling or a friend to record the snaps of the targeted person. It might not be a high-resolution output, but it would surely get your task done without getting noticed.
Final Remarks
Snapchat has become one of the most favorite software in the world. People like to capture the stories and screen record the chats that they find amusing, engaging, and other sneaky reasons. The article offered users a screen record on Snapchat via Android and iPhone. The tricky methods to screen record without getting noticed were also a part of this write-up.
02 How to Screen Record Snapchat on Android Phone?
03 How to Screen Record Snapchat on iPhone?
04 How to Make Screen Record on Snapchat without Notice?
Part 1: Will Snapchat Know When You Do Screen Recording?
Snapchat was designed in a way that it protects the privacy of the users. According to this social networking software policy, the messages and snaps disappear after 24 hours. It creates an urge to screenshot the snap or screen record the chat without getting noticed. The section reflects the answer to the concern if you screen record on Snapchat, does it show?”
The answer is yes. Snapchat sends a notification to the other person if you screen record on Snapchat. It plays a vital role as it helps steer clear from the stalkers and people who have no sense of boundaries.
For taking a screenshot on Snapchat, the following notification show with specific colored arrows.
The red arrow displays that the screenshot was taken of snap without audio.
The purple arrow signifies that the screenshot was taken of snap with audio.
The blue arrows represent that a screenshot has been taken of chat.
 ZoneAlarm Pro Antivirus + Firewall NextGen
It clearly shows that Snapchat takes the privacy of its users seriously. Therefore, to protect oneself from disappointment, it is crucial to avoid taking screenshots or screen recordings on Snapchat. You can use another phone to carry out the sneaky operation or download third-party software to screen capture and record safely.
Part 2: How to Screen Record Snapchat on Android Phone?
The Android users pretty much enhanced in the last decade exponentially. It is mainly because the workability of Android is more straightforward than that of iPhone. If you are a Snapchat addict on an Android phone, this section is designed for you.
Screen recording on Snapchat via Android phone is easy. There are no complications in the process, even for a beginner. For starters, make sure that the in-built screen recording functionality of Android is enabled via Settings. It will help initiate the recording immediately from the Action Center.
So, let us jump right into the step-by-step procedure to screen record on Snapchat.
Step 1: Enabling the Airplane Mode
Open Snapchat from your Android phone. Refresh all the chats so that all new snaps can be accessed easily. After that, launch the “Action Center” and hit “Airplane Mode” to switch it on. It is shaped like an airplane.

Step 2: Start the Recording
Now, start screen recording by opening the “Action Center” again and clicking on “Screen Recorder.” As soon as the recording initiates, open the snap that you wish to record.
Step 3: Stop the Recording
After you are done, stop the recording. Disable the Airplane Mode and close the tool. The screen recording can be accessed from the Gallery.
Part 3: How to Screen Record Snapchat on iPhone?
Bringing more features and traits to the house, people have gone insane with every new model of the iPhone that is announced to the world. If you are an iPhone user looking to screen record on Snapchat, follow this section vividly.
Instead of using third-party software like AZ screen recorder Snapchat, the in-built tool of the iPhone is equally workable. There is no need to install new software on the device and play with the system’s memory. To initiate screen recording on Snapchat via iPhone, let us discuss the procedure extensively.
Step 1: Activating the Screen Recorder
Before starting, the user should make sure that the in-built screen recorder tool has been downloaded. Navigate to the “Control Center” and scroll down to find “Screen Recorder if it is not installed.” Hit the green (+) icon beside the tool to make it easily accessible.
Step 2: Accessing the Feature for iPhone Versions
The accessing of Screen Recorder in-built tool varies from one iPhone version to another. For instance, if you have iPhone 8 or older versions, swipe down to tap the “Screen Recording” icon. However, if you own iPhone X or advanced versions, swipe up from the top right corner of the screen. Find the relevant icon to continue with the targeted process.
Step 3: Starting the Recording
Launch Snapchat from your iPhone and refresh the feed. Now, open the Screen Recording tool and initiate the recording. You have to turn on the “Airplane” mode as well before recording the snap. Now, the user is expected to open the snap that needs to be recorded.
Step 4: Stopping the Recording
Stop the recording by clicking on the red icon on the screen. The screen recording is performed successfully. You can find the recording in your Photos in seconds.

Part 4: How to Make Screen Record on Snapchat without Notice?
It looks pretty embarrassing if you capture a screenshot and the other person receives a notification. The screen recording on Snapchat makes you awkward. To get rid of this embarrassment, one should use tricky and workable methods. Luckily, the section covers some of those methods. Let us have a look at each of them!
Switching off the Internet Connection
The first method revolves around disabling the internet connection of your device. For starters, reload and refresh your Snapchat feed. Disconnect the Wi-Fi or data network, and then screen records the snap. It helps you get the task done without getting noticed, as the app doesn’t know what is happening without internet connectivity.
 vMix 4K - Software based live production. vMix 4K includes everything in vMix HD plus 4K support, PTZ control, External/Fullscreen output, 4 Virtual Outputs, 1 Replay, 4 vMix Call, and 2 Recorders.
Enabling the Airplane Mode
One workable method is to enable the Airplane Mode before you plan to screen record Snapchat. What happens is that the app doesn’t respond to the operation occurring as Airplane Mode is switched on. The process doesn’t send the notification to the targeted person; thus, it always works.
Using a Third-Party Software
You can access the third-party screen recorder and then perform screen recording on Snapchat. The market offers numerous apps for a similar reason. Their usage is simple as well.
Mirroring Phone on PC
Another tricky method revolves around mirroring phones on PC. The Snapchat user can connect the device to the computer and then play the snap story. As Snapchat cannot read the computer’s activities, you can use the recorder to screen record Snapchat stories in seconds.
Using Another Phone
You can pick a phone of your sibling or a friend to record the snaps of the targeted person. It might not be a high-resolution output, but it would surely get your task done without getting noticed.
Final Remarks
Snapchat has become one of the most favorite software in the world. People like to capture the stories and screen record the chats that they find amusing, engaging, and other sneaky reasons. The article offered users a screen record on Snapchat via Android and iPhone. The tricky methods to screen record without getting noticed were also a part of this write-up.
- Title: [New] Transform Your Snapshots Into Shares – Here's How
- Author: Scott
- Created at : 2024-07-25 12:09:59
- Updated at : 2024-07-26 12:09:59
- Link: https://snapchat-videos.techidaily.com/new-transform-your-snapshots-into-shares-heres-how/
- License: This work is licensed under CC BY-NC-SA 4.0.