
![[New] Tips to Trim Your Video Playback Time on Snapchat](https://thmb.techidaily.com/029b0eb85077c27446243e8d1c815878a76764b760390b18a7b33382115f2d0b.jpg)
[New] Tips to Trim Your Video Playback Time on Snapchat
Tips to Trim Your Video Playback Time on Snapchat
Snapchat is an instant messaging app that allows you to share your pictures and videos with your family members, friends, and colleagues. In addition, you can even create your stories in the form of movie clips and share them on the app. These stories remain available for the next 24 hours, after which they are automatically removed from the platform.
While sharing the videos, you can apply several filters that are already present in the app, and Slow Motion is one of them. You may want to learn how to slow down a video on Snapchat when you want to emphasize and draw viewers’ attention toward the scene, or wish to make the audience see your actions closely and in detail.
That said, in the following sections, you will see how to slow down videos on Snapchat, and what other methods you can use to reduce the playback speed more professionally.
In this article
01 How to Add Slow Motion Effects to Video Using the Snapchat App
02 How to Record a Slo-Mo Video and Upload to Snapchat
03 How to Make Flash and Smooth Slo Mo Video for Snapchat
04 FAQs about Slowing Down Snapchat Video
Part 1: How to Add Slow Motion Effects to Video Using the Snapchat App
Snapchat has a built-in Slow Motion filter that reduces the playback speed of a video when applied. You can learn how to slow down on Snapchat by following the instructions that are given below:
Step 1: Record a Video
Launch Snapchat on your smartphone (iPhone 13 Pro Max is used here for illustrations), make sure that the Camera section is selected from the bottom, tap and hold down the Capture button that is present at the lower part of the interface, and let go of it when you are done recording.

Step 2: Apply the Slow Motion Filter
Once the video is recorded, swipe the screen from left to right. Repeat this process until you see the Snail (Slow Motion) icon on the screen. This will reduce the playback speed of the clip.

Step 3: Decorate the Video (Optional)
Use the options present on the upper-right area of the screen to further decorate the video and/or add annotations to it.

Step 4: Share or Publish the Video
Once everything is done, tap Send To from the bottom-right corner to share the video with your family, friends, and colleagues, or publish it as a story that remains available for the next 24 hours.
Related: How to Record Slo-Mo videos on iPhone .
Part 2: How to Record a Slo-Mo Video and Upload to Snapchat
With Snapchat, even though you don’t require any third-party tool to reduce the playback speed of a video, the app has certain limitations. For example, it doesn’t allow you to set a zoom level, you are stuck with the framerate that the app has to offer, etc.
Because of this, many people prefer to use different methods to record a video in slow motion with their preferences, and then upload it to Snapchat. This approach also eliminates the need to swipe the screen several times merely to use a single slow-motion filter.
Fortunately, iPhone has a built-in SLO-MO mode in its Camera app that allows you to capture the videos in slow motion. To learn how to do slow mo on Snapchat with the iPhone’s Camera app, you can follow the instructions that are given below:
Step 1: Get to the iPhone’s SLO-MO Mode
Launch the Camera app on your iPhone (iPhone 13 Pro Max is used here for illustrations), and swipe the screen from left to right until you get to the SLO-MO mode.

Step 2: Set Recording Preferences
Tap the number that is present at the top-right corner (240 here) to toggle between different framerates, tap 1x from the lower-center area, swipe slightly up, and then use the wheel that appears next to define your preferred zoom level.

Step 3: Start and Stop the Recording
Tap the Record button to start the recording, and tap Stop when you’re done.
Note: Make sure that the duration of the recorded video doesn’t exceed 60 seconds.
Step 4: Upload the Slow-Motion Video to Snapchat
After the video is recorded in slow motion, close the Camera app, launch Snapchat, and tap the Gallery icon from the left side of the Capture button on the Camera section. From the Memories screen, go to the Camera Roll tab, and tap to select the video that you recorded in the previous step.
Next, optionally, tap the Edit icon from the bottom-left corner to decorate the video and/or add annotations to it, and follow the process as explained in the previous section to share the clip with your family, friends, or colleagues, or publish it as your story.

Part 3: How to Make Flash and Smooth Slo Mo Video for Snapchat
Although iPhone has the built-in SLO-MO mode that even enables you to set your preferred framerate and zoom level before recording, it still doesn’t allow you to slow down different parts of a video in different speed at your convenience. You can either record the entire video in slow motion or at a normal speed.
This is where a third-party app comes into play. While there are several video editing programs available online, the one of the best slow motion apps that helps you slow down the portions of a video with precision is CapCut.
Downloading and installing CapCut on your iPhone or Android phone is simple, and once it is done, you can follow the process given below to learn how to slow things down on Snapchat:
With CapCut, you can either slow down the whole clip or manage the speed for different segments. This section explains both methods.
Method 1: Slow Down the Whole Clip with CapCut
Step 1: Get to the Speed Panel
Launch CapCut, import the video that you want to slow down, and tap the imported media in the Timeline. Next, tap Speed from the bottom of the interface to get to the next window.

Step 2: Reduce the Speed of the Video
Tap Normal from the bottom of the screen that appears next, and drag the Speed slider to the left to reduce the playback speed. Tap OK from the bottom-right corner to save the changes.

Step 3: Upload the Video to Snapchat
Back on the previous interface, optionally tap Volume from the bottom and reduce the slider to 0 to mute the audio of the footage as it may get distorted due to the reduction in the speed.
Next, tap Share from the top-right corner to save the video on your iPhone, and then use the method explained in the previous section to access the clip from the Gallery within Snapchat for uploading.
Method 2: Reduce the Playback Speed of Different Parts of a Video
Step 1: Get to the Speed Panel
Use the process described in the previous method to get to the Speed panel.
Step 2: Reduce the Speed of Different Parts of the Video
Tap Curve from the bottom of the interface. On the next screen, tap Custom from the lower area, and then tap Edit. From the next panel, drag the beat points down to reduce the speed (or drag them above the line to increase).

Notice that each beat point represents a particular section of the video, and dragging it down reduces the playback speed of that segment. You can even tap anywhere on the line to add a new beat point and drag it down as needed for more precise speed management. Once done, tap OK from the bottom-right corner to save the modifications.

Optionally, you can also tap any of the available presets on the Curve screen to reduce the playback speed of the video accordingly.
Step 3: Upload the Video to Snapchat
Use the method explained in the previous method to export the video, upload it to Snapchat, and share the clip with your family, friends, and colleagues, or publish it as your story.
Part 4: FAQs about Slowing Down Snapchat Video
1. Can I record a slow mo video in Snapchat?
Technically speaking, no, you cannot. However, once you have recorded a video at a normal speed in Snapchat, you can apply the built-in Slow Motion filter to it by swiping the screen from left to right until you see the Snail icon at the center. The Snail icon represents the Slow Motion filter that reduces the playback speed when applied.
2. Besides slow-motion, which speed filters does Snapchat have?
In addition to slow motion Snapchat also has Forward and Fast Forward filters that increase the playback speed. While the Forward filter increases the speed slightly, the Fast Forward one enhances it drastically.
Conclusion
When using an iPhone, even though the SLO-MO mode enables you to record footage in slow motion, you don’t get many options. Therefore, it would be safe to say that it is easy to slow down the speed of a video if you have a dedicated third-party post-production app. However, if you want to go for a convenient method, learning how to slow down a video on Snapchat is an extremely simple and straightforward process.
02 How to Record a Slo-Mo Video and Upload to Snapchat
03 How to Make Flash and Smooth Slo Mo Video for Snapchat
04 FAQs about Slowing Down Snapchat Video
Part 1: How to Add Slow Motion Effects to Video Using the Snapchat App
Snapchat has a built-in Slow Motion filter that reduces the playback speed of a video when applied. You can learn how to slow down on Snapchat by following the instructions that are given below:
Step 1: Record a Video
Launch Snapchat on your smartphone (iPhone 13 Pro Max is used here for illustrations), make sure that the Camera section is selected from the bottom, tap and hold down the Capture button that is present at the lower part of the interface, and let go of it when you are done recording.
Step 2: Apply the Slow Motion Filter
Once the video is recorded, swipe the screen from left to right. Repeat this process until you see the Snail (Slow Motion) icon on the screen. This will reduce the playback speed of the clip.
Step 3: Decorate the Video (Optional)
Use the options present on the upper-right area of the screen to further decorate the video and/or add annotations to it.
Step 4: Share or Publish the Video
Once everything is done, tap Send To from the bottom-right corner to share the video with your family, friends, and colleagues, or publish it as a story that remains available for the next 24 hours.
Related: How to Record Slo-Mo videos on iPhone .
Part 2: How to Record a Slo-Mo Video and Upload to Snapchat
With Snapchat, even though you don’t require any third-party tool to reduce the playback speed of a video, the app has certain limitations. For example, it doesn’t allow you to set a zoom level, you are stuck with the framerate that the app has to offer, etc.
Because of this, many people prefer to use different methods to record a video in slow motion with their preferences, and then upload it to Snapchat. This approach also eliminates the need to swipe the screen several times merely to use a single slow-motion filter.
Fortunately, iPhone has a built-in SLO-MO mode in its Camera app that allows you to capture the videos in slow motion. To learn how to do slow mo on Snapchat with the iPhone’s Camera app, you can follow the instructions that are given below:
Step 1: Get to the iPhone’s SLO-MO Mode
Launch the Camera app on your iPhone (iPhone 13 Pro Max is used here for illustrations), and swipe the screen from left to right until you get to the SLO-MO mode.
Step 2: Set Recording Preferences
Tap the number that is present at the top-right corner (240 here) to toggle between different framerates, tap 1x from the lower-center area, swipe slightly up, and then use the wheel that appears next to define your preferred zoom level.
Step 3: Start and Stop the Recording
Tap the Record button to start the recording, and tap Stop when you’re done.
Note: Make sure that the duration of the recorded video doesn’t exceed 60 seconds.
Step 4: Upload the Slow-Motion Video to Snapchat
After the video is recorded in slow motion, close the Camera app, launch Snapchat, and tap the Gallery icon from the left side of the Capture button on the Camera section. From the Memories screen, go to the Camera Roll tab, and tap to select the video that you recorded in the previous step.
Next, optionally, tap the Edit icon from the bottom-left corner to decorate the video and/or add annotations to it, and follow the process as explained in the previous section to share the clip with your family, friends, or colleagues, or publish it as your story.
Part 3: How to Make Flash and Smooth Slo Mo Video for Snapchat
Although iPhone has the built-in SLO-MO mode that even enables you to set your preferred framerate and zoom level before recording, it still doesn’t allow you to slow down different parts of a video in different speed at your convenience. You can either record the entire video in slow motion or at a normal speed.
This is where a third-party app comes into play. While there are several video editing programs available online, the one of the best slow motion apps that helps you slow down the portions of a video with precision is CapCut.
Downloading and installing CapCut on your iPhone or Android phone is simple, and once it is done, you can follow the process given below to learn how to slow things down on Snapchat:
With CapCut, you can either slow down the whole clip or manage the speed for different segments. This section explains both methods.
Method 1: Slow Down the Whole Clip with CapCut
Step 1: Get to the Speed Panel
Launch CapCut, import the video that you want to slow down, and tap the imported media in the Timeline. Next, tap Speed from the bottom of the interface to get to the next window.
Step 2: Reduce the Speed of the Video
Tap Normal from the bottom of the screen that appears next, and drag the Speed slider to the left to reduce the playback speed. Tap OK from the bottom-right corner to save the changes.
Step 3: Upload the Video to Snapchat
Back on the previous interface, optionally tap Volume from the bottom and reduce the slider to 0 to mute the audio of the footage as it may get distorted due to the reduction in the speed.
Next, tap Share from the top-right corner to save the video on your iPhone, and then use the method explained in the previous section to access the clip from the Gallery within Snapchat for uploading.
Method 2: Reduce the Playback Speed of Different Parts of a Video
Step 1: Get to the Speed Panel
Use the process described in the previous method to get to the Speed panel.
Step 2: Reduce the Speed of Different Parts of the Video
Tap Curve from the bottom of the interface. On the next screen, tap Custom from the lower area, and then tap Edit. From the next panel, drag the beat points down to reduce the speed (or drag them above the line to increase).
Notice that each beat point represents a particular section of the video, and dragging it down reduces the playback speed of that segment. You can even tap anywhere on the line to add a new beat point and drag it down as needed for more precise speed management. Once done, tap OK from the bottom-right corner to save the modifications.
Optionally, you can also tap any of the available presets on the Curve screen to reduce the playback speed of the video accordingly.
Step 3: Upload the Video to Snapchat
Use the method explained in the previous method to export the video, upload it to Snapchat, and share the clip with your family, friends, and colleagues, or publish it as your story.
Part 4: FAQs about Slowing Down Snapchat Video
1. Can I record a slow mo video in Snapchat?
Technically speaking, no, you cannot. However, once you have recorded a video at a normal speed in Snapchat, you can apply the built-in Slow Motion filter to it by swiping the screen from left to right until you see the Snail icon at the center. The Snail icon represents the Slow Motion filter that reduces the playback speed when applied.
2. Besides slow-motion, which speed filters does Snapchat have?
In addition to slow motion Snapchat also has Forward and Fast Forward filters that increase the playback speed. While the Forward filter increases the speed slightly, the Fast Forward one enhances it drastically.
Conclusion
When using an iPhone, even though the SLO-MO mode enables you to record footage in slow motion, you don’t get many options. Therefore, it would be safe to say that it is easy to slow down the speed of a video if you have a dedicated third-party post-production app. However, if you want to go for a convenient method, learning how to slow down a video on Snapchat is an extremely simple and straightforward process.
Efficiently Capturing Footage for Ideal Snaps via Mac
How to Make a Video Best Fits Snapchat Size on Mac?

Liza Brown
Oct 26, 2023• Proven solutions
How to create a video best fit Snapchat? With more than 240 million active daily users, Snapchat is one of the most popular social media networks globally. It is also an instant messaging app that allows its users to express themselves visually in a diverse variety of manners including photos, videos, stories, stickers, emoji, and more.
One of the best features of Snapchat that makes it so attractive among the young audience is its mobile-oriented user interface. Snapchat was the first social networking platform to introduce the concept of daily stories which was widely adopted by other instant messengers as well including Instagram and WhatsApp. Since it is a mobile-oriented platform, you need to create and edit your videos in a certain way to make sure they are the best fit for Snapchat.
You May Also Like: The Ultimate Guide of Snapchat Filters
What Are the Ideal Features of a Snapchat Video?
Snapchat is highly optimized for vertical viewing which means that all the content needs to be served in portrait aspect ratio instead of landscape used by YouTube and other video platforms. You need to ensure that every aspect of your video is perfect before you can upload it for Snapchat on Mac. Here are some of the key features that you must not forget.

- Resolution - The ideal resolution of a Snapchat video is 1080 x 1920 pixels which is known as full HD. This resolution will ensure that your video loads in the right way and remains sharp and crisp for an excellent viewing experience.
- Video Format - The recommended video format for Snapchat clips is MP4 and MOV. You can use either of those formats on your Mac.
- Aspect Ratio - This is one of the key aspects of any video that determines the orientation of viewing. For a perfect Snapchat video, it is recommended that you keep the aspect ratio to 9:16.
- Video Length Size - Remember that Snapchat isn’t like YouTube and serves an audience that wants micro-entertainment. This is why the recommended time for your video is 3 to 10 seconds with the video size not exceeding 32 MB. Otherwise, the Snapchat audience may not respond well to your videos.
That is why it is crucial that your Snapchat video has all the ideal features so your audience can enjoy the viewing experience as intended instead of attempting to manipulate their phones to be able to see the video clearly. It will create an unpleasant and frustrating experience and your viewers might not stay with you.
How to Adjust the Video for Snapchat on Mac? [Step-by-Step]
- Part1. Changing Snapchat Video Format on Filmora
- Part2. Changing Snapchat Video Aspect Ratio on Filmora
- Part3. Changing Snapchat Video Size on Filmora
If your video doesn’t have the ideal features for Snapchat uploading, you don’t need to worry. You can easily edit your video on Filmora X to adjust everything including the aspect ratio, size, and format.


Part1. Changing Snapchat Video Format on Filmora
- Importing Video
The first step is to import the video using the option ‘Import Media Files’ in the import tab. You can also drag and drop the media files you need to work on.

- Selecting the Right Output Format
Once you have imported the file, drag and drop it onto the Timeline. Now click on the ‘Export’ button. Here you will be able to select your output video format which needs to be either MOV or MP4.
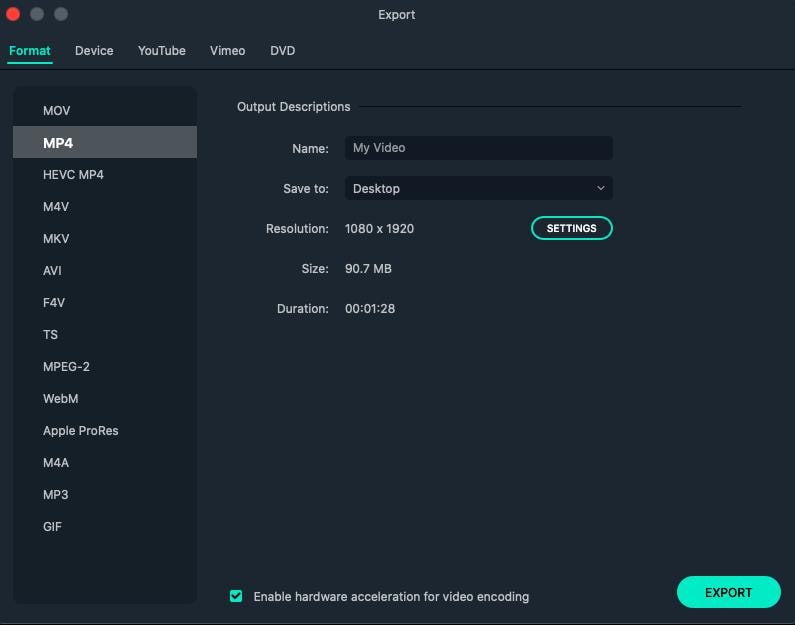
- Exporting Your Snapchat Video
After you have defined the settings, you can click on the ‘Export’ button to start the saving process. Your video is now available to you in the right format.
Part2. Changing Snapchat Video Aspect Ratio on Filmora
You can use multiple methods to change the aspect ratio of your Snapchat video on Filmora. It depends on the nature of editing you need to perform on your video. You can choose from any of the methods given below to edit your video for Snapchat in a user-friendly manner on Mac.
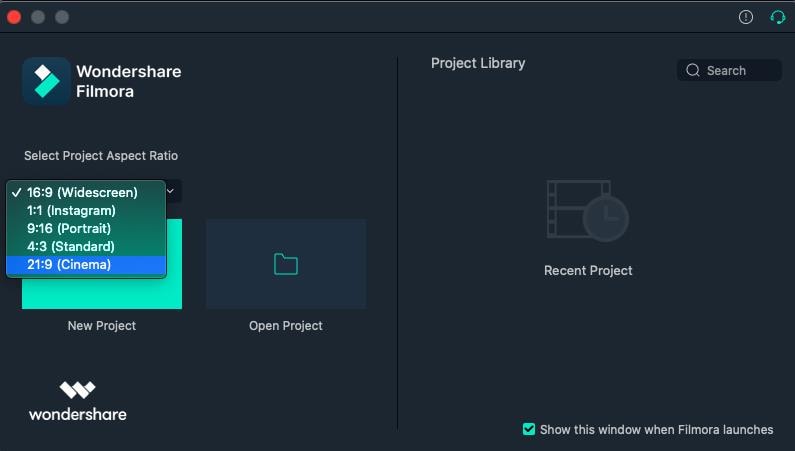
● Method 1 - Launch the editor and click on the drop-down list. You will see the popular aspect ratios listed in the list from where you can choose any. Select the right one that is 9:16 for Snapchat and export the file right away.
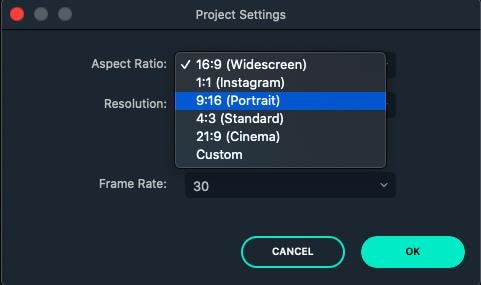
● Method 2 - The second method you can use is present under the Project Settings. You can also lock the aspect ratio using the features available here.

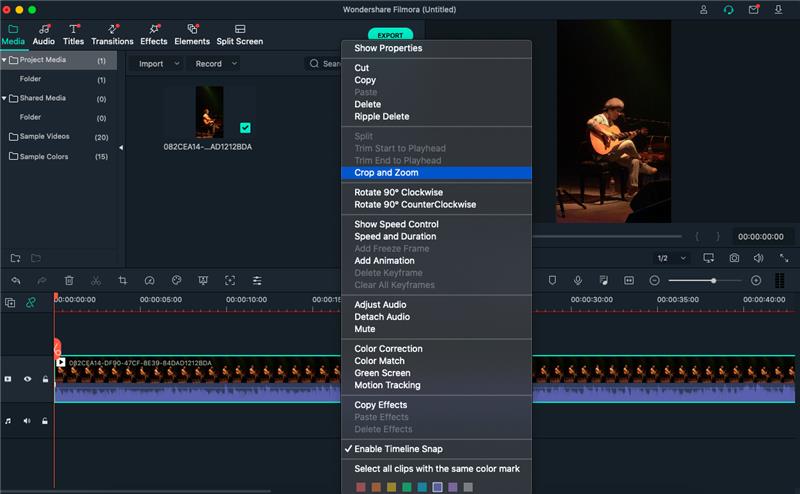
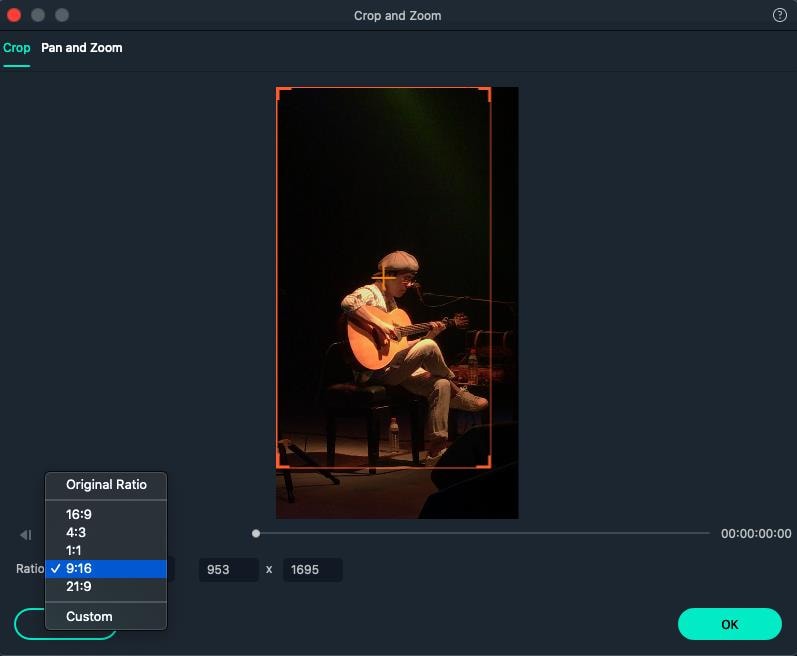
● Method 3 - The third method allows you to change the aspect ratio manually during the video editing process. You need to right-click on the timeline and select the ‘Crop and Zoom’ option. You will see a pop-up window where all the popular options will be available to you. You can choose either of them or select an aspect ratio manually.
● Step 4 - The final method to change the aspect ratio of your video on Mac is at the time of exporting your media file. Here you can select the aspect ratio for your local computer, a particular device, YouTube, or DVD TV.

Part3. Changing Snapchat Video Size on Filmora
- Importing Media File to Filmora
Using the ‘Import’ menu, import your media files, or simply drag and drop them from your Mac OS. Once the files are in the software, drag them to the Timeline track.
- Cropping Your Video for Snapchat
Here you can use the ‘Crop and Zoom’ button from the Timeline by right-clicking on it, so you can only focus on the aspect of the video that you want to show. This will resize the video as well.
- Cutting the Video
Another option you have is to delete the unnecessary parts of the video by selecting them through the indicator present on the timeline. Once you have selected the parts you don’t need, right-click on them and select ‘Delete’.
- Exporting Your Snapchat Video
Once you have resized your video by cropping and cutting the media file, you can now export it in the right resolution, bit rate, and format to ensure you get the minimum file size.
Liza Brown
Liza Brown is a writer and a lover of all things video.
Follow @Liza Brown
Liza Brown
Oct 26, 2023• Proven solutions
How to create a video best fit Snapchat? With more than 240 million active daily users, Snapchat is one of the most popular social media networks globally. It is also an instant messaging app that allows its users to express themselves visually in a diverse variety of manners including photos, videos, stories, stickers, emoji, and more.
One of the best features of Snapchat that makes it so attractive among the young audience is its mobile-oriented user interface. Snapchat was the first social networking platform to introduce the concept of daily stories which was widely adopted by other instant messengers as well including Instagram and WhatsApp. Since it is a mobile-oriented platform, you need to create and edit your videos in a certain way to make sure they are the best fit for Snapchat.
You May Also Like: The Ultimate Guide of Snapchat Filters
What Are the Ideal Features of a Snapchat Video?
Snapchat is highly optimized for vertical viewing which means that all the content needs to be served in portrait aspect ratio instead of landscape used by YouTube and other video platforms. You need to ensure that every aspect of your video is perfect before you can upload it for Snapchat on Mac. Here are some of the key features that you must not forget.
- Resolution - The ideal resolution of a Snapchat video is 1080 x 1920 pixels which is known as full HD. This resolution will ensure that your video loads in the right way and remains sharp and crisp for an excellent viewing experience.
- Video Format - The recommended video format for Snapchat clips is MP4 and MOV. You can use either of those formats on your Mac.
- Aspect Ratio - This is one of the key aspects of any video that determines the orientation of viewing. For a perfect Snapchat video, it is recommended that you keep the aspect ratio to 9:16.
- Video Length Size - Remember that Snapchat isn’t like YouTube and serves an audience that wants micro-entertainment. This is why the recommended time for your video is 3 to 10 seconds with the video size not exceeding 32 MB. Otherwise, the Snapchat audience may not respond well to your videos.
That is why it is crucial that your Snapchat video has all the ideal features so your audience can enjoy the viewing experience as intended instead of attempting to manipulate their phones to be able to see the video clearly. It will create an unpleasant and frustrating experience and your viewers might not stay with you.
How to Adjust the Video for Snapchat on Mac? [Step-by-Step]
- Part1. Changing Snapchat Video Format on Filmora
- Part2. Changing Snapchat Video Aspect Ratio on Filmora
- Part3. Changing Snapchat Video Size on Filmora
If your video doesn’t have the ideal features for Snapchat uploading, you don’t need to worry. You can easily edit your video on Filmora X to adjust everything including the aspect ratio, size, and format.
Part1. Changing Snapchat Video Format on Filmora
- Importing Video
The first step is to import the video using the option ‘Import Media Files’ in the import tab. You can also drag and drop the media files you need to work on.
- Selecting the Right Output Format
Once you have imported the file, drag and drop it onto the Timeline. Now click on the ‘Export’ button. Here you will be able to select your output video format which needs to be either MOV or MP4.
- Exporting Your Snapchat Video
After you have defined the settings, you can click on the ‘Export’ button to start the saving process. Your video is now available to you in the right format.
Part2. Changing Snapchat Video Aspect Ratio on Filmora
You can use multiple methods to change the aspect ratio of your Snapchat video on Filmora. It depends on the nature of editing you need to perform on your video. You can choose from any of the methods given below to edit your video for Snapchat in a user-friendly manner on Mac.
● Method 1 - Launch the editor and click on the drop-down list. You will see the popular aspect ratios listed in the list from where you can choose any. Select the right one that is 9:16 for Snapchat and export the file right away.
● Method 2 - The second method you can use is present under the Project Settings. You can also lock the aspect ratio using the features available here.
● Method 3 - The third method allows you to change the aspect ratio manually during the video editing process. You need to right-click on the timeline and select the ‘Crop and Zoom’ option. You will see a pop-up window where all the popular options will be available to you. You can choose either of them or select an aspect ratio manually.
● Step 4 - The final method to change the aspect ratio of your video on Mac is at the time of exporting your media file. Here you can select the aspect ratio for your local computer, a particular device, YouTube, or DVD TV.
Part3. Changing Snapchat Video Size on Filmora
- Importing Media File to Filmora
Using the ‘Import’ menu, import your media files, or simply drag and drop them from your Mac OS. Once the files are in the software, drag them to the Timeline track.
- Cropping Your Video for Snapchat
Here you can use the ‘Crop and Zoom’ button from the Timeline by right-clicking on it, so you can only focus on the aspect of the video that you want to show. This will resize the video as well.
- Cutting the Video
Another option you have is to delete the unnecessary parts of the video by selecting them through the indicator present on the timeline. Once you have selected the parts you don’t need, right-click on them and select ‘Delete’.
- Exporting Your Snapchat Video
Once you have resized your video by cropping and cutting the media file, you can now export it in the right resolution, bit rate, and format to ensure you get the minimum file size.
Liza Brown
Liza Brown is a writer and a lover of all things video.
Follow @Liza Brown
Also read:
- [New] The Essential Mac Tips for Creating Perfect Snaps
- [New] 2024 Approved How to Screenshot on Snapchat [5 Ways]
- [Updated] Elevate Your Snap Game with Pro-Level Boomerang Expertise for 2024
- [New] 2024 Approved Innovative Ideas for SnapAd Success in Business
- [Updated] In 2024, Easy Storage Solutions for Android/Mac Snaps on Devices
- [Updated] 2024 Approved Elevating Your Visual Narrative Smart Editing on Snapchat
- [New] Instant Recovery of Vanished Visuals
- [Updated] Singular Snaps Crafting a Musical Experience in Snapchat for 2024
- In 2024, Kinja Celebs Chatting via Snapchat
- [Updated] Behind the Scenes of Music-Enhanced Snapchats for 2024
- [New] The Ultimate Guide to Enhancing Your Android & iPhone Snaps for 2024
- [New] Transform Your Snapshots Into Shares – Here's How
- [Updated] 2024 Approved Become a SnapBoom Expert in Minutes
- The Ultimate Guide to Crafting Engaging Snapchat Campaigns for 2024
- In 2024, Light Up the Screen Tips and Steps for Adding GIFs to Snapchats
- Transform Your Snaps Explore These 20 Essential Filters
- [Updated] Snapchat Savvy Elevating Your Photographic Style with App Edits
- In 2024, Easy Storage Solutions for Android/Mac Snaps on Devices
- Decoding Snapchat's Technique for Clockwise Video Reversal for 2024
- Techniques for Securing Snapchat Content via Phone for 2024
- How to Make and Edit Multi Snapchat Videos Easily for 2024
- [New] Journey Into the Enigma Discovering Hidden Emoji Messages
- [New] In 2024, Utilizing Snap Camera Feature on Microsoft Teams
- [Updated] In 2024, Reinventing Personal Snapchat Experiences with More Than 120 Inspirational Ideas
- [Updated] Breaking the Cycle - Or Not? Ideas for Snapstreaks for 2024
- [Updated] In 2024, Perfecting Your Mobile Video Recordings on Snapchat
- [Updated] Easily Manage Your Snapchat Video Speed
- [New] In 2024, Dynamic Designs The Hottest Snapchat Filters Explored
- In 2024, Japanese Pop Culture in Every Frame Learn to Use Snapchat's Filters
- [Updated] In 2024, Breaking the Mold Unique and Compelling Title Themes over a Hundred Strong for Snapstories
- [New] 2024 Approved Unleash Your Creativity Drawing Faces on Snapchat
- [New] Perfecting Your Snap with Snapchat's Inbuilt Editing Tools for 2024
- [New] Essential Strategies for Capturing Your Best Moments in Snapchat
- [Updated] Snaps for Cash A Guide to Profitability
- [Updated] Lens Language Speaking Visually with Snapchat Filters for 2024
- In 2024, Hacks to do pokemon go trainer battles For Oppo Reno 11F 5G | Dr.fone
- [New] Elevate Your Gaming Experience with FBX Recording Tips
- 2024 Approved How to Add Audio to AVI
- In 2024, 3 Methods to Mirror Xiaomi Redmi 12 to Roku | Dr.fone
- How to Bypass Google FRP Lock from Tecno Spark Go (2024) Devices
- [Updated] Seamless Music Addition for Social Media IPhone/Android for 2024
- [Updated] The Complete Guide to Voiced PPT Mastery
- New Auditory Excellence Pinpointing the Best Songs to Accompany Your Montage Narrative
- How to Rescue Lost Music from Moto G84 5G
- Transform Your Video Chats Using Zoom's Filters for 2024
- In 2024, The Modern Guide to Integrating Visuals with Sound Audio Enhancement
- [Updated] Refined Conference Aesthetics The Process to Blur Backgrounds for 2024
- In 2024, How to Unlock Realme Narzo 60x 5G Phone without PIN
- Evolving Sound Quality Issues Within the 2023 Adobe Rush Iteration
- 6 Ways to Change Spotify Location On Your Vivo Y55s 5G (2023) | Dr.fone
- How to Fix Android App Not Installed Error on Asus ROG Phone 8 Pro Quickly? | Dr.fone
- In 2024, Where Is the Best Place to Catch Dratini On Poco X6 | Dr.fone
- [New] 2024 Approved Review Unveiling the Potential of Vidma Capture Tech
- Updated Exploring REAPERs Landscape A Detailed Overview of Its Core Functionalities
- How Can We Bypass Xiaomi FRP?
- Superior Capture Software for Mac, Excluding Bandicam
- Reasons why Pokémon GPS does not Work On Motorola Razr 40? | Dr.fone
- Stuck at Android System Recovery Of Realme Narzo 60 Pro 5G ? Fix It Easily | Dr.fone
- Bricked Your Xiaomi Redmi K70 Pro? Heres A Full Solution | Dr.fone
- In 2024, How to Use Pokémon Emerald Master Ball Cheat On Sony Xperia 10 V | Dr.fone
- [New] Prime Video Chat Solutions for PCs & Phones for 2024
- Updated 2024 Approved Exclusive Guide to High-Quality Audio Recording on Windows 10 Systems
- Understanding Facebook's New Ranking System for 2024
- In 2024, 5 Quick Methods to Bypass Nubia FRP
- [Updated] Reversed Video Techniques for Instagram Savvy Users
- How to Reduce GIF Size and Best GIF Resizers
- Elite Video Transcription Programs in Open Source
- 2024 Approved Transforming Facebook Streams Into Flawless Records
- Title: [New] Tips to Trim Your Video Playback Time on Snapchat
- Author: Scott
- Created at : 2024-06-19 15:35:52
- Updated at : 2024-06-20 15:35:52
- Link: https://snapchat-videos.techidaily.com/new-tips-to-trim-your-video-playback-time-on-snapchat/
- License: This work is licensed under CC BY-NC-SA 4.0.
