![[New] The Right Approach to Uploading Photos From Your Device to Snapchat for 2024](https://thmb.techidaily.com/26dcef27c207b8605e3fcf4585ee0822110eeb8a794c85ff8e27071c7786d452.jpg)
[New] The Right Approach to Uploading Photos From Your Device to Snapchat for 2024
The Right Approach to Uploading Photos From Your Device to Snapchat
Many people haven’t backed up their camera roll to Snapchat due to the default settings. If you want to save each photo or video from your device on the Snapchat cloud, backing up the camera to the Memories is necessary. By doing so, you cannot lose important photos or videos from your phone.
If you change the default settings of the Memories created from the camera roll, Snapchat will automatically create a backup of your Memories. In this regard, this article will guide you on how to back up the camera roll to Snapchat in the easiest way.
Part 1: Backing up automatically - Creating Snapchat Stories from your Camera Roll
If you don’t want to alter the settings of your camera roll, this part will offer you an easy method. Through this method, you can create Snapchat stories from the camera roll directly. By doing so, you can instantly save the camera roll photos to your Snapchat without backing up. To make a Snapchat story from your camera roll, read the following instructions:
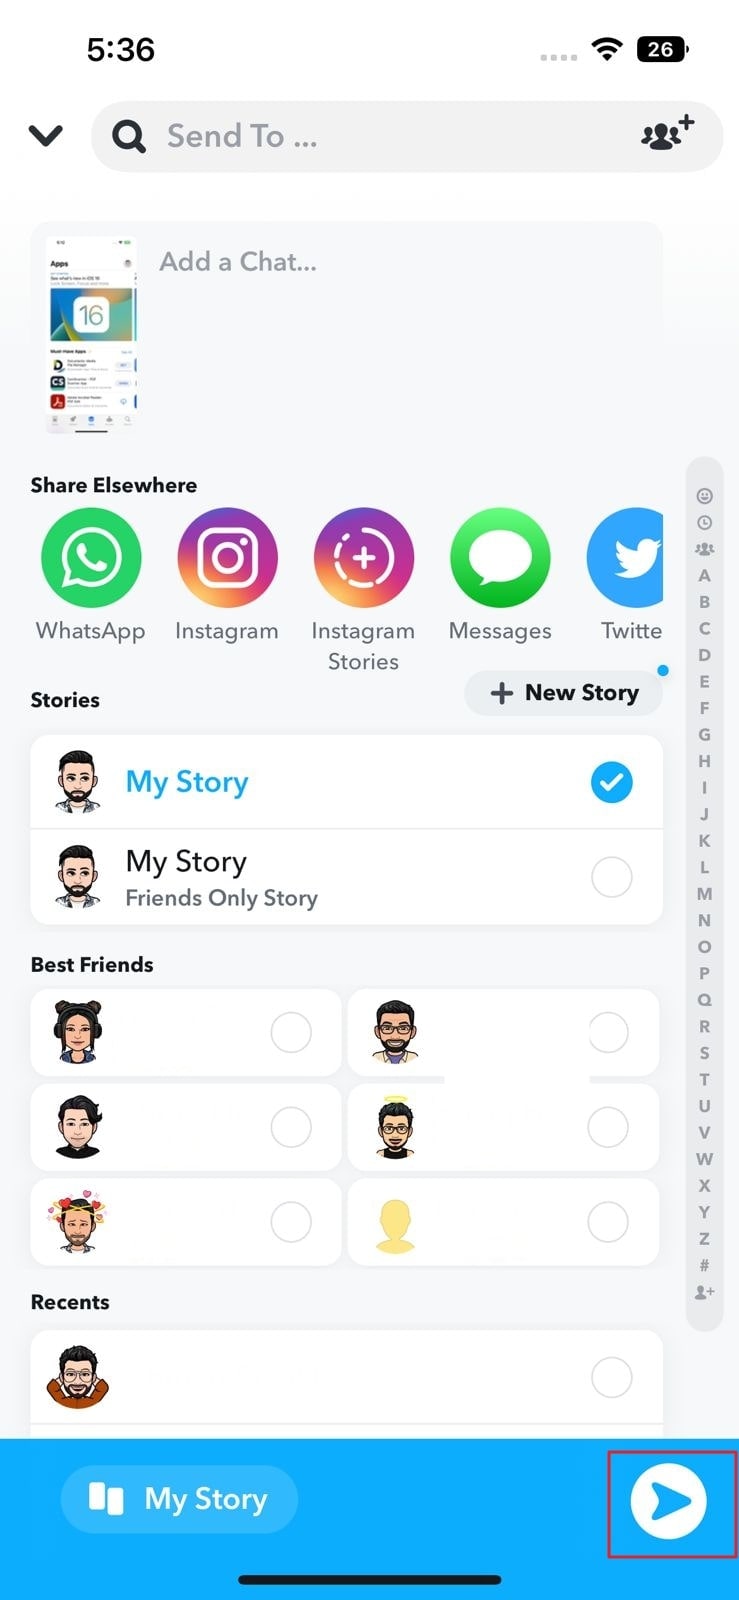
Step1 Open your Snapchat and swipe up from the bottom. Head to the Camera Roll section and select any photo.

Step2 After selecting a particular photo or video, hit the “Arrow” icon. Afterward, tap on the “My Story” option to create a story. For confirmation, press the “Arrow” icon again. This will create a Snapchat story instantly from your Camera Roll.
Part 2: How to Backup your Camera Roll to Snapchat without Creating Stories
In Snapchat, you can only save the camera roll videos having a maximum of 10-second length. It indicates that you cannot save the camera roll videos which exceed the 10-second limit. Furthermore, there are various ways that enable you to make a Camera Roll backup on Snapchat. In this part, we will guide you on how to save a Camera roll photo or video on Snapchat without creating a story. Also, these steps are applicable on both Android and iOS devices:
Step1 After opening your Snapchat app, open your Memories by swiping up. Proceed to your “Camera Roll” section and long-press on any picture. This will let you select any photo or video on your Camera Roll.

Step2 Once you have selected the picture, choose the “Create Story” option. Afterward, tap on the “Save Story” option, which will save the camera roll picture in the Memories section.


Part 3: How to Check Your Backup Progress
To ensure a complete backup of your Memories on Snapchat, a stable Wi-Fi connection is mandatory. That’s why make sure to connect your phone with a stable and strong internet connection. Moreover, if you have chosen multiple photos or videos from the Camera Roll, you can save them as a story on Snapchat. However, if you want to save individual images, you will need to make their backup separately in Memories. To check your backup progress on Snapchat, navigate to the following steps:
Step1 Once you have opened your Snapchat, tap on your Bitmoji icon. From there, proceed to the “Settings” by tapping on the gear icon.

Step2 Scroll down a little to find the option “Memories.” Afterward, you can see the option “Backup Progress.” If you can see the word “Complete,” it means that your Memories are backed up completely. If not, connect your phone to a stable Wi-Fi connection.

Part 4: How to Turn On the Smart Backup
A Smart Backup is an advanced option on Snapchat that lets you back up memories automatically. If you enable this feature, Snapchat will automatically create a backup through a stable internet connection. This feature allows you to easily access your Memories even if you reinstall Snapchat on another device. Moreover, you can save your phone’s storage by saving photos or videos in Memories. To activate the Smart Backup feature, read the below instructions:
Step1 After opening Snapchat, head to its “Settings.” In the Settings menu, locate the option “Memories.”

Step2 After tapping on Memories, you can see various options. Among multiple options, turn on the toggle of “Smart Backup.” Thus, Snapchat will automatically back up your Memories through this activated feature.

Part 5: FAQs
1. How to Backup Memories to Camera Roll on Snapchat?
Open your Snapchat and head to its “Memories.” From the “Snaps” section, select any snap that you want to save to Camera Roll. After choosing the snap, hit on the “Arrow” icon. Under the “Share Elsewhere” heading, press the “Download” icon. This will immediately save the snap on your Camera Roll.
2. How to Backup Pictures in Both Memories and Camera Roll?
To initiate, tap on your “Bitmoji” icon on Snapchat. Head to “Settings” and choose “Memories” from the displayed options. Afterward, tap on the “Save Button” option under the heading “Save Destinations.” In the “Save Button” menu, you can tap “Memories and Camera Roll” to backup pictures in both sections.
3. How to Get My Story Snaps to Auto-Save to Memories?
The process to auto-save the stories to Memories is quite simple. For this, open the “Settings” of Snapchat and head to the “Memories” option. Under the heading called “Save Destination,” tap on “Auto-Save My Story Snaps.” Once done, enable the option “Auto-Save to Memories.” Thus, your Snapchat stories will be automatically saved to your Memories.
Wrap Up
Snapchat allows you to save the captured pictures and videos in their Memories. By doing so, you can save your device’s storage space easily. Moreover, you can access the saved snaps in Memories by logging into your Snapchat from any device. That’s why this article has offered a well-described guide on how to back up the camera roll to Snapchat in a simple way.
Free Download For Win 7 or later(64-bit)
Free Download For macOS 10.14 or later
Free Download For macOS 10.14 or later
Steps for Retrieving Personal, Hidden Snapchat Photos
Have you ever set some of your Snapchat pictures to “My Eyes Only” and then accidentally deleted them? Well, it’s happened to the best of us. Whether it’s a hilarious Snap streak with your best friend or a cute photo of your pet, losing important data can be frustrating.
But don’t worry, there’s a way to recover them! In this article, we’ll show you how to recover “My Eyes Only” pictures on Snapchat. We’ll also discuss how you can change or retrieve your password if you’ve forgotten it.
Part 1. How To Recover Photos Deleted From “My Eyes Only” on Snapchat
- Method 1. Recovering The Photos Via Snapchat - For iOS and Android
- Method 2. Using File Browser - For Android
Have you accidentally deleted a photo from your “My Eyes Only” album on Snapchat, and you’re now panicking because you think it’s gone forever? Don’t worry: with our two step-by-step methods provided below, you will surely retrieve your deleted snaps.
Method 1. Recovering The Photos Via Snapchat - For iOS and Android
The first method to recover My Eyes Only pictures on Snapchat is via the Privacy tab. Although it is a bit of a long process, this is surely going to work.
Here’s a quick and simple rundown of how you can recover your photos via Snapchat on your iOS and Android device:
Step1 Launch the Snapchat app on your device and sign in to your account. On the top left side of the screen, click your profile icon.
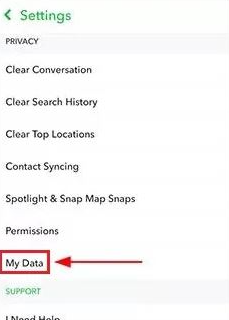
Step2 Tap the Setting icon and scroll down to the Privacy tab.

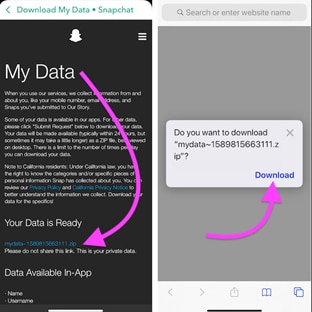
Step3 Under the Privacy tab, find the “My Data” option and tap it.
Step4 Log in to your Snapchat account once again, submit your request for data recovery from Snapchat’s server and download it.
![]()
Note: Keep in mind that only the snaps saved in your memory roll will be revived by this method.
Method 2. Using File Browser - For Android
You can also recover your My Eyes Only snapshots from the File Manager on your device. However, this solution only works on Android devices because iPhones do not provide all access to apps for your data safety.
Step1 Launch the File browser or File app on your device.
Step2 Head to “Data,” find the “Snapchat data or com.snapchat.android” file, and tap to open it.
Step3 Now, find a file with the “a .nomedia” extension, delete it, and the data will be restored to your Snapchat account.
![]()
Note: This method is only effective for a brief amount of time. Therefore, to recover your deleted Snaps, you should follow this method as soon as possible after they are deleted.
Apart from reading the methods we provided for your, you can also watch this video tutorial to help you recover My Eyes Only pictures quickly.
Part 2. A Bonus Tip: What If You Forget The Password Of My Eye Only
If you’ve ever forgotten the password to your “My Eye Only” on Snapchat, don’t worry; below, we’ve provided a few easy-to-follow instructions to help you quickly reset the password.
![]()
Note: If you opt to reset your current passcode, everything presently saved to My Eyes Only will be lost!!
How To Reset My Eyes Only Password?
Step1 Open the Snapchat app on your Android or iOS device and tap the overlaid Photos icon to head to the Memories section. Next, go to the “My Eyes Only” tab.
Step2 Tap “Options” at the lower right corner of the screen and select “Forgot Password.”
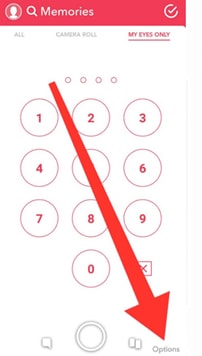
Step3 Type your Snapchat password and tap “Next.” Accept the rules and tap “Continue” to proceed further.
Step4 Reset the password and tap “Confirm” to apply your changes.
FAQs
How To Change My Eyes Only Password?
If you still remember the present password but want to change it, do the following steps to change the “My Eyes Only” password:
Step1 Open the Snapchat app, head to the Memories section, and tap the “My Eyes Only” tab.
Step2 Tap “Option”> “Change Password” and type your current “My Eyes Only” password to continue.
Step3 Type your new PIN and tap “Next.” Tap the “Use Passphrase” option if you do not want to set a PIN code.
Step4 Tap the box next to “I understand that if …” and tap “Continue.” Finally, tap “Finish” to complete the process.
How Do I Move Snaps To My Eyes Only?
Here’s how you can move Snaps to the “My Eyes Only” section on Snapchat:
Step1 Open the Snapchat app on your phone and go to the Memories section.
Step2 Choose the snap you want to move, tap and hold it.
Step3 Select “My Eyes Only” to move your snap.
How Do I Set Up My Eyes Only?
To set up “My Eyes Only” on Snapchat, do the following steps in sequence:
Step1 Head to the Memories section in Snapchat and tap the “My Eyes Only” tab.
Step2 Under the My Eyes Only tab, tap the “Quick Setup” option.
Step3 Create a passphrase or PIN and confirm it. Now, check the box next to “I understand that…,” select “Continue,” and tap the “Finish“ option to complete the setup process.
How Do I Save Snaps To My Eyes Only By Default?
To save your Snaps to My Eyes only by default, follow these instructions step-by-step:
Step1 Open your Snapchat account and tap your Profile icon.
Step2 Tap the Settings icons at the top right-hand side of the screen and head to Memories.
Step3 Now, tap the toggle button next to “Save to My Eyes Only By Default” to change the settings. Your snaps will now save to the My Eyes Only section every time.
Conclusion
In this article, we’ve provided two step-by-step methods to help you recover My Eyes Only pictures on Snapchat on your iOS or Android device**.** We’ve also discussed how you can change or recover the My Eyes Only password with easy-to-follow instructions.
All in all, it is possible to recover your “My Eyes Only” pictures from Snapchat. While the process may be a little bit time-consuming, it is definitely worth it if you value your privacy. So, if you ever find yourself in this predicament, don’t despair - there is hope!
Be sure to follow the instructions carefully, and hopefully, you’ll be able to get your photos back!
Free Download For Win 7 or later(64-bit)
Free Download For macOS 10.14 or later
Method 2. Using File Browser - For Android
You can also recover your My Eyes Only snapshots from the File Manager on your device. However, this solution only works on Android devices because iPhones do not provide all access to apps for your data safety.
Step1 Launch the File browser or File app on your device.
Step2 Head to “Data,” find the “Snapchat data or com.snapchat.android” file, and tap to open it.
Step3 Now, find a file with the “a .nomedia” extension, delete it, and the data will be restored to your Snapchat account.
![]()
Note: This method is only effective for a brief amount of time. Therefore, to recover your deleted Snaps, you should follow this method as soon as possible after they are deleted.
Apart from reading the methods we provided for your, you can also watch this video tutorial to help you recover My Eyes Only pictures quickly.
Part 2. A Bonus Tip: What If You Forget The Password Of My Eye Only
If you’ve ever forgotten the password to your “My Eye Only” on Snapchat, don’t worry; below, we’ve provided a few easy-to-follow instructions to help you quickly reset the password.
![]()
Note: If you opt to reset your current passcode, everything presently saved to My Eyes Only will be lost!!
How To Reset My Eyes Only Password?
Step1 Open the Snapchat app on your Android or iOS device and tap the overlaid Photos icon to head to the Memories section. Next, go to the “My Eyes Only” tab.
Step2 Tap “Options” at the lower right corner of the screen and select “Forgot Password.”
Step3 Type your Snapchat password and tap “Next.” Accept the rules and tap “Continue” to proceed further.
Step4 Reset the password and tap “Confirm” to apply your changes.
FAQs
How To Change My Eyes Only Password?
If you still remember the present password but want to change it, do the following steps to change the “My Eyes Only” password:
Step1 Open the Snapchat app, head to the Memories section, and tap the “My Eyes Only” tab.
Step2 Tap “Option”> “Change Password” and type your current “My Eyes Only” password to continue.
Step3 Type your new PIN and tap “Next.” Tap the “Use Passphrase” option if you do not want to set a PIN code.
Step4 Tap the box next to “I understand that if …” and tap “Continue.” Finally, tap “Finish” to complete the process.
How Do I Move Snaps To My Eyes Only?
Here’s how you can move Snaps to the “My Eyes Only” section on Snapchat:
Step1 Open the Snapchat app on your phone and go to the Memories section.
Step2 Choose the snap you want to move, tap and hold it.
Step3 Select “My Eyes Only” to move your snap.
How Do I Set Up My Eyes Only?
To set up “My Eyes Only” on Snapchat, do the following steps in sequence:
Step1 Head to the Memories section in Snapchat and tap the “My Eyes Only” tab.
Step2 Under the My Eyes Only tab, tap the “Quick Setup” option.
Step3 Create a passphrase or PIN and confirm it. Now, check the box next to “I understand that…,” select “Continue,” and tap the “Finish“ option to complete the setup process.
How Do I Save Snaps To My Eyes Only By Default?
To save your Snaps to My Eyes only by default, follow these instructions step-by-step:
Step1 Open your Snapchat account and tap your Profile icon.
Step2 Tap the Settings icons at the top right-hand side of the screen and head to Memories.
Step3 Now, tap the toggle button next to “Save to My Eyes Only By Default” to change the settings. Your snaps will now save to the My Eyes Only section every time.
Conclusion
In this article, we’ve provided two step-by-step methods to help you recover My Eyes Only pictures on Snapchat on your iOS or Android device**.** We’ve also discussed how you can change or recover the My Eyes Only password with easy-to-follow instructions.
All in all, it is possible to recover your “My Eyes Only” pictures from Snapchat. While the process may be a little bit time-consuming, it is definitely worth it if you value your privacy. So, if you ever find yourself in this predicament, don’t despair - there is hope!
Be sure to follow the instructions carefully, and hopefully, you’ll be able to get your photos back!
Free Download For Win 7 or later(64-bit)
Free Download For macOS 10.14 or later
Also read:
- [New] In 2024, Embark on an Avatar Journey Crafting Characters with Ease and Style
- [New] In 2024, Find the Top 8 Video Communication Apps for Android Groups
- [New] The Insider's Guide to Snapchat Pins
- [New] The Ultimate Checklist Seamless Conversion of Phone Photos to Snapchat for 2024
- [Updated] 2024 Approved Free Meme Makers – The Ultimate Resource Guide
- [Updated] Blitz Through Edits with Windows 11 Pro Tips
- [Updated] In 2024, Targeted Success Using SnapAds for Business Growth
- [Updated] In 2024, The Artisan's Path to Crafting Confidential Snaps
- 2024 Approved Premium Window Calls Top 8 Standout Titles
- In 2024, 3 Effective Methods to Fake GPS location on Android For your Vivo G2 | Dr.fone
- In-Depth Review of the Anycubic Kobra 3 with Multi-Color Capabilities
- New Expert Techniques for Isolating Singers From Visual Media for 2024
- ムービー制作におけるMP4ファイルの保存が不可能だった際の解決策:2024年最新ガイド
- Title: [New] The Right Approach to Uploading Photos From Your Device to Snapchat for 2024
- Author: Scott
- Created at : 2024-10-30 22:53:22
- Updated at : 2024-11-05 21:17:05
- Link: https://snapchat-videos.techidaily.com/new-the-right-approach-to-uploading-photos-from-your-device-to-snapchat-for-2024/
- License: This work is licensed under CC BY-NC-SA 4.0.