![[New] Securing Your Snapchat Memories Mobile Recorders' Guide for 2024](https://thmb.techidaily.com/d8b681dac20745dffc0590df4e8c90e2635d89e0810cfd55569744e9fd64a173.jpg)
"[New] Securing Your Snapchat Memories Mobile Recorders' Guide for 2024"
Securing Your Snapchat Memories: Mobile Recorders’ Guide
Snapchat has 306 million users daily worldwide. It is considered the fastest way to share a moment and make a memory out of it. The article reflects upon screen record Snapchat and covers ways to do so via Android and iPhone devices. Let us commence this, shall we?
In this article
01 Will Snapchat Know When You Do Screen Recording?
02 How to Screen Record Snapchat on Android Phone?
03 How to Screen Record Snapchat on iPhone?
04 How to Make Screen Record on Snapchat without Notice?
Part 1: Will Snapchat Know When You Do Screen Recording?
Snapchat was designed in a way that it protects the privacy of the users. According to this social networking software policy, the messages and snaps disappear after 24 hours. It creates an urge to screenshot the snap or screen record the chat without getting noticed. The section reflects the answer to the concern if you screen record on Snapchat, does it show?”
The answer is yes. Snapchat sends a notification to the other person if you screen record on Snapchat. It plays a vital role as it helps steer clear from the stalkers and people who have no sense of boundaries.
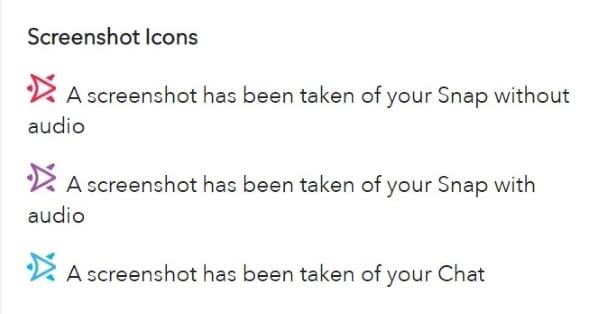
For taking a screenshot on Snapchat, the following notification show with specific colored arrows.
The red arrow displays that the screenshot was taken of snap without audio.
The purple arrow signifies that the screenshot was taken of snap with audio.
The blue arrows represent that a screenshot has been taken of chat.
It clearly shows that Snapchat takes the privacy of its users seriously. Therefore, to protect oneself from disappointment, it is crucial to avoid taking screenshots or screen recordings on Snapchat. You can use another phone to carry out the sneaky operation or download third-party software to screen capture and record safely.
Part 2: How to Screen Record Snapchat on Android Phone?
The Android users pretty much enhanced in the last decade exponentially. It is mainly because the workability of Android is more straightforward than that of iPhone. If you are a Snapchat addict on an Android phone, this section is designed for you.
Screen recording on Snapchat via Android phone is easy. There are no complications in the process, even for a beginner. For starters, make sure that the in-built screen recording functionality of Android is enabled via Settings. It will help initiate the recording immediately from the Action Center.
So, let us jump right into the step-by-step procedure to screen record on Snapchat.
Step 1: Enabling the Airplane Mode
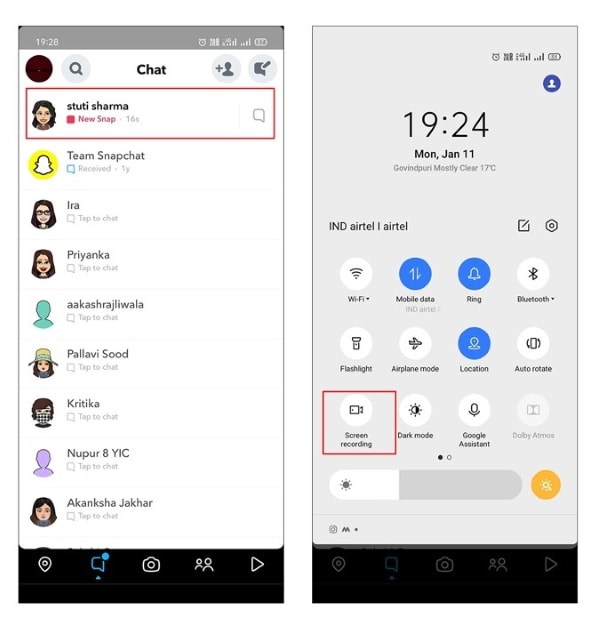
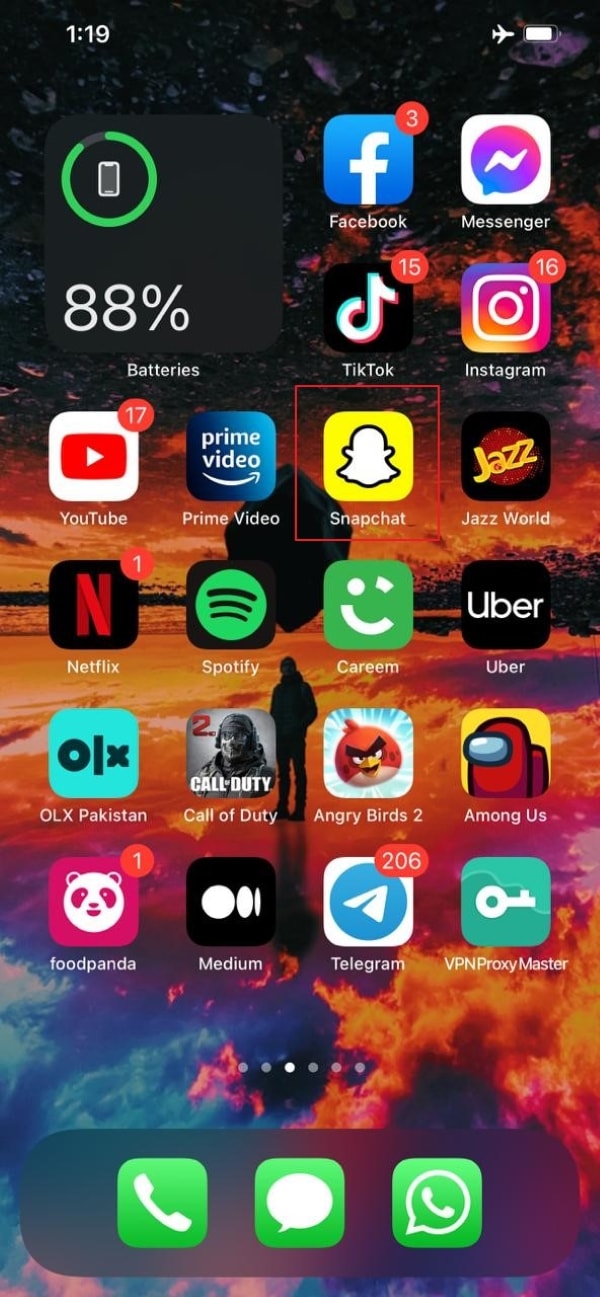
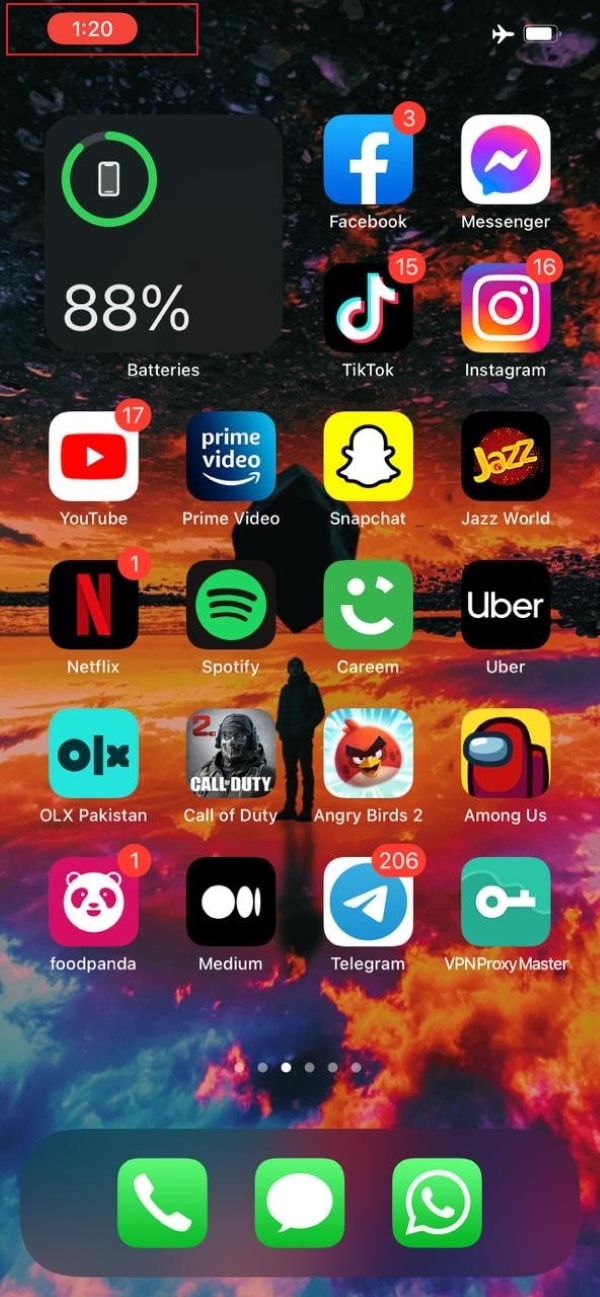
Open Snapchat from your Android phone. Refresh all the chats so that all new snaps can be accessed easily. After that, launch the “Action Center” and hit “Airplane Mode” to switch it on. It is shaped like an airplane.

Step 2: Start the Recording
Now, start screen recording by opening the “Action Center” again and clicking on “Screen Recorder.” As soon as the recording initiates, open the snap that you wish to record.
Step 3: Stop the Recording
After you are done, stop the recording. Disable the Airplane Mode and close the tool. The screen recording can be accessed from the Gallery.
Part 3: How to Screen Record Snapchat on iPhone?
Bringing more features and traits to the house, people have gone insane with every new model of the iPhone that is announced to the world. If you are an iPhone user looking to screen record on Snapchat, follow this section vividly.
Instead of using third-party software like AZ screen recorder Snapchat, the in-built tool of the iPhone is equally workable. There is no need to install new software on the device and play with the system’s memory. To initiate screen recording on Snapchat via iPhone, let us discuss the procedure extensively.
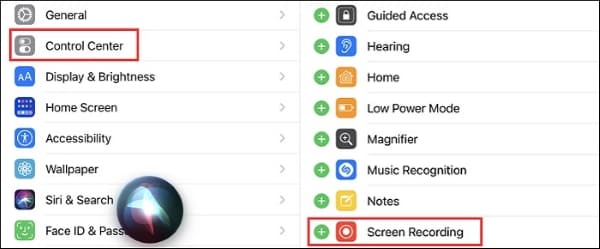
Step 1: Activating the Screen Recorder
Before starting, the user should make sure that the in-built screen recorder tool has been downloaded. Navigate to the “Control Center” and scroll down to find “Screen Recorder if it is not installed.” Hit the green (+) icon beside the tool to make it easily accessible.
Step 2: Accessing the Feature for iPhone Versions
The accessing of Screen Recorder in-built tool varies from one iPhone version to another. For instance, if you have iPhone 8 or older versions, swipe down to tap the “Screen Recording” icon. However, if you own iPhone X or advanced versions, swipe up from the top right corner of the screen. Find the relevant icon to continue with the targeted process.
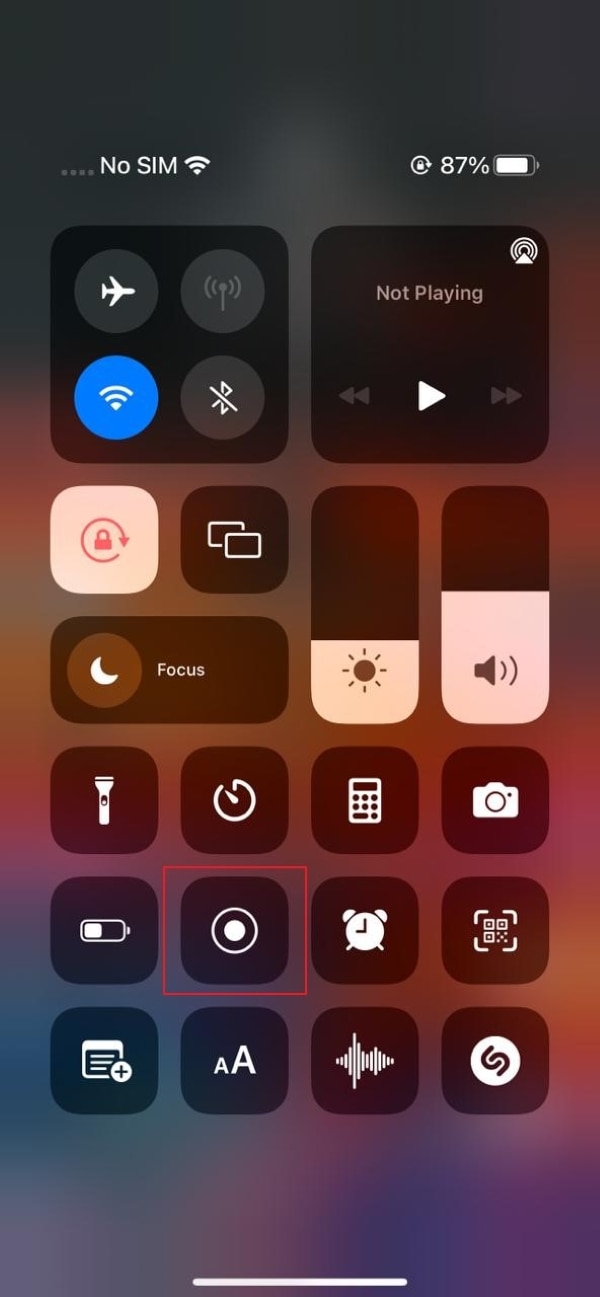
Step 3: Starting the Recording
Launch Snapchat from your iPhone and refresh the feed. Now, open the Screen Recording tool and initiate the recording. You have to turn on the “Airplane” mode as well before recording the snap. Now, the user is expected to open the snap that needs to be recorded.
Step 4: Stopping the Recording
Stop the recording by clicking on the red icon on the screen. The screen recording is performed successfully. You can find the recording in your Photos in seconds.
Part 4: How to Make Screen Record on Snapchat without Notice?
It looks pretty embarrassing if you capture a screenshot and the other person receives a notification. The screen recording on Snapchat makes you awkward. To get rid of this embarrassment, one should use tricky and workable methods. Luckily, the section covers some of those methods. Let us have a look at each of them!
Switching off the Internet Connection
The first method revolves around disabling the internet connection of your device. For starters, reload and refresh your Snapchat feed. Disconnect the Wi-Fi or data network, and then screen records the snap. It helps you get the task done without getting noticed, as the app doesn’t know what is happening without internet connectivity.
Enabling the Airplane Mode
One workable method is to enable the Airplane Mode before you plan to screen record Snapchat. What happens is that the app doesn’t respond to the operation occurring as Airplane Mode is switched on. The process doesn’t send the notification to the targeted person; thus, it always works.
Using a Third-Party Software
You can access the third-party screen recorder and then perform screen recording on Snapchat. The market offers numerous apps for a similar reason. Their usage is simple as well.
Mirroring Phone on PC
Another tricky method revolves around mirroring phones on PC. The Snapchat user can connect the device to the computer and then play the snap story. As Snapchat cannot read the computer’s activities, you can use the recorder to screen record Snapchat stories in seconds.
Using Another Phone
You can pick a phone of your sibling or a friend to record the snaps of the targeted person. It might not be a high-resolution output, but it would surely get your task done without getting noticed.
Final Remarks
Snapchat has become one of the most favorite software in the world. People like to capture the stories and screen record the chats that they find amusing, engaging, and other sneaky reasons. The article offered users a screen record on Snapchat via Android and iPhone. The tricky methods to screen record without getting noticed were also a part of this write-up.
02 How to Screen Record Snapchat on Android Phone?
03 How to Screen Record Snapchat on iPhone?
04 How to Make Screen Record on Snapchat without Notice?
Part 1: Will Snapchat Know When You Do Screen Recording?
Snapchat was designed in a way that it protects the privacy of the users. According to this social networking software policy, the messages and snaps disappear after 24 hours. It creates an urge to screenshot the snap or screen record the chat without getting noticed. The section reflects the answer to the concern if you screen record on Snapchat, does it show?”
The answer is yes. Snapchat sends a notification to the other person if you screen record on Snapchat. It plays a vital role as it helps steer clear from the stalkers and people who have no sense of boundaries.
For taking a screenshot on Snapchat, the following notification show with specific colored arrows.
The red arrow displays that the screenshot was taken of snap without audio.
The purple arrow signifies that the screenshot was taken of snap with audio.
The blue arrows represent that a screenshot has been taken of chat.
It clearly shows that Snapchat takes the privacy of its users seriously. Therefore, to protect oneself from disappointment, it is crucial to avoid taking screenshots or screen recordings on Snapchat. You can use another phone to carry out the sneaky operation or download third-party software to screen capture and record safely.
Part 2: How to Screen Record Snapchat on Android Phone?
The Android users pretty much enhanced in the last decade exponentially. It is mainly because the workability of Android is more straightforward than that of iPhone. If you are a Snapchat addict on an Android phone, this section is designed for you.
Screen recording on Snapchat via Android phone is easy. There are no complications in the process, even for a beginner. For starters, make sure that the in-built screen recording functionality of Android is enabled via Settings. It will help initiate the recording immediately from the Action Center.
So, let us jump right into the step-by-step procedure to screen record on Snapchat.
Step 1: Enabling the Airplane Mode
Open Snapchat from your Android phone. Refresh all the chats so that all new snaps can be accessed easily. After that, launch the “Action Center” and hit “Airplane Mode” to switch it on. It is shaped like an airplane.
Step 2: Start the Recording
Now, start screen recording by opening the “Action Center” again and clicking on “Screen Recorder.” As soon as the recording initiates, open the snap that you wish to record.
Step 3: Stop the Recording
After you are done, stop the recording. Disable the Airplane Mode and close the tool. The screen recording can be accessed from the Gallery.
Part 3: How to Screen Record Snapchat on iPhone?
Bringing more features and traits to the house, people have gone insane with every new model of the iPhone that is announced to the world. If you are an iPhone user looking to screen record on Snapchat, follow this section vividly.
Instead of using third-party software like AZ screen recorder Snapchat, the in-built tool of the iPhone is equally workable. There is no need to install new software on the device and play with the system’s memory. To initiate screen recording on Snapchat via iPhone, let us discuss the procedure extensively.
Step 1: Activating the Screen Recorder
Before starting, the user should make sure that the in-built screen recorder tool has been downloaded. Navigate to the “Control Center” and scroll down to find “Screen Recorder if it is not installed.” Hit the green (+) icon beside the tool to make it easily accessible.
Step 2: Accessing the Feature for iPhone Versions
The accessing of Screen Recorder in-built tool varies from one iPhone version to another. For instance, if you have iPhone 8 or older versions, swipe down to tap the “Screen Recording” icon. However, if you own iPhone X or advanced versions, swipe up from the top right corner of the screen. Find the relevant icon to continue with the targeted process.
Step 3: Starting the Recording
Launch Snapchat from your iPhone and refresh the feed. Now, open the Screen Recording tool and initiate the recording. You have to turn on the “Airplane” mode as well before recording the snap. Now, the user is expected to open the snap that needs to be recorded.
Step 4: Stopping the Recording
Stop the recording by clicking on the red icon on the screen. The screen recording is performed successfully. You can find the recording in your Photos in seconds.
Part 4: How to Make Screen Record on Snapchat without Notice?
It looks pretty embarrassing if you capture a screenshot and the other person receives a notification. The screen recording on Snapchat makes you awkward. To get rid of this embarrassment, one should use tricky and workable methods. Luckily, the section covers some of those methods. Let us have a look at each of them!
Switching off the Internet Connection
The first method revolves around disabling the internet connection of your device. For starters, reload and refresh your Snapchat feed. Disconnect the Wi-Fi or data network, and then screen records the snap. It helps you get the task done without getting noticed, as the app doesn’t know what is happening without internet connectivity.
Enabling the Airplane Mode
One workable method is to enable the Airplane Mode before you plan to screen record Snapchat. What happens is that the app doesn’t respond to the operation occurring as Airplane Mode is switched on. The process doesn’t send the notification to the targeted person; thus, it always works.
Using a Third-Party Software
You can access the third-party screen recorder and then perform screen recording on Snapchat. The market offers numerous apps for a similar reason. Their usage is simple as well.
Mirroring Phone on PC
Another tricky method revolves around mirroring phones on PC. The Snapchat user can connect the device to the computer and then play the snap story. As Snapchat cannot read the computer’s activities, you can use the recorder to screen record Snapchat stories in seconds.
Using Another Phone
You can pick a phone of your sibling or a friend to record the snaps of the targeted person. It might not be a high-resolution output, but it would surely get your task done without getting noticed.
Final Remarks
Snapchat has become one of the most favorite software in the world. People like to capture the stories and screen record the chats that they find amusing, engaging, and other sneaky reasons. The article offered users a screen record on Snapchat via Android and iPhone. The tricky methods to screen record without getting noticed were also a part of this write-up.
A Novice’s Guide to Making Unforgettable Snaps on Snapchat
Social media platforms like Snapchat have gained immense popularity among teenagers and youngsters. People like to try the filters, lenses, and stickers on their snaps. This helps them to communicate with their friends in an interesting manner. These unique features offered on Snapchat are a contributing factor to its popularity.
Using Snapchat, you can not only take ordinary snaps but can also create boomerangs. The bounce feature on Snapchat was first introduced in August 2018 on all iOS devices. This feature is similar to the boomerang option available on Instagram. Through this feature, people can play their captured snap on the loop, highlighting a specific action in it. For your convenience, this article will tell how to do a boomerang on Snapchat in multiple ways.
Part 1: How to Make a Bounce on Snapchat - for iOS
If you are not an Instagram user, you can still make boomerangs using Snapchat. However, you must update your Snapchat to its latest version to use the bounce feature. To update your Snapchat and learn how to do a boomerang on Snapchat, follow the below steps:
Step1 On your iOS device, navigate to the App Store. You then need to click on your “Profile” icon displayed in the top-right corner.

Step2 After tapping on the Profile icon, you can see all the pending updates of your installed apps. If a pending update of Snapchat is available, tap on the “Update” button displayed next to the Snapchat app.

Step3 Once you are done with updating your Snapchat to the latest version, you can now avail its “Bounce” feature. To make a bounce, open your Snapchat and hit the “Record” button to capture a video. Once you have recorded the video, tap on the “Arrow” icon displayed at the bottom of the right section. Keep tapping that icon until you can see the “Bounce“ option. Now set the time duration of your video and tap on the “Save” button to conclude.

Part 2: Alternatives of Bounce on Snapchat - for both iOS and Android
The Bounce feature is only available on iOS devices. If you want to make a bounce on your Android smartphone, you can take help from the following easy methods. These methods can work on iOS and Android phones and will help you with how to do a boomerang on Snapchat.
Method 1: Regular Loop
On Snapchat, a Regular Loop feature allows you to play your snap without back-and-forth effect. By applying this feature, you can make your video enjoyable without the Bounce option. To use this feature, capture a video from the recording button and then press the “Infinity” icon twice. By tapping on the Infinity icon twice, you can activate the feature “Loop.”

Method 2: Limitless Snap
Apart from using the Regular Loop feature, you can use another exciting feature called “Limitless Snap.” This feature lets you send snaps to your friends and post the stories in an endless loop. The limitless snap will play continuously until your added friend does not close it on his own. To utilize this feature, press the “Infinity” icon and select the timer from 1 to infinity to play the snaps on loop.

Method 3: Use Instagram to Make a Boomerang Video
If you are not satisfied with the above two methods, you can use Instagram to make a boomerang video. For this, check the below steps to create a boomerang with Instagram.
Step1 Open your Instagram and swipe from left to right using your finger. On the recording screen, tap on the Boomerang option displayed as the “Infinity” icon.

Step2 Now, you can record the video by pressing and holding the Record button. Once done, tap on the three-dot icon at the top right corner and hit the “Save” button.

Step3 The boomerang video will be saved on your phone’s gallery directly. To access the saved video from Snapchat, you need to open your Snapchat memories and head to the Camera Roll tab. Here, you can find the saved boomerang video created through Instagram.

Part 3: Further Reading: How To Turn Video Into Boomerang With a Useful Tool
If you don’t know how to do a boomerang on Snapchat, you can use a reliable mobile application under the name of Filmora . This software functions effectively and comprises various features through which you can enhance and edit videos flawlessly.
Free Download For Win 7 or later(64-bit)
Free Download For macOS 10.14 or later
While this is available across Android and iOS, it provides a variety of enhancement tools to make videos look better. The use of loop effects helps you make your captured video more vibrant and interesting. If you wish to make your video into a boomerang through this mobile application, read the below details:
Step1 To start off with this tool, make sure you download and install it properly across your smartphone. Launch it and click on “New Project” to initiate a new video project. On the next screen, lead into the “Video” section and import your recorded video that is to be looped.

Step2 As the video opens up in front of you, click on the “Trim” button at the bottom of the screen. Move your cursor to the point where you want to trim the video. Click on the “Trim” button in the bottom-center of the panel to cut the video across the selected point.

Step3 You can select the unnecessary part of the video and simply tap on the “Delete” button on the farthest right of the panel. With the trimmed video, select it and click on the “Copy” button to make duplicates of the specific part. As you make copies of the video to loop it, you can also add effects in between the parts from the “Effect” icon.

Step4 Once you are done with your Snapchat boomerang video, set the resolution of the output video with the provided option on the top and click on the “Export” button.

Conclusion
Do you love making boomerang videos and want to know how to do a boomerang on Snapchat? Snapchat has introduced its Bounce feature, through which you can create boomerang videos and share them with your friends for fun. To achieve the best results in creating a boomerang video, you can try the smartphone tool known as Filmora. This mobile platform also comprises advanced features that can increase the quality of your boomerang video.
Free Download For macOS 10.14 or later
While this is available across Android and iOS, it provides a variety of enhancement tools to make videos look better. The use of loop effects helps you make your captured video more vibrant and interesting. If you wish to make your video into a boomerang through this mobile application, read the below details:
Step1 To start off with this tool, make sure you download and install it properly across your smartphone. Launch it and click on “New Project” to initiate a new video project. On the next screen, lead into the “Video” section and import your recorded video that is to be looped.
Step2 As the video opens up in front of you, click on the “Trim” button at the bottom of the screen. Move your cursor to the point where you want to trim the video. Click on the “Trim” button in the bottom-center of the panel to cut the video across the selected point.
Step3 You can select the unnecessary part of the video and simply tap on the “Delete” button on the farthest right of the panel. With the trimmed video, select it and click on the “Copy” button to make duplicates of the specific part. As you make copies of the video to loop it, you can also add effects in between the parts from the “Effect” icon.
Step4 Once you are done with your Snapchat boomerang video, set the resolution of the output video with the provided option on the top and click on the “Export” button.
Conclusion
Do you love making boomerang videos and want to know how to do a boomerang on Snapchat? Snapchat has introduced its Bounce feature, through which you can create boomerang videos and share them with your friends for fun. To achieve the best results in creating a boomerang video, you can try the smartphone tool known as Filmora. This mobile platform also comprises advanced features that can increase the quality of your boomerang video.
Also read:
- [New] Clandestine Snaps Stealthy Image Recording Hacks for Snapchat
- [New] Discover the Power of Nikon 1J5's 4K Video
- [New] Phonesnapshot Protocols Expert Tips for Mobile Capture on Snapchat
- [New] Recognizing Unseen Snaps on Social Network
- [Updated] 2024 Approved Avoid Snappy Disappointments Streaking Wisdom
- [Updated] 2024 Approved TikTok Vs. Snapchat A Comprehensive Comparison Guide
- [Updated] Boosting Connections on Snapchat Master the Art of Sharing GIFs
- [Updated] Priority Picks High-Rated Graphics Cards for Seamless Playback for 2024
- Effective Marketing Strategies & Budget Allocation: Diving Into 2011-2012 with Channel Optimization and Social Media Integration Using MassMail
- Forgot iPhone 8 Plus Password? – Here are the Best Solutions | Stellar
- Handheld Enlightenment with ROG Ally Fix-It X
- In 2024, Forgot Pattern Lock? Heres How You Can Unlock Motorola G54 5G Pattern Lock Screen
- In 2024, From Basic Snaps to Spectacular Shots Snapchat's Edits for Everyone
- Passos Detalhados Para Transferir Sua Imagem De Sistema Para Outro Hardware: Tutoriais Abrangentes
- Understanding Windows iSCSI: The Basics Explained
- Title: [New] Securing Your Snapchat Memories Mobile Recorders' Guide for 2024
- Author: Scott
- Created at : 2024-11-30 21:15:19
- Updated at : 2024-12-05 11:35:46
- Link: https://snapchat-videos.techidaily.com/new-securing-your-snapchat-memories-mobile-recorders-guide-for-2024/
- License: This work is licensed under CC BY-NC-SA 4.0.