![[New] In 2024, Gain Recovery of Personal Snapshots](https://www.lifewire.com/thmb/m0kpslEgrnZU3NyfOpkK0bna68A=/400x300/filters:no_upscale():max_bytes(150000):strip_icc()/Textingonphone_TomWerner_Getty_2-62b312ba24ad42a5b0bbc0c0c0ac1ddb.jpg)
[New] In 2024, Gain Recovery of Personal Snapshots
Gain Recovery of Personal Snapshots
Have you ever set some of your Snapchat pictures to “My Eyes Only” and then accidentally deleted them? Well, it’s happened to the best of us. Whether it’s a hilarious Snap streak with your best friend or a cute photo of your pet, losing important data can be frustrating.
But don’t worry, there’s a way to recover them! In this article, we’ll show you how to recover “My Eyes Only” pictures on Snapchat. We’ll also discuss how you can change or retrieve your password if you’ve forgotten it.
Part 1. How To Recover Photos Deleted From “My Eyes Only” on Snapchat
- Method 1. Recovering The Photos Via Snapchat - For iOS and Android
- Method 2. Using File Browser - For Android
Have you accidentally deleted a photo from your “My Eyes Only” album on Snapchat, and you’re now panicking because you think it’s gone forever? Don’t worry: with our two step-by-step methods provided below, you will surely retrieve your deleted snaps.
Method 1. Recovering The Photos Via Snapchat - For iOS and Android
The first method to recover My Eyes Only pictures on Snapchat is via the Privacy tab. Although it is a bit of a long process, this is surely going to work.
Here’s a quick and simple rundown of how you can recover your photos via Snapchat on your iOS and Android device:
Step1 Launch the Snapchat app on your device and sign in to your account. On the top left side of the screen, click your profile icon.
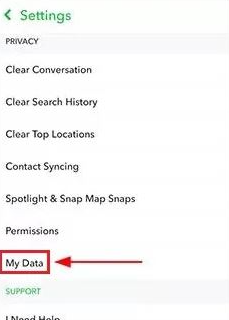
Step2 Tap the Setting icon and scroll down to the Privacy tab.

Step3 Under the Privacy tab, find the “My Data” option and tap it.
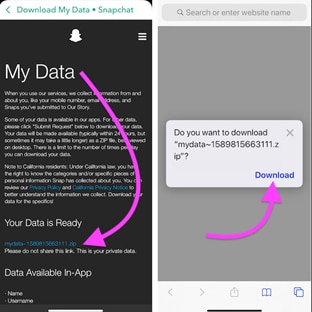
Step4 Log in to your Snapchat account once again, submit your request for data recovery from Snapchat’s server and download it.
![]()
Note: Keep in mind that only the snaps saved in your memory roll will be revived by this method.
Method 2. Using File Browser - For Android
You can also recover your My Eyes Only snapshots from the File Manager on your device. However, this solution only works on Android devices because iPhones do not provide all access to apps for your data safety.
Step1 Launch the File browser or File app on your device.
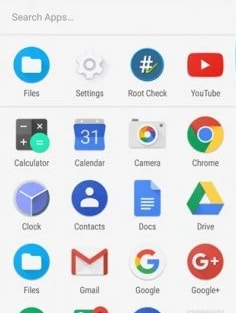
Step2 Head to “Data,” find the “Snapchat data or com.snapchat.android” file, and tap to open it.
Step3 Now, find a file with the “a .nomedia” extension, delete it, and the data will be restored to your Snapchat account.
![]()
Note: This method is only effective for a brief amount of time. Therefore, to recover your deleted Snaps, you should follow this method as soon as possible after they are deleted.
Apart from reading the methods we provided for your, you can also watch this video tutorial to help you recover My Eyes Only pictures quickly.
Part 2. A Bonus Tip: What If You Forget The Password Of My Eye Only
If you’ve ever forgotten the password to your “My Eye Only” on Snapchat, don’t worry; below, we’ve provided a few easy-to-follow instructions to help you quickly reset the password.
![]()
Note: If you opt to reset your current passcode, everything presently saved to My Eyes Only will be lost!!
How To Reset My Eyes Only Password?
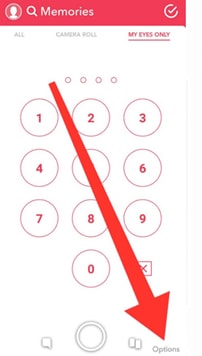
Step1 Open the Snapchat app on your Android or iOS device and tap the overlaid Photos icon to head to the Memories section. Next, go to the “My Eyes Only” tab.
Step2 Tap “Options” at the lower right corner of the screen and select “Forgot Password.”
Step3 Type your Snapchat password and tap “Next.” Accept the rules and tap “Continue” to proceed further.
Step4 Reset the password and tap “Confirm” to apply your changes.
FAQs
How To Change My Eyes Only Password?
If you still remember the present password but want to change it, do the following steps to change the “My Eyes Only” password:
Step1 Open the Snapchat app, head to the Memories section, and tap the “My Eyes Only” tab.
Step2 Tap “Option”> “Change Password” and type your current “My Eyes Only” password to continue.
Step3 Type your new PIN and tap “Next.” Tap the “Use Passphrase” option if you do not want to set a PIN code.
Step4 Tap the box next to “I understand that if …” and tap “Continue.” Finally, tap “Finish” to complete the process.
How Do I Move Snaps To My Eyes Only?
Here’s how you can move Snaps to the “My Eyes Only” section on Snapchat:
Step1 Open the Snapchat app on your phone and go to the Memories section.
Step2 Choose the snap you want to move, tap and hold it.
Step3 Select “My Eyes Only” to move your snap.
How Do I Set Up My Eyes Only?
To set up “My Eyes Only” on Snapchat, do the following steps in sequence:
Step1 Head to the Memories section in Snapchat and tap the “My Eyes Only” tab.
Step2 Under the My Eyes Only tab, tap the “Quick Setup” option.
Step3 Create a passphrase or PIN and confirm it. Now, check the box next to “I understand that…,” select “Continue,” and tap the “Finish“ option to complete the setup process.
How Do I Save Snaps To My Eyes Only By Default?
To save your Snaps to My Eyes only by default, follow these instructions step-by-step:
Step1 Open your Snapchat account and tap your Profile icon.
Step2 Tap the Settings icons at the top right-hand side of the screen and head to Memories.
Step3 Now, tap the toggle button next to “Save to My Eyes Only By Default” to change the settings. Your snaps will now save to the My Eyes Only section every time.
Conclusion
In this article, we’ve provided two step-by-step methods to help you recover My Eyes Only pictures on Snapchat on your iOS or Android device**.** We’ve also discussed how you can change or recover the My Eyes Only password with easy-to-follow instructions.
All in all, it is possible to recover your “My Eyes Only” pictures from Snapchat. While the process may be a little bit time-consuming, it is definitely worth it if you value your privacy. So, if you ever find yourself in this predicament, don’t despair - there is hope!
Be sure to follow the instructions carefully, and hopefully, you’ll be able to get your photos back!
Free Download For Win 7 or later(64-bit)
Free Download For macOS 10.14 or later
Method 2. Using File Browser - For Android
You can also recover your My Eyes Only snapshots from the File Manager on your device. However, this solution only works on Android devices because iPhones do not provide all access to apps for your data safety.
Step1 Launch the File browser or File app on your device.
Step2 Head to “Data,” find the “Snapchat data or com.snapchat.android” file, and tap to open it.
Step3 Now, find a file with the “a .nomedia” extension, delete it, and the data will be restored to your Snapchat account.
![]()
Note: This method is only effective for a brief amount of time. Therefore, to recover your deleted Snaps, you should follow this method as soon as possible after they are deleted.
Apart from reading the methods we provided for your, you can also watch this video tutorial to help you recover My Eyes Only pictures quickly.
Part 2. A Bonus Tip: What If You Forget The Password Of My Eye Only
If you’ve ever forgotten the password to your “My Eye Only” on Snapchat, don’t worry; below, we’ve provided a few easy-to-follow instructions to help you quickly reset the password.
![]()
Note: If you opt to reset your current passcode, everything presently saved to My Eyes Only will be lost!!
How To Reset My Eyes Only Password?
Step1 Open the Snapchat app on your Android or iOS device and tap the overlaid Photos icon to head to the Memories section. Next, go to the “My Eyes Only” tab.
Step2 Tap “Options” at the lower right corner of the screen and select “Forgot Password.”
Step3 Type your Snapchat password and tap “Next.” Accept the rules and tap “Continue” to proceed further.
Step4 Reset the password and tap “Confirm” to apply your changes.
FAQs
How To Change My Eyes Only Password?
If you still remember the present password but want to change it, do the following steps to change the “My Eyes Only” password:
Step1 Open the Snapchat app, head to the Memories section, and tap the “My Eyes Only” tab.
Step2 Tap “Option”> “Change Password” and type your current “My Eyes Only” password to continue.
Step3 Type your new PIN and tap “Next.” Tap the “Use Passphrase” option if you do not want to set a PIN code.
Step4 Tap the box next to “I understand that if …” and tap “Continue.” Finally, tap “Finish” to complete the process.
How Do I Move Snaps To My Eyes Only?
Here’s how you can move Snaps to the “My Eyes Only” section on Snapchat:
Step1 Open the Snapchat app on your phone and go to the Memories section.
Step2 Choose the snap you want to move, tap and hold it.
Step3 Select “My Eyes Only” to move your snap.
How Do I Set Up My Eyes Only?
To set up “My Eyes Only” on Snapchat, do the following steps in sequence:
Step1 Head to the Memories section in Snapchat and tap the “My Eyes Only” tab.
Step2 Under the My Eyes Only tab, tap the “Quick Setup” option.
Step3 Create a passphrase or PIN and confirm it. Now, check the box next to “I understand that…,” select “Continue,” and tap the “Finish“ option to complete the setup process.
How Do I Save Snaps To My Eyes Only By Default?
To save your Snaps to My Eyes only by default, follow these instructions step-by-step:
Step1 Open your Snapchat account and tap your Profile icon.
Step2 Tap the Settings icons at the top right-hand side of the screen and head to Memories.
Step3 Now, tap the toggle button next to “Save to My Eyes Only By Default” to change the settings. Your snaps will now save to the My Eyes Only section every time.
Conclusion
In this article, we’ve provided two step-by-step methods to help you recover My Eyes Only pictures on Snapchat on your iOS or Android device**.** We’ve also discussed how you can change or recover the My Eyes Only password with easy-to-follow instructions.
All in all, it is possible to recover your “My Eyes Only” pictures from Snapchat. While the process may be a little bit time-consuming, it is definitely worth it if you value your privacy. So, if you ever find yourself in this predicament, don’t despair - there is hope!
Be sure to follow the instructions carefully, and hopefully, you’ll be able to get your photos back!
Free Download For Win 7 or later(64-bit)
Free Download For macOS 10.14 or later
The Ultimate Guide to Photo Perfection on Snapchat
Since its inception in 2011, Snapchat has steadily evolved into one of the best social media platforms over time, with over 347 million daily active users today. And it’s not just millennials who are using the app - Snapchat is popular with people of all ages.
But have you ever wondered and thought about how people get those amazing images on Snapchat? Well, wonder no more! In this article, we’re going to show you how to edit photos on Snapchat so that you can make them look even better!

Therefore, without any further delay, let’s dive in!
Part 1. What are Snapchat’s Image Editing Tools?
If you desire to add some extra flair to your photos, Snapchat’s image editing tools are a great way to do it. These tools let you add filters, stickers, and other effects to your photos and videos.
Snapchat photo editing tools are easy-to-use and can help you turn dull pictures into something fun and interesting. You can even edit images that were not originally taken on Snapchat.
Want to know how? Keep reading to find out what is behind the curtain!
Part 2. How to Edit Pictures Taken from the Camera Roll
Have you taken a photo but don’t think it’s worth sharing with the public and want to edit it? Don’t worry; Snapchat has got you covered!
A Quick Guide:
- How to Add Pictures from Your Camera Roll to Snapchat
- How To Edit Photos On Snapchat
- How To Add Stickers To Your Images?
- How to Use the Snapchat Text Tool
- How to Draw on your Images
- How To Add A Theme
- How To Attach A URL
- How To Crop Images On Snapchat
- How to Set a Time Limit
How to Add Pictures from Your Camera Roll to Snapchat
Here’s a quick rundown of how to add pictures from your camera roll to Snapchat:
Step1 Open the Snapchat app on your device and tap the “Two Overlayed Pictures” icon beside the Camera button.

Step2 This will take you to Memories. Click the Camera Roll tab, scroll the pictures to add the one you want, and tap it.

Step3 Now, you can send the picture to your friends, add it to your story, or edit it to create a masterpiece.
How To Edit Photos On Snapchat
Now that you’ve added your picture from the Camera roll, follow the steps below to edit it using the Snapchat image editing tools:
Step1 Click the Edit icon at the bottom-right of the selected picture. To add text, click the T icons, type whatever you want, select color by dragging the icon in the color pane and add the text style.

Step2 If you want to draw something on your picture, use the pencil icon. The draw function offers color panes, an emojis pen, and a color picker.
Step3 You can also use the Scissor icon to cut a portion of your picture and create a sticker or add a URL to your image using the paperclip icon.
Step4 To set a time limit on your snap, click the Clock icon and set the limit. Finally, tap the Done icon to save a copy of the photo, or use the Export icon to share your picture on other social media platforms.
How To Add Stickers To Your Images?
To create your own or add a premade sticker to your picture, do the following steps in sequence:
Step1 Tap the paper icon to the right side of your selected picture. This will take you to the Snapchat stickers library.
Step2 Since the stickers are placed in different categories, including recently used, popular, Bitmojis, etc., swipe right/left to get to the desired page.
Step3 Next, swipe up and down to find the sticker you want and tap it to add to your picture. To know more about Snapchat filters, read “Top 20 Snapchat Filters & Lenses to Make Your Snaps Special .”

How to Use the Snapchat Text Tool
Want to add a caption or something interesting to your picture? With the following steps, you can easily add any text to your photos while editing them on Snapchat:
Step1 Tap the “T” icons at the top-right side of the screen to open the Text tool.
Step2 Type your text and use the font gallery to change the text style. Tap the Align option to set the alignment of your text.
Step3 Next, use the color meter to change the font color. Tap the white icon on the color bar and drag it to select your preferred color. Finally, tap the Back icon at the top-left of the screen to apply the text.

How to Draw on your Images
Snapchat comes with a drawing tool that you can use to add a personal touch to your photos or create fun and unique designs in the following way:
Step1 On your selected picture, tap the Pencil icon to open the drawing tool. Drag your finger on the Color meter to select the color.
Step2 Tap the Color wheel to change the color palette and then choose the color you want. To draw emojis on your picture, tap the Emoji icon and select the one you want to use.
Step3 Finally, use your finger to draw on the picture. You can use the Undo icon to take back any action that goes wrong.

How To Add A Theme
Adding a theme to your images on Snapchat is a great way to add some personality and style. Here’s how you can do this:
Step1 Tap the Paintbrush icon from the Snapchat editing tools at the left of your picture.
Step2 Search for the theme using the Search box or scroll up and down to find the one you like.
Step3 Select the theme you want and tap on it to add to your photo. Keep in mind that Snapchat only adds themes to the original images, not from the Camera Roll.
How To Attach A URL
Do you want to share a clickable website URL on your story to help your audience know the true meaning and concept behind the image? The Snapchat URL tool can help you!
Here’s a quick and easy breakdown of the steps to attach a URL to your pictures:
Step1 On your selected picture, click the Paperclip icon to launch the URL tool.
Step2 Type your URL in the search field, and tap Enter on your keyboard.
Step3 Snapchat will open the website for your review. Tap the “Attach to Snap” option and adjust the link on your picture.
How To Crop Images On Snapchat
The following steps can help your crop images on Snapchat:
Step1 Tap the Crop icon below the Paperclip option on your selected picture.
Step2 Use your fingers to adjust the picture size and remove unwanted areas. You can also use the Rotation icon to rotate your image.
Step3 Finally, tap the blue Check icon to save your cropped image.

If you want to learn how to zoom your videos or images on Snapchat, click here to find out!
How to Set a Time Limit
You can set a time limit on your photo to limit their visibility while editing it on Snapchat. To do so, follow the below instructions step-by-step:
Step1 To set the time limit on your picture, tap the Clock icon from the Snapchat photo editing tools on the right side of the screen.
Step2 Swipe up and down to select the time limit and tap it.
Step3 Finally, tap the Clock icon at the top right side of the screen to apply the time limit.

Part 3. How to Save Snaps for Later Sharing
When you take a Snap, you can directly send it to your friends. But sometimes, you want to keep a Snap around for a while before sharing it. Maybe you want to edit it first, or you want to wait for the perfect moment to share it.
Whatever the reason, there are two scenarios in which you can save your Snaps for later sharing:
A Quick Guide:
Saving the Original Snapchat Pictures
Here’s how you can save the original Snaps as a Snapchat user:
Step1 Launch the Snapchat app and take a picture.
Step2 Tap the Save icon in the lower left-hand corner of the screen.
Step3 Tap the “Save image.”

Saving the Edited Camera Roll’s Pictures
Follow the instructions below to save your edited Camera Roll pictures on Snapchat:
Step1 Once you’ve edited your picture, tap the Done option.
Step2 Tap “Save as Copy,” and your picture will be saved to your gallery.
Step3 Alternatively, you can tap the Export option and select “Download” to save the image to your phone’s Gallery.
A Bonus Tips: How to Save Snapchat Videos with Apps on Android and Mac
Do you want to record your Snapchat stories like a movie or slideshow on Android or Mac? Well, you can save your Snapchat videos using apps or software programs.
For your Mac system, we recommend using Filmora - an easy-to-use video editing software with an excellent recording feature. With this tool, you can record the full screen, part of it, or a specific window on your system.
Free Download For Win 7 or later(64-bit)
Free Download For macOS 10.14 or later
For Android, download the AZ video recorder - an app that does not require any root access and lets you record your screen with a high resolution and frame rate. To learn more, click here!
Conclusion
In this article, we’ve explained how to edit photos on Snapchat with simple and easy-to-follow instructions. We’ve discussed adding stickers, text, URL, time limit, theme, and cropping the image to remove unwanted sections from it.
Hopefully, you’ll find this step-by-step guide helpful and can now use Snapchat photo editing tools without any issues.
Also read:
- [New] 2024 Approved Step-by-Step Adding Snap Camera to Teams Chats
- [New] A Step-by-Step Guide to Microsoft Teams Snap Photos for 2024
- [New] Boosting Income via Social Media Snapchat's Methods
- [New] Bridging Art and Technology A Comprehensive Guide to the Top 10 Websites for Graffiti Fonts
- [New] In 2024, AudioVid Synergy Community Online
- [New] In 2024, Comparing Snapchat & TikTok The Ultimate Guide
- [New] In 2024, Innovative Ideas to Make Money From Your Snapchat Community
- [New] Thrifty Tips for Hosting Webinars on YouTube
- [New] Unlocking Potential in Snaps Maximizing Your Marketing Impact
- 2024 Approved Screen Recorder Showcase Apowersoft's Place in the Market
- Explore Unlimited Access to FCP
- Exploring the Moto G Play - A Look at Its Long-Lasting Battery Life and Reliable Performance
- In 2024, Become a SnapBoom Expert in Minutes
- The Complete Book of Healing | Free Book
- Updated In 2024, Combine Videos Without Restrictions 7 Best Watermark-Free Tools
- Title: [New] In 2024, Gain Recovery of Personal Snapshots
- Author: Scott
- Created at : 2025-01-23 20:49:44
- Updated at : 2025-01-30 16:48:55
- Link: https://snapchat-videos.techidaily.com/new-in-2024-gain-recovery-of-personal-snapshots/
- License: This work is licensed under CC BY-NC-SA 4.0.