![[New] In 2024, Discover Effortless Pathways to Dynamic Snaps](https://thmb.techidaily.com/836b19a99b81c291189dfbcf8add59f634c1fb8aacdfd70319b10cdaec65e638.jpg)
[New] In 2024, Discover Effortless Pathways to Dynamic Snaps
Discover Effortless Pathways to Dynamic Snaps
How to Create Snapchat Lenses Easily: 2 Methods

Ollie Mattison
Mar 27, 2024• Proven solutions
Are you feeling like creating your own Snapchat lens, so you can have an even better experience with the app? The good news is that two new Snapchat tools have been released – the Lens Studio and Create Your Own Lens applications.
If you are a regular Snapchat user, you may want to learn about the Snapchat lens and how it can help you. We will help you get started. Here is our step by step guide on how to make Snapchat lenses.
- Part1: Comparing Lens Studio and Creating Your Own Lens
- Part2: How to Use Lens Studio
- Part3: How to Create Snapchat Lenses Using Create Your Own Lens
Part 1: Comparing Lens Studio and Creating Your Own Lens
The two programs that we are highlighting today are Lens Studio and Create Your Own Lens. These are both fantastic programs for creating your own Snapchat lens, but they do have slightly different uses. If you are the type of person who wants to design a professional Snapchat lens, you are going to prefer Lens Studio.
But if you are hoping to come up with something creative that you can share with your friends and family, then you may love Create Your Own Lens. It is a very easy program to use, and it offers a ton of features that you may be surprised to see.
Snapchat lenses is for fun
The beauty of Snapchat lenses is that you can now create your own environment, which you can use each time you are taking photos or videos. Sure, you can always use the filters that are already available in the application, but not everyone would find those enough.
If you want some customization, or you just want to mess around until you get the filter that makes sense for you, Snapchat lenses are the way to go.
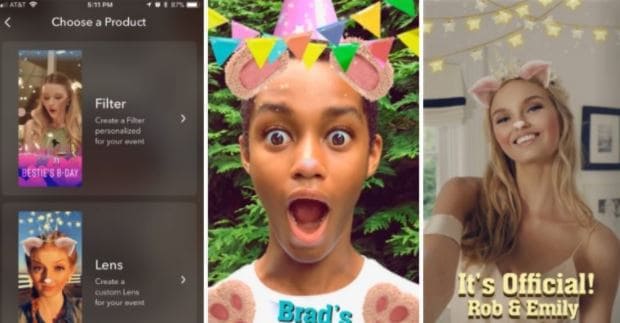
Lens Studio is for business
Lens Studio is perfect for businesses that may want to create unique environments for their clients, or the times when they are releasing company Snapchat posts. Say the company is hosting an event. They may want a custom graphic for that event, which is used for all the pictures and videos posted to Snapchat about the event. Using Lens Studio lets them do that with ease.
Create Your Own Lens is great when you are going to a special event, birthday party or graduating, and you want a special graphic that comes up in all your snaps. It is very intuitive to use, and is available through the App Store as a download.
Part 2: How to Use Lens Studio
1. Download Lens Studio
The first step involves downloading Lens Studio, which you can do from your computer. It is compatible with both Windows and Mac computers, and will run on any semi-modern system. According to the Snapchat team, Lens Studio is similar to the program used by their AR teams to create lenses. That means you are getting similar functionality, but with an easier to manage interface.
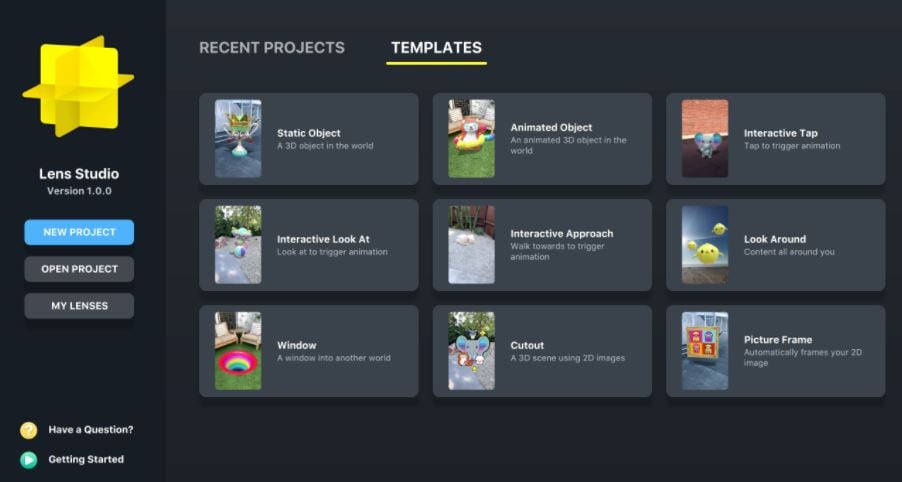
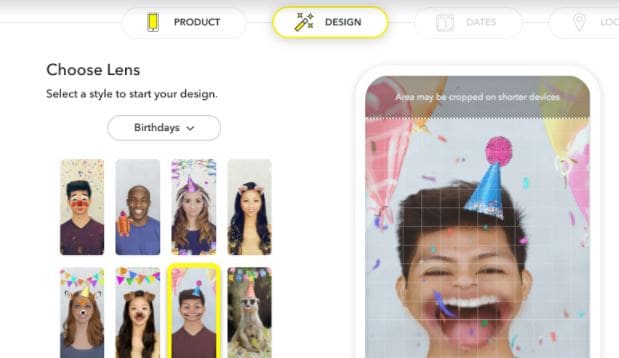
2. Choose Templates Page
It is normal to feel a little overwhelmed the first time you try and use this program. But that is why the templates page is so great. You can select from templates depending on the type of lens that you are hoping to create. You can just use a template, or you can incorporate your own ideas to customize the template.
There is also a Lens Studio Overview guide that you can access online, which will help you get acquainted with the program’s various features and quirks.
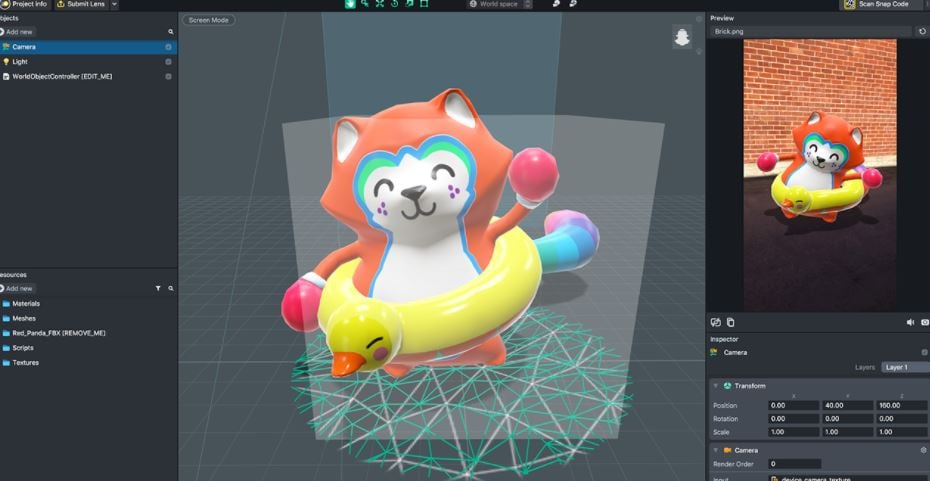
3. Use Studio Panels
Are you ready to create your own custom Snapchat lens? It is time to head over to Studio Panels on the application. This is the area where you can add your own 2D or 3D objects, and you can visualize how they would look as a Snapchat filter. You can add, remove, resize and drag objects to specific areas of the screen.
There are other tools accessible from the Resources panel. You can use these tools to ensure that your Snapchat lens is exactly as you want.
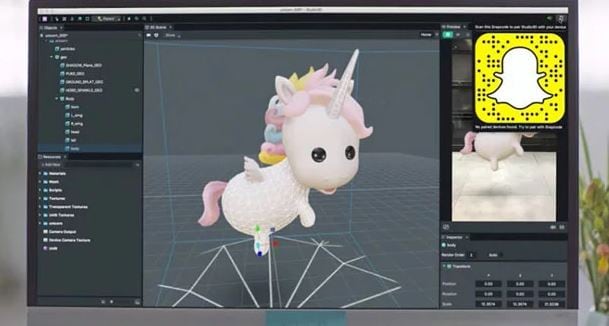
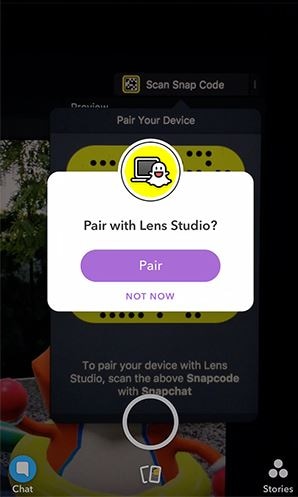
4. Preview the Snapchat Lens You Create
The great thing about this application is that you can preview the lens before you send it out to your phone. When you are satisfied with the image on the preview, you can pair your phone with the application, and you will be able to send that Snapchat lens onto your phone through your Snapcode. It is that simple!
Part 3: How to Create Snapchat Lenses Using Create Your Own Lens
- There are two ways that you can access the tool for creating fun Snapchat lenses. You can either visit the website snapchat.com/create, or you can go on the “filters and lenses” section on your iOS device. If you are using Snapchat on an Android device, you will only have the option for the website. But the feature is coming to the Android version of Snapchat very soon.
- When you are in the application or on the website, you may start to look at the different templates for Snapchat lenses. Now you can add other items into the templates, such as photographs, text or graphics.
It is all up to your imagination. You can create the perfect Snapchat lens, which you can then send into your Snapchat account through your Snapcode. Of course, if you are using your iOS device to create the lens, it is already linked to your account.
Another cool feature is how you can set the location for where the Snapchat lens is available. Say you are hosting a party. You can have the Snapchat lens available to everyone who uses Snapchat within a set square footage of your home. That is an amazing way to let everyone share social media pictures and photos of your party, through the lens you created.
Conclusion
Creating Snapchat lenses has never been easier. Whether you are a business looking to add a custom lens, or you just want to create a fun lens for a graduation or party, there are tools that make the job very easy. Using these tools will allow you to create the perfect Snapchat lens for any occasion.
Ollie Mattison
Ollie Mattison is a writer and a lover of all things video.
Follow @Ollie Mattison
Ollie Mattison
Mar 27, 2024• Proven solutions
Are you feeling like creating your own Snapchat lens, so you can have an even better experience with the app? The good news is that two new Snapchat tools have been released – the Lens Studio and Create Your Own Lens applications.
If you are a regular Snapchat user, you may want to learn about the Snapchat lens and how it can help you. We will help you get started. Here is our step by step guide on how to make Snapchat lenses.
- Part1: Comparing Lens Studio and Creating Your Own Lens
- Part2: How to Use Lens Studio
- Part3: How to Create Snapchat Lenses Using Create Your Own Lens
Part 1: Comparing Lens Studio and Creating Your Own Lens
The two programs that we are highlighting today are Lens Studio and Create Your Own Lens. These are both fantastic programs for creating your own Snapchat lens, but they do have slightly different uses. If you are the type of person who wants to design a professional Snapchat lens, you are going to prefer Lens Studio.
But if you are hoping to come up with something creative that you can share with your friends and family, then you may love Create Your Own Lens. It is a very easy program to use, and it offers a ton of features that you may be surprised to see.
Snapchat lenses is for fun
The beauty of Snapchat lenses is that you can now create your own environment, which you can use each time you are taking photos or videos. Sure, you can always use the filters that are already available in the application, but not everyone would find those enough.
If you want some customization, or you just want to mess around until you get the filter that makes sense for you, Snapchat lenses are the way to go.
Lens Studio is for business
Lens Studio is perfect for businesses that may want to create unique environments for their clients, or the times when they are releasing company Snapchat posts. Say the company is hosting an event. They may want a custom graphic for that event, which is used for all the pictures and videos posted to Snapchat about the event. Using Lens Studio lets them do that with ease.
Create Your Own Lens is great when you are going to a special event, birthday party or graduating, and you want a special graphic that comes up in all your snaps. It is very intuitive to use, and is available through the App Store as a download.
Part 2: How to Use Lens Studio
1. Download Lens Studio
The first step involves downloading Lens Studio, which you can do from your computer. It is compatible with both Windows and Mac computers, and will run on any semi-modern system. According to the Snapchat team, Lens Studio is similar to the program used by their AR teams to create lenses. That means you are getting similar functionality, but with an easier to manage interface.
2. Choose Templates Page
It is normal to feel a little overwhelmed the first time you try and use this program. But that is why the templates page is so great. You can select from templates depending on the type of lens that you are hoping to create. You can just use a template, or you can incorporate your own ideas to customize the template.
There is also a Lens Studio Overview guide that you can access online, which will help you get acquainted with the program’s various features and quirks.
3. Use Studio Panels
Are you ready to create your own custom Snapchat lens? It is time to head over to Studio Panels on the application. This is the area where you can add your own 2D or 3D objects, and you can visualize how they would look as a Snapchat filter. You can add, remove, resize and drag objects to specific areas of the screen.
There are other tools accessible from the Resources panel. You can use these tools to ensure that your Snapchat lens is exactly as you want.
4. Preview the Snapchat Lens You Create
The great thing about this application is that you can preview the lens before you send it out to your phone. When you are satisfied with the image on the preview, you can pair your phone with the application, and you will be able to send that Snapchat lens onto your phone through your Snapcode. It is that simple!
Part 3: How to Create Snapchat Lenses Using Create Your Own Lens
- There are two ways that you can access the tool for creating fun Snapchat lenses. You can either visit the website snapchat.com/create, or you can go on the “filters and lenses” section on your iOS device. If you are using Snapchat on an Android device, you will only have the option for the website. But the feature is coming to the Android version of Snapchat very soon.
- When you are in the application or on the website, you may start to look at the different templates for Snapchat lenses. Now you can add other items into the templates, such as photographs, text or graphics.
It is all up to your imagination. You can create the perfect Snapchat lens, which you can then send into your Snapchat account through your Snapcode. Of course, if you are using your iOS device to create the lens, it is already linked to your account.
Another cool feature is how you can set the location for where the Snapchat lens is available. Say you are hosting a party. You can have the Snapchat lens available to everyone who uses Snapchat within a set square footage of your home. That is an amazing way to let everyone share social media pictures and photos of your party, through the lens you created.
Conclusion
Creating Snapchat lenses has never been easier. Whether you are a business looking to add a custom lens, or you just want to create a fun lens for a graduation or party, there are tools that make the job very easy. Using these tools will allow you to create the perfect Snapchat lens for any occasion.
Ollie Mattison
Ollie Mattison is a writer and a lover of all things video.
Follow @Ollie Mattison
The Ultimate Guide to Drawing Characters with Snaps
How to Use Cartoon Face Lens in Snapchat?

Shanoon Cox
Mar 27, 2024• Proven solutions
The social media apps keep updating themselves and always keep their users thrilled and engaged with the new updates. People love to take selfies, and how exciting it would be, if the selfie turns into Disney and Pixar-style cartoon characters?
Back in 2020, Snapchat released the lens for Disney. Initially, it was tried on pets by the TikTok users, and people loved it. Later, looking to the response on the Disney lens, Snapchat released another filter as Voila AI Artist. Send a snap with the cartoon face lens to get the best response on your click. Also, the Snapchat cartoon face filter is so much famous on Instagram and Facebook.
Is your cellphone camera not good enough? Are you worried about that? You don’t need to now, as the Snapchat lens would help you get various lenses and filters to give you the best clicks. Try out the best lens which you love and get the best images.
Please don’t go away; here, we will get to know about the Snapchat cartoon filter.
- Part 1: What is Snapchat’s Cartoon Lens?
- Part 2: How to Find and Use Snapchat’s Cartoon Lenses?
- Part 3: How to Send a Snap Using the Cartoon Face Lens?
- Part 4: Best App for Disney and Pixal Effect
- Part 5: Differences between Snapchat Cartoon Lens and Anime Filter
Part 1: What is Snapchat’s Cartoon Lens?
Snapchat always keeps on giving the surprise to their users and maintain the selfie crazy on the social media. There are three types of the cartoon lens which is attracting the users and is the latest trend.
- Snapchat Cartoon face Lens - developed and launched way back in August 2020
- Snapchat Cartoon Lens – Quite similar to the Cartoon Face, but the most fantastic thing is it converts your face to a Disney-style character.
- Snapchat Cartoon 3D Style Lens: The most famous Cartoon 3D Style was launched in June 2021 with a Pixar-like funny appearance. Couples love this the most.
Part 2: How to Find and Use Snapchat’s Cartoon Lenses?
Snapchat allows you to use the cartoon lens and send a snap with the cartoon face lens. Ensure you have good internet to get the Snapchat installed first and follow below easy steps below to get your favorite cartoon selfie.
- Open the latest version of Snapchat, and then go to the Camera screen, opt for the smiling face icon as per below.
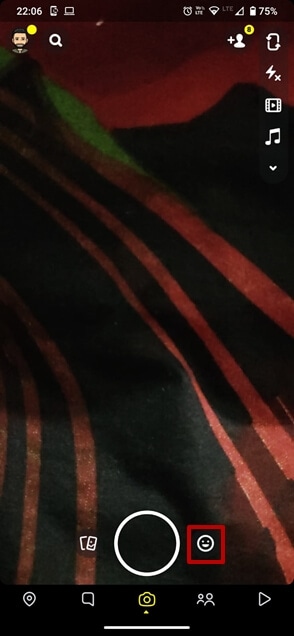
- You need to get to the cartoon lens and hence, click “explore” from the bottom right of the screen.
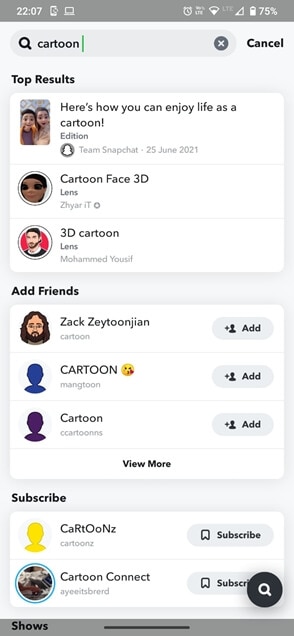
- There are a lot of options and lens; therefore, search for the “cartoon” word. Since there are many cartoon lens, make sure that you have selected the right one developed by Snapchat team. Of course, you can try the cartoon lens created by other creators.
That’s it. You are done. The wait is over. Push the camera button and start taking your video with Snapchat cartoon filter.
Still, if you face difficulty getting the lens for yourself, this link will help you download the cartoon lens and enjoy your video. Further, you can save it or send the stories to your friends. Using the funny lens was never so easy and is so much fun.
Part 3: How to Send a Snap Using the Cartoon Face Lens?
From the above points, you now might know how to get the cartoon lens on the screen. Take the image and video that would make you happy. And now you will be excited to know how it is from your family or friends by sending them the cartoon face Snapchat. But have you added your friends or family members as friends? Make sure to add them to your list or the group, allowing you to send the snap.
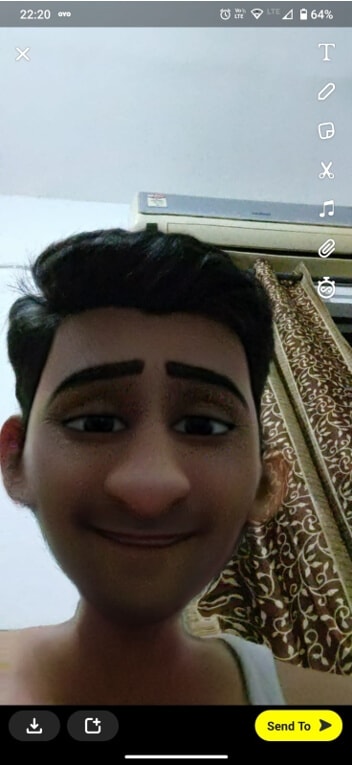
Once you take your snap, click the Send to option on the bottom of the screen to send the snap. Now you will see the list of your added friends or the groups. Tap the friend whom you want to send the snap and tap send.
Your snap has now reached your friends, and you can develop a streak with them. If you send a snap with the cartoon face lens daily to your friends, it will create a specific chain referred to as streak. You can make the streak with them for as long as you can, which means you need to use Snapchat daily. More friends, more fun. The different groups would allow you to stay in touch with more people, and also, you can share the snap with them at one go.
Part 4: Best App for for Disney and Pixal Eeffect
Snapchat is one of the most famous apps which allows the users to take the snap, exchange pictures, and the videos. The Disney Pixar Filter is exclusive on Snapchat. Though you find many similar apps copying the Snapchat filters, the original seems beautiful. You can search the Snapchat cartoon filter 3D style from the search options. Select the filer and click amazing pictures.
Voila Al Artist Carton Photo turns the image into the fantastic pictures of Disney and the Pixal effects. This is the best app giving the Disney and pixal effect specially designed with the help of human capability and artificial intelligence. You can easily take selfies, pictures, and videos with a unique look. If you have the version of 12.0 and Later on iOS , you can easily use this app and click amazing images. Moreover, it only requires 273.6 MB of storage space on iOS.
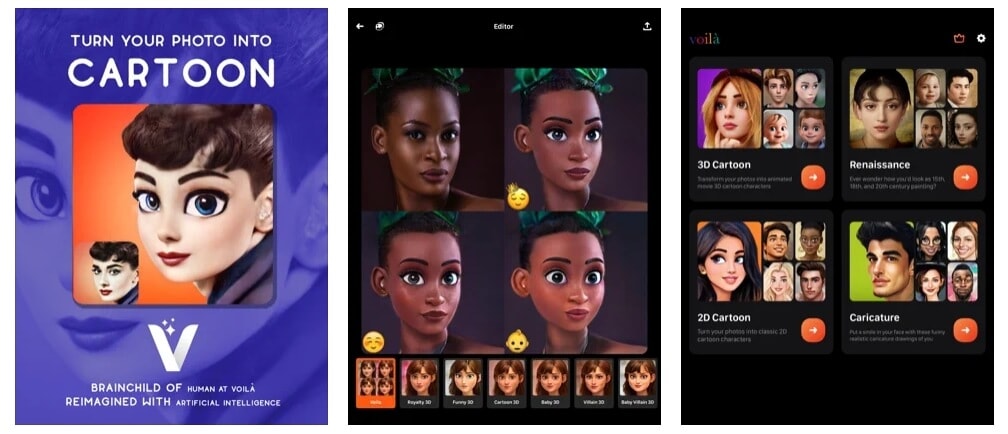
Voila Al Artist is also available on Android , quickly turning the images into cartoon replicas of faces. You can never get tired of this photo app as there are many themes available in the app which can increase your excitement.
The best thing about the Voila Al Artist app is, you can get the app for free. You can use the app on any version of Android. It doesn’t matter if your camera lens is not that good and equipped with high pixels; the Voila Al Artist photo app will make your day with unique photos. If you get tired of the advertisement, you can go for the subscription and enjoy the cartoon selfies.
Part 5: What are the differences between Snapchat Cartoon Lens and Anime Filters ?
Essentially, the difference between a filter and a lens is that the lens is an augmented reality animation, while the filter is a static image overlay.
To Distinguish the difference between Snapchat filters and lenses: Snapchat filters are static and located on top of images or videos. On the other hand, Snapchat lenses are augmented reality animations that can change your voice in addition to changing your appearance on the screen.
Conclusion
Snapchat is primarily known for its lens and filters. Many other apps even try to copy the filers but certainly couldn’t make it up. To develop the longest streak with your friends, you need to use Snapchat daily. Hence, Snapchat would never get you bored if you have to use it and send a snap with the cartoon face lens daily to friends. The regularly updating lens and the streak will keep you engaged in it every day. The app does not demand much high configuration and high storage. Hence, the app can fit into any individual and is easy to operate.
Shanoon Cox
Shanoon Cox is a writer and a lover of all things video.
Follow @Shanoon Cox
Shanoon Cox
Mar 27, 2024• Proven solutions
The social media apps keep updating themselves and always keep their users thrilled and engaged with the new updates. People love to take selfies, and how exciting it would be, if the selfie turns into Disney and Pixar-style cartoon characters?
Back in 2020, Snapchat released the lens for Disney. Initially, it was tried on pets by the TikTok users, and people loved it. Later, looking to the response on the Disney lens, Snapchat released another filter as Voila AI Artist. Send a snap with the cartoon face lens to get the best response on your click. Also, the Snapchat cartoon face filter is so much famous on Instagram and Facebook.
Is your cellphone camera not good enough? Are you worried about that? You don’t need to now, as the Snapchat lens would help you get various lenses and filters to give you the best clicks. Try out the best lens which you love and get the best images.
Please don’t go away; here, we will get to know about the Snapchat cartoon filter.
- Part 1: What is Snapchat’s Cartoon Lens?
- Part 2: How to Find and Use Snapchat’s Cartoon Lenses?
- Part 3: How to Send a Snap Using the Cartoon Face Lens?
- Part 4: Best App for Disney and Pixal Effect
- Part 5: Differences between Snapchat Cartoon Lens and Anime Filter
Part 1: What is Snapchat’s Cartoon Lens?
Snapchat always keeps on giving the surprise to their users and maintain the selfie crazy on the social media. There are three types of the cartoon lens which is attracting the users and is the latest trend.
- Snapchat Cartoon face Lens - developed and launched way back in August 2020
- Snapchat Cartoon Lens – Quite similar to the Cartoon Face, but the most fantastic thing is it converts your face to a Disney-style character.
- Snapchat Cartoon 3D Style Lens: The most famous Cartoon 3D Style was launched in June 2021 with a Pixar-like funny appearance. Couples love this the most.
Part 2: How to Find and Use Snapchat’s Cartoon Lenses?
Snapchat allows you to use the cartoon lens and send a snap with the cartoon face lens. Ensure you have good internet to get the Snapchat installed first and follow below easy steps below to get your favorite cartoon selfie.
- Open the latest version of Snapchat, and then go to the Camera screen, opt for the smiling face icon as per below.
- You need to get to the cartoon lens and hence, click “explore” from the bottom right of the screen.
- There are a lot of options and lens; therefore, search for the “cartoon” word. Since there are many cartoon lens, make sure that you have selected the right one developed by Snapchat team. Of course, you can try the cartoon lens created by other creators.
That’s it. You are done. The wait is over. Push the camera button and start taking your video with Snapchat cartoon filter.
Still, if you face difficulty getting the lens for yourself, this link will help you download the cartoon lens and enjoy your video. Further, you can save it or send the stories to your friends. Using the funny lens was never so easy and is so much fun.
Part 3: How to Send a Snap Using the Cartoon Face Lens?
From the above points, you now might know how to get the cartoon lens on the screen. Take the image and video that would make you happy. And now you will be excited to know how it is from your family or friends by sending them the cartoon face Snapchat. But have you added your friends or family members as friends? Make sure to add them to your list or the group, allowing you to send the snap.
Once you take your snap, click the Send to option on the bottom of the screen to send the snap. Now you will see the list of your added friends or the groups. Tap the friend whom you want to send the snap and tap send.
Your snap has now reached your friends, and you can develop a streak with them. If you send a snap with the cartoon face lens daily to your friends, it will create a specific chain referred to as streak. You can make the streak with them for as long as you can, which means you need to use Snapchat daily. More friends, more fun. The different groups would allow you to stay in touch with more people, and also, you can share the snap with them at one go.
Part 4: Best App for for Disney and Pixal Eeffect
Snapchat is one of the most famous apps which allows the users to take the snap, exchange pictures, and the videos. The Disney Pixar Filter is exclusive on Snapchat. Though you find many similar apps copying the Snapchat filters, the original seems beautiful. You can search the Snapchat cartoon filter 3D style from the search options. Select the filer and click amazing pictures.
Voila Al Artist Carton Photo turns the image into the fantastic pictures of Disney and the Pixal effects. This is the best app giving the Disney and pixal effect specially designed with the help of human capability and artificial intelligence. You can easily take selfies, pictures, and videos with a unique look. If you have the version of 12.0 and Later on iOS , you can easily use this app and click amazing images. Moreover, it only requires 273.6 MB of storage space on iOS.
Voila Al Artist is also available on Android , quickly turning the images into cartoon replicas of faces. You can never get tired of this photo app as there are many themes available in the app which can increase your excitement.
The best thing about the Voila Al Artist app is, you can get the app for free. You can use the app on any version of Android. It doesn’t matter if your camera lens is not that good and equipped with high pixels; the Voila Al Artist photo app will make your day with unique photos. If you get tired of the advertisement, you can go for the subscription and enjoy the cartoon selfies.
Part 5: What are the differences between Snapchat Cartoon Lens and Anime Filters ?
Essentially, the difference between a filter and a lens is that the lens is an augmented reality animation, while the filter is a static image overlay.
To Distinguish the difference between Snapchat filters and lenses: Snapchat filters are static and located on top of images or videos. On the other hand, Snapchat lenses are augmented reality animations that can change your voice in addition to changing your appearance on the screen.
Conclusion
Snapchat is primarily known for its lens and filters. Many other apps even try to copy the filers but certainly couldn’t make it up. To develop the longest streak with your friends, you need to use Snapchat daily. Hence, Snapchat would never get you bored if you have to use it and send a snap with the cartoon face lens daily to friends. The regularly updating lens and the streak will keep you engaged in it every day. The app does not demand much high configuration and high storage. Hence, the app can fit into any individual and is easy to operate.
Shanoon Cox
Shanoon Cox is a writer and a lover of all things video.
Follow @Shanoon Cox
Also read:
- [New] In 2024, Effortless Guide to Exporting and Archiving SnapShot Files
- [New] LiveStream Audio/Video Creators Hub for 2024
- [New] Mac Owners' Guide to Downloading Snapchat
- [New] Mastering Product Reviews for Monetary Rewards on YouTube
- [New] Secrets of the Pros Efficient Snapchat Pinning Techniques for 2024
- [New] Unending Chats - Strategies for Continuous Snapstreaks
- [Updated] 2024 Approved Easy Guide to Blur Background in Google Meet [Laptop and Mobile]
- [Updated] 2024 Approved Mastering Snapchat Photo Edits A Step-by-Step Guide
- 2024 Approved Signs That You've Been Muted by Someone
- 9 Solutions to Fix Process System Isnt Responding Error on Motorola Moto G23 | Dr.fone
- Fixing the Issue: How to Restore Night Light Functionality on Windows 10 & 11
- In 2024, Evaluating the Efficacy of Aurora HDR Technology
- In 2024, From Clouds to Storage Keeping Snapshots on Your Phone
- My Videos Arent Playing on Meizu 21 – What Can I Do? | Dr.fone
- New Free AVI Video Editing Solutions A Top 5 Roundup
- Snapchat Ad 101 Create Stunning & Effective Snapchat Ads for 2024
- Warframe: Fixing the Issue of Frequent Crashes and Stuttering
- Title: [New] In 2024, Discover Effortless Pathways to Dynamic Snaps
- Author: Scott
- Created at : 2025-02-27 21:30:38
- Updated at : 2025-03-03 01:06:05
- Link: https://snapchat-videos.techidaily.com/new-in-2024-discover-effortless-pathways-to-dynamic-snaps/
- License: This work is licensed under CC BY-NC-SA 4.0.