
![[New] How to Save Snapchat Videos with Apps on Android and Mac for 2024](https://thmb.techidaily.com/e6c4e66a053f4adf51b38aa148d1e7f1b0fe37b06c40a2dc84de8d83be8e3fd3.jpg)
[New] How to Save Snapchat Videos with Apps on Android and Mac for 2024
Enhancing Snap Memories with Android and Mac Apps
How to Save Snapchat Videos with Apps on Android and Mac

Ollie Mattison
Mar 27, 2024• Proven solutions
The popular social networking app Snapchat comes with some ephemeral features. This self-deleting feature deters users from saving Snapchat videos of their friends. Snapchat photos, videos, and stories of contacts vanish from storyboard right after you view them.
So, what will you do to save photos or videos from your friends’ Snapchat or Snap Stories long before they are gone? You can take a screenshot, save in flight mode, use your computer, or an app to capture the videos and images.
Through this article, we are going to tell you, how to save Snapchats to your phone to make you watch them later.
- Part1: How to Save Snapchats without them knowing
- Part2: How to save Snapchat videos on Mac
- Part3: How to save Snapchat videos on Android
- Part4: How to save Snapchat videos to your Phone
Part 1: How to Save Snapchats without them knowing
You want to save a friend’s Snaps, but Snapchat immediately alerts them of the screen shot taken. Hence, it is not possible to save other’s pictures or videos in Snapchat in incognito mode. You don’t need apps to save Snapchat to your phone. There is hardly a feasible way to do so without the senders’ knowledge. In such a situation, you can try out the following option – saving Snaps in flight mode.
Here are the steps
- First of all, launch the Snapchat app on your mobile phone and leave it open. Go to your phone’s ‘Settings’ (Android/iPhone) and toggle on the ‘Airplane/Flight’ mode. Airplane/Flight mode disables all the wireless connections, be it network signals or internet related services for your device (Wi-Fi as well as cellular).

- Browse the Snapchat inbox and view the desired Snap that you wish to save, and quickly take a screenshot. Make sure to be quick enough and do it before the Snap expires.
- Now, logout from your Snapchat account right after taking the screenshot. You need to follow the logout process according to your device specific settings. Being in ‘Airplane/Flight’ mode you can’t logout, but click the logout option anyway (this is vital!).

- Here, you need to close the Snapchat app on your mobile phone by swiping out the Snapchat app (up/sideways depending on Android/iPhone) from your device’s force quit screen.
- Toggle off the ‘Airplane/Flight’ mode and wait until your phone connects to the Wi-Fi or mobile network. Now, launch the Snapchat app again and login with the same credentials. The Snaps you have taken screenshots of will still appear as unopened on the storyboard and your friend will have no clue about the Snap being screenshot.
Read More to Get : How to Screenshot on Snapchat without Them Knowing >>
Part 2: How to save Snapchat videos on Mac
After learning to take screenshots of Snaps using the ‘Airplane’ mode, how about saving Snapchat videos on your Mac computer? Yes, you can easily save Snapchat videos using your iPhone and Mac computer. The process involves recording your iPhone’s screen through your Mac as a movie and then saving it. Here is how to do it
- Take and connect your iPhone and Mac computer using a lightning cable. Make sure that they are pre-synced. Now, launch QuickTime Player on your computer and then tap ‘File’ in the finder menu, then ‘New Movie Recording’.

- This will make your Mac’s camera act as the primary camera/recording device. To turn the iPhone as the recording device, go to the QuickTime screen and tap the ‘downward arrow’ button adjacent to the record button. The iPhone will be available under both the Camera and Microphone section, choose it for both the options.

- You’ll now notice that your iPhone’s screen has been mirrored with your Mac computer.
- Now, on your iPhone, go to Snapchat and browse the inbox. Subsequently, on your Mac, tap the ‘Record’ button and then start viewing the snaps on your iPhone. QuickTime will record everything from the snaps and save it on your computer.
- After you’re done with recording, tap the ‘Record’ button again to stop it. Lastly, go to ‘File’ and click ‘Save’, the file format to which the file will be saved is .mov which is generally supported by majority of movie players.
Part 3: How to save Snapchat videos on Android
In case you are looking for a way to save Snapchat videos, take screenshots of chats, make slideshows of stories, or record other’s stories on your Android device itself, then AZ Screen recorder is one such app to save those Snapchats. It doesn’t require any root access to your Android phone, so is preferred by most users.
Step-by-step Tutorial
- Download the Apk file, install, and launch the AZ Screen Recorder Snapchat App. Set up the account in your Android phone with required information.
- Tap the ‘Record’ button in AZ Screen Recorder and then open Snapchat inbox. Browse through the content you want to record, the app will record everything on the go.

- Stop the recording by tapping the ‘Record’ button again.
Note: When saving Snapchat videos via this method, Snapchat is unable to trace that the video or stories are being recorded. Thereby, you save the Snapchat stories without even notifying the uploader.
Part 4: How to save Snapchat videos to your Phone
If you are wondering about saving your own Snapchat videos to your phone, then you are at the right place for a solution. It’s pretty simple, just like saving a photo.
Here is how
- Launch Snapchat in your mobile phone and then press and hold the camera button to record a video.
- Once you are done, lift your finger from the camera and tap the ‘Save’ button from the bottom left corner of the screen.
- You will see the ‘Saved to memories’ message. Now, browse your Snapchat folder to locate the video.

- If you forgot to save it before posting as a story, then go to the ‘Stories’ tab and click on the three vertical dots next to ‘My Story’ and select the video. Click the ‘Save’ button next to it to save Snapchat videos to your mobile.
Conclusion
It is not impossible to save Snapchat videos to your Mac or Android phone. In fact, you just need to learn the right way that suits you. Be it through the apps to save Snapchat videos and stories or taking screenshots in ‘Airplane’ mode, you got to be quick and save what you like.
Ollie Mattison
Ollie Mattison is a writer and a lover of all things video.
Follow @Ollie Mattison
Ollie Mattison
Mar 27, 2024• Proven solutions
The popular social networking app Snapchat comes with some ephemeral features. This self-deleting feature deters users from saving Snapchat videos of their friends. Snapchat photos, videos, and stories of contacts vanish from storyboard right after you view them.
So, what will you do to save photos or videos from your friends’ Snapchat or Snap Stories long before they are gone? You can take a screenshot, save in flight mode, use your computer, or an app to capture the videos and images.
Through this article, we are going to tell you, how to save Snapchats to your phone to make you watch them later.
- Part1: How to Save Snapchats without them knowing
- Part2: How to save Snapchat videos on Mac
- Part3: How to save Snapchat videos on Android
- Part4: How to save Snapchat videos to your Phone
Part 1: How to Save Snapchats without them knowing
You want to save a friend’s Snaps, but Snapchat immediately alerts them of the screen shot taken. Hence, it is not possible to save other’s pictures or videos in Snapchat in incognito mode. You don’t need apps to save Snapchat to your phone. There is hardly a feasible way to do so without the senders’ knowledge. In such a situation, you can try out the following option – saving Snaps in flight mode.
Here are the steps
- First of all, launch the Snapchat app on your mobile phone and leave it open. Go to your phone’s ‘Settings’ (Android/iPhone) and toggle on the ‘Airplane/Flight’ mode. Airplane/Flight mode disables all the wireless connections, be it network signals or internet related services for your device (Wi-Fi as well as cellular).
- Browse the Snapchat inbox and view the desired Snap that you wish to save, and quickly take a screenshot. Make sure to be quick enough and do it before the Snap expires.
- Now, logout from your Snapchat account right after taking the screenshot. You need to follow the logout process according to your device specific settings. Being in ‘Airplane/Flight’ mode you can’t logout, but click the logout option anyway (this is vital!).
- Here, you need to close the Snapchat app on your mobile phone by swiping out the Snapchat app (up/sideways depending on Android/iPhone) from your device’s force quit screen.
- Toggle off the ‘Airplane/Flight’ mode and wait until your phone connects to the Wi-Fi or mobile network. Now, launch the Snapchat app again and login with the same credentials. The Snaps you have taken screenshots of will still appear as unopened on the storyboard and your friend will have no clue about the Snap being screenshot.
Read More to Get : How to Screenshot on Snapchat without Them Knowing >>
Part 2: How to save Snapchat videos on Mac
After learning to take screenshots of Snaps using the ‘Airplane’ mode, how about saving Snapchat videos on your Mac computer? Yes, you can easily save Snapchat videos using your iPhone and Mac computer. The process involves recording your iPhone’s screen through your Mac as a movie and then saving it. Here is how to do it
- Take and connect your iPhone and Mac computer using a lightning cable. Make sure that they are pre-synced. Now, launch QuickTime Player on your computer and then tap ‘File’ in the finder menu, then ‘New Movie Recording’.
- This will make your Mac’s camera act as the primary camera/recording device. To turn the iPhone as the recording device, go to the QuickTime screen and tap the ‘downward arrow’ button adjacent to the record button. The iPhone will be available under both the Camera and Microphone section, choose it for both the options.
- You’ll now notice that your iPhone’s screen has been mirrored with your Mac computer.
- Now, on your iPhone, go to Snapchat and browse the inbox. Subsequently, on your Mac, tap the ‘Record’ button and then start viewing the snaps on your iPhone. QuickTime will record everything from the snaps and save it on your computer.
- After you’re done with recording, tap the ‘Record’ button again to stop it. Lastly, go to ‘File’ and click ‘Save’, the file format to which the file will be saved is .mov which is generally supported by majority of movie players.
Part 3: How to save Snapchat videos on Android
In case you are looking for a way to save Snapchat videos, take screenshots of chats, make slideshows of stories, or record other’s stories on your Android device itself, then AZ Screen recorder is one such app to save those Snapchats. It doesn’t require any root access to your Android phone, so is preferred by most users.
Step-by-step Tutorial
- Download the Apk file, install, and launch the AZ Screen Recorder Snapchat App. Set up the account in your Android phone with required information.
- Tap the ‘Record’ button in AZ Screen Recorder and then open Snapchat inbox. Browse through the content you want to record, the app will record everything on the go.
- Stop the recording by tapping the ‘Record’ button again.
Note: When saving Snapchat videos via this method, Snapchat is unable to trace that the video or stories are being recorded. Thereby, you save the Snapchat stories without even notifying the uploader.
Part 4: How to save Snapchat videos to your Phone
If you are wondering about saving your own Snapchat videos to your phone, then you are at the right place for a solution. It’s pretty simple, just like saving a photo.
Here is how
- Launch Snapchat in your mobile phone and then press and hold the camera button to record a video.
- Once you are done, lift your finger from the camera and tap the ‘Save’ button from the bottom left corner of the screen.
- You will see the ‘Saved to memories’ message. Now, browse your Snapchat folder to locate the video.
- If you forgot to save it before posting as a story, then go to the ‘Stories’ tab and click on the three vertical dots next to ‘My Story’ and select the video. Click the ‘Save’ button next to it to save Snapchat videos to your mobile.
Conclusion
It is not impossible to save Snapchat videos to your Mac or Android phone. In fact, you just need to learn the right way that suits you. Be it through the apps to save Snapchat videos and stories or taking screenshots in ‘Airplane’ mode, you got to be quick and save what you like.
Ollie Mattison
Ollie Mattison is a writer and a lover of all things video.
Follow @Ollie Mattison
How to Make a Video Best Fits Snapchat Size on Mac?
How to Make a Video Best Fits Snapchat Size on Mac?

Liza Brown
Oct 26, 2023• Proven solutions
How to create a video best fit Snapchat? With more than 240 million active daily users, Snapchat is one of the most popular social media networks globally. It is also an instant messaging app that allows its users to express themselves visually in a diverse variety of manners including photos, videos, stories, stickers, emoji, and more.
One of the best features of Snapchat that makes it so attractive among the young audience is its mobile-oriented user interface. Snapchat was the first social networking platform to introduce the concept of daily stories which was widely adopted by other instant messengers as well including Instagram and WhatsApp. Since it is a mobile-oriented platform, you need to create and edit your videos in a certain way to make sure they are the best fit for Snapchat.
You May Also Like: The Ultimate Guide of Snapchat Filters
What Are the Ideal Features of a Snapchat Video?
Snapchat is highly optimized for vertical viewing which means that all the content needs to be served in portrait aspect ratio instead of landscape used by YouTube and other video platforms. You need to ensure that every aspect of your video is perfect before you can upload it for Snapchat on Mac. Here are some of the key features that you must not forget.

- Resolution - The ideal resolution of a Snapchat video is 1080 x 1920 pixels which is known as full HD. This resolution will ensure that your video loads in the right way and remains sharp and crisp for an excellent viewing experience.
- Video Format - The recommended video format for Snapchat clips is MP4 and MOV. You can use either of those formats on your Mac.
- Aspect Ratio - This is one of the key aspects of any video that determines the orientation of viewing. For a perfect Snapchat video, it is recommended that you keep the aspect ratio to 9:16.
- Video Length Size - Remember that Snapchat isn’t like YouTube and serves an audience that wants micro-entertainment. This is why the recommended time for your video is 3 to 10 seconds with the video size not exceeding 32 MB. Otherwise, the Snapchat audience may not respond well to your videos.
That is why it is crucial that your Snapchat video has all the ideal features so your audience can enjoy the viewing experience as intended instead of attempting to manipulate their phones to be able to see the video clearly. It will create an unpleasant and frustrating experience and your viewers might not stay with you.
How to Adjust the Video for Snapchat on Mac? [Step-by-Step]
- Part1. Changing Snapchat Video Format on Filmora
- Part2. Changing Snapchat Video Aspect Ratio on Filmora
- Part3. Changing Snapchat Video Size on Filmora
If your video doesn’t have the ideal features for Snapchat uploading, you don’t need to worry. You can easily edit your video on Filmora X to adjust everything including the aspect ratio, size, and format.


Part1. Changing Snapchat Video Format on Filmora
- Importing Video
The first step is to import the video using the option ‘Import Media Files’ in the import tab. You can also drag and drop the media files you need to work on.

- Selecting the Right Output Format
Once you have imported the file, drag and drop it onto the Timeline. Now click on the ‘Export’ button. Here you will be able to select your output video format which needs to be either MOV or MP4.
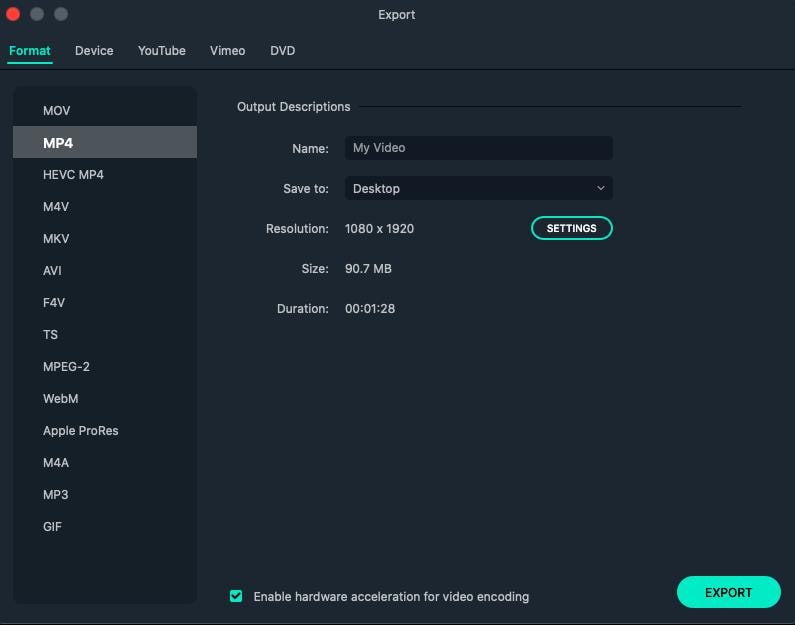
- Exporting Your Snapchat Video
After you have defined the settings, you can click on the ‘Export’ button to start the saving process. Your video is now available to you in the right format.
Part2. Changing Snapchat Video Aspect Ratio on Filmora
You can use multiple methods to change the aspect ratio of your Snapchat video on Filmora. It depends on the nature of editing you need to perform on your video. You can choose from any of the methods given below to edit your video for Snapchat in a user-friendly manner on Mac.
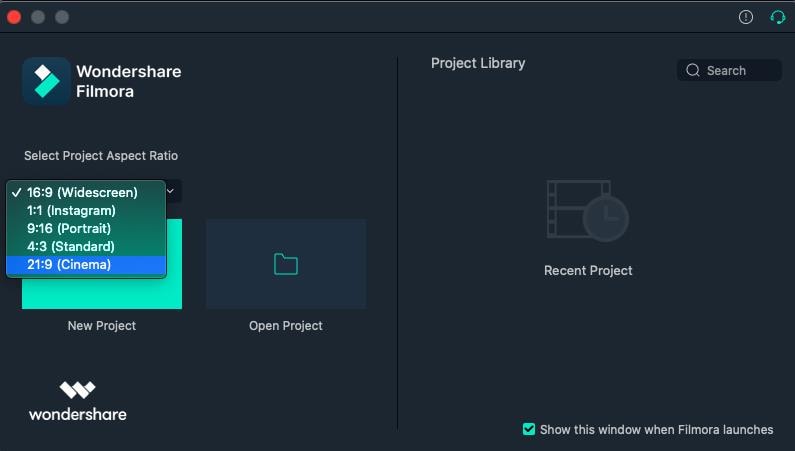
● Method 1 - Launch the editor and click on the drop-down list. You will see the popular aspect ratios listed in the list from where you can choose any. Select the right one that is 9:16 for Snapchat and export the file right away.
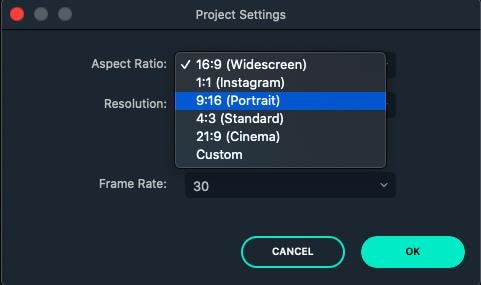
● Method 2 - The second method you can use is present under the Project Settings. You can also lock the aspect ratio using the features available here.

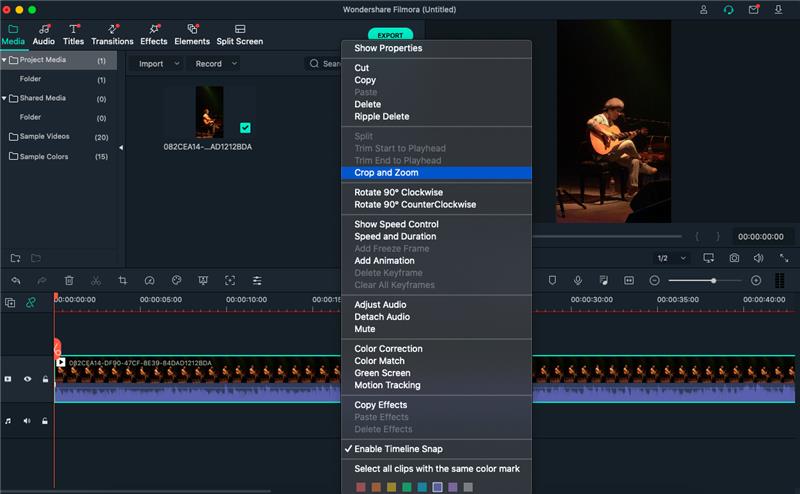
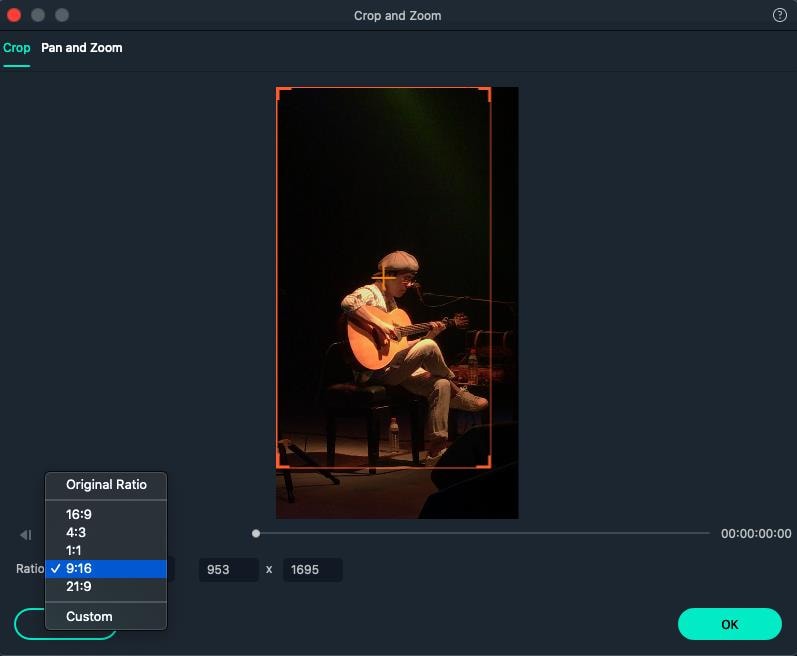
● Method 3 - The third method allows you to change the aspect ratio manually during the video editing process. You need to right-click on the timeline and select the ‘Crop and Zoom’ option. You will see a pop-up window where all the popular options will be available to you. You can choose either of them or select an aspect ratio manually.
● Step 4 - The final method to change the aspect ratio of your video on Mac is at the time of exporting your media file. Here you can select the aspect ratio for your local computer, a particular device, YouTube, or DVD TV.

Part3. Changing Snapchat Video Size on Filmora
- Importing Media File to Filmora
Using the ‘Import’ menu, import your media files, or simply drag and drop them from your Mac OS. Once the files are in the software, drag them to the Timeline track.
- Cropping Your Video for Snapchat
Here you can use the ‘Crop and Zoom’ button from the Timeline by right-clicking on it, so you can only focus on the aspect of the video that you want to show. This will resize the video as well.
- Cutting the Video
Another option you have is to delete the unnecessary parts of the video by selecting them through the indicator present on the timeline. Once you have selected the parts you don’t need, right-click on them and select ‘Delete’.
- Exporting Your Snapchat Video
Once you have resized your video by cropping and cutting the media file, you can now export it in the right resolution, bit rate, and format to ensure you get the minimum file size.
Liza Brown
Liza Brown is a writer and a lover of all things video.
Follow @Liza Brown
Liza Brown
Oct 26, 2023• Proven solutions
How to create a video best fit Snapchat? With more than 240 million active daily users, Snapchat is one of the most popular social media networks globally. It is also an instant messaging app that allows its users to express themselves visually in a diverse variety of manners including photos, videos, stories, stickers, emoji, and more.
One of the best features of Snapchat that makes it so attractive among the young audience is its mobile-oriented user interface. Snapchat was the first social networking platform to introduce the concept of daily stories which was widely adopted by other instant messengers as well including Instagram and WhatsApp. Since it is a mobile-oriented platform, you need to create and edit your videos in a certain way to make sure they are the best fit for Snapchat.
You May Also Like: The Ultimate Guide of Snapchat Filters
What Are the Ideal Features of a Snapchat Video?
Snapchat is highly optimized for vertical viewing which means that all the content needs to be served in portrait aspect ratio instead of landscape used by YouTube and other video platforms. You need to ensure that every aspect of your video is perfect before you can upload it for Snapchat on Mac. Here are some of the key features that you must not forget.
- Resolution - The ideal resolution of a Snapchat video is 1080 x 1920 pixels which is known as full HD. This resolution will ensure that your video loads in the right way and remains sharp and crisp for an excellent viewing experience.
- Video Format - The recommended video format for Snapchat clips is MP4 and MOV. You can use either of those formats on your Mac.
- Aspect Ratio - This is one of the key aspects of any video that determines the orientation of viewing. For a perfect Snapchat video, it is recommended that you keep the aspect ratio to 9:16.
- Video Length Size - Remember that Snapchat isn’t like YouTube and serves an audience that wants micro-entertainment. This is why the recommended time for your video is 3 to 10 seconds with the video size not exceeding 32 MB. Otherwise, the Snapchat audience may not respond well to your videos.
That is why it is crucial that your Snapchat video has all the ideal features so your audience can enjoy the viewing experience as intended instead of attempting to manipulate their phones to be able to see the video clearly. It will create an unpleasant and frustrating experience and your viewers might not stay with you.
How to Adjust the Video for Snapchat on Mac? [Step-by-Step]
- Part1. Changing Snapchat Video Format on Filmora
- Part2. Changing Snapchat Video Aspect Ratio on Filmora
- Part3. Changing Snapchat Video Size on Filmora
If your video doesn’t have the ideal features for Snapchat uploading, you don’t need to worry. You can easily edit your video on Filmora X to adjust everything including the aspect ratio, size, and format.
Part1. Changing Snapchat Video Format on Filmora
- Importing Video
The first step is to import the video using the option ‘Import Media Files’ in the import tab. You can also drag and drop the media files you need to work on.
- Selecting the Right Output Format
Once you have imported the file, drag and drop it onto the Timeline. Now click on the ‘Export’ button. Here you will be able to select your output video format which needs to be either MOV or MP4.
- Exporting Your Snapchat Video
After you have defined the settings, you can click on the ‘Export’ button to start the saving process. Your video is now available to you in the right format.
Part2. Changing Snapchat Video Aspect Ratio on Filmora
You can use multiple methods to change the aspect ratio of your Snapchat video on Filmora. It depends on the nature of editing you need to perform on your video. You can choose from any of the methods given below to edit your video for Snapchat in a user-friendly manner on Mac.
● Method 1 - Launch the editor and click on the drop-down list. You will see the popular aspect ratios listed in the list from where you can choose any. Select the right one that is 9:16 for Snapchat and export the file right away.
● Method 2 - The second method you can use is present under the Project Settings. You can also lock the aspect ratio using the features available here.
● Method 3 - The third method allows you to change the aspect ratio manually during the video editing process. You need to right-click on the timeline and select the ‘Crop and Zoom’ option. You will see a pop-up window where all the popular options will be available to you. You can choose either of them or select an aspect ratio manually.
● Step 4 - The final method to change the aspect ratio of your video on Mac is at the time of exporting your media file. Here you can select the aspect ratio for your local computer, a particular device, YouTube, or DVD TV.
Part3. Changing Snapchat Video Size on Filmora
- Importing Media File to Filmora
Using the ‘Import’ menu, import your media files, or simply drag and drop them from your Mac OS. Once the files are in the software, drag them to the Timeline track.
- Cropping Your Video for Snapchat
Here you can use the ‘Crop and Zoom’ button from the Timeline by right-clicking on it, so you can only focus on the aspect of the video that you want to show. This will resize the video as well.
- Cutting the Video
Another option you have is to delete the unnecessary parts of the video by selecting them through the indicator present on the timeline. Once you have selected the parts you don’t need, right-click on them and select ‘Delete’.
- Exporting Your Snapchat Video
Once you have resized your video by cropping and cutting the media file, you can now export it in the right resolution, bit rate, and format to ensure you get the minimum file size.
Liza Brown
Liza Brown is a writer and a lover of all things video.
Follow @Liza Brown
Also read:
- [New] From Manga to Screen Applying Snapchat's Anime Filter
- [Updated] 2024 Approved Hidden ScreenShotters Concealed Photography on the Snapchat App
- [New] Revisiting Old Memories How to Upload Them on Snapchat
- Elevate Your Storytelling on Snapchat with Top Tips for 2024
- [New] Snapchat for MAC Users - Install and Enjoy
- [New] In 2024, Navigating Snap Camera Feature in Microsoft Teams
- [New] The Secret Language of Snapchat Behind Every Emoji
- Best Practices for Mobile Snapchat Recording Techniques for 2024
- 2024 Approved Elevating Brand Visibility with Cutting-Edge Snap Ad Design
- [Updated] 2024 Approved Explore Creative Horizons with Imaginative Snapchat Boomerang Techniques
- [Updated] How to Screen Capture Snapchat Stories Effectively for 2024
- [New] In 2024, Simplified Techniques for Creating and Modifying Multiple Snaps in Snapchat
- [New] Sneak Peek SnapCapture Unseen Image Capturing Tactics for 2024
- 2024 Approved Integrate Snapchat Into Your Mac Seamlessly
- [New] Guide to Accurate Transfer of Camera Photos to Social Media Apps for 2024
- [Updated] In 2024, Vero Authors Spotlight at Snapchat
- [Updated] A Decade of Digital Disguise Expert Tips on Snapchat Filters
- [New] In 2024, Navigating the Pinning Landscape in Snapchat
- [New] In 2024, Ensuring Accurate iPhone Photo Archive in Snapchat
- [New] Efficient Methods for Producing & Perfecting Multiple Snaps
- 2024 Approved Securing Your Snapchat Memories Mobile Recording Tips
- [Updated] In 2024, Snapshot Safeguarding An Easy Tutorial for Your Phone
- [New] 2024 Approved Capture More Than Memories Adding Fun Filters to Snaps
- [New] Unleash Your Creativity with These 20 Best Snapchat Filters
- [Updated] The Ultimate Snapshot Experience Mastering Snapchat Filters
- [New] Expressive Imagery Premier Snapchat Filters and Lenses
- [New] Intuitive Camera Roll Consolidation Step-by-Step Snapchat Guide
- [Updated] The Art of Past Images A Snapchat Journey
- [Updated] 2024 Approved Strategies to Successfully Pin on Snapchat
- [Updated] Safeguarding Your Snaps Secure Backup From Phone to Snapchat for 2024
- In 2024, From Memory to Moments Securely Uploading Photos to Snapchat
- [Updated] Harnessing Microsoft Teams' Power with Simple Snap Camera Use for 2024
- Elevate Your Snaps The Soundtrack Edition for 2024
- Quick Fixes Screen Recording Snapchat Hacks for 2024
- 2024 Approved Optimizing Your Snapchat Ads for Maximum Monetization
- [Updated] Journey Into the Enigma Discovering Hidden Emoji Messages for 2024
- [Updated] Innovative Pathways Ensuring Correct iPhone-Snapchat Data Flow for 2024
- [Updated] Pacing Perfection Controlling Frame Rates on Snapchat for 2024
- [Updated] In 2024, Step Into the Anime World of Snapchat Filters
- [Updated] Effective Image Sharing Using Snap Camera for Microsoft Teams
- [Updated] In 2024, Ultimate Guide Adding Snapchat to Your Mac
- [New] Instantaneous Video & Picture Revival on Snap
- How To Teleport Your GPS Location On Samsung Galaxy S23 FE? | Dr.fone
- How to Lock Apps on Nokia C300 to Protect Your Individual Information
- New Do You Want to Be Aware of VHSs Meaning? There Is Nothing to Be Worried About because We Will Guide You in This Article
- In 2024, Best Ways on How to Unlock/Bypass/Swipe/Remove Poco C50 Fingerprint Lock
- New How to Add Subtitles in Canva?
- In 2024, Hacking Twitter's Humor for Personal Use on PC
- Updated Best Apps for Tracking Movement on Your Smartphone or Tablet for 2024
- How To Unlock A Found Apple iPhone 12?
- Updated 2024 Approved Free and Easy Rotate Your MOV Videos with These Tools
- Updated In 2024, Get Ahead with FCP Top 5 Editing Shortcuts and Workarounds
- The Digital Deluge Examining This Year's Most Shared Videos
- New 2024 Approved Deciphering Calm Techniques to Reduce Audio Disturbances From Natural Sources in Digital Recordings
- 2024 Approved Decoding Facebook's Absence of Personalized Video Content
- The Ultimate Guide to Bypassing iCloud Activation Lock from iPhone 12 mini
- Updated AVS Video Editor 2023 Features, Pricing, and Performance Review for 2024
- [Updated] HighFidelity Capture Tool Win 10
- [New] Flawless Friending on Instagram - Best Free, Safe Mobile Aid (iOS/Android) for 2024
- Top 7 iCloud Activation Bypass Tools For your Apple iPhone XS Max
- Updated In 2024, Exploring the Best Cinematic Sounds - An Assembled Top 8 Collection
- How to Find Facebook Recently Watched Videos for 2024
- [New] In 2024, Flash Facts How Videos Captivate Twitter's Audience
- Updated From Still to Motion Mastering Time Lapse Video Creation with Software
- How to Factory Reset Vivo X100 Pro without Losing Data | Dr.fone
- [New] In 2024, Breaking the 'RT' Barrier Sharing Photos & Vids on Twitter
- In 2024, Process of Screen Sharing Xiaomi 14 Pro to PC- Detailed Steps | Dr.fone
- [Updated] Invest in IG Success The Top 6 Secure Money Methods
- [New] 2024 Approved Elevate Your Content Top 10 Must-Use Hashtags on IG
- [Updated] In 2024, The Ultimate Strategies for Leveraging the Question Sticker on Instagram
- 2024 Approved Mobile Streamers' Guide Post Photos & Videos, Not Twits
- Vivo Y36 support - Forgotten screen lock.
- New 2024 Approved Unbiased AVS Video Editor Review Is It Right for You?
- Everything You Need to Know about Lock Screen Settings on your Poco X6 Pro
- [New] Secure Storage Strategies for iTunes Media for 2024
- New How to Clone Voice in 2 Ways-Create AI Voices
- Title: [New] How to Save Snapchat Videos with Apps on Android and Mac for 2024
- Author: Scott
- Created at : 2024-06-10 11:57:14
- Updated at : 2024-06-11 11:57:14
- Link: https://snapchat-videos.techidaily.com/new-how-to-save-snapchat-videos-with-apps-on-android-and-mac-for-2024/
- License: This work is licensed under CC BY-NC-SA 4.0.
