
!["[New] 2024 Approved The Filter Frontier Your Ultimate Resource for Creative Snaps"](https://www.lifewire.com/thmb/zw0Z-bfGqX8i4XVXOnsXnouDZuE=/400x300/filters:no_upscale():max_bytes(150000):strip_icc()/how-to-watch-the-crow-movies-in-order-742a37ba4e0748e3a691420484c36796.jpg)
"[New] 2024 Approved The Filter Frontier Your Ultimate Resource for Creative Snaps"
The Filter Frontier: Your Ultimate Resource for Creative Snaps
The Ultimate Guide of Snapchat Filters

Ollie Mattison
Mar 27, 2024• Proven solutions
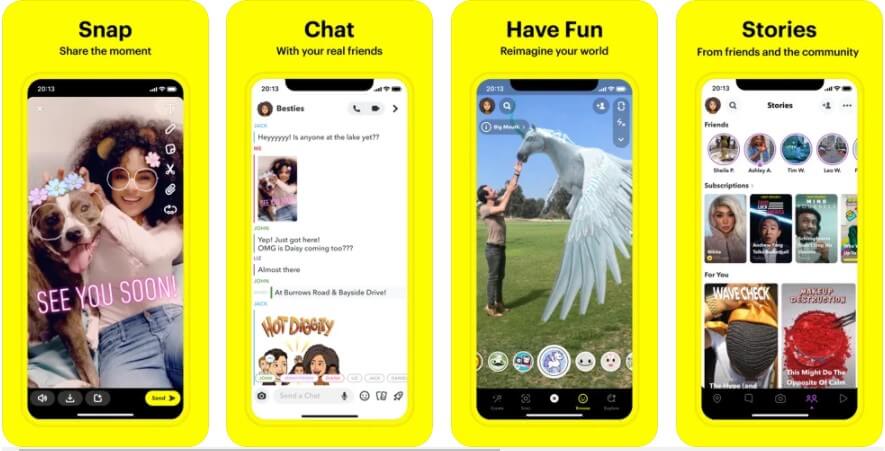
Snapchat is getting widely popular with its interesting, beautiful and yes, hilarious filters. Understanding how to use the best Snapchat filters, as well as unleashing the Snapchat hidden filters would make the pictures super attractive. Not just this, you can also enjoy using those funny filters, especially those with automated voice.
Well! This interesting social media app is all about creative and chuckle-some filters, that garnered a huge fan following. We, through this article are going to show you how to use the various amusing filters of Snapchat.
- Part1: How to use Snapchat filters
- Part2: Best Snapchat filters people prefer to use
- Part3: How to find Snapchat hidden filters
Part 1: How to use Snapchat filters
With their plethora of features these filters add so much fun to your pictures. To get the best out of Snapchat filters, let’s divulge deeper. Here we have explained the basic steps as how to make use of these filters.
Step 1: Tap the camera screen to activate filters
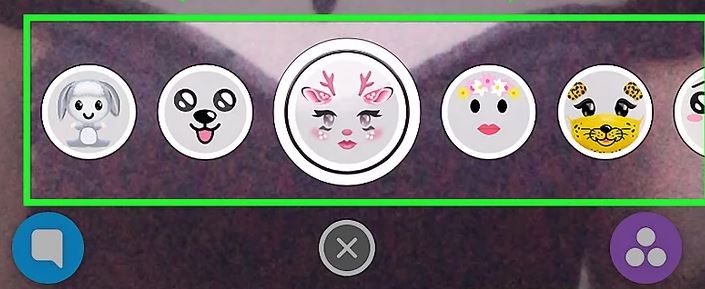
Login to your Snapchat account using the credentials and launch the Snapchat camera. Tap the camera once to activate the filters. Now, you can see the filters show up adjacent to the camera button. Swipe them right or left to choose a desired filter and pose as instructed.
Step 2: Capture a snap
Once you have selected the filter, you can tap the camera button once to click a snap, or hold the camera button in case you want to record a video with that filter.
Step 3: Choose filters
The best part about Snapchat filters is, you not only can use them while clicking a picture, but can also add filters post clicking picture. There are 2 ways to select filters after clicking your picture.
- As soon as you are done clicking a snap, slide the screen to left and you can find the latest filters. Choose whatever filters from the list catches your fancy.
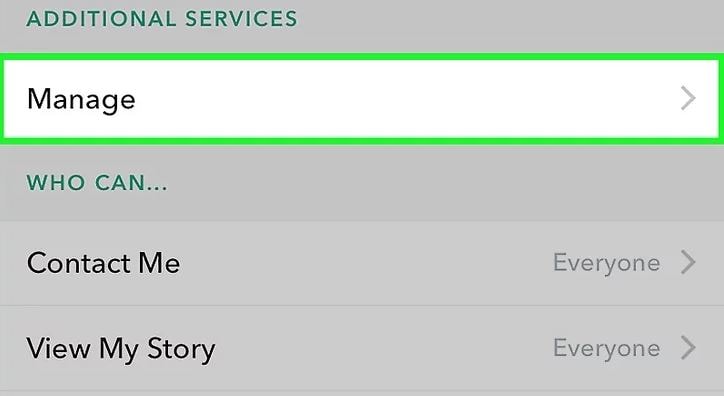
- If you are not happy with these filters from option ‘a’, then don’t get sad. We have a lot more for you, like a set of secret Snapchat filters. After clicking the picture you will see a ‘smiley icon’ on the right side of the screen. Tap the ‘smiley icon’ and then scroll up or down to pick the most enchanting filter for you.
Once you are done finalizing the effects (filters), you can save or share the snap.

Step 4: Share your work
After snapping an interesting picture of you or a loved one, now it’s time to share it on Snapchat. You can either send them directly to your contacts on Snapchat or share it as a story.
- Tap the ‘Send to’ button to send it as a personal snap to your friends. When the list appears tap on the respective names and then click ‘Send’.
- To share it as a story, you can tap the ‘My Story’ tab and then the ‘Send’ button. There is another feature called ‘Our Story’, select it and then ‘Send’.
Note: ‘Our Story’ images are shared with the world, and they are pinned to the map for your location. It is searchable over the internet on or off Snapchat.
Read More to Get : How to Screenshot on Snapchat without Them Knowing >>
Part 2: Best Snapchat filters people prefer to use
After experimenting on the varied range of selfie-enhancing filters on Snapchat, our team rated these 5 Snapchat filters as the best ones. If you haven’t explored the galore of humorous filters yet, then here is the chance to snap and get entertained –
Rainbow Vomit
This funny filter from Snapchat is worth trying. This filter in fact inspired plenty of people to get their chins painted with rainbows on Halloween. AR (Augmented Reality) filters from Snapchat have stepped ahead to allow such magic like features. When you open your mouth in selfie mode, a rainbow comes out of your mouth.
Puppy
There is nobody who would say that they don’t like this Puppy filter. It’s icing on the cake for those dog lovers. When you click or record a Snap using this filter, you can see the puppy ears, puppy nose, and an interactive tongue that makes your Snap super cute. Moreover, you can twin with your BFF using this cutesy puppy filter and share the fun.
Face Swap
Have you tried this nightmarish filter yet? If you are a fantasy lover and love to try stuffs straight out of dreams, then try this filter with a friend. The smart technology in this filter swaps your face with the friend in frame with you. Your face gets masked on your friend’s face, and vise-a-versa.
Flower Crown
We personally are in awe with this beautiful filter from Snapchat. One of the best Snapchat filters, that adorned Snapchat stories and profile pictures of other social media sites as well. This basic filter from Snapchat makes your skin look flawless, adding an instant glow to your picture and enhancing your eyes. The floral crown does the added magical effect to your looks. Like the Puppy filter, you can share screen with your BFF and pose as the flower angels.
Bearded Filters
This filter is really funny for people without beard, more fun for the ladies. Pose as a beard pirate with that mysterious stubble and moustache and up the fun quotient.

Part 3: How to find Snapchat hidden filters
Well, if you want to explore more filters from Snapchat, then we have this amazing solution for you. You can unlock secret Snapchat filters through a Snapcode. Either a hyperlink or a photo can unlock a code and allow you to use interesting filters in your Snaps. Here are the steps –
Step 1: Find Snapcode
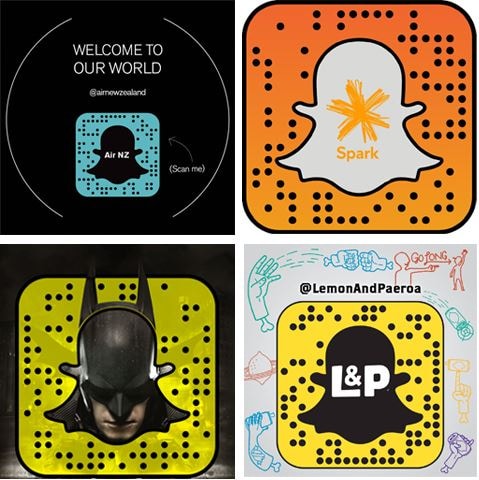
Firstly, What is Snapcode exactly? A Snapcode is nothing but a Snapchat version of a QR code, as well as a hyperlink. Using such Snapcodes you unlock third-party filters with a lot of AR effects to pep-up your fun quotient.
There are multiple ways to find a Snapcode. It can be integrated with a picture, a hyperlink or within a tweet. You can find it by paying a close look. There are multiple sites over the internet which can allow you to use these hidden filters.
Step 2: Open Snapcode
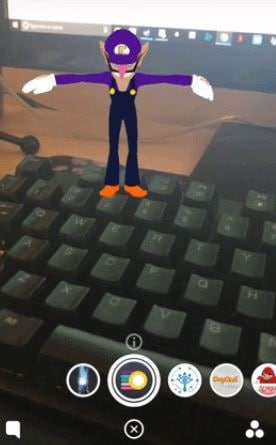
You can open a Snapcode pretty easily, as the process is very user-friendly. Locate a Snapcode using a hyperlink, tweet, or in a picture. You download the filter by clicking the picture with the Snapcode, using the Snapchat camera, or browsing the hyperlink on your mobile phone. In your view finder, you need to long-press on the Snapcode till it gets recognized by the phone.

Step 3: Unlock hidden Snapcode
As soon as you snap the picture, it will get the filter activated for 24 hours on your Snapchat you will be prompted with a pop-up saying ‘Unlock for 24 hours’. Click on it to unlock the secret Snapchat filters. You can also send it to your friends.
Final Verdict
We are positive that this article has helped you uncover plenty of features in Snapchat. Apart from how to use Snapchat filters, you also got a fair idea about how to unlock Snapchat hidden filters. So, what are waiting for? Pick your mobile and start Snapping.
Images come from the Internet
Ollie Mattison
Ollie Mattison is a writer and a lover of all things video.
Follow @Ollie Mattison
Ollie Mattison
Mar 27, 2024• Proven solutions
Snapchat is getting widely popular with its interesting, beautiful and yes, hilarious filters. Understanding how to use the best Snapchat filters, as well as unleashing the Snapchat hidden filters would make the pictures super attractive. Not just this, you can also enjoy using those funny filters, especially those with automated voice.
Well! This interesting social media app is all about creative and chuckle-some filters, that garnered a huge fan following. We, through this article are going to show you how to use the various amusing filters of Snapchat.
- Part1: How to use Snapchat filters
- Part2: Best Snapchat filters people prefer to use
- Part3: How to find Snapchat hidden filters
Part 1: How to use Snapchat filters
With their plethora of features these filters add so much fun to your pictures. To get the best out of Snapchat filters, let’s divulge deeper. Here we have explained the basic steps as how to make use of these filters.
Step 1: Tap the camera screen to activate filters
Login to your Snapchat account using the credentials and launch the Snapchat camera. Tap the camera once to activate the filters. Now, you can see the filters show up adjacent to the camera button. Swipe them right or left to choose a desired filter and pose as instructed.
Step 2: Capture a snap
Once you have selected the filter, you can tap the camera button once to click a snap, or hold the camera button in case you want to record a video with that filter.
Step 3: Choose filters
The best part about Snapchat filters is, you not only can use them while clicking a picture, but can also add filters post clicking picture. There are 2 ways to select filters after clicking your picture.
- As soon as you are done clicking a snap, slide the screen to left and you can find the latest filters. Choose whatever filters from the list catches your fancy.
- If you are not happy with these filters from option ‘a’, then don’t get sad. We have a lot more for you, like a set of secret Snapchat filters. After clicking the picture you will see a ‘smiley icon’ on the right side of the screen. Tap the ‘smiley icon’ and then scroll up or down to pick the most enchanting filter for you.
Once you are done finalizing the effects (filters), you can save or share the snap.
Step 4: Share your work
After snapping an interesting picture of you or a loved one, now it’s time to share it on Snapchat. You can either send them directly to your contacts on Snapchat or share it as a story.
- Tap the ‘Send to’ button to send it as a personal snap to your friends. When the list appears tap on the respective names and then click ‘Send’.
- To share it as a story, you can tap the ‘My Story’ tab and then the ‘Send’ button. There is another feature called ‘Our Story’, select it and then ‘Send’.
Note: ‘Our Story’ images are shared with the world, and they are pinned to the map for your location. It is searchable over the internet on or off Snapchat.
Read More to Get : How to Screenshot on Snapchat without Them Knowing >>
Part 2: Best Snapchat filters people prefer to use
After experimenting on the varied range of selfie-enhancing filters on Snapchat, our team rated these 5 Snapchat filters as the best ones. If you haven’t explored the galore of humorous filters yet, then here is the chance to snap and get entertained –
Rainbow Vomit
This funny filter from Snapchat is worth trying. This filter in fact inspired plenty of people to get their chins painted with rainbows on Halloween. AR (Augmented Reality) filters from Snapchat have stepped ahead to allow such magic like features. When you open your mouth in selfie mode, a rainbow comes out of your mouth.
Puppy
There is nobody who would say that they don’t like this Puppy filter. It’s icing on the cake for those dog lovers. When you click or record a Snap using this filter, you can see the puppy ears, puppy nose, and an interactive tongue that makes your Snap super cute. Moreover, you can twin with your BFF using this cutesy puppy filter and share the fun.
Face Swap
Have you tried this nightmarish filter yet? If you are a fantasy lover and love to try stuffs straight out of dreams, then try this filter with a friend. The smart technology in this filter swaps your face with the friend in frame with you. Your face gets masked on your friend’s face, and vise-a-versa.
Flower Crown
We personally are in awe with this beautiful filter from Snapchat. One of the best Snapchat filters, that adorned Snapchat stories and profile pictures of other social media sites as well. This basic filter from Snapchat makes your skin look flawless, adding an instant glow to your picture and enhancing your eyes. The floral crown does the added magical effect to your looks. Like the Puppy filter, you can share screen with your BFF and pose as the flower angels.
Bearded Filters
This filter is really funny for people without beard, more fun for the ladies. Pose as a beard pirate with that mysterious stubble and moustache and up the fun quotient.
Part 3: How to find Snapchat hidden filters
Well, if you want to explore more filters from Snapchat, then we have this amazing solution for you. You can unlock secret Snapchat filters through a Snapcode. Either a hyperlink or a photo can unlock a code and allow you to use interesting filters in your Snaps. Here are the steps –
Step 1: Find Snapcode
Firstly, What is Snapcode exactly? A Snapcode is nothing but a Snapchat version of a QR code, as well as a hyperlink. Using such Snapcodes you unlock third-party filters with a lot of AR effects to pep-up your fun quotient.
There are multiple ways to find a Snapcode. It can be integrated with a picture, a hyperlink or within a tweet. You can find it by paying a close look. There are multiple sites over the internet which can allow you to use these hidden filters.
Step 2: Open Snapcode
You can open a Snapcode pretty easily, as the process is very user-friendly. Locate a Snapcode using a hyperlink, tweet, or in a picture. You download the filter by clicking the picture with the Snapcode, using the Snapchat camera, or browsing the hyperlink on your mobile phone. In your view finder, you need to long-press on the Snapcode till it gets recognized by the phone.
Step 3: Unlock hidden Snapcode
As soon as you snap the picture, it will get the filter activated for 24 hours on your Snapchat you will be prompted with a pop-up saying ‘Unlock for 24 hours’. Click on it to unlock the secret Snapchat filters. You can also send it to your friends.
Final Verdict
We are positive that this article has helped you uncover plenty of features in Snapchat. Apart from how to use Snapchat filters, you also got a fair idea about how to unlock Snapchat hidden filters. So, what are waiting for? Pick your mobile and start Snapping.
Images come from the Internet
Ollie Mattison
Ollie Mattison is a writer and a lover of all things video.
Follow @Ollie Mattison
Precision Video Capturing on Mac for Snapshares
How to Make a Video Best Fits Snapchat Size on Mac?

Liza Brown
Oct 26, 2023• Proven solutions
How to create a video best fit Snapchat? With more than 240 million active daily users, Snapchat is one of the most popular social media networks globally. It is also an instant messaging app that allows its users to express themselves visually in a diverse variety of manners including photos, videos, stories, stickers, emoji, and more.
One of the best features of Snapchat that makes it so attractive among the young audience is its mobile-oriented user interface. Snapchat was the first social networking platform to introduce the concept of daily stories which was widely adopted by other instant messengers as well including Instagram and WhatsApp. Since it is a mobile-oriented platform, you need to create and edit your videos in a certain way to make sure they are the best fit for Snapchat.
You May Also Like: The Ultimate Guide of Snapchat Filters
What Are the Ideal Features of a Snapchat Video?
Snapchat is highly optimized for vertical viewing which means that all the content needs to be served in portrait aspect ratio instead of landscape used by YouTube and other video platforms. You need to ensure that every aspect of your video is perfect before you can upload it for Snapchat on Mac. Here are some of the key features that you must not forget.
- Resolution - The ideal resolution of a Snapchat video is 1080 x 1920 pixels which is known as full HD. This resolution will ensure that your video loads in the right way and remains sharp and crisp for an excellent viewing experience.
- Video Format - The recommended video format for Snapchat clips is MP4 and MOV. You can use either of those formats on your Mac.
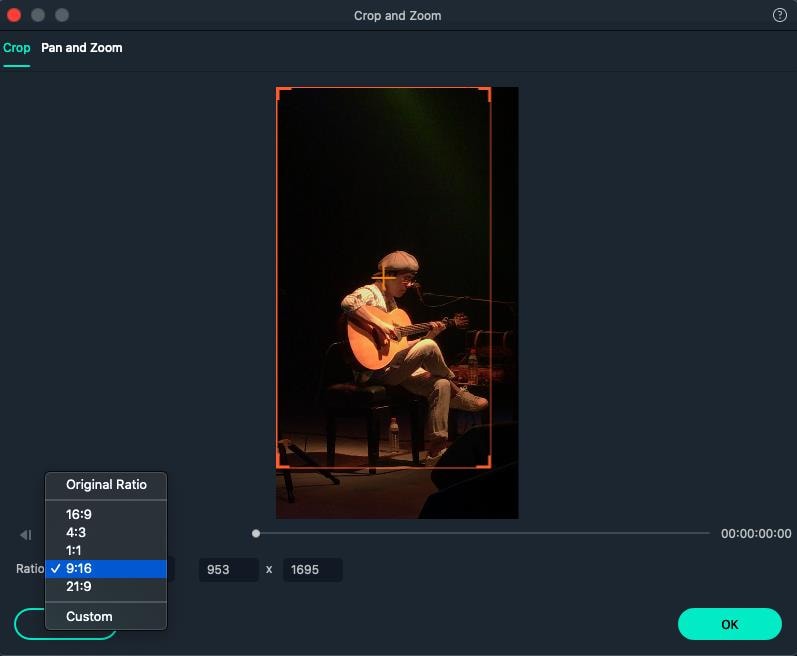
- Aspect Ratio - This is one of the key aspects of any video that determines the orientation of viewing. For a perfect Snapchat video, it is recommended that you keep the aspect ratio to 9:16.
- Video Length Size - Remember that Snapchat isn’t like YouTube and serves an audience that wants micro-entertainment. This is why the recommended time for your video is 3 to 10 seconds with the video size not exceeding 32 MB. Otherwise, the Snapchat audience may not respond well to your videos.
That is why it is crucial that your Snapchat video has all the ideal features so your audience can enjoy the viewing experience as intended instead of attempting to manipulate their phones to be able to see the video clearly. It will create an unpleasant and frustrating experience and your viewers might not stay with you.
How to Adjust the Video for Snapchat on Mac? [Step-by-Step]
- Part1. Changing Snapchat Video Format on Filmora
- Part2. Changing Snapchat Video Aspect Ratio on Filmora
- Part3. Changing Snapchat Video Size on Filmora
If your video doesn’t have the ideal features for Snapchat uploading, you don’t need to worry. You can easily edit your video on Filmora X to adjust everything including the aspect ratio, size, and format.


Part1. Changing Snapchat Video Format on Filmora
- Importing Video
The first step is to import the video using the option ‘Import Media Files’ in the import tab. You can also drag and drop the media files you need to work on.

- Selecting the Right Output Format
Once you have imported the file, drag and drop it onto the Timeline. Now click on the ‘Export’ button. Here you will be able to select your output video format which needs to be either MOV or MP4.
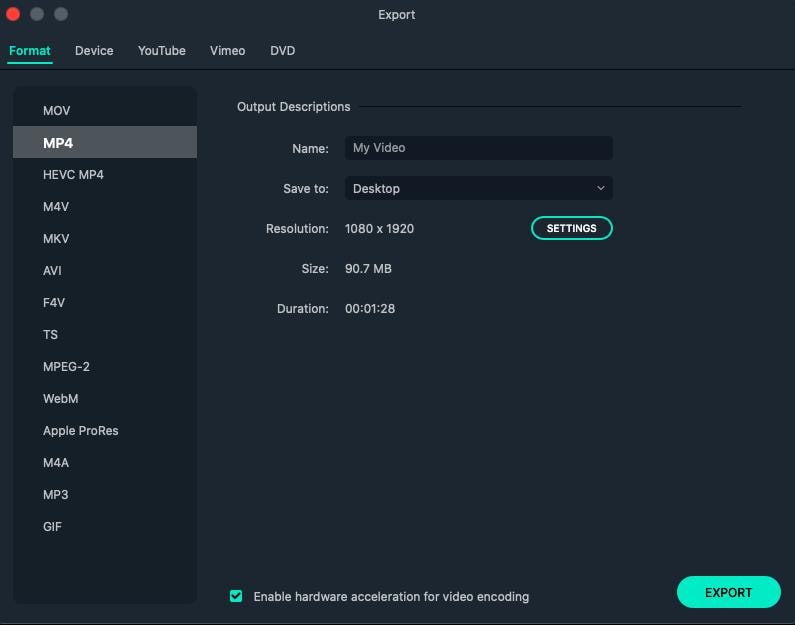
- Exporting Your Snapchat Video
After you have defined the settings, you can click on the ‘Export’ button to start the saving process. Your video is now available to you in the right format.
Part2. Changing Snapchat Video Aspect Ratio on Filmora
You can use multiple methods to change the aspect ratio of your Snapchat video on Filmora. It depends on the nature of editing you need to perform on your video. You can choose from any of the methods given below to edit your video for Snapchat in a user-friendly manner on Mac.
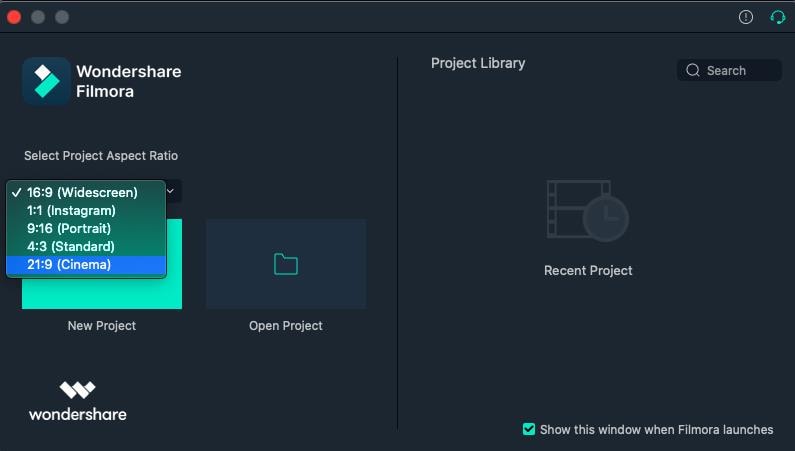
● Method 1 - Launch the editor and click on the drop-down list. You will see the popular aspect ratios listed in the list from where you can choose any. Select the right one that is 9:16 for Snapchat and export the file right away.
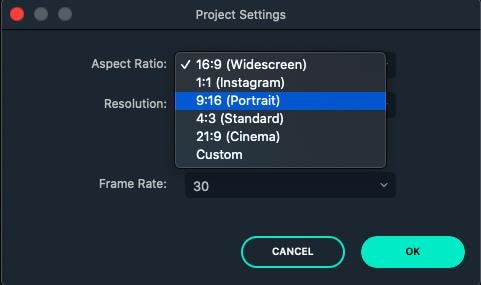
● Method 2 - The second method you can use is present under the Project Settings. You can also lock the aspect ratio using the features available here.

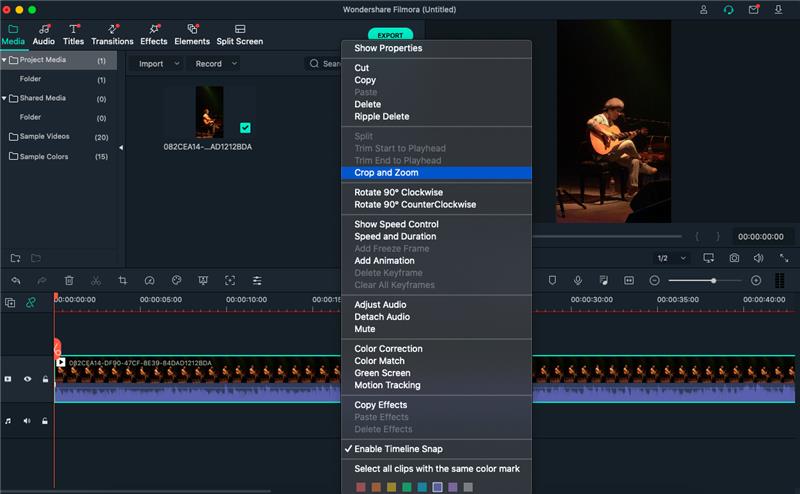
● Method 3 - The third method allows you to change the aspect ratio manually during the video editing process. You need to right-click on the timeline and select the ‘Crop and Zoom’ option. You will see a pop-up window where all the popular options will be available to you. You can choose either of them or select an aspect ratio manually.
● Step 4 - The final method to change the aspect ratio of your video on Mac is at the time of exporting your media file. Here you can select the aspect ratio for your local computer, a particular device, YouTube, or DVD TV.

Part3. Changing Snapchat Video Size on Filmora
- Importing Media File to Filmora
Using the ‘Import’ menu, import your media files, or simply drag and drop them from your Mac OS. Once the files are in the software, drag them to the Timeline track.
- Cropping Your Video for Snapchat
Here you can use the ‘Crop and Zoom’ button from the Timeline by right-clicking on it, so you can only focus on the aspect of the video that you want to show. This will resize the video as well.
- Cutting the Video
Another option you have is to delete the unnecessary parts of the video by selecting them through the indicator present on the timeline. Once you have selected the parts you don’t need, right-click on them and select ‘Delete’.
- Exporting Your Snapchat Video
Once you have resized your video by cropping and cutting the media file, you can now export it in the right resolution, bit rate, and format to ensure you get the minimum file size.
Liza Brown
Liza Brown is a writer and a lover of all things video.
Follow @Liza Brown
Liza Brown
Oct 26, 2023• Proven solutions
How to create a video best fit Snapchat? With more than 240 million active daily users, Snapchat is one of the most popular social media networks globally. It is also an instant messaging app that allows its users to express themselves visually in a diverse variety of manners including photos, videos, stories, stickers, emoji, and more.
One of the best features of Snapchat that makes it so attractive among the young audience is its mobile-oriented user interface. Snapchat was the first social networking platform to introduce the concept of daily stories which was widely adopted by other instant messengers as well including Instagram and WhatsApp. Since it is a mobile-oriented platform, you need to create and edit your videos in a certain way to make sure they are the best fit for Snapchat.
You May Also Like: The Ultimate Guide of Snapchat Filters
What Are the Ideal Features of a Snapchat Video?
Snapchat is highly optimized for vertical viewing which means that all the content needs to be served in portrait aspect ratio instead of landscape used by YouTube and other video platforms. You need to ensure that every aspect of your video is perfect before you can upload it for Snapchat on Mac. Here are some of the key features that you must not forget.
- Resolution - The ideal resolution of a Snapchat video is 1080 x 1920 pixels which is known as full HD. This resolution will ensure that your video loads in the right way and remains sharp and crisp for an excellent viewing experience.
- Video Format - The recommended video format for Snapchat clips is MP4 and MOV. You can use either of those formats on your Mac.
- Aspect Ratio - This is one of the key aspects of any video that determines the orientation of viewing. For a perfect Snapchat video, it is recommended that you keep the aspect ratio to 9:16.
- Video Length Size - Remember that Snapchat isn’t like YouTube and serves an audience that wants micro-entertainment. This is why the recommended time for your video is 3 to 10 seconds with the video size not exceeding 32 MB. Otherwise, the Snapchat audience may not respond well to your videos.
That is why it is crucial that your Snapchat video has all the ideal features so your audience can enjoy the viewing experience as intended instead of attempting to manipulate their phones to be able to see the video clearly. It will create an unpleasant and frustrating experience and your viewers might not stay with you.
How to Adjust the Video for Snapchat on Mac? [Step-by-Step]
- Part1. Changing Snapchat Video Format on Filmora
- Part2. Changing Snapchat Video Aspect Ratio on Filmora
- Part3. Changing Snapchat Video Size on Filmora
If your video doesn’t have the ideal features for Snapchat uploading, you don’t need to worry. You can easily edit your video on Filmora X to adjust everything including the aspect ratio, size, and format.
Part1. Changing Snapchat Video Format on Filmora
- Importing Video
The first step is to import the video using the option ‘Import Media Files’ in the import tab. You can also drag and drop the media files you need to work on.
- Selecting the Right Output Format
Once you have imported the file, drag and drop it onto the Timeline. Now click on the ‘Export’ button. Here you will be able to select your output video format which needs to be either MOV or MP4.
- Exporting Your Snapchat Video
After you have defined the settings, you can click on the ‘Export’ button to start the saving process. Your video is now available to you in the right format.
Part2. Changing Snapchat Video Aspect Ratio on Filmora
You can use multiple methods to change the aspect ratio of your Snapchat video on Filmora. It depends on the nature of editing you need to perform on your video. You can choose from any of the methods given below to edit your video for Snapchat in a user-friendly manner on Mac.
● Method 1 - Launch the editor and click on the drop-down list. You will see the popular aspect ratios listed in the list from where you can choose any. Select the right one that is 9:16 for Snapchat and export the file right away.
● Method 2 - The second method you can use is present under the Project Settings. You can also lock the aspect ratio using the features available here.
● Method 3 - The third method allows you to change the aspect ratio manually during the video editing process. You need to right-click on the timeline and select the ‘Crop and Zoom’ option. You will see a pop-up window where all the popular options will be available to you. You can choose either of them or select an aspect ratio manually.
● Step 4 - The final method to change the aspect ratio of your video on Mac is at the time of exporting your media file. Here you can select the aspect ratio for your local computer, a particular device, YouTube, or DVD TV.
Part3. Changing Snapchat Video Size on Filmora
- Importing Media File to Filmora
Using the ‘Import’ menu, import your media files, or simply drag and drop them from your Mac OS. Once the files are in the software, drag them to the Timeline track.
- Cropping Your Video for Snapchat
Here you can use the ‘Crop and Zoom’ button from the Timeline by right-clicking on it, so you can only focus on the aspect of the video that you want to show. This will resize the video as well.
- Cutting the Video
Another option you have is to delete the unnecessary parts of the video by selecting them through the indicator present on the timeline. Once you have selected the parts you don’t need, right-click on them and select ‘Delete’.
- Exporting Your Snapchat Video
Once you have resized your video by cropping and cutting the media file, you can now export it in the right resolution, bit rate, and format to ensure you get the minimum file size.
Liza Brown
Liza Brown is a writer and a lover of all things video.
Follow @Liza Brown
Also read:
- Unseen Snaps and Silence Could Be a Block
- [Updated] Setting Up Snapchat on Apple Computers Step by Step for 2024
- In 2024, Step-by-Step to Smiles and Laughter Your Snapchat Gif Tutorial
- [New] In 2024, Vero Authors Spotlight at Snapchat
- [New] 2024 Approved Tailoring Social Interaction The Art of Snapchat Pins
- [Updated] 2024 Approved Step-by-Step Adding Snap Camera to Teams Chats
- [Updated] 2024 Approved Maximizing ROI with Snapchat for Biz Leaders
- [New] Best Practices for Sharing Visuals in MS Teams with Snap Camera
- [New] 2024 Approved A Step-by-Step Guide to Mastering Business on Snap
- 2024 Approved Echoes of Entertainment Adding Sound to Snapchat Vids
- [Updated] In 2024, Quick Start Methods for Producing and Perfecting Multiple Snaps in Snapchat
- [New] 2024 Approved Unravel Time The Art of Snapchat Video Reverse
- [Updated] In 2024, How to Unearth Your Secret Snapshots
- [Updated] 2024 Approved Wave Goodbye to Breakups Keep Your Streak Going
- 2024 Approved Quick Guide 3-Step Process to Video Talk via Snapchat
- [Updated] Sonic Steps to Better Snapchat Videos
- [New] Pinpointing Personalities Pinning Friends on Snapchat for 2024
- [Updated] 2024 Approved The Art of Crafting Perfect Boomerangs in Snap
- 2024 Approved Balancing Pace for Better Snapchat Views
- [New] Transitioning Saved Snaps From Social Networks to Personal Archive for 2024
- 2024 Approved From Reels to Filters A Closer Look at TikTok vs Snap's Features
- [New] In 2024, Speed Up Snap Retrieval Methods
- [Updated] In 2024, Perfect Timing Adjust Video Speed in Snapchat Easily
- Elevate Your Snap Game 15 Strategies for Social Success for 2024
- [New] In 2024, From Novice to Pro Creating Snapchat Boomers
- [Updated] Building Brand Awareness Best Practices for Snapchat for 2024
- [New] Multi-Snapping Made Simple in Snapchat Video Edits for 2024
- [New] In 2024, Expert Techniques for Effective Social Sharing via Pins
- 2024 Approved Conquering Snapchat Send Gifs with Ease
- 2024 Approved Building a Business on Snapchat A Beginner's Blueprint
- In 2024, The Artisan's Guide to Crafting Cartoons on Snaps
- [New] 2024 Approved The SnapChat Marketing Playbook Boosting Sales
- In 2024, Pace Control in Snapchat's Video Feature
- In 2024, Ideas to Keep Your Snapchat Streak Alive
- In 2024, From Reels to Filters A Closer Look at TikTok vs Snap's Features
- Seamless Integration Getting Snapchat on macOS for 2024
- [Updated] In 2024, Master the Art of Backup Phone's Camera Roll Upload to Social Apps
- 2024 Approved Tips for Using Snap Camera for Remote Team Collaboration
- [Updated] In 2024, Seamless Integration Mac Recording Techniques for Snapchat
- [New] Instantly Secure Your Snaps Beyond Social Platforms
- 2024 Approved Recover Lost Photos on Snapchat
- From Camera Roll to Screen Share Photos Fast and Simple for 2024
- [New] The Ultimate Guide to Integrating Snap Photos in Teams for 2024
- [New] Enhancing Your Snapchat Experience Mobile Recordings for 2024
- [New] 2024 Approved Tips for Decelerating Video Playback on Snapchat
- 2024 Approved The Alchemy of Animation in Snapchat Videos
- [Updated] In 2024, Behind-the-Scenes How to Flip Your Snaps
- [Updated] How to Notice Unregistered Users on Snapchat for 2024
- [Updated] 2024 Approved How to Screen-Capture High-Quality Snaps with Ease
- Updated In 2024, Windows Movie Maker for Mac Discover the Best Alternatives
- [Updated] 2024 Approved Crafting Viral Covers for Your Facebook Profile
- [New] 2024 Approved Ideas in Images Top 20 Photos to Fire Up Creativity
- 6 Fixes to Unfortunately WhatsApp has stopped Error Popups On Samsung Galaxy XCover 7 | Dr.fone
- [Updated] In 2024, Cutting-Edge Emulators Choose the Best 15 for Your Device
- [New] In 2024, The Ultimate List of Popular Videos Online
- Updated The Best Free Video Editors for Chromebook Users
- 8 Workable Fixes to the SIM not provisioned MM#2 Error on Samsung Galaxy S24 | Dr.fone
- In 2024, How to Change Your Vivo S18 Location on life360 Without Anyone Knowing? | Dr.fone
- Best Instagram Highlights Covers Apps
- New 2024 Approved Mastering Titles in FCPX Essential Skills for Video Editors
- Innovate in FB Advertising - Access No-Cost Video Tools
- New 2024 Approved Top Video Highlight Creators Desktop and Mobile Options
- New In 2024, Do You Love Making and Uploading Status on WhatsApp for Your Friends and Family? It Has Certainly Become a Trend Nowadays. Continue Reading to Learn About the Best WhatsApp Status Maker Apps
- How to recover deleted photos from Android Gallery without backup on C32
- Top Tactics Eliminate FB's Intrusive Video Ads for 2024
- New What Is AI Text to Video for 2024
- In 2024, How to Unlock SIM Card on Vivo X100 online without jailbreak
- How to Unlock Realme C33 2023 Phone Forgot Password
- How to Change Apple iPhone 15 Pro Location on Skout | Dr.fone
- Title: "[New] 2024 Approved The Filter Frontier Your Ultimate Resource for Creative Snaps"
- Author: Scott
- Created at : 2024-05-23 11:58:20
- Updated at : 2024-05-24 11:58:20
- Link: https://snapchat-videos.techidaily.com/new-2024-approved-the-filter-frontier-your-ultimate-resource-for-creative-snaps/
- License: This work is licensed under CC BY-NC-SA 4.0.
