![[New] 2024 Approved Regain Access to Confidential Snapshots](https://thmb.techidaily.com/8b7337516e3ab4c7de40944c48ebe243474ab75d4e4c1c2d693991f9d3085553.jpg)
"[New] 2024 Approved Regain Access to Confidential Snapshots"
Regain Access to Confidential Snapshots
Have you ever set some of your Snapchat pictures to “My Eyes Only” and then accidentally deleted them? Well, it’s happened to the best of us. Whether it’s a hilarious Snap streak with your best friend or a cute photo of your pet, losing important data can be frustrating.
But don’t worry, there’s a way to recover them! In this article, we’ll show you how to recover “My Eyes Only” pictures on Snapchat. We’ll also discuss how you can change or retrieve your password if you’ve forgotten it.
Part 1. How To Recover Photos Deleted From “My Eyes Only” on Snapchat
- Method 1. Recovering The Photos Via Snapchat - For iOS and Android
- Method 2. Using File Browser - For Android
Have you accidentally deleted a photo from your “My Eyes Only” album on Snapchat, and you’re now panicking because you think it’s gone forever? Don’t worry: with our two step-by-step methods provided below, you will surely retrieve your deleted snaps.
Method 1. Recovering The Photos Via Snapchat - For iOS and Android
The first method to recover My Eyes Only pictures on Snapchat is via the Privacy tab. Although it is a bit of a long process, this is surely going to work.
Here’s a quick and simple rundown of how you can recover your photos via Snapchat on your iOS and Android device:
Step1 Launch the Snapchat app on your device and sign in to your account. On the top left side of the screen, click your profile icon.
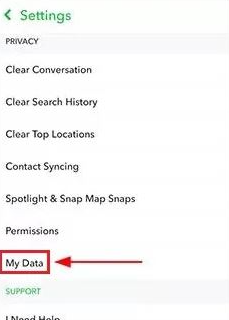
Step2 Tap the Setting icon and scroll down to the Privacy tab.

Step3 Under the Privacy tab, find the “My Data” option and tap it.
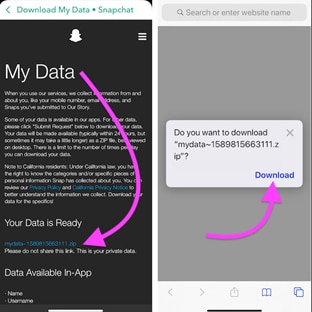
Step4 Log in to your Snapchat account once again, submit your request for data recovery from Snapchat’s server and download it.
![]()
Note: Keep in mind that only the snaps saved in your memory roll will be revived by this method.
Method 2. Using File Browser - For Android
You can also recover your My Eyes Only snapshots from the File Manager on your device. However, this solution only works on Android devices because iPhones do not provide all access to apps for your data safety.
Step1 Launch the File browser or File app on your device.
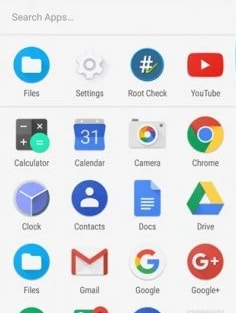
Step2 Head to “Data,” find the “Snapchat data or com.snapchat.android” file, and tap to open it.
Step3 Now, find a file with the “a .nomedia” extension, delete it, and the data will be restored to your Snapchat account.
![]()
Note: This method is only effective for a brief amount of time. Therefore, to recover your deleted Snaps, you should follow this method as soon as possible after they are deleted.
Apart from reading the methods we provided for your, you can also watch this video tutorial to help you recover My Eyes Only pictures quickly.
Part 2. A Bonus Tip: What If You Forget The Password Of My Eye Only
If you’ve ever forgotten the password to your “My Eye Only” on Snapchat, don’t worry; below, we’ve provided a few easy-to-follow instructions to help you quickly reset the password.
![]()
Note: If you opt to reset your current passcode, everything presently saved to My Eyes Only will be lost!!
How To Reset My Eyes Only Password?
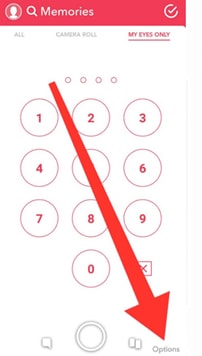
Step1 Open the Snapchat app on your Android or iOS device and tap the overlaid Photos icon to head to the Memories section. Next, go to the “My Eyes Only” tab.
Step2 Tap “Options” at the lower right corner of the screen and select “Forgot Password.”
Step3 Type your Snapchat password and tap “Next.” Accept the rules and tap “Continue” to proceed further.
Step4 Reset the password and tap “Confirm” to apply your changes.
FAQs
How To Change My Eyes Only Password?
If you still remember the present password but want to change it, do the following steps to change the “My Eyes Only” password:
Step1 Open the Snapchat app, head to the Memories section, and tap the “My Eyes Only” tab.
Step2 Tap “Option”> “Change Password” and type your current “My Eyes Only” password to continue.
Step3 Type your new PIN and tap “Next.” Tap the “Use Passphrase” option if you do not want to set a PIN code.
Step4 Tap the box next to “I understand that if …” and tap “Continue.” Finally, tap “Finish” to complete the process.
How Do I Move Snaps To My Eyes Only?
Here’s how you can move Snaps to the “My Eyes Only” section on Snapchat:
Step1 Open the Snapchat app on your phone and go to the Memories section.
Step2 Choose the snap you want to move, tap and hold it.
Step3 Select “My Eyes Only” to move your snap.
How Do I Set Up My Eyes Only?
To set up “My Eyes Only” on Snapchat, do the following steps in sequence:
Step1 Head to the Memories section in Snapchat and tap the “My Eyes Only” tab.
Step2 Under the My Eyes Only tab, tap the “Quick Setup” option.
Step3 Create a passphrase or PIN and confirm it. Now, check the box next to “I understand that…,” select “Continue,” and tap the “Finish“ option to complete the setup process.
How Do I Save Snaps To My Eyes Only By Default?
To save your Snaps to My Eyes only by default, follow these instructions step-by-step:
Step1 Open your Snapchat account and tap your Profile icon.
Step2 Tap the Settings icons at the top right-hand side of the screen and head to Memories.
Step3 Now, tap the toggle button next to “Save to My Eyes Only By Default” to change the settings. Your snaps will now save to the My Eyes Only section every time.
Conclusion
In this article, we’ve provided two step-by-step methods to help you recover My Eyes Only pictures on Snapchat on your iOS or Android device**.** We’ve also discussed how you can change or recover the My Eyes Only password with easy-to-follow instructions.
All in all, it is possible to recover your “My Eyes Only” pictures from Snapchat. While the process may be a little bit time-consuming, it is definitely worth it if you value your privacy. So, if you ever find yourself in this predicament, don’t despair - there is hope!
Be sure to follow the instructions carefully, and hopefully, you’ll be able to get your photos back!
Free Download For Win 7 or later(64-bit)
Free Download For macOS 10.14 or later
Method 2. Using File Browser - For Android
You can also recover your My Eyes Only snapshots from the File Manager on your device. However, this solution only works on Android devices because iPhones do not provide all access to apps for your data safety.
Step1 Launch the File browser or File app on your device.
Step2 Head to “Data,” find the “Snapchat data or com.snapchat.android” file, and tap to open it.
Step3 Now, find a file with the “a .nomedia” extension, delete it, and the data will be restored to your Snapchat account.
![]()
Note: This method is only effective for a brief amount of time. Therefore, to recover your deleted Snaps, you should follow this method as soon as possible after they are deleted.
Apart from reading the methods we provided for your, you can also watch this video tutorial to help you recover My Eyes Only pictures quickly.
Part 2. A Bonus Tip: What If You Forget The Password Of My Eye Only
If you’ve ever forgotten the password to your “My Eye Only” on Snapchat, don’t worry; below, we’ve provided a few easy-to-follow instructions to help you quickly reset the password.
![]()
Note: If you opt to reset your current passcode, everything presently saved to My Eyes Only will be lost!!
How To Reset My Eyes Only Password?
Step1 Open the Snapchat app on your Android or iOS device and tap the overlaid Photos icon to head to the Memories section. Next, go to the “My Eyes Only” tab.
Step2 Tap “Options” at the lower right corner of the screen and select “Forgot Password.”
Step3 Type your Snapchat password and tap “Next.” Accept the rules and tap “Continue” to proceed further.
Step4 Reset the password and tap “Confirm” to apply your changes.
FAQs
How To Change My Eyes Only Password?
If you still remember the present password but want to change it, do the following steps to change the “My Eyes Only” password:
Step1 Open the Snapchat app, head to the Memories section, and tap the “My Eyes Only” tab.
Step2 Tap “Option”> “Change Password” and type your current “My Eyes Only” password to continue.
Step3 Type your new PIN and tap “Next.” Tap the “Use Passphrase” option if you do not want to set a PIN code.
Step4 Tap the box next to “I understand that if …” and tap “Continue.” Finally, tap “Finish” to complete the process.
How Do I Move Snaps To My Eyes Only?
Here’s how you can move Snaps to the “My Eyes Only” section on Snapchat:
Step1 Open the Snapchat app on your phone and go to the Memories section.
Step2 Choose the snap you want to move, tap and hold it.
Step3 Select “My Eyes Only” to move your snap.
How Do I Set Up My Eyes Only?
To set up “My Eyes Only” on Snapchat, do the following steps in sequence:
Step1 Head to the Memories section in Snapchat and tap the “My Eyes Only” tab.
Step2 Under the My Eyes Only tab, tap the “Quick Setup” option.
Step3 Create a passphrase or PIN and confirm it. Now, check the box next to “I understand that…,” select “Continue,” and tap the “Finish“ option to complete the setup process.
How Do I Save Snaps To My Eyes Only By Default?
To save your Snaps to My Eyes only by default, follow these instructions step-by-step:
Step1 Open your Snapchat account and tap your Profile icon.
Step2 Tap the Settings icons at the top right-hand side of the screen and head to Memories.
Step3 Now, tap the toggle button next to “Save to My Eyes Only By Default” to change the settings. Your snaps will now save to the My Eyes Only section every time.
Conclusion
In this article, we’ve provided two step-by-step methods to help you recover My Eyes Only pictures on Snapchat on your iOS or Android device**.** We’ve also discussed how you can change or recover the My Eyes Only password with easy-to-follow instructions.
All in all, it is possible to recover your “My Eyes Only” pictures from Snapchat. While the process may be a little bit time-consuming, it is definitely worth it if you value your privacy. So, if you ever find yourself in this predicament, don’t despair - there is hope!
Be sure to follow the instructions carefully, and hopefully, you’ll be able to get your photos back!
Free Download For Win 7 or later(64-bit)
Free Download For macOS 10.14 or later
Elevate Snaps with Precision Boomerang Techniques
Social media platforms like Snapchat have gained immense popularity among teenagers and youngsters. People like to try the filters, lenses, and stickers on their snaps. This helps them to communicate with their friends in an interesting manner. These unique features offered on Snapchat are a contributing factor to its popularity.
Using Snapchat, you can not only take ordinary snaps but can also create boomerangs. The bounce feature on Snapchat was first introduced in August 2018 on all iOS devices. This feature is similar to the boomerang option available on Instagram. Through this feature, people can play their captured snap on the loop, highlighting a specific action in it. For your convenience, this article will tell how to do a boomerang on Snapchat in multiple ways.
Part 1: How to Make a Bounce on Snapchat - for iOS
If you are not an Instagram user, you can still make boomerangs using Snapchat. However, you must update your Snapchat to its latest version to use the bounce feature. To update your Snapchat and learn how to do a boomerang on Snapchat, follow the below steps:
Step1 On your iOS device, navigate to the App Store. You then need to click on your “Profile” icon displayed in the top-right corner.

Step2 After tapping on the Profile icon, you can see all the pending updates of your installed apps. If a pending update of Snapchat is available, tap on the “Update” button displayed next to the Snapchat app.

Step3 Once you are done with updating your Snapchat to the latest version, you can now avail its “Bounce” feature. To make a bounce, open your Snapchat and hit the “Record” button to capture a video. Once you have recorded the video, tap on the “Arrow” icon displayed at the bottom of the right section. Keep tapping that icon until you can see the “Bounce“ option. Now set the time duration of your video and tap on the “Save” button to conclude.

Part 2: Alternatives of Bounce on Snapchat - for both iOS and Android
The Bounce feature is only available on iOS devices. If you want to make a bounce on your Android smartphone, you can take help from the following easy methods. These methods can work on iOS and Android phones and will help you with how to do a boomerang on Snapchat.
Method 1: Regular Loop
On Snapchat, a Regular Loop feature allows you to play your snap without back-and-forth effect. By applying this feature, you can make your video enjoyable without the Bounce option. To use this feature, capture a video from the recording button and then press the “Infinity” icon twice. By tapping on the Infinity icon twice, you can activate the feature “Loop.”

Method 2: Limitless Snap
Apart from using the Regular Loop feature, you can use another exciting feature called “Limitless Snap.” This feature lets you send snaps to your friends and post the stories in an endless loop. The limitless snap will play continuously until your added friend does not close it on his own. To utilize this feature, press the “Infinity” icon and select the timer from 1 to infinity to play the snaps on loop.

Method 3: Use Instagram to Make a Boomerang Video
If you are not satisfied with the above two methods, you can use Instagram to make a boomerang video. For this, check the below steps to create a boomerang with Instagram.
Step1 Open your Instagram and swipe from left to right using your finger. On the recording screen, tap on the Boomerang option displayed as the “Infinity” icon.

Step2 Now, you can record the video by pressing and holding the Record button. Once done, tap on the three-dot icon at the top right corner and hit the “Save” button.

Step3 The boomerang video will be saved on your phone’s gallery directly. To access the saved video from Snapchat, you need to open your Snapchat memories and head to the Camera Roll tab. Here, you can find the saved boomerang video created through Instagram.

Part 3: Further Reading: How To Turn Video Into Boomerang With a Useful Tool
If you don’t know how to do a boomerang on Snapchat, you can use a reliable mobile application under the name of Filmora . This software functions effectively and comprises various features through which you can enhance and edit videos flawlessly.
Free Download For Win 7 or later(64-bit)
Free Download For macOS 10.14 or later
While this is available across Android and iOS, it provides a variety of enhancement tools to make videos look better. The use of loop effects helps you make your captured video more vibrant and interesting. If you wish to make your video into a boomerang through this mobile application, read the below details:
Step1 To start off with this tool, make sure you download and install it properly across your smartphone. Launch it and click on “New Project” to initiate a new video project. On the next screen, lead into the “Video” section and import your recorded video that is to be looped.

Step2 As the video opens up in front of you, click on the “Trim” button at the bottom of the screen. Move your cursor to the point where you want to trim the video. Click on the “Trim” button in the bottom-center of the panel to cut the video across the selected point.

Step3 You can select the unnecessary part of the video and simply tap on the “Delete” button on the farthest right of the panel. With the trimmed video, select it and click on the “Copy” button to make duplicates of the specific part. As you make copies of the video to loop it, you can also add effects in between the parts from the “Effect” icon.

Step4 Once you are done with your Snapchat boomerang video, set the resolution of the output video with the provided option on the top and click on the “Export” button.

Conclusion
Do you love making boomerang videos and want to know how to do a boomerang on Snapchat? Snapchat has introduced its Bounce feature, through which you can create boomerang videos and share them with your friends for fun. To achieve the best results in creating a boomerang video, you can try the smartphone tool known as Filmora. This mobile platform also comprises advanced features that can increase the quality of your boomerang video.
Free Download For macOS 10.14 or later
While this is available across Android and iOS, it provides a variety of enhancement tools to make videos look better. The use of loop effects helps you make your captured video more vibrant and interesting. If you wish to make your video into a boomerang through this mobile application, read the below details:
Step1 To start off with this tool, make sure you download and install it properly across your smartphone. Launch it and click on “New Project” to initiate a new video project. On the next screen, lead into the “Video” section and import your recorded video that is to be looped.
Step2 As the video opens up in front of you, click on the “Trim” button at the bottom of the screen. Move your cursor to the point where you want to trim the video. Click on the “Trim” button in the bottom-center of the panel to cut the video across the selected point.
Step3 You can select the unnecessary part of the video and simply tap on the “Delete” button on the farthest right of the panel. With the trimmed video, select it and click on the “Copy” button to make duplicates of the specific part. As you make copies of the video to loop it, you can also add effects in between the parts from the “Effect” icon.
Step4 Once you are done with your Snapchat boomerang video, set the resolution of the output video with the provided option on the top and click on the “Export” button.
Conclusion
Do you love making boomerang videos and want to know how to do a boomerang on Snapchat? Snapchat has introduced its Bounce feature, through which you can create boomerang videos and share them with your friends for fun. To achieve the best results in creating a boomerang video, you can try the smartphone tool known as Filmora. This mobile platform also comprises advanced features that can increase the quality of your boomerang video.
Also read:
- [New] 2024 Approved Snaps in a Flash Directly Upload Images From Camera Roll
- [New] High Definition Footage Leading Cameras of 2024
- [New] Year's Round Showcase of Best Zero-Toll LiveStream Utilities for 2024
- [Updated] 2024 Approved Optimal Sony PS3 Reproduction Tools Ranked (PC)
- [Updated] In 2024, Nailing the Technique for Snapchat Screen Time-Lapses
- [Updated] In 2024, Snappy Adjustments The Art of Perfecting Photos on Snapchat
- 2024 Approved The Complete Snapchat Editor's Toolbox for Photo Finesse
- A Detailed Guide on Faking Your Location in Mozilla Firefox On Nubia Z50S Pro | Dr.fone
- In 2024, Snapstreak Savvy Guidance to Prevent Interruptions
- In 2024, Utilizing Alternate Shots to Elevate Film Quality
- Overcoming 'Camera Unavailable' Obstacle on Snapchat – A Step-by-Step Guide
- The Power and Potential of Claude 2
- Update HP OfficeJet 8620 Printer Drivers on Windows Systems Efficiently
- Title: [New] 2024 Approved Regain Access to Confidential Snapshots
- Author: Scott
- Created at : 2024-12-09 19:33:03
- Updated at : 2024-12-10 18:05:43
- Link: https://snapchat-videos.techidaily.com/new-2024-approved-regain-access-to-confidential-snapshots/
- License: This work is licensed under CC BY-NC-SA 4.0.