![[New] 2024 Approved Navigating Through the Essentials of Snap Camera on MS Teams](https://thmb.techidaily.com/470729e2db7d552929f896fede9bd2112971e2401fbcd66ce15df928f6be58b2.jpg)
"[New] 2024 Approved Navigating Through the Essentials of Snap Camera on MS Teams"
Navigating Through the Essentials of Snap Camera on MS Teams
The trend of using vibrant filters and lenses during the pandemic time was first introduced by Snap Camera. There are various popular filters in the Snap Camera app that indulges people in creating captivating avatars. Moreover, people also use this popular app to enhance their visual presence in virtual conferences. You can apply unique filters or lenses through the Snap Camera app to make funny virtual meetings with friends.
This article will address how to properly download and launch the Snap Camera app. Moreover, you can also learn to link the Snap Camera on Microsoft Teams easily.
Part 1: How To Download Snap Camera on Your PC or Mac?
Snap Camera is a popular app that can change your visual appearance on many platforms. For instance, you can use the Snap Camera app on Skype, Microsoft Teams, Google Meetings, etc. This app offers attractive lenses and filters that can make your facial appearance interesting. To conduct a casual meeting with your friends, you can use the webcam of Snap Camera. The Snap Camera’s webcam lets you greet your friends or colleagues in a unique manner.
In this section, we will provide you with the exact system requirements of the Snap Camera. Also, we will guide you on how to install and launch the Snap Camera tool on your Windows or Mac device easily.
System Requirements of Snap Camera
- Required Operating System: Windows 10 (64 bit) or latest; macOS 10.13 or latest
- Minimum Hardware Requirements: Minimum of Intel Core i3 2.5Ghz or AMD FX 4300 2.6Ghz with 4 GB RAM / Intel HD Graphics 4000 / Nvidia GeForce 710 / AMD Radeon HD 6450 / Screen Resolution of 1280 x 768 or higher
Steps to Install and Launch Snap Camera on Windows or Mac
Step1 Visit the official website of Snap Camera and tap on the “Download” button. This will open a new page on your computer’s screen.

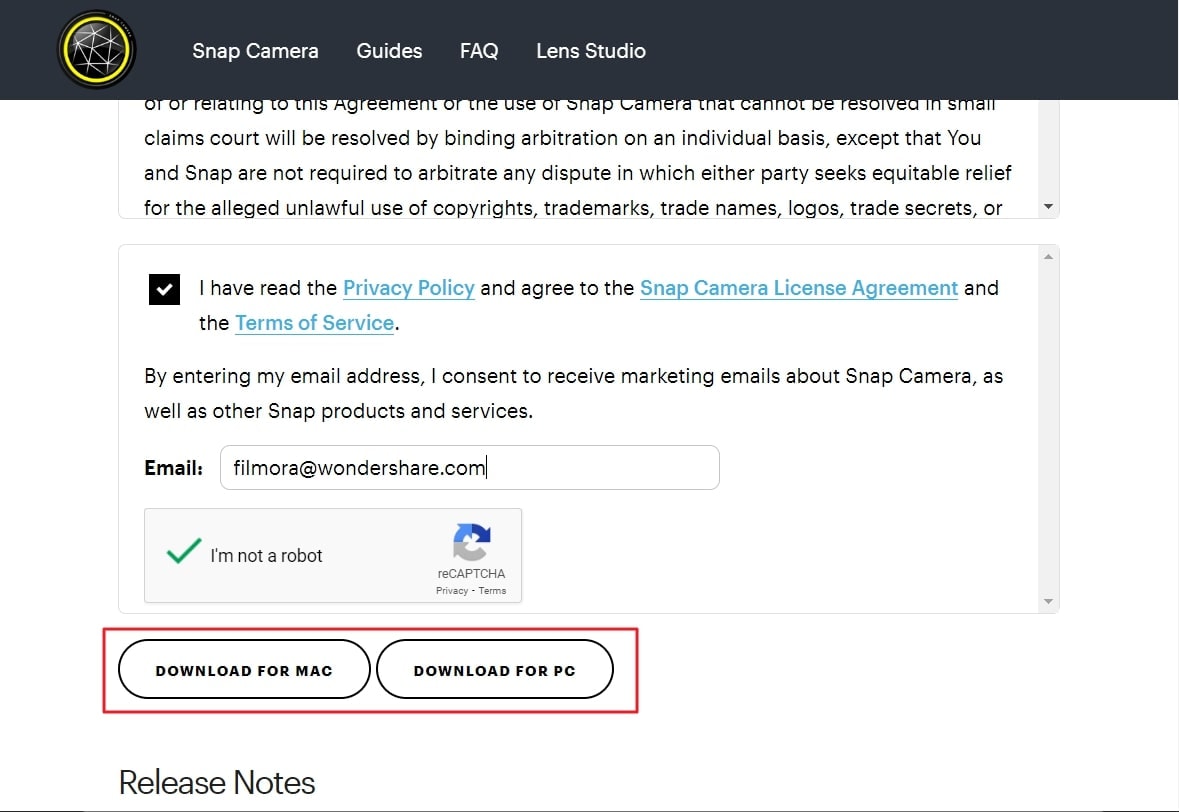
Step2 Click the “I agree” button and tap on the “I’m not a robot” option. Afterward, enter your email address in the given box.

Step3 Afterward, click either “Download for Mac” or “Download for PC,” depending on your need. Wait until the installer file gets downloaded on your computer completely. After that, double-click on the .exe file to install the Snap Camera for Microsoft Teams app.
Part 2: How To Set up Snap Camera on your PC
Do you want to set up the Snap Camera for Microsoft Teams on your computer? The setup process of the Snap Camera app is simple to follow. First, download the Snap Camera app on your computer successfully. Once done with launching the Snap Camera app, follow the below instructions:
Step1 After opening the Snap Camera app, click on the “Gear” icon. This will open the Settings of the Snap Camera.
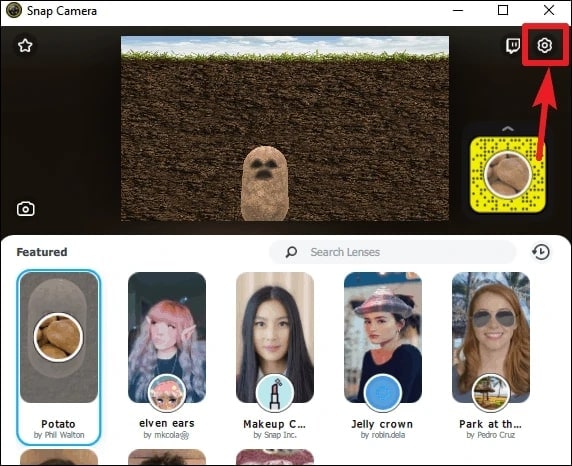
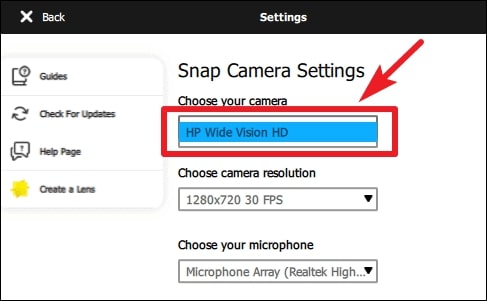
Step2 In Snap Camera Settings, head to the “Choose your Camera” option. Here, choose your desktop’s webcam to proceed. Afterward, select a filter on the app you want to apply during your virtual meeting.
Step3 Now, you can utilize the Snap Camera app on Microsoft Teams. For this, open the Microsoft Teams app after setting up the Snap Camera on your PC.
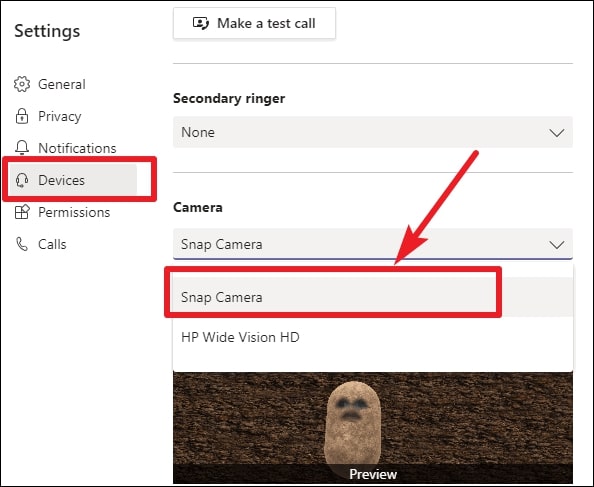
Step4 On your Microsoft Teams, tap on the “Profile” icon. Select “Settings” and tap on “Devices” from the left section. Afterward, scroll to the bottom until you can locate the “Camera” section.
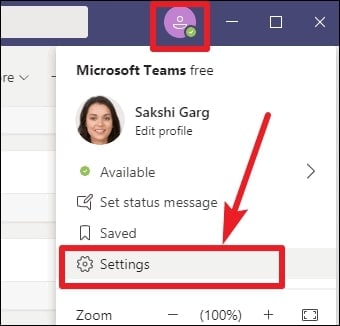
Step5 Under the Camera section, choose “Snap Camera” from the list. Thus, you conduct a virtual meeting using the Snap Camera for Microsoft Teams webcam and applied filters.
Part 3: Recommending Popular Snap Camera Filters
Do you want to try the trending filters of Snap Camera for Microsoft Teams? Read this part to discover the exciting filters that are exclusively provided in the Snap Camera tool:
1. Potato
This unique filter can be used to describe a funny situation in the form of a potato cartoon.

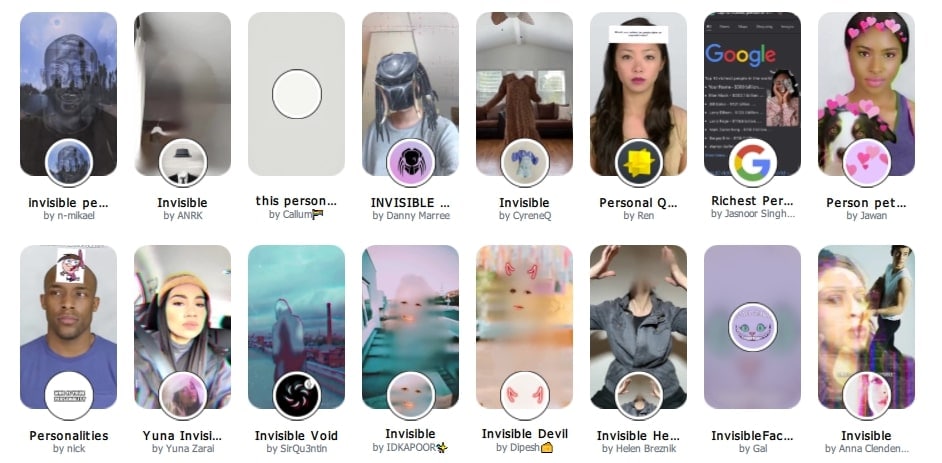
2. Invisible Person
This filter is for you if you want to highlight your presence by getting invisible!
3. Baby
Do you want to take the sympathies of your colleagues? Try this filter to make a baby face to prevent yourself in vulnerable situations.

4. Snorkle
Are you the one who is always punctual in attending the virtual meetings? This filter can describe your dedication to the team’s goals.

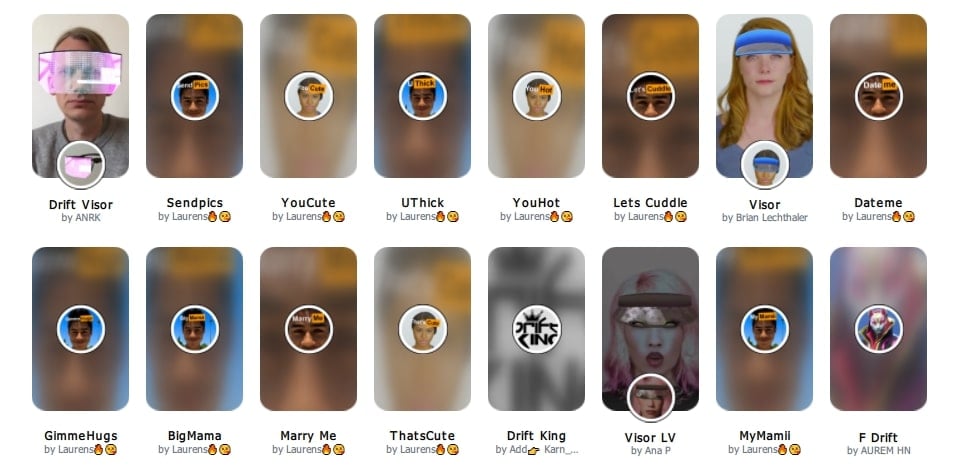
5. Drift Visor
Drift Visor is a vibrant filter that can be used by IT experts. If you are a technical expert, use this filter during virtual meetings.
Conclusion
Snap Camera is an advanced app that functions in altering the visual look. Using this app, you can try a different look in virtual sessions flawlessly. You can eliminate your facial flaws by applying the offered lenses and filters from the Snap Camera. This article taught you how to set up the Snap Camera on Microsoft Teams easily. If you are willing to use the Snap Camera app during your Zoom and Google Meet meetings, you can read their respective guides.
Free Download For Win 7 or later(64-bit)
Free Download For macOS 10.14 or later
Free Download For macOS 10.14 or later
Mastering GIFs: A Step-by-Step Snapchat Guide

For all informal interactions between pals, Snapchat is the go-to app. Many configurable options are available on the platform, allowing you to express your inner creative sides. Snapchat helps to put your spin on anything, whether it’s just sharing random photos to your contacts or having extended chats.
The option to add GIFs to Snapchat is one such great feature. Because Snapchat is primarily a picture-sharing app, the emphasis is on making these images as engaging and imaginative as possible, and this is where animated GIFs come to play.
GIF stickers have exploded in popularity and for a good cause. The active emojis are mostly not amusing, but they also give life to your images, making your digital experience better overall.
Given how entertaining GIFs can be, knowing how to send gif on snapchat is essential. As a result, we’ve put up a detailed guide that explains how to send gif on snapchat in four distinct methods. Enjoy!
Do you want to know how to send gif on snapchat in different simple ways? Then you’ve arrived at the correct page. In this post, we’ll show you how to send gif on snapchat in just a few easy and simple steps.
1.How to send gif on snapchat?
- On your phone, open Snapchat.
- Take a picture
- Select the Stickers symbol.
- Select a GIF.
- Choose the GIF you want to use.
- Finally, please include it in the picture.
2.How to make your animated GIFs
GIF means Graphics Interchange Format, and it’s simply a series of moving, dynamic pictures (think Harry Potter) that loop indefinitely. They give your image, which would otherwise be stagnant and dull, a new dimension.
GIFs are so entertaining that they can be used to carry a whole discussion. However, if you want to learn how to make your GIFs, follow the steps below.
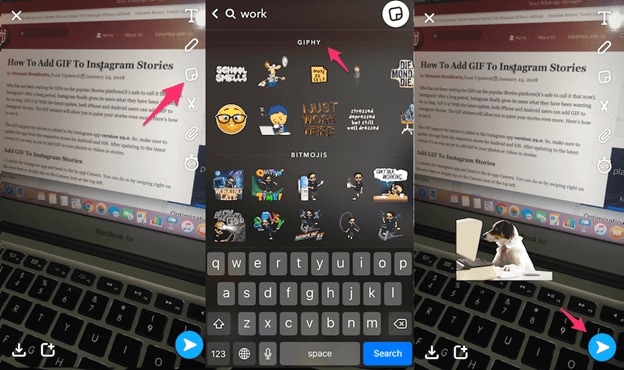
You’ll need to utilize the GIPHY application to generate your unique GIFs for this.
On your phone, download the GIPHY app.
- Start the app on your Mobile and select the create option.
- Smile symbol: Take a Photo and Gallery Option are the three options available to you.
- Smile Icon: This option allows you to make GIFs using the edit button.
- Capture a Photo: This option allows the user to take a photo on the scene and convert it to a GIF.
- Option of Gallery: You may build a GIF by selecting a photo from your gallery and editing it.
- Select options and begin designing depending on your preferences.
- When you will finish, click on the arrow in the bottom right-hand corner to exit.
- To save all the GIFs, go to Generated GIFs, touch on the three vertical dots, and choose Save GIF.
That GIF has now been saved to your pictures folder and can be seen anytime you need that.
3.What is the best way to transmit GIFs on Snapchat?
Putting GIFs in your photos is easy and takes only a few minutes. Here’s how to accomplish it.
- Log in to your Snapchat account by opening the app on your phone.
- Click a photo or choose an image from your collection to upload.
- Select the sticker button to add extra components to the Snap.
- Choose the GIF choice and any GIF you wish.
- Once you’ve chosen a GIF, it’ll show on the Snap for you to adjust and position anywhere you’d like.
- Lastly, to send the Snap to your pals, select the arrow option in the lower right corner.
4.On Android, how to send gif on snapchat Messages?
You must download the GBoard app on your phone to transfer GIFs to your pals immediately from a keypad on Android.
5.How can I get Gboard to work on Android?
To install and activate the Gboard application and transmit GIFs directly from it, follow the procedure.
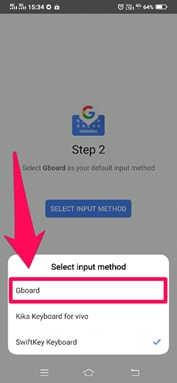
- Download the Gboard application on your Android.

- Open the app and select Enable in Configurations from the menu.
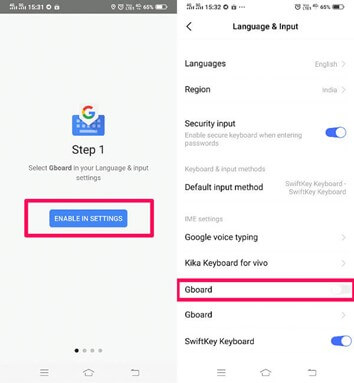
- The Communication and Input menu will appear in Preferences.
- Choose Gboard from the list of available keyboards.
6.In iOS, how to send gif on snapchat Messages?
Using the GIPHY keypad on your iPhone, you can share GIFs straight to your pals via Snapchat chats. However, you must first activate the keypad.
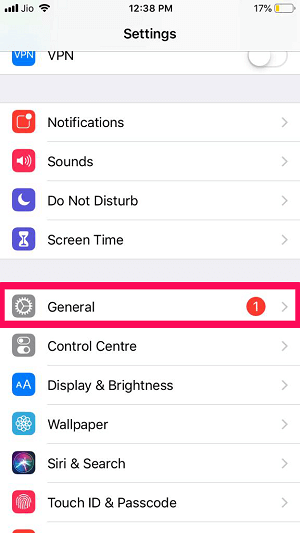
- Turn on the GIPHY keypad on your iPhone. Install the GIPHY phone app from the Apple Store. After you’ve downloaded the app, you’ll need to activate the GIPHY keypad on your iPhone.
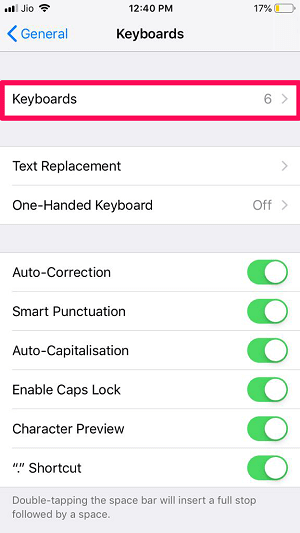
- To do just that, go over to the iPhone configuration menu and select “General” from the drop-down menu.
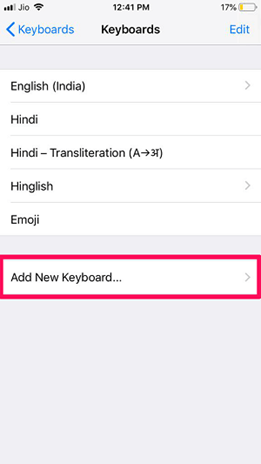
- Scroll to the bottom of the Keypad choice, then click “Keypads” once again.
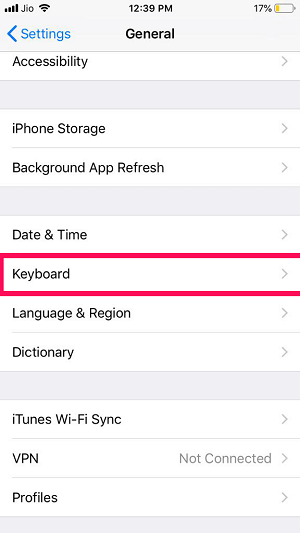
- All of the newly added keyboards will now be visible. Click the “Add Additional Keyboard” option to add GIPHY.
For Win 7 or later (64-bit)
For macOS 10.12 or later
For all informal interactions between pals, Snapchat is the go-to app. Many configurable options are available on the platform, allowing you to express your inner creative sides. Snapchat helps to put your spin on anything, whether it’s just sharing random photos to your contacts or having extended chats.
The option to add GIFs to Snapchat is one such great feature. Because Snapchat is primarily a picture-sharing app, the emphasis is on making these images as engaging and imaginative as possible, and this is where animated GIFs come to play.
GIF stickers have exploded in popularity and for a good cause. The active emojis are mostly not amusing, but they also give life to your images, making your digital experience better overall.
Given how entertaining GIFs can be, knowing how to send gif on snapchat is essential. As a result, we’ve put up a detailed guide that explains how to send gif on snapchat in four distinct methods. Enjoy!
Do you want to know how to send gif on snapchat in different simple ways? Then you’ve arrived at the correct page. In this post, we’ll show you how to send gif on snapchat in just a few easy and simple steps.
1.How to send gif on snapchat?
- On your phone, open Snapchat.
- Take a picture
- Select the Stickers symbol.
- Select a GIF.
- Choose the GIF you want to use.
- Finally, please include it in the picture.
2.How to make your animated GIFs
GIF means Graphics Interchange Format, and it’s simply a series of moving, dynamic pictures (think Harry Potter) that loop indefinitely. They give your image, which would otherwise be stagnant and dull, a new dimension.
GIFs are so entertaining that they can be used to carry a whole discussion. However, if you want to learn how to make your GIFs, follow the steps below.
You’ll need to utilize the GIPHY application to generate your unique GIFs for this.
On your phone, download the GIPHY app.
- Start the app on your Mobile and select the create option.
- Smile symbol: Take a Photo and Gallery Option are the three options available to you.
- Smile Icon: This option allows you to make GIFs using the edit button.
- Capture a Photo: This option allows the user to take a photo on the scene and convert it to a GIF.
- Option of Gallery: You may build a GIF by selecting a photo from your gallery and editing it.
- Select options and begin designing depending on your preferences.
- When you will finish, click on the arrow in the bottom right-hand corner to exit.
- To save all the GIFs, go to Generated GIFs, touch on the three vertical dots, and choose Save GIF.
That GIF has now been saved to your pictures folder and can be seen anytime you need that.
3.What is the best way to transmit GIFs on Snapchat?
Putting GIFs in your photos is easy and takes only a few minutes. Here’s how to accomplish it.
- Log in to your Snapchat account by opening the app on your phone.
- Click a photo or choose an image from your collection to upload.
- Select the sticker button to add extra components to the Snap.
- Choose the GIF choice and any GIF you wish.
- Once you’ve chosen a GIF, it’ll show on the Snap for you to adjust and position anywhere you’d like.
- Lastly, to send the Snap to your pals, select the arrow option in the lower right corner.
4.On Android, how to send gif on snapchat Messages?
You must download the GBoard app on your phone to transfer GIFs to your pals immediately from a keypad on Android.
5.How can I get Gboard to work on Android?
To install and activate the Gboard application and transmit GIFs directly from it, follow the procedure.
- Download the Gboard application on your Android.
- Open the app and select Enable in Configurations from the menu.
- The Communication and Input menu will appear in Preferences.
- Choose Gboard from the list of available keyboards.
6.In iOS, how to send gif on snapchat Messages?
Using the GIPHY keypad on your iPhone, you can share GIFs straight to your pals via Snapchat chats. However, you must first activate the keypad.
- Turn on the GIPHY keypad on your iPhone. Install the GIPHY phone app from the Apple Store. After you’ve downloaded the app, you’ll need to activate the GIPHY keypad on your iPhone.
- To do just that, go over to the iPhone configuration menu and select “General” from the drop-down menu.
- Scroll to the bottom of the Keypad choice, then click “Keypads” once again.
- All of the newly added keyboards will now be visible. Click the “Add Additional Keyboard” option to add GIPHY.
For Win 7 or later (64-bit)
For macOS 10.12 or later
Also read:
- [New] 2024 Approved Discovering Snapchat's Video Capabilities with Ease
- [New] 2024 Approved Long-Term Snap Storage on Android/Mac Systems
- [New] Expert Selection The Top 11 Kid-Friendly, Waterproof Camcorders for 2024
- [Updated] Enhancing Media Speed on Messenger & FB for 2024
- [Updated] In 2024, Finding Inner Voice How to Confidently Share Stories Online
- [Updated] The Definitive Path From Twitter Video to Creatively Crafted GIFs
- 2024 Approved A Comprehensive Guide to Business on Snapchat
- 2024 Approved Fine-Tune Your Snaps with Mac-Produced Content
- 2024 Approved Hear the Difference on Chrome The Ultimate Guide to Voice Alteration Apps
- Best Ways on How to Unlock/Bypass/Swipe/Remove ZTE Blade A73 5G Fingerprint Lock
- In 2024, Capturing Snapshots Transferring From Snapchat to Device Storage
- In 2024, Demystifying Screen Record Snapchat A Beginner's Handbook
- In 2024, How to Unlock Vivo Y17s Phone Password Without Factory Reset?
- Reignite Your Gaming Experience Free Voice Transformation for Valorant Lovers for 2024
- The Arrival of Samsung Galaxy Watch 7: Latest Updates and Features Unveiled
- Title: [New] 2024 Approved Navigating Through the Essentials of Snap Camera on MS Teams
- Author: Scott
- Created at : 2024-12-24 16:37:37
- Updated at : 2024-12-26 06:57:51
- Link: https://snapchat-videos.techidaily.com/new-2024-approved-navigating-through-the-essentials-of-snap-camera-on-ms-teams/
- License: This work is licensed under CC BY-NC-SA 4.0.