
!["[New] 2024 Approved How to Add a Pop of Japanese Style with Snapchat's Anime Filter"](https://www.lifewire.com/thmb/WFvU4ZL5NviLm9GFYkEUQ5kjayU=/400x300/filters:no_upscale():max_bytes(150000):strip_icc()/02LW4149830-HeroSquare-d2335ae2774942c09bf723276ea1a609.jpg)
"[New] 2024 Approved How to Add a Pop of Japanese Style with Snapchat's Anime Filter"
How to Add a Pop of Japanese Style with Snapchat’s Anime Filter
What Is Anime Filter On Snapchat?

Shanoon Cox
Mar 27, 2024• Proven solutions
Snapchat anime filter is the new sensation that is making waves all across social media. The best part about anime filter is that it has the ability to transform your videos and images into anime instantly. This filter has already gone viral on other social media platforms, such as TikTok, Instagram, and Twitter.
Filters and effects are not new when it comes to social media services, and almost all of them have their own versions, which you can use. Snapchat is here with a new lens, which is becoming immensely popular. If you have been trying to use the Snapchat anime filter and don’t know how to go about it, you have come to the right place because this article will talk about how to get this filter and how to use it. Keep reading!
Part 1: What is Anime Filter on Snapchat?
Out of the many AR lenses from Snapchat, the latest one is the anime lens. It’s a filter that will morph a person’s photo or video into an anime character and will customize the anime face based on the person’s facial features. So, rather than simply applying a generic image on top of your face, Snapchat makes sure that the anime image looks similar to your actual image. And as a result, each person’s anime face turns out to be different.
Since the hashtag #animefilter is trending, you can also apply the anime filter on your face and be a part of the trend. The reaction to this filter is lowkey amazing because the filter not only changes your face and makes it look like a part of a hit anime cartoon series or movie, but it sometimes also changes your hair color making you look like the King of the Pirates or Rapunzel. What this lens will do and how your image will turn out to be is highly fascinating.
What stands out is that after the anime filter of Snapchat was released, it has been used over 3 billion times. Snapchat has confirmed this statistic in its Third Quarter 2020 Financial report, and they even said that they already knew it would be a massive hit.
Part 2: How to Get the Anime Filter on Snapchat?
Now that you know how popular the Snapchat anime filter is. It’s worth knowing how to get it. Although this filter is available on Snapchat, many users are facing issues finding it. This section will show you two easy ways to get this filter. You can use one or both methods and start using the filter to show the world how you will look like an anime character. Here are the two ways:
Method 1: Get the Anime Face Filter on Snapchat via Link
Step 1: First, click on the link here . You will need this link to get the anime face filter.
Step 2: Once you click on the click, a pop-up window will open. If you haven’t downloaded the anime filter yet, then Snapchat will say, “New lens found.” Right below it, you will see the message “unlock for 48 hours.” Go ahead and click on that.
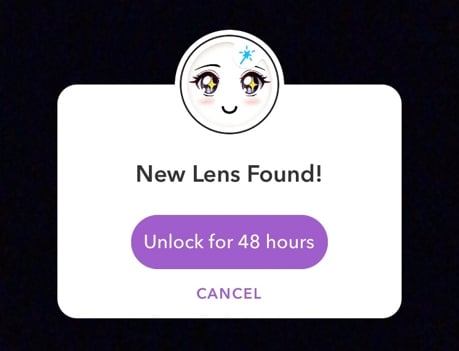
Step 3: By clicking on the purple button, your Snapchat anime filter will be available for use for 48 hours.
Here’s a pro tip, if you want to continue using this filter, once the 48 hours are over, simply repeat the steps, and you can use it for additional 48 hours. Simple!
If the pop-up says, “nothing to see here”, which means you have the filter already. In this case, you can go to Snapchat and click the filter accordingly.
Method 2: Get the Anime Style Filter via Explore on Snapchat
If you don’t want to click any unknown links, you can explore the anime filter by searching on Snapchat.
Step 1: Make sure your Snapchat is up-to-date. If not, update it to the latest version.
Step 2: Open Snapchat on your mobile or tablet, whichever you are using. Now, turn the lens towards you or someone else as if you are clicking a picture.
Step 3: Now, click on the smiley face filter button, and tap on the Explore button to continue.
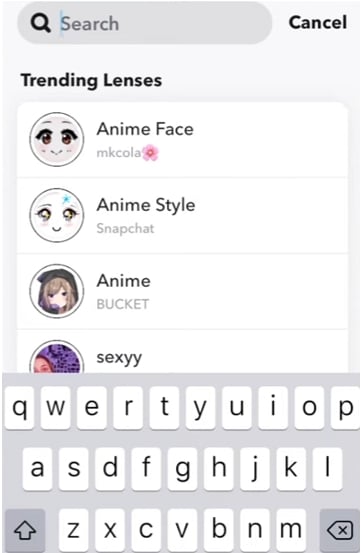
Step 4: You can now search for Anime Styles. There are several anime filters available, just make sure that the creator of the filter is Snapchat.
Step 5: Once you have the anime filter, you can record a video of yourself, or take photos. You may also use both back and front cameras to turn anyone into an anime character.
Pro tip: This filter works on already saved photos and videos as well. Try them on too. This filter will work only on your face, though. So, it won’t turn your entire body into an anime character.
Part 3: How Do I Get More Filters on Snapchat?
Since Snapchat keeps coming up with attractive filters, you may wonder how you can get more filters to keep using them. Well, there are a few tricks that you can try. We will explain these tricks in detail, so make sure to follow them correctly.
Trick 1: Turn on Snapchat Geofilters
Before you try using Snapchat geofilters, you will first have to permit Snapchat to access your location. Whether you are using iOS or Android, enable location, and you will start seeing geofilters and all the other filters that you have saved.
Don’t expect a plethora of filters to suddenly turn up. For example, when you apply a geofilter, you will see that it adds an illustration and the place name to your Snap. So, the more you explore and go out, the more filters you will start seeing.
Trick 2: Check Online Resources on Lens Studio and Lenslist
You can also explore two filter libraries, which are Lens Studio and Lenslist. These are repositories of AR content. These two libraries have many attractive filters. All you need to do is scan the Snapcode available in the filters and unlock them. Both of them will have duplicate filters as well, though. But dig a bit deeper, and you will have enough codes of filters to keep using them every day. You will find these codes in your profile once you add them.
Trick 3: Share Snapcodes for Snapchat
The last way to add Snapcode of filters is by scanning other people’s codes. Once you go to your profile, you will see your Snapcodes, which other people can scan. Just like that, you can scan other people’s code as well. Some codes will be available for 24 hours, while others for 48 hours. After that, you can scan the code again when you want to reuse them. To scan a code, just hold your camera over the code and allow the screen to register it.
Bonus: How to Add Anime Effect to Video with Filmora
As we shared, Snapchat will only morph your face into an anime character. But if you are not satisfied with that and want to turn a whole video into anime or cartoon, then one of the best ways to go about it is by getting Wondershare Filmora. Filmora is an easy-to-use yet powerful enough video editing tool loaded with stunning effects, such as cartoons, sketches, color sketches, and more. The process is very easy to follow, and to use Filmora, you don’t need to be a pro. Here are the steps that you can follow:
Step 1: Launch Wondershare Filmora to your Mac or Windows computer. If you haven’t downloaded it yet, click the Try It Free button below to start.


Step 2: Now, import media files and load the video that you want to convert into a cartoon or anime to the media library, and then add that video to the timeline.

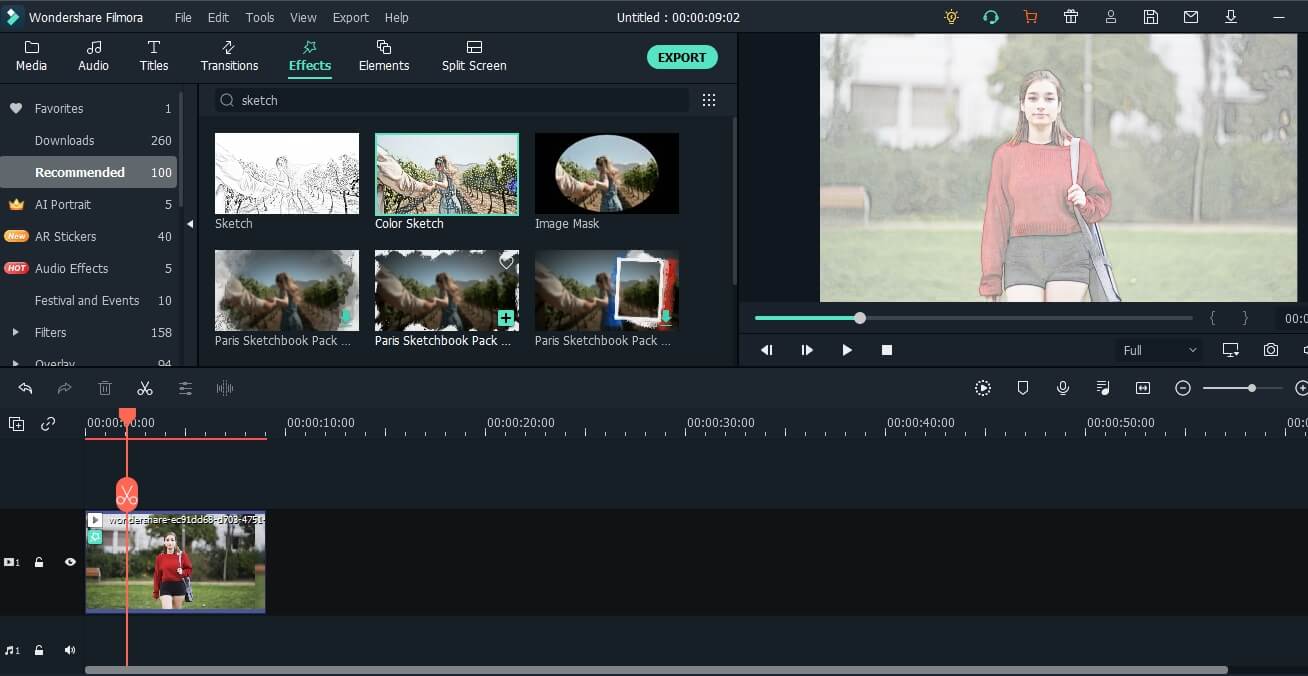
Step 3: Go to the Effects option, and type sketch in the search effects bar, which will be on the top of the screen.
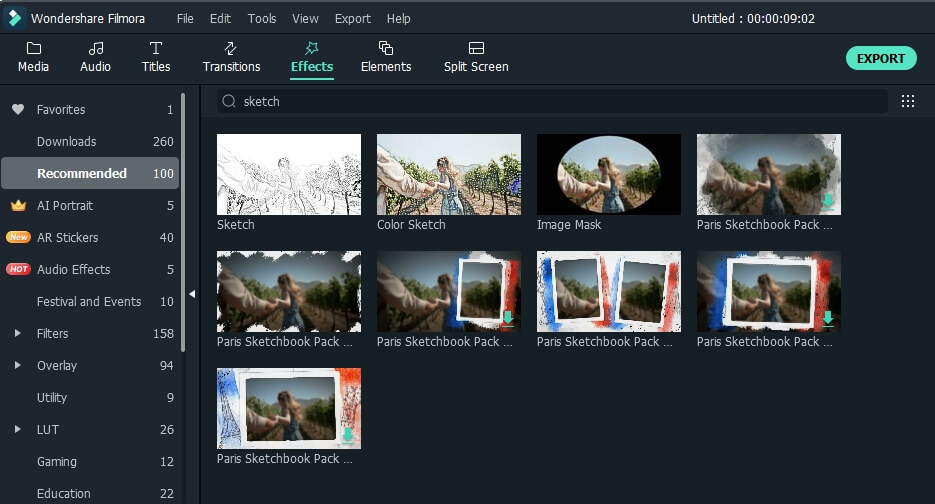
Step 4: Currently, Filmora provides sketch and color sketch effects. Try each one of them to see which one works the best. If you want to add the filter to the entire video, just drag and drop the filter to the video, and it’s done.
Step 5: Finally, click on the Export button after everything is done to save the edited video on your computer.
Note: If you want to add the sketch effect to the person only, you can use the Human Segmentation in AI Portrait. In this way, you can also try the Cartoon effect to see the result.
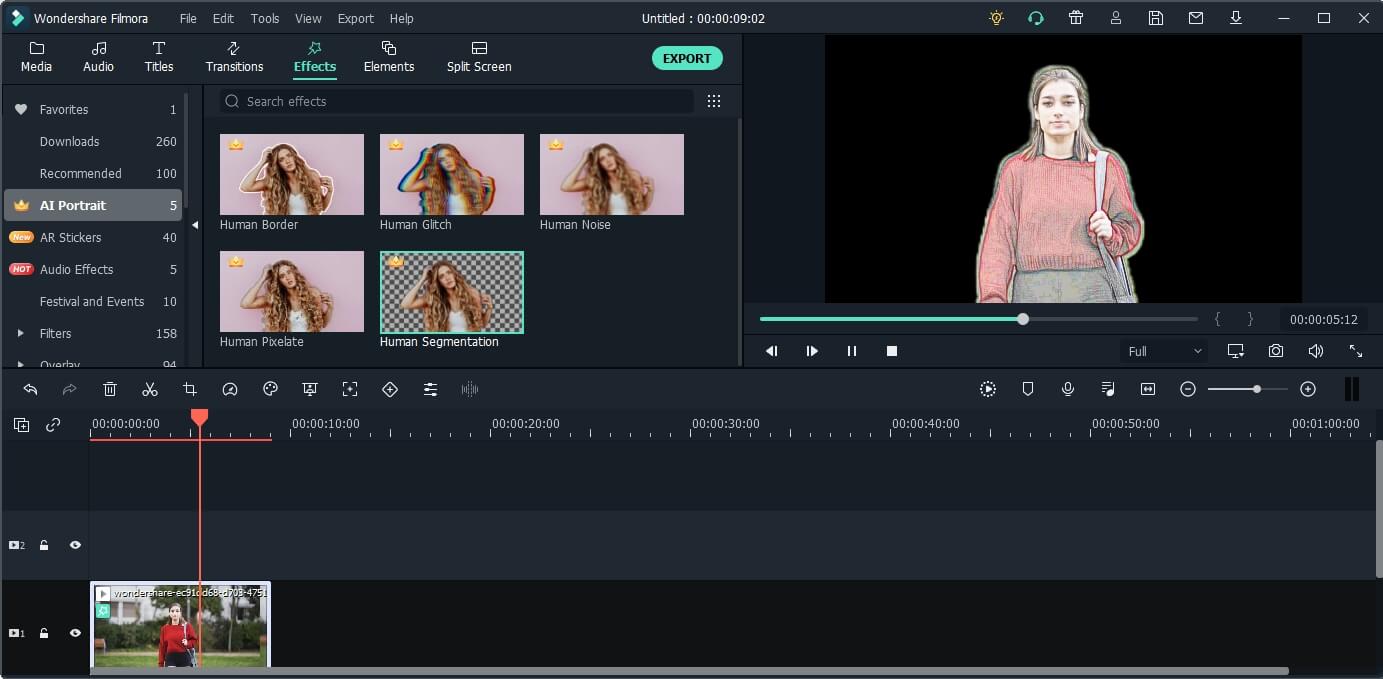
Check the video tutorial below to explore more usage of the AI Portrait add-on.
Shanoon Cox
Shanoon Cox is a writer and a lover of all things video.
Follow @Shanoon Cox
Shanoon Cox
Mar 27, 2024• Proven solutions
Snapchat anime filter is the new sensation that is making waves all across social media. The best part about anime filter is that it has the ability to transform your videos and images into anime instantly. This filter has already gone viral on other social media platforms, such as TikTok, Instagram, and Twitter.
Filters and effects are not new when it comes to social media services, and almost all of them have their own versions, which you can use. Snapchat is here with a new lens, which is becoming immensely popular. If you have been trying to use the Snapchat anime filter and don’t know how to go about it, you have come to the right place because this article will talk about how to get this filter and how to use it. Keep reading!
Part 1: What is Anime Filter on Snapchat?
Out of the many AR lenses from Snapchat, the latest one is the anime lens. It’s a filter that will morph a person’s photo or video into an anime character and will customize the anime face based on the person’s facial features. So, rather than simply applying a generic image on top of your face, Snapchat makes sure that the anime image looks similar to your actual image. And as a result, each person’s anime face turns out to be different.
Since the hashtag #animefilter is trending, you can also apply the anime filter on your face and be a part of the trend. The reaction to this filter is lowkey amazing because the filter not only changes your face and makes it look like a part of a hit anime cartoon series or movie, but it sometimes also changes your hair color making you look like the King of the Pirates or Rapunzel. What this lens will do and how your image will turn out to be is highly fascinating.
What stands out is that after the anime filter of Snapchat was released, it has been used over 3 billion times. Snapchat has confirmed this statistic in its Third Quarter 2020 Financial report, and they even said that they already knew it would be a massive hit.
Part 2: How to Get the Anime Filter on Snapchat?
Now that you know how popular the Snapchat anime filter is. It’s worth knowing how to get it. Although this filter is available on Snapchat, many users are facing issues finding it. This section will show you two easy ways to get this filter. You can use one or both methods and start using the filter to show the world how you will look like an anime character. Here are the two ways:
Method 1: Get the Anime Face Filter on Snapchat via Link
Step 1: First, click on the link here . You will need this link to get the anime face filter.
Step 2: Once you click on the click, a pop-up window will open. If you haven’t downloaded the anime filter yet, then Snapchat will say, “New lens found.” Right below it, you will see the message “unlock for 48 hours.” Go ahead and click on that.
Step 3: By clicking on the purple button, your Snapchat anime filter will be available for use for 48 hours.
Here’s a pro tip, if you want to continue using this filter, once the 48 hours are over, simply repeat the steps, and you can use it for additional 48 hours. Simple!
If the pop-up says, “nothing to see here”, which means you have the filter already. In this case, you can go to Snapchat and click the filter accordingly.
Method 2: Get the Anime Style Filter via Explore on Snapchat
If you don’t want to click any unknown links, you can explore the anime filter by searching on Snapchat.
Step 1: Make sure your Snapchat is up-to-date. If not, update it to the latest version.
Step 2: Open Snapchat on your mobile or tablet, whichever you are using. Now, turn the lens towards you or someone else as if you are clicking a picture.
Step 3: Now, click on the smiley face filter button, and tap on the Explore button to continue.
Step 4: You can now search for Anime Styles. There are several anime filters available, just make sure that the creator of the filter is Snapchat.
Step 5: Once you have the anime filter, you can record a video of yourself, or take photos. You may also use both back and front cameras to turn anyone into an anime character.
Pro tip: This filter works on already saved photos and videos as well. Try them on too. This filter will work only on your face, though. So, it won’t turn your entire body into an anime character.
Part 3: How Do I Get More Filters on Snapchat?
Since Snapchat keeps coming up with attractive filters, you may wonder how you can get more filters to keep using them. Well, there are a few tricks that you can try. We will explain these tricks in detail, so make sure to follow them correctly.
Trick 1: Turn on Snapchat Geofilters
Before you try using Snapchat geofilters, you will first have to permit Snapchat to access your location. Whether you are using iOS or Android, enable location, and you will start seeing geofilters and all the other filters that you have saved.
Don’t expect a plethora of filters to suddenly turn up. For example, when you apply a geofilter, you will see that it adds an illustration and the place name to your Snap. So, the more you explore and go out, the more filters you will start seeing.
Trick 2: Check Online Resources on Lens Studio and Lenslist
You can also explore two filter libraries, which are Lens Studio and Lenslist. These are repositories of AR content. These two libraries have many attractive filters. All you need to do is scan the Snapcode available in the filters and unlock them. Both of them will have duplicate filters as well, though. But dig a bit deeper, and you will have enough codes of filters to keep using them every day. You will find these codes in your profile once you add them.
Trick 3: Share Snapcodes for Snapchat
The last way to add Snapcode of filters is by scanning other people’s codes. Once you go to your profile, you will see your Snapcodes, which other people can scan. Just like that, you can scan other people’s code as well. Some codes will be available for 24 hours, while others for 48 hours. After that, you can scan the code again when you want to reuse them. To scan a code, just hold your camera over the code and allow the screen to register it.
Bonus: How to Add Anime Effect to Video with Filmora
As we shared, Snapchat will only morph your face into an anime character. But if you are not satisfied with that and want to turn a whole video into anime or cartoon, then one of the best ways to go about it is by getting Wondershare Filmora. Filmora is an easy-to-use yet powerful enough video editing tool loaded with stunning effects, such as cartoons, sketches, color sketches, and more. The process is very easy to follow, and to use Filmora, you don’t need to be a pro. Here are the steps that you can follow:
Step 1: Launch Wondershare Filmora to your Mac or Windows computer. If you haven’t downloaded it yet, click the Try It Free button below to start.
Step 2: Now, import media files and load the video that you want to convert into a cartoon or anime to the media library, and then add that video to the timeline.
Step 3: Go to the Effects option, and type sketch in the search effects bar, which will be on the top of the screen.
Step 4: Currently, Filmora provides sketch and color sketch effects. Try each one of them to see which one works the best. If you want to add the filter to the entire video, just drag and drop the filter to the video, and it’s done.
Step 5: Finally, click on the Export button after everything is done to save the edited video on your computer.
Note: If you want to add the sketch effect to the person only, you can use the Human Segmentation in AI Portrait. In this way, you can also try the Cartoon effect to see the result.
Check the video tutorial below to explore more usage of the AI Portrait add-on.
Shanoon Cox
Shanoon Cox is a writer and a lover of all things video.
Follow @Shanoon Cox
Mastering Simple Multi-Snap Chat Video Creation & Editing
How to Make and Edit Multi Snapchat Videos Easily

Ollie Mattison
Mar 27, 2024• Proven solutions
Recording and sharing videos are now easy with Snapchat. With a maximum limit of 10 seconds, these videos are kept short in duration. Whether posting the Snapchat video to the story, sharing it with friends or in a Snapchat group, Snapchat was always a hit until numerous competitors started ripping its features.
But, Snapchat is back with a bounce with its multi snaps feature which is a new addition to video sharing feature in Snapchat. What is a multi snap? Snapchat, allows users to make more than 10 seconds snap video now, which is called multi snaps.
In this feature, you can record footages as long as 1 minute, which is divided into 6 snaps. Do you know how to make a video on Snapchat? Here you will learn how to make and edit multi Snapchat videos even without holding the button.
- Part1: How to Make Snapchat Multi Video Easily
- Part2: Notes About Multi Snapchat Videos
- Part3: How to Make Multi Video Without Holding the Button On iPhone
- Part4: How To Edit Video With The Built-In Features
Part1: How to Make Snapchat Multi Video Easily
If you wish to make a multi video in a few minutes very quickly, you just need to tap the big round button on the screen of the camera app and hold it.
Don’t leave the button even after the time is over. As you keep holding the button, the next snap starts recording automatically.
When you think it’s complete, at the bottom of the screen you can see the snaps appearing.
The ones you wish to keep must be saved and the rest can be dragged in order to delete.
Finally, you may edit the snaps and add effects like you do with any usual snap at the same time.

Part2: Notes About Multi Snapchat Videos
- In the Memories tab, you can find the multi snaps under the ‘Snaps’ icon and ‘All’ tabs
- When a multi snap is added and saved to the Camera Roll folder, it will be saved as a seamless single video. You cannot divide the video or break it into parts.
- One particular snap cannot be extracted from the multi snap
- Are you looking forward to sending multi snaps to My Story but facing difficulty? In such a situation you can always find it in My Stories screen and send each snap one by one.
- In multi snap, you cannot include 3D stickers, and it also cannot be reversed or looped at present.
Part3: How to Make Multi Video Without Holding the Button On iPhone
Pressing and holding the button constantly for recording multi snaps can be quite tiresome as it keeps your finger held down. But, the iPhone users can record multi video even without holding the button. Do your know how? Let’s learn the trick.
- Firstly, go to the Settings and select General from the drop-down menu. Tap on Accessibility and click the Assistive Touch. The Assistive Touch option helps to access the iPhone when you are unable to touch the screen.

- Turn the Assistive Touch On from the of mode and then Create New Gesture, under Custom Gestures. With this mode, you can record the gestures. You can activate it from the Favorites in Menu bar. Then, use one finger to press and hold your iPhone screen’s center to allow recording your Touch. You can see at the bottom there’s a blue bar which once filled indicates that your Touch is recorded. Now, Save the gesture and open Snapchat. You can find a grey dot on the screen, tap it. Now, tap on the Custom and the saved gesture.

- Once you click the saved gesture, you can see another grey dot on the screen. Drag the grey dot over record button of Snapchat and let go. One thing must be noted that you can only record 8 seconds video in iPhone than usual 10 seconds because gestures can be set only for 8 seconds.

Your hands are free to move anywhere, meanwhile, the Snapchat video is recording.
Part4: How To Edit Video With The Built-In Features
Editing snaps and videos have always been fun whether it’s for trial or for work. After recording a snapshot video, you can edit it by swiping right or left to add special effects.
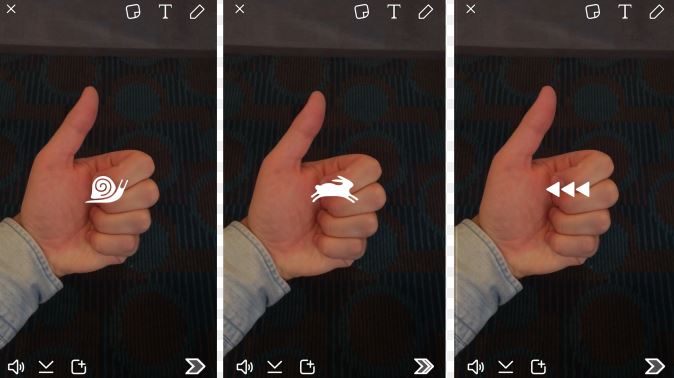
- Filters must be enabled to access the special effects. So turn it on. Rabbit will speed up your Snapchat video whereas, the snail will slow it down.
- If you wish to play your video is reverse mode then use the 3 backward arrows.The brightness of your Snapchat video can be adjusted with some of the filters. Your time, location, and speed can also be transformed by adding effects with some filters.
- There’s a magic eraser tool that can help you in erasing any object like a tree or your ex-girlfriend from the snap. You may also use a tint brush to pick a color and then touch the object you wish to tint with the brush. This feature is available for both the Android and iOS users.
Conclusion
If you want to have fun and better video effects, you can use Filmora to edit video on desktop before uploading Snapchat videos from the camera roll. Filmora is one of the best applications with a range of features. You can add graphic overlays and filters, color tuning, noise removal, 4k video resolution, pan zoom, and many more features to make your Snapchat video attractive and amazing. This article gives you a detailed information on how to make a video on Snapchat, even without pressing the button. Enjoy multi snaps feature on Snapchat videos and use by following the steps mentioned above.
Ollie Mattison
Ollie Mattison is a writer and a lover of all things video.
Follow @Ollie Mattison
Ollie Mattison
Mar 27, 2024• Proven solutions
Recording and sharing videos are now easy with Snapchat. With a maximum limit of 10 seconds, these videos are kept short in duration. Whether posting the Snapchat video to the story, sharing it with friends or in a Snapchat group, Snapchat was always a hit until numerous competitors started ripping its features.
But, Snapchat is back with a bounce with its multi snaps feature which is a new addition to video sharing feature in Snapchat. What is a multi snap? Snapchat, allows users to make more than 10 seconds snap video now, which is called multi snaps.
In this feature, you can record footages as long as 1 minute, which is divided into 6 snaps. Do you know how to make a video on Snapchat? Here you will learn how to make and edit multi Snapchat videos even without holding the button.
- Part1: How to Make Snapchat Multi Video Easily
- Part2: Notes About Multi Snapchat Videos
- Part3: How to Make Multi Video Without Holding the Button On iPhone
- Part4: How To Edit Video With The Built-In Features
Part1: How to Make Snapchat Multi Video Easily
If you wish to make a multi video in a few minutes very quickly, you just need to tap the big round button on the screen of the camera app and hold it.
Don’t leave the button even after the time is over. As you keep holding the button, the next snap starts recording automatically.
When you think it’s complete, at the bottom of the screen you can see the snaps appearing.
The ones you wish to keep must be saved and the rest can be dragged in order to delete.
Finally, you may edit the snaps and add effects like you do with any usual snap at the same time.
Part2: Notes About Multi Snapchat Videos
- In the Memories tab, you can find the multi snaps under the ‘Snaps’ icon and ‘All’ tabs
- When a multi snap is added and saved to the Camera Roll folder, it will be saved as a seamless single video. You cannot divide the video or break it into parts.
- One particular snap cannot be extracted from the multi snap
- Are you looking forward to sending multi snaps to My Story but facing difficulty? In such a situation you can always find it in My Stories screen and send each snap one by one.
- In multi snap, you cannot include 3D stickers, and it also cannot be reversed or looped at present.
Part3: How to Make Multi Video Without Holding the Button On iPhone
Pressing and holding the button constantly for recording multi snaps can be quite tiresome as it keeps your finger held down. But, the iPhone users can record multi video even without holding the button. Do your know how? Let’s learn the trick.
- Firstly, go to the Settings and select General from the drop-down menu. Tap on Accessibility and click the Assistive Touch. The Assistive Touch option helps to access the iPhone when you are unable to touch the screen.
- Turn the Assistive Touch On from the of mode and then Create New Gesture, under Custom Gestures. With this mode, you can record the gestures. You can activate it from the Favorites in Menu bar. Then, use one finger to press and hold your iPhone screen’s center to allow recording your Touch. You can see at the bottom there’s a blue bar which once filled indicates that your Touch is recorded. Now, Save the gesture and open Snapchat. You can find a grey dot on the screen, tap it. Now, tap on the Custom and the saved gesture.
- Once you click the saved gesture, you can see another grey dot on the screen. Drag the grey dot over record button of Snapchat and let go. One thing must be noted that you can only record 8 seconds video in iPhone than usual 10 seconds because gestures can be set only for 8 seconds.
Your hands are free to move anywhere, meanwhile, the Snapchat video is recording.
Part4: How To Edit Video With The Built-In Features
Editing snaps and videos have always been fun whether it’s for trial or for work. After recording a snapshot video, you can edit it by swiping right or left to add special effects.
- Filters must be enabled to access the special effects. So turn it on. Rabbit will speed up your Snapchat video whereas, the snail will slow it down.
- If you wish to play your video is reverse mode then use the 3 backward arrows.The brightness of your Snapchat video can be adjusted with some of the filters. Your time, location, and speed can also be transformed by adding effects with some filters.
- There’s a magic eraser tool that can help you in erasing any object like a tree or your ex-girlfriend from the snap. You may also use a tint brush to pick a color and then touch the object you wish to tint with the brush. This feature is available for both the Android and iOS users.
Conclusion
If you want to have fun and better video effects, you can use Filmora to edit video on desktop before uploading Snapchat videos from the camera roll. Filmora is one of the best applications with a range of features. You can add graphic overlays and filters, color tuning, noise removal, 4k video resolution, pan zoom, and many more features to make your Snapchat video attractive and amazing. This article gives you a detailed information on how to make a video on Snapchat, even without pressing the button. Enjoy multi snaps feature on Snapchat videos and use by following the steps mentioned above.
Ollie Mattison
Ollie Mattison is a writer and a lover of all things video.
Follow @Ollie Mattison
Also read:
- 2024 Approved The Pathway to Success with Snapchat in the Workplace
- In 2024, Transform Your Snapchat Soundtrack Easy Changes in Just Two Steps
- [Updated] Photo Perfection How to Automatically Save Snaps From Snapchat for 2024
- [New] In 2024, Keeping Memories Alive on Android/Mac with Snaps
- [New] 2024 Approved The Right Approach to Uploading Photos From Your Device to Snapchat
- [New] In 2024, Speak and Stun on Snapchat Voice Change Made Simple
- [New] In 2024, Securing and Rediscovering Hidden Snaps
- 2024 Approved Step-by-Step Manual Upside Down Movies in Snap
- [New] 2024 Approved The Snap Spectrum A Compilation of Favorite Augments
- [Updated] 2024 Approved Enhancing Snap Memories with Android and Mac Apps
- In 2024, Augmenting Reality Advanced Filtration Tactics in Snapchat
- [Updated] 2024 Approved Tailoring Mac Videos to Fit Snapchat Dimensions
- [Updated] Precision in Photograph Preservation Phone to Snapchat Guide
- In 2024, Pro-Level Insights for Perfectly Crafted Snaps
- [Updated] Audience Allure Techniques for Creating Engaging Snap Advertising
- [Updated] In 2024, Unlocking Team Potential Harnessing the Power of Snap Camera
- [Updated] In 2024, Efficient Resurrection for Lost Images
- [Updated] Revolutionize Your Snaps with Innovative Boomerang Tactics for 2024
- [New] In 2024, Clandestine SnapSnapper Concealed Techniques for Image Capturing
- Covert SnapSnapper Stealth Techniques for Picture Capture for 2024
- [Updated] 2024 Approved Simple Method Setting up Snapchat for Mac Users
- [Updated] 2024 Approved TikTok & Snapchat Face-Off A User's Perspective Guide
- [Updated] In 2024, Elevate Every Moment Mastering Snapchat Photo Edits
- [New] Jumpstart Your Snapchat Learn to Create Top Boomers for 2024
- [Updated] Navigating the World of Snapchat for Professional Growth for 2024
- [Updated] Secrets to Uncovering Missed Confidential Images for 2024
- Your Snap Chronicles Await Over 120 Ideas to Craft Personal and Distinctive Story Titles for 2024
- [New] In 2024, Compre Points with Perfect Pictures Snap Techniques for Teams
- [New] 2024 Approved Step-By-Step Guide to Snapchat's Captivating Boomers
- In 2024, Make Every Snap Count with These Top Tips
- [New] Cutting-Edge Techniques Making Mac Videos for Snapchat
- [New] Retrieving Secret Snaps Tips for Snapchat's Private Photos for 2024
- [New] In 2024, Vero Authors Spotlight at Snapchat
- [Updated] Peeling Back Layers What Every Snapchat Emoji Hides
- [New] In 2024, Swift Video and Picture Retrieval Guide
- [Updated] Maximizing Your Monetary Gains on Social Media with Snapchat
- [Updated] In 2024, Guide – Backing Up Camera Roll to Snapchat In the Right Way
- [Updated] 2024 Approved Snapchat Savvy Elevating Your Photographic Style with App Edits
- [New] 2024 Approved Unleashing the Power of TeamSnap for Virtual Meetings
- The Ultimate Guide to Phone Snapchat Screen Records for 2024
- [Updated] Playlists that Rule Spotify's Top 10
- In 2024, 5 Techniques to Transfer Data from Oppo A78 to iPhone 15/14/13/12 | Dr.fone
- Final Cut Pro X Debugging Made Easy A Step-by-Step Guide for 2024
- Solutions to Spy on Vivo V30 with and without jailbreak | Dr.fone
- Forgot iPhone Passcode Again? Unlock Apple iPhone 15 Pro Without Passcode Now | Dr.fone
- New In 2024, Premiere Rush Not Your Cup of Tea? Try These 4 Alternatives
- New In 2024, The Ultimate Guide to Animation Drawing 7 Essential Tools
- How to Reset a Nokia 105 Classic Phone that is Locked?
- In 2024, Delete Gmail Account With/Without Password On Samsung Galaxy S24
- Expert Breakdown Free2X WebCam Tools Insight
- How To Fix Part of the Touch Screen Not Working on Vivo S18 Pro | Dr.fone
- 2024 Approved Webcam Wonders Your MacBook Video Journey
- New In 2024, Dollar-Store DIY Hacks to Use for Filmmaking
- [New] 2024 Approved The Finest 6 Video Snaggers for Mac Users Now
- Updated 2024 Approved Best Online Lyrics Video Makers
- [Updated] VisualCapture Pro X - Windows Enthusiasts for 2024
- [Updated] NanoRecording App Critique with Backup Choices for 2024
- How to Change Netflix Location to Get More Country Version On Xiaomi 13T | Dr.fone
- Updated In 2024, Beyond the Basics 5 Advanced Tips for Using the 16X9 Ratio Calculator
- In 2024, The Ultimate Guide to Get the Rare Candy on Pokemon Go Fire Red On Vivo S17t | Dr.fone
- [Updated] 2024 Approved Mastering Instagram Videos for Marketing Top 10 Strategic Plans
- [New] Screencast Savvy A Comprehensive Examination of Techniques & Tools for 2024
- How To Check if Your Honor X50i Is Unlocked
- [New] 2024 Approved CamTech Dive Looking for Improved Alternatives
- Quest for Freedom Guide to Affordable MMO Games for 2024
- How To Transfer WhatsApp From iPhone 12 mini to other iPhone devices? | Dr.fone
- In 2024, 6 Proven Ways to Unlock Vivo S17 Pro Phone When You Forget the Password
- [Updated] In 2024, Mac Techniques to Shorten Instagram Vids
- [Updated] Uncomplicated Methods Sharing IGTV in Stories
- Streaming Virtual Classrooms for 2024
- [Updated] The Essential Framework for Saving Instagram Vids From Desktop Systems
- [Updated] The Art of Transcribing Top 4 Tactics for FB Chat Recordings
- In 2024, How To Change Your Apple ID Password On your Apple iPhone SE (2020)
- New 2024 Approved Video Editing Essentials for Mac OS X Yosemite Tips and Tricks
- In 2024, How to Transfer Apps from Realme 10T 5G to Another | Dr.fone
- 2024 Approved Shielding Imagery Best Practices for Instagram Photowatermarking
- 8 Ultimate Fixes for Google Play Your Poco M6 Pro 5G Isnt Compatible | Dr.fone
- How to Fake Snapchat Location without Jailbreak On Oppo Find N3 | Dr.fone
- Title: "[New] 2024 Approved How to Add a Pop of Japanese Style with Snapchat's Anime Filter"
- Author: Scott
- Created at : 2024-05-23 11:17:28
- Updated at : 2024-05-24 11:17:28
- Link: https://snapchat-videos.techidaily.com/new-2024-approved-how-to-add-a-pop-of-japanese-style-with-snapchats-anime-filter/
- License: This work is licensed under CC BY-NC-SA 4.0.
