
:max_bytes(150000):strip_icc()/Cahlaflour1-31d410658870432f8ea92f42d16f89f8.jpeg)
"Mastering Snapchat Three Simple Steps for Calls and Chats for 2024"
Mastering Snapchat: Three Simple Steps for Calls and Chats
How to Video Chat/Call on Snapchat with 3 Steps

Ollie Mattison
Mar 27, 2024• Proven solutions
Most people are not aware about Snapchat video chat facilities, though it’s been around since a long time. Sounds surprising though! Even few of our acquaintances approached us to know about Snapchat video call.
Well! We decided to decipher the fact and reveal the video calling feature of Snapchat, to make your life simpler. Your favorite social networking app is not restricted to sharing photos, videos, and stories, they can make you talk and see your family and friends anytime.
Here, in this article we are going to explain you the 3 steps to make a video call using Snapchat app.
Part 1: How to video chat/call on Snapchat
Least people had an idea that Snapchat offers a sleek video calling feature as well. So, we are bringing you the steps as how to video call someone using Snapchat without any trouble. Let’s see how you can enjoy communicating face to face from your respective places–
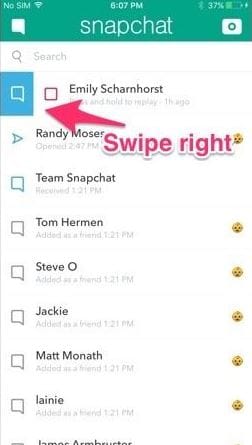
Step 1: Swipe right to start a video chat
First of all, launch the latest version of Snapchat on your mobile and then swipe right on the camera to get the ‘Friends’ list. You can also tap on the ‘Friends’ tab found at the bottom left corner of the screen. Now, find the contact you want to make a Snapchat video call with, and tap or right swipe on it.
Step 2: Press video camera icon
In this step, you will start calling your friend. For this, look for the video recorder icon on the next screen and tap on it to place the call. It should start ringing ASAP by sending them a chat request.

Step 3: Wait for answering
Their phone will start ringing if they have enabled Snapchat notifications. Enabling notification will also let them know that you’re calling even if they are not using the app that time. Or else, they can only get the call, while using Snapchat.
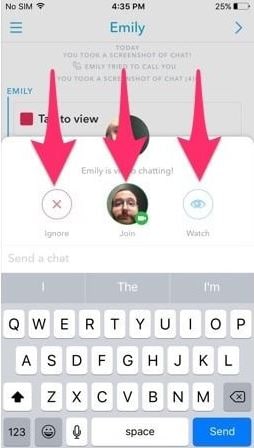
There are 3 options to respond to a call.
- If they click on ‘Watch’ option, they can see you, but you aren’t allowed for so.
- If they tap ‘Join’ option, it means both of you can see and talk to each other. In case they select ‘Ignore’ option, you will get a busy message.
- If you tap the green camera icon the video becomes one way, where only you can see them, but they won’t see you.
Note: By swiping the screen down, you can minimize the Snapchat video call.
Part 2: Tips for using video chat/call
Now that you are well aware of Snapchat video chat, how about some extra tips to add more fun to your chat sessions? So, get creative and enjoy the fun
1 Double check to switch
When you want to show your friend what your pet is up to, or that blooming rose on your balcony, you will definitely need to roam around and adjust the front camera. But, you can show him/her without switching your place. Just double-tap the screen of your Snapchat video chat and your friend can see everything. Switching or swapping between your cameras during a Snapchat video call is that easy.

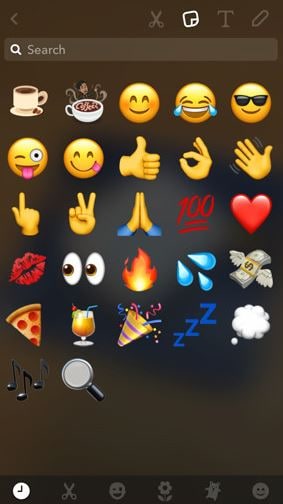
2 Add stickers
You are up to surprise your BFF with cute and funny stickers during the Snapchat video chat? Why not! On your screen, tap the ‘Smiley’ tab and select the stickers, they will be included in your video chat and both of you can view them.
3 Close the call
Well! Now that you guys ran out of topics for the day and want to end the call. It is very easy to close a Snapchat call. You just need to exit the video chat by going back to the recent conversations or switch to another app.
4 Make sure to upload the latest version
It is advised that you update to the latest version of Snapchat to get the best out of this app.
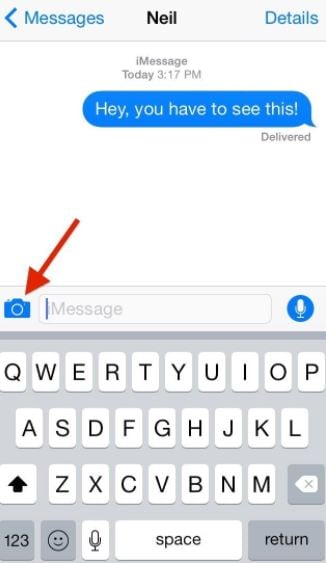
5 Send video message
When your friends are not online in Snapchat or haven’t enabled notifications for Snapchat video calls, you can still leave video messages for them. To share a video message, tap and hold the video recorder button in the chat, and record something up to 10 seconds, then send it. Your friends will get the video message when they open that message in their Snapchat.
Final Verdict
Moving towards the end, we hope you have got a broad idea about how to use Snapchat’s video call feature, and add cute and funny stickers as well to pep up the chat. So, what are you waiting for? Grab your mobile phone and start Snapchat video calling, we are sure that it will be so much fun than just sharing one sided snaps to each other. Thanks for going through the post. Please share your first experience with video calling with the Snapchat.
Ollie Mattison
Ollie Mattison is a writer and a lover of all things video.
Follow @Ollie Mattison
Ollie Mattison
Mar 27, 2024• Proven solutions
Most people are not aware about Snapchat video chat facilities, though it’s been around since a long time. Sounds surprising though! Even few of our acquaintances approached us to know about Snapchat video call.
Well! We decided to decipher the fact and reveal the video calling feature of Snapchat, to make your life simpler. Your favorite social networking app is not restricted to sharing photos, videos, and stories, they can make you talk and see your family and friends anytime.
Here, in this article we are going to explain you the 3 steps to make a video call using Snapchat app.
Part 1: How to video chat/call on Snapchat
Least people had an idea that Snapchat offers a sleek video calling feature as well. So, we are bringing you the steps as how to video call someone using Snapchat without any trouble. Let’s see how you can enjoy communicating face to face from your respective places–
Step 1: Swipe right to start a video chat
First of all, launch the latest version of Snapchat on your mobile and then swipe right on the camera to get the ‘Friends’ list. You can also tap on the ‘Friends’ tab found at the bottom left corner of the screen. Now, find the contact you want to make a Snapchat video call with, and tap or right swipe on it.
Step 2: Press video camera icon
In this step, you will start calling your friend. For this, look for the video recorder icon on the next screen and tap on it to place the call. It should start ringing ASAP by sending them a chat request.
Step 3: Wait for answering
Their phone will start ringing if they have enabled Snapchat notifications. Enabling notification will also let them know that you’re calling even if they are not using the app that time. Or else, they can only get the call, while using Snapchat.
There are 3 options to respond to a call.
- If they click on ‘Watch’ option, they can see you, but you aren’t allowed for so.
- If they tap ‘Join’ option, it means both of you can see and talk to each other. In case they select ‘Ignore’ option, you will get a busy message.
- If you tap the green camera icon the video becomes one way, where only you can see them, but they won’t see you.
Note: By swiping the screen down, you can minimize the Snapchat video call.
Part 2: Tips for using video chat/call
Now that you are well aware of Snapchat video chat, how about some extra tips to add more fun to your chat sessions? So, get creative and enjoy the fun
1 Double check to switch
When you want to show your friend what your pet is up to, or that blooming rose on your balcony, you will definitely need to roam around and adjust the front camera. But, you can show him/her without switching your place. Just double-tap the screen of your Snapchat video chat and your friend can see everything. Switching or swapping between your cameras during a Snapchat video call is that easy.
2 Add stickers
You are up to surprise your BFF with cute and funny stickers during the Snapchat video chat? Why not! On your screen, tap the ‘Smiley’ tab and select the stickers, they will be included in your video chat and both of you can view them.
3 Close the call
Well! Now that you guys ran out of topics for the day and want to end the call. It is very easy to close a Snapchat call. You just need to exit the video chat by going back to the recent conversations or switch to another app.
4 Make sure to upload the latest version
It is advised that you update to the latest version of Snapchat to get the best out of this app.
5 Send video message
When your friends are not online in Snapchat or haven’t enabled notifications for Snapchat video calls, you can still leave video messages for them. To share a video message, tap and hold the video recorder button in the chat, and record something up to 10 seconds, then send it. Your friends will get the video message when they open that message in their Snapchat.
Final Verdict
Moving towards the end, we hope you have got a broad idea about how to use Snapchat’s video call feature, and add cute and funny stickers as well to pep up the chat. So, what are you waiting for? Grab your mobile phone and start Snapchat video calling, we are sure that it will be so much fun than just sharing one sided snaps to each other. Thanks for going through the post. Please share your first experience with video calling with the Snapchat.
Ollie Mattison
Ollie Mattison is a writer and a lover of all things video.
Follow @Ollie Mattison
The Ultimate Guide to Pacing Your Videos on Snapchat
Snapchat is an instant messaging app that allows you to share your pictures and videos with your family members, friends, and colleagues. In addition, you can even create your stories in the form of movie clips and share them on the app. These stories remain available for the next 24 hours, after which they are automatically removed from the platform.
While sharing the videos, you can apply several filters that are already present in the app, and Slow Motion is one of them. You may want to learn how to slow down a video on Snapchat when you want to emphasize and draw viewers’ attention toward the scene, or wish to make the audience see your actions closely and in detail.
That said, in the following sections, you will see how to slow down videos on Snapchat, and what other methods you can use to reduce the playback speed more professionally.
In this article
01 How to Add Slow Motion Effects to Video Using the Snapchat App
02 How to Record a Slo-Mo Video and Upload to Snapchat
03 How to Make Flash and Smooth Slo Mo Video for Snapchat
04 FAQs about Slowing Down Snapchat Video
Part 1: How to Add Slow Motion Effects to Video Using the Snapchat App
Snapchat has a built-in Slow Motion filter that reduces the playback speed of a video when applied. You can learn how to slow down on Snapchat by following the instructions that are given below:
Step 1: Record a Video
Launch Snapchat on your smartphone (iPhone 13 Pro Max is used here for illustrations), make sure that the Camera section is selected from the bottom, tap and hold down the Capture button that is present at the lower part of the interface, and let go of it when you are done recording.

Step 2: Apply the Slow Motion Filter
Once the video is recorded, swipe the screen from left to right. Repeat this process until you see the Snail (Slow Motion) icon on the screen. This will reduce the playback speed of the clip.

Step 3: Decorate the Video (Optional)
Use the options present on the upper-right area of the screen to further decorate the video and/or add annotations to it.

Step 4: Share or Publish the Video
Once everything is done, tap Send To from the bottom-right corner to share the video with your family, friends, and colleagues, or publish it as a story that remains available for the next 24 hours.
Related: How to Record Slo-Mo videos on iPhone .
Part 2: How to Record a Slo-Mo Video and Upload to Snapchat
With Snapchat, even though you don’t require any third-party tool to reduce the playback speed of a video, the app has certain limitations. For example, it doesn’t allow you to set a zoom level, you are stuck with the framerate that the app has to offer, etc.
Because of this, many people prefer to use different methods to record a video in slow motion with their preferences, and then upload it to Snapchat. This approach also eliminates the need to swipe the screen several times merely to use a single slow-motion filter.
Fortunately, iPhone has a built-in SLO-MO mode in its Camera app that allows you to capture the videos in slow motion. To learn how to do slow mo on Snapchat with the iPhone’s Camera app, you can follow the instructions that are given below:
Step 1: Get to the iPhone’s SLO-MO Mode
Launch the Camera app on your iPhone (iPhone 13 Pro Max is used here for illustrations), and swipe the screen from left to right until you get to the SLO-MO mode.

Step 2: Set Recording Preferences
Tap the number that is present at the top-right corner (240 here) to toggle between different framerates, tap 1x from the lower-center area, swipe slightly up, and then use the wheel that appears next to define your preferred zoom level.

Step 3: Start and Stop the Recording
Tap the Record button to start the recording, and tap Stop when you’re done.
Note: Make sure that the duration of the recorded video doesn’t exceed 60 seconds.
Step 4: Upload the Slow-Motion Video to Snapchat
After the video is recorded in slow motion, close the Camera app, launch Snapchat, and tap the Gallery icon from the left side of the Capture button on the Camera section. From the Memories screen, go to the Camera Roll tab, and tap to select the video that you recorded in the previous step.
Next, optionally, tap the Edit icon from the bottom-left corner to decorate the video and/or add annotations to it, and follow the process as explained in the previous section to share the clip with your family, friends, or colleagues, or publish it as your story.

Part 3: How to Make Flash and Smooth Slo Mo Video for Snapchat
Although iPhone has the built-in SLO-MO mode that even enables you to set your preferred framerate and zoom level before recording, it still doesn’t allow you to slow down different parts of a video in different speed at your convenience. You can either record the entire video in slow motion or at a normal speed.
This is where a third-party app comes into play. While there are several video editing programs available online, the one of the best slow motion apps that helps you slow down the portions of a video with precision is CapCut.
Downloading and installing CapCut on your iPhone or Android phone is simple, and once it is done, you can follow the process given below to learn how to slow things down on Snapchat:
With CapCut, you can either slow down the whole clip or manage the speed for different segments. This section explains both methods.
Method 1: Slow Down the Whole Clip with CapCut
Step 1: Get to the Speed Panel
Launch CapCut, import the video that you want to slow down, and tap the imported media in the Timeline. Next, tap Speed from the bottom of the interface to get to the next window.

Step 2: Reduce the Speed of the Video
Tap Normal from the bottom of the screen that appears next, and drag the Speed slider to the left to reduce the playback speed. Tap OK from the bottom-right corner to save the changes.

Step 3: Upload the Video to Snapchat
Back on the previous interface, optionally tap Volume from the bottom and reduce the slider to 0 to mute the audio of the footage as it may get distorted due to the reduction in the speed.
Next, tap Share from the top-right corner to save the video on your iPhone, and then use the method explained in the previous section to access the clip from the Gallery within Snapchat for uploading.
Method 2: Reduce the Playback Speed of Different Parts of a Video
Step 1: Get to the Speed Panel
Use the process described in the previous method to get to the Speed panel.
Step 2: Reduce the Speed of Different Parts of the Video
Tap Curve from the bottom of the interface. On the next screen, tap Custom from the lower area, and then tap Edit. From the next panel, drag the beat points down to reduce the speed (or drag them above the line to increase).

Notice that each beat point represents a particular section of the video, and dragging it down reduces the playback speed of that segment. You can even tap anywhere on the line to add a new beat point and drag it down as needed for more precise speed management. Once done, tap OK from the bottom-right corner to save the modifications.

Optionally, you can also tap any of the available presets on the Curve screen to reduce the playback speed of the video accordingly.
Step 3: Upload the Video to Snapchat
Use the method explained in the previous method to export the video, upload it to Snapchat, and share the clip with your family, friends, and colleagues, or publish it as your story.
Part 4: FAQs about Slowing Down Snapchat Video
1. Can I record a slow mo video in Snapchat?
Technically speaking, no, you cannot. However, once you have recorded a video at a normal speed in Snapchat, you can apply the built-in Slow Motion filter to it by swiping the screen from left to right until you see the Snail icon at the center. The Snail icon represents the Slow Motion filter that reduces the playback speed when applied.
2. Besides slow-motion, which speed filters does Snapchat have?
In addition to slow motion Snapchat also has Forward and Fast Forward filters that increase the playback speed. While the Forward filter increases the speed slightly, the Fast Forward one enhances it drastically.
Conclusion
When using an iPhone, even though the SLO-MO mode enables you to record footage in slow motion, you don’t get many options. Therefore, it would be safe to say that it is easy to slow down the speed of a video if you have a dedicated third-party post-production app. However, if you want to go for a convenient method, learning how to slow down a video on Snapchat is an extremely simple and straightforward process.
02 How to Record a Slo-Mo Video and Upload to Snapchat
03 How to Make Flash and Smooth Slo Mo Video for Snapchat
04 FAQs about Slowing Down Snapchat Video
Part 1: How to Add Slow Motion Effects to Video Using the Snapchat App
Snapchat has a built-in Slow Motion filter that reduces the playback speed of a video when applied. You can learn how to slow down on Snapchat by following the instructions that are given below:
Step 1: Record a Video
Launch Snapchat on your smartphone (iPhone 13 Pro Max is used here for illustrations), make sure that the Camera section is selected from the bottom, tap and hold down the Capture button that is present at the lower part of the interface, and let go of it when you are done recording.
Step 2: Apply the Slow Motion Filter
Once the video is recorded, swipe the screen from left to right. Repeat this process until you see the Snail (Slow Motion) icon on the screen. This will reduce the playback speed of the clip.
Step 3: Decorate the Video (Optional)
Use the options present on the upper-right area of the screen to further decorate the video and/or add annotations to it.
Step 4: Share or Publish the Video
Once everything is done, tap Send To from the bottom-right corner to share the video with your family, friends, and colleagues, or publish it as a story that remains available for the next 24 hours.
Related: How to Record Slo-Mo videos on iPhone .
Part 2: How to Record a Slo-Mo Video and Upload to Snapchat
With Snapchat, even though you don’t require any third-party tool to reduce the playback speed of a video, the app has certain limitations. For example, it doesn’t allow you to set a zoom level, you are stuck with the framerate that the app has to offer, etc.
Because of this, many people prefer to use different methods to record a video in slow motion with their preferences, and then upload it to Snapchat. This approach also eliminates the need to swipe the screen several times merely to use a single slow-motion filter.
Fortunately, iPhone has a built-in SLO-MO mode in its Camera app that allows you to capture the videos in slow motion. To learn how to do slow mo on Snapchat with the iPhone’s Camera app, you can follow the instructions that are given below:
Step 1: Get to the iPhone’s SLO-MO Mode
Launch the Camera app on your iPhone (iPhone 13 Pro Max is used here for illustrations), and swipe the screen from left to right until you get to the SLO-MO mode.
Step 2: Set Recording Preferences
Tap the number that is present at the top-right corner (240 here) to toggle between different framerates, tap 1x from the lower-center area, swipe slightly up, and then use the wheel that appears next to define your preferred zoom level.
Step 3: Start and Stop the Recording
Tap the Record button to start the recording, and tap Stop when you’re done.
Note: Make sure that the duration of the recorded video doesn’t exceed 60 seconds.
Step 4: Upload the Slow-Motion Video to Snapchat
After the video is recorded in slow motion, close the Camera app, launch Snapchat, and tap the Gallery icon from the left side of the Capture button on the Camera section. From the Memories screen, go to the Camera Roll tab, and tap to select the video that you recorded in the previous step.
Next, optionally, tap the Edit icon from the bottom-left corner to decorate the video and/or add annotations to it, and follow the process as explained in the previous section to share the clip with your family, friends, or colleagues, or publish it as your story.
Part 3: How to Make Flash and Smooth Slo Mo Video for Snapchat
Although iPhone has the built-in SLO-MO mode that even enables you to set your preferred framerate and zoom level before recording, it still doesn’t allow you to slow down different parts of a video in different speed at your convenience. You can either record the entire video in slow motion or at a normal speed.
This is where a third-party app comes into play. While there are several video editing programs available online, the one of the best slow motion apps that helps you slow down the portions of a video with precision is CapCut.
Downloading and installing CapCut on your iPhone or Android phone is simple, and once it is done, you can follow the process given below to learn how to slow things down on Snapchat:
With CapCut, you can either slow down the whole clip or manage the speed for different segments. This section explains both methods.
Method 1: Slow Down the Whole Clip with CapCut
Step 1: Get to the Speed Panel
Launch CapCut, import the video that you want to slow down, and tap the imported media in the Timeline. Next, tap Speed from the bottom of the interface to get to the next window.
Step 2: Reduce the Speed of the Video
Tap Normal from the bottom of the screen that appears next, and drag the Speed slider to the left to reduce the playback speed. Tap OK from the bottom-right corner to save the changes.
Step 3: Upload the Video to Snapchat
Back on the previous interface, optionally tap Volume from the bottom and reduce the slider to 0 to mute the audio of the footage as it may get distorted due to the reduction in the speed.
Next, tap Share from the top-right corner to save the video on your iPhone, and then use the method explained in the previous section to access the clip from the Gallery within Snapchat for uploading.
Method 2: Reduce the Playback Speed of Different Parts of a Video
Step 1: Get to the Speed Panel
Use the process described in the previous method to get to the Speed panel.
Step 2: Reduce the Speed of Different Parts of the Video
Tap Curve from the bottom of the interface. On the next screen, tap Custom from the lower area, and then tap Edit. From the next panel, drag the beat points down to reduce the speed (or drag them above the line to increase).
Notice that each beat point represents a particular section of the video, and dragging it down reduces the playback speed of that segment. You can even tap anywhere on the line to add a new beat point and drag it down as needed for more precise speed management. Once done, tap OK from the bottom-right corner to save the modifications.
Optionally, you can also tap any of the available presets on the Curve screen to reduce the playback speed of the video accordingly.
Step 3: Upload the Video to Snapchat
Use the method explained in the previous method to export the video, upload it to Snapchat, and share the clip with your family, friends, and colleagues, or publish it as your story.
Part 4: FAQs about Slowing Down Snapchat Video
1. Can I record a slow mo video in Snapchat?
Technically speaking, no, you cannot. However, once you have recorded a video at a normal speed in Snapchat, you can apply the built-in Slow Motion filter to it by swiping the screen from left to right until you see the Snail icon at the center. The Snail icon represents the Slow Motion filter that reduces the playback speed when applied.
2. Besides slow-motion, which speed filters does Snapchat have?
In addition to slow motion Snapchat also has Forward and Fast Forward filters that increase the playback speed. While the Forward filter increases the speed slightly, the Fast Forward one enhances it drastically.
Conclusion
When using an iPhone, even though the SLO-MO mode enables you to record footage in slow motion, you don’t get many options. Therefore, it would be safe to say that it is easy to slow down the speed of a video if you have a dedicated third-party post-production app. However, if you want to go for a convenient method, learning how to slow down a video on Snapchat is an extremely simple and straightforward process.
Also read:
- [New] In 2024, Pro-Level Insights for Perfectly Crafted Snaps
- 2024 Approved How to Archive Snaps From Android + Mac Systems
- 2024 Approved Audio Aesthetics Weaving Tunes Into Snapchat
- [Updated] Mac Owners' Guide to Downloading Snapchat
- 2024 Approved Snap Protection Android & Mac App Recommendations
- [Updated] Turning Snaps Into Cashflow
- [New] In 2024, Navigating Mobile Recorders to Capture Snapchat Moments
- [New] Elevate Snaps with Precision Boomerang Techniques
- Elevating Your Snapping Game Tips for Uninterrupted Streaks for 2024
- In 2024, Melody Mixin' Adding Tracks to Snapchat Vids
- [Updated] In 2024, Techniques for Capturing and Storing Android & Mac Snaps
- [Updated] Mastering Snapchat Pins A Complete Guide for 2024
- [Updated] How to Edit Photos on Snapchat for 2024
- [New] In 2024, Step-by-Step Guide to Masterful Snapchat Editing
- 2024 Approved Unseen Snaps and Hushed User Signal to Check for Blocks
- [Updated] From Simple Scenes Advanced Techniques for Snapchat Edits
- 2024 Approved The Ultimate Guide for Transforming Fragments Into Lasting Memories
- [New] 2024 Approved Stepwise Instructions Snapchat for Mac Users
- [New] 2024 Approved Innovative Techniques Crafting Unique Boomerangs on Snapchat
- 2024 Approved Keep It Hot - Ideas for Uninterrupted Snapchat Connections
- [New] 2024 Approved Snap Into Style The 20 Best Filter Tips
- [Updated] Prolong Your Snapstreak Legacy with Ease
- [Updated] The Ultimate Guide to SnapChat Brand Building
- 2024 Approved A Techie's Playbook Screen Record & Share on Snapchat
- In 2024, DeviantArt Pros Sharing Snapchat Stories
- Revolutionize Your Speaking Style in Snapchat with Two Easy Methods for 2024
- In 2024, The Easy Guide Initiating a Call or Chat on Snapchat
- How To Seamlessly Add Snap Camera to Microsoft Chats for 2024
- [New] Unleash Creativity Using Snapchat to Edit and Enhance Photos for 2024
- [New] In 2024, Drive Sales Through Smart Use of Snapchat's Tools
- Quick Start Methods for Producing and Perfecting Multiple Snaps in Snapchat for 2024
- In 2024, Enhance Snapchat Stories with These Top 6 Mobile Editors
- Rapid Retrieval for Missed Snaps for 2024
- [New] Top 6 Mobile Phones Snapchat's Ultimate Video Editing Companions
- 2024 Approved Quick Fixes Enhancing Your Snaps with Snapchat Edits
- [Updated] Elevating Your Visual Narrative Smart Editing on Snapchat
- [Updated] 2024 Approved Qzone Elites' Brief Visits to Snapchat
- [New] Inverting Video Order on Snapchat for 2024
- [New] 2024 Approved How to Create Snapchat Lenses Easily 2 Methods
- 2024 Approved From Basic Snaps to Expertly Crafted Images on Snapchat
- [Updated] 2024 Approved Fiery Friendship Keeping Your Snapstreak Hot and Steady
- [Updated] In 2024, Detecting Silent Communication on Snapstreak
- [Updated] 2024 Approved Conquered Creativity Unleashing Photo Potential on Snapchat
- [Updated] 2024 Approved Step-by-Step Screen Recording for Snapchat Stories on Mobile
- [New] Hidden Narratives Unlocked A Complete Snapguide
- 2024 Approved Earn on the Go Snapchat's Money Tips
- [New] Enhancing Connectivity IOS Photo Library & Snapchat Merge for 2024
- [New] In 2024, Simplifying Visual Sharing in MS Teams with Snap Camera
- In 2024, 5 Ways to Transfer Music from Tecno Camon 30 Pro 5G to Other Android Devices Easily | Dr.fone
- In 2024, Mastering Game Streams with AI-Enhanced Portraits
- Want to Uninstall Google Play Service from Poco C55? Here is How | Dr.fone
- Updated Windows Video Editing Software Top 6 Choices for Beginners and Pros for 2024
- Updated In 2024, How to Use GIMP GREEN SCREEN
- Navigating Through an Absent OBS Camera Input for 2024
- Meme Magic March 2024
- 9 Mind-Blowing Tricks to Hatch Eggs in Pokemon Go Without Walking On Vivo Y77t | Dr.fone
- Make Your Content Stand Out with Instagram’s Procedural Slow Mo Journey for 2024
- Step-by-Step Tutorial How To Bypass Xiaomi Redmi A2+ FRP
- 2024 Approved Enhancing Meet Visuals Applying Filters, Effects & Masks
- [Updated] Android's Prime Portable GBA Simulators Ranked for 2024
- [Updated] 2024 Approved Camouflaged Consumer of Facebook Feeds
- Masterful Screencasting Insights Into Advanced Techniques & Tools
- Best Ways on How to Unlock/Bypass/Swipe/Remove Vivo T2 5G Fingerprint Lock
- [New] Strategies for Clearer Facebook Live Footage Viewing
- Hassle-Free Ways to Remove FRP Lock on Honor Magic Vs 2 Phones with/without a PC
- 2024 Approved Injecting External URLs Into Instagram Content
- How to Shoot IGTV Videos With Smartphone/DLSR Cameras?
- [Updated] Future-Proofing Filmmaking with Green Tools for 2024
- [Updated] In 2024, What Lies Beneath Instagram Story Perceptions
- In 2024, How To Reset the Security Questions of Your Apple ID From Your iPhone 13 Pro Max
- In 2024, No More Troubles? Mastering iPad Video Captures Now
- Updated In 2024, From Script to Screen 8 Essential Mac Movie Creator Tools
- In 2024, Top 15 Augmented Reality Games Like Pokémon GO To Play On Asus ROG Phone 7 Ultimate | Dr.fone
- [New] In 2024, Detailed Study of Frozen Delights Playback Gadgets
- Updated 2024 Approved Guidelines for Exporting Audio From Audacity to MP3
- [Updated] Mastering Link Sharing Instagram Stories & Posts for 2024
- In 2024, Still Using Pattern Locks with Vivo S17 Pro? Tips, Tricks and Helpful Advice
- Updated 2024 Approved 1 Audio Purification Kit Videos Elevate Visuals to the Next Level
- In 2024, Best Solutions for HTC Network Unlock
- Updated 2024 Approved The Best Video Editors for Creating Music Videos
- In 2024, How To Bypass iCloud Activation Lock on Mac For iPhone SE (2020)?
- 2024 Approved The FCP Factor 10 Successful Movies That Used Final Cut Pro
- New Reversing Video Clips in Final Cut Pro Tips and Tricks for 2024
- In This Article, We Will Introduce some Cool Video Effects that You Can Use in Filmora as Well as the Step-by-Step Guide About How to Add Cool Effects to Videos for Making a Cool Edit with This Cool V for 2024
- [Updated] Profile Perfection Expert Tips for Personalized and Engaging FB Biographies for 2024
- Title: "Mastering Snapchat Three Simple Steps for Calls and Chats for 2024"
- Author: Scott
- Created at : 2024-05-23 10:15:41
- Updated at : 2024-05-24 10:15:41
- Link: https://snapchat-videos.techidaily.com/mastering-snapchat-three-simple-steps-for-calls-and-chats-for-2024/
- License: This work is licensed under CC BY-NC-SA 4.0.
