
"Infuse Your Snap with Japanese Pop Culture The Anime Filter Tutorial for 2024"
Infuse Your Snap with Japanese Pop Culture: The Anime Filter Tutorial
What Is Anime Filter On Snapchat?


Shanoon Cox
Mar 27, 2024• Proven solutions
Snapchat anime filter is the new sensation that is making waves all across social media. The best part about anime filter is that it has the ability to transform your videos and images into anime instantly. This filter has already gone viral on other social media platforms, such as TikTok, Instagram, and Twitter.
Filters and effects are not new when it comes to social media services, and almost all of them have their own versions, which you can use. Snapchat is here with a new lens, which is becoming immensely popular. If you have been trying to use the Snapchat anime filter and don’t know how to go about it, you have come to the right place because this article will talk about how to get this filter and how to use it. Keep reading!
Part 1: What is Anime Filter on Snapchat?
Out of the many AR lenses from Snapchat, the latest one is the anime lens. It’s a filter that will morph a person’s photo or video into an anime character and will customize the anime face based on the person’s facial features. So, rather than simply applying a generic image on top of your face, Snapchat makes sure that the anime image looks similar to your actual image. And as a result, each person’s anime face turns out to be different.
Since the hashtag #animefilter is trending, you can also apply the anime filter on your face and be a part of the trend. The reaction to this filter is lowkey amazing because the filter not only changes your face and makes it look like a part of a hit anime cartoon series or movie, but it sometimes also changes your hair color making you look like the King of the Pirates or Rapunzel. What this lens will do and how your image will turn out to be is highly fascinating.
What stands out is that after the anime filter of Snapchat was released, it has been used over 3 billion times. Snapchat has confirmed this statistic in its Third Quarter 2020 Financial report, and they even said that they already knew it would be a massive hit.
Part 2: How to Get the Anime Filter on Snapchat?
Now that you know how popular the Snapchat anime filter is. It’s worth knowing how to get it. Although this filter is available on Snapchat, many users are facing issues finding it. This section will show you two easy ways to get this filter. You can use one or both methods and start using the filter to show the world how you will look like an anime character. Here are the two ways:

Method 1: Get the Anime Face Filter on Snapchat via Link
Step 1: First, click on the link here . You will need this link to get the anime face filter.
Step 2: Once you click on the click, a pop-up window will open. If you haven’t downloaded the anime filter yet, then Snapchat will say, “New lens found.” Right below it, you will see the message “unlock for 48 hours.” Go ahead and click on that.
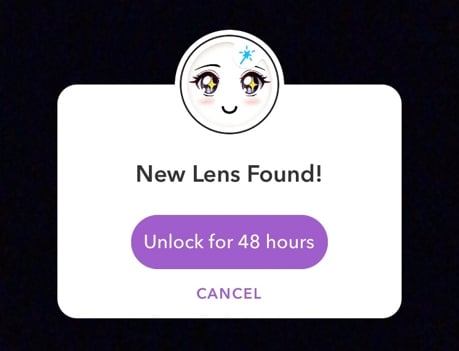
Step 3: By clicking on the purple button, your Snapchat anime filter will be available for use for 48 hours.
Here’s a pro tip, if you want to continue using this filter, once the 48 hours are over, simply repeat the steps, and you can use it for additional 48 hours. Simple!
If the pop-up says, “nothing to see here”, which means you have the filter already. In this case, you can go to Snapchat and click the filter accordingly.
Method 2: Get the Anime Style Filter via Explore on Snapchat
If you don’t want to click any unknown links, you can explore the anime filter by searching on Snapchat.
Step 1: Make sure your Snapchat is up-to-date. If not, update it to the latest version.
Step 2: Open Snapchat on your mobile or tablet, whichever you are using. Now, turn the lens towards you or someone else as if you are clicking a picture.
Step 3: Now, click on the smiley face filter button, and tap on the Explore button to continue.

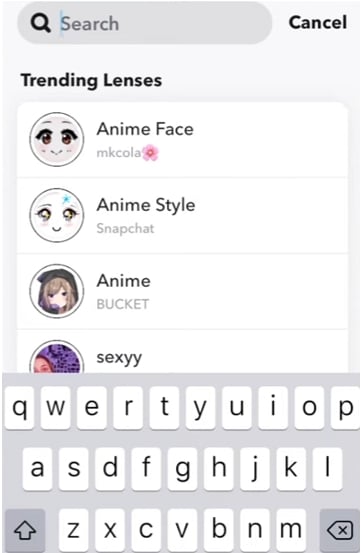
Step 4: You can now search for Anime Styles. There are several anime filters available, just make sure that the creator of the filter is Snapchat.
Step 5: Once you have the anime filter, you can record a video of yourself, or take photos. You may also use both back and front cameras to turn anyone into an anime character.
Pro tip: This filter works on already saved photos and videos as well. Try them on too. This filter will work only on your face, though. So, it won’t turn your entire body into an anime character.
Part 3: How Do I Get More Filters on Snapchat?
Since Snapchat keeps coming up with attractive filters, you may wonder how you can get more filters to keep using them. Well, there are a few tricks that you can try. We will explain these tricks in detail, so make sure to follow them correctly.
Trick 1: Turn on Snapchat Geofilters
Before you try using Snapchat geofilters, you will first have to permit Snapchat to access your location. Whether you are using iOS or Android, enable location, and you will start seeing geofilters and all the other filters that you have saved.
Don’t expect a plethora of filters to suddenly turn up. For example, when you apply a geofilter, you will see that it adds an illustration and the place name to your Snap. So, the more you explore and go out, the more filters you will start seeing.
Trick 2: Check Online Resources on Lens Studio and Lenslist
You can also explore two filter libraries, which are Lens Studio and Lenslist. These are repositories of AR content. These two libraries have many attractive filters. All you need to do is scan the Snapcode available in the filters and unlock them. Both of them will have duplicate filters as well, though. But dig a bit deeper, and you will have enough codes of filters to keep using them every day. You will find these codes in your profile once you add them.
Trick 3: Share Snapcodes for Snapchat
The last way to add Snapcode of filters is by scanning other people’s codes. Once you go to your profile, you will see your Snapcodes, which other people can scan. Just like that, you can scan other people’s code as well. Some codes will be available for 24 hours, while others for 48 hours. After that, you can scan the code again when you want to reuse them. To scan a code, just hold your camera over the code and allow the screen to register it.
Bonus: How to Add Anime Effect to Video with Filmora
As we shared, Snapchat will only morph your face into an anime character. But if you are not satisfied with that and want to turn a whole video into anime or cartoon, then one of the best ways to go about it is by getting Wondershare Filmora. Filmora is an easy-to-use yet powerful enough video editing tool loaded with stunning effects, such as cartoons, sketches, color sketches, and more. The process is very easy to follow, and to use Filmora, you don’t need to be a pro. Here are the steps that you can follow:
Step 1: Launch Wondershare Filmora to your Mac or Windows computer. If you haven’t downloaded it yet, click the Try It Free button below to start.


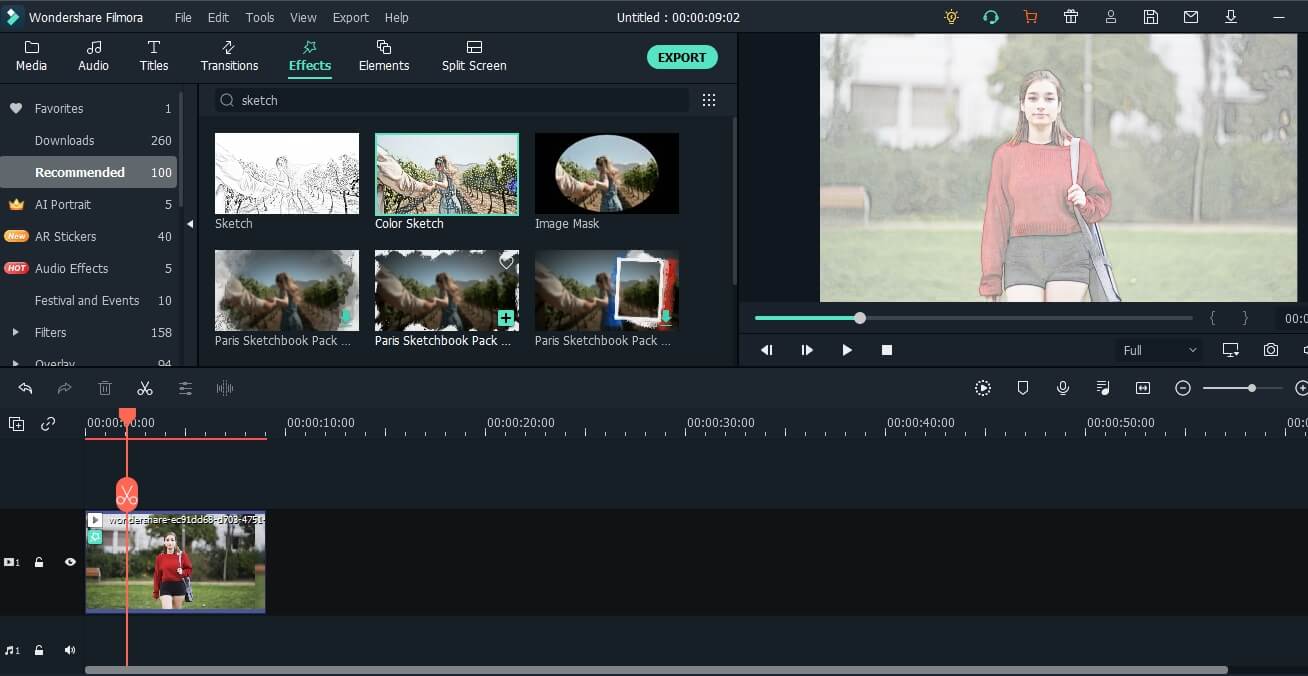
Step 2: Now, import media files and load the video that you want to convert into a cartoon or anime to the media library, and then add that video to the timeline.

Step 3: Go to the Effects option, and type sketch in the search effects bar, which will be on the top of the screen.
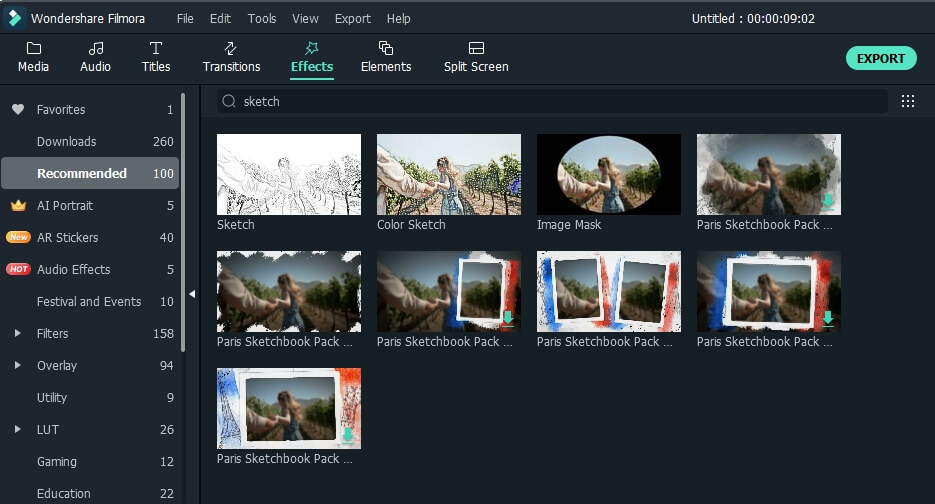
Step 4: Currently, Filmora provides sketch and color sketch effects. Try each one of them to see which one works the best. If you want to add the filter to the entire video, just drag and drop the filter to the video, and it’s done.
Step 5: Finally, click on the Export button after everything is done to save the edited video on your computer.
Note: If you want to add the sketch effect to the person only, you can use the Human Segmentation in AI Portrait. In this way, you can also try the Cartoon effect to see the result.
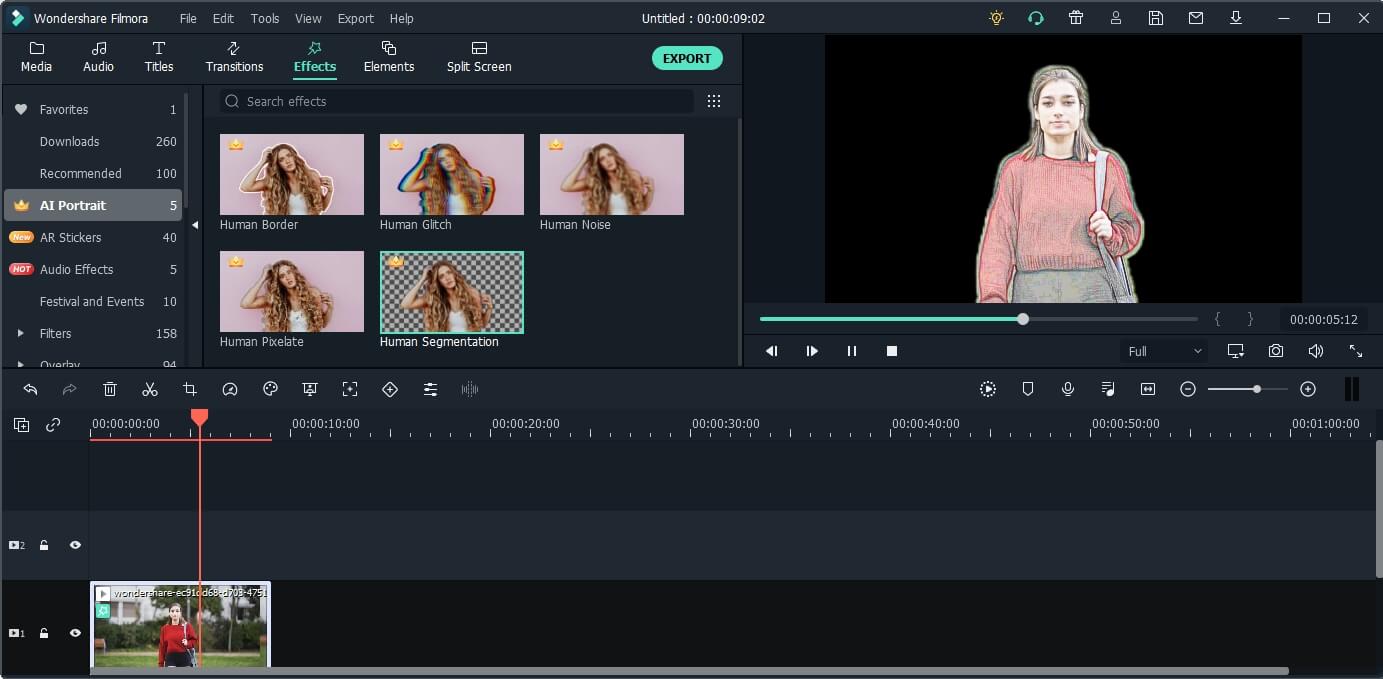
Check the video tutorial below to explore more usage of the AI Portrait add-on.
Shanoon Cox
Shanoon Cox is a writer and a lover of all things video.
Follow @Shanoon Cox
Shanoon Cox
Mar 27, 2024• Proven solutions
Snapchat anime filter is the new sensation that is making waves all across social media. The best part about anime filter is that it has the ability to transform your videos and images into anime instantly. This filter has already gone viral on other social media platforms, such as TikTok, Instagram, and Twitter.
Filters and effects are not new when it comes to social media services, and almost all of them have their own versions, which you can use. Snapchat is here with a new lens, which is becoming immensely popular. If you have been trying to use the Snapchat anime filter and don’t know how to go about it, you have come to the right place because this article will talk about how to get this filter and how to use it. Keep reading!
Part 1: What is Anime Filter on Snapchat?
Out of the many AR lenses from Snapchat, the latest one is the anime lens. It’s a filter that will morph a person’s photo or video into an anime character and will customize the anime face based on the person’s facial features. So, rather than simply applying a generic image on top of your face, Snapchat makes sure that the anime image looks similar to your actual image. And as a result, each person’s anime face turns out to be different.
Since the hashtag #animefilter is trending, you can also apply the anime filter on your face and be a part of the trend. The reaction to this filter is lowkey amazing because the filter not only changes your face and makes it look like a part of a hit anime cartoon series or movie, but it sometimes also changes your hair color making you look like the King of the Pirates or Rapunzel. What this lens will do and how your image will turn out to be is highly fascinating.
What stands out is that after the anime filter of Snapchat was released, it has been used over 3 billion times. Snapchat has confirmed this statistic in its Third Quarter 2020 Financial report, and they even said that they already knew it would be a massive hit.
Part 2: How to Get the Anime Filter on Snapchat?
Now that you know how popular the Snapchat anime filter is. It’s worth knowing how to get it. Although this filter is available on Snapchat, many users are facing issues finding it. This section will show you two easy ways to get this filter. You can use one or both methods and start using the filter to show the world how you will look like an anime character. Here are the two ways:
Method 1: Get the Anime Face Filter on Snapchat via Link
Step 1: First, click on the link here . You will need this link to get the anime face filter.
Step 2: Once you click on the click, a pop-up window will open. If you haven’t downloaded the anime filter yet, then Snapchat will say, “New lens found.” Right below it, you will see the message “unlock for 48 hours.” Go ahead and click on that.
Step 3: By clicking on the purple button, your Snapchat anime filter will be available for use for 48 hours.
Here’s a pro tip, if you want to continue using this filter, once the 48 hours are over, simply repeat the steps, and you can use it for additional 48 hours. Simple!
If the pop-up says, “nothing to see here”, which means you have the filter already. In this case, you can go to Snapchat and click the filter accordingly.
Method 2: Get the Anime Style Filter via Explore on Snapchat
If you don’t want to click any unknown links, you can explore the anime filter by searching on Snapchat.
Step 1: Make sure your Snapchat is up-to-date. If not, update it to the latest version.
Step 2: Open Snapchat on your mobile or tablet, whichever you are using. Now, turn the lens towards you or someone else as if you are clicking a picture.
Step 3: Now, click on the smiley face filter button, and tap on the Explore button to continue.
Step 4: You can now search for Anime Styles. There are several anime filters available, just make sure that the creator of the filter is Snapchat.
Step 5: Once you have the anime filter, you can record a video of yourself, or take photos. You may also use both back and front cameras to turn anyone into an anime character.
Pro tip: This filter works on already saved photos and videos as well. Try them on too. This filter will work only on your face, though. So, it won’t turn your entire body into an anime character.

Part 3: How Do I Get More Filters on Snapchat?
Since Snapchat keeps coming up with attractive filters, you may wonder how you can get more filters to keep using them. Well, there are a few tricks that you can try. We will explain these tricks in detail, so make sure to follow them correctly.
Trick 1: Turn on Snapchat Geofilters
Before you try using Snapchat geofilters, you will first have to permit Snapchat to access your location. Whether you are using iOS or Android, enable location, and you will start seeing geofilters and all the other filters that you have saved.
Don’t expect a plethora of filters to suddenly turn up. For example, when you apply a geofilter, you will see that it adds an illustration and the place name to your Snap. So, the more you explore and go out, the more filters you will start seeing.
Trick 2: Check Online Resources on Lens Studio and Lenslist
You can also explore two filter libraries, which are Lens Studio and Lenslist. These are repositories of AR content. These two libraries have many attractive filters. All you need to do is scan the Snapcode available in the filters and unlock them. Both of them will have duplicate filters as well, though. But dig a bit deeper, and you will have enough codes of filters to keep using them every day. You will find these codes in your profile once you add them.
Trick 3: Share Snapcodes for Snapchat
The last way to add Snapcode of filters is by scanning other people’s codes. Once you go to your profile, you will see your Snapcodes, which other people can scan. Just like that, you can scan other people’s code as well. Some codes will be available for 24 hours, while others for 48 hours. After that, you can scan the code again when you want to reuse them. To scan a code, just hold your camera over the code and allow the screen to register it.

Bonus: How to Add Anime Effect to Video with Filmora
As we shared, Snapchat will only morph your face into an anime character. But if you are not satisfied with that and want to turn a whole video into anime or cartoon, then one of the best ways to go about it is by getting Wondershare Filmora. Filmora is an easy-to-use yet powerful enough video editing tool loaded with stunning effects, such as cartoons, sketches, color sketches, and more. The process is very easy to follow, and to use Filmora, you don’t need to be a pro. Here are the steps that you can follow:
Step 1: Launch Wondershare Filmora to your Mac or Windows computer. If you haven’t downloaded it yet, click the Try It Free button below to start.
Step 2: Now, import media files and load the video that you want to convert into a cartoon or anime to the media library, and then add that video to the timeline.
Step 3: Go to the Effects option, and type sketch in the search effects bar, which will be on the top of the screen.
Step 4: Currently, Filmora provides sketch and color sketch effects. Try each one of them to see which one works the best. If you want to add the filter to the entire video, just drag and drop the filter to the video, and it’s done.

Step 5: Finally, click on the Export button after everything is done to save the edited video on your computer.
Note: If you want to add the sketch effect to the person only, you can use the Human Segmentation in AI Portrait. In this way, you can also try the Cartoon effect to see the result.
Check the video tutorial below to explore more usage of the AI Portrait add-on.
 ZoneAlarm Extreme Security NextGen
Shanoon Cox
Shanoon Cox is a writer and a lover of all things video.
Follow @Shanoon Cox
Shanoon Cox
Mar 27, 2024• Proven solutions
Snapchat anime filter is the new sensation that is making waves all across social media. The best part about anime filter is that it has the ability to transform your videos and images into anime instantly. This filter has already gone viral on other social media platforms, such as TikTok, Instagram, and Twitter.
Filters and effects are not new when it comes to social media services, and almost all of them have their own versions, which you can use. Snapchat is here with a new lens, which is becoming immensely popular. If you have been trying to use the Snapchat anime filter and don’t know how to go about it, you have come to the right place because this article will talk about how to get this filter and how to use it. Keep reading!
Part 1: What is Anime Filter on Snapchat?
Out of the many AR lenses from Snapchat, the latest one is the anime lens. It’s a filter that will morph a person’s photo or video into an anime character and will customize the anime face based on the person’s facial features. So, rather than simply applying a generic image on top of your face, Snapchat makes sure that the anime image looks similar to your actual image. And as a result, each person’s anime face turns out to be different.
Since the hashtag #animefilter is trending, you can also apply the anime filter on your face and be a part of the trend. The reaction to this filter is lowkey amazing because the filter not only changes your face and makes it look like a part of a hit anime cartoon series or movie, but it sometimes also changes your hair color making you look like the King of the Pirates or Rapunzel. What this lens will do and how your image will turn out to be is highly fascinating.
What stands out is that after the anime filter of Snapchat was released, it has been used over 3 billion times. Snapchat has confirmed this statistic in its Third Quarter 2020 Financial report, and they even said that they already knew it would be a massive hit.
Part 2: How to Get the Anime Filter on Snapchat?
Now that you know how popular the Snapchat anime filter is. It’s worth knowing how to get it. Although this filter is available on Snapchat, many users are facing issues finding it. This section will show you two easy ways to get this filter. You can use one or both methods and start using the filter to show the world how you will look like an anime character. Here are the two ways:
Method 1: Get the Anime Face Filter on Snapchat via Link
Step 1: First, click on the link here . You will need this link to get the anime face filter.
Step 2: Once you click on the click, a pop-up window will open. If you haven’t downloaded the anime filter yet, then Snapchat will say, “New lens found.” Right below it, you will see the message “unlock for 48 hours.” Go ahead and click on that.
Step 3: By clicking on the purple button, your Snapchat anime filter will be available for use for 48 hours.
Here’s a pro tip, if you want to continue using this filter, once the 48 hours are over, simply repeat the steps, and you can use it for additional 48 hours. Simple!
If the pop-up says, “nothing to see here”, which means you have the filter already. In this case, you can go to Snapchat and click the filter accordingly.

Method 2: Get the Anime Style Filter via Explore on Snapchat
If you don’t want to click any unknown links, you can explore the anime filter by searching on Snapchat.
Step 1: Make sure your Snapchat is up-to-date. If not, update it to the latest version.
Step 2: Open Snapchat on your mobile or tablet, whichever you are using. Now, turn the lens towards you or someone else as if you are clicking a picture.
Step 3: Now, click on the smiley face filter button, and tap on the Explore button to continue.
Step 4: You can now search for Anime Styles. There are several anime filters available, just make sure that the creator of the filter is Snapchat.
Step 5: Once you have the anime filter, you can record a video of yourself, or take photos. You may also use both back and front cameras to turn anyone into an anime character.
Pro tip: This filter works on already saved photos and videos as well. Try them on too. This filter will work only on your face, though. So, it won’t turn your entire body into an anime character.
Part 3: How Do I Get More Filters on Snapchat?
Since Snapchat keeps coming up with attractive filters, you may wonder how you can get more filters to keep using them. Well, there are a few tricks that you can try. We will explain these tricks in detail, so make sure to follow them correctly.
 Allavsoft Batch Download Online Videos, Music Offline to MP4, MP3, MOV, etc format
Trick 1: Turn on Snapchat Geofilters
Before you try using Snapchat geofilters, you will first have to permit Snapchat to access your location. Whether you are using iOS or Android, enable location, and you will start seeing geofilters and all the other filters that you have saved.
Don’t expect a plethora of filters to suddenly turn up. For example, when you apply a geofilter, you will see that it adds an illustration and the place name to your Snap. So, the more you explore and go out, the more filters you will start seeing.

Trick 2: Check Online Resources on Lens Studio and Lenslist
You can also explore two filter libraries, which are Lens Studio and Lenslist. These are repositories of AR content. These two libraries have many attractive filters. All you need to do is scan the Snapcode available in the filters and unlock them. Both of them will have duplicate filters as well, though. But dig a bit deeper, and you will have enough codes of filters to keep using them every day. You will find these codes in your profile once you add them.
Trick 3: Share Snapcodes for Snapchat
The last way to add Snapcode of filters is by scanning other people’s codes. Once you go to your profile, you will see your Snapcodes, which other people can scan. Just like that, you can scan other people’s code as well. Some codes will be available for 24 hours, while others for 48 hours. After that, you can scan the code again when you want to reuse them. To scan a code, just hold your camera over the code and allow the screen to register it.

Bonus: How to Add Anime Effect to Video with Filmora
As we shared, Snapchat will only morph your face into an anime character. But if you are not satisfied with that and want to turn a whole video into anime or cartoon, then one of the best ways to go about it is by getting Wondershare Filmora. Filmora is an easy-to-use yet powerful enough video editing tool loaded with stunning effects, such as cartoons, sketches, color sketches, and more. The process is very easy to follow, and to use Filmora, you don’t need to be a pro. Here are the steps that you can follow:
Step 1: Launch Wondershare Filmora to your Mac or Windows computer. If you haven’t downloaded it yet, click the Try It Free button below to start.
Step 2: Now, import media files and load the video that you want to convert into a cartoon or anime to the media library, and then add that video to the timeline.

Step 3: Go to the Effects option, and type sketch in the search effects bar, which will be on the top of the screen.
Step 4: Currently, Filmora provides sketch and color sketch effects. Try each one of them to see which one works the best. If you want to add the filter to the entire video, just drag and drop the filter to the video, and it’s done.
Step 5: Finally, click on the Export button after everything is done to save the edited video on your computer.
Note: If you want to add the sketch effect to the person only, you can use the Human Segmentation in AI Portrait. In this way, you can also try the Cartoon effect to see the result.
 KoolReport Pro is an advanced solution for creating data reports and dashboards in PHP. Equipped with all extended packages , KoolReport Pro is able to connect to various datasources, perform advanced data analysis, construct stunning charts and graphs and export your beautiful work to PDF, Excel, JPG or other formats. Plus, it includes powerful built-in reports such as pivot report and drill-down report which will save your time in building ones.
 It will help you to write dynamic data reports easily, to construct intuitive dashboards or to build a whole business intelligence cockpit.
KoolReport Pro package goes with Full Source Code, Royal Free, ONE (1) Year Priority Support, ONE (1) Year Free Upgrade and 30-Days Money Back Guarantee.
Developer License allows Single Developer to create Unlimited Reports, deploy on Unlimited Servers and able deliver the work to Unlimited Clients.
Check the video tutorial below to explore more usage of the AI Portrait add-on.
Shanoon Cox
Shanoon Cox is a writer and a lover of all things video.
Follow @Shanoon Cox
Shanoon Cox
Mar 27, 2024• Proven solutions
Snapchat anime filter is the new sensation that is making waves all across social media. The best part about anime filter is that it has the ability to transform your videos and images into anime instantly. This filter has already gone viral on other social media platforms, such as TikTok, Instagram, and Twitter.
Filters and effects are not new when it comes to social media services, and almost all of them have their own versions, which you can use. Snapchat is here with a new lens, which is becoming immensely popular. If you have been trying to use the Snapchat anime filter and don’t know how to go about it, you have come to the right place because this article will talk about how to get this filter and how to use it. Keep reading!
Part 1: What is Anime Filter on Snapchat?
Out of the many AR lenses from Snapchat, the latest one is the anime lens. It’s a filter that will morph a person’s photo or video into an anime character and will customize the anime face based on the person’s facial features. So, rather than simply applying a generic image on top of your face, Snapchat makes sure that the anime image looks similar to your actual image. And as a result, each person’s anime face turns out to be different.
Since the hashtag #animefilter is trending, you can also apply the anime filter on your face and be a part of the trend. The reaction to this filter is lowkey amazing because the filter not only changes your face and makes it look like a part of a hit anime cartoon series or movie, but it sometimes also changes your hair color making you look like the King of the Pirates or Rapunzel. What this lens will do and how your image will turn out to be is highly fascinating.
What stands out is that after the anime filter of Snapchat was released, it has been used over 3 billion times. Snapchat has confirmed this statistic in its Third Quarter 2020 Financial report, and they even said that they already knew it would be a massive hit.
Part 2: How to Get the Anime Filter on Snapchat?
Now that you know how popular the Snapchat anime filter is. It’s worth knowing how to get it. Although this filter is available on Snapchat, many users are facing issues finding it. This section will show you two easy ways to get this filter. You can use one or both methods and start using the filter to show the world how you will look like an anime character. Here are the two ways:
Method 1: Get the Anime Face Filter on Snapchat via Link
Step 1: First, click on the link here . You will need this link to get the anime face filter.
Step 2: Once you click on the click, a pop-up window will open. If you haven’t downloaded the anime filter yet, then Snapchat will say, “New lens found.” Right below it, you will see the message “unlock for 48 hours.” Go ahead and click on that.
Step 3: By clicking on the purple button, your Snapchat anime filter will be available for use for 48 hours.
Here’s a pro tip, if you want to continue using this filter, once the 48 hours are over, simply repeat the steps, and you can use it for additional 48 hours. Simple!
If the pop-up says, “nothing to see here”, which means you have the filter already. In this case, you can go to Snapchat and click the filter accordingly.
 Forex Robotron Basic Package
Method 2: Get the Anime Style Filter via Explore on Snapchat
If you don’t want to click any unknown links, you can explore the anime filter by searching on Snapchat.
Step 1: Make sure your Snapchat is up-to-date. If not, update it to the latest version.
Step 2: Open Snapchat on your mobile or tablet, whichever you are using. Now, turn the lens towards you or someone else as if you are clicking a picture.
Step 3: Now, click on the smiley face filter button, and tap on the Explore button to continue.
Step 4: You can now search for Anime Styles. There are several anime filters available, just make sure that the creator of the filter is Snapchat.
Step 5: Once you have the anime filter, you can record a video of yourself, or take photos. You may also use both back and front cameras to turn anyone into an anime character.
Pro tip: This filter works on already saved photos and videos as well. Try them on too. This filter will work only on your face, though. So, it won’t turn your entire body into an anime character.
Part 3: How Do I Get More Filters on Snapchat?
Since Snapchat keeps coming up with attractive filters, you may wonder how you can get more filters to keep using them. Well, there are a few tricks that you can try. We will explain these tricks in detail, so make sure to follow them correctly.
Trick 1: Turn on Snapchat Geofilters
Before you try using Snapchat geofilters, you will first have to permit Snapchat to access your location. Whether you are using iOS or Android, enable location, and you will start seeing geofilters and all the other filters that you have saved.
Don’t expect a plethora of filters to suddenly turn up. For example, when you apply a geofilter, you will see that it adds an illustration and the place name to your Snap. So, the more you explore and go out, the more filters you will start seeing.
Trick 2: Check Online Resources on Lens Studio and Lenslist
You can also explore two filter libraries, which are Lens Studio and Lenslist. These are repositories of AR content. These two libraries have many attractive filters. All you need to do is scan the Snapcode available in the filters and unlock them. Both of them will have duplicate filters as well, though. But dig a bit deeper, and you will have enough codes of filters to keep using them every day. You will find these codes in your profile once you add them.
Trick 3: Share Snapcodes for Snapchat
The last way to add Snapcode of filters is by scanning other people’s codes. Once you go to your profile, you will see your Snapcodes, which other people can scan. Just like that, you can scan other people’s code as well. Some codes will be available for 24 hours, while others for 48 hours. After that, you can scan the code again when you want to reuse them. To scan a code, just hold your camera over the code and allow the screen to register it.
Bonus: How to Add Anime Effect to Video with Filmora
As we shared, Snapchat will only morph your face into an anime character. But if you are not satisfied with that and want to turn a whole video into anime or cartoon, then one of the best ways to go about it is by getting Wondershare Filmora. Filmora is an easy-to-use yet powerful enough video editing tool loaded with stunning effects, such as cartoons, sketches, color sketches, and more. The process is very easy to follow, and to use Filmora, you don’t need to be a pro. Here are the steps that you can follow:
Step 1: Launch Wondershare Filmora to your Mac or Windows computer. If you haven’t downloaded it yet, click the Try It Free button below to start.
Step 2: Now, import media files and load the video that you want to convert into a cartoon or anime to the media library, and then add that video to the timeline.
Step 3: Go to the Effects option, and type sketch in the search effects bar, which will be on the top of the screen.
 Glarysoft File Recovery Pro - Helps to recover your lost file/data, even permanently deleted data.
Step 4: Currently, Filmora provides sketch and color sketch effects. Try each one of them to see which one works the best. If you want to add the filter to the entire video, just drag and drop the filter to the video, and it’s done.
Step 5: Finally, click on the Export button after everything is done to save the edited video on your computer.
Note: If you want to add the sketch effect to the person only, you can use the Human Segmentation in AI Portrait. In this way, you can also try the Cartoon effect to see the result.
 Project Manager - Asset Browser for 3Ds Max
Check the video tutorial below to explore more usage of the AI Portrait add-on.
Shanoon Cox
Shanoon Cox is a writer and a lover of all things video.
Follow @Shanoon Cox
 Power Tools add-on for Google Sheets, 12-month subscription
Inject Personality Into Snaps on Snapchat Through Voice Customization
How to Change Voice on Snapchat with 2 Easy Methods

Ollie Mattison
Mar 27, 2024• Proven solutions
The recent feature of Snapchat allows you to change your voice without using some third party voice changers. Isn’t it an amazing news? Yes, now you can manipulate your voice in a weird manner and gain confidence to say anything you want to, which you otherwise, lacked in your original voice.
Your confidence level can sky rocket with the new Snapchat voice changer feature and it is definitely fun and cool. Now, create a cat face on Snapchat and add a voiceover to make it more weird and funny.
The alien, robot, bear, and cat voice filters have been released and more are sure, on its way. But, how to use the voice filters? In this article learn how to change voice on Snapchat in 2 easy ways.

Part 1: How To Change Voice On Snapchat With Lenses
Earlier, there were a few lenses that had built in Snapchat voice changer feature. But with the new voice filters on Snapchat, you can add voice to an already recorded video snap. Do you know how to change voice on Snapchat with the lenses? Let’s learn the following steps.
- The first thing that you need to do in order to use the Snapchat voice changer is Launch the Snapchat app. Next, you may hold your finger on the screen, on your face to select the lens and keep holding it until a white colored grid appears and you select the filter from the list available on the right side of the capture button. Or you may also just record the video snap first by holding the capture button without or with any filter selection.

- Once the recording is over, let the capture button go off to stop the recording. Beside the add to story icon and usual download options, at the left bottom, you can find a speaker icon. For the first time users, check for the message displaying ‘Tap to try Voice Filters!’

- When you click on the speaker icon, a list of voice filters appear above the screen. You may tap on any of the icon choices to start using the new voice filters.
- Once you have selected the Snapchat voice changer, you may keep on sharing snaps as you usually send by clicking on the blue button for sending.


Part 2: How To Change Voice On Snapchat With Speed Modifiers
Do you know how to change voice on Snapchat with the speed modifiers? By altering the speed of your Snapchat video, you may change your voice sound. So, first, you have to open the Snapchat app.
- You have to use the front facing camera so tap twice on the Snapchat camera. Then, you can see a round shaped button for recording the video. Press the button to start recording. Once you start recording the video a red line starts filling the circle around the icon. Once the recording is over, just release your finger to stop.

- You can find a range of filter appear when you swipe the video to the right or to the left. These filters are used to change the video speed. To play the audio or video in reverse motion tap the rewind filter, for playing it in slow motion tap the snail filter, and tap the rabbit filter for playing fast paced video and audio.

- Once the recording is finished, it starts automatic playback, which lets you listen to the filter modified voice of yours.
- For editing your snap, from the top screen, you may select the icons to add stickers, texts, and drawings to your snap by swiping left or right. You may save the snap by pressing the download icon. You may set the timer at the bottom of the screen for how long your friends can see your snap. The share button may also be tapped in order to share Snap to the Snapchat story.

- Lastly, on the right of your screen, you can see a blue button. You may choose the friends and press the button to receive Snapchat from them.
Conclusion
Although the voice filters were already available on Snapchat through some of the face filters, the new Snapchat voice changer feature is an added bonus. This feature lets you use both face filters as well as the voice filters combinedly. You may obviously, also use the voice filter alone. Select the features and make a great entry into the Snapchat land with a bang.
Images come from the Internet
Ollie Mattison
Ollie Mattison is a writer and a lover of all things video.
Follow @Ollie Mattison
Ollie Mattison
Mar 27, 2024• Proven solutions
The recent feature of Snapchat allows you to change your voice without using some third party voice changers. Isn’t it an amazing news? Yes, now you can manipulate your voice in a weird manner and gain confidence to say anything you want to, which you otherwise, lacked in your original voice.
Your confidence level can sky rocket with the new Snapchat voice changer feature and it is definitely fun and cool. Now, create a cat face on Snapchat and add a voiceover to make it more weird and funny.
The alien, robot, bear, and cat voice filters have been released and more are sure, on its way. But, how to use the voice filters? In this article learn how to change voice on Snapchat in 2 easy ways.
Part 1: How To Change Voice On Snapchat With Lenses
Earlier, there were a few lenses that had built in Snapchat voice changer feature. But with the new voice filters on Snapchat, you can add voice to an already recorded video snap. Do you know how to change voice on Snapchat with the lenses? Let’s learn the following steps.
- The first thing that you need to do in order to use the Snapchat voice changer is Launch the Snapchat app. Next, you may hold your finger on the screen, on your face to select the lens and keep holding it until a white colored grid appears and you select the filter from the list available on the right side of the capture button. Or you may also just record the video snap first by holding the capture button without or with any filter selection.
- Once the recording is over, let the capture button go off to stop the recording. Beside the add to story icon and usual download options, at the left bottom, you can find a speaker icon. For the first time users, check for the message displaying ‘Tap to try Voice Filters!’

- When you click on the speaker icon, a list of voice filters appear above the screen. You may tap on any of the icon choices to start using the new voice filters.
- Once you have selected the Snapchat voice changer, you may keep on sharing snaps as you usually send by clicking on the blue button for sending.
Part 2: How To Change Voice On Snapchat With Speed Modifiers
Do you know how to change voice on Snapchat with the speed modifiers? By altering the speed of your Snapchat video, you may change your voice sound. So, first, you have to open the Snapchat app.
- You have to use the front facing camera so tap twice on the Snapchat camera. Then, you can see a round shaped button for recording the video. Press the button to start recording. Once you start recording the video a red line starts filling the circle around the icon. Once the recording is over, just release your finger to stop.

- You can find a range of filter appear when you swipe the video to the right or to the left. These filters are used to change the video speed. To play the audio or video in reverse motion tap the rewind filter, for playing it in slow motion tap the snail filter, and tap the rabbit filter for playing fast paced video and audio.
- Once the recording is finished, it starts automatic playback, which lets you listen to the filter modified voice of yours.
- For editing your snap, from the top screen, you may select the icons to add stickers, texts, and drawings to your snap by swiping left or right. You may save the snap by pressing the download icon. You may set the timer at the bottom of the screen for how long your friends can see your snap. The share button may also be tapped in order to share Snap to the Snapchat story.
- Lastly, on the right of your screen, you can see a blue button. You may choose the friends and press the button to receive Snapchat from them.
Conclusion
Although the voice filters were already available on Snapchat through some of the face filters, the new Snapchat voice changer feature is an added bonus. This feature lets you use both face filters as well as the voice filters combinedly. You may obviously, also use the voice filter alone. Select the features and make a great entry into the Snapchat land with a bang.
Images come from the Internet
Ollie Mattison
Ollie Mattison is a writer and a lover of all things video.
Follow @Ollie Mattison
Ollie Mattison
Mar 27, 2024• Proven solutions
The recent feature of Snapchat allows you to change your voice without using some third party voice changers. Isn’t it an amazing news? Yes, now you can manipulate your voice in a weird manner and gain confidence to say anything you want to, which you otherwise, lacked in your original voice.
Your confidence level can sky rocket with the new Snapchat voice changer feature and it is definitely fun and cool. Now, create a cat face on Snapchat and add a voiceover to make it more weird and funny.
The alien, robot, bear, and cat voice filters have been released and more are sure, on its way. But, how to use the voice filters? In this article learn how to change voice on Snapchat in 2 easy ways.
Part 1: How To Change Voice On Snapchat With Lenses
Earlier, there were a few lenses that had built in Snapchat voice changer feature. But with the new voice filters on Snapchat, you can add voice to an already recorded video snap. Do you know how to change voice on Snapchat with the lenses? Let’s learn the following steps.
- The first thing that you need to do in order to use the Snapchat voice changer is Launch the Snapchat app. Next, you may hold your finger on the screen, on your face to select the lens and keep holding it until a white colored grid appears and you select the filter from the list available on the right side of the capture button. Or you may also just record the video snap first by holding the capture button without or with any filter selection.
- Once the recording is over, let the capture button go off to stop the recording. Beside the add to story icon and usual download options, at the left bottom, you can find a speaker icon. For the first time users, check for the message displaying ‘Tap to try Voice Filters!’
- When you click on the speaker icon, a list of voice filters appear above the screen. You may tap on any of the icon choices to start using the new voice filters.
- Once you have selected the Snapchat voice changer, you may keep on sharing snaps as you usually send by clicking on the blue button for sending.
Part 2: How To Change Voice On Snapchat With Speed Modifiers
Do you know how to change voice on Snapchat with the speed modifiers? By altering the speed of your Snapchat video, you may change your voice sound. So, first, you have to open the Snapchat app.
- You have to use the front facing camera so tap twice on the Snapchat camera. Then, you can see a round shaped button for recording the video. Press the button to start recording. Once you start recording the video a red line starts filling the circle around the icon. Once the recording is over, just release your finger to stop.
- You can find a range of filter appear when you swipe the video to the right or to the left. These filters are used to change the video speed. To play the audio or video in reverse motion tap the rewind filter, for playing it in slow motion tap the snail filter, and tap the rabbit filter for playing fast paced video and audio.
- Once the recording is finished, it starts automatic playback, which lets you listen to the filter modified voice of yours.
- For editing your snap, from the top screen, you may select the icons to add stickers, texts, and drawings to your snap by swiping left or right. You may save the snap by pressing the download icon. You may set the timer at the bottom of the screen for how long your friends can see your snap. The share button may also be tapped in order to share Snap to the Snapchat story.
- Lastly, on the right of your screen, you can see a blue button. You may choose the friends and press the button to receive Snapchat from them.
Conclusion
Although the voice filters were already available on Snapchat through some of the face filters, the new Snapchat voice changer feature is an added bonus. This feature lets you use both face filters as well as the voice filters combinedly. You may obviously, also use the voice filter alone. Select the features and make a great entry into the Snapchat land with a bang.
Images come from the Internet
Ollie Mattison
Ollie Mattison is a writer and a lover of all things video.
Follow @Ollie Mattison
Ollie Mattison
Mar 27, 2024• Proven solutions
The recent feature of Snapchat allows you to change your voice without using some third party voice changers. Isn’t it an amazing news? Yes, now you can manipulate your voice in a weird manner and gain confidence to say anything you want to, which you otherwise, lacked in your original voice.
Your confidence level can sky rocket with the new Snapchat voice changer feature and it is definitely fun and cool. Now, create a cat face on Snapchat and add a voiceover to make it more weird and funny.
The alien, robot, bear, and cat voice filters have been released and more are sure, on its way. But, how to use the voice filters? In this article learn how to change voice on Snapchat in 2 easy ways.
Part 1: How To Change Voice On Snapchat With Lenses
Earlier, there were a few lenses that had built in Snapchat voice changer feature. But with the new voice filters on Snapchat, you can add voice to an already recorded video snap. Do you know how to change voice on Snapchat with the lenses? Let’s learn the following steps.
- The first thing that you need to do in order to use the Snapchat voice changer is Launch the Snapchat app. Next, you may hold your finger on the screen, on your face to select the lens and keep holding it until a white colored grid appears and you select the filter from the list available on the right side of the capture button. Or you may also just record the video snap first by holding the capture button without or with any filter selection.
- Once the recording is over, let the capture button go off to stop the recording. Beside the add to story icon and usual download options, at the left bottom, you can find a speaker icon. For the first time users, check for the message displaying ‘Tap to try Voice Filters!’
- When you click on the speaker icon, a list of voice filters appear above the screen. You may tap on any of the icon choices to start using the new voice filters.
- Once you have selected the Snapchat voice changer, you may keep on sharing snaps as you usually send by clicking on the blue button for sending.

 The BootIt Collection covers multi-booting, partitioning, and disk imaging on traditional PC’s using the standard BIOS and newer PC’s using UEFI. The collection includes BootIt Bare Metal (BIBM) for standard BIOS systems and BootIt UEFI (BIU) for UEFI system.
Part 2: How To Change Voice On Snapchat With Speed Modifiers
Do you know how to change voice on Snapchat with the speed modifiers? By altering the speed of your Snapchat video, you may change your voice sound. So, first, you have to open the Snapchat app.
- You have to use the front facing camera so tap twice on the Snapchat camera. Then, you can see a round shaped button for recording the video. Press the button to start recording. Once you start recording the video a red line starts filling the circle around the icon. Once the recording is over, just release your finger to stop.
- You can find a range of filter appear when you swipe the video to the right or to the left. These filters are used to change the video speed. To play the audio or video in reverse motion tap the rewind filter, for playing it in slow motion tap the snail filter, and tap the rabbit filter for playing fast paced video and audio.
- Once the recording is finished, it starts automatic playback, which lets you listen to the filter modified voice of yours.
- For editing your snap, from the top screen, you may select the icons to add stickers, texts, and drawings to your snap by swiping left or right. You may save the snap by pressing the download icon. You may set the timer at the bottom of the screen for how long your friends can see your snap. The share button may also be tapped in order to share Snap to the Snapchat story.
- Lastly, on the right of your screen, you can see a blue button. You may choose the friends and press the button to receive Snapchat from them.
Conclusion
Although the voice filters were already available on Snapchat through some of the face filters, the new Snapchat voice changer feature is an added bonus. This feature lets you use both face filters as well as the voice filters combinedly. You may obviously, also use the voice filter alone. Select the features and make a great entry into the Snapchat land with a bang.
Images come from the Internet
Ollie Mattison
Ollie Mattison is a writer and a lover of all things video.
Follow @Ollie Mattison
- Title: Infuse Your Snap with Japanese Pop Culture The Anime Filter Tutorial for 2024
- Author: Scott
- Created at : 2024-07-25 10:54:47
- Updated at : 2024-07-26 10:54:47
- Link: https://snapchat-videos.techidaily.com/infuse-your-snap-with-japanese-pop-culture-the-anime-filter-tutorial-for-2024/
- License: This work is licensed under CC BY-NC-SA 4.0.