
:max_bytes(150000):strip_icc()/googleaskphotosai-dc323a4a137549d59c5ac6ff0f98eb7b.png)
"In 2024, Snapchat's Speed Control Hacks for Cutting-Edge Creators"
Snapchat’s Speed Control Hacks for Cutting-Edge Creators
Snapchat is an instant messaging app that allows you to share your pictures and videos with your family members, friends, and colleagues. In addition, you can even create your stories in the form of movie clips and share them on the app. These stories remain available for the next 24 hours, after which they are automatically removed from the platform.
While sharing the videos, you can apply several filters that are already present in the app, and Slow Motion is one of them. You may want to learn how to slow down a video on Snapchat when you want to emphasize and draw viewers’ attention toward the scene, or wish to make the audience see your actions closely and in detail.
That said, in the following sections, you will see how to slow down videos on Snapchat, and what other methods you can use to reduce the playback speed more professionally.
In this article
01 How to Add Slow Motion Effects to Video Using the Snapchat App
02 How to Record a Slo-Mo Video and Upload to Snapchat
03 How to Make Flash and Smooth Slo Mo Video for Snapchat
04 FAQs about Slowing Down Snapchat Video
Part 1: How to Add Slow Motion Effects to Video Using the Snapchat App
Snapchat has a built-in Slow Motion filter that reduces the playback speed of a video when applied. You can learn how to slow down on Snapchat by following the instructions that are given below:
Step 1: Record a Video
Launch Snapchat on your smartphone (iPhone 13 Pro Max is used here for illustrations), make sure that the Camera section is selected from the bottom, tap and hold down the Capture button that is present at the lower part of the interface, and let go of it when you are done recording.

Step 2: Apply the Slow Motion Filter
Once the video is recorded, swipe the screen from left to right. Repeat this process until you see the Snail (Slow Motion) icon on the screen. This will reduce the playback speed of the clip.

Step 3: Decorate the Video (Optional)
Use the options present on the upper-right area of the screen to further decorate the video and/or add annotations to it.

Step 4: Share or Publish the Video
Once everything is done, tap Send To from the bottom-right corner to share the video with your family, friends, and colleagues, or publish it as a story that remains available for the next 24 hours.
Related: How to Record Slo-Mo videos on iPhone .
Part 2: How to Record a Slo-Mo Video and Upload to Snapchat
With Snapchat, even though you don’t require any third-party tool to reduce the playback speed of a video, the app has certain limitations. For example, it doesn’t allow you to set a zoom level, you are stuck with the framerate that the app has to offer, etc.
Because of this, many people prefer to use different methods to record a video in slow motion with their preferences, and then upload it to Snapchat. This approach also eliminates the need to swipe the screen several times merely to use a single slow-motion filter.
Fortunately, iPhone has a built-in SLO-MO mode in its Camera app that allows you to capture the videos in slow motion. To learn how to do slow mo on Snapchat with the iPhone’s Camera app, you can follow the instructions that are given below:
Step 1: Get to the iPhone’s SLO-MO Mode
Launch the Camera app on your iPhone (iPhone 13 Pro Max is used here for illustrations), and swipe the screen from left to right until you get to the SLO-MO mode.

Step 2: Set Recording Preferences
Tap the number that is present at the top-right corner (240 here) to toggle between different framerates, tap 1x from the lower-center area, swipe slightly up, and then use the wheel that appears next to define your preferred zoom level.

Step 3: Start and Stop the Recording
Tap the Record button to start the recording, and tap Stop when you’re done.
Note: Make sure that the duration of the recorded video doesn’t exceed 60 seconds.
Step 4: Upload the Slow-Motion Video to Snapchat
After the video is recorded in slow motion, close the Camera app, launch Snapchat, and tap the Gallery icon from the left side of the Capture button on the Camera section. From the Memories screen, go to the Camera Roll tab, and tap to select the video that you recorded in the previous step.
Next, optionally, tap the Edit icon from the bottom-left corner to decorate the video and/or add annotations to it, and follow the process as explained in the previous section to share the clip with your family, friends, or colleagues, or publish it as your story.

Part 3: How to Make Flash and Smooth Slo Mo Video for Snapchat
Although iPhone has the built-in SLO-MO mode that even enables you to set your preferred framerate and zoom level before recording, it still doesn’t allow you to slow down different parts of a video in different speed at your convenience. You can either record the entire video in slow motion or at a normal speed.
This is where a third-party app comes into play. While there are several video editing programs available online, the one of the best slow motion apps that helps you slow down the portions of a video with precision is CapCut.
Downloading and installing CapCut on your iPhone or Android phone is simple, and once it is done, you can follow the process given below to learn how to slow things down on Snapchat:
With CapCut, you can either slow down the whole clip or manage the speed for different segments. This section explains both methods.
Method 1: Slow Down the Whole Clip with CapCut
Step 1: Get to the Speed Panel
Launch CapCut, import the video that you want to slow down, and tap the imported media in the Timeline. Next, tap Speed from the bottom of the interface to get to the next window.

Step 2: Reduce the Speed of the Video
Tap Normal from the bottom of the screen that appears next, and drag the Speed slider to the left to reduce the playback speed. Tap OK from the bottom-right corner to save the changes.

Step 3: Upload the Video to Snapchat
Back on the previous interface, optionally tap Volume from the bottom and reduce the slider to 0 to mute the audio of the footage as it may get distorted due to the reduction in the speed.
Next, tap Share from the top-right corner to save the video on your iPhone, and then use the method explained in the previous section to access the clip from the Gallery within Snapchat for uploading.
Method 2: Reduce the Playback Speed of Different Parts of a Video
Step 1: Get to the Speed Panel
Use the process described in the previous method to get to the Speed panel.
Step 2: Reduce the Speed of Different Parts of the Video
Tap Curve from the bottom of the interface. On the next screen, tap Custom from the lower area, and then tap Edit. From the next panel, drag the beat points down to reduce the speed (or drag them above the line to increase).

Notice that each beat point represents a particular section of the video, and dragging it down reduces the playback speed of that segment. You can even tap anywhere on the line to add a new beat point and drag it down as needed for more precise speed management. Once done, tap OK from the bottom-right corner to save the modifications.

Optionally, you can also tap any of the available presets on the Curve screen to reduce the playback speed of the video accordingly.
Step 3: Upload the Video to Snapchat
Use the method explained in the previous method to export the video, upload it to Snapchat, and share the clip with your family, friends, and colleagues, or publish it as your story.
Part 4: FAQs about Slowing Down Snapchat Video
1. Can I record a slow mo video in Snapchat?
Technically speaking, no, you cannot. However, once you have recorded a video at a normal speed in Snapchat, you can apply the built-in Slow Motion filter to it by swiping the screen from left to right until you see the Snail icon at the center. The Snail icon represents the Slow Motion filter that reduces the playback speed when applied.
2. Besides slow-motion, which speed filters does Snapchat have?
In addition to slow motion Snapchat also has Forward and Fast Forward filters that increase the playback speed. While the Forward filter increases the speed slightly, the Fast Forward one enhances it drastically.
Conclusion
When using an iPhone, even though the SLO-MO mode enables you to record footage in slow motion, you don’t get many options. Therefore, it would be safe to say that it is easy to slow down the speed of a video if you have a dedicated third-party post-production app. However, if you want to go for a convenient method, learning how to slow down a video on Snapchat is an extremely simple and straightforward process.
02 How to Record a Slo-Mo Video and Upload to Snapchat
03 How to Make Flash and Smooth Slo Mo Video for Snapchat
04 FAQs about Slowing Down Snapchat Video
Part 1: How to Add Slow Motion Effects to Video Using the Snapchat App
Snapchat has a built-in Slow Motion filter that reduces the playback speed of a video when applied. You can learn how to slow down on Snapchat by following the instructions that are given below:
Step 1: Record a Video
Launch Snapchat on your smartphone (iPhone 13 Pro Max is used here for illustrations), make sure that the Camera section is selected from the bottom, tap and hold down the Capture button that is present at the lower part of the interface, and let go of it when you are done recording.
Step 2: Apply the Slow Motion Filter
Once the video is recorded, swipe the screen from left to right. Repeat this process until you see the Snail (Slow Motion) icon on the screen. This will reduce the playback speed of the clip.
Step 3: Decorate the Video (Optional)
Use the options present on the upper-right area of the screen to further decorate the video and/or add annotations to it.
Step 4: Share or Publish the Video
Once everything is done, tap Send To from the bottom-right corner to share the video with your family, friends, and colleagues, or publish it as a story that remains available for the next 24 hours.
Related: How to Record Slo-Mo videos on iPhone .
Part 2: How to Record a Slo-Mo Video and Upload to Snapchat
With Snapchat, even though you don’t require any third-party tool to reduce the playback speed of a video, the app has certain limitations. For example, it doesn’t allow you to set a zoom level, you are stuck with the framerate that the app has to offer, etc.
Because of this, many people prefer to use different methods to record a video in slow motion with their preferences, and then upload it to Snapchat. This approach also eliminates the need to swipe the screen several times merely to use a single slow-motion filter.
Fortunately, iPhone has a built-in SLO-MO mode in its Camera app that allows you to capture the videos in slow motion. To learn how to do slow mo on Snapchat with the iPhone’s Camera app, you can follow the instructions that are given below:
Step 1: Get to the iPhone’s SLO-MO Mode
Launch the Camera app on your iPhone (iPhone 13 Pro Max is used here for illustrations), and swipe the screen from left to right until you get to the SLO-MO mode.
Step 2: Set Recording Preferences
Tap the number that is present at the top-right corner (240 here) to toggle between different framerates, tap 1x from the lower-center area, swipe slightly up, and then use the wheel that appears next to define your preferred zoom level.
Step 3: Start and Stop the Recording
Tap the Record button to start the recording, and tap Stop when you’re done.
Note: Make sure that the duration of the recorded video doesn’t exceed 60 seconds.
Step 4: Upload the Slow-Motion Video to Snapchat
After the video is recorded in slow motion, close the Camera app, launch Snapchat, and tap the Gallery icon from the left side of the Capture button on the Camera section. From the Memories screen, go to the Camera Roll tab, and tap to select the video that you recorded in the previous step.
Next, optionally, tap the Edit icon from the bottom-left corner to decorate the video and/or add annotations to it, and follow the process as explained in the previous section to share the clip with your family, friends, or colleagues, or publish it as your story.
Part 3: How to Make Flash and Smooth Slo Mo Video for Snapchat
Although iPhone has the built-in SLO-MO mode that even enables you to set your preferred framerate and zoom level before recording, it still doesn’t allow you to slow down different parts of a video in different speed at your convenience. You can either record the entire video in slow motion or at a normal speed.
This is where a third-party app comes into play. While there are several video editing programs available online, the one of the best slow motion apps that helps you slow down the portions of a video with precision is CapCut.
Downloading and installing CapCut on your iPhone or Android phone is simple, and once it is done, you can follow the process given below to learn how to slow things down on Snapchat:
With CapCut, you can either slow down the whole clip or manage the speed for different segments. This section explains both methods.
Method 1: Slow Down the Whole Clip with CapCut
Step 1: Get to the Speed Panel
Launch CapCut, import the video that you want to slow down, and tap the imported media in the Timeline. Next, tap Speed from the bottom of the interface to get to the next window.
Step 2: Reduce the Speed of the Video
Tap Normal from the bottom of the screen that appears next, and drag the Speed slider to the left to reduce the playback speed. Tap OK from the bottom-right corner to save the changes.
Step 3: Upload the Video to Snapchat
Back on the previous interface, optionally tap Volume from the bottom and reduce the slider to 0 to mute the audio of the footage as it may get distorted due to the reduction in the speed.
Next, tap Share from the top-right corner to save the video on your iPhone, and then use the method explained in the previous section to access the clip from the Gallery within Snapchat for uploading.
Method 2: Reduce the Playback Speed of Different Parts of a Video
Step 1: Get to the Speed Panel
Use the process described in the previous method to get to the Speed panel.
Step 2: Reduce the Speed of Different Parts of the Video
Tap Curve from the bottom of the interface. On the next screen, tap Custom from the lower area, and then tap Edit. From the next panel, drag the beat points down to reduce the speed (or drag them above the line to increase).
Notice that each beat point represents a particular section of the video, and dragging it down reduces the playback speed of that segment. You can even tap anywhere on the line to add a new beat point and drag it down as needed for more precise speed management. Once done, tap OK from the bottom-right corner to save the modifications.
Optionally, you can also tap any of the available presets on the Curve screen to reduce the playback speed of the video accordingly.
Step 3: Upload the Video to Snapchat
Use the method explained in the previous method to export the video, upload it to Snapchat, and share the clip with your family, friends, and colleagues, or publish it as your story.
Part 4: FAQs about Slowing Down Snapchat Video
1. Can I record a slow mo video in Snapchat?
Technically speaking, no, you cannot. However, once you have recorded a video at a normal speed in Snapchat, you can apply the built-in Slow Motion filter to it by swiping the screen from left to right until you see the Snail icon at the center. The Snail icon represents the Slow Motion filter that reduces the playback speed when applied.
2. Besides slow-motion, which speed filters does Snapchat have?
In addition to slow motion Snapchat also has Forward and Fast Forward filters that increase the playback speed. While the Forward filter increases the speed slightly, the Fast Forward one enhances it drastically.
Conclusion
When using an iPhone, even though the SLO-MO mode enables you to record footage in slow motion, you don’t get many options. Therefore, it would be safe to say that it is easy to slow down the speed of a video if you have a dedicated third-party post-production app. However, if you want to go for a convenient method, learning how to slow down a video on Snapchat is an extremely simple and straightforward process.
Capture More Than Memories: Adding Fun Filters to Snaps
How to Use Cartoon Face Lens in Snapchat?

Shanoon Cox
Mar 27, 2024• Proven solutions
The social media apps keep updating themselves and always keep their users thrilled and engaged with the new updates. People love to take selfies, and how exciting it would be, if the selfie turns into Disney and Pixar-style cartoon characters?
Back in 2020, Snapchat released the lens for Disney. Initially, it was tried on pets by the TikTok users, and people loved it. Later, looking to the response on the Disney lens, Snapchat released another filter as Voila AI Artist. Send a snap with the cartoon face lens to get the best response on your click. Also, the Snapchat cartoon face filter is so much famous on Instagram and Facebook.
Is your cellphone camera not good enough? Are you worried about that? You don’t need to now, as the Snapchat lens would help you get various lenses and filters to give you the best clicks. Try out the best lens which you love and get the best images.
Please don’t go away; here, we will get to know about the Snapchat cartoon filter.
- Part 1: What is Snapchat’s Cartoon Lens?
- Part 2: How to Find and Use Snapchat’s Cartoon Lenses?
- Part 3: How to Send a Snap Using the Cartoon Face Lens?
- Part 4: Best App for Disney and Pixal Effect
- Part 5: Differences between Snapchat Cartoon Lens and Anime Filter
Part 1: What is Snapchat’s Cartoon Lens?
Snapchat always keeps on giving the surprise to their users and maintain the selfie crazy on the social media. There are three types of the cartoon lens which is attracting the users and is the latest trend.
- Snapchat Cartoon face Lens - developed and launched way back in August 2020
- Snapchat Cartoon Lens – Quite similar to the Cartoon Face, but the most fantastic thing is it converts your face to a Disney-style character.
- Snapchat Cartoon 3D Style Lens: The most famous Cartoon 3D Style was launched in June 2021 with a Pixar-like funny appearance. Couples love this the most.
Part 2: How to Find and Use Snapchat’s Cartoon Lenses?
Snapchat allows you to use the cartoon lens and send a snap with the cartoon face lens. Ensure you have good internet to get the Snapchat installed first and follow below easy steps below to get your favorite cartoon selfie.
- Open the latest version of Snapchat, and then go to the Camera screen, opt for the smiling face icon as per below.
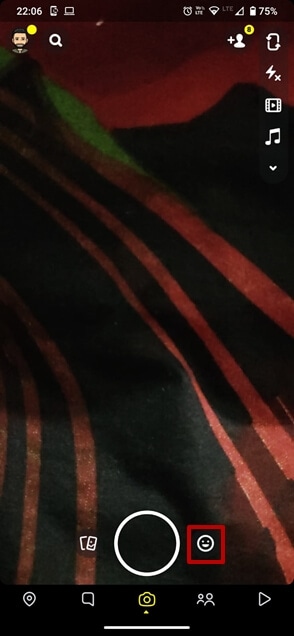
- You need to get to the cartoon lens and hence, click “explore” from the bottom right of the screen.
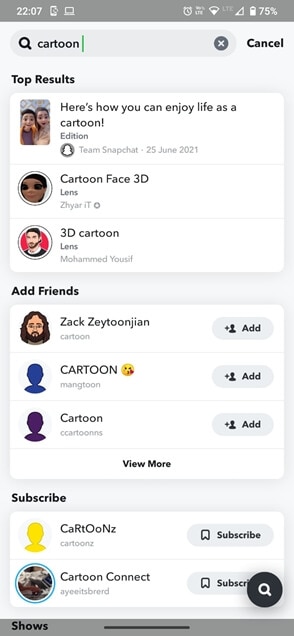
- There are a lot of options and lens; therefore, search for the “cartoon” word. Since there are many cartoon lens, make sure that you have selected the right one developed by Snapchat team. Of course, you can try the cartoon lens created by other creators.
That’s it. You are done. The wait is over. Push the camera button and start taking your video with Snapchat cartoon filter.
Still, if you face difficulty getting the lens for yourself, this link will help you download the cartoon lens and enjoy your video. Further, you can save it or send the stories to your friends. Using the funny lens was never so easy and is so much fun.
Part 3: How to Send a Snap Using the Cartoon Face Lens?
From the above points, you now might know how to get the cartoon lens on the screen. Take the image and video that would make you happy. And now you will be excited to know how it is from your family or friends by sending them the cartoon face Snapchat. But have you added your friends or family members as friends? Make sure to add them to your list or the group, allowing you to send the snap.
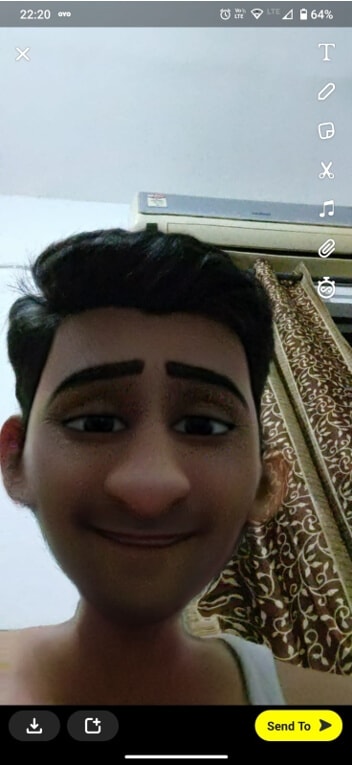
Once you take your snap, click the Send to option on the bottom of the screen to send the snap. Now you will see the list of your added friends or the groups. Tap the friend whom you want to send the snap and tap send.
Your snap has now reached your friends, and you can develop a streak with them. If you send a snap with the cartoon face lens daily to your friends, it will create a specific chain referred to as streak. You can make the streak with them for as long as you can, which means you need to use Snapchat daily. More friends, more fun. The different groups would allow you to stay in touch with more people, and also, you can share the snap with them at one go.
Part 4: Best App for for Disney and Pixal Eeffect
Snapchat is one of the most famous apps which allows the users to take the snap, exchange pictures, and the videos. The Disney Pixar Filter is exclusive on Snapchat. Though you find many similar apps copying the Snapchat filters, the original seems beautiful. You can search the Snapchat cartoon filter 3D style from the search options. Select the filer and click amazing pictures.
Voila Al Artist Carton Photo turns the image into the fantastic pictures of Disney and the Pixal effects. This is the best app giving the Disney and pixal effect specially designed with the help of human capability and artificial intelligence. You can easily take selfies, pictures, and videos with a unique look. If you have the version of 12.0 and Later on iOS , you can easily use this app and click amazing images. Moreover, it only requires 273.6 MB of storage space on iOS.
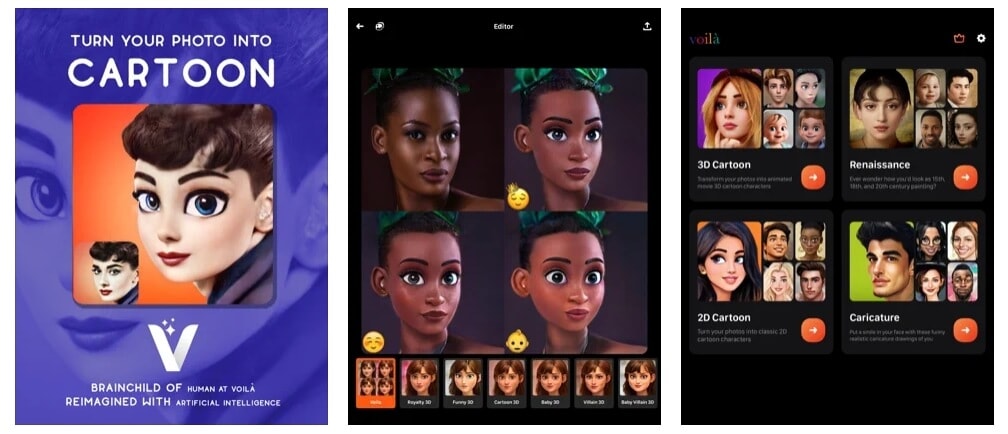
Voila Al Artist is also available on Android , quickly turning the images into cartoon replicas of faces. You can never get tired of this photo app as there are many themes available in the app which can increase your excitement.
The best thing about the Voila Al Artist app is, you can get the app for free. You can use the app on any version of Android. It doesn’t matter if your camera lens is not that good and equipped with high pixels; the Voila Al Artist photo app will make your day with unique photos. If you get tired of the advertisement, you can go for the subscription and enjoy the cartoon selfies.
Part 5: What are the differences between Snapchat Cartoon Lens and Anime Filters ?
Essentially, the difference between a filter and a lens is that the lens is an augmented reality animation, while the filter is a static image overlay.
To Distinguish the difference between Snapchat filters and lenses: Snapchat filters are static and located on top of images or videos. On the other hand, Snapchat lenses are augmented reality animations that can change your voice in addition to changing your appearance on the screen.
Conclusion
Snapchat is primarily known for its lens and filters. Many other apps even try to copy the filers but certainly couldn’t make it up. To develop the longest streak with your friends, you need to use Snapchat daily. Hence, Snapchat would never get you bored if you have to use it and send a snap with the cartoon face lens daily to friends. The regularly updating lens and the streak will keep you engaged in it every day. The app does not demand much high configuration and high storage. Hence, the app can fit into any individual and is easy to operate.
Shanoon Cox
Shanoon Cox is a writer and a lover of all things video.
Follow @Shanoon Cox
Shanoon Cox
Mar 27, 2024• Proven solutions
The social media apps keep updating themselves and always keep their users thrilled and engaged with the new updates. People love to take selfies, and how exciting it would be, if the selfie turns into Disney and Pixar-style cartoon characters?
Back in 2020, Snapchat released the lens for Disney. Initially, it was tried on pets by the TikTok users, and people loved it. Later, looking to the response on the Disney lens, Snapchat released another filter as Voila AI Artist. Send a snap with the cartoon face lens to get the best response on your click. Also, the Snapchat cartoon face filter is so much famous on Instagram and Facebook.
Is your cellphone camera not good enough? Are you worried about that? You don’t need to now, as the Snapchat lens would help you get various lenses and filters to give you the best clicks. Try out the best lens which you love and get the best images.
Please don’t go away; here, we will get to know about the Snapchat cartoon filter.
- Part 1: What is Snapchat’s Cartoon Lens?
- Part 2: How to Find and Use Snapchat’s Cartoon Lenses?
- Part 3: How to Send a Snap Using the Cartoon Face Lens?
- Part 4: Best App for Disney and Pixal Effect
- Part 5: Differences between Snapchat Cartoon Lens and Anime Filter
Part 1: What is Snapchat’s Cartoon Lens?
Snapchat always keeps on giving the surprise to their users and maintain the selfie crazy on the social media. There are three types of the cartoon lens which is attracting the users and is the latest trend.
- Snapchat Cartoon face Lens - developed and launched way back in August 2020
- Snapchat Cartoon Lens – Quite similar to the Cartoon Face, but the most fantastic thing is it converts your face to a Disney-style character.
- Snapchat Cartoon 3D Style Lens: The most famous Cartoon 3D Style was launched in June 2021 with a Pixar-like funny appearance. Couples love this the most.
Part 2: How to Find and Use Snapchat’s Cartoon Lenses?
Snapchat allows you to use the cartoon lens and send a snap with the cartoon face lens. Ensure you have good internet to get the Snapchat installed first and follow below easy steps below to get your favorite cartoon selfie.
- Open the latest version of Snapchat, and then go to the Camera screen, opt for the smiling face icon as per below.
- You need to get to the cartoon lens and hence, click “explore” from the bottom right of the screen.
- There are a lot of options and lens; therefore, search for the “cartoon” word. Since there are many cartoon lens, make sure that you have selected the right one developed by Snapchat team. Of course, you can try the cartoon lens created by other creators.
That’s it. You are done. The wait is over. Push the camera button and start taking your video with Snapchat cartoon filter.
Still, if you face difficulty getting the lens for yourself, this link will help you download the cartoon lens and enjoy your video. Further, you can save it or send the stories to your friends. Using the funny lens was never so easy and is so much fun.
Part 3: How to Send a Snap Using the Cartoon Face Lens?
From the above points, you now might know how to get the cartoon lens on the screen. Take the image and video that would make you happy. And now you will be excited to know how it is from your family or friends by sending them the cartoon face Snapchat. But have you added your friends or family members as friends? Make sure to add them to your list or the group, allowing you to send the snap.
Once you take your snap, click the Send to option on the bottom of the screen to send the snap. Now you will see the list of your added friends or the groups. Tap the friend whom you want to send the snap and tap send.
Your snap has now reached your friends, and you can develop a streak with them. If you send a snap with the cartoon face lens daily to your friends, it will create a specific chain referred to as streak. You can make the streak with them for as long as you can, which means you need to use Snapchat daily. More friends, more fun. The different groups would allow you to stay in touch with more people, and also, you can share the snap with them at one go.
Part 4: Best App for for Disney and Pixal Eeffect
Snapchat is one of the most famous apps which allows the users to take the snap, exchange pictures, and the videos. The Disney Pixar Filter is exclusive on Snapchat. Though you find many similar apps copying the Snapchat filters, the original seems beautiful. You can search the Snapchat cartoon filter 3D style from the search options. Select the filer and click amazing pictures.
Voila Al Artist Carton Photo turns the image into the fantastic pictures of Disney and the Pixal effects. This is the best app giving the Disney and pixal effect specially designed with the help of human capability and artificial intelligence. You can easily take selfies, pictures, and videos with a unique look. If you have the version of 12.0 and Later on iOS , you can easily use this app and click amazing images. Moreover, it only requires 273.6 MB of storage space on iOS.
Voila Al Artist is also available on Android , quickly turning the images into cartoon replicas of faces. You can never get tired of this photo app as there are many themes available in the app which can increase your excitement.
The best thing about the Voila Al Artist app is, you can get the app for free. You can use the app on any version of Android. It doesn’t matter if your camera lens is not that good and equipped with high pixels; the Voila Al Artist photo app will make your day with unique photos. If you get tired of the advertisement, you can go for the subscription and enjoy the cartoon selfies.
Part 5: What are the differences between Snapchat Cartoon Lens and Anime Filters ?
Essentially, the difference between a filter and a lens is that the lens is an augmented reality animation, while the filter is a static image overlay.
To Distinguish the difference between Snapchat filters and lenses: Snapchat filters are static and located on top of images or videos. On the other hand, Snapchat lenses are augmented reality animations that can change your voice in addition to changing your appearance on the screen.
Conclusion
Snapchat is primarily known for its lens and filters. Many other apps even try to copy the filers but certainly couldn’t make it up. To develop the longest streak with your friends, you need to use Snapchat daily. Hence, Snapchat would never get you bored if you have to use it and send a snap with the cartoon face lens daily to friends. The regularly updating lens and the streak will keep you engaged in it every day. The app does not demand much high configuration and high storage. Hence, the app can fit into any individual and is easy to operate.
Shanoon Cox
Shanoon Cox is a writer and a lover of all things video.
Follow @Shanoon Cox
Also read:
- [New] In 2024, Step-In Making the Most of Snap Camera in Microsoft Teams
- [Updated] 2024 Approved Two Easy Steps for Altering Snapchat's Audio Effects
- [New] The Ultimate Guide to Sending Animated Gifs on Snapchat
- [New] 2024 Approved Beneath the Surface The Deeper Meanings in Snapchat Symbols
- [New] In 2024, Unlocking Potential in Snaps Maximizing Your Marketing Impact
- [Updated] Essential Snaps Cutting-Edge Filters & Lenses Unveiled for 2024
- 2024 Approved Initiating Efficient Conversations on Snapchat with Three Steps
- [New] The Essential Guide to Crafting Dynamic Snaps
- 2024 Approved Flip Your Snapchat Video Clockwise
- [Updated] Crafting Moments of Happiness Animated Filters on Your Phone for 2024
- [Updated] How to Add Music to Any Snapchat Video for 2024
- [New] Effortless Snapchat Integration Mac Tips & Tricks
- 2024 Approved The Snapper's Playbook Advanced Tactics for Filter Fun
- [New] Effortless Communication Unveil the Three-Step Method for Snapchat Calls for 2024
- [Updated] Step-by-Step Snapchat's Video Reversal Technique for 2024
- [New] A Step-by-Step Guide to Snapchat's Boomerang Magic
- [Updated] Sonic Boom The Guide to Musical Snapchat Videos for 2024
- In 2024, Embrace Your Inner Cartoon How To Apply Snapchat's Anime Effect
- [Updated] In 2024, The Ultimate Snapchat Slideshow Technique
- [Updated] 2024 Approved Reimagine Your Snapchat Chats with Ease Voice Change Guides Here
- 2024 Approved From Novice to Pro Creating Snapchat Boomers
- Navigating Novelty A Deep Exploration of Filter Innovations for 2024
- [Updated] Effortlessly Enhanced Images Learn the Insider Snapchat Tactics
- [New] 2024 Approved How to Make a Video Best Fits Snapchat Size on Mac?
- In 2024, Swift Video and Picture Retrieval Guide
- [Updated] Profit Strategies for Snapchat Users for 2024
- 2024 Approved Securing Snapshots Across Android and Mac Platforms
- [Updated] Flipping Frames Learn Snapchat's Reverse Trick
- [Updated] Unlocking Cash on the Snapchat Grid
- Pro Tips for Captivating Snapchat Stories for 2024
- [Updated] Fast Track Installing Snapchat on Your Mac Device
- [New] 2024 Approved Boosting Your Snapstreak Essential Tips and Tricks
- 2024 Approved Revolutionize Your Snapchat Experience A Compendium of Over 120 Innovative Story Titles
- [Updated] 2024 Approved Elevate Snappy Moments with Convenient Voice Customization Tips
- [Updated] Social Media Showdown 2021 TikTok vs Snapchat - Who’s Winning?
- [New] 2024 Approved Snap It Right 15 Innovative Posting Hacks
- 2024 Approved Perfecting Your Mobile Video Recordings on Snapchat
- [Updated] In 2024, Discover the Coolest Snapchat Lenses & Filters Now
- [Updated] In 2024, The Best Ways to Captivate an Audience on Snapchat
- [New] In 2024, Snapchat Savvy Mastering Screen Recordings on Your Phone
- 2024 Approved Behind the Smile The Deeper Story in Each Snapchat Emoji
- [Updated] In 2024, Guide for Snapchat Business
- Become the Star with Your Own Stories Guidelines for Crafting over 120 Creative Snap Tales for 2024
- 2024 Approved Ultimate Guide to Maximum Fitness Mac Recordings for Snapchat
- [New] 2024 Approved Invisible Stories Unveiled A Complete Snapguide
- [Updated] 2024 Approved Set You Apart on Snapchat Explore Over 120 Innovative Narrative Ideas for Stories
- [New] Expert Guide Moving Snaps From Snapchat App Effortlessly for 2024
- [New] Perfecting Sound on Snapchat Master Your Vocal Effects in Minutes for 2024
- Keep Your Snaps Alive – Strategies for Longevity for 2024
- Updated Unleash Creative Sound Editing - The Best Free Open-Source Options for Windows Users
- [New] In 2024, Your Go-To List for Immersive Sandboxes
- New Vlog Editing Made Easy The Best Free and Paid Software Solutions
- [New] Uncovering Niche Experts on Instagram A Guide to Impactful Collaborators for 2024
- Updated In 2024, Zoom Sound Off Disabling Video Chat Volume on All Devices
- In 2024, Mavericks Video Creator Bringing Your Vision to Life
- 2024 Approved Top iOS PSP Games & Emulators Revealed
- [New] Video Sequencing Synergy Mastering Blend Modes
- [New] Unveiling Stardew Valley's Most Innovative Game Updates
- 5 Techniques to Transfer Data from Itel P40+ to iPhone 15/14/13/12 | Dr.fone
- Hard Reset Asus ROG Phone 7 Ultimate in 3 Efficient Ways | Dr.fone
- All Must-Knows to Use Fake GPS GO Location Spoofer On Honor Magic 5 | Dr.fone
- 2024 Approved Unlock Slow Motion on VLC A Beginners Guide to Video Playback Tricks
- In 2024, Effortless Video Size Adjustment A How-To Guide
- [New] Save Webcam Videos Using VLC Software for 2024
- 2024 Approved Crafting Content that Captivates Instagram’s Roadmap to Success
- Updated 2024 Approved Synchronize Your Spectacle An Exclusive Look at the Leading 5 Multimedia Mergers
- Top 11 Free Apps to Check IMEI on Vivo Y200 Phones
- 2024 Approved Capture Masters Expertly Reviewing Recorders
- Can I use iTools gpx file to catch the rare Pokemon On Samsung Galaxy M34 5G | Dr.fone
- 2024 Approved Top Video Metadata Editors for Windows and macOS
- How to play HEVC H.265 video on Xiaomi Redmi Note 13 Pro 5G?
- In 2024, How to Unlock iCloud lock on your iPhone X and iPad?
- 2024 Approved Streamline Your Videography Insta-to-MP4 Made Simple
- Updated What Is an AI Headshot Generator?
- In 2024, Hassle-Free Ways to Remove FRP Lock from Huawei Nova Y91 Phones with/without a PC
- Undelete lost pictures from Nokia G42 5G.
- 5 Ways to Restart Tecno Camon 30 Pro 5G Without Power Button | Dr.fone
- [New] 2024 Approved Ultimate Screen Recorder Pro - Win11 Edition
- How to Add a Spooky Shadow Effect for 2024
- Cutting Edge Tech Mastering DSLR, Mac/PC for Social Media Broadcasts for 2024
- New In 2024, How to Find & Make Animated Christmas GIFs?
- 3 Ways to Fake GPS Without Root On Oppo K11x | Dr.fone
- Title: "In 2024, Snapchat's Speed Control Hacks for Cutting-Edge Creators"
- Author: Scott
- Created at : 2024-05-23 10:31:17
- Updated at : 2024-05-24 10:31:17
- Link: https://snapchat-videos.techidaily.com/in-2024-snapchats-speed-control-hacks-for-cutting-edge-creators/
- License: This work is licensed under CC BY-NC-SA 4.0.
