
:max_bytes(150000):strip_icc()/how-to-use-image-creator-from-microsoft-designer-7fad906276724cac96622cfcf3af3322.jpg)
"In 2024, Mastering Time Warp Your Snapchat Slideshow Guide"
Mastering Time Warp: Your Snapchat Slideshow Guide
Snapchat is an instant messaging app that allows you to share your pictures and videos with your family members, friends, and colleagues. In addition, you can even create your stories in the form of movie clips and share them on the app. These stories remain available for the next 24 hours, after which they are automatically removed from the platform.
While sharing the videos, you can apply several filters that are already present in the app, and Slow Motion is one of them. You may want to learn how to slow down a video on Snapchat when you want to emphasize and draw viewers’ attention toward the scene, or wish to make the audience see your actions closely and in detail.
That said, in the following sections, you will see how to slow down videos on Snapchat, and what other methods you can use to reduce the playback speed more professionally.
In this article
01 How to Add Slow Motion Effects to Video Using the Snapchat App
02 How to Record a Slo-Mo Video and Upload to Snapchat
03 How to Make Flash and Smooth Slo Mo Video for Snapchat
04 FAQs about Slowing Down Snapchat Video
Part 1: How to Add Slow Motion Effects to Video Using the Snapchat App
Snapchat has a built-in Slow Motion filter that reduces the playback speed of a video when applied. You can learn how to slow down on Snapchat by following the instructions that are given below:
Step 1: Record a Video
Launch Snapchat on your smartphone (iPhone 13 Pro Max is used here for illustrations), make sure that the Camera section is selected from the bottom, tap and hold down the Capture button that is present at the lower part of the interface, and let go of it when you are done recording.

Step 2: Apply the Slow Motion Filter
Once the video is recorded, swipe the screen from left to right. Repeat this process until you see the Snail (Slow Motion) icon on the screen. This will reduce the playback speed of the clip.

Step 3: Decorate the Video (Optional)
Use the options present on the upper-right area of the screen to further decorate the video and/or add annotations to it.

Step 4: Share or Publish the Video
Once everything is done, tap Send To from the bottom-right corner to share the video with your family, friends, and colleagues, or publish it as a story that remains available for the next 24 hours.
Related: How to Record Slo-Mo videos on iPhone .
Part 2: How to Record a Slo-Mo Video and Upload to Snapchat
With Snapchat, even though you don’t require any third-party tool to reduce the playback speed of a video, the app has certain limitations. For example, it doesn’t allow you to set a zoom level, you are stuck with the framerate that the app has to offer, etc.
Because of this, many people prefer to use different methods to record a video in slow motion with their preferences, and then upload it to Snapchat. This approach also eliminates the need to swipe the screen several times merely to use a single slow-motion filter.
Fortunately, iPhone has a built-in SLO-MO mode in its Camera app that allows you to capture the videos in slow motion. To learn how to do slow mo on Snapchat with the iPhone’s Camera app, you can follow the instructions that are given below:
Step 1: Get to the iPhone’s SLO-MO Mode
Launch the Camera app on your iPhone (iPhone 13 Pro Max is used here for illustrations), and swipe the screen from left to right until you get to the SLO-MO mode.

Step 2: Set Recording Preferences
Tap the number that is present at the top-right corner (240 here) to toggle between different framerates, tap 1x from the lower-center area, swipe slightly up, and then use the wheel that appears next to define your preferred zoom level.

Step 3: Start and Stop the Recording
Tap the Record button to start the recording, and tap Stop when you’re done.
Note: Make sure that the duration of the recorded video doesn’t exceed 60 seconds.
Step 4: Upload the Slow-Motion Video to Snapchat
After the video is recorded in slow motion, close the Camera app, launch Snapchat, and tap the Gallery icon from the left side of the Capture button on the Camera section. From the Memories screen, go to the Camera Roll tab, and tap to select the video that you recorded in the previous step.
Next, optionally, tap the Edit icon from the bottom-left corner to decorate the video and/or add annotations to it, and follow the process as explained in the previous section to share the clip with your family, friends, or colleagues, or publish it as your story.

Part 3: How to Make Flash and Smooth Slo Mo Video for Snapchat
Although iPhone has the built-in SLO-MO mode that even enables you to set your preferred framerate and zoom level before recording, it still doesn’t allow you to slow down different parts of a video in different speed at your convenience. You can either record the entire video in slow motion or at a normal speed.
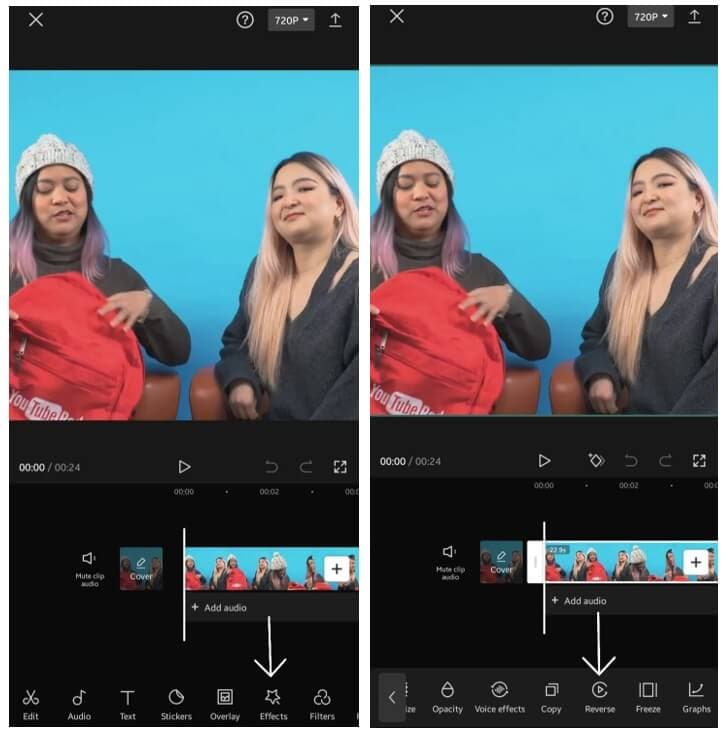
This is where a third-party app comes into play. While there are several video editing programs available online, the one of the best slow motion apps that helps you slow down the portions of a video with precision is CapCut.
Downloading and installing CapCut on your iPhone or Android phone is simple, and once it is done, you can follow the process given below to learn how to slow things down on Snapchat:
With CapCut, you can either slow down the whole clip or manage the speed for different segments. This section explains both methods.
Method 1: Slow Down the Whole Clip with CapCut
Step 1: Get to the Speed Panel
Launch CapCut, import the video that you want to slow down, and tap the imported media in the Timeline. Next, tap Speed from the bottom of the interface to get to the next window.

Step 2: Reduce the Speed of the Video
Tap Normal from the bottom of the screen that appears next, and drag the Speed slider to the left to reduce the playback speed. Tap OK from the bottom-right corner to save the changes.

Step 3: Upload the Video to Snapchat
Back on the previous interface, optionally tap Volume from the bottom and reduce the slider to 0 to mute the audio of the footage as it may get distorted due to the reduction in the speed.
Next, tap Share from the top-right corner to save the video on your iPhone, and then use the method explained in the previous section to access the clip from the Gallery within Snapchat for uploading.
Method 2: Reduce the Playback Speed of Different Parts of a Video
Step 1: Get to the Speed Panel
Use the process described in the previous method to get to the Speed panel.
Step 2: Reduce the Speed of Different Parts of the Video
Tap Curve from the bottom of the interface. On the next screen, tap Custom from the lower area, and then tap Edit. From the next panel, drag the beat points down to reduce the speed (or drag them above the line to increase).

Notice that each beat point represents a particular section of the video, and dragging it down reduces the playback speed of that segment. You can even tap anywhere on the line to add a new beat point and drag it down as needed for more precise speed management. Once done, tap OK from the bottom-right corner to save the modifications.

Optionally, you can also tap any of the available presets on the Curve screen to reduce the playback speed of the video accordingly.
Step 3: Upload the Video to Snapchat
Use the method explained in the previous method to export the video, upload it to Snapchat, and share the clip with your family, friends, and colleagues, or publish it as your story.
Part 4: FAQs about Slowing Down Snapchat Video
1. Can I record a slow mo video in Snapchat?
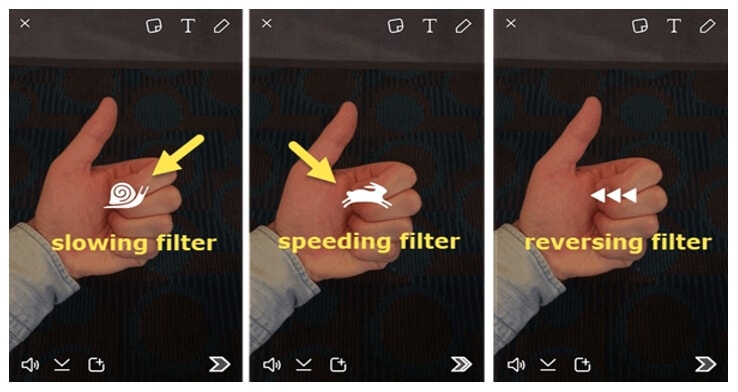
Technically speaking, no, you cannot. However, once you have recorded a video at a normal speed in Snapchat, you can apply the built-in Slow Motion filter to it by swiping the screen from left to right until you see the Snail icon at the center. The Snail icon represents the Slow Motion filter that reduces the playback speed when applied.
2. Besides slow-motion, which speed filters does Snapchat have?
In addition to slow motion Snapchat also has Forward and Fast Forward filters that increase the playback speed. While the Forward filter increases the speed slightly, the Fast Forward one enhances it drastically.
Conclusion
When using an iPhone, even though the SLO-MO mode enables you to record footage in slow motion, you don’t get many options. Therefore, it would be safe to say that it is easy to slow down the speed of a video if you have a dedicated third-party post-production app. However, if you want to go for a convenient method, learning how to slow down a video on Snapchat is an extremely simple and straightforward process.
02 How to Record a Slo-Mo Video and Upload to Snapchat
03 How to Make Flash and Smooth Slo Mo Video for Snapchat
04 FAQs about Slowing Down Snapchat Video
Part 1: How to Add Slow Motion Effects to Video Using the Snapchat App
Snapchat has a built-in Slow Motion filter that reduces the playback speed of a video when applied. You can learn how to slow down on Snapchat by following the instructions that are given below:
Step 1: Record a Video
Launch Snapchat on your smartphone (iPhone 13 Pro Max is used here for illustrations), make sure that the Camera section is selected from the bottom, tap and hold down the Capture button that is present at the lower part of the interface, and let go of it when you are done recording.
Step 2: Apply the Slow Motion Filter
Once the video is recorded, swipe the screen from left to right. Repeat this process until you see the Snail (Slow Motion) icon on the screen. This will reduce the playback speed of the clip.
Step 3: Decorate the Video (Optional)
Use the options present on the upper-right area of the screen to further decorate the video and/or add annotations to it.
Step 4: Share or Publish the Video
Once everything is done, tap Send To from the bottom-right corner to share the video with your family, friends, and colleagues, or publish it as a story that remains available for the next 24 hours.
Related: How to Record Slo-Mo videos on iPhone .
Part 2: How to Record a Slo-Mo Video and Upload to Snapchat
With Snapchat, even though you don’t require any third-party tool to reduce the playback speed of a video, the app has certain limitations. For example, it doesn’t allow you to set a zoom level, you are stuck with the framerate that the app has to offer, etc.
Because of this, many people prefer to use different methods to record a video in slow motion with their preferences, and then upload it to Snapchat. This approach also eliminates the need to swipe the screen several times merely to use a single slow-motion filter.
Fortunately, iPhone has a built-in SLO-MO mode in its Camera app that allows you to capture the videos in slow motion. To learn how to do slow mo on Snapchat with the iPhone’s Camera app, you can follow the instructions that are given below:
Step 1: Get to the iPhone’s SLO-MO Mode
Launch the Camera app on your iPhone (iPhone 13 Pro Max is used here for illustrations), and swipe the screen from left to right until you get to the SLO-MO mode.
Step 2: Set Recording Preferences
Tap the number that is present at the top-right corner (240 here) to toggle between different framerates, tap 1x from the lower-center area, swipe slightly up, and then use the wheel that appears next to define your preferred zoom level.
Step 3: Start and Stop the Recording
Tap the Record button to start the recording, and tap Stop when you’re done.
Note: Make sure that the duration of the recorded video doesn’t exceed 60 seconds.
Step 4: Upload the Slow-Motion Video to Snapchat
After the video is recorded in slow motion, close the Camera app, launch Snapchat, and tap the Gallery icon from the left side of the Capture button on the Camera section. From the Memories screen, go to the Camera Roll tab, and tap to select the video that you recorded in the previous step.
Next, optionally, tap the Edit icon from the bottom-left corner to decorate the video and/or add annotations to it, and follow the process as explained in the previous section to share the clip with your family, friends, or colleagues, or publish it as your story.
Part 3: How to Make Flash and Smooth Slo Mo Video for Snapchat
Although iPhone has the built-in SLO-MO mode that even enables you to set your preferred framerate and zoom level before recording, it still doesn’t allow you to slow down different parts of a video in different speed at your convenience. You can either record the entire video in slow motion or at a normal speed.
This is where a third-party app comes into play. While there are several video editing programs available online, the one of the best slow motion apps that helps you slow down the portions of a video with precision is CapCut.
Downloading and installing CapCut on your iPhone or Android phone is simple, and once it is done, you can follow the process given below to learn how to slow things down on Snapchat:
With CapCut, you can either slow down the whole clip or manage the speed for different segments. This section explains both methods.
Method 1: Slow Down the Whole Clip with CapCut
Step 1: Get to the Speed Panel
Launch CapCut, import the video that you want to slow down, and tap the imported media in the Timeline. Next, tap Speed from the bottom of the interface to get to the next window.
Step 2: Reduce the Speed of the Video
Tap Normal from the bottom of the screen that appears next, and drag the Speed slider to the left to reduce the playback speed. Tap OK from the bottom-right corner to save the changes.
Step 3: Upload the Video to Snapchat
Back on the previous interface, optionally tap Volume from the bottom and reduce the slider to 0 to mute the audio of the footage as it may get distorted due to the reduction in the speed.
Next, tap Share from the top-right corner to save the video on your iPhone, and then use the method explained in the previous section to access the clip from the Gallery within Snapchat for uploading.
Method 2: Reduce the Playback Speed of Different Parts of a Video
Step 1: Get to the Speed Panel
Use the process described in the previous method to get to the Speed panel.
Step 2: Reduce the Speed of Different Parts of the Video
Tap Curve from the bottom of the interface. On the next screen, tap Custom from the lower area, and then tap Edit. From the next panel, drag the beat points down to reduce the speed (or drag them above the line to increase).
Notice that each beat point represents a particular section of the video, and dragging it down reduces the playback speed of that segment. You can even tap anywhere on the line to add a new beat point and drag it down as needed for more precise speed management. Once done, tap OK from the bottom-right corner to save the modifications.
Optionally, you can also tap any of the available presets on the Curve screen to reduce the playback speed of the video accordingly.
Step 3: Upload the Video to Snapchat
Use the method explained in the previous method to export the video, upload it to Snapchat, and share the clip with your family, friends, and colleagues, or publish it as your story.
Part 4: FAQs about Slowing Down Snapchat Video
1. Can I record a slow mo video in Snapchat?
Technically speaking, no, you cannot. However, once you have recorded a video at a normal speed in Snapchat, you can apply the built-in Slow Motion filter to it by swiping the screen from left to right until you see the Snail icon at the center. The Snail icon represents the Slow Motion filter that reduces the playback speed when applied.
2. Besides slow-motion, which speed filters does Snapchat have?
In addition to slow motion Snapchat also has Forward and Fast Forward filters that increase the playback speed. While the Forward filter increases the speed slightly, the Fast Forward one enhances it drastically.
Conclusion
When using an iPhone, even though the SLO-MO mode enables you to record footage in slow motion, you don’t get many options. Therefore, it would be safe to say that it is easy to slow down the speed of a video if you have a dedicated third-party post-production app. However, if you want to go for a convenient method, learning how to slow down a video on Snapchat is an extremely simple and straightforward process.
Conquer Backward Motion in Snapchat Videos Quickly
Snapchat has become one of the foremost popular chat applications for young adults and teenagers worldwide. Released in 2011, it gives you a choice to feature captions, drawings, and filters to your photos and videos referred to as snaps. Few people want to see the videos in reverse on Snapchat.
But, only a few people know about the Snapchat reverse filter. Don’t worry if you are clueless about the reverse video Snapchat process. Since reversing a video, snap is as easy as applying a filter. This article will enable you to reverse Snapchat for iOS and Android versions quickly.
In this article
01 How to Record Reverse video on Snapchat for free with the built-in filter?
02 How to Add Reverse Effect to Existing Videos on Snapchat?
03 Best Apps to Create Reverse Video for Snapchat.
04 When Should You Apply the Reverse Filter to Video on Snapchat?
05 Tips for a good reverse video
Part 1: How to Record Reverse video on Snapchat for free with the built-in filter?
Now that you need to know how to invert a video on Snapchat do not remain absent from this dialog. As you all know, it is beautifully simple to record a specific video on Snapchat. Like recording a video, turning around is also a pretty easy one.
Let’s examine in detail how you’ll switch Snapchat video via a free built-in reverse feature on Snapchat.
Note: Video duration should not be more than 10 seconds.
Step 1: Begin to record the video.
Open your Snapchat, then move to the camera screen. Later, capture a specific video clip by holding down a button display within the middle of the screen.
Step 2: T urn around the filter effect.
After capturing a video on Snapchat, another step for you’ll be to undertake to go for a turnaround channel there that is swipe to the left. By swiping, you’ll discover the reverse option alternative quickly. When you reach after swiping, you will find several types of filters. There, stay on the reverse screen.
Step 3: Share the altered video.
After switching your video to reverse mode, you’ll be able to share it with your companions. If you want to include more impacts in the video, tap the symbol button on your right side. Doing so will empower you to add effect. That’s all for turning around a video on Snapchat. Finally, you will get the reversed video with varying speed options.
You may also like: How to slow down video on Snapchat.
Part 2: How to Add Reverse Effect to Existing Videos on Snapchat?
This strategy works for both recordings you previously took with the Snapchat app and those you transfer from your phone’s collections. Follow the following step guidelines to reverse video on Snapchat.
Step 1: Open Snapchat and select the video
After landing on the main screen, you will see the camera icon. Swipe up the screen. You will see different options. Either choose the short video of duration less than 10 sec from ‘Snaps’ sections for a video you had previously recorded in Snapchat. Or else you can go for ‘Camera Roll’ to select a video from the phone camera Gallery.
Step 2: Edit Snap Menu and reverse video
Tap on the three-dot symbols on the upper right portion of the screen to open the menu. Tap on ‘Edit Snap’ from the given options. Swipe Left and find the reverse filter in Snapchat from all the filters. Selecting the reverse option will enable the Snapchat reverse filter effect on the selected video.
Part 3: Best Apps to Create Reverse Video for Snapchat
1. CapCut
CapCut may be a portable app for iOS and Android gadgets, mainly created to complement the essential video altering highlights of the famous social stage. Several critical features of CapCut, bring it unique for social media. For example, Split function, Speed control, High defined filters, effect, and many more.
But if we talk about its reverse feature, a triangle-shaped figure inside a circle icon is known as the reverse feature in the software. This is not so tricky to use. But you can use this feature only on short videos. You can reverse it in slow motion after applying high-quality effects in your video. This version is available on iPhone as well as on Android devices.
You can check this article and find out the details about how to edit videos with CapCut.
2. Wondershare Filmora
Wondershare Filmora is the most recommended video-altering computer program that creates astonishing recordings productively employing a vast extent of powerful altering devices. Wondershare Filmora uses a delightfully realistic plan that makes it simple for anybody to become an incredible video editor.
Filmora is the most suitable app for video playback and reverses the video. And not only this, it has many other features that may facilitate your videos more engaging. If you’re trying to find an all-around video app, Filmora is the one for you. It has various kinds of critical features of Wondershare Filmora. For example, support to 4K editing, GIF, Noise removal, Advanced text editor, etc.
Talking its reverse feature is the ideal thing. It has professional tools for reversing video. Your videos will become more attractive through reverse, and additional features and concise videos will be on top.
3. Reverse Movie FX - Magic

If you need to turn around your recordings uploaded on Snapchat, Motion picture FX can make the difference. To begin with, record a video. Then, follow the steps to select the motion picture part, and press, begin. Switch Motion picture FX will start switching a video.
The main features of Reverse Movie FX- magic video are: Reverse Motion FX - Magic video carries colossal highlights for turning around a video. You will discover staggering liveliness and imaginative moves in this application. It has a smooth altering interface and timeline. You can include an inverted impact to your video by fair tapping an alternative.
Reverse Movie FX is a reverse video app available for Android and iOS devices. It offers reverse video options, including reversed + original (loop), original + reversed (loop), adding music, and many more.
Part 4: When Should You Apply the Reverse Filter to Video on Snapchat?
Reversing your video on Snapchat reflects how to show off a chain of occasions backward. This clear-out out is frequently satisfactory carried out to action-packed videos. For illustration, consider something as straightforward as dropping a shake onto a frozen pond that breaks through the ice. Rather than watching the ice smash after the video, you may apply the turnaround effect to appear the broken ice is coming back together as the video film plays in reverse.
Moving clouds, waterfall, hair flaunting, moving steps, playing with accessories, cycling, sky diving, breaking of glass, food making, makeup reverse videos, these kinds of videos easily catch trends on any social media platform.
Part 5: Tips for a good reverse video
Here are a few tips to assist you with the Snapchat reverse filter.
- Include voice: Once you utilize the turnaround effect, it’s not as it was the video that gets turned around. Any sound recorded with the video moreover gets turned around. This includes a tremendous impact on your clip as of now reversed video. So, beyond any doubt, say something while recording your video.
- Do the bizarre: If you’re aiming to be turning back time, your superior does it in fashion! Utilize the switch movement channel on things that don’t, as a rule, work that way. Like streaming water, flying feathered creatures, running mutts, you get the thought.
- Moderate that video down: Most phones these days have a few frames of slow-motion shooting mode in their camera app. Shoot your video in moderate movement, and after that, utilize the reverse motion channel on it.
- Shoot in great lighting: We know how terrible the Snapchat camera is. So, when shooting a video, shoot it in great characteristic light. Well, there you’ve got it! Have fun messing around with the reverse effect, and create a few intriguing science-defying snaps within the deal!
Conclusion
In the end, we hope that all your queries get cleared while reading this post. There are a few questions answered like:
- How to make a reverse video on Snapchat.
- Tips to make the reverse video better.
- How to use the in-built Snapchat reverse filter.
- Some apps create the best reverse videos.
Thus, I hope your queries are explicit after reading this post.
02 How to Add Reverse Effect to Existing Videos on Snapchat?
03 Best Apps to Create Reverse Video for Snapchat.
04 When Should You Apply the Reverse Filter to Video on Snapchat?
05 Tips for a good reverse video
Part 1: How to Record Reverse video on Snapchat for free with the built-in filter?
Now that you need to know how to invert a video on Snapchat do not remain absent from this dialog. As you all know, it is beautifully simple to record a specific video on Snapchat. Like recording a video, turning around is also a pretty easy one.
Let’s examine in detail how you’ll switch Snapchat video via a free built-in reverse feature on Snapchat.
Note: Video duration should not be more than 10 seconds.
Step 1: Begin to record the video.
Open your Snapchat, then move to the camera screen. Later, capture a specific video clip by holding down a button display within the middle of the screen.
Step 2: T urn around the filter effect.
After capturing a video on Snapchat, another step for you’ll be to undertake to go for a turnaround channel there that is swipe to the left. By swiping, you’ll discover the reverse option alternative quickly. When you reach after swiping, you will find several types of filters. There, stay on the reverse screen.
Step 3: Share the altered video.
After switching your video to reverse mode, you’ll be able to share it with your companions. If you want to include more impacts in the video, tap the symbol button on your right side. Doing so will empower you to add effect. That’s all for turning around a video on Snapchat. Finally, you will get the reversed video with varying speed options.
You may also like: How to slow down video on Snapchat.
Part 2: How to Add Reverse Effect to Existing Videos on Snapchat?
This strategy works for both recordings you previously took with the Snapchat app and those you transfer from your phone’s collections. Follow the following step guidelines to reverse video on Snapchat.
Step 1: Open Snapchat and select the video
After landing on the main screen, you will see the camera icon. Swipe up the screen. You will see different options. Either choose the short video of duration less than 10 sec from ‘Snaps’ sections for a video you had previously recorded in Snapchat. Or else you can go for ‘Camera Roll’ to select a video from the phone camera Gallery.
Step 2: Edit Snap Menu and reverse video
Tap on the three-dot symbols on the upper right portion of the screen to open the menu. Tap on ‘Edit Snap’ from the given options. Swipe Left and find the reverse filter in Snapchat from all the filters. Selecting the reverse option will enable the Snapchat reverse filter effect on the selected video.
Part 3: Best Apps to Create Reverse Video for Snapchat
1. CapCut
CapCut may be a portable app for iOS and Android gadgets, mainly created to complement the essential video altering highlights of the famous social stage. Several critical features of CapCut, bring it unique for social media. For example, Split function, Speed control, High defined filters, effect, and many more.
But if we talk about its reverse feature, a triangle-shaped figure inside a circle icon is known as the reverse feature in the software. This is not so tricky to use. But you can use this feature only on short videos. You can reverse it in slow motion after applying high-quality effects in your video. This version is available on iPhone as well as on Android devices.
You can check this article and find out the details about how to edit videos with CapCut.
2. Wondershare Filmora
Wondershare Filmora is the most recommended video-altering computer program that creates astonishing recordings productively employing a vast extent of powerful altering devices. Wondershare Filmora uses a delightfully realistic plan that makes it simple for anybody to become an incredible video editor.
Filmora is the most suitable app for video playback and reverses the video. And not only this, it has many other features that may facilitate your videos more engaging. If you’re trying to find an all-around video app, Filmora is the one for you. It has various kinds of critical features of Wondershare Filmora. For example, support to 4K editing, GIF, Noise removal, Advanced text editor, etc.
Talking its reverse feature is the ideal thing. It has professional tools for reversing video. Your videos will become more attractive through reverse, and additional features and concise videos will be on top.
3. Reverse Movie FX - Magic
If you need to turn around your recordings uploaded on Snapchat, Motion picture FX can make the difference. To begin with, record a video. Then, follow the steps to select the motion picture part, and press, begin. Switch Motion picture FX will start switching a video.
The main features of Reverse Movie FX- magic video are: Reverse Motion FX - Magic video carries colossal highlights for turning around a video. You will discover staggering liveliness and imaginative moves in this application. It has a smooth altering interface and timeline. You can include an inverted impact to your video by fair tapping an alternative.
Reverse Movie FX is a reverse video app available for Android and iOS devices. It offers reverse video options, including reversed + original (loop), original + reversed (loop), adding music, and many more.
Part 4: When Should You Apply the Reverse Filter to Video on Snapchat?
Reversing your video on Snapchat reflects how to show off a chain of occasions backward. This clear-out out is frequently satisfactory carried out to action-packed videos. For illustration, consider something as straightforward as dropping a shake onto a frozen pond that breaks through the ice. Rather than watching the ice smash after the video, you may apply the turnaround effect to appear the broken ice is coming back together as the video film plays in reverse.
Moving clouds, waterfall, hair flaunting, moving steps, playing with accessories, cycling, sky diving, breaking of glass, food making, makeup reverse videos, these kinds of videos easily catch trends on any social media platform.
Part 5: Tips for a good reverse video
Here are a few tips to assist you with the Snapchat reverse filter.
- Include voice: Once you utilize the turnaround effect, it’s not as it was the video that gets turned around. Any sound recorded with the video moreover gets turned around. This includes a tremendous impact on your clip as of now reversed video. So, beyond any doubt, say something while recording your video.
- Do the bizarre: If you’re aiming to be turning back time, your superior does it in fashion! Utilize the switch movement channel on things that don’t, as a rule, work that way. Like streaming water, flying feathered creatures, running mutts, you get the thought.
- Moderate that video down: Most phones these days have a few frames of slow-motion shooting mode in their camera app. Shoot your video in moderate movement, and after that, utilize the reverse motion channel on it.
- Shoot in great lighting: We know how terrible the Snapchat camera is. So, when shooting a video, shoot it in great characteristic light. Well, there you’ve got it! Have fun messing around with the reverse effect, and create a few intriguing science-defying snaps within the deal!
Conclusion
In the end, we hope that all your queries get cleared while reading this post. There are a few questions answered like:
- How to make a reverse video on Snapchat.
- Tips to make the reverse video better.
- How to use the in-built Snapchat reverse filter.
- Some apps create the best reverse videos.
Thus, I hope your queries are explicit after reading this post.
Also read:
- [New] 2024 Approved Transform Your Snapshots Into Shares – Here's How
- 2024 Approved Beam Bright Navigating the World of Snapchat GIFS
- Sonic Steps to Better Snapchat Videos for 2024
- [Updated] In 2024, How to Find Muted Conversations on Snapchat
- [Updated] In 2024, Social Network Showdown 2021 The Battle Between TikTok and Snapchat
- [Updated] 2024 Approved Discover 15 Superior Snap Strategies
- [New] Fast & Easy Guide How to Set up Snapchat on a Mac
- [Updated] Easy Implementation of Snap Camera on MS Teams
- [New] Unlocking the Art of Reversed Video Experience on Snapchat
- 2024 Approved Augmenting Reality Advanced Filtration Tactics in Snapchat
- In 2024, Unveiling Secrets to Effective Snapchat Pins
- [New] Speed Up Snap Retrieval Methods for 2024
- [New] 2024 Approved Seamless Integration of Snapchat on Apple's Laptops
- [Updated] 2024 Approved Anchoring in Antiquity How to Reverse Snapchat Movements
- Understanding Snapchat's Emojis More Than Just Fun for 2024
- [Updated] How to Send a Snap From Memories/Camera Roll on Snapchat for 2024
- [Updated] In 2024, Innovative Illusions Snapchat Filters Leading the Way
- [New] Essential Tutorial How to Install Snapchat on macOS for 2024
- How Can You Screen Record Snapchat on Mobile Phone, In 2024
- [New] 2024 Approved Unleash Photos on Instagram with Ease – Follow This Guide
- The Essence of Elegance Premium Filters for Your Snap for 2024
- 2024 Approved Symphony of Sounds in Every Snapchat Story
- 2024 Approved Undisclosed ScreenGrabbing Invisible Photography on Snapchat
- [New] Social Network Showdown 2 Written by a Computer Program, without Understanding Language or Culture
- 2024 Approved Unlock the Full Potential of SnapKit in Business Ads
- [New] Learn the Art of Live Screen Sharing on Snapchat for 2024
- [Updated] In 2024, Step-by-Step Snapchat's Video Reversal Technique
- [Updated] Cash Creation Hacks for Snapchat Users
- [New] Tips to Trim Your Video Playback Time on Snapchat for 2024
- Make Every Chat Memorable How to Send Engaging Gifs on Snapchat for 2024
- [Updated] 2024 Approved Mastery Guide Installing Snapchat on Mac OS
- The Ultimate Tutorial for Sharing Photos From Phone Memory for 2024
- [Updated] How to Reverse a Video on Snapchat for 2024
- [Updated] In 2024, Essential Tips Direct Camera Roll Upload to Snapchat
- Eye-Catching Snaps Made Simple The 20 Must-Try Filters & Lenses for 2024
- [Updated] In 2024, Navigating Snapchat A Commerce Strategy
- The 6 Best SIM Unlock Services That Actually Work On Your Gionee F3 Pro Device
- [Updated] Stepping Up Advanced Techniques for W11 Gamers
- In 2024, Detailed guide of ispoofer for pogo installation On Realme 12 Pro 5G | Dr.fone
- [Updated] How to Stream Your Google Meet Talks IPhone & Android for 2024
- In 2024, How to Unlock Samsung Galaxy S24+ Phone without Any Data Loss
- [New] Jumping Into the Virtual Discussions via Google for 2024
- How to Repair corrupt MP4 and MOV files of Infinix Note 30i?
- Step-by-Step Tutorial How To Bypass Vivo Y200e 5G FRP
- [Updated] Eye Appeal The Top 3 Ways to Increase Instagram Visibility for 2024
- Prime Picks Top Tweets for Must-See Original Series for 2024
- Forgotten The Voicemail Password Of Samsung Galaxy Z Flip 5? Try These Fixes
- [Updated] Step-by-Step Perfecting Your LOL Recordings
- Title: "In 2024, Mastering Time Warp Your Snapchat Slideshow Guide"
- Author: Scott
- Created at : 2024-05-23 10:16:27
- Updated at : 2024-05-24 10:16:27
- Link: https://snapchat-videos.techidaily.com/in-2024-mastering-time-warp-your-snapchat-slideshow-guide/
- License: This work is licensed under CC BY-NC-SA 4.0.
