
In 2024, Enhancing Collaboration with Snap Camera Techniques
Enhancing Collaboration with Snap Camera Techniques
The trend of using vibrant filters and lenses during the pandemic time was first introduced by Snap Camera. There are various popular filters in the Snap Camera app that indulges people in creating captivating avatars. Moreover, people also use this popular app to enhance their visual presence in virtual conferences. You can apply unique filters or lenses through the Snap Camera app to make funny virtual meetings with friends.
This article will address how to properly download and launch the Snap Camera app. Moreover, you can also learn to link the Snap Camera on Microsoft Teams easily.

Part 1: How To Download Snap Camera on Your PC or Mac?
Snap Camera is a popular app that can change your visual appearance on many platforms. For instance, you can use the Snap Camera app on Skype, Microsoft Teams, Google Meetings, etc. This app offers attractive lenses and filters that can make your facial appearance interesting. To conduct a casual meeting with your friends, you can use the webcam of Snap Camera. The Snap Camera’s webcam lets you greet your friends or colleagues in a unique manner.
In this section, we will provide you with the exact system requirements of the Snap Camera. Also, we will guide you on how to install and launch the Snap Camera tool on your Windows or Mac device easily.
System Requirements of Snap Camera
- Required Operating System: Windows 10 (64 bit) or latest; macOS 10.13 or latest
- Minimum Hardware Requirements: Minimum of Intel Core i3 2.5Ghz or AMD FX 4300 2.6Ghz with 4 GB RAM / Intel HD Graphics 4000 / Nvidia GeForce 710 / AMD Radeon HD 6450 / Screen Resolution of 1280 x 768 or higher
Steps to Install and Launch Snap Camera on Windows or Mac
Step1 Visit the official website of Snap Camera and tap on the “Download” button. This will open a new page on your computer’s screen.


Step2 Click the “I agree” button and tap on the “I’m not a robot” option. Afterward, enter your email address in the given box.
 The Tube Sites Submitter is a fast and efficient tool for anyone who needs to upload videos quickly, easily and automatically to hundreds of tube sites in mere minutes .
Step3 Afterward, click either “Download for Mac” or “Download for PC,” depending on your need. Wait until the installer file gets downloaded on your computer completely. After that, double-click on the .exe file to install the Snap Camera for Microsoft Teams app.
 Screensaver Factory, Create stunning professional screensavers within minutes. Create screensavers for yourself, for marketing or unlimited royalty-free commercial distribution. Make screensavers from images, video and swf flash, add background music and smooth sprite and transition effects. Screensaver Factory is very easy to use, and it enables you to make self-installing screensaver files and CDs for easy setup and distribution. Screensaver Factory is the most advanced software of its kind.
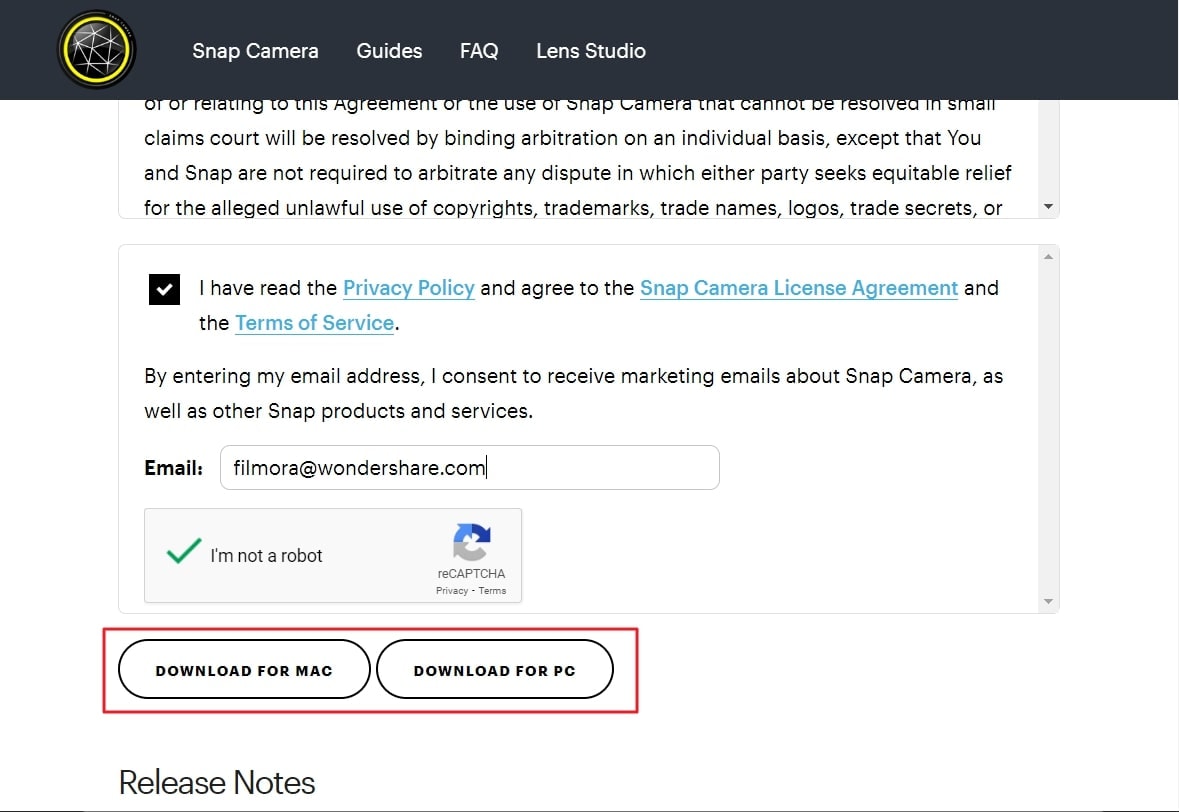
Part 2: How To Set up Snap Camera on your PC
Do you want to set up the Snap Camera for Microsoft Teams on your computer? The setup process of the Snap Camera app is simple to follow. First, download the Snap Camera app on your computer successfully. Once done with launching the Snap Camera app, follow the below instructions:
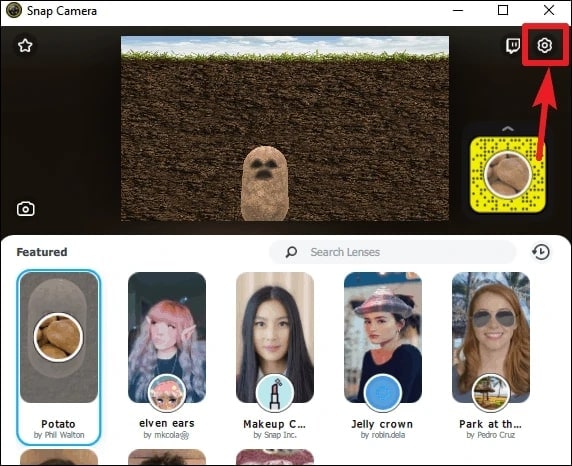
Step1 After opening the Snap Camera app, click on the “Gear” icon. This will open the Settings of the Snap Camera.
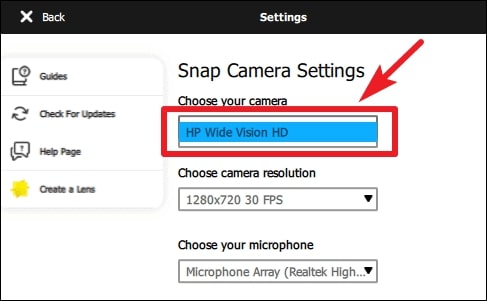
Step2 In Snap Camera Settings, head to the “Choose your Camera” option. Here, choose your desktop’s webcam to proceed. Afterward, select a filter on the app you want to apply during your virtual meeting.
Step3 Now, you can utilize the Snap Camera app on Microsoft Teams. For this, open the Microsoft Teams app after setting up the Snap Camera on your PC.
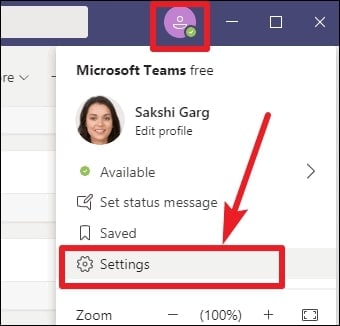
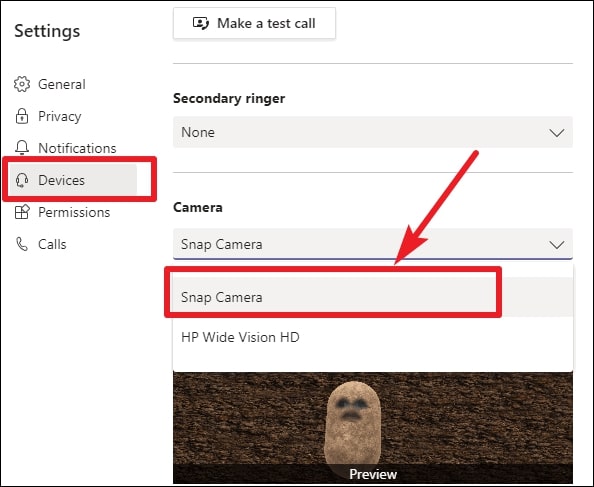
Step4 On your Microsoft Teams, tap on the “Profile” icon. Select “Settings” and tap on “Devices” from the left section. Afterward, scroll to the bottom until you can locate the “Camera” section.
 Nero Burning ROM:
The ultimate burning program for all your needs!
Step5 Under the Camera section, choose “Snap Camera” from the list. Thus, you conduct a virtual meeting using the Snap Camera for Microsoft Teams webcam and applied filters.
Part 3: Recommending Popular Snap Camera Filters
Do you want to try the trending filters of Snap Camera for Microsoft Teams? Read this part to discover the exciting filters that are exclusively provided in the Snap Camera tool:
1. Potato
This unique filter can be used to describe a funny situation in the form of a potato cartoon.

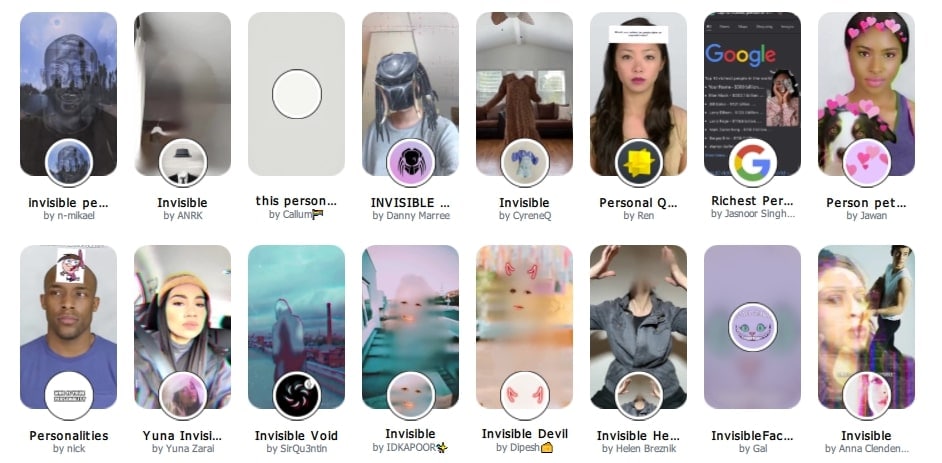
2. Invisible Person
This filter is for you if you want to highlight your presence by getting invisible!
3. Baby
Do you want to take the sympathies of your colleagues? Try this filter to make a baby face to prevent yourself in vulnerable situations.

WPS Office Premium ( File Recovery, Photo Scanning, Convert PDF)–Yearly


4. Snorkle
Are you the one who is always punctual in attending the virtual meetings? This filter can describe your dedication to the team’s goals.

 Simple and intuitive video editing
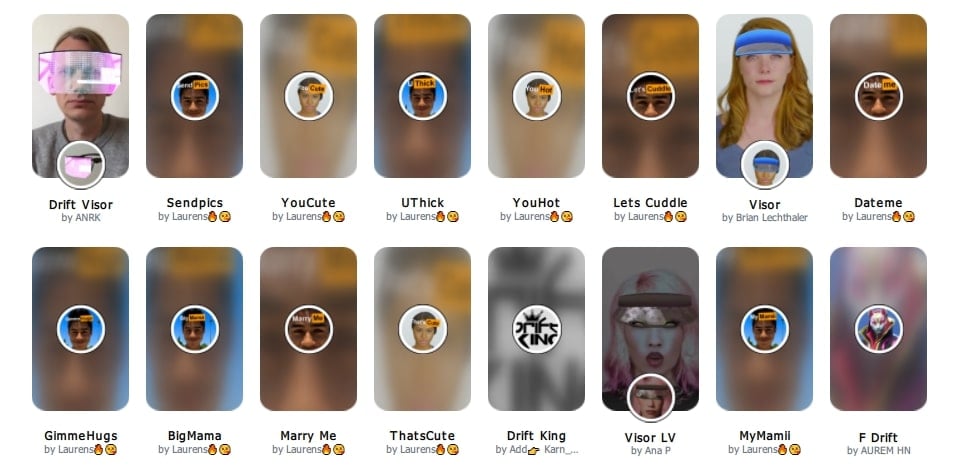
5. Drift Visor
Drift Visor is a vibrant filter that can be used by IT experts. If you are a technical expert, use this filter during virtual meetings.
Conclusion
Snap Camera is an advanced app that functions in altering the visual look. Using this app, you can try a different look in virtual sessions flawlessly. You can eliminate your facial flaws by applying the offered lenses and filters from the Snap Camera. This article taught you how to set up the Snap Camera on Microsoft Teams easily. If you are willing to use the Snap Camera app during your Zoom and Google Meet meetings, you can read their respective guides.
Free Download For Win 7 or later(64-bit)
Free Download For macOS 10.14 or later
Free Download For macOS 10.14 or later

Sending Past Moments via Snapchat: Camera Roll Guide
Snapchat enables you to communicate with your friends in an engaging way. To send a normal snap to your friends, you need to take a live photo or video from the Snapchat camera. This may be out of your comfort zone to send normal live snaps every time.
This article will explain how to send a picture from your memories or camera roll as a normal snap. By using our recommended apps and methods, you can also hide that the sent picture is from the camera roll. Let’s dive into the details to learn how to send snaps from the camera roll.
Wondershare Filmora Easily Snapchat Videos on PC and Mac.
Free Download Free Download Learn More


![]()

WPS Office Premium ( File Recovery, Photo Scanning, Convert PDF)–Yearly
How to Send a Snap from Memories/Camera Roll as a Snap
Are you tired of sending your live selfies as snaps to your friends? In this section, you can learn how to send snaps from the camera roll without capturing a live snap. For this, we will explain some manual methods as well as some reliable apps in a detailed manner.
Method 1: Using a Snapchat Filter
Snapchat allows you to apply its filters on any of your camera roll’s pictures. By selecting a particular photo or video from your memories or snap, you can instantly add a filter to them. Afterward, you can send the filtered image to your friends as a regular snap. However, this solution has a significant drawback that you must know. The limitation is that the receiver of the snap would be able to see that the sent picture is from the camera roll.
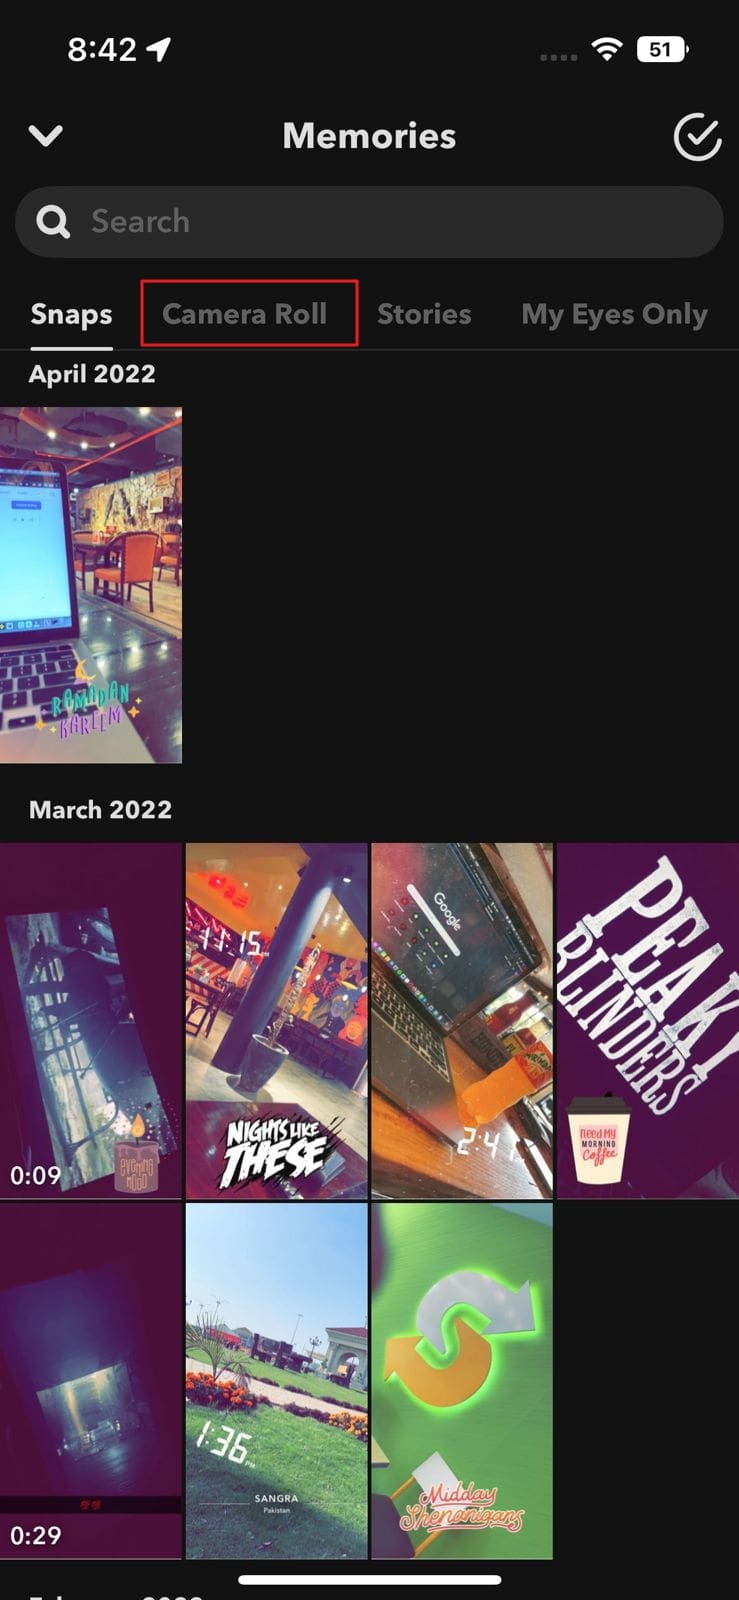
Step1 Open your Snapchat and swipe up to open the ‘Memories’. Go to your Camera Roll and select any particular picture from there.

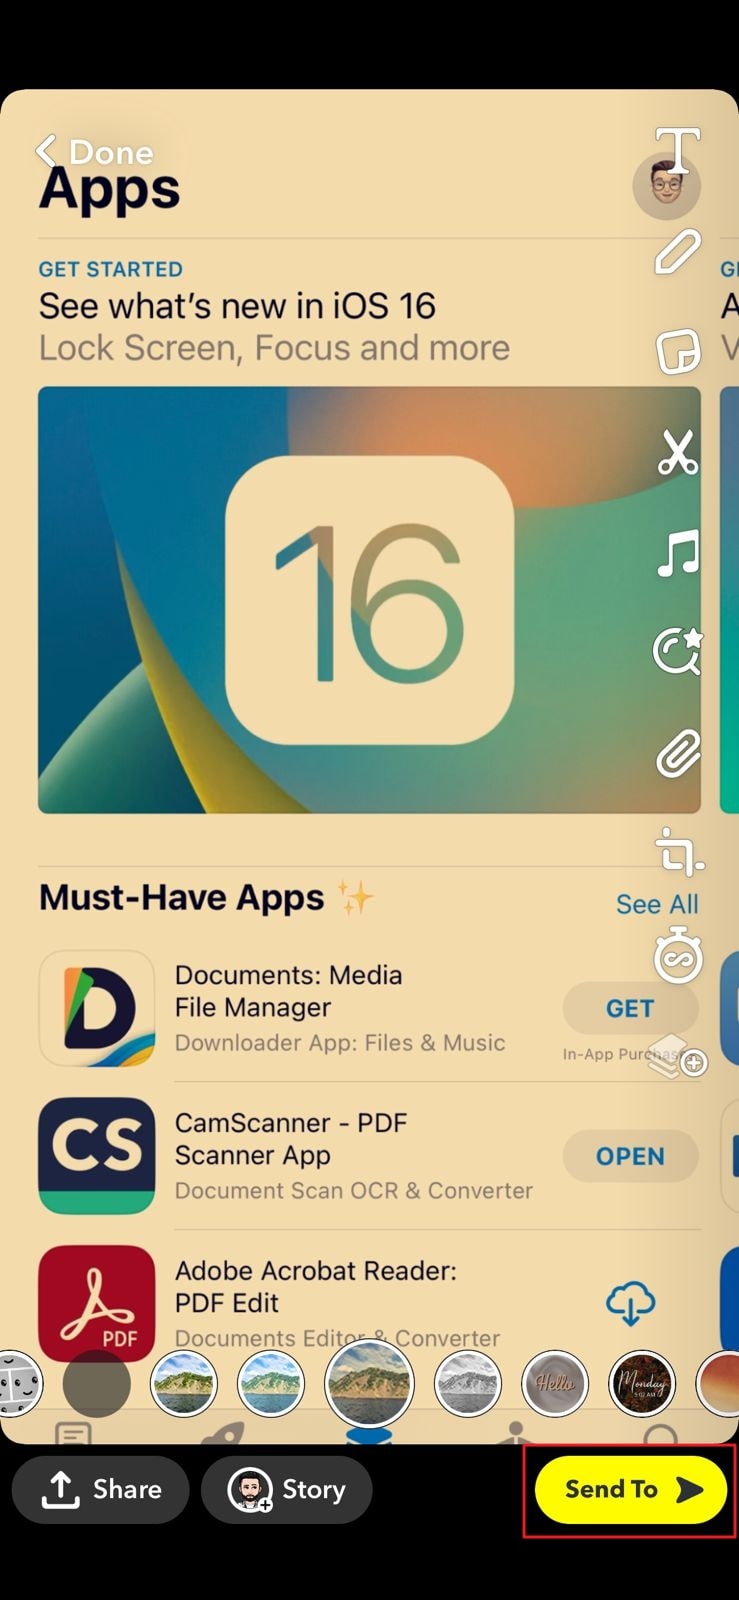
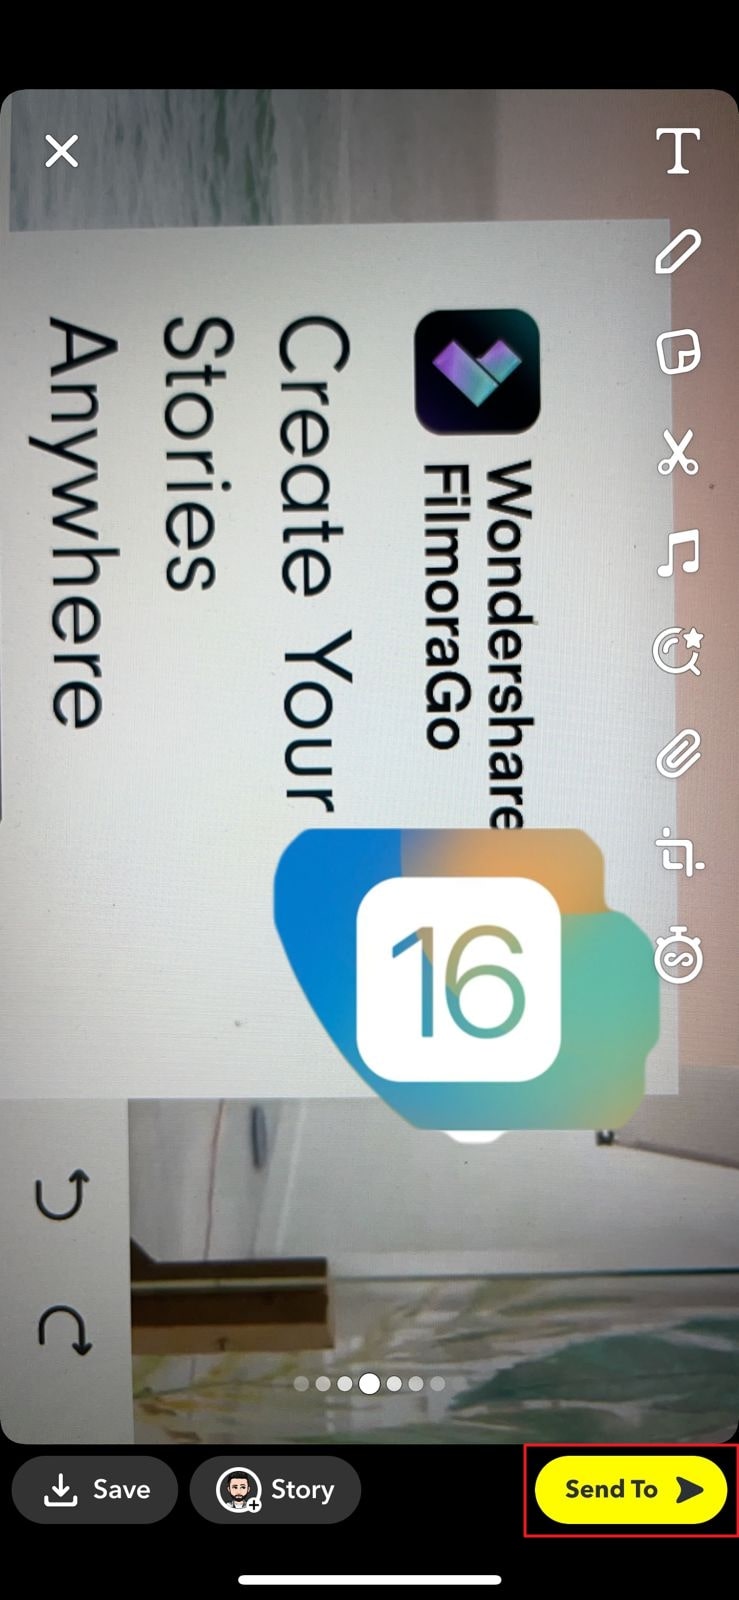
Step2 After choosing a particular photo, tap on the “Edit“ icon at the bottom left corner. You can apply filters to the photo by swiping from right to left. Keep swiping until you can find your preferred filter.
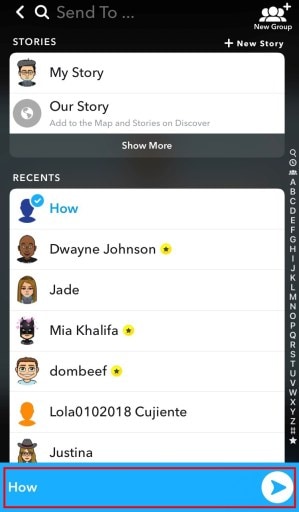
Step1 Once you have applied the filter to the photo, touch on the “Send To” button. Choose any Snapchat friend to whom you want to send the picture. Next, hit the “Send” icon again to send the photo successfully.
Method 2: Using a Sticker
If you want to make your camera roll picture funny and entertaining, you can add stickers to it. Through Snapchat, you can make your customized sticker of any interesting face or object. Moreover, Snapchat also offers a huge variety of built-in stickers. If you don’t want to create a customized sticker, you can easily add the built-in sticker with a single tap.
Step1 Once you have opened your Snapchat, go to Memories. From there, you can access and select any picture from the Camera Roll.
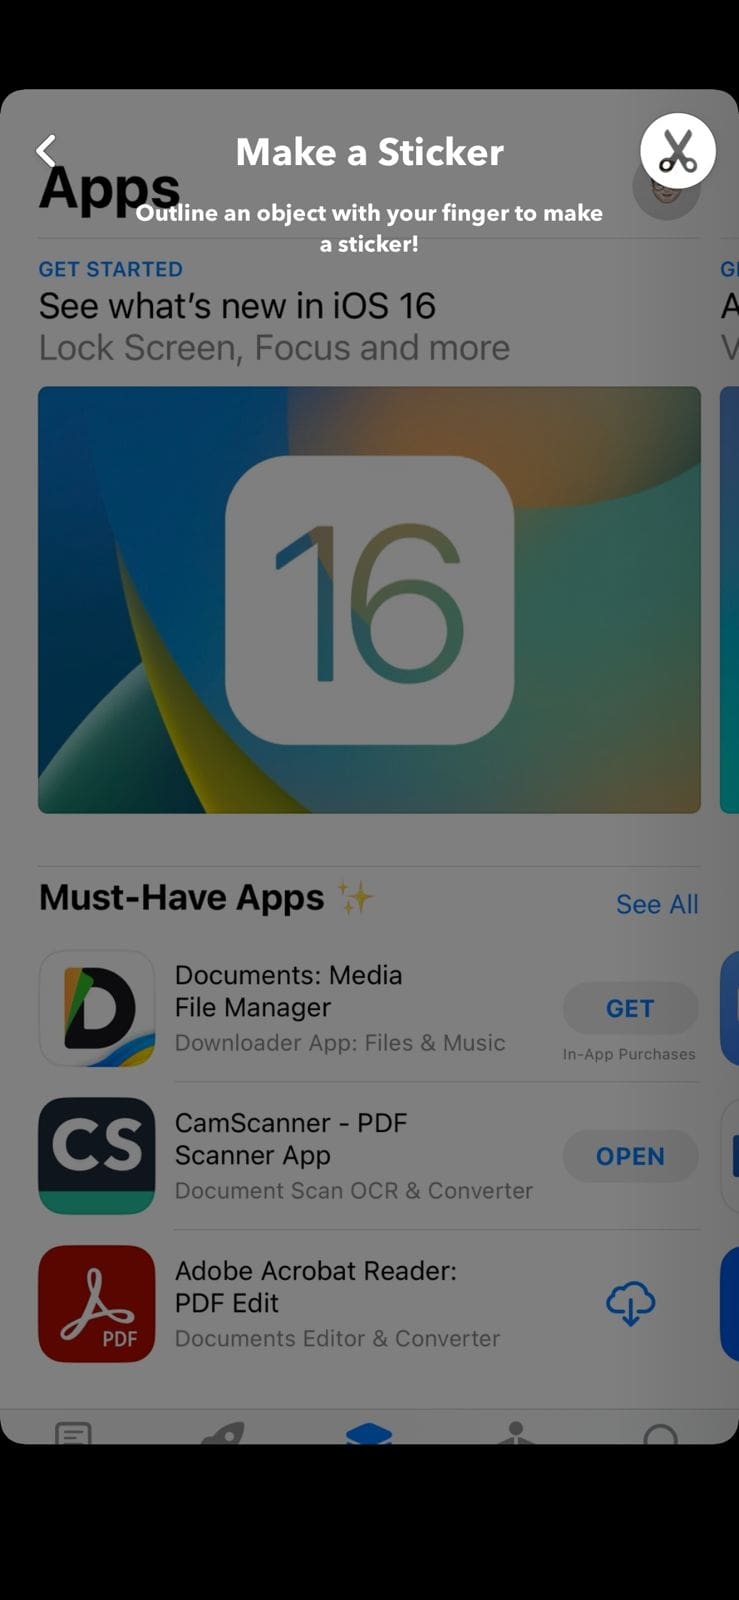
Step2 After selecting a specific picture from Camera Roll, tap on the “Pencil” icon at the bottom left corner to edit the photo. Afterward, select the “Scissor” icon from the right section. Using the Snapchat Scissor, you can create a sticker of any face or object you find interesting. Just select any area of the photo using your finger.
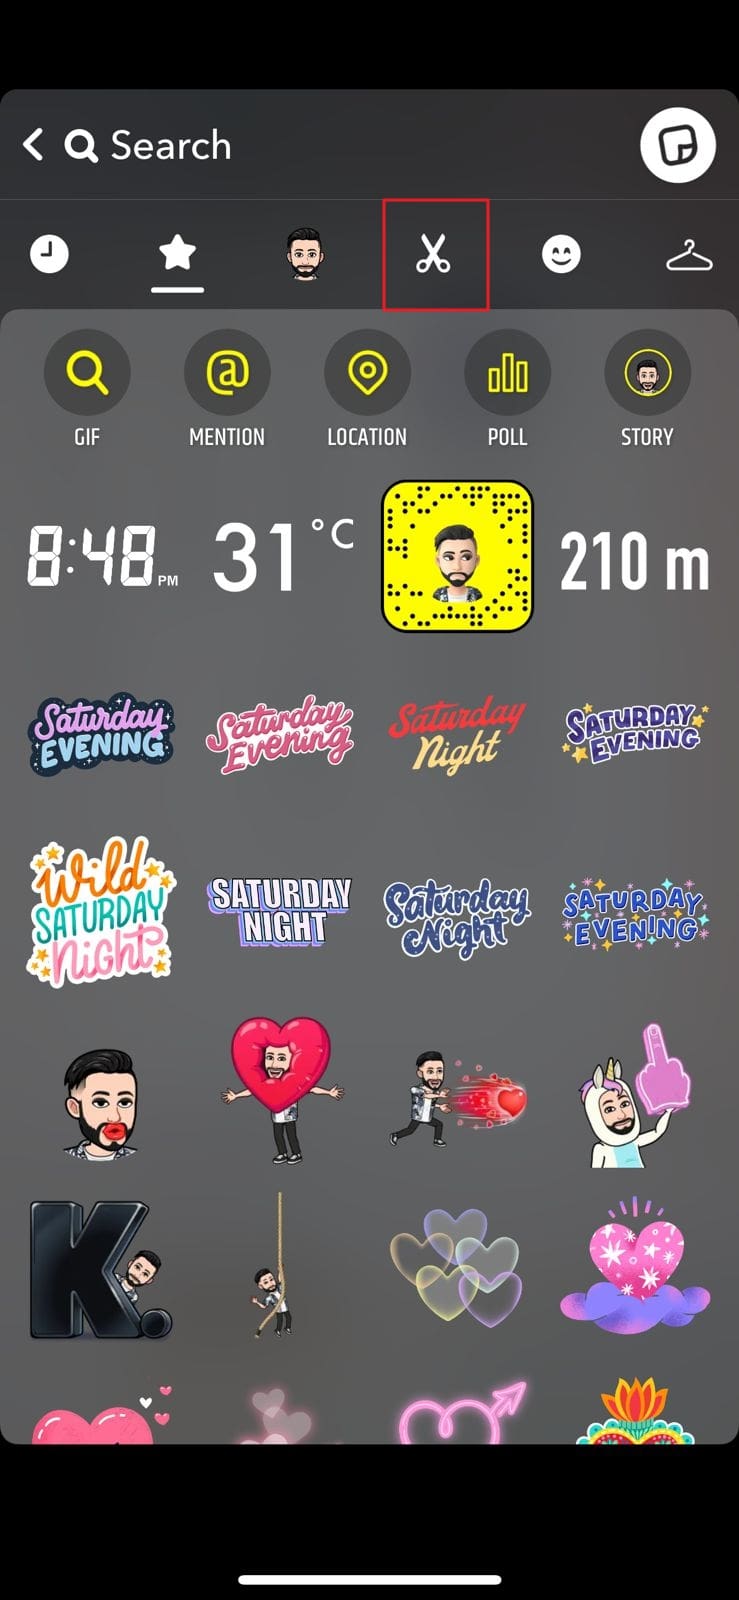
Step3 Now close the picture opened for creating the sticker. Once done, take a snap from your Snapchat to proceed. Now from the right section, tap on the “Sticker” icon. Here, you can choose the built-in stickers easily. Or you can navigate to the “Scissor” icon to select your created sticker.
Step4 Once done with adding and adjusting the sticker, hit the “Send To” button. Choose your preferred contact and tap on the “Send” icon again.
Method 3: Using the LMK App
Another efficient way to send a camera roll picture as a regular snap is by using a third-party app. LMK is a reliable social media platform that enables you to communicate with friends having similar interests. You can craft your profile by adding your interests and hobbies.
It helps people to create a safe and healthy community for enhanced communication. In this solution, we will guide you on how to send snaps from the camera roll using the LMK app. Through this app, you can send snaps to your friends without mentioning the camera roll.
Step1 Open your Snapchat either from your Android or iOS device. Proceed to the Memories section and select Camera Roll. Here, tap on any picture that you want to send.
Step2 Now hit the “Arrow” button to share the selected snap. From the displayed options, tap on the “Download” icon to save the picture on your device gallery.

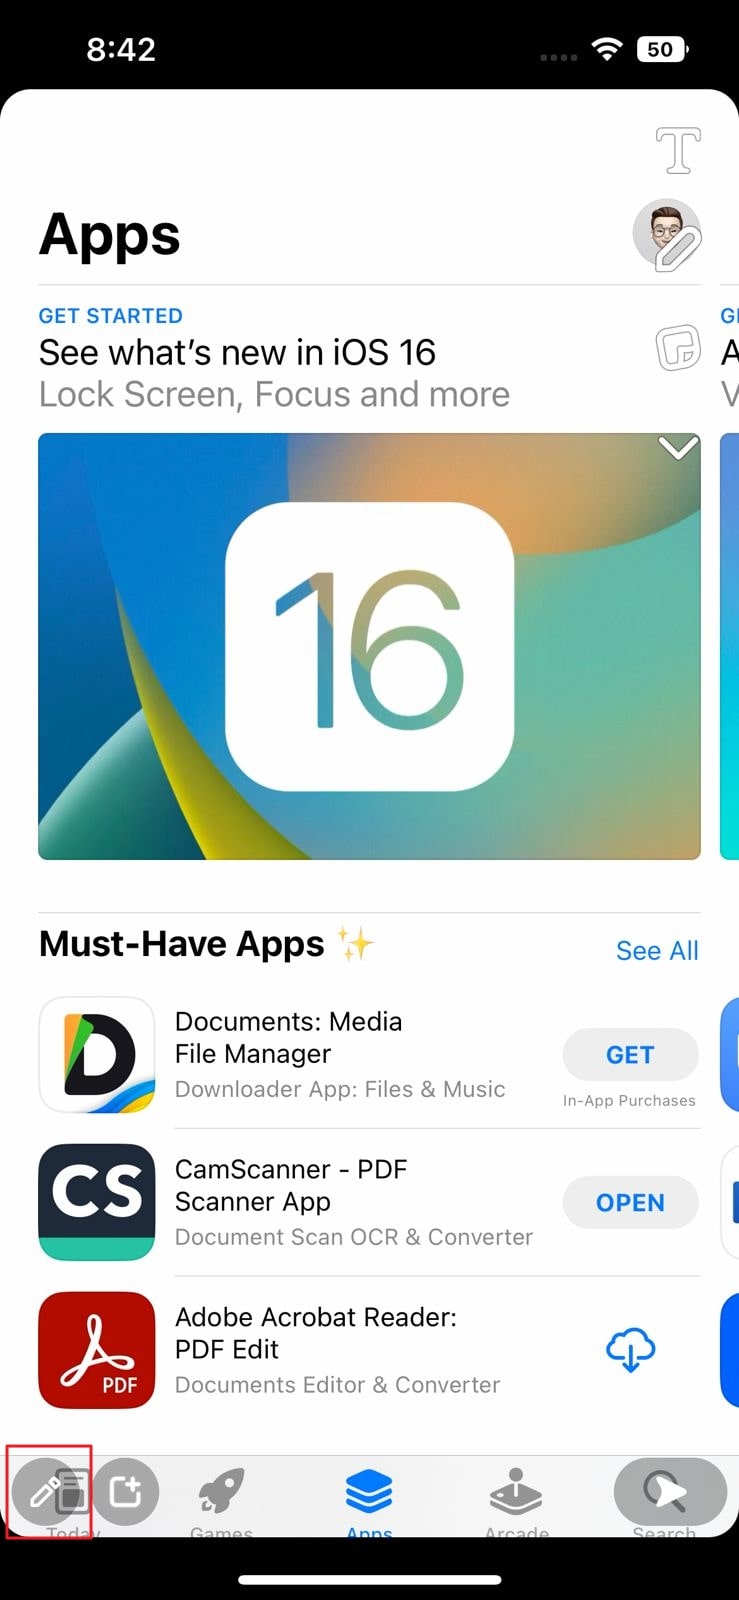
Step3 Now head to your Play Store or App Store according to the OS of your mobile device. From there, download the LMK app. After its complete installation, open this app using your Snapchat login.

Step4 On the LMK app, tap on the “Plus” icon to proceed. Afterward, tap on “Post” and hit the “Camera” icon from the bottom left side. Now choose the photo that you have recently saved in your gallery.

Step5 After choosing the photo from the gallery, tap “Post to Snapchat.” By doing so, you will be redirected to your Snapchat. From your image, remove the added stickers of the LMK app. You can drag the sticker to the trash bin icon. Afterward, tap on the “Paper Clip” icon to remove the added attachment.

Step6 Once done with removing the sticker and attached link, hit the “Send” button. Now choose a Snapchat contact and hit the “Send” button.
Method 4: Casper APK for Android
Casper is an excellent alternative for Snapchat users. Using this app, you can instantly add stickers and filters to the captured snaps. You can also save and forward snaps using this app to other platforms. However, Casper is not available on the Play Store. You can download the Casper APK from your web browser easily. Before installing it, you should alter some settings from your phone, as described below:
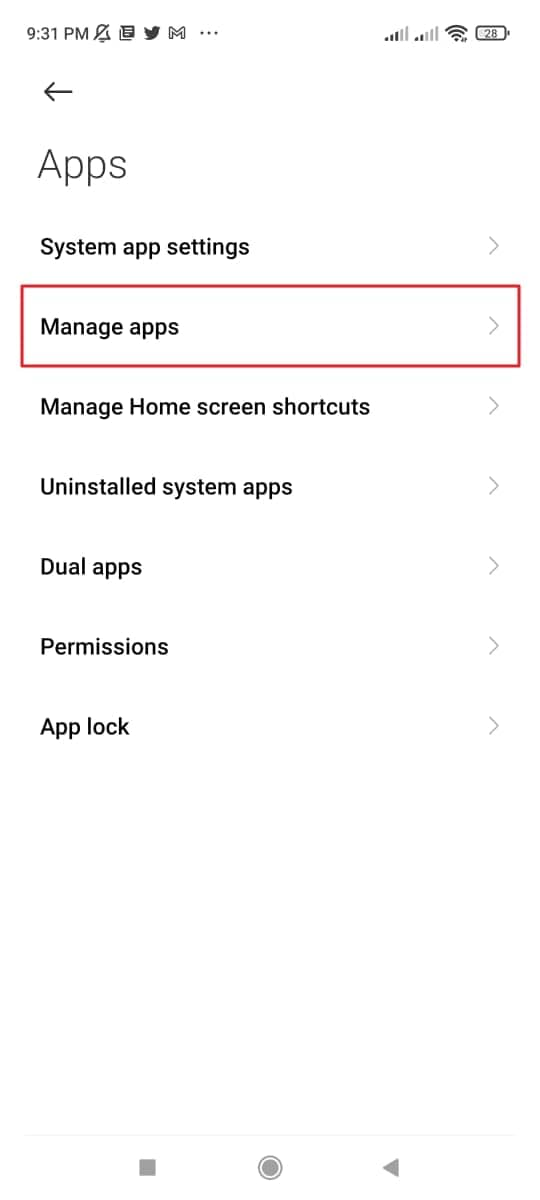
Step1 Open Settings from your phone and tap “Apps.” Afterward, select “Manage Apps” to proceed.
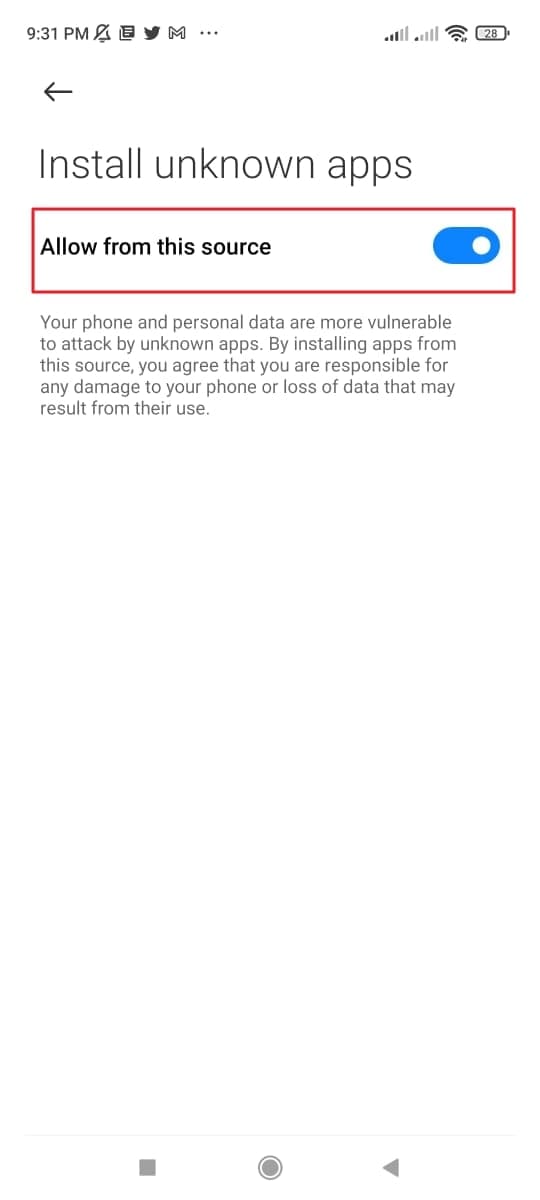
Step2 Once done, locate the “Google Chrome” option and turn on the toggle of “Install from unknown sources.”
Once you are done with installing Casper APK, you can take help from the following steps:
Step1 Sign out from your Snapchat account to initiate. Open Casper and sign into your Snapchat account.
Step2 Hit the “Plus” icon and tap on “Choose from Gallery.” After selecting a picture from your phone’s gallery, press the “Send” button.
Step3 Choose your preferred contact to whom you want to send the picture. For confirmation, tap on the “Send” button again.
Conclusion
Many youngsters are addicted to Snapchat to provide daily updates to their friends. You can utilize the offered filters, lenses, and stickers on Snapchat to make your snaps vibrant. However, this article has guided you on how to send snaps from the camera roll as a regular snap. You can send everyday snaps to your friends without mentioning the camera roll picture. For this, you can rely upon our recommended solutions and applications.
Free Download For Win 7 or later(64-bit)
Free Download For macOS 10.14 or later
Free Download Free Download Learn More
![]()
How to Send a Snap from Memories/Camera Roll as a Snap
Are you tired of sending your live selfies as snaps to your friends? In this section, you can learn how to send snaps from the camera roll without capturing a live snap. For this, we will explain some manual methods as well as some reliable apps in a detailed manner.
Method 1: Using a Snapchat Filter
Snapchat allows you to apply its filters on any of your camera roll’s pictures. By selecting a particular photo or video from your memories or snap, you can instantly add a filter to them. Afterward, you can send the filtered image to your friends as a regular snap. However, this solution has a significant drawback that you must know. The limitation is that the receiver of the snap would be able to see that the sent picture is from the camera roll.
Step1 Open your Snapchat and swipe up to open the ‘Memories’. Go to your Camera Roll and select any particular picture from there.
Step2 After choosing a particular photo, tap on the “Edit“ icon at the bottom left corner. You can apply filters to the photo by swiping from right to left. Keep swiping until you can find your preferred filter.
Step1 Once you have applied the filter to the photo, touch on the “Send To” button. Choose any Snapchat friend to whom you want to send the picture. Next, hit the “Send” icon again to send the photo successfully.
Method 2: Using a Sticker
If you want to make your camera roll picture funny and entertaining, you can add stickers to it. Through Snapchat, you can make your customized sticker of any interesting face or object. Moreover, Snapchat also offers a huge variety of built-in stickers. If you don’t want to create a customized sticker, you can easily add the built-in sticker with a single tap.
Step1 Once you have opened your Snapchat, go to Memories. From there, you can access and select any picture from the Camera Roll.
Step2 After selecting a specific picture from Camera Roll, tap on the “Pencil” icon at the bottom left corner to edit the photo. Afterward, select the “Scissor” icon from the right section. Using the Snapchat Scissor, you can create a sticker of any face or object you find interesting. Just select any area of the photo using your finger.

Step3 Now close the picture opened for creating the sticker. Once done, take a snap from your Snapchat to proceed. Now from the right section, tap on the “Sticker” icon. Here, you can choose the built-in stickers easily. Or you can navigate to the “Scissor” icon to select your created sticker.
Step4 Once done with adding and adjusting the sticker, hit the “Send To” button. Choose your preferred contact and tap on the “Send” icon again.
Method 3: Using the LMK App
Another efficient way to send a camera roll picture as a regular snap is by using a third-party app. LMK is a reliable social media platform that enables you to communicate with friends having similar interests. You can craft your profile by adding your interests and hobbies.
It helps people to create a safe and healthy community for enhanced communication. In this solution, we will guide you on how to send snaps from the camera roll using the LMK app. Through this app, you can send snaps to your friends without mentioning the camera roll.
Step1 Open your Snapchat either from your Android or iOS device. Proceed to the Memories section and select Camera Roll. Here, tap on any picture that you want to send.

company, user or members of the same household. Action! - screen and game recorder</a>

Step2 Now hit the “Arrow” button to share the selected snap. From the displayed options, tap on the “Download” icon to save the picture on your device gallery.
Step3 Now head to your Play Store or App Store according to the OS of your mobile device. From there, download the LMK app. After its complete installation, open this app using your Snapchat login.
Step4 On the LMK app, tap on the “Plus” icon to proceed. Afterward, tap on “Post” and hit the “Camera” icon from the bottom left side. Now choose the photo that you have recently saved in your gallery.
 Forex Robotron Gold Package
Step5 After choosing the photo from the gallery, tap “Post to Snapchat.” By doing so, you will be redirected to your Snapchat. From your image, remove the added stickers of the LMK app. You can drag the sticker to the trash bin icon. Afterward, tap on the “Paper Clip” icon to remove the added attachment.
Step6 Once done with removing the sticker and attached link, hit the “Send” button. Now choose a Snapchat contact and hit the “Send” button.

Method 4: Casper APK for Android
Casper is an excellent alternative for Snapchat users. Using this app, you can instantly add stickers and filters to the captured snaps. You can also save and forward snaps using this app to other platforms. However, Casper is not available on the Play Store. You can download the Casper APK from your web browser easily. Before installing it, you should alter some settings from your phone, as described below:
Step1 Open Settings from your phone and tap “Apps.” Afterward, select “Manage Apps” to proceed.
Step2 Once done, locate the “Google Chrome” option and turn on the toggle of “Install from unknown sources.”
Once you are done with installing Casper APK, you can take help from the following steps:
Step1 Sign out from your Snapchat account to initiate. Open Casper and sign into your Snapchat account.
Step2 Hit the “Plus” icon and tap on “Choose from Gallery.” After selecting a picture from your phone’s gallery, press the “Send” button.
Step3 Choose your preferred contact to whom you want to send the picture. For confirmation, tap on the “Send” button again.
Conclusion
Many youngsters are addicted to Snapchat to provide daily updates to their friends. You can utilize the offered filters, lenses, and stickers on Snapchat to make your snaps vibrant. However, this article has guided you on how to send snaps from the camera roll as a regular snap. You can send everyday snaps to your friends without mentioning the camera roll picture. For this, you can rely upon our recommended solutions and applications.
Free Download For Win 7 or later(64-bit)
Free Download For macOS 10.14 or later
- Title: In 2024, Enhancing Collaboration with Snap Camera Techniques
- Author: Scott
- Created at : 2024-07-25 10:32:56
- Updated at : 2024-07-26 10:32:56
- Link: https://snapchat-videos.techidaily.com/in-2024-enhancing-collaboration-with-snap-camera-techniques/
- License: This work is licensed under CC BY-NC-SA 4.0.