
:max_bytes(150000):strip_icc():format(webp)/Sony-PS5-PlayStation-5-Gaming-Console-7-1434c073922c4bf59bca47a33013a6dd.jpg)
How to Make a Video on Mac that Best Fits Snapchat Size, In 2024
How to Make a Video on Mac that Best Fits Snapchat Size?
How to Make a Video Best Fits Snapchat Size on Mac?

Liza Brown
Oct 26, 2023• Proven solutions
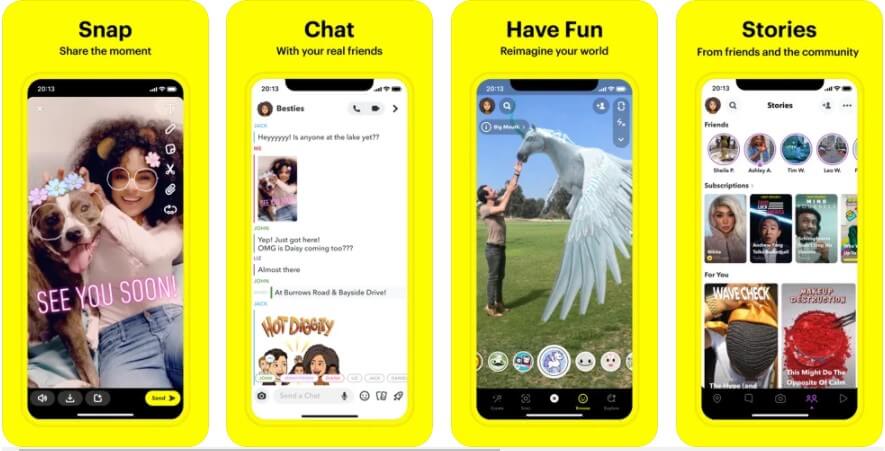
How to create a video best fit Snapchat? With more than 240 million active daily users, Snapchat is one of the most popular social media networks globally. It is also an instant messaging app that allows its users to express themselves visually in a diverse variety of manners including photos, videos, stories, stickers, emoji, and more.
One of the best features of Snapchat that makes it so attractive among the young audience is its mobile-oriented user interface. Snapchat was the first social networking platform to introduce the concept of daily stories which was widely adopted by other instant messengers as well including Instagram and WhatsApp. Since it is a mobile-oriented platform, you need to create and edit your videos in a certain way to make sure they are the best fit for Snapchat.
You May Also Like: The Ultimate Guide of Snapchat Filters
What Are the Ideal Features of a Snapchat Video?
Snapchat is highly optimized for vertical viewing which means that all the content needs to be served in portrait aspect ratio instead of landscape used by YouTube and other video platforms. You need to ensure that every aspect of your video is perfect before you can upload it for Snapchat on Mac. Here are some of the key features that you must not forget.
- Resolution - The ideal resolution of a Snapchat video is 1080 x 1920 pixels which is known as full HD. This resolution will ensure that your video loads in the right way and remains sharp and crisp for an excellent viewing experience.
- Video Format - The recommended video format for Snapchat clips is MP4 and MOV. You can use either of those formats on your Mac.
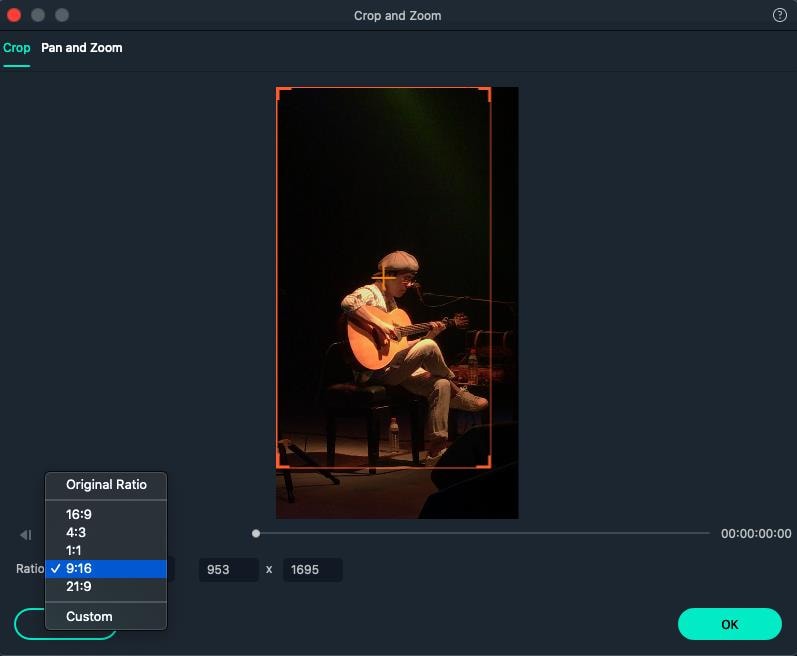
- Aspect Ratio - This is one of the key aspects of any video that determines the orientation of viewing. For a perfect Snapchat video, it is recommended that you keep the aspect ratio to 9:16.
- Video Length Size - Remember that Snapchat isn’t like YouTube and serves an audience that wants micro-entertainment. This is why the recommended time for your video is 3 to 10 seconds with the video size not exceeding 32 MB. Otherwise, the Snapchat audience may not respond well to your videos.
That is why it is crucial that your Snapchat video has all the ideal features so your audience can enjoy the viewing experience as intended instead of attempting to manipulate their phones to be able to see the video clearly. It will create an unpleasant and frustrating experience and your viewers might not stay with you.
How to Adjust the Video for Snapchat on Mac? [Step-by-Step]
- Part1. Changing Snapchat Video Format on Filmora
- Part2. Changing Snapchat Video Aspect Ratio on Filmora
- Part3. Changing Snapchat Video Size on Filmora
If your video doesn’t have the ideal features for Snapchat uploading, you don’t need to worry. You can easily edit your video on Filmora X to adjust everything including the aspect ratio, size, and format.


Part1. Changing Snapchat Video Format on Filmora
- Importing Video
The first step is to import the video using the option ‘Import Media Files’ in the import tab. You can also drag and drop the media files you need to work on.

- Selecting the Right Output Format
Once you have imported the file, drag and drop it onto the Timeline. Now click on the ‘Export’ button. Here you will be able to select your output video format which needs to be either MOV or MP4.
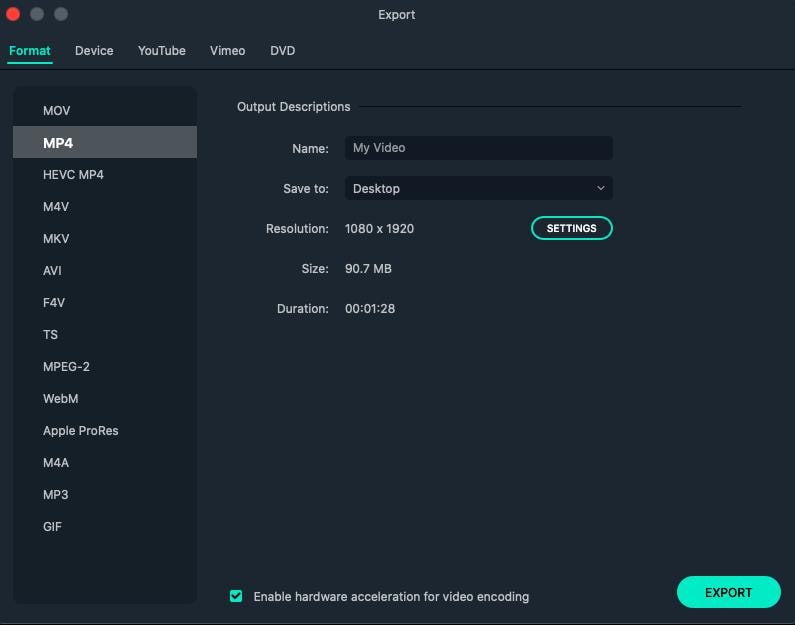
- Exporting Your Snapchat Video
After you have defined the settings, you can click on the ‘Export’ button to start the saving process. Your video is now available to you in the right format.
Part2. Changing Snapchat Video Aspect Ratio on Filmora
You can use multiple methods to change the aspect ratio of your Snapchat video on Filmora. It depends on the nature of editing you need to perform on your video. You can choose from any of the methods given below to edit your video for Snapchat in a user-friendly manner on Mac.
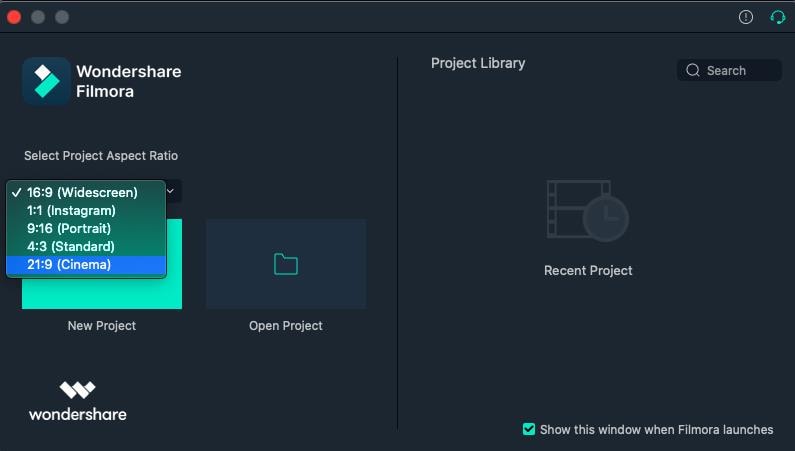
● Method 1 - Launch the editor and click on the drop-down list. You will see the popular aspect ratios listed in the list from where you can choose any. Select the right one that is 9:16 for Snapchat and export the file right away.
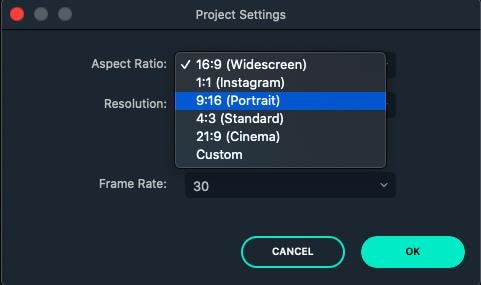
● Method 2 - The second method you can use is present under the Project Settings. You can also lock the aspect ratio using the features available here.

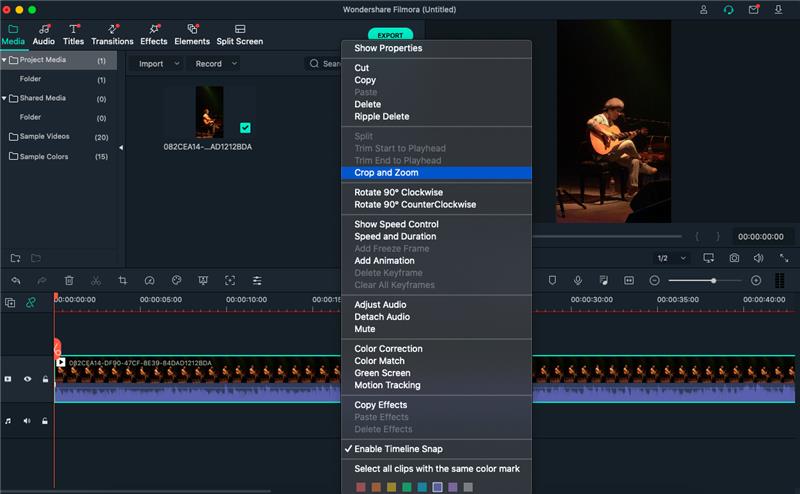
● Method 3 - The third method allows you to change the aspect ratio manually during the video editing process. You need to right-click on the timeline and select the ‘Crop and Zoom’ option. You will see a pop-up window where all the popular options will be available to you. You can choose either of them or select an aspect ratio manually.
● Step 4 - The final method to change the aspect ratio of your video on Mac is at the time of exporting your media file. Here you can select the aspect ratio for your local computer, a particular device, YouTube, or DVD TV.

Part3. Changing Snapchat Video Size on Filmora
- Importing Media File to Filmora
Using the ‘Import’ menu, import your media files, or simply drag and drop them from your Mac OS. Once the files are in the software, drag them to the Timeline track.
- Cropping Your Video for Snapchat
Here you can use the ‘Crop and Zoom’ button from the Timeline by right-clicking on it, so you can only focus on the aspect of the video that you want to show. This will resize the video as well.
- Cutting the Video
Another option you have is to delete the unnecessary parts of the video by selecting them through the indicator present on the timeline. Once you have selected the parts you don’t need, right-click on them and select ‘Delete’.
- Exporting Your Snapchat Video
Once you have resized your video by cropping and cutting the media file, you can now export it in the right resolution, bit rate, and format to ensure you get the minimum file size.
Liza Brown
Liza Brown is a writer and a lover of all things video.
Follow @Liza Brown
Liza Brown
Oct 26, 2023• Proven solutions
How to create a video best fit Snapchat? With more than 240 million active daily users, Snapchat is one of the most popular social media networks globally. It is also an instant messaging app that allows its users to express themselves visually in a diverse variety of manners including photos, videos, stories, stickers, emoji, and more.
One of the best features of Snapchat that makes it so attractive among the young audience is its mobile-oriented user interface. Snapchat was the first social networking platform to introduce the concept of daily stories which was widely adopted by other instant messengers as well including Instagram and WhatsApp. Since it is a mobile-oriented platform, you need to create and edit your videos in a certain way to make sure they are the best fit for Snapchat.
You May Also Like: The Ultimate Guide of Snapchat Filters
What Are the Ideal Features of a Snapchat Video?
Snapchat is highly optimized for vertical viewing which means that all the content needs to be served in portrait aspect ratio instead of landscape used by YouTube and other video platforms. You need to ensure that every aspect of your video is perfect before you can upload it for Snapchat on Mac. Here are some of the key features that you must not forget.
- Resolution - The ideal resolution of a Snapchat video is 1080 x 1920 pixels which is known as full HD. This resolution will ensure that your video loads in the right way and remains sharp and crisp for an excellent viewing experience.
- Video Format - The recommended video format for Snapchat clips is MP4 and MOV. You can use either of those formats on your Mac.
- Aspect Ratio - This is one of the key aspects of any video that determines the orientation of viewing. For a perfect Snapchat video, it is recommended that you keep the aspect ratio to 9:16.
- Video Length Size - Remember that Snapchat isn’t like YouTube and serves an audience that wants micro-entertainment. This is why the recommended time for your video is 3 to 10 seconds with the video size not exceeding 32 MB. Otherwise, the Snapchat audience may not respond well to your videos.
That is why it is crucial that your Snapchat video has all the ideal features so your audience can enjoy the viewing experience as intended instead of attempting to manipulate their phones to be able to see the video clearly. It will create an unpleasant and frustrating experience and your viewers might not stay with you.
How to Adjust the Video for Snapchat on Mac? [Step-by-Step]
- Part1. Changing Snapchat Video Format on Filmora
- Part2. Changing Snapchat Video Aspect Ratio on Filmora
- Part3. Changing Snapchat Video Size on Filmora
If your video doesn’t have the ideal features for Snapchat uploading, you don’t need to worry. You can easily edit your video on Filmora X to adjust everything including the aspect ratio, size, and format.
Part1. Changing Snapchat Video Format on Filmora
- Importing Video
The first step is to import the video using the option ‘Import Media Files’ in the import tab. You can also drag and drop the media files you need to work on.
- Selecting the Right Output Format
Once you have imported the file, drag and drop it onto the Timeline. Now click on the ‘Export’ button. Here you will be able to select your output video format which needs to be either MOV or MP4.
- Exporting Your Snapchat Video
After you have defined the settings, you can click on the ‘Export’ button to start the saving process. Your video is now available to you in the right format.
Part2. Changing Snapchat Video Aspect Ratio on Filmora
You can use multiple methods to change the aspect ratio of your Snapchat video on Filmora. It depends on the nature of editing you need to perform on your video. You can choose from any of the methods given below to edit your video for Snapchat in a user-friendly manner on Mac.
● Method 1 - Launch the editor and click on the drop-down list. You will see the popular aspect ratios listed in the list from where you can choose any. Select the right one that is 9:16 for Snapchat and export the file right away.
● Method 2 - The second method you can use is present under the Project Settings. You can also lock the aspect ratio using the features available here.
● Method 3 - The third method allows you to change the aspect ratio manually during the video editing process. You need to right-click on the timeline and select the ‘Crop and Zoom’ option. You will see a pop-up window where all the popular options will be available to you. You can choose either of them or select an aspect ratio manually.
● Step 4 - The final method to change the aspect ratio of your video on Mac is at the time of exporting your media file. Here you can select the aspect ratio for your local computer, a particular device, YouTube, or DVD TV.
Part3. Changing Snapchat Video Size on Filmora
- Importing Media File to Filmora
Using the ‘Import’ menu, import your media files, or simply drag and drop them from your Mac OS. Once the files are in the software, drag them to the Timeline track.
- Cropping Your Video for Snapchat
Here you can use the ‘Crop and Zoom’ button from the Timeline by right-clicking on it, so you can only focus on the aspect of the video that you want to show. This will resize the video as well.
- Cutting the Video
Another option you have is to delete the unnecessary parts of the video by selecting them through the indicator present on the timeline. Once you have selected the parts you don’t need, right-click on them and select ‘Delete’.
- Exporting Your Snapchat Video
Once you have resized your video by cropping and cutting the media file, you can now export it in the right resolution, bit rate, and format to ensure you get the minimum file size.
Liza Brown
Liza Brown is a writer and a lover of all things video.
Follow @Liza Brown
Hidden Shot Snaps: Keeping Your Captures Under Wraps
How to Screenshot on Snapchat [5 Ways]

Max Wales
Mar 27, 2024• Proven solutions
A great way to share specific memories with those not on the social platform, or even for those looking to make personalized and meaningful memoir collages for their friends and loved ones, there are plenty of ways to inconspicuously screenshot on Snapchat without the sender being made aware.
Becoming one of the most popular and highly favored Social Media platforms over the past several years, Snapchat is a great place to showcase 10-second snippets of your day-to-day life with your followers, friends, and family members. From selfies to shots of food, videos taken during nights on the town to holiday adventures, Snapchat is the perfect video and image-sharing platform for Social Media fans.
![]()

The All-in-One Screen Recorder & Video Editor
- Record PC screen , voiceover, and webcam simultaneously
- Edit recorded clips quickly with a wide range of professional tools
- Built-in plentiful templates and effects
- Export to MP4, MOV, MKV, GIF and multiple formats
For Win 7 or later (64-bit)
For macOS 10.12 or later
 Secure Download
How to screenshot on snapchat without stimulating a notification?
An incredible application that allows you to send and share videos and images with friends and followers, Snapchat is designed to help you stay connected in more ways than one. Featuring an anti-screenshot notification system that automatically notifies posters when a recipient or audience member screenshots a snap, it’s become increasingly harder to screenshot without being detected.
That being said, there are still plenty of other methods that offer a practical alternative to ensure you avoid that awkward automated notification.
Option 1. Use Another Phone or Mobile Device to Take Snapchat Screenshot
An easy and risk-free way to capture and store a specific snap with ease, utilizing another mobile device or camera is a great method that requires very little effort. Simply us a second phone, or a nearby tablet, to record the whole duration of the video or photo.
Although the quality of the recording won’t be as crisp and clear as it appears on the handheld, this is a reliable and fool-proof way to preserve those special snaps. From those video recordings, you should then be able to crop out the video or image you needed.
Missed it?
Why not take advantage of Snapchat’s “replay” mode to ensure you get the perfect shot – but be warned, posters also get notified of this too.
Option 2. Use the Built-In Screen Recoding Tool on iOS11
If you didn’t already know, there’s a built-in screen recording software within iOS11 that allows you to effectively capture and record snaps with ease. Lying within the Settings of any iPhone, follow these easy steps on how to live record your screen:
- Step 1: Head to Settings > Control Centre > Customize Controls
- Step 2: Locate the “Screen Recording” functionality
- Step 3: Select the small cross to add it to your Control Centre
- Step 4: To activate – Tap the icon with the 2 concentric circles to start recording. To complete a recording, simply tap the red bar that’s present at the top of the screen and select “End Recording”.
Although it’s not possible to start recording a snap whilst it’s already open, it’s best to start recording before you opt to open a specific message.
Please note: If you have updated to Snapchat version 10.17.5, the posters will be notified each and every time you initiate and capture a recording through the use of this built-in recorder.
Option 3. Use QuickTime Screen Capture on a Mac
A little more technical than simply using another mobile device to record a snap, using the QuickTime Player is an efficient and high-quality method for those looking to secretly store a snapchat post.
To start recording snaps, follow these simple steps:
- Step 1: Connect your iPhone to your Mac
- Step 2: Open the QuickTime Player application
- Step 3: Select File > New Movie Recording from the menu
- Step 4: Once loaded, simply hover the mouse beside the recording button. By clicking the small arrow, you’ll be provided with a range of different recording options
- Step 5: Select your Phone as the Movie Recording Input
Once connected, your Mac screen should now be mirroring your mobile device. Just like you would on your phone, simply hit record and head on over to the Snapchat application to begin recording.
Option 4. Use the Mirror Feature for Android
Similar to the use of QuickTime or the iOS11 Screen Recording software, Screen Mirroring is another effective method for capturing Snapchat screenshots without the poster being made aware. By connecting a HDMI cable to both your TV and laptop, or by accessing the “Screen Mirroring” application that’s often built-in to most Smart Phones and Android devices, it’s possible to mirror/cast the active screen on your device onto an external platform.
In doing so, you’re presented with the opportunity to utilize another device to record a playing snap or even share a recently received snap with other audience members that are present in the room.
Option 5. Delay the Snapchat Screenshot Notification
A method for those feeling a more confident or even for those that aren’t too bothered about their posters receiving a notification in the long run, this method is a great way to delay the arrival of that pop-down notification.
To delay the notification process, follow these simple steps:
- Step 1: Load the Snapchat application on your mobile device
- Step 2: Find the snap you want to open/record (ensure it is fully loaded)
- Step 3: Turn off WiFi, Bluetooth, Mobile Data
- Step 4: Turn on the Airplane Mode
- Step 5: Open the snap and take your screenshot
- Step 6: Wait approximately 30 seconds and then turn all your connections back on
Designed to postpone the process of the poster receiving a notification, but not allowing for viewers to screenshot undetected, this method allows audience members to screenshot snaps from those that are perhaps a little unobservant when it comes to checking their notifications.
Be warned though, some posters may catch on to this method of screenshotting and they may stop sharing their videos and images with you.
Summary
Despite there being plenty of reasons why there might be a need for you to record a Snapchat memory without the sender being made aware, it’s important to note that this can also be viewed as a breach of privacy with senders not only being informed of who has taken a screenshot, but also how many times they’ve done so and of which post.
With Snapchat designed to maintain the notion that any media sent between users is considered temporary, thanks to the 5-10 second duration limit, the methods listed above, although not fail-proof, are suggested as simple yet effective ways to avoid triggering an unwanted notification whilst using this highly popular social networking application.

Max Wales
Max Wales is a writer and a lover of all things video.
Follow @Max Wales
Max Wales
Mar 27, 2024• Proven solutions
A great way to share specific memories with those not on the social platform, or even for those looking to make personalized and meaningful memoir collages for their friends and loved ones, there are plenty of ways to inconspicuously screenshot on Snapchat without the sender being made aware.
Becoming one of the most popular and highly favored Social Media platforms over the past several years, Snapchat is a great place to showcase 10-second snippets of your day-to-day life with your followers, friends, and family members. From selfies to shots of food, videos taken during nights on the town to holiday adventures, Snapchat is the perfect video and image-sharing platform for Social Media fans.
![]()
The All-in-One Screen Recorder & Video Editor
- Record PC screen , voiceover, and webcam simultaneously
- Edit recorded clips quickly with a wide range of professional tools
- Built-in plentiful templates and effects
- Export to MP4, MOV, MKV, GIF and multiple formats
For Win 7 or later (64-bit)
For macOS 10.12 or later
Secure Download
How to screenshot on snapchat without stimulating a notification?
An incredible application that allows you to send and share videos and images with friends and followers, Snapchat is designed to help you stay connected in more ways than one. Featuring an anti-screenshot notification system that automatically notifies posters when a recipient or audience member screenshots a snap, it’s become increasingly harder to screenshot without being detected.
That being said, there are still plenty of other methods that offer a practical alternative to ensure you avoid that awkward automated notification.
Option 1. Use Another Phone or Mobile Device to Take Snapchat Screenshot
An easy and risk-free way to capture and store a specific snap with ease, utilizing another mobile device or camera is a great method that requires very little effort. Simply us a second phone, or a nearby tablet, to record the whole duration of the video or photo.
Although the quality of the recording won’t be as crisp and clear as it appears on the handheld, this is a reliable and fool-proof way to preserve those special snaps. From those video recordings, you should then be able to crop out the video or image you needed.
Missed it?
Why not take advantage of Snapchat’s “replay” mode to ensure you get the perfect shot – but be warned, posters also get notified of this too.
Option 2. Use the Built-In Screen Recoding Tool on iOS11
If you didn’t already know, there’s a built-in screen recording software within iOS11 that allows you to effectively capture and record snaps with ease. Lying within the Settings of any iPhone, follow these easy steps on how to live record your screen:
- Step 1: Head to Settings > Control Centre > Customize Controls
- Step 2: Locate the “Screen Recording” functionality
- Step 3: Select the small cross to add it to your Control Centre
- Step 4: To activate – Tap the icon with the 2 concentric circles to start recording. To complete a recording, simply tap the red bar that’s present at the top of the screen and select “End Recording”.
Although it’s not possible to start recording a snap whilst it’s already open, it’s best to start recording before you opt to open a specific message.
Please note: If you have updated to Snapchat version 10.17.5, the posters will be notified each and every time you initiate and capture a recording through the use of this built-in recorder.
Option 3. Use QuickTime Screen Capture on a Mac
A little more technical than simply using another mobile device to record a snap, using the QuickTime Player is an efficient and high-quality method for those looking to secretly store a snapchat post.
To start recording snaps, follow these simple steps:
- Step 1: Connect your iPhone to your Mac
- Step 2: Open the QuickTime Player application
- Step 3: Select File > New Movie Recording from the menu
- Step 4: Once loaded, simply hover the mouse beside the recording button. By clicking the small arrow, you’ll be provided with a range of different recording options
- Step 5: Select your Phone as the Movie Recording Input
Once connected, your Mac screen should now be mirroring your mobile device. Just like you would on your phone, simply hit record and head on over to the Snapchat application to begin recording.
Option 4. Use the Mirror Feature for Android
Similar to the use of QuickTime or the iOS11 Screen Recording software, Screen Mirroring is another effective method for capturing Snapchat screenshots without the poster being made aware. By connecting a HDMI cable to both your TV and laptop, or by accessing the “Screen Mirroring” application that’s often built-in to most Smart Phones and Android devices, it’s possible to mirror/cast the active screen on your device onto an external platform.
In doing so, you’re presented with the opportunity to utilize another device to record a playing snap or even share a recently received snap with other audience members that are present in the room.
Option 5. Delay the Snapchat Screenshot Notification
A method for those feeling a more confident or even for those that aren’t too bothered about their posters receiving a notification in the long run, this method is a great way to delay the arrival of that pop-down notification.
To delay the notification process, follow these simple steps:
- Step 1: Load the Snapchat application on your mobile device
- Step 2: Find the snap you want to open/record (ensure it is fully loaded)
- Step 3: Turn off WiFi, Bluetooth, Mobile Data
- Step 4: Turn on the Airplane Mode
- Step 5: Open the snap and take your screenshot
- Step 6: Wait approximately 30 seconds and then turn all your connections back on
Designed to postpone the process of the poster receiving a notification, but not allowing for viewers to screenshot undetected, this method allows audience members to screenshot snaps from those that are perhaps a little unobservant when it comes to checking their notifications.
Be warned though, some posters may catch on to this method of screenshotting and they may stop sharing their videos and images with you.
Summary
Despite there being plenty of reasons why there might be a need for you to record a Snapchat memory without the sender being made aware, it’s important to note that this can also be viewed as a breach of privacy with senders not only being informed of who has taken a screenshot, but also how many times they’ve done so and of which post.
With Snapchat designed to maintain the notion that any media sent between users is considered temporary, thanks to the 5-10 second duration limit, the methods listed above, although not fail-proof, are suggested as simple yet effective ways to avoid triggering an unwanted notification whilst using this highly popular social networking application.
Max Wales
Max Wales is a writer and a lover of all things video.
Follow @Max Wales
Also read:
- [New] Realizing Unnoticeable Connections in SnapCircle
- [New] Essential Snaps Cutting-Edge Filters & Lenses Unveiled
- [Updated] Quick and Effective Video Production on Mac for Snapchat for 2024
- [New] In 2024, Captivate Audiences Perfecting Snapchat's Boomerang Feature
- [Updated] Inject Personality Into Snaps on Snapchat Through Voice Customization for 2024
- [New] In 2024, Unlocking Potential Snapchat Insights for Companies
- Step-by-Step Rewinding Snapchat Videos for 2024
- [New] Streamlining Sales with Snapchat's Marketing Features
- [New] Innovative Tips for Multisnap Creation on Snapchat for 2024
- [New] Journey to Visual Impact with Simple Lenses for 2024
- [Updated] Quick Reinstatement Protocols for Snaps for 2024
- Navigating the Maze of Communication Features on Snapchat for 2024
- [Updated] In 2024, Rediscovering the Past with Your Camera Roll on Snapchat
- [Updated] Master Your Snapchats The Top 6 Editing Apps for Both Devices
- [Updated] Reversing Footage in a Snap
- 2024 Approved Breaking the Internet with These Hysterical Stickers
- [Updated] 2024 Approved Navigating Snapchat Pins with Ease
- [Updated] Maximizing Team Productivity with Snap Camera Integration for 2024
- [Updated] 2024 Approved Streamlined Processes for Crafting Smooth Multi-Snap Videos
- [Updated] 2024 Approved From Memory to Moments Share Images Seamlessly Today
- [New] Snapshot Hits Must-Have Filters to Enhance Your Snap for 2024
- [New] In 2024, The Essential Guide to Creating Snaps on Snapchat
- 2024 Approved Snapchat's Speed Control Hacks for Cutting-Edge Creators
- [Updated] Beyond the Basics Advanced Insights Into Snapchat Filters
- [New] Essential Tips for Snapchat Enterprise Marketing
- [Updated] Monetizing Your Social Media Presence Snapchat Edition
- [New] 2024 Approved Explore Creative Horizons with Imaginative Snapchat Boomerang Techniques
- 2024 Approved Conquer Backward Motion in Snapchat Videos Quickly
- [New] 2024 Approved Perfecting Sound on Snapchat Master Your Vocal Effects in Minutes
- [New] Snapchat to Device - The Step by Step Process Explained for 2024
- [Updated] Navigating Mobile Recorders to Capture Snapchat Moments for 2024
- [New] Deciphering No Snaps, Possible Blocking for 2024
- [New] Snapchat Versus TikTok What's The Real Difference?
- [Updated] Fire Up the Connections Maintaining Long-Lasting Streaks for 2024
- Professional Video Capture on Apple Devices
- 4 Most-Known Ways to Find Someone on Tinder For Apple iPhone SE by Name | Dr.fone
- 2024 Approved Elevate Your Social Presence The Art of Uploading Many Images and Videos to Instagram
- Snapshot of Sound Forge A Thorough Look at Its Audio Production Capabilities for 2024
- In 2024, A Step-by-Step Guide on Using ADB and Fastboot to Remove FRP Lock on your Oppo Find N3
- Updated 2024 Approved The Most User-Friendly Video Editing Apps
- How to Change Vivo Y78+ Location on Skout | Dr.fone
- [New] In 2024, Clear Conferencing Backdrops Blurring for Better Presence
- In 2024, A Quick Guide to Samsung Galaxy F14 5G FRP Bypass Instantly
- 10 Essential Online Waveform Generators for Audio Enthusiasts
- Recover Missing Social Media Icon in Facebook Watch for 2024
- [New] 2024 Approved Pairing Facebook Playback With Home Theaters
- [New] In 2024, Prime Picks Top Tweets for Must-See Original Series
- How to Unlock Infinix Phone without Google Account?
- Updated Twitter Video Dimensions What You Need to Know
- Updated The Art of Sound Alteration A Critical Review of Leading Instant Voice Transformation Software
- Why Your Vivo Y78+ Screen Might be Unresponsive and How to Fix It | Dr.fone
- New 2024 Approved Auditory Excellence in Action How to Identify the Sound Editor of Your Dreams
- New Top Lego Animators Stop Motion Masters
- In 2024, How to Lock Apps on Oppo Reno 11 Pro 5G to Protect Your Individual Information
- [New] Step-by-Step Process of Capturing FB Messages
- [Updated] Advanced Editing Techniques That Maximize OBS Potential
- Updated 8 Best DAW Software for Mac Fully Review
- How can I get more stardust in pokemon go On Oppo A59 5G? | Dr.fone
- In 2024, How to Transfer Music from Oppo A38 to iPod | Dr.fone
- Unlocking Podcast Quality Learn How to Craft a Professional Audio Experience for 2024
- How To Use Allshare Cast To Turn On Screen Mirroring On Poco X5 | Dr.fone
- In 2024, Ways to stop parent tracking your ZTE Blade A73 5G | Dr.fone
- 10 Fake GPS Location Apps on Android Of your OnePlus 12 | Dr.fone
- Easy Guide How To Bypass Infinix Note 30 5G FRP Android 10/11/12/13
- New 2024 Approved Sound Sculpting Without Spending Essential Free Online Audio Trimming Software
- Discover the Truth Is VN Video Editor Pro a Top-Notch Video Editor?
- Easy steps to recover deleted call history from Pop 7 Pro
- Updated In 2024, LinkedIn Video Best Practices Aspect Ratio, Size, and More
- Title: How to Make a Video on Mac that Best Fits Snapchat Size, In 2024
- Author: Scott
- Created at : 2024-05-23 10:13:27
- Updated at : 2024-05-24 10:13:27
- Link: https://snapchat-videos.techidaily.com/how-to-make-a-video-on-mac-that-best-fits-snapchat-size-in-2024/
- License: This work is licensed under CC BY-NC-SA 4.0.
