
:max_bytes(150000):strip_icc()/iTethering-resized-56a532c53df78cf77286dec1.jpg)
Advanced Techniques to Save Snapchat Stories on Devices for 2024
Advanced Techniques to Save Snapchat Stories on Devices
Snapchat has 306 million users daily worldwide. It is considered the fastest way to share a moment and make a memory out of it. The article reflects upon screen record Snapchat and covers ways to do so via Android and iPhone devices. Let us commence this, shall we?
In this article
01 Will Snapchat Know When You Do Screen Recording?
02 How to Screen Record Snapchat on Android Phone?
03 How to Screen Record Snapchat on iPhone?
04 How to Make Screen Record on Snapchat without Notice?
Part 1: Will Snapchat Know When You Do Screen Recording?
Snapchat was designed in a way that it protects the privacy of the users. According to this social networking software policy, the messages and snaps disappear after 24 hours. It creates an urge to screenshot the snap or screen record the chat without getting noticed. The section reflects the answer to the concern if you screen record on Snapchat, does it show?”
The answer is yes. Snapchat sends a notification to the other person if you screen record on Snapchat. It plays a vital role as it helps steer clear from the stalkers and people who have no sense of boundaries.
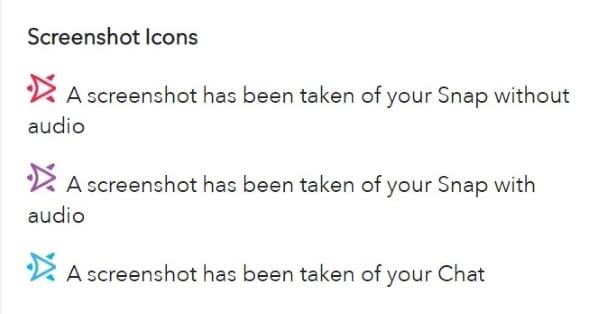
For taking a screenshot on Snapchat, the following notification show with specific colored arrows.
The red arrow displays that the screenshot was taken of snap without audio.
The purple arrow signifies that the screenshot was taken of snap with audio.
The blue arrows represent that a screenshot has been taken of chat.
It clearly shows that Snapchat takes the privacy of its users seriously. Therefore, to protect oneself from disappointment, it is crucial to avoid taking screenshots or screen recordings on Snapchat. You can use another phone to carry out the sneaky operation or download third-party software to screen capture and record safely.
Part 2: How to Screen Record Snapchat on Android Phone?
The Android users pretty much enhanced in the last decade exponentially. It is mainly because the workability of Android is more straightforward than that of iPhone. If you are a Snapchat addict on an Android phone, this section is designed for you.
Screen recording on Snapchat via Android phone is easy. There are no complications in the process, even for a beginner. For starters, make sure that the in-built screen recording functionality of Android is enabled via Settings. It will help initiate the recording immediately from the Action Center.
So, let us jump right into the step-by-step procedure to screen record on Snapchat.
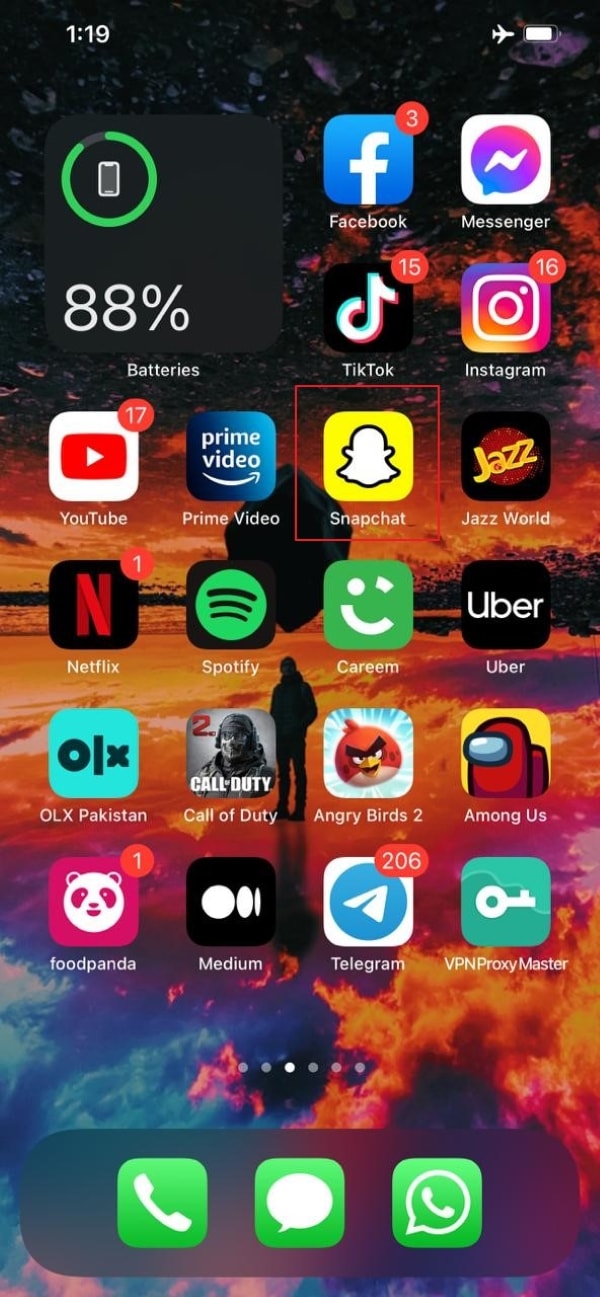
Step 1: Enabling the Airplane Mode
Open Snapchat from your Android phone. Refresh all the chats so that all new snaps can be accessed easily. After that, launch the “Action Center” and hit “Airplane Mode” to switch it on. It is shaped like an airplane.

Step 2: Start the Recording
Now, start screen recording by opening the “Action Center” again and clicking on “Screen Recorder.” As soon as the recording initiates, open the snap that you wish to record.
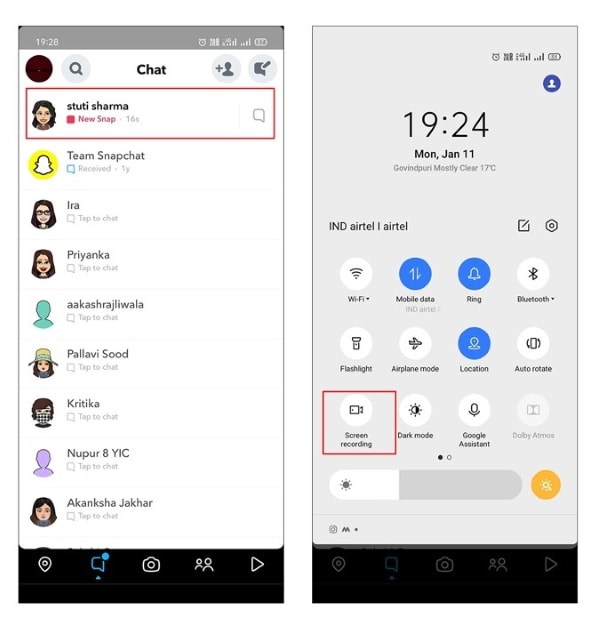
Step 3: Stop the Recording
After you are done, stop the recording. Disable the Airplane Mode and close the tool. The screen recording can be accessed from the Gallery.
Part 3: How to Screen Record Snapchat on iPhone?
Bringing more features and traits to the house, people have gone insane with every new model of the iPhone that is announced to the world. If you are an iPhone user looking to screen record on Snapchat, follow this section vividly.
Instead of using third-party software like AZ screen recorder Snapchat, the in-built tool of the iPhone is equally workable. There is no need to install new software on the device and play with the system’s memory. To initiate screen recording on Snapchat via iPhone, let us discuss the procedure extensively.
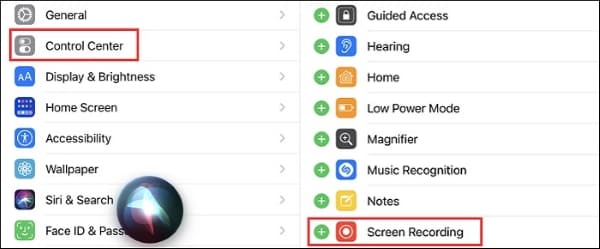
Step 1: Activating the Screen Recorder
Before starting, the user should make sure that the in-built screen recorder tool has been downloaded. Navigate to the “Control Center” and scroll down to find “Screen Recorder if it is not installed.” Hit the green (+) icon beside the tool to make it easily accessible.
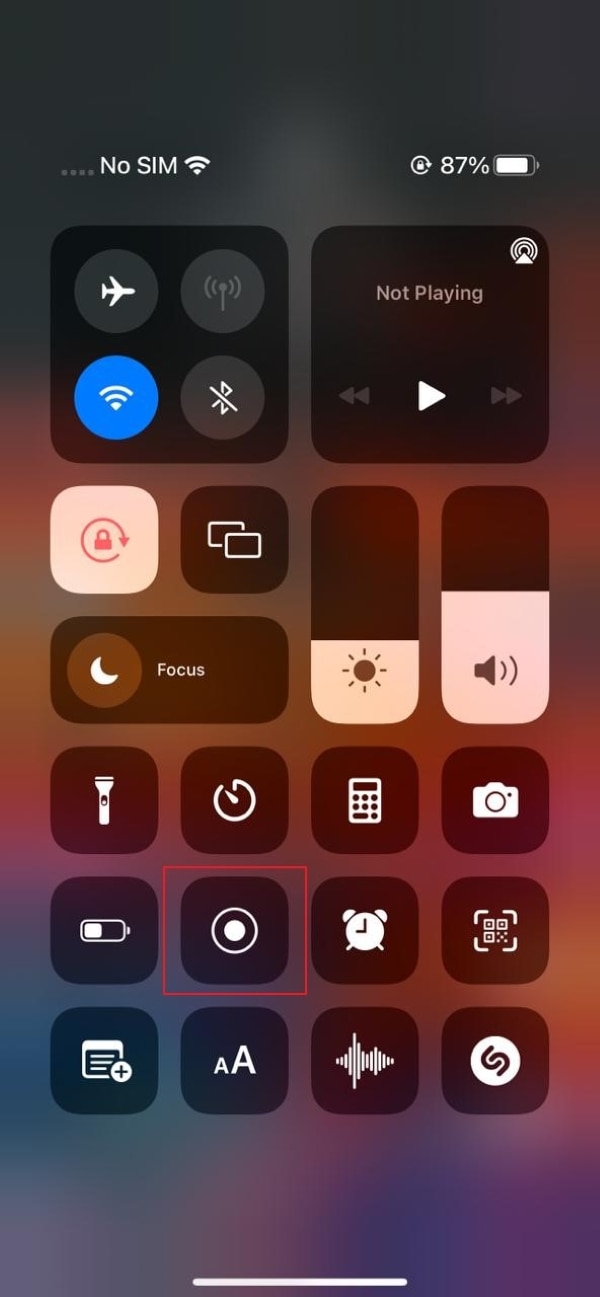
Step 2: Accessing the Feature for iPhone Versions
The accessing of Screen Recorder in-built tool varies from one iPhone version to another. For instance, if you have iPhone 8 or older versions, swipe down to tap the “Screen Recording” icon. However, if you own iPhone X or advanced versions, swipe up from the top right corner of the screen. Find the relevant icon to continue with the targeted process.
Step 3: Starting the Recording
Launch Snapchat from your iPhone and refresh the feed. Now, open the Screen Recording tool and initiate the recording. You have to turn on the “Airplane” mode as well before recording the snap. Now, the user is expected to open the snap that needs to be recorded.
Step 4: Stopping the Recording
Stop the recording by clicking on the red icon on the screen. The screen recording is performed successfully. You can find the recording in your Photos in seconds.
Part 4: How to Make Screen Record on Snapchat without Notice?
It looks pretty embarrassing if you capture a screenshot and the other person receives a notification. The screen recording on Snapchat makes you awkward. To get rid of this embarrassment, one should use tricky and workable methods. Luckily, the section covers some of those methods. Let us have a look at each of them!
Switching off the Internet Connection
The first method revolves around disabling the internet connection of your device. For starters, reload and refresh your Snapchat feed. Disconnect the Wi-Fi or data network, and then screen records the snap. It helps you get the task done without getting noticed, as the app doesn’t know what is happening without internet connectivity.
Enabling the Airplane Mode
One workable method is to enable the Airplane Mode before you plan to screen record Snapchat. What happens is that the app doesn’t respond to the operation occurring as Airplane Mode is switched on. The process doesn’t send the notification to the targeted person; thus, it always works.
Using a Third-Party Software
You can access the third-party screen recorder and then perform screen recording on Snapchat. The market offers numerous apps for a similar reason. Their usage is simple as well.
Mirroring Phone on PC
Another tricky method revolves around mirroring phones on PC. The Snapchat user can connect the device to the computer and then play the snap story. As Snapchat cannot read the computer’s activities, you can use the recorder to screen record Snapchat stories in seconds.
Using Another Phone
You can pick a phone of your sibling or a friend to record the snaps of the targeted person. It might not be a high-resolution output, but it would surely get your task done without getting noticed.
Final Remarks
Snapchat has become one of the most favorite software in the world. People like to capture the stories and screen record the chats that they find amusing, engaging, and other sneaky reasons. The article offered users a screen record on Snapchat via Android and iPhone. The tricky methods to screen record without getting noticed were also a part of this write-up.
02 How to Screen Record Snapchat on Android Phone?
03 How to Screen Record Snapchat on iPhone?
04 How to Make Screen Record on Snapchat without Notice?
Part 1: Will Snapchat Know When You Do Screen Recording?
Snapchat was designed in a way that it protects the privacy of the users. According to this social networking software policy, the messages and snaps disappear after 24 hours. It creates an urge to screenshot the snap or screen record the chat without getting noticed. The section reflects the answer to the concern if you screen record on Snapchat, does it show?”
The answer is yes. Snapchat sends a notification to the other person if you screen record on Snapchat. It plays a vital role as it helps steer clear from the stalkers and people who have no sense of boundaries.
For taking a screenshot on Snapchat, the following notification show with specific colored arrows.
The red arrow displays that the screenshot was taken of snap without audio.
The purple arrow signifies that the screenshot was taken of snap with audio.
The blue arrows represent that a screenshot has been taken of chat.
It clearly shows that Snapchat takes the privacy of its users seriously. Therefore, to protect oneself from disappointment, it is crucial to avoid taking screenshots or screen recordings on Snapchat. You can use another phone to carry out the sneaky operation or download third-party software to screen capture and record safely.
Part 2: How to Screen Record Snapchat on Android Phone?
The Android users pretty much enhanced in the last decade exponentially. It is mainly because the workability of Android is more straightforward than that of iPhone. If you are a Snapchat addict on an Android phone, this section is designed for you.
Screen recording on Snapchat via Android phone is easy. There are no complications in the process, even for a beginner. For starters, make sure that the in-built screen recording functionality of Android is enabled via Settings. It will help initiate the recording immediately from the Action Center.
So, let us jump right into the step-by-step procedure to screen record on Snapchat.
Step 1: Enabling the Airplane Mode
Open Snapchat from your Android phone. Refresh all the chats so that all new snaps can be accessed easily. After that, launch the “Action Center” and hit “Airplane Mode” to switch it on. It is shaped like an airplane.
Step 2: Start the Recording
Now, start screen recording by opening the “Action Center” again and clicking on “Screen Recorder.” As soon as the recording initiates, open the snap that you wish to record.
Step 3: Stop the Recording
After you are done, stop the recording. Disable the Airplane Mode and close the tool. The screen recording can be accessed from the Gallery.
Part 3: How to Screen Record Snapchat on iPhone?
Bringing more features and traits to the house, people have gone insane with every new model of the iPhone that is announced to the world. If you are an iPhone user looking to screen record on Snapchat, follow this section vividly.
Instead of using third-party software like AZ screen recorder Snapchat, the in-built tool of the iPhone is equally workable. There is no need to install new software on the device and play with the system’s memory. To initiate screen recording on Snapchat via iPhone, let us discuss the procedure extensively.
Step 1: Activating the Screen Recorder
Before starting, the user should make sure that the in-built screen recorder tool has been downloaded. Navigate to the “Control Center” and scroll down to find “Screen Recorder if it is not installed.” Hit the green (+) icon beside the tool to make it easily accessible.
Step 2: Accessing the Feature for iPhone Versions
The accessing of Screen Recorder in-built tool varies from one iPhone version to another. For instance, if you have iPhone 8 or older versions, swipe down to tap the “Screen Recording” icon. However, if you own iPhone X or advanced versions, swipe up from the top right corner of the screen. Find the relevant icon to continue with the targeted process.
Step 3: Starting the Recording
Launch Snapchat from your iPhone and refresh the feed. Now, open the Screen Recording tool and initiate the recording. You have to turn on the “Airplane” mode as well before recording the snap. Now, the user is expected to open the snap that needs to be recorded.
Step 4: Stopping the Recording
Stop the recording by clicking on the red icon on the screen. The screen recording is performed successfully. You can find the recording in your Photos in seconds.
Part 4: How to Make Screen Record on Snapchat without Notice?
It looks pretty embarrassing if you capture a screenshot and the other person receives a notification. The screen recording on Snapchat makes you awkward. To get rid of this embarrassment, one should use tricky and workable methods. Luckily, the section covers some of those methods. Let us have a look at each of them!
Switching off the Internet Connection
The first method revolves around disabling the internet connection of your device. For starters, reload and refresh your Snapchat feed. Disconnect the Wi-Fi or data network, and then screen records the snap. It helps you get the task done without getting noticed, as the app doesn’t know what is happening without internet connectivity.
Enabling the Airplane Mode
One workable method is to enable the Airplane Mode before you plan to screen record Snapchat. What happens is that the app doesn’t respond to the operation occurring as Airplane Mode is switched on. The process doesn’t send the notification to the targeted person; thus, it always works.
Using a Third-Party Software
You can access the third-party screen recorder and then perform screen recording on Snapchat. The market offers numerous apps for a similar reason. Their usage is simple as well.
Mirroring Phone on PC
Another tricky method revolves around mirroring phones on PC. The Snapchat user can connect the device to the computer and then play the snap story. As Snapchat cannot read the computer’s activities, you can use the recorder to screen record Snapchat stories in seconds.
Using Another Phone
You can pick a phone of your sibling or a friend to record the snaps of the targeted person. It might not be a high-resolution output, but it would surely get your task done without getting noticed.
Final Remarks
Snapchat has become one of the most favorite software in the world. People like to capture the stories and screen record the chats that they find amusing, engaging, and other sneaky reasons. The article offered users a screen record on Snapchat via Android and iPhone. The tricky methods to screen record without getting noticed were also a part of this write-up.
Quick Guide to Achieving Video Freeze Effects on Snapchat
Snapchat is an instant messaging app that allows you to share your pictures and videos with your family members, friends, and colleagues. In addition, you can even create your stories in the form of movie clips and share them on the app. These stories remain available for the next 24 hours, after which they are automatically removed from the platform.
While sharing the videos, you can apply several filters that are already present in the app, and Slow Motion is one of them. You may want to learn how to slow down a video on Snapchat when you want to emphasize and draw viewers’ attention toward the scene, or wish to make the audience see your actions closely and in detail.
That said, in the following sections, you will see how to slow down videos on Snapchat, and what other methods you can use to reduce the playback speed more professionally.
In this article
01 How to Add Slow Motion Effects to Video Using the Snapchat App
02 How to Record a Slo-Mo Video and Upload to Snapchat
03 How to Make Flash and Smooth Slo Mo Video for Snapchat
04 FAQs about Slowing Down Snapchat Video
Part 1: How to Add Slow Motion Effects to Video Using the Snapchat App
Snapchat has a built-in Slow Motion filter that reduces the playback speed of a video when applied. You can learn how to slow down on Snapchat by following the instructions that are given below:
Step 1: Record a Video
Launch Snapchat on your smartphone (iPhone 13 Pro Max is used here for illustrations), make sure that the Camera section is selected from the bottom, tap and hold down the Capture button that is present at the lower part of the interface, and let go of it when you are done recording.

Step 2: Apply the Slow Motion Filter
Once the video is recorded, swipe the screen from left to right. Repeat this process until you see the Snail (Slow Motion) icon on the screen. This will reduce the playback speed of the clip.

Step 3: Decorate the Video (Optional)
Use the options present on the upper-right area of the screen to further decorate the video and/or add annotations to it.

Step 4: Share or Publish the Video
Once everything is done, tap Send To from the bottom-right corner to share the video with your family, friends, and colleagues, or publish it as a story that remains available for the next 24 hours.
Related: How to Record Slo-Mo videos on iPhone .
Part 2: How to Record a Slo-Mo Video and Upload to Snapchat
With Snapchat, even though you don’t require any third-party tool to reduce the playback speed of a video, the app has certain limitations. For example, it doesn’t allow you to set a zoom level, you are stuck with the framerate that the app has to offer, etc.
Because of this, many people prefer to use different methods to record a video in slow motion with their preferences, and then upload it to Snapchat. This approach also eliminates the need to swipe the screen several times merely to use a single slow-motion filter.
Fortunately, iPhone has a built-in SLO-MO mode in its Camera app that allows you to capture the videos in slow motion. To learn how to do slow mo on Snapchat with the iPhone’s Camera app, you can follow the instructions that are given below:
Step 1: Get to the iPhone’s SLO-MO Mode
Launch the Camera app on your iPhone (iPhone 13 Pro Max is used here for illustrations), and swipe the screen from left to right until you get to the SLO-MO mode.

Step 2: Set Recording Preferences
Tap the number that is present at the top-right corner (240 here) to toggle between different framerates, tap 1x from the lower-center area, swipe slightly up, and then use the wheel that appears next to define your preferred zoom level.

Step 3: Start and Stop the Recording
Tap the Record button to start the recording, and tap Stop when you’re done.
Note: Make sure that the duration of the recorded video doesn’t exceed 60 seconds.
Step 4: Upload the Slow-Motion Video to Snapchat
After the video is recorded in slow motion, close the Camera app, launch Snapchat, and tap the Gallery icon from the left side of the Capture button on the Camera section. From the Memories screen, go to the Camera Roll tab, and tap to select the video that you recorded in the previous step.
Next, optionally, tap the Edit icon from the bottom-left corner to decorate the video and/or add annotations to it, and follow the process as explained in the previous section to share the clip with your family, friends, or colleagues, or publish it as your story.

Part 3: How to Make Flash and Smooth Slo Mo Video for Snapchat
Although iPhone has the built-in SLO-MO mode that even enables you to set your preferred framerate and zoom level before recording, it still doesn’t allow you to slow down different parts of a video in different speed at your convenience. You can either record the entire video in slow motion or at a normal speed.
This is where a third-party app comes into play. While there are several video editing programs available online, the one of the best slow motion apps that helps you slow down the portions of a video with precision is CapCut.
Downloading and installing CapCut on your iPhone or Android phone is simple, and once it is done, you can follow the process given below to learn how to slow things down on Snapchat:
With CapCut, you can either slow down the whole clip or manage the speed for different segments. This section explains both methods.
Method 1: Slow Down the Whole Clip with CapCut
Step 1: Get to the Speed Panel
Launch CapCut, import the video that you want to slow down, and tap the imported media in the Timeline. Next, tap Speed from the bottom of the interface to get to the next window.

Step 2: Reduce the Speed of the Video
Tap Normal from the bottom of the screen that appears next, and drag the Speed slider to the left to reduce the playback speed. Tap OK from the bottom-right corner to save the changes.

Step 3: Upload the Video to Snapchat
Back on the previous interface, optionally tap Volume from the bottom and reduce the slider to 0 to mute the audio of the footage as it may get distorted due to the reduction in the speed.
Next, tap Share from the top-right corner to save the video on your iPhone, and then use the method explained in the previous section to access the clip from the Gallery within Snapchat for uploading.
Method 2: Reduce the Playback Speed of Different Parts of a Video
Step 1: Get to the Speed Panel
Use the process described in the previous method to get to the Speed panel.
Step 2: Reduce the Speed of Different Parts of the Video
Tap Curve from the bottom of the interface. On the next screen, tap Custom from the lower area, and then tap Edit. From the next panel, drag the beat points down to reduce the speed (or drag them above the line to increase).

Notice that each beat point represents a particular section of the video, and dragging it down reduces the playback speed of that segment. You can even tap anywhere on the line to add a new beat point and drag it down as needed for more precise speed management. Once done, tap OK from the bottom-right corner to save the modifications.

Optionally, you can also tap any of the available presets on the Curve screen to reduce the playback speed of the video accordingly.
Step 3: Upload the Video to Snapchat
Use the method explained in the previous method to export the video, upload it to Snapchat, and share the clip with your family, friends, and colleagues, or publish it as your story.
Part 4: FAQs about Slowing Down Snapchat Video
1. Can I record a slow mo video in Snapchat?
Technically speaking, no, you cannot. However, once you have recorded a video at a normal speed in Snapchat, you can apply the built-in Slow Motion filter to it by swiping the screen from left to right until you see the Snail icon at the center. The Snail icon represents the Slow Motion filter that reduces the playback speed when applied.
2. Besides slow-motion, which speed filters does Snapchat have?
In addition to slow motion Snapchat also has Forward and Fast Forward filters that increase the playback speed. While the Forward filter increases the speed slightly, the Fast Forward one enhances it drastically.
Conclusion
When using an iPhone, even though the SLO-MO mode enables you to record footage in slow motion, you don’t get many options. Therefore, it would be safe to say that it is easy to slow down the speed of a video if you have a dedicated third-party post-production app. However, if you want to go for a convenient method, learning how to slow down a video on Snapchat is an extremely simple and straightforward process.
02 How to Record a Slo-Mo Video and Upload to Snapchat
03 How to Make Flash and Smooth Slo Mo Video for Snapchat
04 FAQs about Slowing Down Snapchat Video
Part 1: How to Add Slow Motion Effects to Video Using the Snapchat App
Snapchat has a built-in Slow Motion filter that reduces the playback speed of a video when applied. You can learn how to slow down on Snapchat by following the instructions that are given below:
Step 1: Record a Video
Launch Snapchat on your smartphone (iPhone 13 Pro Max is used here for illustrations), make sure that the Camera section is selected from the bottom, tap and hold down the Capture button that is present at the lower part of the interface, and let go of it when you are done recording.
Step 2: Apply the Slow Motion Filter
Once the video is recorded, swipe the screen from left to right. Repeat this process until you see the Snail (Slow Motion) icon on the screen. This will reduce the playback speed of the clip.
Step 3: Decorate the Video (Optional)
Use the options present on the upper-right area of the screen to further decorate the video and/or add annotations to it.
Step 4: Share or Publish the Video
Once everything is done, tap Send To from the bottom-right corner to share the video with your family, friends, and colleagues, or publish it as a story that remains available for the next 24 hours.
Related: How to Record Slo-Mo videos on iPhone .
Part 2: How to Record a Slo-Mo Video and Upload to Snapchat
With Snapchat, even though you don’t require any third-party tool to reduce the playback speed of a video, the app has certain limitations. For example, it doesn’t allow you to set a zoom level, you are stuck with the framerate that the app has to offer, etc.
Because of this, many people prefer to use different methods to record a video in slow motion with their preferences, and then upload it to Snapchat. This approach also eliminates the need to swipe the screen several times merely to use a single slow-motion filter.
Fortunately, iPhone has a built-in SLO-MO mode in its Camera app that allows you to capture the videos in slow motion. To learn how to do slow mo on Snapchat with the iPhone’s Camera app, you can follow the instructions that are given below:
Step 1: Get to the iPhone’s SLO-MO Mode
Launch the Camera app on your iPhone (iPhone 13 Pro Max is used here for illustrations), and swipe the screen from left to right until you get to the SLO-MO mode.
Step 2: Set Recording Preferences
Tap the number that is present at the top-right corner (240 here) to toggle between different framerates, tap 1x from the lower-center area, swipe slightly up, and then use the wheel that appears next to define your preferred zoom level.
Step 3: Start and Stop the Recording
Tap the Record button to start the recording, and tap Stop when you’re done.
Note: Make sure that the duration of the recorded video doesn’t exceed 60 seconds.
Step 4: Upload the Slow-Motion Video to Snapchat
After the video is recorded in slow motion, close the Camera app, launch Snapchat, and tap the Gallery icon from the left side of the Capture button on the Camera section. From the Memories screen, go to the Camera Roll tab, and tap to select the video that you recorded in the previous step.
Next, optionally, tap the Edit icon from the bottom-left corner to decorate the video and/or add annotations to it, and follow the process as explained in the previous section to share the clip with your family, friends, or colleagues, or publish it as your story.
Part 3: How to Make Flash and Smooth Slo Mo Video for Snapchat
Although iPhone has the built-in SLO-MO mode that even enables you to set your preferred framerate and zoom level before recording, it still doesn’t allow you to slow down different parts of a video in different speed at your convenience. You can either record the entire video in slow motion or at a normal speed.
This is where a third-party app comes into play. While there are several video editing programs available online, the one of the best slow motion apps that helps you slow down the portions of a video with precision is CapCut.
Downloading and installing CapCut on your iPhone or Android phone is simple, and once it is done, you can follow the process given below to learn how to slow things down on Snapchat:
With CapCut, you can either slow down the whole clip or manage the speed for different segments. This section explains both methods.
Method 1: Slow Down the Whole Clip with CapCut
Step 1: Get to the Speed Panel
Launch CapCut, import the video that you want to slow down, and tap the imported media in the Timeline. Next, tap Speed from the bottom of the interface to get to the next window.
Step 2: Reduce the Speed of the Video
Tap Normal from the bottom of the screen that appears next, and drag the Speed slider to the left to reduce the playback speed. Tap OK from the bottom-right corner to save the changes.
Step 3: Upload the Video to Snapchat
Back on the previous interface, optionally tap Volume from the bottom and reduce the slider to 0 to mute the audio of the footage as it may get distorted due to the reduction in the speed.
Next, tap Share from the top-right corner to save the video on your iPhone, and then use the method explained in the previous section to access the clip from the Gallery within Snapchat for uploading.
Method 2: Reduce the Playback Speed of Different Parts of a Video
Step 1: Get to the Speed Panel
Use the process described in the previous method to get to the Speed panel.
Step 2: Reduce the Speed of Different Parts of the Video
Tap Curve from the bottom of the interface. On the next screen, tap Custom from the lower area, and then tap Edit. From the next panel, drag the beat points down to reduce the speed (or drag them above the line to increase).
Notice that each beat point represents a particular section of the video, and dragging it down reduces the playback speed of that segment. You can even tap anywhere on the line to add a new beat point and drag it down as needed for more precise speed management. Once done, tap OK from the bottom-right corner to save the modifications.
Optionally, you can also tap any of the available presets on the Curve screen to reduce the playback speed of the video accordingly.
Step 3: Upload the Video to Snapchat
Use the method explained in the previous method to export the video, upload it to Snapchat, and share the clip with your family, friends, and colleagues, or publish it as your story.
Part 4: FAQs about Slowing Down Snapchat Video
1. Can I record a slow mo video in Snapchat?
Technically speaking, no, you cannot. However, once you have recorded a video at a normal speed in Snapchat, you can apply the built-in Slow Motion filter to it by swiping the screen from left to right until you see the Snail icon at the center. The Snail icon represents the Slow Motion filter that reduces the playback speed when applied.
2. Besides slow-motion, which speed filters does Snapchat have?
In addition to slow motion Snapchat also has Forward and Fast Forward filters that increase the playback speed. While the Forward filter increases the speed slightly, the Fast Forward one enhances it drastically.
Conclusion
When using an iPhone, even though the SLO-MO mode enables you to record footage in slow motion, you don’t get many options. Therefore, it would be safe to say that it is easy to slow down the speed of a video if you have a dedicated third-party post-production app. However, if you want to go for a convenient method, learning how to slow down a video on Snapchat is an extremely simple and straightforward process.
Also read:
- Snapchat Private Chronicles Top 120+ Innovative Ideas to Distinguish You for 2024
- [Updated] Unleashing Creativity Quick Lens Building on Snapchat for 2024
- [New] Unleash Creativity in Snaps 15 Innovative Posting Techniques for 2024
- [New] Unleash Your Creativity Drawing Faces on Snapchat
- [Updated] Boosting Engagement Techniques for Snap Camera on Teams
- [New] Speedy Retrieval for Elusive Snaps for 2024
- [New] Mastering Snapchat Flip Your Videos Backwards
- [New] Leveraging Technology to Keep Your Snapchats Alive for 2024
- [Updated] 2024 Approved Enhance Team Collaboration Through Effective Microsoft Teams Snap Practices
- [New] How to Reverse a Video on Snapchat, In 2024
- [Updated] In 2024, Dive Into Effortless Gif Sharing in Snapchat's Guide
- [Updated] Tactics for Preserving Your Snapchat Streak
- [New] Instantly Restore Forgotten Snaps for 2024
- [New] 2024 Approved Simplifying Visual Sharing in MS Teams with Snap Camera
- [New] In 2024, Enhancing Your Memories Bank with Snapchat's Images
- [Updated] Deciphering the Block Code on Snapchat for 2024
- [Updated] Transform Your Snapchat Sound Wave in Less Than 15 Minutes for 2024
- [New] 2024 Approved Snap Sensation Filter Favorites for Every Moment
- 2024 Approved Beyond the Basics Advanced Insights Into Snapchat Filters
- [New] How to Notice Unregistered Users on Snapchat
- [Updated] Snapshot Strategies Maintaining Consistent Snapstreaks
- [New] 2024 Approved Embrace Digital Preservation Keeping Your Snaps Fresh on Devices
- [Updated] The Complete Guide to Crafting Captivating Snapchat Boomers for 2024
- [Updated] Easy Steps to Personalize Your Snapchat Pin
- [Updated] Revisiting Old Memories How to Upload Them on Snapchat for 2024
- How to Use Cartoon Face Lens in Snapchat, In 2024
- [New] In 2024, The Ultimate Guide to Using Snapchat in Biz
- [Updated] Simplifying Snapchat Recording for Smooth Experience for 2024
- Discovering Direct Conversations on Snapchat in a Click for 2024
- [New] Transform Your Snaps Explore These 20 Essential Filters for 2024
- [Updated] In 2024, A Step-by-Step Guide to Microsoft Teams Snap Photos
- [New] Step-by-Step Screen Recording for Snapchat Stories on Mobile for 2024
- [New] 2024 Approved Multi-Snapping Made Simple in Snapchat Video Edits
- [Updated] The Ultimate Guide to Mobile Video Capture for 2024
- [New] 2024 Approved Maximizing Video Longevity Saving Snaps on Android & Mac
- In 2024, Undoing Movement How to Reverse Video on Snapchat
- [New] 2024 Approved Getting Started with Snapchat on Apple Computers
- 2024 Approved Convenient Tutorial Snapchat Installation macOS-Style
- [New] Innovative Tricks for Captivating Boomerangs
- In 2024, Stay on Top of Your Streaks Must-Try Techniques
- [Updated] In 2024, Boosting Meeting Impact with Simple Snap Camera Steps
- [New] In 2024, Unlocking Potential Snapchat's Business Toolkit
- In 2024, Simplified Guide From Camera Roll Capture to Snapchat Posting
- [New] Sending Past Moments via Snapchat Camera Roll Guide for 2024
- [Updated] Innovative Pathways Ensuring Correct iPhone-Snapchat Data Flow for 2024
- [Updated] In 2024, Step-by-Step Drawing Faces on Snapchat
- Quick Cuts Editing Instagram Videos on macOS for 2024
- [Updated] Quieting Mute Voices on OBS Platforms
- What is the best Pokemon for pokemon pvp ranking On Samsung Galaxy XCover 6 Pro Tactical Edition? | Dr.fone
- 2024 Approved The Ultimate Video Editor Comparison 35 Options for Windows, Mac, iOS, Android, and Linux
- Edit and Send Fake Location on Telegram For your Nokia G42 5G in 3 Ways | Dr.fone
- 10 Best Free Websites to Watch Cartoons Online for 2024
- In 2024, Unlocking Profound Sound A Guide to Deepening Your Vocal Presence via Filmora
- [Updated] 2024 Approved Streamlined Capturing Top 5 Mac Tools for Effective Snipping
- Top Mac Device for Seamless Auto Music Integration
- In 2024, How to Fake GPS on Android without Mock Location For your ZTE Nubia Z60 Ultra | Dr.fone
- 2024 Approved How to Get Filmora for Free? With the Proceeding Guide, You Can Now Get the Full Version of Filmora for Free on Your Device without Crack. Also, Learn About some Wonderful Features of Filmora that Are a Must-Have
- 2024 Approved Essential Free Nintendo Switch Games
- 4 Feasible Ways to Fake Location on Facebook For your Motorola Moto G13 | Dr.fone
- Chrome-Compatible Microphone Revolution Discover the Leading Models for 2024
- 2024 Approved CrystalVision Pro Screen Capturing 101
- 2024 Approved Streamline Your Recordings Zoom's Leading Transcription Apps Reviewed
- [Updated] Unleash Creativity with Free, Excellent Facebook Picture Makers for 2024
- In 2024, Slow Motion Video Playback on VLC A Beginners Guide
- Overview of the Best Itel P40+ Screen Mirroring App | Dr.fone
- In 2024, Elevate Your Event Planning with These Top Video Invitation Apps
- How To Update or Downgrade iPhone 12 Pro Max? | Dr.fone
- [Updated] The Slippery Slope of Simulated Support, Instagram Style for 2024
- In 2024, How To Open Your iPhone 11 Without a Home Button
- How to sign a PDF v1.1 document with digital signature software
- [New] Discovering the Finest Mac Screen Capture Software for 2024
- In 2024, 4 Ways to Transfer Music from Poco X5 to iPhone | Dr.fone
- [New] In 2024, Chuckle Cache Unearthing Humor in Twitters Feeds
- New The Ultimate List of Free Online Subtitle Creation Tools for 2024
- [Updated] Bring Back Disappearing Video Icon on FB Watch
- In 2024, Ultimate Guide on Apple iPhone 6s Plus iCloud Activation Lock Bypass
- [Updated] In 2024, Achieve Flawless Video for Instagram Perfection
- [Updated] 2024 Approved Top 5 Innovative Mac Capturing Solutions, Moving Past Bandicam
- Title: Advanced Techniques to Save Snapchat Stories on Devices for 2024
- Author: Scott
- Created at : 2024-05-23 09:44:35
- Updated at : 2024-05-24 09:44:35
- Link: https://snapchat-videos.techidaily.com/advanced-techniques-to-save-snapchat-stories-on-devices-for-2024/
- License: This work is licensed under CC BY-NC-SA 4.0.
