
"2024 Approved The Ultimate Guide to Seamless Snapchat Lens Creation"
The Ultimate Guide to Seamless Snapchat Lens Creation
How to Create Snapchat Lenses Easily: 2 Methods
 PaperScan Professional: PaperScan Scanner Software is a powerful TWAIN & WIA scanning application centered on one idea: making document acquisition an unparalleled easy task for anyone.
Ollie Mattison
Mar 27, 2024• Proven solutions
Are you feeling like creating your own Snapchat lens, so you can have an even better experience with the app? The good news is that two new Snapchat tools have been released – the Lens Studio and Create Your Own Lens applications.
If you are a regular Snapchat user, you may want to learn about the Snapchat lens and how it can help you. We will help you get started. Here is our step by step guide on how to make Snapchat lenses.
- Part1: Comparing Lens Studio and Creating Your Own Lens
- Part2: How to Use Lens Studio
- Part3: How to Create Snapchat Lenses Using Create Your Own Lens

Part 1: Comparing Lens Studio and Creating Your Own Lens
The two programs that we are highlighting today are Lens Studio and Create Your Own Lens. These are both fantastic programs for creating your own Snapchat lens, but they do have slightly different uses. If you are the type of person who wants to design a professional Snapchat lens, you are going to prefer Lens Studio.
But if you are hoping to come up with something creative that you can share with your friends and family, then you may love Create Your Own Lens. It is a very easy program to use, and it offers a ton of features that you may be surprised to see.
Snapchat lenses is for fun
The beauty of Snapchat lenses is that you can now create your own environment, which you can use each time you are taking photos or videos. Sure, you can always use the filters that are already available in the application, but not everyone would find those enough.
If you want some customization, or you just want to mess around until you get the filter that makes sense for you, Snapchat lenses are the way to go.

Lens Studio is for business
Lens Studio is perfect for businesses that may want to create unique environments for their clients, or the times when they are releasing company Snapchat posts. Say the company is hosting an event. They may want a custom graphic for that event, which is used for all the pictures and videos posted to Snapchat about the event. Using Lens Studio lets them do that with ease.
Create Your Own Lens is great when you are going to a special event, birthday party or graduating, and you want a special graphic that comes up in all your snaps. It is very intuitive to use, and is available through the App Store as a download.
 KoolReport Pro is an advanced solution for creating data reports and dashboards in PHP. Equipped with all extended packages , KoolReport Pro is able to connect to various datasources, perform advanced data analysis, construct stunning charts and graphs and export your beautiful work to PDF, Excel, JPG or other formats. Plus, it includes powerful built-in reports such as pivot report and drill-down report which will save your time in building ones.
 It will help you to write dynamic data reports easily, to construct intuitive dashboards or to build a whole business intelligence cockpit.
KoolReport Pro package goes with Full Source Code, Royal Free, ONE (1) Year Priority Support, ONE (1) Year Free Upgrade and 30-Days Money Back Guarantee.
Developer License allows Single Developer to create Unlimited Reports, deploy on Unlimited Servers and able deliver the work to Unlimited Clients.
Part 2: How to Use Lens Studio
1. Download Lens Studio
The first step involves downloading Lens Studio, which you can do from your computer. It is compatible with both Windows and Mac computers, and will run on any semi-modern system. According to the Snapchat team, Lens Studio is similar to the program used by their AR teams to create lenses. That means you are getting similar functionality, but with an easier to manage interface.
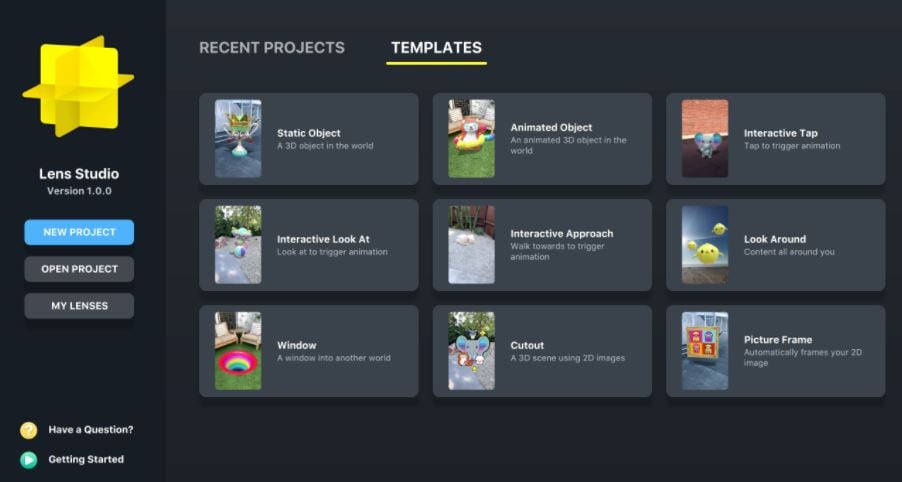
2. Choose Templates Page
It is normal to feel a little overwhelmed the first time you try and use this program. But that is why the templates page is so great. You can select from templates depending on the type of lens that you are hoping to create. You can just use a template, or you can incorporate your own ideas to customize the template.
There is also a Lens Studio Overview guide that you can access online, which will help you get acquainted with the program’s various features and quirks.
 Project Manager - Asset Browser for 3Ds Max
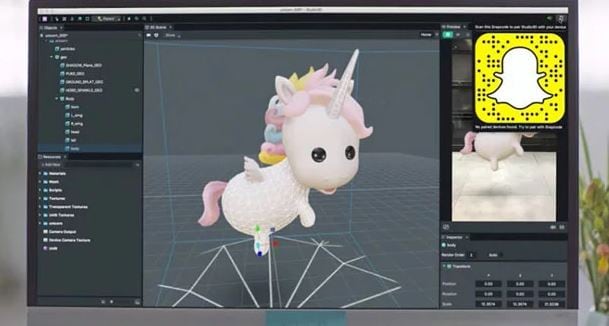
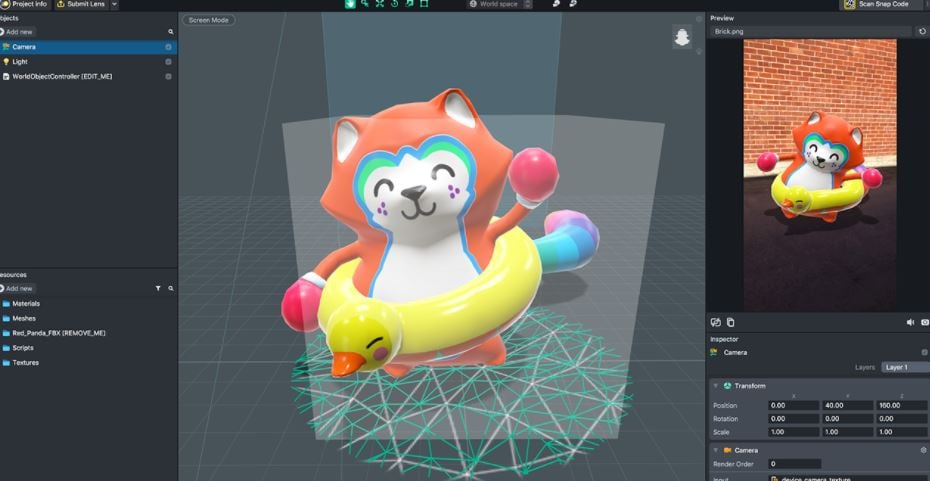
3. Use Studio Panels
Are you ready to create your own custom Snapchat lens? It is time to head over to Studio Panels on the application. This is the area where you can add your own 2D or 3D objects, and you can visualize how they would look as a Snapchat filter. You can add, remove, resize and drag objects to specific areas of the screen.
There are other tools accessible from the Resources panel. You can use these tools to ensure that your Snapchat lens is exactly as you want.
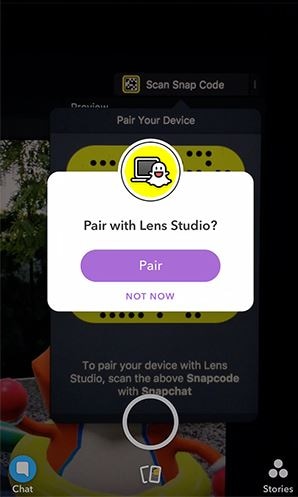
4. Preview the Snapchat Lens You Create
The great thing about this application is that you can preview the lens before you send it out to your phone. When you are satisfied with the image on the preview, you can pair your phone with the application, and you will be able to send that Snapchat lens onto your phone through your Snapcode. It is that simple!


Part 3: How to Create Snapchat Lenses Using Create Your Own Lens
- There are two ways that you can access the tool for creating fun Snapchat lenses. You can either visit the website snapchat.com/create, or you can go on the “filters and lenses” section on your iOS device. If you are using Snapchat on an Android device, you will only have the option for the website. But the feature is coming to the Android version of Snapchat very soon.
- When you are in the application or on the website, you may start to look at the different templates for Snapchat lenses. Now you can add other items into the templates, such as photographs, text or graphics.
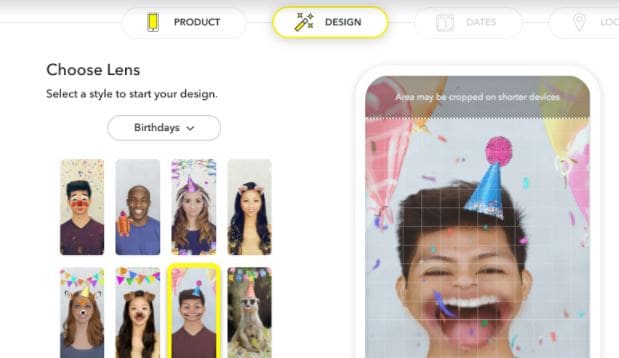
It is all up to your imagination. You can create the perfect Snapchat lens, which you can then send into your Snapchat account through your Snapcode. Of course, if you are using your iOS device to create the lens, it is already linked to your account.
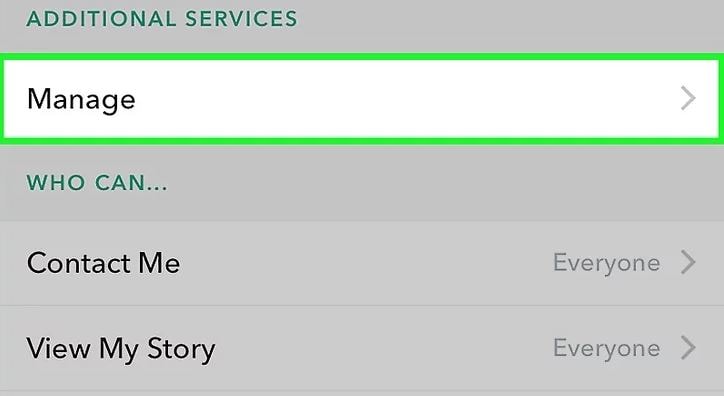
Another cool feature is how you can set the location for where the Snapchat lens is available. Say you are hosting a party. You can have the Snapchat lens available to everyone who uses Snapchat within a set square footage of your home. That is an amazing way to let everyone share social media pictures and photos of your party, through the lens you created.

WPS Office Premium ( File Recovery, Photo Scanning, Convert PDF)–Yearly
Conclusion
Creating Snapchat lenses has never been easier. Whether you are a business looking to add a custom lens, or you just want to create a fun lens for a graduation or party, there are tools that make the job very easy. Using these tools will allow you to create the perfect Snapchat lens for any occasion.
Ollie Mattison
Ollie Mattison is a writer and a lover of all things video.
Follow @Ollie Mattison
Ollie Mattison
Mar 27, 2024• Proven solutions
Are you feeling like creating your own Snapchat lens, so you can have an even better experience with the app? The good news is that two new Snapchat tools have been released – the Lens Studio and Create Your Own Lens applications.
If you are a regular Snapchat user, you may want to learn about the Snapchat lens and how it can help you. We will help you get started. Here is our step by step guide on how to make Snapchat lenses.
- Part1: Comparing Lens Studio and Creating Your Own Lens
- Part2: How to Use Lens Studio
- Part3: How to Create Snapchat Lenses Using Create Your Own Lens

Part 1: Comparing Lens Studio and Creating Your Own Lens
The two programs that we are highlighting today are Lens Studio and Create Your Own Lens. These are both fantastic programs for creating your own Snapchat lens, but they do have slightly different uses. If you are the type of person who wants to design a professional Snapchat lens, you are going to prefer Lens Studio.
But if you are hoping to come up with something creative that you can share with your friends and family, then you may love Create Your Own Lens. It is a very easy program to use, and it offers a ton of features that you may be surprised to see.
Snapchat lenses is for fun
The beauty of Snapchat lenses is that you can now create your own environment, which you can use each time you are taking photos or videos. Sure, you can always use the filters that are already available in the application, but not everyone would find those enough.
If you want some customization, or you just want to mess around until you get the filter that makes sense for you, Snapchat lenses are the way to go.
 vMix 4K - Software based live production. vMix 4K includes everything in vMix HD plus 4K support, PTZ control, External/Fullscreen output, 4 Virtual Outputs, 1 Replay, 4 vMix Call, and 2 Recorders.
Lens Studio is for business
Lens Studio is perfect for businesses that may want to create unique environments for their clients, or the times when they are releasing company Snapchat posts. Say the company is hosting an event. They may want a custom graphic for that event, which is used for all the pictures and videos posted to Snapchat about the event. Using Lens Studio lets them do that with ease.
Create Your Own Lens is great when you are going to a special event, birthday party or graduating, and you want a special graphic that comes up in all your snaps. It is very intuitive to use, and is available through the App Store as a download.

Part 2: How to Use Lens Studio
1. Download Lens Studio
The first step involves downloading Lens Studio, which you can do from your computer. It is compatible with both Windows and Mac computers, and will run on any semi-modern system. According to the Snapchat team, Lens Studio is similar to the program used by their AR teams to create lenses. That means you are getting similar functionality, but with an easier to manage interface.
2. Choose Templates Page
It is normal to feel a little overwhelmed the first time you try and use this program. But that is why the templates page is so great. You can select from templates depending on the type of lens that you are hoping to create. You can just use a template, or you can incorporate your own ideas to customize the template.
There is also a Lens Studio Overview guide that you can access online, which will help you get acquainted with the program’s various features and quirks.
3. Use Studio Panels
Are you ready to create your own custom Snapchat lens? It is time to head over to Studio Panels on the application. This is the area where you can add your own 2D or 3D objects, and you can visualize how they would look as a Snapchat filter. You can add, remove, resize and drag objects to specific areas of the screen.
There are other tools accessible from the Resources panel. You can use these tools to ensure that your Snapchat lens is exactly as you want.

4. Preview the Snapchat Lens You Create
The great thing about this application is that you can preview the lens before you send it out to your phone. When you are satisfied with the image on the preview, you can pair your phone with the application, and you will be able to send that Snapchat lens onto your phone through your Snapcode. It is that simple!
Part 3: How to Create Snapchat Lenses Using Create Your Own Lens
- There are two ways that you can access the tool for creating fun Snapchat lenses. You can either visit the website snapchat.com/create, or you can go on the “filters and lenses” section on your iOS device. If you are using Snapchat on an Android device, you will only have the option for the website. But the feature is coming to the Android version of Snapchat very soon.
- When you are in the application or on the website, you may start to look at the different templates for Snapchat lenses. Now you can add other items into the templates, such as photographs, text or graphics.
It is all up to your imagination. You can create the perfect Snapchat lens, which you can then send into your Snapchat account through your Snapcode. Of course, if you are using your iOS device to create the lens, it is already linked to your account.
Another cool feature is how you can set the location for where the Snapchat lens is available. Say you are hosting a party. You can have the Snapchat lens available to everyone who uses Snapchat within a set square footage of your home. That is an amazing way to let everyone share social media pictures and photos of your party, through the lens you created.
Conclusion
Creating Snapchat lenses has never been easier. Whether you are a business looking to add a custom lens, or you just want to create a fun lens for a graduation or party, there are tools that make the job very easy. Using these tools will allow you to create the perfect Snapchat lens for any occasion.
Ollie Mattison
Ollie Mattison is a writer and a lover of all things video.
Follow @Ollie Mattison
Ollie Mattison
Mar 27, 2024• Proven solutions
Are you feeling like creating your own Snapchat lens, so you can have an even better experience with the app? The good news is that two new Snapchat tools have been released – the Lens Studio and Create Your Own Lens applications.
If you are a regular Snapchat user, you may want to learn about the Snapchat lens and how it can help you. We will help you get started. Here is our step by step guide on how to make Snapchat lenses.
- Part1: Comparing Lens Studio and Creating Your Own Lens
- Part2: How to Use Lens Studio
- Part3: How to Create Snapchat Lenses Using Create Your Own Lens
Part 1: Comparing Lens Studio and Creating Your Own Lens
The two programs that we are highlighting today are Lens Studio and Create Your Own Lens. These are both fantastic programs for creating your own Snapchat lens, but they do have slightly different uses. If you are the type of person who wants to design a professional Snapchat lens, you are going to prefer Lens Studio.
But if you are hoping to come up with something creative that you can share with your friends and family, then you may love Create Your Own Lens. It is a very easy program to use, and it offers a ton of features that you may be surprised to see.
Snapchat lenses is for fun
The beauty of Snapchat lenses is that you can now create your own environment, which you can use each time you are taking photos or videos. Sure, you can always use the filters that are already available in the application, but not everyone would find those enough.
If you want some customization, or you just want to mess around until you get the filter that makes sense for you, Snapchat lenses are the way to go.
Lens Studio is for business
Lens Studio is perfect for businesses that may want to create unique environments for their clients, or the times when they are releasing company Snapchat posts. Say the company is hosting an event. They may want a custom graphic for that event, which is used for all the pictures and videos posted to Snapchat about the event. Using Lens Studio lets them do that with ease.
Create Your Own Lens is great when you are going to a special event, birthday party or graduating, and you want a special graphic that comes up in all your snaps. It is very intuitive to use, and is available through the App Store as a download.
Part 2: How to Use Lens Studio
1. Download Lens Studio
The first step involves downloading Lens Studio, which you can do from your computer. It is compatible with both Windows and Mac computers, and will run on any semi-modern system. According to the Snapchat team, Lens Studio is similar to the program used by their AR teams to create lenses. That means you are getting similar functionality, but with an easier to manage interface.
2. Choose Templates Page
It is normal to feel a little overwhelmed the first time you try and use this program. But that is why the templates page is so great. You can select from templates depending on the type of lens that you are hoping to create. You can just use a template, or you can incorporate your own ideas to customize the template.
There is also a Lens Studio Overview guide that you can access online, which will help you get acquainted with the program’s various features and quirks.
3. Use Studio Panels
Are you ready to create your own custom Snapchat lens? It is time to head over to Studio Panels on the application. This is the area where you can add your own 2D or 3D objects, and you can visualize how they would look as a Snapchat filter. You can add, remove, resize and drag objects to specific areas of the screen.
There are other tools accessible from the Resources panel. You can use these tools to ensure that your Snapchat lens is exactly as you want.
4. Preview the Snapchat Lens You Create
The great thing about this application is that you can preview the lens before you send it out to your phone. When you are satisfied with the image on the preview, you can pair your phone with the application, and you will be able to send that Snapchat lens onto your phone through your Snapcode. It is that simple!

Part 3: How to Create Snapchat Lenses Using Create Your Own Lens
- There are two ways that you can access the tool for creating fun Snapchat lenses. You can either visit the website snapchat.com/create, or you can go on the “filters and lenses” section on your iOS device. If you are using Snapchat on an Android device, you will only have the option for the website. But the feature is coming to the Android version of Snapchat very soon.
- When you are in the application or on the website, you may start to look at the different templates for Snapchat lenses. Now you can add other items into the templates, such as photographs, text or graphics.
It is all up to your imagination. You can create the perfect Snapchat lens, which you can then send into your Snapchat account through your Snapcode. Of course, if you are using your iOS device to create the lens, it is already linked to your account.
Another cool feature is how you can set the location for where the Snapchat lens is available. Say you are hosting a party. You can have the Snapchat lens available to everyone who uses Snapchat within a set square footage of your home. That is an amazing way to let everyone share social media pictures and photos of your party, through the lens you created.
Conclusion
Creating Snapchat lenses has never been easier. Whether you are a business looking to add a custom lens, or you just want to create a fun lens for a graduation or party, there are tools that make the job very easy. Using these tools will allow you to create the perfect Snapchat lens for any occasion.
Ollie Mattison
Ollie Mattison is a writer and a lover of all things video.
Follow @Ollie Mattison
Ollie Mattison
Mar 27, 2024• Proven solutions
Are you feeling like creating your own Snapchat lens, so you can have an even better experience with the app? The good news is that two new Snapchat tools have been released – the Lens Studio and Create Your Own Lens applications.
If you are a regular Snapchat user, you may want to learn about the Snapchat lens and how it can help you. We will help you get started. Here is our step by step guide on how to make Snapchat lenses.
- Part1: Comparing Lens Studio and Creating Your Own Lens
- Part2: How to Use Lens Studio
- Part3: How to Create Snapchat Lenses Using Create Your Own Lens
Part 1: Comparing Lens Studio and Creating Your Own Lens
The two programs that we are highlighting today are Lens Studio and Create Your Own Lens. These are both fantastic programs for creating your own Snapchat lens, but they do have slightly different uses. If you are the type of person who wants to design a professional Snapchat lens, you are going to prefer Lens Studio.
But if you are hoping to come up with something creative that you can share with your friends and family, then you may love Create Your Own Lens. It is a very easy program to use, and it offers a ton of features that you may be surprised to see.
Snapchat lenses is for fun
The beauty of Snapchat lenses is that you can now create your own environment, which you can use each time you are taking photos or videos. Sure, you can always use the filters that are already available in the application, but not everyone would find those enough.
If you want some customization, or you just want to mess around until you get the filter that makes sense for you, Snapchat lenses are the way to go.

Lens Studio is for business
Lens Studio is perfect for businesses that may want to create unique environments for their clients, or the times when they are releasing company Snapchat posts. Say the company is hosting an event. They may want a custom graphic for that event, which is used for all the pictures and videos posted to Snapchat about the event. Using Lens Studio lets them do that with ease.
Create Your Own Lens is great when you are going to a special event, birthday party or graduating, and you want a special graphic that comes up in all your snaps. It is very intuitive to use, and is available through the App Store as a download.
Part 2: How to Use Lens Studio
1. Download Lens Studio
The first step involves downloading Lens Studio, which you can do from your computer. It is compatible with both Windows and Mac computers, and will run on any semi-modern system. According to the Snapchat team, Lens Studio is similar to the program used by their AR teams to create lenses. That means you are getting similar functionality, but with an easier to manage interface.
2. Choose Templates Page
It is normal to feel a little overwhelmed the first time you try and use this program. But that is why the templates page is so great. You can select from templates depending on the type of lens that you are hoping to create. You can just use a template, or you can incorporate your own ideas to customize the template.
There is also a Lens Studio Overview guide that you can access online, which will help you get acquainted with the program’s various features and quirks.
3. Use Studio Panels
Are you ready to create your own custom Snapchat lens? It is time to head over to Studio Panels on the application. This is the area where you can add your own 2D or 3D objects, and you can visualize how they would look as a Snapchat filter. You can add, remove, resize and drag objects to specific areas of the screen.
There are other tools accessible from the Resources panel. You can use these tools to ensure that your Snapchat lens is exactly as you want.
 Video Converter Factory Pro
4. Preview the Snapchat Lens You Create
The great thing about this application is that you can preview the lens before you send it out to your phone. When you are satisfied with the image on the preview, you can pair your phone with the application, and you will be able to send that Snapchat lens onto your phone through your Snapcode. It is that simple!
Part 3: How to Create Snapchat Lenses Using Create Your Own Lens
- There are two ways that you can access the tool for creating fun Snapchat lenses. You can either visit the website snapchat.com/create, or you can go on the “filters and lenses” section on your iOS device. If you are using Snapchat on an Android device, you will only have the option for the website. But the feature is coming to the Android version of Snapchat very soon.
- When you are in the application or on the website, you may start to look at the different templates for Snapchat lenses. Now you can add other items into the templates, such as photographs, text or graphics.
It is all up to your imagination. You can create the perfect Snapchat lens, which you can then send into your Snapchat account through your Snapcode. Of course, if you are using your iOS device to create the lens, it is already linked to your account.
Another cool feature is how you can set the location for where the Snapchat lens is available. Say you are hosting a party. You can have the Snapchat lens available to everyone who uses Snapchat within a set square footage of your home. That is an amazing way to let everyone share social media pictures and photos of your party, through the lens you created.
Conclusion
Creating Snapchat lenses has never been easier. Whether you are a business looking to add a custom lens, or you just want to create a fun lens for a graduation or party, there are tools that make the job very easy. Using these tools will allow you to create the perfect Snapchat lens for any occasion.
Ollie Mattison
Ollie Mattison is a writer and a lover of all things video.
Follow @Ollie Mattison
Expertise in Ease: Simplifying Complex Snapchat Filters
The Ultimate Guide of Snapchat Filters
Ollie Mattison
Mar 27, 2024• Proven solutions
Snapchat is getting widely popular with its interesting, beautiful and yes, hilarious filters. Understanding how to use the best Snapchat filters, as well as unleashing the Snapchat hidden filters would make the pictures super attractive. Not just this, you can also enjoy using those funny filters, especially those with automated voice.
Well! This interesting social media app is all about creative and chuckle-some filters, that garnered a huge fan following. We, through this article are going to show you how to use the various amusing filters of Snapchat.
- Part1: How to use Snapchat filters
- Part2: Best Snapchat filters people prefer to use
- Part3: How to find Snapchat hidden filters
Part 1: How to use Snapchat filters
With their plethora of features these filters add so much fun to your pictures. To get the best out of Snapchat filters, let’s divulge deeper. Here we have explained the basic steps as how to make use of these filters.
Step 1: Tap the camera screen to activate filters
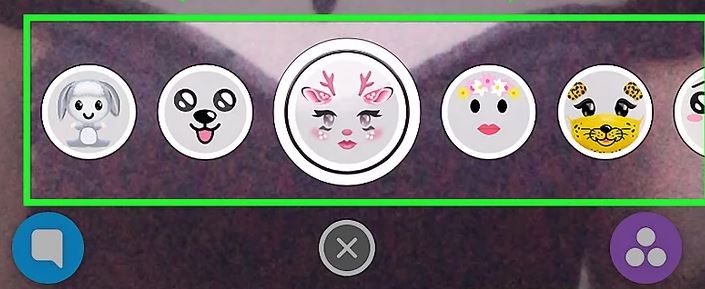
Login to your Snapchat account using the credentials and launch the Snapchat camera. Tap the camera once to activate the filters. Now, you can see the filters show up adjacent to the camera button. Swipe them right or left to choose a desired filter and pose as instructed.
Step 2: Capture a snap
Once you have selected the filter, you can tap the camera button once to click a snap, or hold the camera button in case you want to record a video with that filter.
Step 3: Choose filters
The best part about Snapchat filters is, you not only can use them while clicking a picture, but can also add filters post clicking picture. There are 2 ways to select filters after clicking your picture.
- As soon as you are done clicking a snap, slide the screen to left and you can find the latest filters. Choose whatever filters from the list catches your fancy.
- If you are not happy with these filters from option ‘a’, then don’t get sad. We have a lot more for you, like a set of secret Snapchat filters. After clicking the picture you will see a ‘smiley icon’ on the right side of the screen. Tap the ‘smiley icon’ and then scroll up or down to pick the most enchanting filter for you.
Once you are done finalizing the effects (filters), you can save or share the snap.

Step 4: Share your work
After snapping an interesting picture of you or a loved one, now it’s time to share it on Snapchat. You can either send them directly to your contacts on Snapchat or share it as a story.
- Tap the ‘Send to’ button to send it as a personal snap to your friends. When the list appears tap on the respective names and then click ‘Send’.
- To share it as a story, you can tap the ‘My Story’ tab and then the ‘Send’ button. There is another feature called ‘Our Story’, select it and then ‘Send’.
Note: ‘Our Story’ images are shared with the world, and they are pinned to the map for your location. It is searchable over the internet on or off Snapchat.
Read More to Get : How to Screenshot on Snapchat without Them Knowing >>
Part 2: Best Snapchat filters people prefer to use
After experimenting on the varied range of selfie-enhancing filters on Snapchat, our team rated these 5 Snapchat filters as the best ones. If you haven’t explored the galore of humorous filters yet, then here is the chance to snap and get entertained –
Rainbow Vomit
This funny filter from Snapchat is worth trying. This filter in fact inspired plenty of people to get their chins painted with rainbows on Halloween. AR (Augmented Reality) filters from Snapchat have stepped ahead to allow such magic like features. When you open your mouth in selfie mode, a rainbow comes out of your mouth.
Puppy
There is nobody who would say that they don’t like this Puppy filter. It’s icing on the cake for those dog lovers. When you click or record a Snap using this filter, you can see the puppy ears, puppy nose, and an interactive tongue that makes your Snap super cute. Moreover, you can twin with your BFF using this cutesy puppy filter and share the fun.
Face Swap
Have you tried this nightmarish filter yet? If you are a fantasy lover and love to try stuffs straight out of dreams, then try this filter with a friend. The smart technology in this filter swaps your face with the friend in frame with you. Your face gets masked on your friend’s face, and vise-a-versa.
Flower Crown
We personally are in awe with this beautiful filter from Snapchat. One of the best Snapchat filters, that adorned Snapchat stories and profile pictures of other social media sites as well. This basic filter from Snapchat makes your skin look flawless, adding an instant glow to your picture and enhancing your eyes. The floral crown does the added magical effect to your looks. Like the Puppy filter, you can share screen with your BFF and pose as the flower angels.
Bearded Filters
This filter is really funny for people without beard, more fun for the ladies. Pose as a beard pirate with that mysterious stubble and moustache and up the fun quotient.

Part 3: How to find Snapchat hidden filters
Well, if you want to explore more filters from Snapchat, then we have this amazing solution for you. You can unlock secret Snapchat filters through a Snapcode. Either a hyperlink or a photo can unlock a code and allow you to use interesting filters in your Snaps. Here are the steps –
Step 1: Find Snapcode
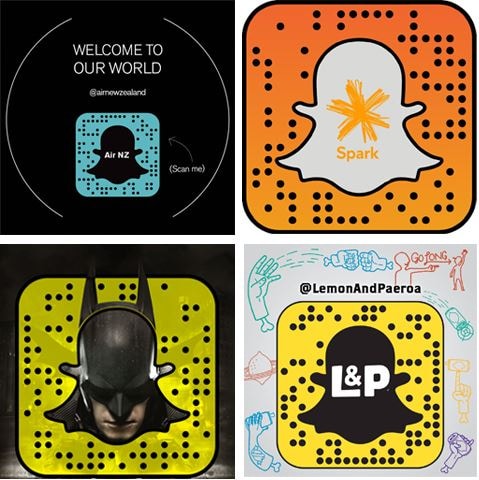
Firstly, What is Snapcode exactly? A Snapcode is nothing but a Snapchat version of a QR code, as well as a hyperlink. Using such Snapcodes you unlock third-party filters with a lot of AR effects to pep-up your fun quotient.
There are multiple ways to find a Snapcode. It can be integrated with a picture, a hyperlink or within a tweet. You can find it by paying a close look. There are multiple sites over the internet which can allow you to use these hidden filters.

Step 2: Open Snapcode
You can open a Snapcode pretty easily, as the process is very user-friendly. Locate a Snapcode using a hyperlink, tweet, or in a picture. You download the filter by clicking the picture with the Snapcode, using the Snapchat camera, or browsing the hyperlink on your mobile phone. In your view finder, you need to long-press on the Snapcode till it gets recognized by the phone.
.png) Kanto Player Professional
Kanto Player Professional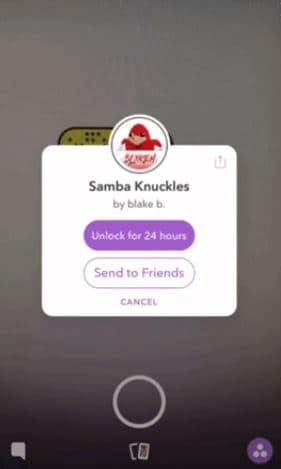
Step 3: Unlock hidden Snapcode
As soon as you snap the picture, it will get the filter activated for 24 hours on your Snapchat you will be prompted with a pop-up saying ‘Unlock for 24 hours’. Click on it to unlock the secret Snapchat filters. You can also send it to your friends.

Final Verdict
We are positive that this article has helped you uncover plenty of features in Snapchat. Apart from how to use Snapchat filters, you also got a fair idea about how to unlock Snapchat hidden filters. So, what are waiting for? Pick your mobile and start Snapping.
Images come from the Internet
Ollie Mattison
Ollie Mattison is a writer and a lover of all things video.
Follow @Ollie Mattison
Ollie Mattison
Mar 27, 2024• Proven solutions
Snapchat is getting widely popular with its interesting, beautiful and yes, hilarious filters. Understanding how to use the best Snapchat filters, as well as unleashing the Snapchat hidden filters would make the pictures super attractive. Not just this, you can also enjoy using those funny filters, especially those with automated voice.
Well! This interesting social media app is all about creative and chuckle-some filters, that garnered a huge fan following. We, through this article are going to show you how to use the various amusing filters of Snapchat.
- Part1: How to use Snapchat filters
- Part2: Best Snapchat filters people prefer to use
- Part3: How to find Snapchat hidden filters
Part 1: How to use Snapchat filters
With their plethora of features these filters add so much fun to your pictures. To get the best out of Snapchat filters, let’s divulge deeper. Here we have explained the basic steps as how to make use of these filters.
Step 1: Tap the camera screen to activate filters
Login to your Snapchat account using the credentials and launch the Snapchat camera. Tap the camera once to activate the filters. Now, you can see the filters show up adjacent to the camera button. Swipe them right or left to choose a desired filter and pose as instructed.
 Easy GIF Animator is a powerful animated GIF editor and the top tool for creating animated pictures, banners, buttons and GIF videos. You get extensive animation editing features, animation effects, unmatched image quality and optimization for the web. No other GIF animation software matches our features and ease of use, that’s why Easy GIF Animator is so popular.
Step 2: Capture a snap
Once you have selected the filter, you can tap the camera button once to click a snap, or hold the camera button in case you want to record a video with that filter.
Step 3: Choose filters
The best part about Snapchat filters is, you not only can use them while clicking a picture, but can also add filters post clicking picture. There are 2 ways to select filters after clicking your picture.
- As soon as you are done clicking a snap, slide the screen to left and you can find the latest filters. Choose whatever filters from the list catches your fancy.
- If you are not happy with these filters from option ‘a’, then don’t get sad. We have a lot more for you, like a set of secret Snapchat filters. After clicking the picture you will see a ‘smiley icon’ on the right side of the screen. Tap the ‘smiley icon’ and then scroll up or down to pick the most enchanting filter for you.
Once you are done finalizing the effects (filters), you can save or share the snap.
Step 4: Share your work
After snapping an interesting picture of you or a loved one, now it’s time to share it on Snapchat. You can either send them directly to your contacts on Snapchat or share it as a story.
- Tap the ‘Send to’ button to send it as a personal snap to your friends. When the list appears tap on the respective names and then click ‘Send’.
- To share it as a story, you can tap the ‘My Story’ tab and then the ‘Send’ button. There is another feature called ‘Our Story’, select it and then ‘Send’.
Note: ‘Our Story’ images are shared with the world, and they are pinned to the map for your location. It is searchable over the internet on or off Snapchat.
Read More to Get : How to Screenshot on Snapchat without Them Knowing >>
Part 2: Best Snapchat filters people prefer to use
After experimenting on the varied range of selfie-enhancing filters on Snapchat, our team rated these 5 Snapchat filters as the best ones. If you haven’t explored the galore of humorous filters yet, then here is the chance to snap and get entertained –
Rainbow Vomit
This funny filter from Snapchat is worth trying. This filter in fact inspired plenty of people to get their chins painted with rainbows on Halloween. AR (Augmented Reality) filters from Snapchat have stepped ahead to allow such magic like features. When you open your mouth in selfie mode, a rainbow comes out of your mouth.
Puppy
There is nobody who would say that they don’t like this Puppy filter. It’s icing on the cake for those dog lovers. When you click or record a Snap using this filter, you can see the puppy ears, puppy nose, and an interactive tongue that makes your Snap super cute. Moreover, you can twin with your BFF using this cutesy puppy filter and share the fun.
Face Swap
Have you tried this nightmarish filter yet? If you are a fantasy lover and love to try stuffs straight out of dreams, then try this filter with a friend. The smart technology in this filter swaps your face with the friend in frame with you. Your face gets masked on your friend’s face, and vise-a-versa.
Flower Crown
We personally are in awe with this beautiful filter from Snapchat. One of the best Snapchat filters, that adorned Snapchat stories and profile pictures of other social media sites as well. This basic filter from Snapchat makes your skin look flawless, adding an instant glow to your picture and enhancing your eyes. The floral crown does the added magical effect to your looks. Like the Puppy filter, you can share screen with your BFF and pose as the flower angels.
Bearded Filters
This filter is really funny for people without beard, more fun for the ladies. Pose as a beard pirate with that mysterious stubble and moustache and up the fun quotient.

Part 3: How to find Snapchat hidden filters
Well, if you want to explore more filters from Snapchat, then we have this amazing solution for you. You can unlock secret Snapchat filters through a Snapcode. Either a hyperlink or a photo can unlock a code and allow you to use interesting filters in your Snaps. Here are the steps –
Step 1: Find Snapcode
Firstly, What is Snapcode exactly? A Snapcode is nothing but a Snapchat version of a QR code, as well as a hyperlink. Using such Snapcodes you unlock third-party filters with a lot of AR effects to pep-up your fun quotient.
There are multiple ways to find a Snapcode. It can be integrated with a picture, a hyperlink or within a tweet. You can find it by paying a close look. There are multiple sites over the internet which can allow you to use these hidden filters.
Step 2: Open Snapcode
You can open a Snapcode pretty easily, as the process is very user-friendly. Locate a Snapcode using a hyperlink, tweet, or in a picture. You download the filter by clicking the picture with the Snapcode, using the Snapchat camera, or browsing the hyperlink on your mobile phone. In your view finder, you need to long-press on the Snapcode till it gets recognized by the phone.
Step 3: Unlock hidden Snapcode
As soon as you snap the picture, it will get the filter activated for 24 hours on your Snapchat you will be prompted with a pop-up saying ‘Unlock for 24 hours’. Click on it to unlock the secret Snapchat filters. You can also send it to your friends.
Final Verdict
We are positive that this article has helped you uncover plenty of features in Snapchat. Apart from how to use Snapchat filters, you also got a fair idea about how to unlock Snapchat hidden filters. So, what are waiting for? Pick your mobile and start Snapping.
Images come from the Internet
Ollie Mattison
Ollie Mattison is a writer and a lover of all things video.
Follow @Ollie Mattison
Ollie Mattison
Mar 27, 2024• Proven solutions
Snapchat is getting widely popular with its interesting, beautiful and yes, hilarious filters. Understanding how to use the best Snapchat filters, as well as unleashing the Snapchat hidden filters would make the pictures super attractive. Not just this, you can also enjoy using those funny filters, especially those with automated voice.
Well! This interesting social media app is all about creative and chuckle-some filters, that garnered a huge fan following. We, through this article are going to show you how to use the various amusing filters of Snapchat.
- Part1: How to use Snapchat filters
- Part2: Best Snapchat filters people prefer to use
- Part3: How to find Snapchat hidden filters

Part 1: How to use Snapchat filters
With their plethora of features these filters add so much fun to your pictures. To get the best out of Snapchat filters, let’s divulge deeper. Here we have explained the basic steps as how to make use of these filters.
Step 1: Tap the camera screen to activate filters
Login to your Snapchat account using the credentials and launch the Snapchat camera. Tap the camera once to activate the filters. Now, you can see the filters show up adjacent to the camera button. Swipe them right or left to choose a desired filter and pose as instructed.
Step 2: Capture a snap
Once you have selected the filter, you can tap the camera button once to click a snap, or hold the camera button in case you want to record a video with that filter.
Step 3: Choose filters
The best part about Snapchat filters is, you not only can use them while clicking a picture, but can also add filters post clicking picture. There are 2 ways to select filters after clicking your picture.
- As soon as you are done clicking a snap, slide the screen to left and you can find the latest filters. Choose whatever filters from the list catches your fancy.
- If you are not happy with these filters from option ‘a’, then don’t get sad. We have a lot more for you, like a set of secret Snapchat filters. After clicking the picture you will see a ‘smiley icon’ on the right side of the screen. Tap the ‘smiley icon’ and then scroll up or down to pick the most enchanting filter for you.
Once you are done finalizing the effects (filters), you can save or share the snap.
Step 4: Share your work
After snapping an interesting picture of you or a loved one, now it’s time to share it on Snapchat. You can either send them directly to your contacts on Snapchat or share it as a story.
- Tap the ‘Send to’ button to send it as a personal snap to your friends. When the list appears tap on the respective names and then click ‘Send’.
- To share it as a story, you can tap the ‘My Story’ tab and then the ‘Send’ button. There is another feature called ‘Our Story’, select it and then ‘Send’.
Note: ‘Our Story’ images are shared with the world, and they are pinned to the map for your location. It is searchable over the internet on or off Snapchat.
Read More to Get : How to Screenshot on Snapchat without Them Knowing >>
Part 2: Best Snapchat filters people prefer to use
After experimenting on the varied range of selfie-enhancing filters on Snapchat, our team rated these 5 Snapchat filters as the best ones. If you haven’t explored the galore of humorous filters yet, then here is the chance to snap and get entertained –
Rainbow Vomit
This funny filter from Snapchat is worth trying. This filter in fact inspired plenty of people to get their chins painted with rainbows on Halloween. AR (Augmented Reality) filters from Snapchat have stepped ahead to allow such magic like features. When you open your mouth in selfie mode, a rainbow comes out of your mouth.
Puppy
There is nobody who would say that they don’t like this Puppy filter. It’s icing on the cake for those dog lovers. When you click or record a Snap using this filter, you can see the puppy ears, puppy nose, and an interactive tongue that makes your Snap super cute. Moreover, you can twin with your BFF using this cutesy puppy filter and share the fun.
Face Swap
Have you tried this nightmarish filter yet? If you are a fantasy lover and love to try stuffs straight out of dreams, then try this filter with a friend. The smart technology in this filter swaps your face with the friend in frame with you. Your face gets masked on your friend’s face, and vise-a-versa.
Flower Crown
We personally are in awe with this beautiful filter from Snapchat. One of the best Snapchat filters, that adorned Snapchat stories and profile pictures of other social media sites as well. This basic filter from Snapchat makes your skin look flawless, adding an instant glow to your picture and enhancing your eyes. The floral crown does the added magical effect to your looks. Like the Puppy filter, you can share screen with your BFF and pose as the flower angels.
Bearded Filters
This filter is really funny for people without beard, more fun for the ladies. Pose as a beard pirate with that mysterious stubble and moustache and up the fun quotient.
 NeoDownloader - Fast and fully automatic image/video/music downloader.
Part 3: How to find Snapchat hidden filters
Well, if you want to explore more filters from Snapchat, then we have this amazing solution for you. You can unlock secret Snapchat filters through a Snapcode. Either a hyperlink or a photo can unlock a code and allow you to use interesting filters in your Snaps. Here are the steps –
Step 1: Find Snapcode
Firstly, What is Snapcode exactly? A Snapcode is nothing but a Snapchat version of a QR code, as well as a hyperlink. Using such Snapcodes you unlock third-party filters with a lot of AR effects to pep-up your fun quotient.
There are multiple ways to find a Snapcode. It can be integrated with a picture, a hyperlink or within a tweet. You can find it by paying a close look. There are multiple sites over the internet which can allow you to use these hidden filters.
Step 2: Open Snapcode
You can open a Snapcode pretty easily, as the process is very user-friendly. Locate a Snapcode using a hyperlink, tweet, or in a picture. You download the filter by clicking the picture with the Snapcode, using the Snapchat camera, or browsing the hyperlink on your mobile phone. In your view finder, you need to long-press on the Snapcode till it gets recognized by the phone.
 The BootIt Collection covers multi-booting, partitioning, and disk imaging on traditional PC’s using the standard BIOS and newer PC’s using UEFI. The collection includes BootIt Bare Metal (BIBM) for standard BIOS systems and BootIt UEFI (BIU) for UEFI system.
Step 3: Unlock hidden Snapcode
As soon as you snap the picture, it will get the filter activated for 24 hours on your Snapchat you will be prompted with a pop-up saying ‘Unlock for 24 hours’. Click on it to unlock the secret Snapchat filters. You can also send it to your friends.
Final Verdict
We are positive that this article has helped you uncover plenty of features in Snapchat. Apart from how to use Snapchat filters, you also got a fair idea about how to unlock Snapchat hidden filters. So, what are waiting for? Pick your mobile and start Snapping.
Images come from the Internet
Ollie Mattison
Ollie Mattison is a writer and a lover of all things video.
Follow @Ollie Mattison
Ollie Mattison
Mar 27, 2024• Proven solutions
Snapchat is getting widely popular with its interesting, beautiful and yes, hilarious filters. Understanding how to use the best Snapchat filters, as well as unleashing the Snapchat hidden filters would make the pictures super attractive. Not just this, you can also enjoy using those funny filters, especially those with automated voice.
Well! This interesting social media app is all about creative and chuckle-some filters, that garnered a huge fan following. We, through this article are going to show you how to use the various amusing filters of Snapchat.
- Part1: How to use Snapchat filters
- Part2: Best Snapchat filters people prefer to use
- Part3: How to find Snapchat hidden filters
 Forex Robotron Gold Package
Part 1: How to use Snapchat filters
With their plethora of features these filters add so much fun to your pictures. To get the best out of Snapchat filters, let’s divulge deeper. Here we have explained the basic steps as how to make use of these filters.
Step 1: Tap the camera screen to activate filters
Login to your Snapchat account using the credentials and launch the Snapchat camera. Tap the camera once to activate the filters. Now, you can see the filters show up adjacent to the camera button. Swipe them right or left to choose a desired filter and pose as instructed.
 Glary Utilities PRO - Premium all-in-one utility to clean, speed up, maintain and protect your PC
Step 2: Capture a snap
Once you have selected the filter, you can tap the camera button once to click a snap, or hold the camera button in case you want to record a video with that filter.
 Allavsoft Batch Download Online Videos, Music Offline to MP4, MP3, MOV, etc format
Step 3: Choose filters
The best part about Snapchat filters is, you not only can use them while clicking a picture, but can also add filters post clicking picture. There are 2 ways to select filters after clicking your picture.
- As soon as you are done clicking a snap, slide the screen to left and you can find the latest filters. Choose whatever filters from the list catches your fancy.
- If you are not happy with these filters from option ‘a’, then don’t get sad. We have a lot more for you, like a set of secret Snapchat filters. After clicking the picture you will see a ‘smiley icon’ on the right side of the screen. Tap the ‘smiley icon’ and then scroll up or down to pick the most enchanting filter for you.
Once you are done finalizing the effects (filters), you can save or share the snap.
Step 4: Share your work
After snapping an interesting picture of you or a loved one, now it’s time to share it on Snapchat. You can either send them directly to your contacts on Snapchat or share it as a story.
- Tap the ‘Send to’ button to send it as a personal snap to your friends. When the list appears tap on the respective names and then click ‘Send’.
- To share it as a story, you can tap the ‘My Story’ tab and then the ‘Send’ button. There is another feature called ‘Our Story’, select it and then ‘Send’.
Note: ‘Our Story’ images are shared with the world, and they are pinned to the map for your location. It is searchable over the internet on or off Snapchat.
Read More to Get : How to Screenshot on Snapchat without Them Knowing >>
Part 2: Best Snapchat filters people prefer to use
After experimenting on the varied range of selfie-enhancing filters on Snapchat, our team rated these 5 Snapchat filters as the best ones. If you haven’t explored the galore of humorous filters yet, then here is the chance to snap and get entertained –
Rainbow Vomit
This funny filter from Snapchat is worth trying. This filter in fact inspired plenty of people to get their chins painted with rainbows on Halloween. AR (Augmented Reality) filters from Snapchat have stepped ahead to allow such magic like features. When you open your mouth in selfie mode, a rainbow comes out of your mouth.
Puppy
There is nobody who would say that they don’t like this Puppy filter. It’s icing on the cake for those dog lovers. When you click or record a Snap using this filter, you can see the puppy ears, puppy nose, and an interactive tongue that makes your Snap super cute. Moreover, you can twin with your BFF using this cutesy puppy filter and share the fun.
Face Swap
Have you tried this nightmarish filter yet? If you are a fantasy lover and love to try stuffs straight out of dreams, then try this filter with a friend. The smart technology in this filter swaps your face with the friend in frame with you. Your face gets masked on your friend’s face, and vise-a-versa.
Flower Crown
We personally are in awe with this beautiful filter from Snapchat. One of the best Snapchat filters, that adorned Snapchat stories and profile pictures of other social media sites as well. This basic filter from Snapchat makes your skin look flawless, adding an instant glow to your picture and enhancing your eyes. The floral crown does the added magical effect to your looks. Like the Puppy filter, you can share screen with your BFF and pose as the flower angels.
Bearded Filters
This filter is really funny for people without beard, more fun for the ladies. Pose as a beard pirate with that mysterious stubble and moustache and up the fun quotient.

Part 3: How to find Snapchat hidden filters
Well, if you want to explore more filters from Snapchat, then we have this amazing solution for you. You can unlock secret Snapchat filters through a Snapcode. Either a hyperlink or a photo can unlock a code and allow you to use interesting filters in your Snaps. Here are the steps –
Step 1: Find Snapcode
Firstly, What is Snapcode exactly? A Snapcode is nothing but a Snapchat version of a QR code, as well as a hyperlink. Using such Snapcodes you unlock third-party filters with a lot of AR effects to pep-up your fun quotient.
There are multiple ways to find a Snapcode. It can be integrated with a picture, a hyperlink or within a tweet. You can find it by paying a close look. There are multiple sites over the internet which can allow you to use these hidden filters.
Step 2: Open Snapcode
You can open a Snapcode pretty easily, as the process is very user-friendly. Locate a Snapcode using a hyperlink, tweet, or in a picture. You download the filter by clicking the picture with the Snapcode, using the Snapchat camera, or browsing the hyperlink on your mobile phone. In your view finder, you need to long-press on the Snapcode till it gets recognized by the phone.
Step 3: Unlock hidden Snapcode
As soon as you snap the picture, it will get the filter activated for 24 hours on your Snapchat you will be prompted with a pop-up saying ‘Unlock for 24 hours’. Click on it to unlock the secret Snapchat filters. You can also send it to your friends.
Final Verdict
We are positive that this article has helped you uncover plenty of features in Snapchat. Apart from how to use Snapchat filters, you also got a fair idea about how to unlock Snapchat hidden filters. So, what are waiting for? Pick your mobile and start Snapping.
Images come from the Internet
Ollie Mattison
Ollie Mattison is a writer and a lover of all things video.
Follow @Ollie Mattison
- Title: 2024 Approved The Ultimate Guide to Seamless Snapchat Lens Creation
- Author: Scott
- Created at : 2024-07-25 12:05:44
- Updated at : 2024-07-26 12:05:44
- Link: https://snapchat-videos.techidaily.com/2024-approved-the-ultimate-guide-to-seamless-snapchat-lens-creation/
- License: This work is licensed under CC BY-NC-SA 4.0.