
:max_bytes(150000):strip_icc()/14511925043_956d7ff9af_k-580112be3df78cbc28cc6e94.jpg)
"2024 Approved Elevate Your Social Presence Essential Tips for Sending GIFs on Snapchat"
Elevate Your Social Presence: Essential Tips for Sending GIFs on Snapchat

For all informal interactions between pals, Snapchat is the go-to app. Many configurable options are available on the platform, allowing you to express your inner creative sides. Snapchat helps to put your spin on anything, whether it’s just sharing random photos to your contacts or having extended chats.
The option to add GIFs to Snapchat is one such great feature. Because Snapchat is primarily a picture-sharing app, the emphasis is on making these images as engaging and imaginative as possible, and this is where animated GIFs come to play.
GIF stickers have exploded in popularity and for a good cause. The active emojis are mostly not amusing, but they also give life to your images, making your digital experience better overall.
Given how entertaining GIFs can be, knowing how to send gif on snapchat is essential. As a result, we’ve put up a detailed guide that explains how to send gif on snapchat in four distinct methods. Enjoy!
Do you want to know how to send gif on snapchat in different simple ways? Then you’ve arrived at the correct page. In this post, we’ll show you how to send gif on snapchat in just a few easy and simple steps.
1.How to send gif on snapchat?
- On your phone, open Snapchat.
- Take a picture
- Select the Stickers symbol.
- Select a GIF.
- Choose the GIF you want to use.
- Finally, please include it in the picture.
2.How to make your animated GIFs
GIF means Graphics Interchange Format, and it’s simply a series of moving, dynamic pictures (think Harry Potter) that loop indefinitely. They give your image, which would otherwise be stagnant and dull, a new dimension.
GIFs are so entertaining that they can be used to carry a whole discussion. However, if you want to learn how to make your GIFs, follow the steps below.
You’ll need to utilize the GIPHY application to generate your unique GIFs for this.
On your phone, download the GIPHY app.
- Start the app on your Mobile and select the create option.
- Smile symbol: Take a Photo and Gallery Option are the three options available to you.
- Smile Icon: This option allows you to make GIFs using the edit button.
- Capture a Photo: This option allows the user to take a photo on the scene and convert it to a GIF.
- Option of Gallery: You may build a GIF by selecting a photo from your gallery and editing it.
- Select options and begin designing depending on your preferences.
- When you will finish, click on the arrow in the bottom right-hand corner to exit.
- To save all the GIFs, go to Generated GIFs, touch on the three vertical dots, and choose Save GIF.
That GIF has now been saved to your pictures folder and can be seen anytime you need that.
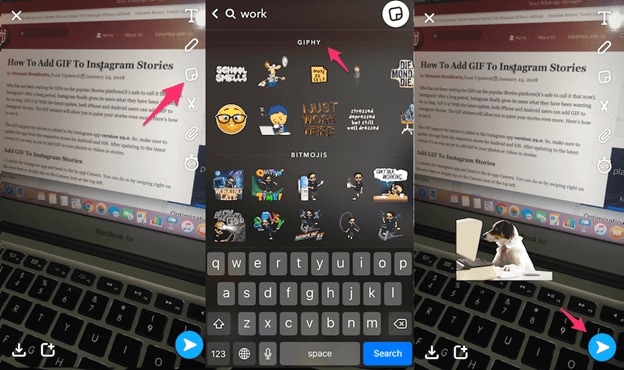
3.What is the best way to transmit GIFs on Snapchat?
Putting GIFs in your photos is easy and takes only a few minutes. Here’s how to accomplish it.
- Log in to your Snapchat account by opening the app on your phone.
- Click a photo or choose an image from your collection to upload.
- Select the sticker button to add extra components to the Snap.
- Choose the GIF choice and any GIF you wish.
- Once you’ve chosen a GIF, it’ll show on the Snap for you to adjust and position anywhere you’d like.
- Lastly, to send the Snap to your pals, select the arrow option in the lower right corner.
4.On Android, how to send gif on snapchat Messages?
You must download the GBoard app on your phone to transfer GIFs to your pals immediately from a keypad on Android.
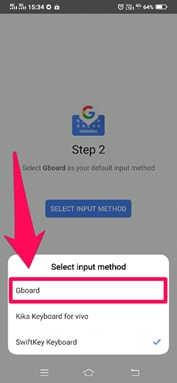
5.How can I get Gboard to work on Android?
To install and activate the Gboard application and transmit GIFs directly from it, follow the procedure.
- Download the Gboard application on your Android.
- Open the app and select Enable in Configurations from the menu.
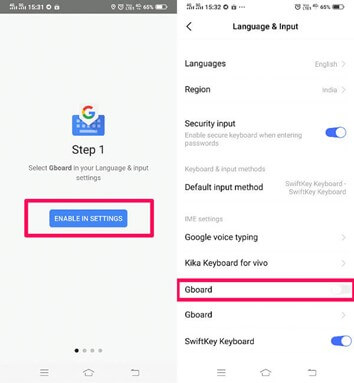
- The Communication and Input menu will appear in Preferences.
- Choose Gboard from the list of available keyboards.
6.In iOS, how to send gif on snapchat Messages?
Using the GIPHY keypad on your iPhone, you can share GIFs straight to your pals via Snapchat chats. However, you must first activate the keypad.
- Turn on the GIPHY keypad on your iPhone. Install the GIPHY phone app from the Apple Store. After you’ve downloaded the app, you’ll need to activate the GIPHY keypad on your iPhone.
- To do just that, go over to the iPhone configuration menu and select “General” from the drop-down menu.
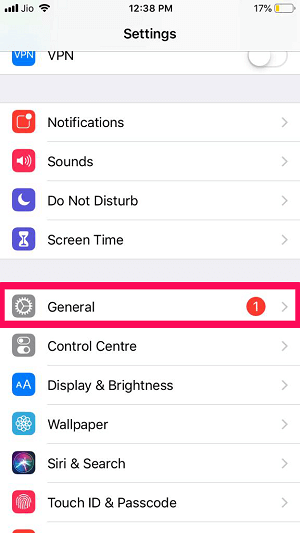
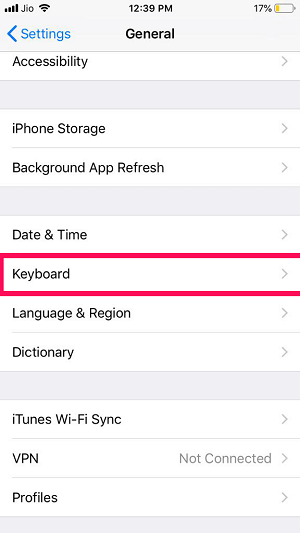
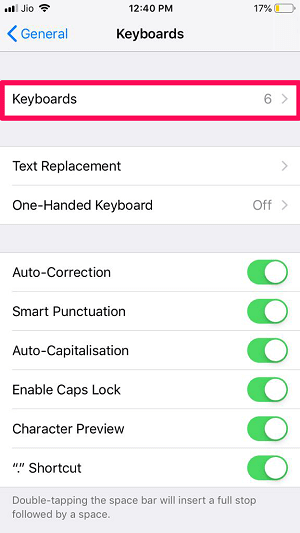
- Scroll to the bottom of the Keypad choice, then click “Keypads” once again.
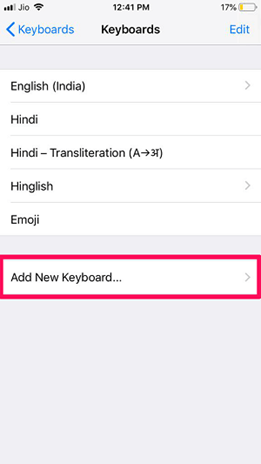
- All of the newly added keyboards will now be visible. Click the “Add Additional Keyboard” option to add GIPHY.
For Win 7 or later (64-bit)
For macOS 10.12 or later
For all informal interactions between pals, Snapchat is the go-to app. Many configurable options are available on the platform, allowing you to express your inner creative sides. Snapchat helps to put your spin on anything, whether it’s just sharing random photos to your contacts or having extended chats.
The option to add GIFs to Snapchat is one such great feature. Because Snapchat is primarily a picture-sharing app, the emphasis is on making these images as engaging and imaginative as possible, and this is where animated GIFs come to play.
GIF stickers have exploded in popularity and for a good cause. The active emojis are mostly not amusing, but they also give life to your images, making your digital experience better overall.
Given how entertaining GIFs can be, knowing how to send gif on snapchat is essential. As a result, we’ve put up a detailed guide that explains how to send gif on snapchat in four distinct methods. Enjoy!
Do you want to know how to send gif on snapchat in different simple ways? Then you’ve arrived at the correct page. In this post, we’ll show you how to send gif on snapchat in just a few easy and simple steps.
1.How to send gif on snapchat?
- On your phone, open Snapchat.
- Take a picture
- Select the Stickers symbol.
- Select a GIF.
- Choose the GIF you want to use.
- Finally, please include it in the picture.
2.How to make your animated GIFs
GIF means Graphics Interchange Format, and it’s simply a series of moving, dynamic pictures (think Harry Potter) that loop indefinitely. They give your image, which would otherwise be stagnant and dull, a new dimension.
GIFs are so entertaining that they can be used to carry a whole discussion. However, if you want to learn how to make your GIFs, follow the steps below.
You’ll need to utilize the GIPHY application to generate your unique GIFs for this.
On your phone, download the GIPHY app.
- Start the app on your Mobile and select the create option.
- Smile symbol: Take a Photo and Gallery Option are the three options available to you.
- Smile Icon: This option allows you to make GIFs using the edit button.
- Capture a Photo: This option allows the user to take a photo on the scene and convert it to a GIF.
- Option of Gallery: You may build a GIF by selecting a photo from your gallery and editing it.
- Select options and begin designing depending on your preferences.
- When you will finish, click on the arrow in the bottom right-hand corner to exit.
- To save all the GIFs, go to Generated GIFs, touch on the three vertical dots, and choose Save GIF.
That GIF has now been saved to your pictures folder and can be seen anytime you need that.
3.What is the best way to transmit GIFs on Snapchat?
Putting GIFs in your photos is easy and takes only a few minutes. Here’s how to accomplish it.
- Log in to your Snapchat account by opening the app on your phone.
- Click a photo or choose an image from your collection to upload.
- Select the sticker button to add extra components to the Snap.
- Choose the GIF choice and any GIF you wish.
- Once you’ve chosen a GIF, it’ll show on the Snap for you to adjust and position anywhere you’d like.
- Lastly, to send the Snap to your pals, select the arrow option in the lower right corner.
4.On Android, how to send gif on snapchat Messages?
You must download the GBoard app on your phone to transfer GIFs to your pals immediately from a keypad on Android.
5.How can I get Gboard to work on Android?
To install and activate the Gboard application and transmit GIFs directly from it, follow the procedure.
- Download the Gboard application on your Android.
- Open the app and select Enable in Configurations from the menu.
- The Communication and Input menu will appear in Preferences.
- Choose Gboard from the list of available keyboards.
6.In iOS, how to send gif on snapchat Messages?
Using the GIPHY keypad on your iPhone, you can share GIFs straight to your pals via Snapchat chats. However, you must first activate the keypad.
- Turn on the GIPHY keypad on your iPhone. Install the GIPHY phone app from the Apple Store. After you’ve downloaded the app, you’ll need to activate the GIPHY keypad on your iPhone.
- To do just that, go over to the iPhone configuration menu and select “General” from the drop-down menu.
- Scroll to the bottom of the Keypad choice, then click “Keypads” once again.
- All of the newly added keyboards will now be visible. Click the “Add Additional Keyboard” option to add GIPHY.
For Win 7 or later (64-bit)
For macOS 10.12 or later
Snapchat Speed Control: A Detailed Walkthrough
Snapchat is an instant messaging app that allows you to share your pictures and videos with your family members, friends, and colleagues. In addition, you can even create your stories in the form of movie clips and share them on the app. These stories remain available for the next 24 hours, after which they are automatically removed from the platform.
While sharing the videos, you can apply several filters that are already present in the app, and Slow Motion is one of them. You may want to learn how to slow down a video on Snapchat when you want to emphasize and draw viewers’ attention toward the scene, or wish to make the audience see your actions closely and in detail.
That said, in the following sections, you will see how to slow down videos on Snapchat, and what other methods you can use to reduce the playback speed more professionally.
In this article
01 How to Add Slow Motion Effects to Video Using the Snapchat App
02 How to Record a Slo-Mo Video and Upload to Snapchat
03 How to Make Flash and Smooth Slo Mo Video for Snapchat
04 FAQs about Slowing Down Snapchat Video
Part 1: How to Add Slow Motion Effects to Video Using the Snapchat App
Snapchat has a built-in Slow Motion filter that reduces the playback speed of a video when applied. You can learn how to slow down on Snapchat by following the instructions that are given below:
Step 1: Record a Video
Launch Snapchat on your smartphone (iPhone 13 Pro Max is used here for illustrations), make sure that the Camera section is selected from the bottom, tap and hold down the Capture button that is present at the lower part of the interface, and let go of it when you are done recording.

Step 2: Apply the Slow Motion Filter
Once the video is recorded, swipe the screen from left to right. Repeat this process until you see the Snail (Slow Motion) icon on the screen. This will reduce the playback speed of the clip.

Step 3: Decorate the Video (Optional)
Use the options present on the upper-right area of the screen to further decorate the video and/or add annotations to it.

Step 4: Share or Publish the Video
Once everything is done, tap Send To from the bottom-right corner to share the video with your family, friends, and colleagues, or publish it as a story that remains available for the next 24 hours.
Related: How to Record Slo-Mo videos on iPhone .
Part 2: How to Record a Slo-Mo Video and Upload to Snapchat
With Snapchat, even though you don’t require any third-party tool to reduce the playback speed of a video, the app has certain limitations. For example, it doesn’t allow you to set a zoom level, you are stuck with the framerate that the app has to offer, etc.
Because of this, many people prefer to use different methods to record a video in slow motion with their preferences, and then upload it to Snapchat. This approach also eliminates the need to swipe the screen several times merely to use a single slow-motion filter.
Fortunately, iPhone has a built-in SLO-MO mode in its Camera app that allows you to capture the videos in slow motion. To learn how to do slow mo on Snapchat with the iPhone’s Camera app, you can follow the instructions that are given below:
Step 1: Get to the iPhone’s SLO-MO Mode
Launch the Camera app on your iPhone (iPhone 13 Pro Max is used here for illustrations), and swipe the screen from left to right until you get to the SLO-MO mode.

Step 2: Set Recording Preferences
Tap the number that is present at the top-right corner (240 here) to toggle between different framerates, tap 1x from the lower-center area, swipe slightly up, and then use the wheel that appears next to define your preferred zoom level.

Step 3: Start and Stop the Recording
Tap the Record button to start the recording, and tap Stop when you’re done.
Note: Make sure that the duration of the recorded video doesn’t exceed 60 seconds.
Step 4: Upload the Slow-Motion Video to Snapchat
After the video is recorded in slow motion, close the Camera app, launch Snapchat, and tap the Gallery icon from the left side of the Capture button on the Camera section. From the Memories screen, go to the Camera Roll tab, and tap to select the video that you recorded in the previous step.
Next, optionally, tap the Edit icon from the bottom-left corner to decorate the video and/or add annotations to it, and follow the process as explained in the previous section to share the clip with your family, friends, or colleagues, or publish it as your story.

Part 3: How to Make Flash and Smooth Slo Mo Video for Snapchat
Although iPhone has the built-in SLO-MO mode that even enables you to set your preferred framerate and zoom level before recording, it still doesn’t allow you to slow down different parts of a video in different speed at your convenience. You can either record the entire video in slow motion or at a normal speed.
This is where a third-party app comes into play. While there are several video editing programs available online, the one of the best slow motion apps that helps you slow down the portions of a video with precision is CapCut.
Downloading and installing CapCut on your iPhone or Android phone is simple, and once it is done, you can follow the process given below to learn how to slow things down on Snapchat:
With CapCut, you can either slow down the whole clip or manage the speed for different segments. This section explains both methods.
Method 1: Slow Down the Whole Clip with CapCut
Step 1: Get to the Speed Panel
Launch CapCut, import the video that you want to slow down, and tap the imported media in the Timeline. Next, tap Speed from the bottom of the interface to get to the next window.

Step 2: Reduce the Speed of the Video
Tap Normal from the bottom of the screen that appears next, and drag the Speed slider to the left to reduce the playback speed. Tap OK from the bottom-right corner to save the changes.

Step 3: Upload the Video to Snapchat
Back on the previous interface, optionally tap Volume from the bottom and reduce the slider to 0 to mute the audio of the footage as it may get distorted due to the reduction in the speed.
Next, tap Share from the top-right corner to save the video on your iPhone, and then use the method explained in the previous section to access the clip from the Gallery within Snapchat for uploading.
Method 2: Reduce the Playback Speed of Different Parts of a Video
Step 1: Get to the Speed Panel
Use the process described in the previous method to get to the Speed panel.
Step 2: Reduce the Speed of Different Parts of the Video
Tap Curve from the bottom of the interface. On the next screen, tap Custom from the lower area, and then tap Edit. From the next panel, drag the beat points down to reduce the speed (or drag them above the line to increase).

Notice that each beat point represents a particular section of the video, and dragging it down reduces the playback speed of that segment. You can even tap anywhere on the line to add a new beat point and drag it down as needed for more precise speed management. Once done, tap OK from the bottom-right corner to save the modifications.

Optionally, you can also tap any of the available presets on the Curve screen to reduce the playback speed of the video accordingly.
Step 3: Upload the Video to Snapchat
Use the method explained in the previous method to export the video, upload it to Snapchat, and share the clip with your family, friends, and colleagues, or publish it as your story.
Part 4: FAQs about Slowing Down Snapchat Video
1. Can I record a slow mo video in Snapchat?
Technically speaking, no, you cannot. However, once you have recorded a video at a normal speed in Snapchat, you can apply the built-in Slow Motion filter to it by swiping the screen from left to right until you see the Snail icon at the center. The Snail icon represents the Slow Motion filter that reduces the playback speed when applied.
2. Besides slow-motion, which speed filters does Snapchat have?
In addition to slow motion Snapchat also has Forward and Fast Forward filters that increase the playback speed. While the Forward filter increases the speed slightly, the Fast Forward one enhances it drastically.
Conclusion
When using an iPhone, even though the SLO-MO mode enables you to record footage in slow motion, you don’t get many options. Therefore, it would be safe to say that it is easy to slow down the speed of a video if you have a dedicated third-party post-production app. However, if you want to go for a convenient method, learning how to slow down a video on Snapchat is an extremely simple and straightforward process.
02 How to Record a Slo-Mo Video and Upload to Snapchat
03 How to Make Flash and Smooth Slo Mo Video for Snapchat
04 FAQs about Slowing Down Snapchat Video
Part 1: How to Add Slow Motion Effects to Video Using the Snapchat App
Snapchat has a built-in Slow Motion filter that reduces the playback speed of a video when applied. You can learn how to slow down on Snapchat by following the instructions that are given below:
Step 1: Record a Video
Launch Snapchat on your smartphone (iPhone 13 Pro Max is used here for illustrations), make sure that the Camera section is selected from the bottom, tap and hold down the Capture button that is present at the lower part of the interface, and let go of it when you are done recording.
Step 2: Apply the Slow Motion Filter
Once the video is recorded, swipe the screen from left to right. Repeat this process until you see the Snail (Slow Motion) icon on the screen. This will reduce the playback speed of the clip.
Step 3: Decorate the Video (Optional)
Use the options present on the upper-right area of the screen to further decorate the video and/or add annotations to it.
Step 4: Share or Publish the Video
Once everything is done, tap Send To from the bottom-right corner to share the video with your family, friends, and colleagues, or publish it as a story that remains available for the next 24 hours.
Related: How to Record Slo-Mo videos on iPhone .
Part 2: How to Record a Slo-Mo Video and Upload to Snapchat
With Snapchat, even though you don’t require any third-party tool to reduce the playback speed of a video, the app has certain limitations. For example, it doesn’t allow you to set a zoom level, you are stuck with the framerate that the app has to offer, etc.
Because of this, many people prefer to use different methods to record a video in slow motion with their preferences, and then upload it to Snapchat. This approach also eliminates the need to swipe the screen several times merely to use a single slow-motion filter.
Fortunately, iPhone has a built-in SLO-MO mode in its Camera app that allows you to capture the videos in slow motion. To learn how to do slow mo on Snapchat with the iPhone’s Camera app, you can follow the instructions that are given below:
Step 1: Get to the iPhone’s SLO-MO Mode
Launch the Camera app on your iPhone (iPhone 13 Pro Max is used here for illustrations), and swipe the screen from left to right until you get to the SLO-MO mode.
Step 2: Set Recording Preferences
Tap the number that is present at the top-right corner (240 here) to toggle between different framerates, tap 1x from the lower-center area, swipe slightly up, and then use the wheel that appears next to define your preferred zoom level.
Step 3: Start and Stop the Recording
Tap the Record button to start the recording, and tap Stop when you’re done.
Note: Make sure that the duration of the recorded video doesn’t exceed 60 seconds.
Step 4: Upload the Slow-Motion Video to Snapchat
After the video is recorded in slow motion, close the Camera app, launch Snapchat, and tap the Gallery icon from the left side of the Capture button on the Camera section. From the Memories screen, go to the Camera Roll tab, and tap to select the video that you recorded in the previous step.
Next, optionally, tap the Edit icon from the bottom-left corner to decorate the video and/or add annotations to it, and follow the process as explained in the previous section to share the clip with your family, friends, or colleagues, or publish it as your story.
Part 3: How to Make Flash and Smooth Slo Mo Video for Snapchat
Although iPhone has the built-in SLO-MO mode that even enables you to set your preferred framerate and zoom level before recording, it still doesn’t allow you to slow down different parts of a video in different speed at your convenience. You can either record the entire video in slow motion or at a normal speed.
This is where a third-party app comes into play. While there are several video editing programs available online, the one of the best slow motion apps that helps you slow down the portions of a video with precision is CapCut.
Downloading and installing CapCut on your iPhone or Android phone is simple, and once it is done, you can follow the process given below to learn how to slow things down on Snapchat:
With CapCut, you can either slow down the whole clip or manage the speed for different segments. This section explains both methods.
Method 1: Slow Down the Whole Clip with CapCut
Step 1: Get to the Speed Panel
Launch CapCut, import the video that you want to slow down, and tap the imported media in the Timeline. Next, tap Speed from the bottom of the interface to get to the next window.
Step 2: Reduce the Speed of the Video
Tap Normal from the bottom of the screen that appears next, and drag the Speed slider to the left to reduce the playback speed. Tap OK from the bottom-right corner to save the changes.
Step 3: Upload the Video to Snapchat
Back on the previous interface, optionally tap Volume from the bottom and reduce the slider to 0 to mute the audio of the footage as it may get distorted due to the reduction in the speed.
Next, tap Share from the top-right corner to save the video on your iPhone, and then use the method explained in the previous section to access the clip from the Gallery within Snapchat for uploading.
Method 2: Reduce the Playback Speed of Different Parts of a Video
Step 1: Get to the Speed Panel
Use the process described in the previous method to get to the Speed panel.
Step 2: Reduce the Speed of Different Parts of the Video
Tap Curve from the bottom of the interface. On the next screen, tap Custom from the lower area, and then tap Edit. From the next panel, drag the beat points down to reduce the speed (or drag them above the line to increase).
Notice that each beat point represents a particular section of the video, and dragging it down reduces the playback speed of that segment. You can even tap anywhere on the line to add a new beat point and drag it down as needed for more precise speed management. Once done, tap OK from the bottom-right corner to save the modifications.
Optionally, you can also tap any of the available presets on the Curve screen to reduce the playback speed of the video accordingly.
Step 3: Upload the Video to Snapchat
Use the method explained in the previous method to export the video, upload it to Snapchat, and share the clip with your family, friends, and colleagues, or publish it as your story.
Part 4: FAQs about Slowing Down Snapchat Video
1. Can I record a slow mo video in Snapchat?
Technically speaking, no, you cannot. However, once you have recorded a video at a normal speed in Snapchat, you can apply the built-in Slow Motion filter to it by swiping the screen from left to right until you see the Snail icon at the center. The Snail icon represents the Slow Motion filter that reduces the playback speed when applied.
2. Besides slow-motion, which speed filters does Snapchat have?
In addition to slow motion Snapchat also has Forward and Fast Forward filters that increase the playback speed. While the Forward filter increases the speed slightly, the Fast Forward one enhances it drastically.
Conclusion
When using an iPhone, even though the SLO-MO mode enables you to record footage in slow motion, you don’t get many options. Therefore, it would be safe to say that it is easy to slow down the speed of a video if you have a dedicated third-party post-production app. However, if you want to go for a convenient method, learning how to slow down a video on Snapchat is an extremely simple and straightforward process.
Also read:
- [New] Want to Send Snaps From Camera Roll? See How It Is Done for 2024
- [Updated] 2024 Approved Quick Save Techniques for Snapchat Memories
- [Updated] Navigating Snapchat's Hidden Story Arena for 2024
- [New] Snap Into Fun Step-by-Step Guide for Adding Gifs in Conversations for 2024
- How to Dial Down the Velocity of Your Snapchat Videos for 2024
- [Updated] Mastering Snap Ad Creation Essential Tips for Impactful Promotion for 2024
- [Updated] Innovative Snapchat Strategies The Ultimate List
- [New] 2024 Approved Efficiently Upgrading Your Snaps on Snapchat
- [Updated] 2024 Approved Capturing Life Easy Guide to Mobile Recording on Snapchat
- [New] Elevate Engagement Crafting High-Impact Snaps for Your Brand for 2024
- [New] A Beginner's Pathway to Innovative Snapchat Expressions
- In 2024, Decoding Displacement Your Snapchat Time-Turner Guide
- [Updated] In 2024, The Ultimate Snapchat GIF Steps for Every User
- [New] 2024 Approved Mastering Visual Narratives Essential Snapchat Video Editors
- [New] 2024 Approved Beyond Basic Filters Elevating Your Snapchat Game
- [Updated] Instantaneous Video & Picture Revival on Snap
- [New] In 2024, Elevate Your Snaps Techniques for Captivating Marketing Visuals
- [New] Optimize Video Playback with Snapchat Tricks for 2024
- [Updated] 2024 Approved Exploring the Future of Social Sharing with TikTok vs Snapchat
- Transform Your Social Media Pics with These Top 20 Snap Filters
- [New] In 2024, How to Use Snap Camera for Microsoft Teams
- [Updated] Essential 15 Ideas to Boost Your Snap Score
- In 2024, Streamline Your Social Impact with Snapchat Gifs
- [Updated] Captivating Comic Relief in Snapchat Graphics for 2024
- [New] In 2024, Beyond Playfulness A Closer Look at Snapchat's Emojis
- The Comprehensible Guide to Marketing on Snapchat for 2024
- [Updated] Integrate Snapchat Into Your Mac Seamlessly for 2024
- [Updated] 2024 Approved Navigating the Backup of Phone's Camera Roll for Snapchat Users
- [Updated] 2024 Approved Leveraging Likes and Shares for Financial Gain on Snapchat
- [New] In 2024, Discovering Snapchat's Video Capabilities with Ease
- [Updated] Reclaiming Snap's Secret Images for 2024
- [Updated] Identifying a User' Writes Silent, Unseen Snapshots
- [Updated] 2024 Approved Precise Process Installing Snapchat on a Mac OS
- Top 6 Mobile Phones Snapchat's Ultimate Video Editing Companions
- [New] 2024 Approved Optimal Transfer Methods IPhone Camera Roll to Snapchat Journey
- In 2024, Snapchat Secrets Lowering Playback Rate for Better Views
- [New] Beam Brilliant with Our 20 Best Snapchat Lens Selection
- [Updated] Social Media Strategies An In-Depth Comparison Between TikTok & Snap
- [Updated] 2024 Approved Making Yourself Laugh with Snapchat's Animated Filters
- [New] In 2024, Expert Tips on Seamless Multisnapping Videos in Snapchat
- 2024 Approved Social Network Showdown TikTok Vs Snap
- [Updated] In 2024, The Ultimate Guide to Enhancing Your Android & iPhone Snaps
- Everything You Need To Know About Unlocked iPhone XS | Dr.fone
- Updated 2024 Approved The Ultimate Guide to Converting Text to Voice Recordings
- Updated Unleash Your Creativity Top Stop Motion Apps for iOS and Android Devices for 2024
- Unlock iPhone 15 Plus lock with iCloud
- [Updated] In 2024, Excellent Screenshot & Videography Solutions Ubuntu Edition
- 2024 Approved From Zero to Hero Mastering Reaction Videos with Filmoras Latest Features
- Fine-Tuning Sound Quality Expert Tips on Minimizing Audio Reverb Effectively for 2024
- Resolve Absent Watch Screen Button
- [New] The Essential Handbook for Instagram Video Posting From PC/Mac for 2024
- Best Vivo Y77t Pattern Lock Removal Tools Remove Android Pattern Lock Without Losing Data
- [New] In 2024, Deep Dive Into Instagram's Daily Narrative Components
- [New] 2024 Approved Android's Highest-Rated Portable GBA Simulator Guide
- [Updated] Expert Techniques for Superior Quality in Zoom Meetings
- New In 2024, Windows 8 AVI File Editor Simple and Efficient Video Editing Solution
- Direct Save + Alternative Pathways Your Instagram Video Guide for 2024
- 3 Facts You Need to Know about Screen Mirroring OnePlus Ace 2 Pro | Dr.fone
- In 2024, Fake Android Location without Rooting For Your Sony Xperia 10 V | Dr.fone
- New 2024 Approved Creative Ways to Add Green Screen Effects In Photoshop
- 2024 Approved The Ultimate 7 FPS Gaming List
- All Things You Need to Know about Wipe Data/Factory Reset For Vivo X Flip | Dr.fone
- In 2024, Comprehensive Guide to the Wave Editor Highlights, Critiques, and Walkthroughs
- [Updated] 2024 Approved Simultaneous Scheduling on iPhone/Android with Zoom Desktop Timeline
- [Updated] In 2024, Step-by-Step Guide to Painless iPhone Screen Sharing
- 2024 Approved How to Take Screenshots of PC Games [6 Methods]
- In 2024, Best Practices in Selecting Screen Recording Tools for Windows 10
- How To Transfer Data From iPhone 6s Plus To Other iPhone 13 Pro Max devices? | Dr.fone
- In 2024, A Step-by-Step Guide to Finding Your Apple ID From Your Apple iPhone 11
- Simple and Effective Ways to Change Your Country on YouTube App Of your Oppo Find X6 Pro | Dr.fone
- [New] The Comprehensive Guide to Crafting an Authentic Online Persona on Facebook
- Social Media Screen Recorder App (Mobile, Windows, Mac) for 2024
- History on Your Flip Watching Old FB Stories
- New 2024 Approved The Best Facebook Music Downloaders in MP3 Format
- In 2024, Still Using Pattern Locks with Samsung Galaxy A25 5G? Tips, Tricks and Helpful Advice
- In 2024, How to Fake Snapchat Location without Jailbreak On Motorola Edge+ (2023) | Dr.fone
- [New] In 2024, 2023'S Premier 8 Hidden-Video Downloaders
- New 10 Caricature Makers to Turn Your Photo to Caricature Effects
- Ultimate Guide on Gionee FRP Bypass
- How to Fix Android App Not Installed Error on Nokia C02 Quickly? | Dr.fone
- In 2024, How to Change GPS Location on Motorola Moto G04 Easily & Safely | Dr.fone
- Use Device Manager to identify missing drivers with Windows Device Manager on Windows 11/10
- Title: "2024 Approved Elevate Your Social Presence Essential Tips for Sending GIFs on Snapchat"
- Author: Scott
- Created at : 2024-05-23 09:58:18
- Updated at : 2024-05-24 09:58:18
- Link: https://snapchat-videos.techidaily.com/2024-approved-elevate-your-social-presence-essential-tips-for-sending-gifs-on-snapchat/
- License: This work is licensed under CC BY-NC-SA 4.0.
