
:max_bytes(150000):strip_icc()/text-message-on-ipad-1994688-207f73a5d0274a6b97e1027420c6d329.png)
"2024 Approved Beneath the Surface A Deep Dive Into Private Story Making"
Beneath the Surface: A Deep Dive Into Private Story Making
How to Make a Private Story on Snapchat: A Complete Guide

Ollie Mattison
Mar 27, 2024• Proven solutions
A private story is one that you share with your closest friends. Snapchat is a way to restrict the people who can see the story. Snapchat provides options on how to make a private story on Snapchat and share the same to a select few. With such a feature you have more control over who sees the content you publish. A Snapchat private story is easy to create, the only difference is how you send the video or story across to the people you choose. You can do so on the Snapchat application on an Android as well as on an iOS device. Here we explore how such a story can be created and published or posted privately.

- Part 1: What Is a Private Story on Snapchat?
- Part 2: How to Create a Private Story on Snapchat?
- Part 3: Creative Private Story Names and Ideas for Snapchat
- Part 4: Troubleshooting Tips: When Someone Hide Their Snapchat Stories from You
What Is a Private Story on Snapchat?
Stories are a term popular in Snapchat, to showcase images and videos for the last 24 hours. Stories can comprise photos as well as videos. You can post stories to your feed which you can view as well as your friends. These show your friends your different activities the day before. These exist for the next 24 hours within which you can replay them many times.
There is a difference between ‘My Stories’ and ‘Private Stories’. When you record and post a video or a photo on your Snapchat account publicly, it is seen by all your contacts. On the other hand, if you wish to post a private story, you need to create a custom story. After you create a custom story, you can then post the same as a private one. Here you select the ones who would view the story. You choose the contacts who would view the post before publishing it. Another aspect is that no one else can add content to the private stories you post on Snapchat.
How to Create a Private Story on Snapchat?
To begin how to make a private story on Snapchat, here are the steps to follow:
- 1.Log into Your Account.
- 2.Visit Your Profile Page
- 3.Select the Private Story option
- 4.Create the Story
- 5.Share with Your Select Friends
1.Log into Your Account
Start by logging in to your Snapchat account. In case you have been using the account often, it would be already logged in.
2.Visit Your Profile Page
Click the ‘Open Your Profile’ section and tap on the profile icon. You will find the Snapchat private story thumbnail on the top left-hand corner of the app screen.
3.Select the Private Story option
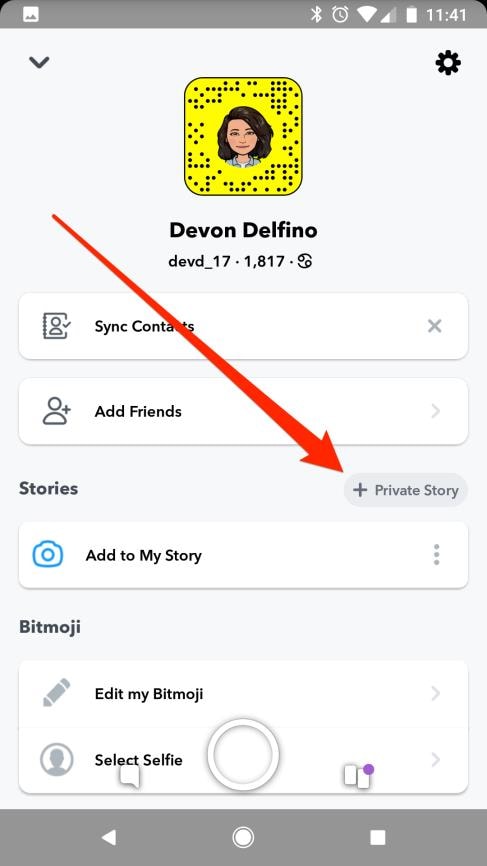
You will find options such as ‘Private Story’ or ‘Custom Story’ to add in the ‘Stories’ section. You might be asked to confirm whether you wish to make a private story. Simply tap on ‘Private Story’ to get started.
4.Create the Story
Start by adding photos or videos to your story. Tap on a rectangle icon with a plus sign on the bottom of the Snapchat screen. You will get the option to add a photo or video to your story. The feed will exist for the next 24 hours. You can even delete a snap from a story. Simply visit the ‘My Friends’ page and tap on the gear icon next to the story. Tap ‘Delete’ if you wish to remove a video or image. You can also edit or add tags or stickers to a video or story before sharing.
5.Share with Your Select Friends
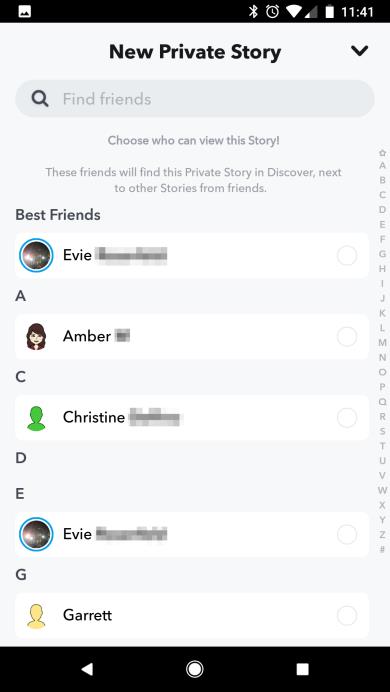
Once your video or photos are ready for sharing, proceed to the ‘Send’ tab. Check off the circle next to ‘My Story’, ensuring that the feed will not be public. You can then choose friends from your contact list who would receive the Snapchat private story. Alternately, you could find the story in the ‘Stories’ section on your user page. Once the story is selected, tap on a recipient to whom you wish to share the private story. After you pick the people you wish to share the story with, hit the ‘Send’ button.
Once you have chosen the recipients of your Snapchat private story, they will be able to see your private as well as public stories. In the iPhone, the application shows the videos as mixed up. For Android users, the stories can be differentiated. Also, the people who were not specified for receiving the private content will have no idea of the private stories created and shared with others.
Creative Private Story Names and Ideas for Snapchat
Since private stories are usually daily incidents that could be mundane, funny, or tragic, here are some quirky name ideas for the same:
1.Work it out
2.Got up on the wrong side of the bed today
3.Cake anyone
4.Waking up to coffee
5.Monday mayhem
6.Lazy
7.WFH
8.Just another day at work
9.Mememe
10.Blissful fun
11.A night out with the ladies
12.Boots for walking
13.Christmas is here
14.New food mantra
15.Cheat day today
16.Diet food anyone
17.Soulful vibes
18.Social distancing
19.Snooze the alarm
20.A hug in a mug
To get creative, choose a name that would set the narrative or theme for your story. You could then add on photos and videos to showcase the theme.
Troubleshooting Tips: When Someone Hide Their Snapchat Stories from You
How to Know if Someone Hid Their Snapchat Story from You?
There is a way to find out whether someone is hiding their Snapchat stories from you. You can use someone else’s account to check if their stories are showing on their feed. You could also send a private snap to that person. If he or she answers the same quickly and yet, you do not get to see their stories that would mean that you are hidden contact in their list.
You could also ask a common friend if they have even received stories and updates from that person. If the person’s stories are reaching others but not you, that means that they have hidden their stories from you.
Can You Hide Someone on Snapchat Without Them Knowing?
If you wish to hide someone but in a way that they do not find out, try the new muting function. This allows you to mute certain friends without them realizing the same. The feature is called ‘Do Not Disturb’ and it allows you to mute conversations that are one on one or come from groups. The feature is a new addition and is a useful one. You need not hide or block any contact in this case but simply silence notifications of their updates.
To use this feature, all you need to do is tap on the group or the person you wish to silence. The popup menu would include ‘Settings’ and here you can select the option ‘Do Not Disturb’. You will not receive notifications from such conversations. However, you will still be able to access, check messages from such contacts as well as share your stories as well.
This feature is a useful addition and you need not hide or block a contact to silence conversations from them. Hence, those people will also not get notified unlike when you block a contact. It allows you to see updates from them at your ease and convenience.
Conclusion
Snapchat is an attractive platform to get your daily moments the attention they deserve. You can create stories, private or with anyone else, and share them with selective people of your choice. The Snapchat private story option is great to keep your moments between your close friends or loved ones. Other features such as ‘Do Not Disturb’ allow you to silence notifications from friends or groups that you wish to check as per your convenience.
Ollie Mattison
Ollie Mattison is a writer and a lover of all things video.
Follow @Ollie Mattison
Ollie Mattison
Mar 27, 2024• Proven solutions
A private story is one that you share with your closest friends. Snapchat is a way to restrict the people who can see the story. Snapchat provides options on how to make a private story on Snapchat and share the same to a select few. With such a feature you have more control over who sees the content you publish. A Snapchat private story is easy to create, the only difference is how you send the video or story across to the people you choose. You can do so on the Snapchat application on an Android as well as on an iOS device. Here we explore how such a story can be created and published or posted privately.
- Part 1: What Is a Private Story on Snapchat?
- Part 2: How to Create a Private Story on Snapchat?
- Part 3: Creative Private Story Names and Ideas for Snapchat
- Part 4: Troubleshooting Tips: When Someone Hide Their Snapchat Stories from You
What Is a Private Story on Snapchat?
Stories are a term popular in Snapchat, to showcase images and videos for the last 24 hours. Stories can comprise photos as well as videos. You can post stories to your feed which you can view as well as your friends. These show your friends your different activities the day before. These exist for the next 24 hours within which you can replay them many times.
There is a difference between ‘My Stories’ and ‘Private Stories’. When you record and post a video or a photo on your Snapchat account publicly, it is seen by all your contacts. On the other hand, if you wish to post a private story, you need to create a custom story. After you create a custom story, you can then post the same as a private one. Here you select the ones who would view the story. You choose the contacts who would view the post before publishing it. Another aspect is that no one else can add content to the private stories you post on Snapchat.
How to Create a Private Story on Snapchat?
To begin how to make a private story on Snapchat, here are the steps to follow:
- 1.Log into Your Account.
- 2.Visit Your Profile Page
- 3.Select the Private Story option
- 4.Create the Story
- 5.Share with Your Select Friends
1.Log into Your Account
Start by logging in to your Snapchat account. In case you have been using the account often, it would be already logged in.
2.Visit Your Profile Page
Click the ‘Open Your Profile’ section and tap on the profile icon. You will find the Snapchat private story thumbnail on the top left-hand corner of the app screen.
3.Select the Private Story option
You will find options such as ‘Private Story’ or ‘Custom Story’ to add in the ‘Stories’ section. You might be asked to confirm whether you wish to make a private story. Simply tap on ‘Private Story’ to get started.
4.Create the Story
Start by adding photos or videos to your story. Tap on a rectangle icon with a plus sign on the bottom of the Snapchat screen. You will get the option to add a photo or video to your story. The feed will exist for the next 24 hours. You can even delete a snap from a story. Simply visit the ‘My Friends’ page and tap on the gear icon next to the story. Tap ‘Delete’ if you wish to remove a video or image. You can also edit or add tags or stickers to a video or story before sharing.
5.Share with Your Select Friends
Once your video or photos are ready for sharing, proceed to the ‘Send’ tab. Check off the circle next to ‘My Story’, ensuring that the feed will not be public. You can then choose friends from your contact list who would receive the Snapchat private story. Alternately, you could find the story in the ‘Stories’ section on your user page. Once the story is selected, tap on a recipient to whom you wish to share the private story. After you pick the people you wish to share the story with, hit the ‘Send’ button.
Once you have chosen the recipients of your Snapchat private story, they will be able to see your private as well as public stories. In the iPhone, the application shows the videos as mixed up. For Android users, the stories can be differentiated. Also, the people who were not specified for receiving the private content will have no idea of the private stories created and shared with others.
Creative Private Story Names and Ideas for Snapchat
Since private stories are usually daily incidents that could be mundane, funny, or tragic, here are some quirky name ideas for the same:
1.Work it out
2.Got up on the wrong side of the bed today
3.Cake anyone
4.Waking up to coffee
5.Monday mayhem
6.Lazy
7.WFH
8.Just another day at work
9.Mememe
10.Blissful fun
11.A night out with the ladies
12.Boots for walking
13.Christmas is here
14.New food mantra
15.Cheat day today
16.Diet food anyone
17.Soulful vibes
18.Social distancing
19.Snooze the alarm
20.A hug in a mug
To get creative, choose a name that would set the narrative or theme for your story. You could then add on photos and videos to showcase the theme.
Troubleshooting Tips: When Someone Hide Their Snapchat Stories from You
How to Know if Someone Hid Their Snapchat Story from You?
There is a way to find out whether someone is hiding their Snapchat stories from you. You can use someone else’s account to check if their stories are showing on their feed. You could also send a private snap to that person. If he or she answers the same quickly and yet, you do not get to see their stories that would mean that you are hidden contact in their list.
You could also ask a common friend if they have even received stories and updates from that person. If the person’s stories are reaching others but not you, that means that they have hidden their stories from you.
Can You Hide Someone on Snapchat Without Them Knowing?
If you wish to hide someone but in a way that they do not find out, try the new muting function. This allows you to mute certain friends without them realizing the same. The feature is called ‘Do Not Disturb’ and it allows you to mute conversations that are one on one or come from groups. The feature is a new addition and is a useful one. You need not hide or block any contact in this case but simply silence notifications of their updates.
To use this feature, all you need to do is tap on the group or the person you wish to silence. The popup menu would include ‘Settings’ and here you can select the option ‘Do Not Disturb’. You will not receive notifications from such conversations. However, you will still be able to access, check messages from such contacts as well as share your stories as well.
This feature is a useful addition and you need not hide or block a contact to silence conversations from them. Hence, those people will also not get notified unlike when you block a contact. It allows you to see updates from them at your ease and convenience.
Conclusion
Snapchat is an attractive platform to get your daily moments the attention they deserve. You can create stories, private or with anyone else, and share them with selective people of your choice. The Snapchat private story option is great to keep your moments between your close friends or loved ones. Other features such as ‘Do Not Disturb’ allow you to silence notifications from friends or groups that you wish to check as per your convenience.
Ollie Mattison
Ollie Mattison is a writer and a lover of all things video.
Follow @Ollie Mattison
Enhance Viewing Experience by Adjusting Snapchat’s Frame Rate
Snapchat is an instant messaging app that allows you to share your pictures and videos with your family members, friends, and colleagues. In addition, you can even create your stories in the form of movie clips and share them on the app. These stories remain available for the next 24 hours, after which they are automatically removed from the platform.
While sharing the videos, you can apply several filters that are already present in the app, and Slow Motion is one of them. You may want to learn how to slow down a video on Snapchat when you want to emphasize and draw viewers’ attention toward the scene, or wish to make the audience see your actions closely and in detail.
That said, in the following sections, you will see how to slow down videos on Snapchat, and what other methods you can use to reduce the playback speed more professionally.
In this article
01 How to Add Slow Motion Effects to Video Using the Snapchat App
02 How to Record a Slo-Mo Video and Upload to Snapchat
03 How to Make Flash and Smooth Slo Mo Video for Snapchat
04 FAQs about Slowing Down Snapchat Video
Part 1: How to Add Slow Motion Effects to Video Using the Snapchat App
Snapchat has a built-in Slow Motion filter that reduces the playback speed of a video when applied. You can learn how to slow down on Snapchat by following the instructions that are given below:
Step 1: Record a Video
Launch Snapchat on your smartphone (iPhone 13 Pro Max is used here for illustrations), make sure that the Camera section is selected from the bottom, tap and hold down the Capture button that is present at the lower part of the interface, and let go of it when you are done recording.

Step 2: Apply the Slow Motion Filter
Once the video is recorded, swipe the screen from left to right. Repeat this process until you see the Snail (Slow Motion) icon on the screen. This will reduce the playback speed of the clip.

Step 3: Decorate the Video (Optional)
Use the options present on the upper-right area of the screen to further decorate the video and/or add annotations to it.

Step 4: Share or Publish the Video
Once everything is done, tap Send To from the bottom-right corner to share the video with your family, friends, and colleagues, or publish it as a story that remains available for the next 24 hours.
Related: How to Record Slo-Mo videos on iPhone .
Part 2: How to Record a Slo-Mo Video and Upload to Snapchat
With Snapchat, even though you don’t require any third-party tool to reduce the playback speed of a video, the app has certain limitations. For example, it doesn’t allow you to set a zoom level, you are stuck with the framerate that the app has to offer, etc.
Because of this, many people prefer to use different methods to record a video in slow motion with their preferences, and then upload it to Snapchat. This approach also eliminates the need to swipe the screen several times merely to use a single slow-motion filter.
Fortunately, iPhone has a built-in SLO-MO mode in its Camera app that allows you to capture the videos in slow motion. To learn how to do slow mo on Snapchat with the iPhone’s Camera app, you can follow the instructions that are given below:
Step 1: Get to the iPhone’s SLO-MO Mode
Launch the Camera app on your iPhone (iPhone 13 Pro Max is used here for illustrations), and swipe the screen from left to right until you get to the SLO-MO mode.

Step 2: Set Recording Preferences
Tap the number that is present at the top-right corner (240 here) to toggle between different framerates, tap 1x from the lower-center area, swipe slightly up, and then use the wheel that appears next to define your preferred zoom level.

Step 3: Start and Stop the Recording
Tap the Record button to start the recording, and tap Stop when you’re done.
Note: Make sure that the duration of the recorded video doesn’t exceed 60 seconds.
Step 4: Upload the Slow-Motion Video to Snapchat
After the video is recorded in slow motion, close the Camera app, launch Snapchat, and tap the Gallery icon from the left side of the Capture button on the Camera section. From the Memories screen, go to the Camera Roll tab, and tap to select the video that you recorded in the previous step.
Next, optionally, tap the Edit icon from the bottom-left corner to decorate the video and/or add annotations to it, and follow the process as explained in the previous section to share the clip with your family, friends, or colleagues, or publish it as your story.

Part 3: How to Make Flash and Smooth Slo Mo Video for Snapchat
Although iPhone has the built-in SLO-MO mode that even enables you to set your preferred framerate and zoom level before recording, it still doesn’t allow you to slow down different parts of a video in different speed at your convenience. You can either record the entire video in slow motion or at a normal speed.
This is where a third-party app comes into play. While there are several video editing programs available online, the one of the best slow motion apps that helps you slow down the portions of a video with precision is CapCut.
Downloading and installing CapCut on your iPhone or Android phone is simple, and once it is done, you can follow the process given below to learn how to slow things down on Snapchat:
With CapCut, you can either slow down the whole clip or manage the speed for different segments. This section explains both methods.
Method 1: Slow Down the Whole Clip with CapCut
Step 1: Get to the Speed Panel
Launch CapCut, import the video that you want to slow down, and tap the imported media in the Timeline. Next, tap Speed from the bottom of the interface to get to the next window.

Step 2: Reduce the Speed of the Video
Tap Normal from the bottom of the screen that appears next, and drag the Speed slider to the left to reduce the playback speed. Tap OK from the bottom-right corner to save the changes.

Step 3: Upload the Video to Snapchat
Back on the previous interface, optionally tap Volume from the bottom and reduce the slider to 0 to mute the audio of the footage as it may get distorted due to the reduction in the speed.
Next, tap Share from the top-right corner to save the video on your iPhone, and then use the method explained in the previous section to access the clip from the Gallery within Snapchat for uploading.
Method 2: Reduce the Playback Speed of Different Parts of a Video
Step 1: Get to the Speed Panel
Use the process described in the previous method to get to the Speed panel.
Step 2: Reduce the Speed of Different Parts of the Video
Tap Curve from the bottom of the interface. On the next screen, tap Custom from the lower area, and then tap Edit. From the next panel, drag the beat points down to reduce the speed (or drag them above the line to increase).

Notice that each beat point represents a particular section of the video, and dragging it down reduces the playback speed of that segment. You can even tap anywhere on the line to add a new beat point and drag it down as needed for more precise speed management. Once done, tap OK from the bottom-right corner to save the modifications.

Optionally, you can also tap any of the available presets on the Curve screen to reduce the playback speed of the video accordingly.
Step 3: Upload the Video to Snapchat
Use the method explained in the previous method to export the video, upload it to Snapchat, and share the clip with your family, friends, and colleagues, or publish it as your story.
Part 4: FAQs about Slowing Down Snapchat Video
1. Can I record a slow mo video in Snapchat?
Technically speaking, no, you cannot. However, once you have recorded a video at a normal speed in Snapchat, you can apply the built-in Slow Motion filter to it by swiping the screen from left to right until you see the Snail icon at the center. The Snail icon represents the Slow Motion filter that reduces the playback speed when applied.
2. Besides slow-motion, which speed filters does Snapchat have?
In addition to slow motion Snapchat also has Forward and Fast Forward filters that increase the playback speed. While the Forward filter increases the speed slightly, the Fast Forward one enhances it drastically.
Conclusion
When using an iPhone, even though the SLO-MO mode enables you to record footage in slow motion, you don’t get many options. Therefore, it would be safe to say that it is easy to slow down the speed of a video if you have a dedicated third-party post-production app. However, if you want to go for a convenient method, learning how to slow down a video on Snapchat is an extremely simple and straightforward process.
02 How to Record a Slo-Mo Video and Upload to Snapchat
03 How to Make Flash and Smooth Slo Mo Video for Snapchat
04 FAQs about Slowing Down Snapchat Video
Part 1: How to Add Slow Motion Effects to Video Using the Snapchat App
Snapchat has a built-in Slow Motion filter that reduces the playback speed of a video when applied. You can learn how to slow down on Snapchat by following the instructions that are given below:
Step 1: Record a Video
Launch Snapchat on your smartphone (iPhone 13 Pro Max is used here for illustrations), make sure that the Camera section is selected from the bottom, tap and hold down the Capture button that is present at the lower part of the interface, and let go of it when you are done recording.
Step 2: Apply the Slow Motion Filter
Once the video is recorded, swipe the screen from left to right. Repeat this process until you see the Snail (Slow Motion) icon on the screen. This will reduce the playback speed of the clip.
Step 3: Decorate the Video (Optional)
Use the options present on the upper-right area of the screen to further decorate the video and/or add annotations to it.
Step 4: Share or Publish the Video
Once everything is done, tap Send To from the bottom-right corner to share the video with your family, friends, and colleagues, or publish it as a story that remains available for the next 24 hours.
Related: How to Record Slo-Mo videos on iPhone .
Part 2: How to Record a Slo-Mo Video and Upload to Snapchat
With Snapchat, even though you don’t require any third-party tool to reduce the playback speed of a video, the app has certain limitations. For example, it doesn’t allow you to set a zoom level, you are stuck with the framerate that the app has to offer, etc.
Because of this, many people prefer to use different methods to record a video in slow motion with their preferences, and then upload it to Snapchat. This approach also eliminates the need to swipe the screen several times merely to use a single slow-motion filter.
Fortunately, iPhone has a built-in SLO-MO mode in its Camera app that allows you to capture the videos in slow motion. To learn how to do slow mo on Snapchat with the iPhone’s Camera app, you can follow the instructions that are given below:
Step 1: Get to the iPhone’s SLO-MO Mode
Launch the Camera app on your iPhone (iPhone 13 Pro Max is used here for illustrations), and swipe the screen from left to right until you get to the SLO-MO mode.
Step 2: Set Recording Preferences
Tap the number that is present at the top-right corner (240 here) to toggle between different framerates, tap 1x from the lower-center area, swipe slightly up, and then use the wheel that appears next to define your preferred zoom level.
Step 3: Start and Stop the Recording
Tap the Record button to start the recording, and tap Stop when you’re done.
Note: Make sure that the duration of the recorded video doesn’t exceed 60 seconds.
Step 4: Upload the Slow-Motion Video to Snapchat
After the video is recorded in slow motion, close the Camera app, launch Snapchat, and tap the Gallery icon from the left side of the Capture button on the Camera section. From the Memories screen, go to the Camera Roll tab, and tap to select the video that you recorded in the previous step.
Next, optionally, tap the Edit icon from the bottom-left corner to decorate the video and/or add annotations to it, and follow the process as explained in the previous section to share the clip with your family, friends, or colleagues, or publish it as your story.
Part 3: How to Make Flash and Smooth Slo Mo Video for Snapchat
Although iPhone has the built-in SLO-MO mode that even enables you to set your preferred framerate and zoom level before recording, it still doesn’t allow you to slow down different parts of a video in different speed at your convenience. You can either record the entire video in slow motion or at a normal speed.
This is where a third-party app comes into play. While there are several video editing programs available online, the one of the best slow motion apps that helps you slow down the portions of a video with precision is CapCut.
Downloading and installing CapCut on your iPhone or Android phone is simple, and once it is done, you can follow the process given below to learn how to slow things down on Snapchat:
With CapCut, you can either slow down the whole clip or manage the speed for different segments. This section explains both methods.
Method 1: Slow Down the Whole Clip with CapCut
Step 1: Get to the Speed Panel
Launch CapCut, import the video that you want to slow down, and tap the imported media in the Timeline. Next, tap Speed from the bottom of the interface to get to the next window.
Step 2: Reduce the Speed of the Video
Tap Normal from the bottom of the screen that appears next, and drag the Speed slider to the left to reduce the playback speed. Tap OK from the bottom-right corner to save the changes.
Step 3: Upload the Video to Snapchat
Back on the previous interface, optionally tap Volume from the bottom and reduce the slider to 0 to mute the audio of the footage as it may get distorted due to the reduction in the speed.
Next, tap Share from the top-right corner to save the video on your iPhone, and then use the method explained in the previous section to access the clip from the Gallery within Snapchat for uploading.
Method 2: Reduce the Playback Speed of Different Parts of a Video
Step 1: Get to the Speed Panel
Use the process described in the previous method to get to the Speed panel.
Step 2: Reduce the Speed of Different Parts of the Video
Tap Curve from the bottom of the interface. On the next screen, tap Custom from the lower area, and then tap Edit. From the next panel, drag the beat points down to reduce the speed (or drag them above the line to increase).
Notice that each beat point represents a particular section of the video, and dragging it down reduces the playback speed of that segment. You can even tap anywhere on the line to add a new beat point and drag it down as needed for more precise speed management. Once done, tap OK from the bottom-right corner to save the modifications.
Optionally, you can also tap any of the available presets on the Curve screen to reduce the playback speed of the video accordingly.
Step 3: Upload the Video to Snapchat
Use the method explained in the previous method to export the video, upload it to Snapchat, and share the clip with your family, friends, and colleagues, or publish it as your story.
Part 4: FAQs about Slowing Down Snapchat Video
1. Can I record a slow mo video in Snapchat?
Technically speaking, no, you cannot. However, once you have recorded a video at a normal speed in Snapchat, you can apply the built-in Slow Motion filter to it by swiping the screen from left to right until you see the Snail icon at the center. The Snail icon represents the Slow Motion filter that reduces the playback speed when applied.
2. Besides slow-motion, which speed filters does Snapchat have?
In addition to slow motion Snapchat also has Forward and Fast Forward filters that increase the playback speed. While the Forward filter increases the speed slightly, the Fast Forward one enhances it drastically.
Conclusion
When using an iPhone, even though the SLO-MO mode enables you to record footage in slow motion, you don’t get many options. Therefore, it would be safe to say that it is easy to slow down the speed of a video if you have a dedicated third-party post-production app. However, if you want to go for a convenient method, learning how to slow down a video on Snapchat is an extremely simple and straightforward process.
Also read:
- [New] 2024 Approved Android-Mac Video Archiving A Snap Solution Guide
- [New] Unlocking the Art of Reversed Video Experience on Snapchat
- [Updated] In 2024, Narrowing Focus Mac Techniques for Snapchat Videos
- [Updated] 2024 Approved Long-Lasting Friendship on Snapchat Ideas and Insights
- Inspiration for Individuality on Snapchat A Resource of Over 120 Private Story Concepts for 2024
- [Updated] 2024 Approved Exploring the World of Animated Lenses in Snapchat
- [New] In 2024, A Novice's Guide to Making Unforgettable Snaps on Snapchat
- Beyond the Basics Advanced Insights Into Snapchat Filters for 2024
- 2024 Approved Craft Your Signature Snaps with Easeful Lens Design
- [Updated] In 2024, Keep Up the Pace in Snapchat Streaks with These Tips
- 2024 Approved Fast Track Adding Snapchat to Your Mac
- Snap Into Style Expert Tips to Outshine the Competition for 2024
- In 2024, The Disconnect on Snapchat Are They Blocked?
- [New] In 2024, Capture Attention with Top Mobile Video Editing Software for Snapchats
- [New] 2024 Approved Complete Guide to Slow Down a Video on Snapchat
- [New] Innovative Snap Filters for Dynamic Photography Experiences for 2024
- [New] 2024 Approved From Reels to Filters A Closer Look at TikTok vs Snap's Features
- [Updated] Unlocking Your Camera's Screen Recording Features for 2024
- 2024 Approved How to Screenshot on Snapchat without Them Knowing 5 Ways
- [Updated] Unlocking Hidden Images on Snapchat
- [New] 2024 Approved Make Every Snap Spectacular 20 Top Filter Recommendations
- [Updated] Explore the Latest Trends with These Snapchat Ideas
- [New] 2024 Approved Snapchat Emojis Explained More Than Meets the Eye
- [New] 2024 Approved Snapchat's Hidden Content Finding and Restoring Photos
- Sonic Steps to Better Snapchat Videos for 2024
- [Updated] Discovering Charismatic Faces on Your Snaps
- [New] Sparkle and Shine Tips to Preserve Your Snapstreak for 2024
- [Updated] Innovative Boomers for Dynamic Snaps on Snapchat for 2024
- In 2024, Unlocking Creative Expression An In-Depth Guide to Snapchat Filters
- [Updated] Best Practices for Secure Transfer of Phone's Camera Roll Content to Snapchat for 2024
- Mastering Snapchat Flipping Videos Backwards for 2024
- 2024 Approved Securing and Archiving Snapchat Content on Phone
- [Updated] Snapshot Superstars Essential Filters to Elevate Your Snaps for 2024
- [Updated] Pro Mobile Techniques for Snapchat Recording
- Discover Snapchat’s Artistic Side with Anime-Inspired Effects for 2024
- How To Bypass the Required Apple Store Verification For Apple iPhone 12 Pro | Dr.fone
- 2024 Approved S Best Video Editors for Mac Pinnacle Studio Alternates
- In 2024, Which Pokémon can Evolve with a Moon Stone For Oppo Find X6 Pro? | Dr.fone
- New Are You Aware that AV1 Has the Potential to Change the Way We Watch Videos Online? Read on to Learn More About AV1 and How It Could Impact Your Life
- How to Remove a Previously Synced Google Account from Your Xiaomi Redmi Note 12R
- New 2024 Approved Advanced Software Options for Distilling Pure Auditory Experiences
- [New] Unlock Your Screen Android's Premier Free Recorder Tools
- 3 Things You Must Know about Fake Snapchat Location On Oppo A78 | Dr.fone
- New How to Become a Motion Graphic Designer
- New Reveal the Most Efficient Digital Tools to Purify Your Recordings of Background Noise for 2024
- In 2024, Apple ID Unlock From Apple iPhone 14 Pro? How to Fix it?
- In 2024, Everything You Need to Know about Lock Screen Settings on your Realme Narzo N55
- The way to recover deleted contacts on 12+ 5G without backup.
- Navigating Instagram's Filter Features for High-Quality Images for 2024
- Quick Steps to Document Your YouTube Creations
- [New] In 2024, Streamlining Twitter Media on Instagram Platforms
- [Updated] 2024 Approved Cut to Perfection Advanced Guide to Cropping Videos for Instagram
- New 2024 Approved Ever-Changing Era of AI Video Translation A Reality to Be Fulfilled
- Insta Savvy The Top 10 Tags That Matter Most
- FRP Hijacker by Hagard Download and Bypass your Oppo Find X6 FRP Locks
- Edit and Send Fake Location on Telegram For your Realme Note 50 in 3 Ways | Dr.fone
- Title: "2024 Approved Beneath the Surface A Deep Dive Into Private Story Making"
- Author: Scott
- Created at : 2024-05-23 09:46:30
- Updated at : 2024-05-24 09:46:30
- Link: https://snapchat-videos.techidaily.com/2024-approved-beneath-the-surface-a-deep-dive-into-private-story-making/
- License: This work is licensed under CC BY-NC-SA 4.0.
